
When Halloween rolls around, evenings can get so wonderfully busy. That’s why I’ve gathered 12 easy snack ideas that promise festive fun without the fuss. Think ghostly cheese sticks with candy eyes or adorable pretzel broomsticks perfect for little witches. How about spooky spiders on crackers or mummy hot dogs to wrap up the night? Let’s make your Halloween night deliciously spooky and stress-free with these creative delights.
Ghostly Cheese Sticks
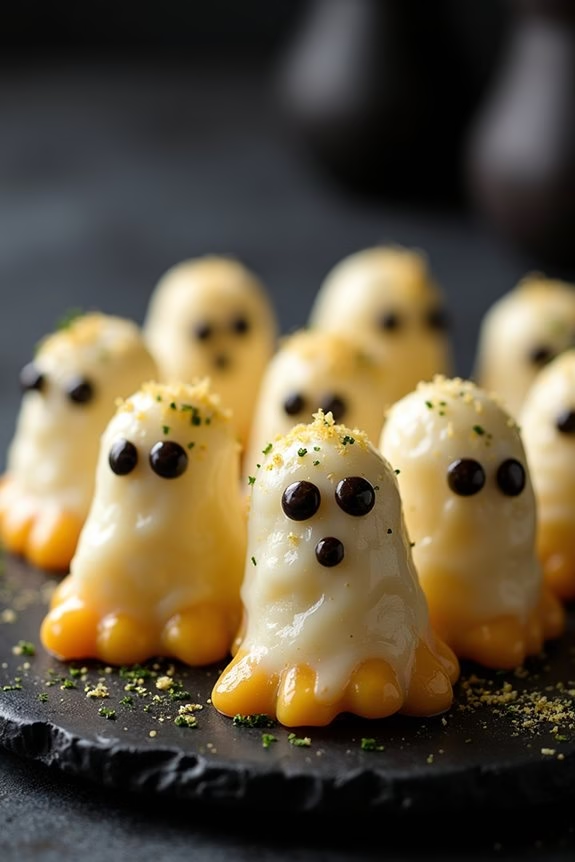
Ghostly Cheese Sticks are a fun and spooky treat perfect for your Halloween festivities. These cheesy delights not only look adorable but are also incredibly easy to make, making them an excellent choice for both kids and adults.
With a few simple ingredients, you can transform ordinary cheese sticks into a ghoulish snack that’s sure to be a hit at any Halloween party. Perfectly suited for a spooky snack table or as a fun appetizer, these ghostly treats are bound to add a touch of eerie delight to your celebration.
Preparing Ghostly Cheese Sticks for 4-6 people involves minimal ingredients and a straightforward process. The key to achieving the ghostly appearance is using string cheese and a few edible decorations to bring your cheese sticks to life. The following recipe will guide you through each step, ensuring that your cheese sticks turn out both delicious and delightfully spooky.
Ingredients (Serving Size: 4-6 people):
- 6 string cheese sticks
- 12 small edible candy eyes
- 1 tube of black edible gel or food coloring pen
- 1 tablespoon of butter, melted
- 2 tablespoons of grated Parmesan cheese
- 1 teaspoon of garlic powder
- 1 teaspoon of dried parsley flakes
Cooking Instructions:
- Prepare the Cheese Sticks: Unwrap each string cheese stick and place them on a clean surface. Using a knife, gently cut the bottom third of each stick into thin strips to resemble ghostly fringes. Be careful not to cut too far up the stick, as you want the top to remain solid.
- Add the Ghostly Features: Using the black edible gel or food coloring pen, draw two small circles for eyes just above the fringed area of each cheese stick. Press a small edible candy eye into each circle to create a spooky eye effect.
- Prepare the Topping: In a small bowl, combine the melted butter, grated Parmesan cheese, garlic powder, and dried parsley flakes. Mix well to create a flavorful topping.
- Coat the Cheese Sticks: Brush the Parmesan mixture over each cheese stick, ensuring that the entire surface is evenly coated. This will add flavor and help the cheese sticks look more textured and ghostly.
- Serve and Enjoy: Arrange the ghostly cheese sticks on a spooky-themed platter or plate. They’re now ready to be served as a fun and festive Halloween snack.
Extra Tips: For an added touch of creativity, you can experiment with different edible decorations to customize your ghostly cheese sticks. Consider using sliced black olives or small pieces of nori for a different take on the eyes.
If you want to add a bit of heat, sprinkle a pinch of cayenne pepper over the cheese sticks before brushing on the Parmesan mix. Remember, the key to making these snacks irresistible is to keep them simple yet visually appealing, so don’t be afraid to get a little creative with the decorations!
Witch’s Broomstick Pretzels
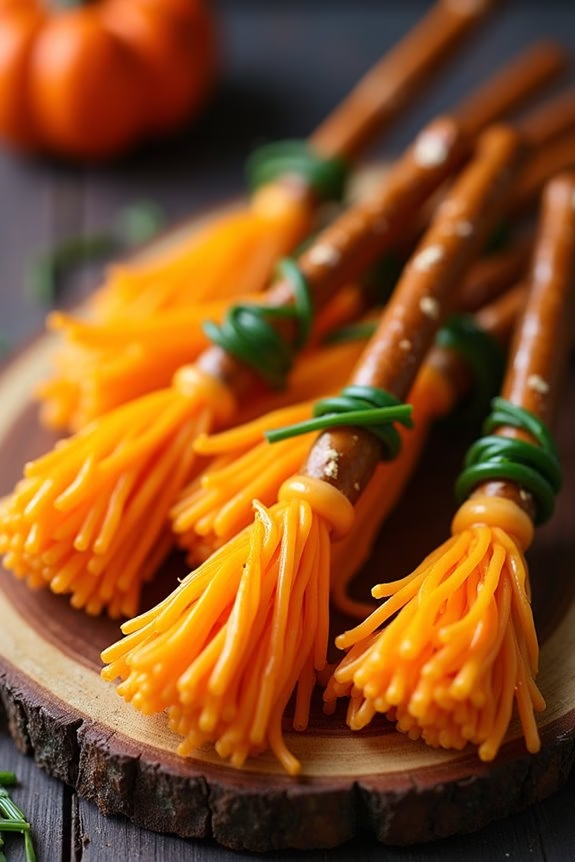
Witch’s Broomstick Pretzels are a spooktacular addition to any Halloween gathering. These delightful snacks are as fun to make as they’re to eat, transforming ordinary pretzels into bewitching broomsticks with just a few simple ingredients. Perfect for serving a group of 4-6 people, these treats are sure to cast a spell over both kids and adults, making them an ideal choice for any Halloween party or festive occasion.
This recipe isn’t only easy to follow but also allows for creativity in presentation. The pretzel sticks serve as broom handles, while cheese slices are carefully crafted into broom bristles, all tied together with a savory string. Whether you’re hosting a Halloween bash or simply want to surprise your family with a fun snack, Witch’s Broomstick Pretzels are bound to delight with their whimsical appearance and delicious taste.
Ingredients (serving size: 4-6 people):
- 12 pretzel sticks
- 6 slices of cheddar cheese
- 12 chive strings or thin strips of green onion
Cooking Instructions:
- Prepare the Cheese Bristles: Start by cutting each slice of cheddar cheese into two equal rectangles. For each rectangle, make several parallel cuts along one of the longer edges, stopping about half an inch from the opposite edge to create the appearance of broom bristles.
- Attach the Cheese to the Pretzels: Take one of the pretzel sticks and wrap the uncut edge of a cheese rectangle around the end of the stick. Confirm that the “bristles” are hanging downward. Press gently so the cheese adheres to the pretzel.
- Secure with a Chive String: Use a chive string or a thin strip of green onion to tie around the cheese, securing it in place on the pretzel stick. Knot it gently to avoid breaking the chive.
- Repeat the Process: Continue with the remaining pretzel sticks, cheese rectangles, and chive strings until you have completed all 12 broomsticks.
- Serve and Enjoy: Arrange the Witch’s Broomstick Pretzels on a serving platter, and get ready for a wave of compliments from your guests!
Extra Tips:
When preparing Witch’s Broomstick Pretzels, use cheese that’s slightly chilled for easier cutting and handling. If the cheese becomes too warm, it can become difficult to work with.
Additionally, consider using different types of cheese for a variety of flavors, such as mozzarella or Swiss. If chive strings are unavailable, thin strips of green onion work wonderfully as an alternative.
For an even more festive presentation, consider using a variety of pretzel stick sizes or incorporating whole grain or flavored pretzels.
Spooky Spider Crackers
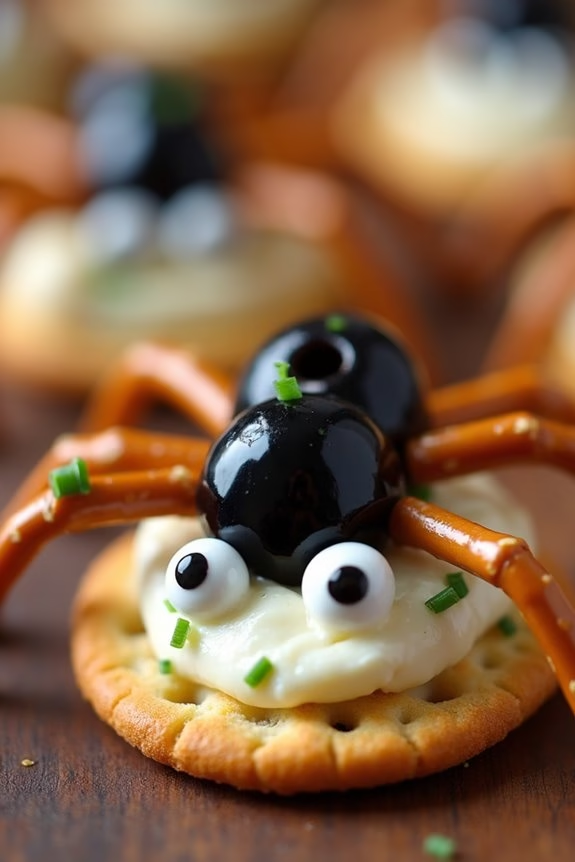
Get into the Halloween spirit with these fun and easy-to-make Spooky Spider Crackers. Perfect for a Halloween party or a themed snack, these crackers aren’t only delightful to look at but also delicious to eat.
Combining the crunchy texture of crackers with a rich cream cheese spread and some creative garnishes, these snacks are sure to impress your guests, both young and old alike.
The beauty of Spooky Spider Crackers lies in their simple assembly and the ability to customize them to suit your taste preferences. Whether you’re hosting a Halloween party or simply looking to surprise your family with a spooky treat, these edible spiders are sure to be a hit.
Plus, they’re an excellent way to involve children in the kitchen, allowing them to express their creativity while having fun.
Ingredients (Serving Size: 4-6 people):
- 24 round crackers
- 1 cup cream cheese, softened
- 24 black olives, pitted and halved
- 12 pretzel sticks, broken in half
- 2 tablespoons chopped chives
- 24 tiny candy eyeballs or capers
Cooking Instructions:
- Prepare the Spread: Begin by placing the softened cream cheese in a mixing bowl. Stir in the chopped chives until well combined, creating a flavorful spread that will serve as the base for your spider crackers.
- Assemble the Spiders: Take one cracker and spread about a teaspoon of the cream cheese mixture over its surface. Place the cracker on a flat surface.
- Create the Spider Legs: Insert four pretzel stick halves into the cream cheese on each side of the cracker to form the spider’s legs, making sure they’re evenly spaced and secure.
- Add the Body: Place a halved black olive onto the cream cheese at the center of the cracker to create the spider’s body, pressing gently so it adheres well.
- Attach the Eyes: Carefully place two candy eyeballs or capers onto the olive, using a tiny dab of cream cheese if needed to make them stick securely.
- Repeat: Continue assembling the rest of the crackers following these steps until all 24 crackers are transformed into spooky spiders.
Extra Tips:
For a more vibrant appearance, consider using different types of olives or colorful candy eyes, which can add a splash of color to your creations.
If you want to add some extra flavor, you can mix in garlic powder or herbs into the cream cheese spread.
To guarantee the crackers don’t become soggy, try assembling the spiders just before serving.
Finally, if you’re preparing these with children, be sure to supervise them closely while handling the pretzel sticks to prevent any accidental pokes. Enjoy your spook-tacular creation!
Mummy Hot Dogs
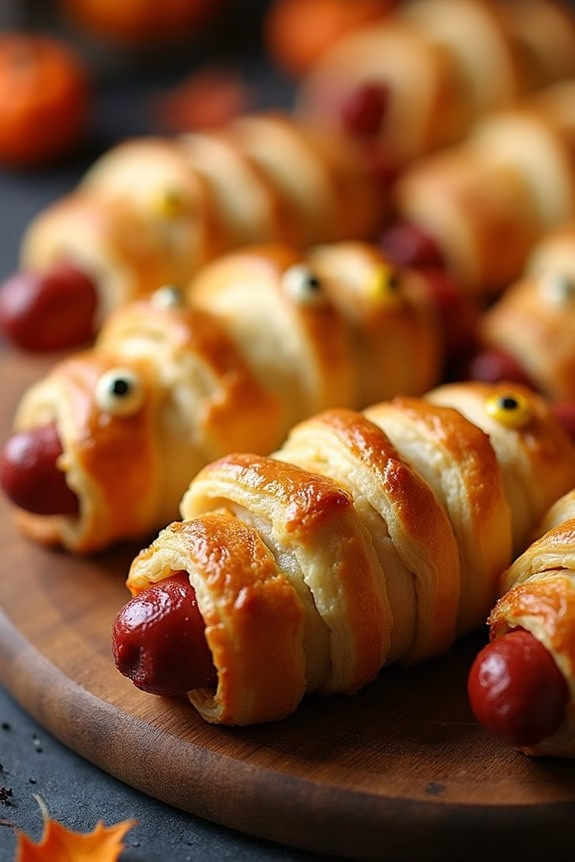
Ideal for a party or a cozy family gathering, Mummy Hot Dogs require minimal ingredients and effort, making them a go-to recipe for busy hosts. The combination of flaky pastry with savory hot dogs is a crowd-pleaser, and the creative presentation adds a whimsical touch to your Halloween spread.
Whether you’re hosting a large event or a small get-together, these Mummy Hot Dogs are sure to be a hit.
Ingredients (Serving Size: 4-6 people):
- 8 hot dogs
- 1 package of refrigerated crescent roll dough
- 1 egg
- 1 tablespoon of water
- Ketchup or mustard (for serving)
- Optional: small edible eyes or mustard for eyes
Instructions:
- Preheat the Oven: Begin by preheating your oven to 375°F (190°C). This will guarantee it’s at the right temperature for baking the mummy hot dogs.
- Prepare the Dough: Unroll the crescent roll dough on a clean surface. Using a knife or pizza cutter, slice the dough into thin strips, approximately 1/4 inch wide. These strips will be wrapped around the hot dogs to create the mummy effect.
- Wrap the Hot Dogs: Take one hot dog and start wrapping it with the dough strips. Leave a small gap at the top to resemble the mummy’s face. Continue wrapping the rest of the hot dogs in a similar manner.
- Create the Egg Wash: In a small bowl, whisk together the egg and water to create an egg wash. This will help give the mummy hot dogs a golden brown finish.
- Brush and Bake: Place the wrapped hot dogs on a baking sheet lined with parchment paper. Lightly brush each one with the egg wash. Bake in the preheated oven for 12-15 minutes or until the dough is golden brown.
- Add the Eyes: Once the hot dogs are baked, use mustard or edible eyes to add fun eyes to the mummies. This step is optional but adds a playful touch to the presentation.
Extra Tips:
For a fun twist, try using different types of sausages or hot dogs, such as turkey or chicken, to suit your taste or dietary preferences.
If you want to add more flavor to your Mummy Hot Dogs, consider sprinkling some shredded cheese inside the dough before wrapping or adding a sprinkle of garlic powder or herbs for an extra kick.
These little mummies can be prepared ahead of time and stored in the refrigerator; just bake them fresh before serving to guarantee they’re warm and crispy.
Monster Fruit Cups
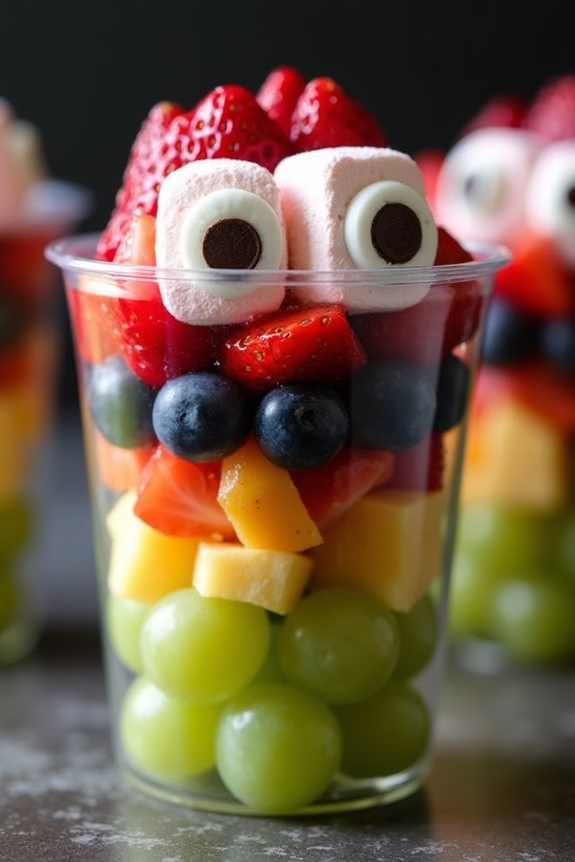
Monster Fruit Cups are a fun and healthy Halloween treat that’s perfect for kids and adults alike. These spooky fruit cups are a creative way to serve fruit, making them more appealing by transforming them into little monsters. Not only are they visually appealing, but they also provide a nutritious alternative to the candy and sugary treats that usually dominate the Halloween season.
These Monster Fruit Cups are easy to prepare and can be customized with your favorite fruits and decorations. The combination of vibrant fruit colors and playful monster faces will surely be a hit at your Halloween party. With just a little bit of creativity and some basic ingredients, you can create a tray full of adorable, delicious monsters that everyone will love.
Ingredients for 4-6 servings:
- 2 cups green grapes
- 2 cups blueberries
- 2 cups diced kiwi
- 2 cups diced pineapple
- 2 cups diced strawberries
- 1 cup mini marshmallows
- 1/2 cup mini chocolate chips
- 1/2 cup candy eyes
- 1/2 cup toothpicks or skewers
- 4-6 clear plastic cups
Instructions:
- Prepare the Fruit: Start by washing all the fruits thoroughly. Peel and dice the kiwi and pineapple into small bite-sized pieces. Hull and dice the strawberries into similar sizes.
- Layer the Fruit: Take the clear plastic cups and begin layering the fruit. Start with a layer of green grapes at the bottom, followed by blueberries, then diced kiwi, pineapple, and finally strawberries on top. This creates a colorful, layered effect that resembles a monster’s body.
- Add the Monster Features: Use a toothpick or skewer to attach mini marshmallows to the top layer of fruit in each cup, creating the monster’s eyes. Secure a candy eye on each marshmallow using a dab of melted chocolate or a mini chocolate chip pressed into it to make the eyes.
- Create Additional Features: Use extra fruit or marshmallows to create additional features such as fangs or horns. For instance, you can stick a couple of mini marshmallows on toothpicks and place them at the top of the cup to resemble horns.
- Final Touches: Arrange the Monster Fruit Cups on a platter or tray for serving. If desired, garnish with a few extra mini marshmallows or chocolate chips around the dish for added decoration.
Extra Tips:
To make these Monster Fruit Cups even more fun, consider using themed cups or adding a small amount of food coloring to the marshmallows to give them a spooky hue. You can also substitute or add other fruits, such as mandarin oranges or raspberries, to mix up the colors and flavors.
If you’re preparing these treats ahead of time, keep them chilled in the refrigerator to maintain the freshness of the fruit. Finally, for an added personal touch, let children decorate their own monster cups. This can be a fun and interactive activity, making your Halloween gathering even more memorable.
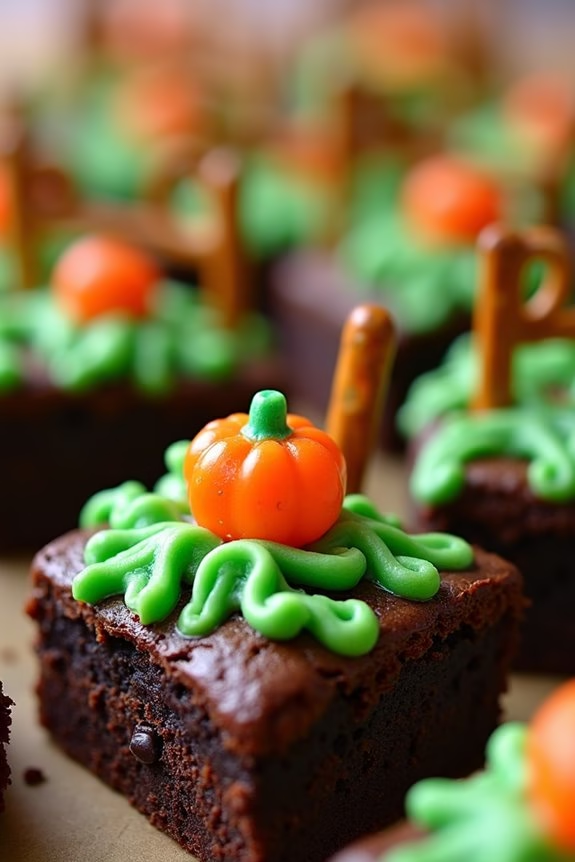
Pumpkin Patch Brownies
Pumpkin Patch Brownies are a delightful treat perfect for celebrating Halloween with a festive twist. These brownies combine the rich, fudgy goodness we all love with the whimsical charm of a pumpkin patch, making them a crowd-pleaser at any Halloween gathering. Not only are they delicious, but they’re also fun to decorate, offering an opportunity to get creative in the kitchen.
Imagine serving a tray of these brownies, each piece adorned with tiny candy pumpkins, pretzel “fences,” and green frosting vines that resemble a miniature pumpkin patch. This recipe is designed for 4-6 people, guaranteeing that everyone can have a generous portion. Whether you’re hosting a Halloween party or simply indulging in some holiday baking, these Pumpkin Patch Brownies are sure to impress.
Ingredients for 4-6 servings:
- 1 cup unsalted butter
- 2 cups granulated sugar
- 1 cup all-purpose flour
- 1 cup unsweetened cocoa powder
- 1 teaspoon baking powder
- 1 teaspoon vanilla extract
- 4 large eggs
- 1/2 teaspoon salt
- 1 cup chocolate chips
- Green frosting or icing (store-bought or homemade)
- Mini candy pumpkins
- Pretzel sticks
Cooking Instructions:
- Preheat and Prepare: Preheat your oven to 350°F (175°C). Grease a 9×13 inch baking pan with butter or line it with parchment paper for easy removal.
- Mix Wet Ingredients: In a large saucepan, melt the butter over low heat. Remove from heat and stir in the sugar and vanilla extract. Allow the mixture to cool slightly before adding the eggs one at a time, beating well after each addition.
- Combine Dry Ingredients: In a separate bowl, whisk together the flour, cocoa powder, baking powder, and salt.
- Create Batter: Gradually add the dry ingredients to the butter mixture, stirring until well combined. Fold in the chocolate chips to guarantee even distribution throughout the batter.
- Bake the Brownies: Pour the brownie batter into the prepared baking pan, spreading it evenly. Bake in the preheated oven for 25-30 minutes, or until a toothpick inserted into the center comes out with a few moist crumbs (not wet batter).
- Cool and Decorate: Once baked, allow the brownies to cool completely in the pan on a wire rack. Once cooled, spread or pipe green frosting in a vine pattern over the surface. Decoratively place mini candy pumpkins on top and use pretzel sticks to create small fences around each pumpkin to mimic a pumpkin patch.
Extra Tips:
To enhance the flavor, consider adding a teaspoon of espresso powder to the dry ingredients for a deeper chocolate taste. If you’re making homemade green frosting, make sure it’s stiff enough to hold its shape when piped.
For an added Halloween touch, you can sprinkle some crushed Oreo cookies around the candy pumpkins to resemble soil. Always let the brownies cool completely before decorating to prevent the frosting from melting off.
Enjoy your festive Pumpkin Patch Brownies with a glass of milk or a cup of hot cocoa for the perfect Halloween treat.
Batty Chocolate Pretzels
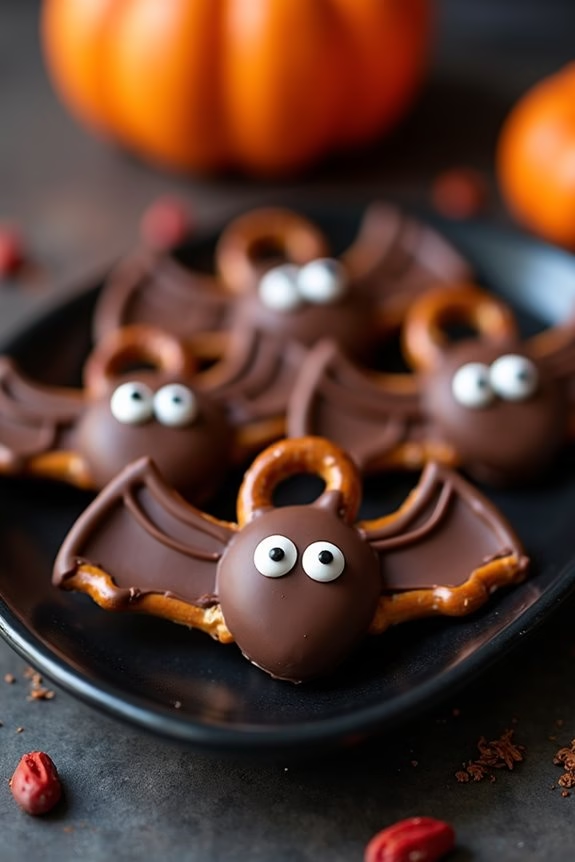
Batty Chocolate Pretzels are the perfect spooky treat for your Halloween festivities. These delightful snacks combine the salty crunch of pretzels with the rich sweetness of chocolate, all dressed up with little bat wings for a festive flair.
Whether you’re hosting a Halloween party or just want to surprise your family with a themed treat, these Batty Chocolate Pretzels are bound to be a hit. They’re fun to make, delicious to eat, and add a creative touch to any Halloween spread.
The process of making Batty Chocolate Pretzels is both engaging and straightforward, making it a great activity to do with kids. These snacks not only taste great but also serve as an eye-catching decoration for your Halloween table.
With just a few ingredients and some simple steps, you’ll have a batch of these bat-shaped goodies ready in no time. The combination of textures and flavors makes them irresistible, and they’re just the right size for snacking.
Ingredients (serving size: 4-6 people):
- 24 mini pretzel twists
- 12 ounces of semi-sweet chocolate chips
- 1 tablespoon of vegetable shortening
- 24 candy eyes
- 24 candy-coated chocolate pieces (e.g., M&Ms)
- Parchment paper
Instructions:
- Prepare a Baking Sheet: Line a baking sheet with parchment paper. This will prevent the pretzels from sticking and make cleanup easier.
- Melt the Chocolate: In a microwave-safe bowl, combine the semi-sweet chocolate chips and vegetable shortening. Microwave in 30-second intervals, stirring after each, until the chocolate is smooth and fully melted.
- Dip the Pretzels: Using a fork, dip each pretzel twist into the melted chocolate, making sure it’s fully coated. Let the excess chocolate drip off, then place the pretzel on the prepared baking sheet.
- Add the Eyes and Wings: While the chocolate is still wet, press two candy eyes onto the top of each pretzel to form the bat’s eyes. Next, place one candy-coated chocolate piece on each side of the eyes to create the bat’s wings.
- Set the Pretzels: Once all pretzels are decorated, place the baking sheet in the refrigerator for about 20 minutes, or until the chocolate is completely set.
- Serve: Remove from the refrigerator and arrange your Batty Chocolate Pretzels on a serving platter. They’re now ready to enjoy!
Extra Tips:
To guarantee the chocolate melts smoothly and doesn’t seize, make sure no water comes into contact with the chocolate.
Also, if you prefer a different flavor, you can substitute white chocolate or milk chocolate for the semi-sweet chocolate chips. For an added dimension of flavor, consider sprinkling a little sea salt on top of the pretzels before the chocolate sets.
And remember, the candy eyes can be replaced with small white chocolate chips if you don’t have candy eyes on hand. Enjoy the creative process and have fun with your Halloween treats!
Ghoulish Guacamole Dip
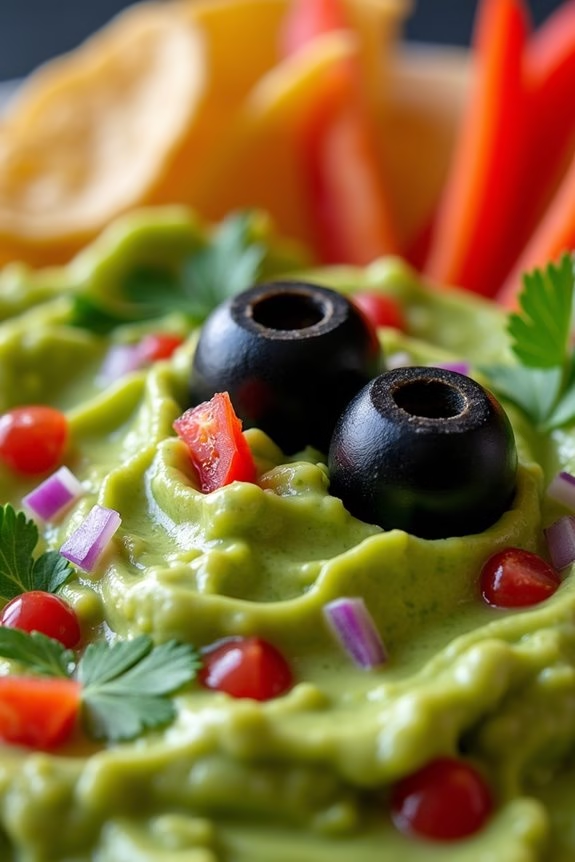
Ghoulish Guacamole Dip is a spooky twist on the classic guacamole, perfect for your Halloween festivities. This dip not only tastes great but also adds a creepy element to your snack table. With its vibrant green color, you can easily transform it into a monster-inspired treat by adding edible decorations to resemble eyes, teeth, and other ghoulish features.
It’s a fun and festive way to enjoy a healthy snack while getting into the Halloween spirit. This ghoulish dip isn’t only delicious but also incredibly easy to make, making it a fantastic last-minute addition to your party spread. The creamy texture of ripe avocados combined with the zing of lime and the kick from jalapeños creates a flavorful treat that your guests will love.
Pair it with tortilla chips or vegetable sticks for a complete party snack that serves 4-6 people.
Ingredients:
- 4 ripe avocados
- ½ cup diced tomatoes
- ¼ cup chopped red onion
- 1 minced jalapeño (seeds removed for less heat)
- 2 tablespoons chopped fresh cilantro
- Juice of 2 limes
- Salt to taste
- Black olives for decoration
- Tortilla chips or vegetable sticks for serving
Instructions:
- Prepare the Avocados: Begin by slicing each avocado in half, removing the pit, and scooping out the flesh into a medium-sized mixing bowl. Use a fork or potato masher to mash the avocado to your preferred consistency, leaving some chunks for texture.
- Mix the Ingredients: Add the diced tomatoes, chopped red onion, minced jalapeño, and chopped cilantro to the mashed avocados. Pour the lime juice over the mixture and sprinkle with salt. Stir everything together until well combined.
- Adjust Seasoning: Taste the guacamole and adjust the seasoning as needed. You may add more lime juice or salt based on your preference.
- Add the Ghoulish Touch: Transfer the guacamole to a serving dish. Slice black olives in half to create “eyes” and place them strategically on top of the guacamole. You can also use other edible decorations to create a monster face or spooky design.
- Serve: Serve the Ghoulish Guacamole Dip immediately with tortilla chips or vegetable sticks. Enjoy the spooky and delicious flavors with your guests.
Extra Tips: For an even spookier look, you can carve small triangles of red bell pepper to create “fangs” or use pieces of cheese sticks to resemble “bones” sticking out of the dip. If you’re preparing the guacamole ahead of time, cover it tightly with plastic wrap directly on the surface to prevent browning.
Additionally, if you prefer your guacamole extra spicy, feel free to add more jalapeño or a pinch of cayenne pepper.
Frankenstein Rice Krispies
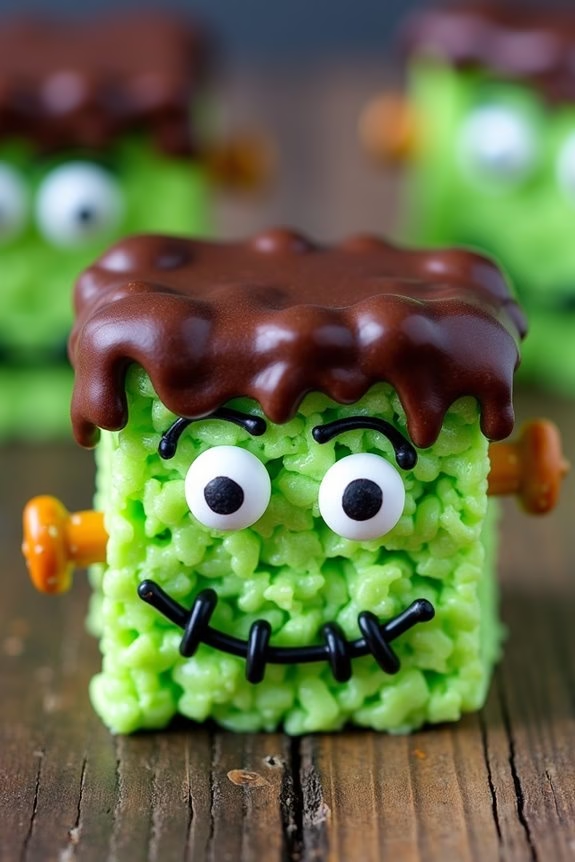
Halloween is the perfect time for creative and spooky-themed treats, and Frankenstein Rice Krispies are sure to be a hit at any festive gathering. Combining the classic, gooey goodness of Rice Krispies treats with a fun, monster twist, these green, chocolate-topped snacks are both delicious and delightful. Not only are they easy to make, but they also offer a great opportunity to get creative with decorations, making them a perfect activity for kids and adults alike.
These Frankenstein Rice Krispies treats are made by coloring the traditional marshmallow and cereal mixture with green food coloring, giving them their distinctive monster hue. You can then add some chocolate frosting for hair, candy eyes, and use a little creativity for the face to bring Frankenstein to life. This treat is ideal for a serving size of 4-6 people, and makes for a fun addition to your Halloween snack table.
Ingredients for 4-6 servings:
- 6 cups Rice Krispies cereal
- 3 tablespoons unsalted butter
- 4 cups mini marshmallows
- Green food coloring
- 1 cup of chocolate chips
- Candy eyes
- Black decorating gel
- Pretzel sticks
Cooking Instructions:
- Prepare the Base: Start by greasing a 9×13-inch baking dish with cooking spray or butter to prevent sticking. This will guarantee that your Rice Krispies mixture doesn’t stick to the pan, making it easier to cut and serve.
- Melt the Butter and Marshmallows: In a large saucepan, melt the butter over low heat. Once the butter is melted, add the mini marshmallows and stir continuously until completely melted and smooth. Keep the heat low to avoid burning the marshmallows.
- Add Food Coloring: Remove the saucepan from heat and add green food coloring to the melted marshmallow mixture, stirring until you achieve your desired shade of green for Frankenstein’s face.
- Combine with Cereal: Quickly stir in the Rice Krispies cereal until the cereal is well coated with the green marshmallow mixture. Work quickly as the mixture will begin to set as it cools.
- Press into Pan: Transfer the mixture into the prepared baking dish. Use a buttered spatula or wax paper to press the mixture evenly into the pan, making sure it’s level.
- Make Hair and Face: Melt the chocolate chips in a microwave-safe bowl in 30-second intervals, stirring in between until smooth. Spread the melted chocolate along the top of each Rice Krispies rectangle to form Frankenstein’s hair.
- Decorate: Place the candy eyes on the chocolate hair while it’s still soft. Use the black decorating gel to draw stitches, and add a small mouth to create Frankenstein’s face.
- Add Bolts: Break pretzel sticks in half and insert them into the sides of each Rice Krispies treat to mimic Frankenstein’s bolts.
Extra Tips:
When making Frankenstein Rice Krispies, it’s important to work quickly once you’ve added the food coloring and cereal to the melted marshmallows, as the mixture can harden fast.
If you’re making these with kids, have all your decorations prepped and ready to go before you begin the marshmallow step. If you prefer a sweeter treat, consider adding a layer of white chocolate beneath the chocolate hair for added flavor.
Finally, feel free to get creative with the face decorations, using different candies or gels to personalize your Frankenstein treats!
Creepy Crawly Deviled Eggs
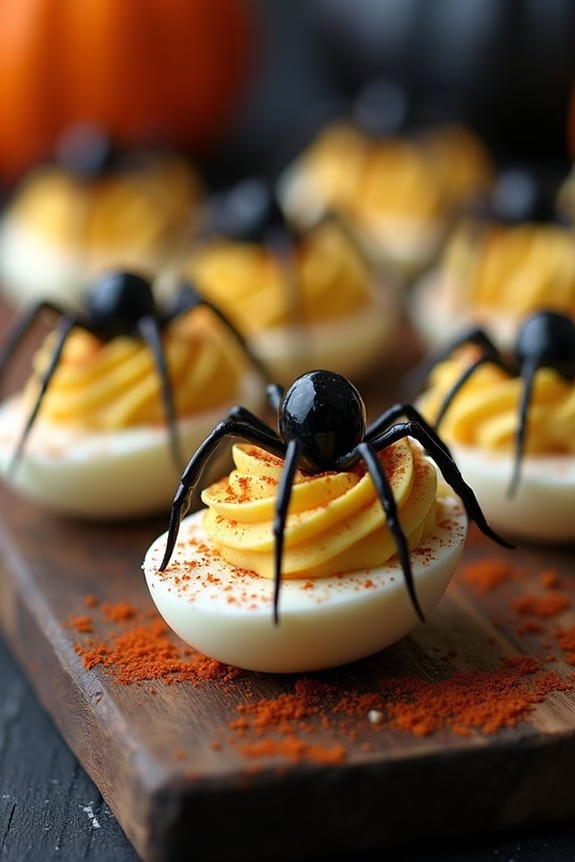
Creepy Crawly Deviled Eggs are the perfect spooky snack to serve at your Halloween gathering. These ghoulish treats transform classic deviled eggs into an eerie delight, complete with edible spiders or bugs crawling over the top. Not only do they look impressive, but they’re also delicious and easy to make, guaranteeing your Halloween spread is both festive and flavorful.
The combination of creamy yolk filling and creepy garnishes will thrill kids and adults alike, making them a hit at any Halloween party. This recipe maintains the traditional deviled egg flavor while adding a haunting twist. The secret lies in the creative use of black olives and food coloring, which are cleverly employed to mimic the appearance of creepy crawlers on the egg halves.
With just a few simple steps, you can transform ordinary ingredients into a spooky spectacle that will have your guests doing a double-take. Serve these Creepy Crawly Deviled Eggs as a fun appetizer or a creepy side dish to enhance your Halloween festivities.
Ingredients for 4-6 servings:
- 6 large eggs
- 1/4 cup mayonnaise
- 1 teaspoon Dijon mustard
- 1 teaspoon white vinegar
- Salt and pepper to taste
- Black olives (pitted)
- Blue or black food coloring (optional)
- Paprika (for garnish)
Cooking Instructions:
- Boil the Eggs: Place the eggs in a single layer in a saucepan and cover them with cold water. Bring the water to a boil over medium-high heat. Once boiling, cover the pan, remove it from heat, and let it sit for 10-12 minutes.
- Cool the Eggs: Carefully drain the hot water and transfer the eggs to a bowl of ice water to cool for about 5 minutes. This makes them easier to peel without breaking.
- Peel and Halve: Once cooled, gently peel the eggs and slice them in half lengthwise. Remove the yolks and place them in a mixing bowl, setting the whites aside on a serving platter.
- Prepare the Filling: Mash the yolks with a fork and mix in mayonnaise, Dijon mustard, vinegar, salt, and pepper. Stir until smooth and creamy.
- Color the Filling (Optional): If you want a more dramatic effect, add a few drops of blue or black food coloring to the yolk mixture and mix until evenly colored.
- Pipe or Spoon the Filling: Fill a piping bag with the yolk mixture or use a spoon to fill the egg whites evenly with the prepared filling.
- Create the Creepy Crawlies: Slice the black olives in half lengthwise for the spider bodies. Slice the other half into thin strips for legs. Arrange one half of an olive on each egg to form the spider’s body, and place the olive strips around it to create legs.
- Garnish and Serve: Lightly sprinkle the deviled eggs with paprika to give them a finished look. Serve immediately or refrigerate until ready to serve.
Extra Tips:
For an extra spooky touch, consider using different types of olives or food coloring to create a variety of creepy creatures. If you’d like to prepare these in advance, keep the egg whites and yolk mixture separate until serving to guarantee freshness and prevent the eggs from becoming soggy.
Additionally, be gentle when peeling the eggs to maintain the shape and avoid tearing the whites, guaranteeing your creepy crawlers have a solid base.
Haunted Veggie Platter
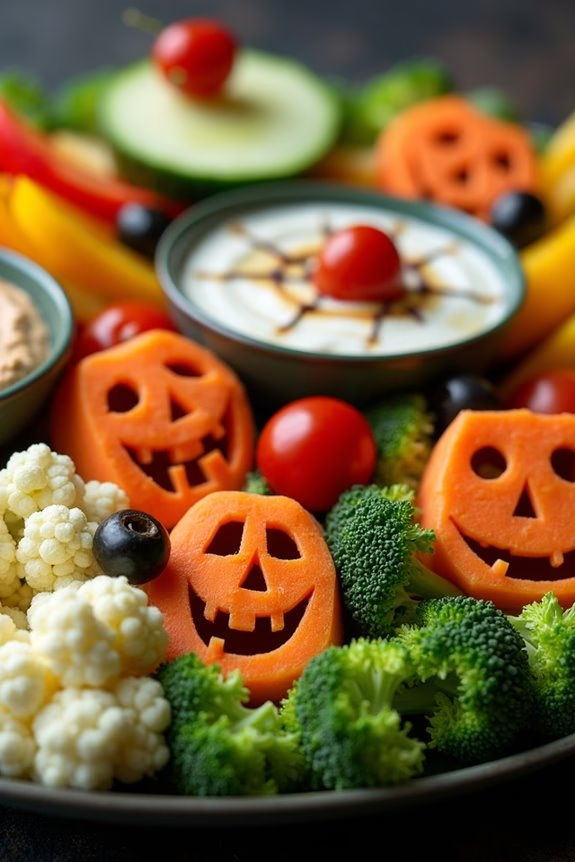
Transform your Halloween snack table with a spooky yet healthy Haunted Veggie Platter. This ghoulishly delightful dish is perfect for serving 4-6 people and is sure to be a hit at any Halloween gathering.
Featuring an array of colorful vegetables, this platter is artfully arranged to resemble a haunted scene, complete with creepy shapes and eerie designs. Not only is it visually appealing, but it also provides a nutritious option amidst the candy and treats commonly associated with Halloween.
The key to creating a memorable Haunted Veggie Platter is selecting a variety of fresh, vibrant vegetables that will stand out on the table. Use your creativity to carve and shape the veggies into ghostly figures, scary faces, and other Halloween-themed designs.
Pair the platter with a couple of delicious dips, such as hummus or ranch dressing, to enhance the flavor and offer guests a tasty way to enjoy their veggies.
Ingredients:
- 1 head of cauliflower
- 1 bunch of broccoli
- 1 red bell pepper
- 1 yellow bell pepper
- 4 large carrots
- 1 cucumber
- 1 cup cherry tomatoes
- 1 can of black olives
- 1/2 cup hummus
- 1/2 cup ranch dressing
Instructions:
1. Prepare the Veggies: Wash all vegetables thoroughly under cold water. Pat them dry with a clean towel to remove any excess moisture.
2. Cut and Carve:
- Separate the cauliflower and broccoli into small florets.
- Slice the red and yellow bell peppers into strips.
- Peel and slice the carrots into sticks. Use a small knife to carve out jack-o-lantern faces on some carrot slices.
- Slice the cucumber into rounds and carve ghostly faces on some slices.
- Arrange the cherry tomatoes and black olives in small groups to create eyes or other creepy features.
3. Arrange the Platter:
- Start by placing the cauliflower and broccoli florets in a circular pattern on a large serving platter.
- Add the bell pepper strips in a ring around the florets.
- Position the carved cucumber slices and carrot sticks in spooky patterns throughout the platter.
- Scatter the cherry tomatoes and black olives to create eyes or other eerie decorations.
4. Add the Dips:
- Place the hummus and ranch dressing in small bowls and position them on the platter or alongside it.
- For an added spooky touch, use a toothpick to draw spiderweb patterns on the surface of the hummus.
Extra Tips:
To elevate the Halloween theme, consider using small cookie cutters to make fun shapes from the bell peppers or cucumbers.
You might also add a few edible decorations, like edible glitter or food-safe markers, to add more character to your veggies. Make sure to prepare the veggies just before serving to maintain their freshness and crunchiness.
If you have time, try chilling the platter for about 30 minutes before serving to keep the veggies crisp and invigorating.
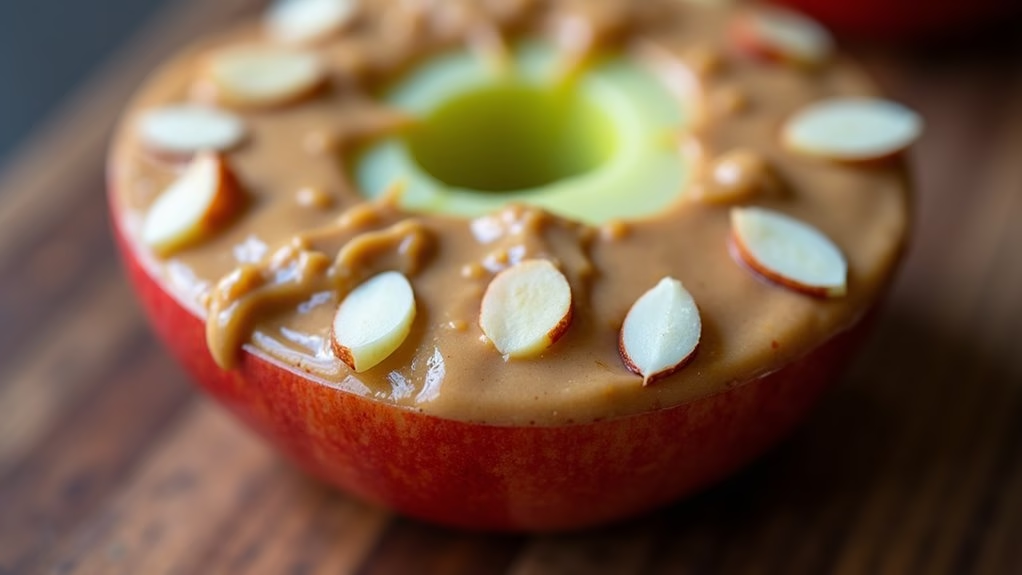
Vampire Fang Apples
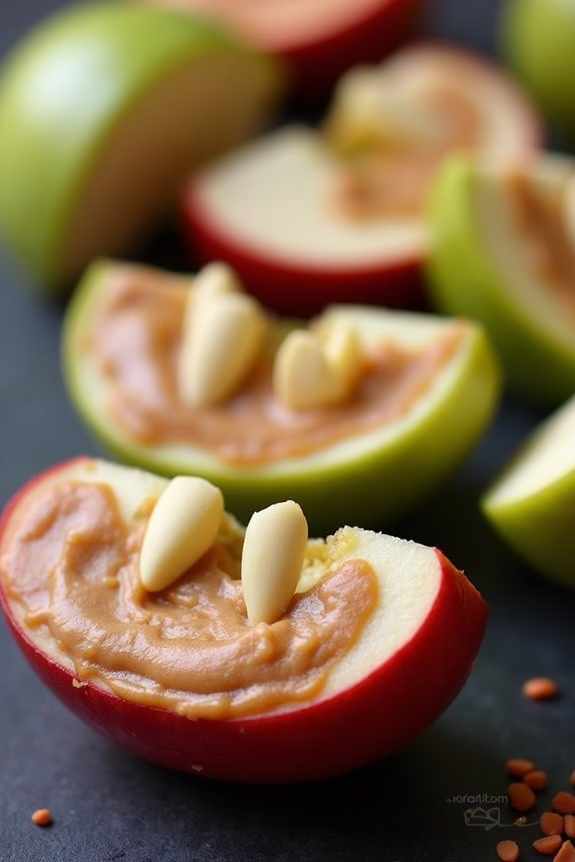
Halloween is the perfect time to get creative with your snacks, and these Vampire Fang Apples are sure to be a hit at any spooky gathering. Not only are they a fun and festive treat, but they’re also a healthy alternative to the usual sugary Halloween candies. The combination of crispy apple slices, creamy peanut butter, and sharp almond slivers perfectly captures the essence of a vampire’s smile, making them both delicious and visually appealing.
This recipe is simple and quick to prepare, making it ideal for a last-minute Halloween snack or party treat. The different textures and flavors blend together to create a satisfying bite that’s sure to please both kids and adults alike. With just a few ingredients and minimal preparation time, you can whip up a batch of these Vampire Fang Apples and add a touch of spooky charm to your Halloween celebrations.
Ingredients (Serves 4-6):
- 4 medium apples (any variety you prefer)
- 1 cup of peanut butter (or any nut butter of your choice)
- 1 cup of slivered almonds
- 2 tablespoons of lemon juice
Cooking Instructions:
- Prepare the Apples: Start by washing the apples thoroughly under running water. Once clean, cut each apple into quarters and remove the core and seeds. Slice each quarter into thin wedges, making sure they’re thick enough to hold the peanut butter and almond slivers.
- Prevent Browning: To keep the apple slices looking fresh and prevent browning, lightly brush each slice with lemon juice. This will help maintain their crisp appearance and add a hint of citrus flavor.
- Assemble the Vampire Fangs: Take a slice of apple and spread a generous layer of peanut butter on one side. Be careful not to overdo it, as too much peanut butter can make them difficult to handle. Then, carefully press a few slivered almonds into the peanut butter to resemble fangs, spacing them evenly for the best effect.
- Finish and Serve: Once all the apple slices are prepared, arrange them on a serving platter. For an added spooky effect, you can drizzle a little extra lemon juice over the top to give them a glossy finish. Serve immediately for the best texture and flavor.
Extra Tips:
When selecting apples, opt for varieties that are crisp and firm, such as Granny Smith or Honeycrisp, to guarantee they hold their shape well. If you’re preparing these Vampire Fang Apples for a crowd or in advance, dip them in a mixture of water and lemon juice to prevent browning, then store in an airtight container in the refrigerator until ready to serve.
For a nut-free version, substitute peanut butter with sunflower seed butter, and consider using pretzel sticks instead of almonds for the fangs.