

Hosting Halloween gatherings is one of my favorite traditions, and over the years, I’ve curated a collection of delightfully simple potluck recipes that always wow the crowd. When your guests take a bite of a mummy jalapeño popper or spot a whimsical pumpkin cheese ball on the table, the excitement is palpable. These dishes are not only festive but also incredibly easy to whip up. Curious about more spooky treats that will enchant your guests? Let’s get inspired with recipes that transform your Halloween table into a magical spread.
Spooky Spider Deviled Eggs
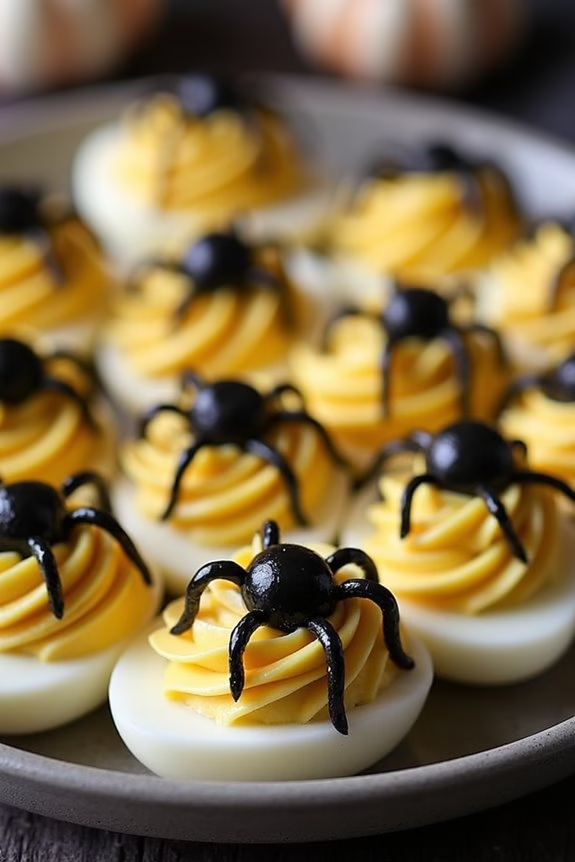
These Spooky Spider Deviled Eggs are the perfect addition to any Halloween potluck, offering a deliciously creepy twist on a classic appetizer. The combination of smooth, creamy yolk filling and a fun olive spider topping makes these deviled eggs not only tasty but also an eye-catching centerpiece for your spooky spread.
Whether you’re hosting a Halloween party or attending one, these themed treats are sure to delight both kids and adults alike. By using simple ingredients that you likely already have in your kitchen, these Spooky Spider Deviled Eggs can be whipped up in no time, making them an ideal last-minute addition to your Halloween festivities.
The olives form the spiders, adding a touch of eerie elegance to each egg half. The recipe below serves 4-6 people, making it the perfect size for a small gathering or a contribution to a larger potluck table.
Ingredients:
- 6 large eggs
- 1/4 cup mayonnaise
- 1 teaspoon Dijon mustard
- 1 teaspoon white vinegar
- Salt and pepper to taste
- 12 black olives (pitted)
Cooking Instructions:
- Boil the Eggs: Place the eggs in a single layer in a saucepan and cover them with water. Bring the water to a rolling boil over high heat. Once boiling, turn off the heat and let the eggs sit in the hot water for about 10-12 minutes.
- Cool and Peel: Transfer the eggs to a bowl of ice water to cool them quickly. Once cooled, gently crack and peel the shells off the eggs.
- Prepare the Filling: Slice each egg in half lengthwise and carefully remove the yolks, placing them into a mixing bowl. Arrange the egg whites on a serving platter.
- Mix the Filling: Using a fork, mash the yolks until smooth. Add mayonnaise, Dijon mustard, white vinegar, salt, and pepper, mixing until the filling is creamy and well combined.
- Fill the Egg Whites: Spoon or pipe the yolk mixture back into the hollowed-out egg whites, making sure each half is generously filled.
- Create the Olive Spiders: Slice the olives in half lengthwise. Use one half as the spider’s body, placing it on top of the filled egg. Slice the remaining half into thin strips to form the spider’s legs. Arrange these around the olive body, with four legs on each side.
- Serve: Arrange the Spooky Spider Deviled Eggs on a decorative platter and serve immediately, or refrigerate until ready to serve.
Extra Tips:
For the best presentation, try to choose eggs that are similar in size so that they cook evenly. When creating the spider legs, use a sharp knife to make thin, even slices for a more realistic look.
If you’re preparing these ahead of time, store the filled eggs without the olive spiders in the refrigerator, adding the spiders just before serving to guarantee they remain fresh and intact. Feel free to adjust the seasoning in the filling to your taste or add a pinch of paprika for a hint of color and flavor.
Mummy Jalapeño Poppers

Mummy Jalapeño Poppers are a fun and spooky treat perfect for a Halloween potluck. These delightful appetizers combine the spicy kick of jalapeños with a creamy, cheesy filling, all wrapped up in a flaky crescent roll mummy disguise.
They’re easy to make and guaranteed to be a hit at any gathering, impressing guests with both their taste and their festive appearance.
This recipe yields enough Mummy Jalapeño Poppers to serve 4-6 people, making it ideal for sharing. The jalapeños are halved and hollowed out, then filled with a rich mixture of cream cheese and cheddar. Each pepper is then wrapped in strips of crescent roll dough to resemble a mummy, and decorated with edible eyes to complete the spooky look.
When baked to golden perfection, these poppers offer a delicious blend of flavors and textures that capture the spirit of Halloween.
Ingredients (Serving size: 4-6 people):
- 6 large jalapeño peppers
- 8 oz cream cheese, softened
- 1 cup shredded cheddar cheese
- 1/2 teaspoon garlic powder
- 1/2 teaspoon onion powder
- 1/4 teaspoon salt
- 1/4 teaspoon black pepper
- 1 can (8 oz) refrigerated crescent roll dough
- 24 candy eyeballs (or small pieces of black olives for eyes)
Cooking Instructions:
- Preheat the Oven: Preheat your oven to 375°F (190°C) and line a baking sheet with parchment paper to prevent sticking.
- Prepare the Jalapeños: Cut each jalapeño in half lengthwise and remove the seeds and membranes. Be sure to wear gloves or wash your hands thoroughly afterward to avoid irritation.
- Make the Filling: In a medium-sized bowl, mix together the cream cheese, shredded cheddar cheese, garlic powder, onion powder, salt, and pepper until well combined.
- Fill the Jalapeños: Using a spoon or a piping bag, fill each jalapeño half with the cheese mixture, making sure to fill them generously, but not overfilling.
- Wrap the Jalapeños: Unroll the crescent roll dough and separate it into strips. Cut each strip into thin, long pieces. Wrap these strips around the filled jalapeños to create a mummy effect, leaving a small space open for the eyes.
- Add the Eyes: Gently press two candy eyeballs (or olive pieces) into the cheese filling at the top of each wrapped jalapeño to create eyes.
- Bake: Place the wrapped jalapeños on the prepared baking sheet and bake in the preheated oven for 12-15 minutes, or until the crescent dough is golden brown and cooked through.
- Cool and Serve: Allow the poppers to cool slightly before serving. They’re best served warm.
Extra Tips: When handling jalapeños, it’s important to be cautious, as the oils can irritate your skin and eyes. Always use gloves or wash your hands immediately after touching the peppers.
For a milder version, consider using mini sweet peppers instead of jalapeños. If you’re serving these poppers at a party, prepare them a few hours in advance and bake them just before guests arrive to guarantee they’re fresh and warm.
You can also experiment with different cheese combinations to suit your taste preferences.
Witch’s Broomstick Pretzels
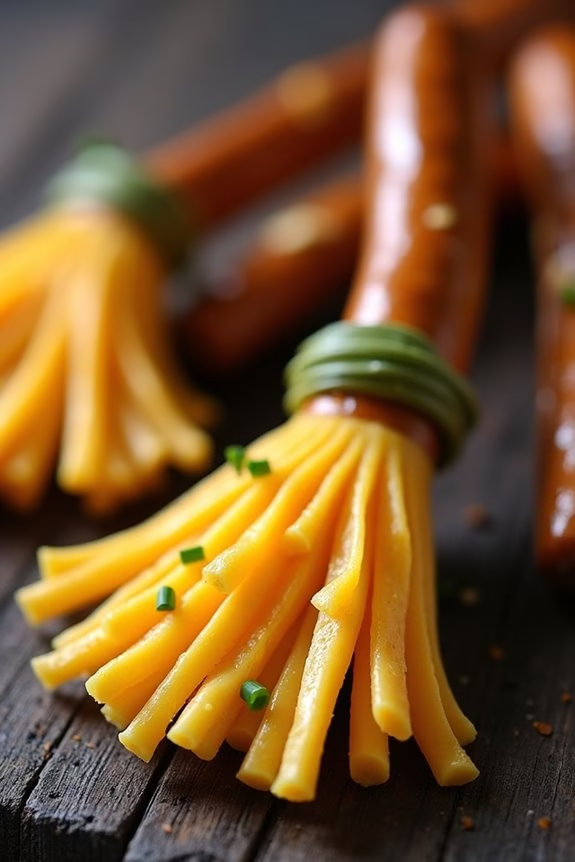
Witch’s Broomstick Pretzels are a delightful and spooky treat perfect for any Halloween potluck. These whimsical snacks combine the salty goodness of pretzels with the rich and creamy flavor of cheese, making them an irresistible addition to your festive gathering.
Not only are they easy to make, but they also add a touch of magical fun to your Halloween spread, ensuring that your guests will be enchanted by both the taste and the presentation.
The key to these charming broomsticks is their simple yet effective construction. Each broomstick is made by pairing a pretzel stick with a slice of cheese that’s been cleverly transformed into a broom bristle.
These pretzel broomsticks aren’t only visually appealing but also provide a satisfying crunch paired with the smooth texture of cheese. Perfect for serving 4-6 people, this recipe is a surefire way to cast a spell over your Halloween party guests.
Ingredients:
- 24 pretzel sticks
- 12 slices of cheddar cheese (or any cheese of your choice)
- Fresh chives (optional, for tying the cheese onto the pretzels)
Instructions:
- Prepare the Cheese: Begin by cutting each slice of cheddar cheese into three equal strips. You should have 36 strips in total. Take each strip and carefully cut fringe along one edge to resemble broom bristles, leaving about 1 inch at the top uncut.
- Assemble the Broomsticks: Wrap one fringed cheese strip around the end of a pretzel stick, with the uncut section at the top. Gently press the cheese to secure it to the pretzel. If desired, you can use a fresh chive to tie around the cheese at the top for added decoration and security.
- Repeat: Continue assembling the broomsticks by repeating the previous step until all pretzel sticks are paired with a fringed cheese strip. You should have 24 completed broomsticks.
- Serve: Arrange the Witch’s Broomstick Pretzels on a serving platter, allowing guests to easily grab and enjoy them as they please.
Extra Tips: To prevent the cheese from drying out, you can prepare the broomsticks a few hours in advance and store them in an airtight container in the refrigerator.
If you’re using fresh chives, dip them briefly in hot water to soften before tying them around the cheese. This will make them more pliable and less likely to break.
Additionally, feel free to experiment with different types of cheese to suit your taste preferences or dietary needs. Enjoy your magical Halloween treat!
Pumpkin Cheese Ball

The Pumpkin Cheese Ball is a delightful and festive appetizer perfect for Halloween potlucks. Its creamy, cheesy goodness combined with the visual appeal of a pumpkin shape makes it a crowd-pleaser. Whether you’re hosting a spooky gathering or attending a Halloween party, this dish will surely be a hit.
The combination of cream cheese, cheddar, and spices provides a savory flavor that pairs wonderfully with crackers, pretzels, or fresh veggies. Plus, it’s a fun dish to prepare and doesn’t require any cooking, making it a convenient option for busy hosts.
This recipe is designed to serve 4-6 people, making it ideal for small gatherings or family parties. The Pumpkin Cheese Ball not only tastes delicious but also adds an element of fun to your Halloween spread. The vibrant orange color and pumpkin-like appearance fit perfectly into the theme of the season.
By following these steps, you’ll create a dish that’s as visually appealing as it’s tasty, bringing a touch of creativity and flavor to your Halloween celebration.
Ingredients:
- 16 oz cream cheese, softened
- 2 cups shredded sharp cheddar cheese
- 1 tablespoon Worcestershire sauce
- 1 teaspoon garlic powder
- 1 teaspoon onion powder
- 1/2 teaspoon smoked paprika
- 1/2 teaspoon salt
- 1/2 teaspoon black pepper
- 1/2 cup finely chopped pecans
- 1/2 cup crushed pretzels
- 1 bell pepper stem, for decoration
Cooking Instructions:
- Prepare the Cheese Mixture: In a large mixing bowl, combine the softened cream cheese, shredded cheddar cheese, Worcestershire sauce, garlic powder, onion powder, smoked paprika, salt, and black pepper. Mix well until all ingredients are fully incorporated and the mixture is smooth.
- Shape the Cheese Ball: Transfer the cheese mixture onto a piece of plastic wrap. Wrap the mixture tightly, shaping it into a round ball. Once shaped, refrigerate the cheese ball for at least 2 hours or until it’s firm and holds its shape.
- Coat with Pecans and Pretzels: Combine the chopped pecans and crushed pretzels on a plate. Unwrap the chilled cheese ball and roll it in the pecan and pretzel mixture, pressing gently to verify the coating sticks evenly across the surface.
- Add the Finishing Touch: Place the coated cheese ball on a serving platter. Insert the bell pepper stem into the top center of the cheese ball to mimic a pumpkin stem. This will give your cheese ball the appearance of a pumpkin.
- Serve and Enjoy: Allow the cheese ball to sit at room temperature for about 15 minutes before serving. This will make it easier to spread. Serve with an assortment of crackers, pretzels, and fresh vegetables.
Extra Tips: For added flavor, consider incorporating some finely chopped green onions or fresh herbs into the cheese mixture. If you prefer a spicier version, add a pinch of cayenne pepper or a few dashes of hot sauce.
When shaping the cheese ball, use the plastic wrap to help form a more defined pumpkin shape by creating slight grooves around the sides. This will enhance the pumpkin-like appearance. Remember, the cheese ball can be prepared a day in advance, making it a great make-ahead option for your Halloween festivities.
Monster Meatball Sliders

Monster Meatball Sliders are a spooky and delicious addition to any Halloween potluck. These tiny, savory sandwiches are packed with flavor and are easy to assemble, making them a crowd-pleaser for both kids and adults. The combination of seasoned meatballs, tangy marinara sauce, and gooey melted cheese all nestled within soft slider buns makes for a delightfully monstrous snack that’s both satisfying and fun to eat. Perfectly portioned for parties, these sliders are sure to be a hit at any Halloween gathering.
Creating these Monster Meatball Sliders involves a few simple steps that result in a ghoulishly good treat. The meatballs are seasoned to perfection with a blend of herbs and spices that give them a rich, savory taste. They’re then simmered in marinara sauce, which adds a touch of tanginess and moisture.
The assembly is simple—just add a meatball to each bun, top with cheese, and bake until everything is hot and melted. Serve these sliders on a platter, and watch them disappear as fast as a ghost in the night!
Ingredients (Serves 4-6 people):
- 1 pound ground beef
- 1/2 cup breadcrumbs
- 1/4 cup grated Parmesan cheese
- 1 egg
- 2 cloves garlic, minced
- 1 teaspoon Italian seasoning
- Salt and pepper to taste
- 1 cup marinara sauce
- 12 slider buns
- 6 slices of mozzarella cheese, halved
- 2 tablespoons olive oil
- Fresh basil leaves (optional, for garnish)
Cooking Instructions:
- Preheat the Oven: Preheat your oven to 375°F (190°C) to get it ready for baking the sliders.
- Prepare the Meatball Mixture: In a large bowl, combine the ground beef, breadcrumbs, Parmesan cheese, egg, minced garlic, Italian seasoning, salt, and pepper. Mix well until all ingredients are evenly incorporated.
- Form the Meatballs: Roll the mixture into 24 small meatballs (about 1 inch in diameter) and set them aside on a plate.
- Cook the Meatballs: Heat olive oil in a large skillet over medium heat. Add the meatballs and cook until they’re browned on all sides, about 5-7 minutes. Remove from heat and set aside.
- Simmer in Marinara Sauce: Pour the marinara sauce into the skillet with the meatballs. Stir to coat the meatballs in the sauce, then cover and let them simmer for 10 minutes over low heat.
- Prepare the Sliders: Place the bottom halves of the slider buns on a baking sheet. Add one meatball onto each bun, then spoon a little marinara sauce over the top.
- Add Cheese: Place a half slice of mozzarella cheese over each meatball. Cover with the top halves of the slider buns.
- Bake the Sliders: Bake in the preheated oven for 10 minutes, or until the cheese is melted and the sliders are heated through.
- Serve: Remove from the oven and serve immediately. Garnish with fresh basil leaves if desired.
Extra Tips:
For an extra spooky touch, you can use food-safe Halloween-themed toothpicks to hold the sliders together. If you prefer a spicier flavor, consider adding a dash of crushed red pepper flakes to the meatball mixture.
These sliders can also be made with ground turkey or chicken for a lighter option. To keep the sliders warm during the party, consider placing them in a slow cooker set to the “warm” setting. Enjoy your Monster Meatball Sliders with a side of extra marinara sauce for dipping!
Ghostly White Chocolate Covered Strawberries

Ghostly White Chocolate Covered Strawberries are a spooktacular treat perfect for any Halloween potluck or party. These delightful strawberries are dipped in creamy white chocolate and decorated to resemble adorable little ghosts. They’re not only fun to make but also delicious to eat, providing a sweet and slightly fruity bite that’s sure to be a hit with both kids and adults.
This recipe is designed to serve 4-6 people, making it an ideal contribution to any Halloween gathering. The process is simple and requires minimal ingredients, so even if you’re a beginner in the kitchen, you can create these ghostly delights with ease. Plus, you can get creative with the decorations, adding personal touches to make each ghost unique.
Ingredients:
- 1 pound of fresh strawberries
- 1 cup of white chocolate chips or white candy melts
- 1 tablespoon of coconut oil or vegetable shortening
- Mini chocolate chips or black icing for eyes
- Wax paper or parchment paper
Cooking Instructions:
- Prepare the Strawberries: Wash the strawberries thoroughly under cold water and gently pat them dry with paper towels. Make certain they’re completely dry before dipping, as moisture can prevent the chocolate from adhering properly.
- Melt the White Chocolate: In a microwave-safe bowl, combine the white chocolate chips and coconut oil. Microwave in 30-second intervals, stirring after each, until the chocolate is fully melted and smooth. Be cautious not to overheat the chocolate, as it can seize.
- Dip the Strawberries: Hold each strawberry by the stem or use a toothpick, and dip it into the melted white chocolate, swirling to cover about 3/4 of the berry. Allow any excess chocolate to drip off before placing the strawberry onto a baking sheet lined with wax paper.
- Create the Ghostly Faces: Before the chocolate sets, press two mini chocolate chips into the chocolate to create eyes. Alternatively, wait for the chocolate to set and use black icing to draw on eyes and a mouth.
- Set the Chocolate: Allow the chocolate-covered strawberries to set at room temperature for about 30 minutes, or place them in the refrigerator for a quicker set.
- Serve and Enjoy: Once the chocolate is firm, your Ghostly White Chocolate Covered Strawberries are ready to serve. Arrange them on a platter and enjoy the festive treat!
Extra Tips:
To guarantee a smooth chocolate coating, make sure the strawberries are completely dry before dipping. Any water on the berries can cause the chocolate to seize or not adhere well.
If you find the chocolate too thick, you can add a bit more coconut oil to achieve the desired consistency. Additionally, when creating the ghost faces, using a toothpick can help with precision if you’re using icing for the eyes and mouth.
For a fun twist, consider using colored candy melts for a variety of ghostly hues.
Creepy Crawly Pasta Salad
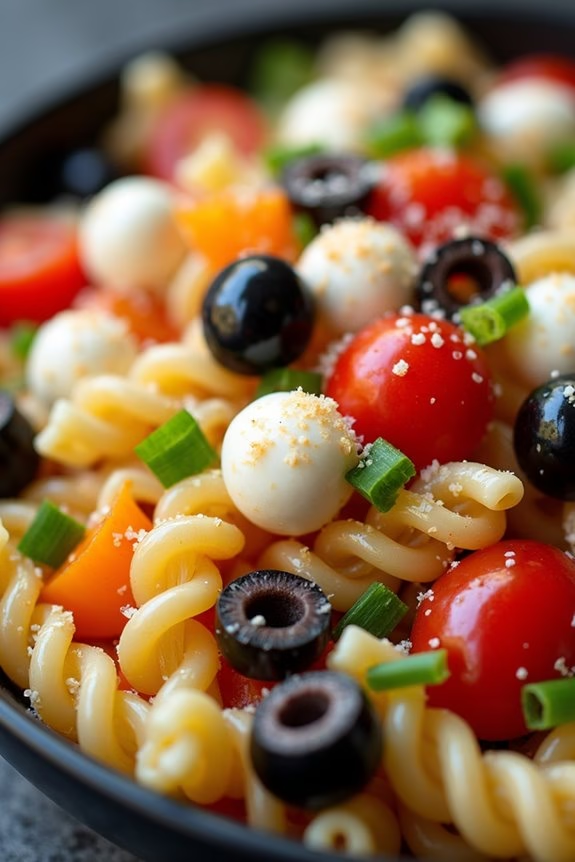
Creepy Crawly Pasta Salad is the perfect dish to spook your guests at a Halloween potluck. This eerie and delicious pasta salad combines fun, themed ingredients with tangy flavors to delight both kids and adults. The pasta is shaped like creepy crawlies, while olives, bell peppers, and other ingredients add pops of color and flavor. The creamy dressing brings everything together in a ghoulishly good way, making it a must-have on your Halloween menu.
This dish not only looks the part but also offers a healthy and satisfying option amidst the candies and sweets often found at Halloween gatherings. Best of all, it’s easy to prepare and can be made in advance, allowing you more time to focus on other Halloween festivities. Whether you’re hosting a spooky soirée or attending a frightful potluck, Creepy Crawly Pasta Salad is sure to be a hit.
Ingredients (for 4-6 people):
- 12 oz creepy crawly pasta (such as rotini or fusilli)
- 1 cup cherry tomatoes, halved
- 1 cup black olives, sliced
- 1 cup orange bell pepper, diced
- 1/2 cup green onions, chopped
- 1 cup mozzarella pearls
- 1/2 cup Italian dressing
- 1/4 cup mayonnaise
- 2 tablespoons grated Parmesan cheese
- Salt and pepper to taste
Instructions:
- Cook the Pasta: Begin by cooking the pasta according to the package instructions. Make sure to cook until al dente, as this will help the pasta maintain its shape and texture. Once cooked, drain and rinse the pasta under cold water to stop the cooking process.
- Prepare the Dressing: In a small bowl, combine the Italian dressing, mayonnaise, and Parmesan cheese. Mix well until the ingredients are fully integrated and smooth. Set aside.
- Assemble the Salad: In a large mixing bowl, combine the cooked and cooled pasta, cherry tomatoes, olives, bell pepper, green onions, and mozzarella pearls. Toss gently to distribute the ingredients evenly.
- Add the Dressing: Pour the dressing over the pasta salad and toss again to make certain everything is thoroughly coated. Taste and adjust seasoning with salt and pepper as needed.
- Chill the Salad: Cover the salad and refrigerate for at least 1 hour before serving. This chilling time allows the flavors to meld together for a more cohesive taste.
Extra Tips:
For an extra festive touch, consider using Halloween-themed pasta shapes if available. If you can’t find creepy crawly pasta, any fun-shaped pasta will work.
Feel free to add more spooky elements like mini pepperoni slices or cooked, crumbled bacon for added texture and flavor. When transporting to a potluck, keep the salad chilled in a cooler or insulated bag to maintain freshness.
Finally, remember that pasta salads often taste better the next day, so feel free to make this dish ahead of time!
Gory Bloody Mary Dip
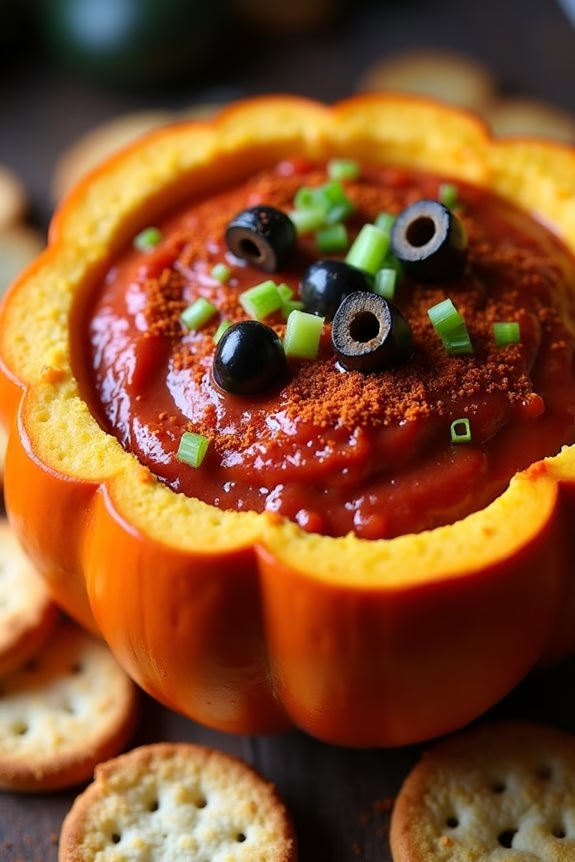
Gory Bloody Mary Dip is a spine-chilling, savory treat perfect for your Halloween potluck. This eerie dish isn’t only visually striking but also packed with rich flavors that will tantalize your guests’ taste buds. Drawing inspiration from the classic Bloody Mary cocktail, this dip incorporates the bold flavors of tomato, spices, and a hint of vodka to create a terrifyingly tasty appetizer.
With its vibrant red color and creative presentation, the Gory Bloody Mary Dip is guaranteed to be a standout at your spooky gathering. The dip is designed to serve 4-6 people and pairs well with a variety of dippers such as crusty bread, vegetable sticks, or even crackers for a crunchy contrast.
This recipe requires a blend of fresh ingredients and a touch of creativity to assemble a dish that’s both gruesome and gourmet. Whether you’re a fan of horror-themed foods or simply love a good Bloody Mary, this dip will satisfy your cravings while adding a festive flair to your Halloween spread.
Ingredients for 4-6 people:
- 2 cups tomato puree
- 1/2 cup vodka
- 1 tablespoon Worcestershire sauce
- 1 teaspoon hot sauce
- 1 teaspoon celery salt
- 1 teaspoon black pepper
- 1 teaspoon horseradish
- 1/2 cup sour cream
- 1/4 cup chopped celery
- 1/4 cup chopped green onions
- 1/4 cup chopped olives
- 1 tablespoon lemon juice
- 1 teaspoon paprika
- Crackers or bread for serving
Cooking Instructions:
- Prepare the Base: In a medium-sized mixing bowl, combine the tomato puree, vodka, Worcestershire sauce, hot sauce, celery salt, black pepper, and horseradish. Stir well until all the ingredients are fully integrated. This mixture will serve as the flavorful base of your dip.
- Fold in the Sour Cream: Add the sour cream to the tomato mixture. Gently fold it in until the mixture is smooth and creamy. This will help balance the acidity of the tomatoes and vodka with some creaminess.
- Add Vegetables and Olives: Stir in the chopped celery, green onions, and olives. These ingredients will add a crunchy texture and a burst of flavor to your dip.
- Season and Adjust Flavors: Squeeze the lemon juice into the mixture and sprinkle in the paprika. Stir everything together and taste to adjust the seasoning if needed. You can add more hot sauce or horseradish for an extra kick.
- Chill the Dip: Transfer the dip to a serving bowl and cover it with plastic wrap. Refrigerate for at least one hour to let the flavors meld together.
- Serve Creatively: Before serving, give the dip a final stir and garnish with additional chopped olives and a sprinkle of paprika for a gruesome effect. Arrange crackers or bread around the dip for a complete presentation.
Extra Tips:
To enhance the gory theme, consider serving the dip in a hollowed-out pumpkin or a skull-shaped bowl to give it a Halloween vibe. If you’re worried about the strength of the vodka, you can reduce the amount or use a non-alcoholic substitute for a family-friendly version.
Remember to adjust the level of spiciness to your preference by playing around with the hot sauce and horseradish quantities. For a vegetarian-friendly option, verify that the Worcestershire sauce is suitable, as some brands contain anchovies. Enjoy your spooky culinary creation!
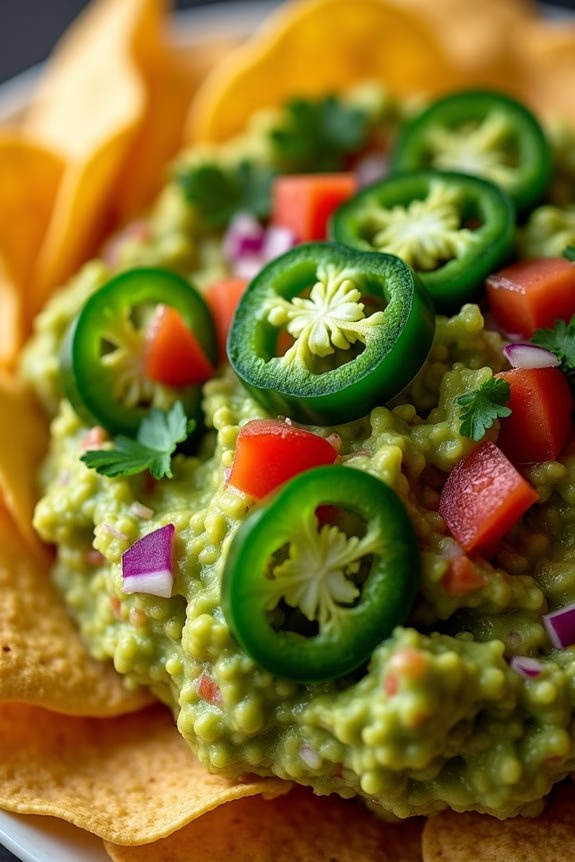
Goblin Guacamole
Ingredients (Serves 4-6):
- 4 ripe avocados
- 2 limes
- 1 small red onion
- 2 cloves of garlic
- 1-2 jalapeños
- 1 medium tomato
- 1/4 cup fresh cilantro
- Salt to taste
- Black pepper to taste
- Tortilla chips for serving
Instructions:
- Prepare the Avocados: Cut the avocados in half, remove the pits, and scoop the flesh into a large mixing bowl. Use a fork to mash the avocado until it’s smooth but still slightly chunky for texture.
- Add Lime Juice: Squeeze the juice of the two limes over the mashed avocados. This not only enhances the flavor but also prevents the guacamole from browning quickly.
- Chop and Mix Vegetables: Finely chop the red onion, garlic cloves, and jalapeños (remove seeds for milder heat) and add them to the bowl. Dice the tomato and add it to the mixture as well.
- Season and Mix: Chop the cilantro and add it to the bowl, then sprinkle in salt and black pepper to taste. Stir everything together until well combined, making sure all the ingredients are evenly distributed.
- Taste and Adjust: Taste the guacamole and adjust the seasoning if necessary, adding more lime juice, salt, or pepper according to your preference.
- Serve and Enjoy: Transfer the guacamole to a serving bowl and pair it with tortilla chips for a delightful dip experience. Arrange it creatively to enhance the Halloween theme, perhaps adding a few plastic spiders or a spooky bowl to complement the mood.
Extra Tips:
For the best Goblin Guacamole, verify that your avocados are perfectly ripe; they should yield slightly to gentle pressure.
If you prefer a spicier kick, add more jalapeños or even a dash of hot sauce.
To keep the guacamole fresh for longer, press a piece of plastic wrap directly onto the surface of the guacamole before refrigerating, as this minimizes exposure to air and slows down browning.
Enjoy crafting this festive dish and watch as it vanishes quickly at your Halloween celebration!
Vampire Bat Cupcakes
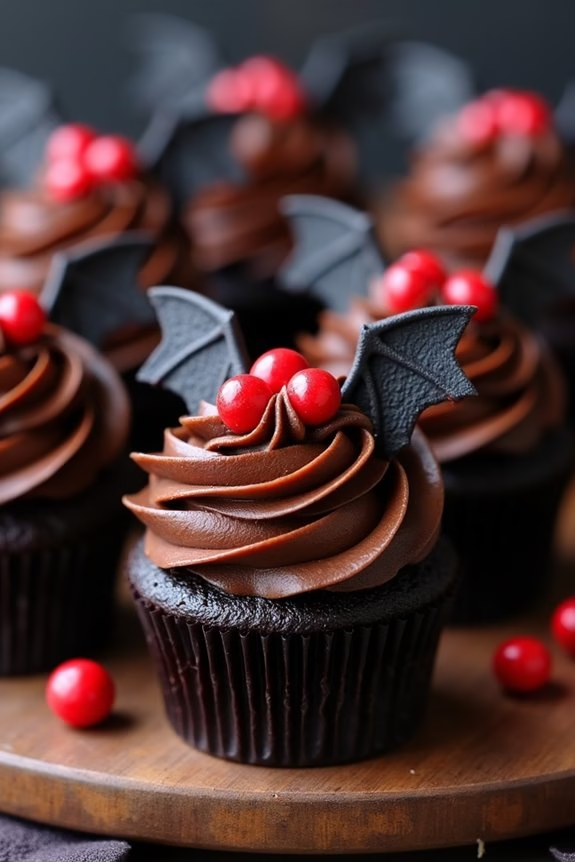
Halloween is the perfect time to get creative in the kitchen, and these Vampire Bat Cupcakes are sure to steal the show at your next potluck. These spooky treats aren’t only fun to make but also delicious to eat, combining rich chocolate flavors with a hint of dark fruitiness from black cherry jam. The cupcakes are topped with a velvety chocolate frosting and adorned with bat wings and red candy eyes, transforming them into the perfect Halloween centerpiece.
Whether you’re hosting a party or bringing a dish to share, these cupcakes are bound to be a hit. These Vampire Bat Cupcakes serve 4-6 people, making them ideal for a small gathering. The recipe is simple enough for novice bakers but also offers room for creativity with decorations. The cupcakes themselves are moist and fluffy, thanks to the addition of buttermilk and a touch of coffee, which enhances the chocolate flavor.
The frosting is rich and creamy, providing the perfect canvas for bat-like adornments. With just a few simple steps, you’ll have a batch of cupcakes that are equal parts spooky and scrumptious.
Ingredients:
- 1 cup all-purpose flour
- 1/2 cup unsweetened cocoa powder
- 1 cup granulated sugar
- 1 teaspoon baking soda
- 1/2 teaspoon baking powder
- 1/2 teaspoon salt
- 1/2 cup buttermilk
- 1/4 cup vegetable oil
- 1 large egg
- 1 teaspoon vanilla extract
- 1/2 cup hot coffee
- 1/4 cup black cherry jam
For the Frosting and Decoration:
- 1/2 cup unsalted butter, softened
- 2 cups powdered sugar
- 1/4 cup unsweetened cocoa powder
- 2 tablespoons milk
- 1 teaspoon vanilla extract
- Black licorice or chocolate wafers (for wings)
- Red candy (for eyes)
Instructions:
- Preheat and Prepare: Preheat your oven to 350°F (175°C) and line a cupcake tin with paper liners. This guarantees your cupcakes bake evenly and are easy to remove.
- Mix Dry Ingredients: In a large mixing bowl, whisk together the flour, cocoa powder, sugar, baking soda, baking powder, and salt until well combined.
- Combine Wet Ingredients: In a separate bowl, mix the buttermilk, vegetable oil, egg, and vanilla extract. Slowly add this to the dry ingredients, mixing until just combined.
- Incorporate Coffee: Gradually stir in the hot coffee. The batter will be thin, but this is key to creating moist cupcakes.
- Fill and Bake: Fill each cupcake liner halfway with batter. Drop a teaspoon of black cherry jam into each cup. Bake for 18-20 minutes or until a toothpick inserted into the center comes out clean. Allow to cool completely on a wire rack.
- Prepare Frosting: While the cupcakes cool, make the frosting by beating the softened butter until creamy. Gradually add powdered sugar and cocoa powder, alternating with milk, until smooth. Stir in the vanilla extract.
- Decorate: Frost each cupcake with an even layer of chocolate frosting. Cut black licorice or wafers into bat wing shapes and insert them into the sides of the cupcakes. Use red candies to create eyes on top of each cupcake.
Extra Tips:
When making these Vampire Bat Cupcakes, make certain that the coffee is freshly brewed and hot to maximize the chocolate flavor. If you can’t find black cherry jam, any dark fruit jam will work as a substitute.
For the wings, if black licorice or chocolate wafers aren’t available, get creative with other edible materials, like oreo halves or chocolate-covered pretzels. Finally, store these cupcakes in an airtight container at room temperature to maintain their freshness and moist texture. Enjoy your spooky and delicious Halloween treats!
Frankenstein Rice Krispie Treats
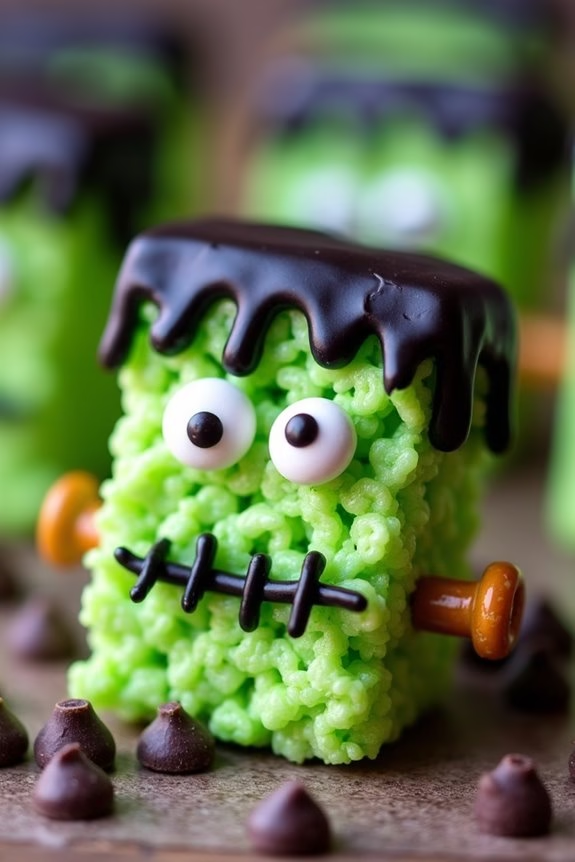
Frankenstein Rice Krispie Treats are a fun and festive dessert perfect for Halloween potlucks. These treats take the classic, gooey, and crispy delight of Rice Krispie squares and add a spooky twist. With a vibrant green color and charming decorations to resemble Frankenstein’s monster, they’re sure to be a hit with both kids and adults alike.
Easy to make and even easier to eat, these treats will add a pop of color and whimsy to any Halloween gathering. The preparation of Frankenstein Rice Krispie Treats involves only a few additional steps beyond the traditional recipe, making them an easy yet impressive treat.
You’ll need some simple ingredients like marshmallows, Rice Krispies cereal, and some decorative elements to create the Frankenstein look. Perfect for a serving size of 4-6 people, this recipe is ideal for sharing at a party or enjoying at home.
Let’s plunge into the ingredient list and get started on making these monstrously delightful treats.
Ingredients (serving size: 4-6 people):
- 4 tablespoons unsalted butter
- 10 ounces mini marshmallows
- Green food coloring
- 6 cups Rice Krispies cereal
- Black icing or gel
- Candy eyes
- Pretzel sticks
- Mini chocolate chips
Instructions:
- Melt the Butter: In a large saucepan, melt the unsalted butter over low heat. Stir occasionally to guarantee it doesn’t burn.
- Add Marshmallows: Once the butter is melted, add the mini marshmallows to the saucepan. Stir continuously until the marshmallows are completely melted and the mixture is smooth.
- Color the Mixture: Add several drops of green food coloring to the melted marshmallow mixture and stir until you achieve a vibrant green color. Adjust the amount of food coloring to reach your desired shade.
- Combine with Cereal: Remove the saucepan from the heat and immediately add the Rice Krispies cereal. Stir until the cereal is fully coated with the green marshmallow mixture.
- Shape the Treats: Transfer the mixture to a greased 9×13-inch baking dish. Using a spatula or wax paper, press the mixture down evenly into the dish. Allow it to cool slightly.
- Cut into Squares: Once the mixture is cool, cut it into even squares or rectangles to form the base of Frankenstein’s face.
- Decorate: Use black icing or gel to draw on a mouth and hair on each treat. Attach candy eyes to each piece to give it life. Insert pretzel sticks into the sides of the treats to mimic bolts, and use mini chocolate chips to add any additional details.
Extra Tips:
When making Frankenstein Rice Krispie Treats, be careful not to overcook the marshmallow mixture as it can become too hard to mix with the cereal.
If you find the mixture too sticky, lightly grease your hands or spatula to help press it into the pan. For a fun variation, consider using different colors or additional candies to create other Halloween-themed characters. Enjoy the creativity and have fun with your designs!
Poison Apple Punch
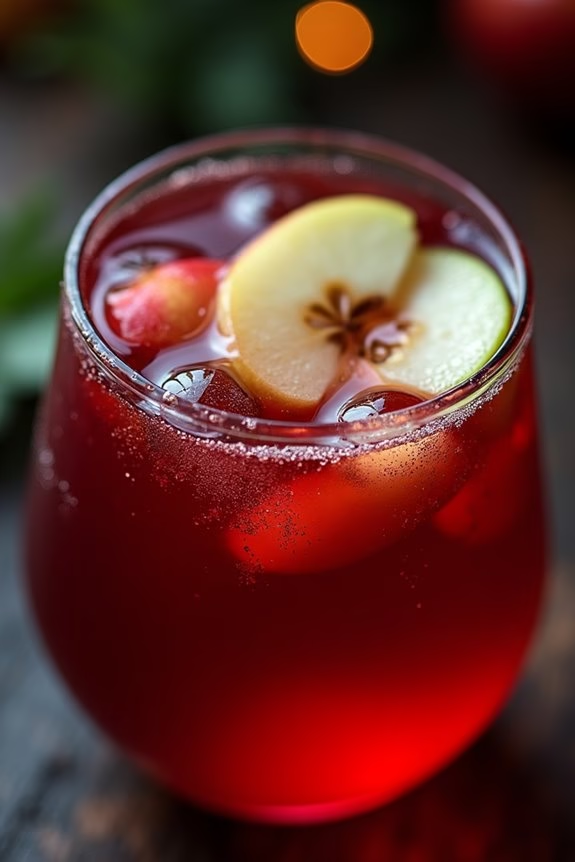
Transform your Halloween gathering into a hauntingly delightful event with a batch of Poison Apple Punch. This enchanting drink is as bewitching as it sounds, combining the tartness of apple with a mysterious blend of flavors that will leave your guests spellbound. Perfect for serving at a potluck or any spooky celebration, this punch isn’t only easy to make but also visually striking, thanks to its deep, dark color and eerie garnishes. It’s a bewitching brew that will keep everyone coming back for more.
The Poison Apple Punch is a non-alcoholic beverage that’s suitable for all ages, guaranteeing that everyone from little goblins to grown-up ghouls can enjoy a sip. The deep red hue of the punch evokes the image of a poison apple, making it a fantastic thematic addition to your Halloween spread. Serve it in a large cauldron-like bowl for an added dramatic effect, and garnish with apple slices and edible glitter for that extra touch of magic. This recipe serves 4-6 people, making it perfect for intimate gatherings or as part of a larger drink selection.
Ingredients (Serves 4-6):
- 4 cups apple cider
- 2 cups cranberry juice
- 1 cup pomegranate juice
- 1 cup sparkling water
- 1/4 cup fresh lime juice
- 1/4 cup grenadine syrup
- Ice cubes
- Sliced apples (for garnish)
- Edible glitter (optional, for garnish)
Instructions:
- Prepare the Base: In a large pitcher or punch bowl, combine 4 cups of apple cider, 2 cups of cranberry juice, and 1 cup of pomegranate juice. Stir well to guarantee all the juices are thoroughly mixed.
- Add the Sparkle: Pour in 1 cup of sparkling water to give the punch a fizzy, invigorating touch. This will also help balance the sweetness of the juices.
- Infuse with Citrus: Add 1/4 cup of fresh lime juice to the mix. The lime juice will provide a tangy contrast to the sweetness, enhancing the overall flavor profile of the punch.
- Sweeten the Potion: Stir in 1/4 cup of grenadine syrup. This will add a deeper red hue and a hint of sweetness that mimics the allure of a forbidden fruit.
- Chill and Serve: Fill the punch bowl with ice cubes to keep the drink cold. Add sliced apples for garnish, arranging them on top to float for a hauntingly beautiful presentation.
- Add the Final Touch: If desired, sprinkle a pinch of edible glitter over the top for a magical shimmer. Serve immediately to keep the sparkling water’s fizz intact.
Extra Tips:
For a more immersive experience, consider freezing the apple slices slightly to keep the punch colder for longer without diluting it. If you want to add an alcoholic twist for adult gatherings, consider incorporating a splash of vodka or rum.
Always taste-test the punch before serving; if it’s too sweet or tart, adjust the lime juice or grenadine to your liking. Remember to use edible glitter that’s safe for consumption, as regular craft glitter isn’t edible. Enjoy your bewitching brew and have a spooktacular Halloween!
Eyeball Caprese Salad
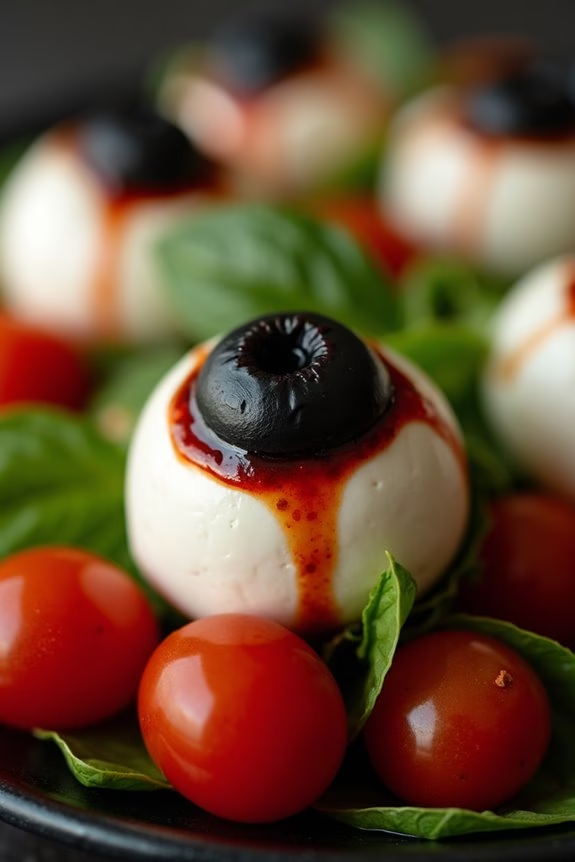
Halloween is a perfect time to get creative in the kitchen, especially when you’re trying to add a spooky twist to traditional dishes. The Eyeball Caprese Salad is a fun and eerie take on the classic Italian appetizer, making it a great addition to any Halloween potluck. This dish combines the fresh flavors of tomatoes, mozzarella, and basil, but with a ghoulish presentation that will delight both kids and adults alike. The “eyeballs” are made using mozzarella balls adorned with black olive slices and red food coloring, giving them a realistic and slightly creepy appearance.
Not only is this dish visually striking, but it also maintains the delicious and revitalizing taste of a classic Caprese salad. The combination of creamy mozzarella, juicy tomatoes, and fragrant basil leaves, drizzled with balsamic glaze, provides a delightful contrast in textures and flavors. It’s a simple yet effective way to bring some Halloween spirit into your culinary creations without sacrificing taste. Perfect for a serving size of 4-6 people, this dish is sure to be a hit at your spooky gathering.
Ingredients:
- 12 small fresh mozzarella balls
- 12 cherry tomatoes
- Fresh basil leaves
- 12 black olives (pitted)
- 1 tablespoon balsamic glaze
- 1 tablespoon olive oil
- Salt and pepper to taste
- Red food coloring
- Optional: toothpicks for assembly
Instructions:
- Prepare the Mozzarella Balls: Begin by draining the mozzarella balls and patting them dry with a paper towel. This will guarantee that they don’t slip around when assembling the salad.
- Create the Eyeballs: Take each mozzarella ball and place a small slice of black olive on top to create the pupil. Use a toothpick to carefully add a drop of red food coloring around the edge of the olive to mimic bloodshot eyes. Set aside.
- Assemble the Caprese: On a large serving platter, arrange the basil leaves to form a bed. Place a cherry tomato on each basil leaf, then top with an “eyeball” mozzarella ball. Confirm the mozzarella sits securely on the tomato.
- Drizzle and Season: Lightly drizzle the balsamic glaze and olive oil over the assembled salad. Sprinkle with salt and pepper to taste. This adds flavor without overshadowing the spooky presentation.
- Serve: If desired, use toothpicks to hold the mozzarella and tomato in place for easy serving. Arrange the finished eyeball Caprese salad on the platter in a visually appealing manner.
Extra Tips:
To enhance the spooky appearance, consider serving the salad on a dark-colored platter or plate to create a striking contrast with the white mozzarella and red-tinted tomatoes.
If you have the time, let the mozzarella balls sit with the red food coloring for a few minutes before serving to allow the color to spread slightly, enhancing the bloodshot effect.
Additionally, you can experiment with different olive sizes or use green olives for a different eerie look. Remember to keep the salad chilled until serving to maintain the freshness of the ingredients.
Graveyard Pudding Cups

Graveyard Pudding Cups are a spooky and delightful treat perfect for any Halloween potluck. These fun and easy-to-make desserts aren’t only visually impressive with their graveyard theme, but they also offer a delicious combination of creamy pudding and crunchy cookie toppings. The eerie decorations, such as cookie tombstones and gummy worms, make these pudding cups an entertaining centerpiece for your Halloween spread while also being a sweet delight for both kids and adults.
The Graveyard Pudding Cups aren’t just about their haunting appearance; they’re also a cinch to prepare, making them an ideal choice for busy hosts. With a rich chocolate pudding base and a layer of crushed cookies to mimic soil, these cups are topped with creative decorations that can be customized to your liking. Whether you’re hosting a Halloween party or attending one, these dessert cups will surely impress and satisfy all your guests.
Ingredients for 4-6 servings:
- 2 cups of cold milk
- 1 (3.9 oz) package of instant chocolate pudding mix
- 1 cup of crushed chocolate sandwich cookies
- 12 gummy worms
- 6 rectangular-shaped cookies (like Milano or Vienna Fingers)
- 1 tube of black decorating gel
- 1 cup of whipped topping
- Optional: candy pumpkins and edible grass for decoration
Cooking Instructions:
- Prepare the Pudding: Begin by pouring 2 cups of cold milk into a large mixing bowl. Add the instant chocolate pudding mix to the milk. Use a whisk or electric mixer to combine them until the mixture thickens, which usually takes about 2 minutes. Place the pudding in the refrigerator to set for at least 5 minutes.
- Crush the Cookies: While the pudding is setting, place the chocolate sandwich cookies in a resealable plastic bag. Use a rolling pin or mallet to crush the cookies into fine crumbs, which will resemble soil.
- Create the Tombstones: Take the rectangular-shaped cookies and use the black decorating gel to write spooky messages on them, such as “RIP” or “BOO”. Let the gel set for a few minutes.
- Assemble the Pudding Cups: Once the pudding has set, evenly distribute it among 4 to 6 clear cups or small bowls. Sprinkle a generous layer of the crushed cookie crumbs on top of each pudding portion to create the “dirt” layer.
- Decorate: Insert a decorated cookie tombstone into each cup, standing it upright in the pudding. Add 2 gummy worms to each cup, positioning them to look as if they’re crawling out of the dirt. If desired, add candy pumpkins and edible grass for additional decoration.
- Add Whipped Topping: Just before serving, add a dollop of whipped topping to each cup as a finishing touch.
Extra Tips:
For an extra touch of creativity, consider using different flavors of pudding, such as vanilla or butterscotch, and adding food coloring for a more vibrant look.
If you’re making these cups ahead of time, wait to add the whipped topping and final decorations until just before serving to guarantee they stay fresh and visually appealing.
Additionally, involve the kids in decorating their own cups to make it a fun activity. Adjust the decoration elements to fit your theme or personal preference, and feel free to experiment with different types of cookies or candies for a truly unique Halloween treat.
Skeleton Bone Breadsticks

Skeleton Bone Breadsticks are a fun and spooky addition to any Halloween potluck. These eerie breadsticks not only look the part with their bone-like shape, but they’re also deliciously soft and flavorful, making them a hit among both kids and adults.
Perfect for dipping in marinara sauce or enjoying on their own, these breadsticks are guaranteed to be a conversation starter at your gathering.
Creating these breadsticks is simple and requires basic ingredients that you likely already have in your pantry. The dough is easy to work with, allowing you to shape each breadstick into a convincing bone shape.
With a little creativity and a few simple steps, you’ll have a batch of bone breadsticks that taste as good as they look. This recipe serves 4-6 people, making it ideal for sharing and enjoying with friends and family.
Ingredients:
- 1 packet (2 1/4 teaspoons) active dry yeast
- 1 cup warm water (about 110°F)
- 2 tablespoons sugar
- 2 1/2 cups all-purpose flour
- 1 teaspoon salt
- 2 tablespoons olive oil
- 1/4 cup grated Parmesan cheese
- 1/2 teaspoon garlic powder
- 2 tablespoons unsalted butter, melted
- Marinara sauce (optional for dipping)
Cooking Instructions:
- Prepare the Yeast Mixture: In a large mixing bowl, dissolve the sugar in warm water. Sprinkle the active dry yeast over the water and let it sit for about 5 minutes, or until it becomes frothy. This indicates the yeast is activated and ready to use.
- Make the Dough: Add the flour, salt, and olive oil to the yeast mixture. Mix until a dough begins to form. Turn the dough onto a lightly floured surface and knead for about 5-7 minutes, or until the dough is smooth and elastic. If the dough is sticky, add a little more flour as needed.
- Let the Dough Rise: Place the dough in a lightly oiled bowl, cover it with a damp cloth, and let it rise in a warm place for about 1 hour, or until it has doubled in size.
- Shape the Breadsticks: Preheat the oven to 400°F (200°C). Punch the dough down and divide it into 12 equal pieces. Roll each piece into a thin rope, about 8 inches long. To create the bone shape, tie a loose knot at each end of the rope.
- Season the Breadsticks: Arrange the breadsticks on a baking sheet lined with parchment paper. In a small bowl, mix the melted butter with garlic powder. Brush this mixture over each breadstick, then sprinkle the grated Parmesan cheese on top.
- Bake the Breadsticks: Place the baking sheet in the preheated oven and bake for 12-15 minutes, or until the breadsticks are golden brown. Remove from the oven and allow them to cool slightly before serving.
Extra Tips:
For the best results, verify your yeast is fresh and active; otherwise, the dough may not rise properly.
You can also experiment with different seasonings, such as Italian herbs or onion powder, to add extra flavor to your breadsticks. If you prefer a crispier texture, roll the dough thinner and adjust the baking time accordingly.
Serve these Skeleton Bone Breadsticks with a warm marinara sauce for dipping to enhance their spooky appeal and deliciousness.