
As Halloween sneaks up on us, I’m bubbling over with excitement to share some delightfully spooky recipes that are perfect for every skill level. Picture spider cupcakes with gooey chocolate frosting or mummy hot dogs wrapped snugly in dough. These treats are not only a blast to make but are sure to be a hit at any gathering. Your guests will be enchanted by the delicious flavors. Ready to transform your kitchen into a Halloween wonderland?
Spooky Spider Cupcakes
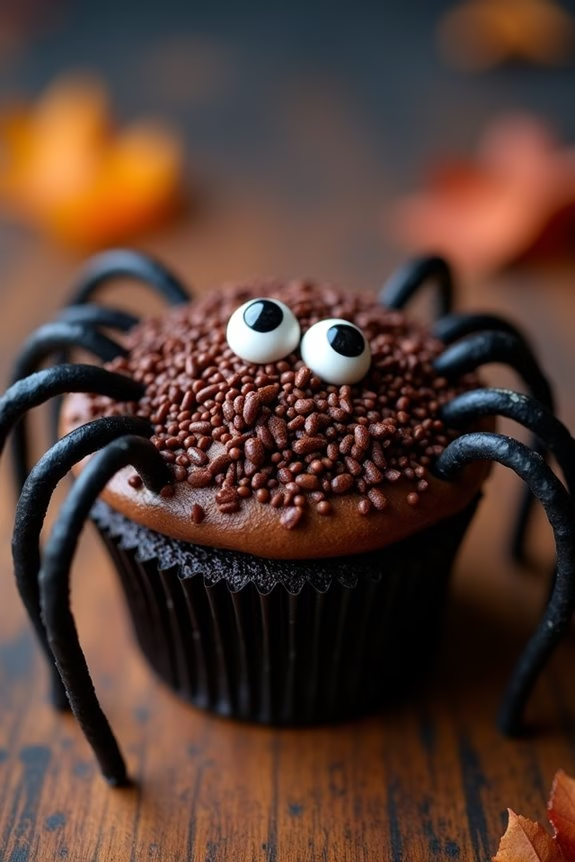
Spooky Spider Cupcakes are a fun and delicious treat perfect for any Halloween celebration. These creepy-crawly confections aren’t only delightful to look at, but they also offer a rich blend of chocolatey goodness, making them a hit with both kids and adults.
The cupcakes are topped with a luscious chocolate frosting and decorated with edible spider designs, adding a festive flair to your Halloween spread. Whether you’re hosting a party or simply wanting to surprise your family with something special, these Spooky Spider Cupcakes are sure to make a memorable impression.
Creating these cupcakes is an enjoyable process that can involve the whole family, making it a perfect Halloween activity. The recipe combines simple baking techniques with creative decorating to result in a dessert that’s both spooky and sweet.
You’ll need basic baking ingredients along with a few extras for decoration, such as candy eyes and licorice strips for the spider legs. The key is to have fun and let your imagination run wild as you bring these edible spiders to life atop your cupcakes.
Ingredients (serves 4-6 people):
- 1 cup all-purpose flour
- 1/2 cup unsweetened cocoa powder
- 1 teaspoon baking powder
- 1/2 teaspoon baking soda
- 1/4 teaspoon salt
- 1/2 cup unsalted butter, softened
- 1 cup granulated sugar
- 2 large eggs
- 1 teaspoon vanilla extract
- 1/2 cup whole milk
- 1 cup chocolate frosting
- 1/2 cup chocolate sprinkles
- 24 candy eyes
- Black licorice strips
Cooking Instructions:
- Preheat the Oven: Begin by preheating your oven to 350°F (175°C). Line a standard muffin tin with cupcake liners to prepare for baking.
- Mix Dry Ingredients: In a medium bowl, whisk together the flour, cocoa powder, baking powder, baking soda, and salt. Set this mixture aside.
- Cream Butter and Sugar: In a separate large bowl, use an electric mixer to cream the softened butter and sugar together until light and fluffy, about 3-4 minutes.
- Incorporate Eggs and Vanilla: Add the eggs one at a time to the butter mixture, beating well after each addition. Mix in the vanilla extract until well combined.
- Combine Wet and Dry Ingredients: Gradually add the dry mixture to the wet mixture, alternating with the milk. Begin and end with the dry ingredients, mixing until just combined.
- Fill Cupcake Liners: Divide the batter evenly among the prepared cupcake liners, filling each about two-thirds full.
- Bake the Cupcakes: Place the muffin tin in the preheated oven and bake for 18-20 minutes, or until a toothpick inserted into the center of a cupcake comes out clean.
- Cool and Frost: Allow the cupcakes to cool in the tin for 5 minutes, then transfer them to a wire rack to cool completely. Once cooled, spread a generous amount of chocolate frosting over each cupcake.
- Decorate with Spiders: Dip the frosted cupcakes in chocolate sprinkles to create the spider body. Place candy eyes on each cupcake, and use black licorice strips to form the spider legs, positioning them securely into the frosting.
Extra Tips:
When making Spooky Spider Cupcakes, consider using gel-based food coloring to tint the frosting for an even spookier effect. You can also experiment with different colors and styles of candy eyes for varied expressions.
If licorice isn’t your favorite, try substituting with thin pretzel sticks or chocolate-covered pretzels for the spider legs. These cupcakes are best served on the day they’re made but can be stored in an airtight container for up to two days.
Mummy Hot Dogs

Mummy Hot Dogs are a fun and festive treat perfect for Halloween celebrations. This spooky appetizer isn’t only easy to prepare but is also a hit among both kids and adults. The combination of savory hot dogs wrapped in golden, flaky crescent roll dough is certain to delight your guests.
Whether you’re hosting a Halloween party or looking for a simple yet creative dish to make with your family, Mummy Hot Dogs are the perfect choice. These little mummies aren’t only adorable but also delicious. They offer a great opportunity to get creative as you can personalize each mummy with different condiments or decorations.
Serve them with a side of ketchup or mustard for dipping, and you have a fun and tasty snack that fits the Halloween theme perfectly. With just a few ingredients and minimal preparation time, you can whip up these spooky snacks in no time.
Ingredients for 4-6 servings:
- 8 hot dogs
- 1 can (8 oz) refrigerated crescent roll dough
- 2 tablespoons all-purpose flour (for dusting)
- 2 tablespoons mustard (for decoration)
- Cooking spray
Cooking Instructions:
- Preheat the Oven: Preheat your oven to 375°F (190°C). A well-heated oven guarantees the dough bakes evenly and becomes flaky and golden.
- Prepare the Dough: Open the can of crescent roll dough and unroll it onto a floured surface. Use a rolling pin to gently flatten the dough, then cut it into thin strips, about 1/4 inch wide. These strips will act as the mummy bandages.
- Wrap the Hot Dogs: Take one hot dog and start wrapping the thin strips of dough around it, leaving a small gap for the “face” of the mummy. Continue wrapping each hot dog until all are covered in dough strips, resembling mummies.
- Place on Baking Sheet: Lightly spray a baking sheet with cooking spray to prevent sticking. Arrange the wrapped hot dogs on the sheet, ensuring they’re evenly spaced to allow for even cooking.
- Bake the Mummies: Place the baking sheet in the preheated oven and bake for 12-15 minutes, or until the dough is golden brown and cooked through. Keep an eye on them to prevent burning.
- Decorate the Mummies: Once baked, remove the mummies from the oven and let them cool slightly. Use a small amount of mustard to create eyes on each mummy. You can use a toothpick or a small piping bag for precision.
Extra Tips: If you want to add a bit more flavor, consider using cheese-stuffed hot dogs or adding a slice of cheese under the dough strips before wrapping. For a vegetarian option, substitute the hot dogs with veggie dogs.
If you have kids helping, let them be creative with the dough wrapping and decorating the faces; it’s a fun way to engage them in the cooking process. Remember, the key to perfect Mummy Hot Dogs isn’t to wrap the dough too tightly, as it will expand while baking. Enjoy your spooky creation!
Witch’s Broomstick Snacks

Witch’s Broomstick Snacks are a delightful and easy-to-make treat perfect for any Halloween gathering. These whimsical snacks not only look festive but are also delicious and fun to make. Whether you’re hosting a Halloween party or just want to surprise your family with a spooky snack, these broomsticks are sure to be a hit.
With just a few simple ingredients, you can create a bewitching platter that will enchant both kids and adults alike. The magic of Witch’s Broomstick Snacks lies in their simplicity and creativity. Using pretzel sticks as the broom handles and string cheese as the bristles, these snacks are a breeze to assemble. They aren’t only visually appealing but also provide a delightful combination of salty and cheesy flavors.
Perfect for a serving size of 4-6 people, these snacks can be prepared in advance, allowing you to focus on other Halloween festivities. Gather your ingredients and let’s get started on making this spooky treat!
Ingredients for 4-6 servings:
- 12 pretzel sticks
- 6 string cheese sticks
- 12 fresh chives
Cooking Instructions:
- Prepare the String Cheese:
- Take each string cheese stick and cut it in half. You should have 12 pieces in total. These will serve as the broom bristles.
- Create the Broom Bristles:
- Use a knife or your fingers to gently fray one end of each string cheese piece, creating a broom-like appearance with the strands. Be careful not to pull the cheese apart completely.
- Attach the Broom Handles:
- Insert one pretzel stick into the unfrayed end of each string cheese piece. Gently push the pretzel stick about halfway into the cheese to guarantee it stays secure.
- Tie the Chives:
- Take one fresh chive and carefully tie it around the top of the cheese, just above the frayed end. This will help hold the cheese in place and add a decorative touch. Trim any excess chive.
- Repeat the Steps:
- Repeat the process for the remaining pretzel sticks and string cheese pieces until all 12 broomsticks are assembled.
- Serve:
- Arrange the Witch’s Broomstick Snacks on a platter, spacing them evenly for a neat presentation. Serve immediately or refrigerate until ready to serve.
Extra Tips:
To maintain freshness, prepare these snacks on the day of your event. If you need to prepare them in advance, store in an airtight container in the refrigerator and add the chive ties just before serving to prevent wilting.
For a twist, try using flavored string cheese or adding a small dip on the side for guests to enjoy with their broomsticks. Remember, the key to these snacks is in the presentation, so have fun arranging them with other Halloween-themed treats for a spooky display!
Ghostly Marshmallow Pops
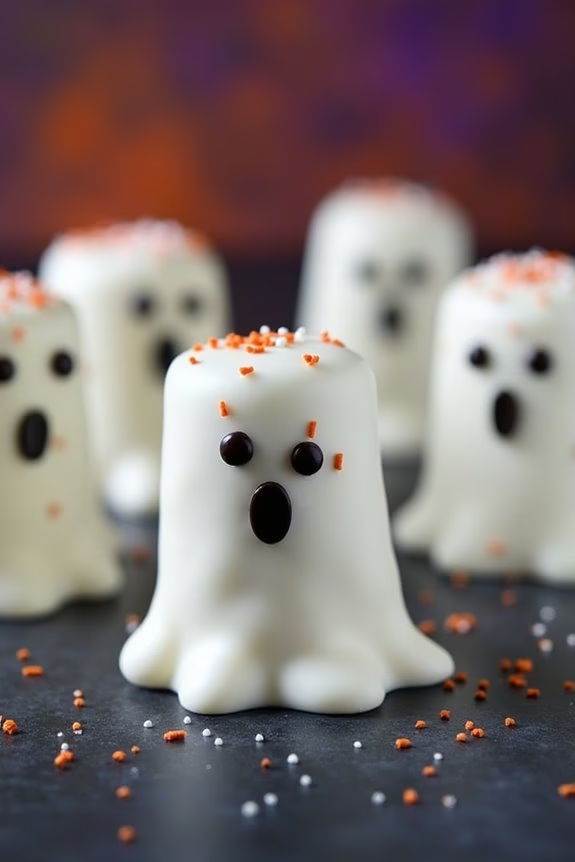
Ghostly Marshmallow Pops are a delightful and spooky treat perfect for any Halloween celebration. These adorable marshmallow pops are easy to make and can be a fun activity to do with family or friends. The combination of fluffy marshmallows, sweet chocolate, and eerie designs makes them an instant hit at parties or as a festive snack.
Not only are they visually appealing, but they also pack a sweet punch that’s certain to satisfy any sweet tooth. Creating these marshmallow pops involves dipping marshmallows in melted chocolate and decorating them to resemble little ghosts. With just a few ingredients and some creativity, you can whip up these ghostly treats in no time.
Whether you’re hosting a Halloween bash or just looking to add a spooky touch to your dessert table, Ghostly Marshmallow Pops are a simple yet effective way to impress your guests.
Ingredients (for 4-6 people):
- 12 large marshmallows
- 12 lollipop sticks
- 1 cup white chocolate chips
- 1 tablespoon vegetable shortening
- Black decorating gel or edible marker
- Sprinkles (optional)
Instructions:
- Prepare the Marshmallows: Insert a lollipop stick into each marshmallow, making sure they’re firmly secured but not piercing through the top.
- Melt the Chocolate: In a microwave-safe bowl, combine the white chocolate chips and vegetable shortening. Microwave in 30-second intervals, stirring in between, until the chocolate is completely melted and smooth.
- Dip the Marshmallows: Hold each marshmallow by the stick and dip it into the melted white chocolate, making sure it’s fully coated. Allow any excess chocolate to drip off before placing the marshmallow pops on a lined baking sheet.
- Create the Ghostly Faces: Once the chocolate has slightly set but is still soft, use the black decorating gel or edible marker to draw ghostly faces on each marshmallow. You can get creative with different expressions to add personality to your ghostly treats.
- Add Sprinkles (Optional): While the chocolate is still tacky, add sprinkles if desired for extra decoration.
- Set the Pops: Allow the decorated marshmallow pops to set at room temperature or place them in the refrigerator for a quicker setting time. Make sure the chocolate is completely hardened before serving.
Extra Tips:
For the best results, make sure that the chocolate isn’t too hot when dipping to prevent the marshmallows from melting. If the chocolate is too thick, you can add a little more vegetable shortening to achieve a smoother consistency.
Additionally, if you don’t have an edible marker, you can use melted dark chocolate applied with a toothpick to draw the ghost faces. Have fun experimenting with different designs and expressions to make your Ghostly Marshmallow Pops unique and festive!
Monster Eyeball Pasta
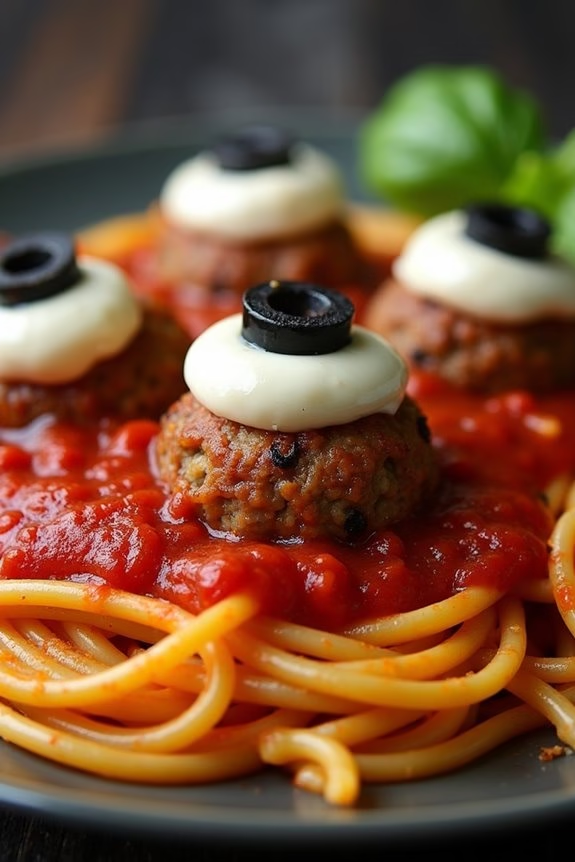
Monster Eyeball Pasta is a spooky yet delightful dish perfect for any Halloween gathering. This eerie creation combines tender pasta with savory meatballs designed to resemble creepy eyeballs, sure to send chills down your spine while tantalizing your taste buds. The dish isn’t only visually striking but also deliciously comforting, making it a hit with both kids and adults.
The pasta is coated in a rich tomato sauce, providing a perfect backdrop for the monster eyeballs, which are made from flavorful meatballs topped with mozzarella and sliced olives to complete the haunting look.
This dish serves 4-6 people, making it ideal for a festive family meal or a Halloween party. The combination of textures and flavors, from the al dente pasta to the juicy meatballs and the creamy mozzarella, guarantees that every bite is a treat. Whether you’re throwing a Halloween bash or simply enjoying a themed dinner, Monster Eyeball Pasta will add a fun and delicious twist to your spooky celebrations.
Ingredients:
- 1 pound spaghetti or your choice of pasta
- 1 pound ground beef or turkey
- 1/2 cup breadcrumbs
- 1/4 cup grated Parmesan cheese
- 1 large egg
- 2 cloves garlic, minced
- 1 teaspoon dried oregano
- 1 teaspoon salt
- 1/2 teaspoon black pepper
- 2 cups marinara sauce
- 12 small mozzarella balls (bocconcini)
- 12 black olives, sliced
- Fresh basil leaves for garnish (optional)
Cooking Instructions:
- Prepare the Meatball Mixture: In a large bowl, combine the ground beef or turkey, breadcrumbs, Parmesan cheese, egg, minced garlic, oregano, salt, and pepper. Mix well until all ingredients are evenly incorporated.
- Shape the Meatballs: Roll the mixture into 12 equal-sized meatballs, about the size of a golf ball. Make sure they’re tightly packed to hold their shape during cooking.
- Cook the Meatballs: In a large skillet over medium heat, cook the meatballs until browned on all sides and cooked through, about 8-10 minutes. Remove the meatballs from the skillet and set aside.
- Cook the Pasta: Meanwhile, in a large pot of boiling salted water, cook the spaghetti according to package instructions until al dente. Drain the pasta and set aside.
- Prepare the Sauce: In the same skillet used for the meatballs, add the marinara sauce and bring it to a simmer. Return the meatballs to the skillet, spooning some sauce over each to coat them well.
- Assemble the Eyeballs: Place one mozzarella ball on top of each meatball, pressing down gently. Top each mozzarella ball with a slice of black olive to create the appearance of an eyeball.
- Serve: Divide the spaghetti among serving plates. Spoon the saucy meatballs over the pasta, and garnish with fresh basil leaves if desired. Serve hot.
Extra Tips:
For a more intense flavor, you can add a pinch of red pepper flakes to the meatball mixture or the marinara sauce for some heat. If you prefer a vegetarian option, consider using plant-based meat alternatives for the meatballs.
Additionally, feel free to customize the pasta type to your preference, such as using fettuccine or penne, which can hold more sauce. For added spookiness, dye the pasta with a few drops of black or green food coloring for an eerie effect. Enjoy this monstrously delicious dish and have a spooky Halloween!
Pumpkin Patch Dirt Cups
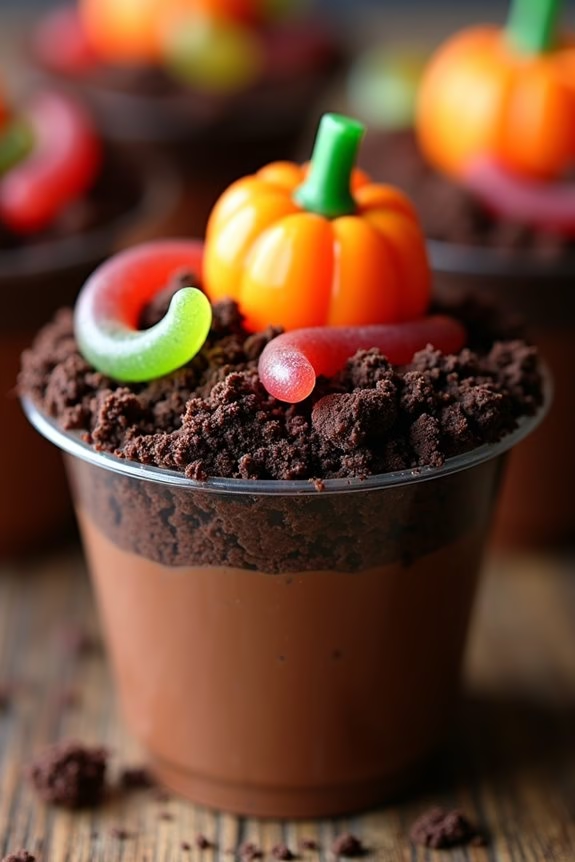
Pumpkin Patch Dirt Cups are a fun and delightful Halloween treat that combines creamy pudding, crushed cookies, and gummy worms to mimic the look of a spooky garden. These cups aren’t only easy to assemble but also a fantastic way to engage kids in the kitchen, allowing them to have fun while creating a delicious dessert.
With a blend of chocolatey flavors and playful textures, these cups are sure to be a hit at any Halloween gathering. Perfect for serving 4-6 people, this recipe is both simple and quick to prepare, making it an ideal last-minute addition to your Halloween menu.
Each cup is layered with rich chocolate pudding, topped with cookie crumbs, and decorated with gummy worms to resemble a tiny pumpkin patch. Whether you’re throwing a party or just want a festive snack, these Pumpkin Patch Dirt Cups are a spooky yet sweet treat that everyone will enjoy.
Ingredients:
- 2 cups cold milk
- 1 package (3.9 oz) instant chocolate pudding mix
- 1 package (14.3 oz) chocolate sandwich cookies
- 1 cup whipped topping
- 1 package (5 oz) gummy worms
- 6 small pumpkins or pumpkin candies for decoration
Instructions:
- Prepare the Pudding: In a medium-sized bowl, pour the cold milk and add the instant chocolate pudding mix. Whisk the mixture for about 2 minutes until it thickens and becomes smooth. Set aside for 5 minutes to allow it to set.
- Crush the Cookies: Place the chocolate sandwich cookies in a large resealable plastic bag. Use a rolling pin to crush the cookies into fine crumbs, resembling dirt. Alternatively, a food processor can be used to achieve the desired texture.
- Assemble the Dirt Cups: Take 4-6 clear plastic cups and begin layering. Start by spooning a layer of chocolate pudding into each cup, filling about one-third of the cup.
- Add the “Dirt”: Sprinkle a generous layer of the crushed cookie crumbs over the pudding. Guarantee it covers the pudding completely, creating the appearance of soil.
- Add Whipped Topping: Spoon a small amount of whipped topping over the cookie crumbs to add a creamy layer before the final topping.
- Decorate with Gummy Worms: Place a few gummy worms onto the whipped topping, letting them peek out of the “dirt.” This gives the impression of worms crawling through the soil.
- Final Touches: Add a small pumpkin or pumpkin candy on top of each cup for a festive touch, completing the pumpkin patch look.
- Chill and Serve: Place the assembled cups in the refrigerator for at least 30 minutes to chill before serving. This allows the flavors to meld together.
Extra Tips:
For an even more festive presentation, consider serving the Pumpkin Patch Dirt Cups in small clay pots lined with plastic wrap. This enhances the garden-like appearance and adds a whimsical touch to your Halloween spread.
Additionally, you can customize the recipe by using different flavors of pudding or adding extra Halloween-themed candies for decoration. If you’re preparing this with children, let them get creative with the placement of gummy worms and pumpkins, making it an enjoyable activity for the whole family.
Bat Wings (Chicken Wings)

Get ready to spook your guests with this delicious and eerie take on chicken wings—Bat Wings! These flavorful wings are perfect for a Halloween party, adding a touch of the macabre to your spread. The dark, rich glaze gives the wings their bat-like appearance, while a balance of savory and sweet flavors guarantees they’re a hit with everyone.
With just a few simple steps, you’ll have a platter of wings that are as tasty as they’re terrifying. This Bat Wings recipe serves 4-6 people, making it a great choice for a small gathering or family dinner. The wings are coated in a savory-sweet soy and balsamic glaze, giving them a deep, eerie color. Perfect for Halloween, this dish is sure to be a conversation starter.
So, don your witch’s hat, and let’s plunge into the cauldron of flavors with this chillingly delicious recipe!
Ingredients:
- 2 pounds of chicken wings
- 1/2 cup soy sauce
- 1/2 cup balsamic vinegar
- 1/4 cup honey
- 2 tablespoons olive oil
- 4 cloves garlic, minced
- 1 tablespoon fresh ginger, grated
- 1 teaspoon black food coloring (optional)
- 1 teaspoon salt
- 1/2 teaspoon black pepper
- Green onions, sliced (for garnish)
Instructions:
1. Prepare the Marinade:
In a large bowl, combine the soy sauce, balsamic vinegar, honey, olive oil, minced garlic, grated ginger, salt, and black pepper. If desired, add the black food coloring to give the wings a darker, more ominous appearance. Whisk together until well combined.
2. Marinate the Wings:
Add the chicken wings to the bowl, making sure they’re thoroughly coated in the marinade. Cover the bowl with plastic wrap and refrigerate for at least 2 hours, or overnight if possible, to allow the flavors to penetrate the meat.
3. Preheat the Oven:
Preheat your oven to 400°F (200°C). Line a baking sheet with aluminum foil and place a wire rack on top. This will help the wings cook evenly and become crispy.
4. Bake the Wings:
Arrange the marinated wings on the wire rack, ensuring they’re spaced apart. Bake in the preheated oven for 35-40 minutes, turning halfway through, until the wings are cooked through and the glaze is sticky and caramelized.
5. Garnish and Serve:
Once cooked, let the wings rest for a few minutes before transferring them to a serving platter. Garnish with sliced green onions for a pop of color and a hint of freshness.
Extra Tips:
For best results, make sure the wings are marinated for at least 2 hours to absorb all the delicious flavors. If you don’t have black food coloring, the wings will still taste fantastic—they just won’t have the dark, spooky appearance.
To promote even cooking, try to use wings of similar size and turn them halfway through baking. Finally, a wire rack is key to achieving a crispy exterior, so don’t skip this step if you want perfectly cooked Bat Wings!
Creepy Crawly Pizza
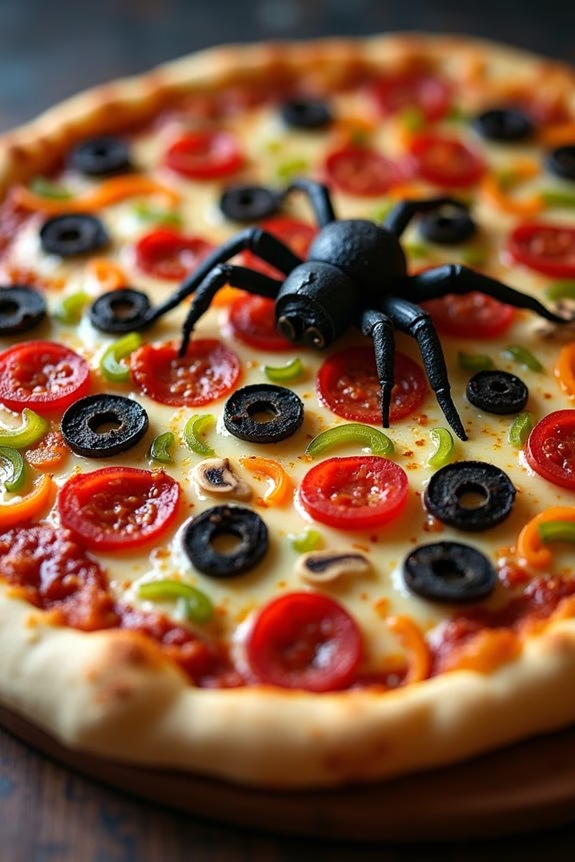
Creepy Crawly Pizza is the perfect way to add a fun and spooky twist to your Halloween party menu. This delicious and creatively designed pizza is topped with ingredients that mimic the look of creepy crawlies, making it a hit with both kids and adults alike. The base of the pizza is a classic cheesy delight, but the toppings are where the Halloween magic happens. With some clever arrangement and a little imagination, you can transform a simple pizza into a creepy, crawly masterpiece.
This recipe is crafted to serve 4-6 people and is perfect for any Halloween gathering or family night in. It’s an easy and delightful way to get into the spirit of the season, and it’s customizable to suit the tastes of your guests. Whether you’re a seasoned chef or a beginner in the kitchen, this Creepy Crawly Pizza is sure to bring smiles and maybe a few squeals to your table.
Ingredients:
- 1 large pizza dough
- 1 cup tomato sauce
- 2 cups shredded mozzarella cheese
- 1/2 cup black olives, sliced
- 1/2 cup sliced bell peppers (red, green, or yellow)
- 1/2 cup pepperoni slices
- 1/4 cup mushrooms, sliced
- 1/4 cup cherry tomatoes, halved
- 1 tablespoon olive oil
- 1 teaspoon dried oregano
- 1 teaspoon garlic powder
Instructions:
- Preheat the Oven: Start by preheating your oven to 475°F (245°C). This high temperature will guarantee a crispy crust and melted cheese.
- Prepare the Dough: Roll out your pizza dough on a floured surface to your desired thickness. Transfer it onto a lightly oiled pizza pan or baking sheet to prevent sticking.
- Add the Sauce: Spread the tomato sauce evenly over the base of the dough, leaving a small border around the edges for the crust.
- Cheese Layer: Sprinkle the shredded mozzarella cheese over the sauce. Make sure the cheese is evenly distributed for a consistent melt.
- Create the Creepy Crawlies: Arrange the sliced black olives, bell peppers, pepperoni, mushrooms, and cherry tomatoes creatively on top of the cheese. Use olives and pepperoni slices to resemble spiders, bell peppers for legs, and mushrooms for additional creepy shapes.
- Season and Drizzle: Sprinkle the dried oregano and garlic powder over the toppings for added flavor. Drizzle a tablespoon of olive oil over the top to help the toppings cook evenly.
- Bake the Pizza: Place the pizza in the preheated oven and bake for 12-15 minutes, or until the crust is golden brown and the cheese is bubbly and slightly browned.
- Serve: Once baked, remove the pizza from the oven and let it cool slightly before slicing. Serve hot and enjoy your Creepy Crawly Pizza!
Extra Tips:
For an extra festive touch, consider using cookie cutters to shape some of your toppings into ghost, bat, or pumpkin shapes before arranging them on the pizza.
You can also use different cheese varieties like cheddar or parmesan for additional flavor. If you’re making the pizza with kids, involve them in the decorating process to make it a fun family activity.
Remember to keep an eye on the baking pizza to avoid burning the edges, especially if you prefer a thinner crust.
Frankenstein Rice Krispie Treats
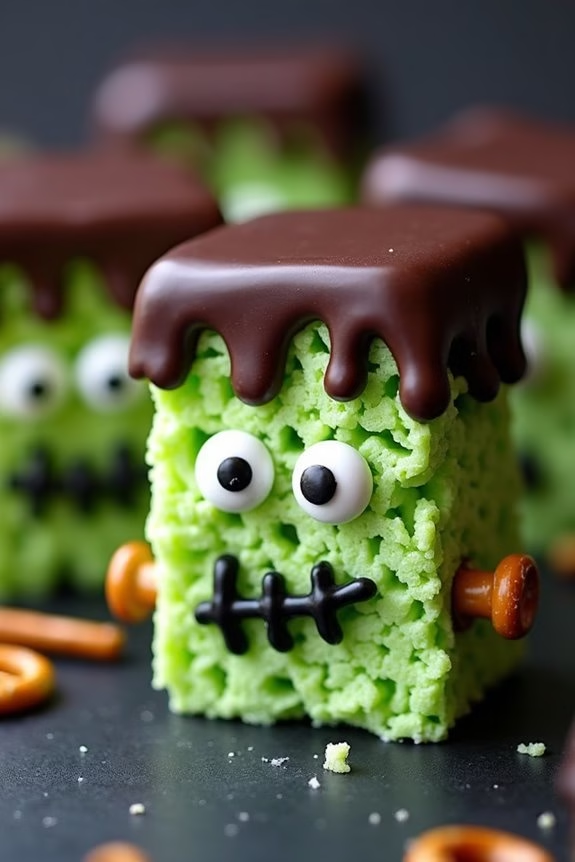
Frankenstein Rice Krispie Treats are a delightful and spooky way to celebrate Halloween. These treats aren’t only easy to make but are also a fun activity for both kids and adults. The classic Rice Krispie Treats are transformed into little green monsters that resemble Frankenstein, complete with candy eyes and a chocolatey hairdo. Perfect for a Halloween party or just a festive snack, these treats are sure to be a hit.
The preparation involves the classic Rice Krispie method, but with a twist of adding green food coloring to mimic Frankenstein’s iconic skin tone. You’ll need to shape the treats into rectangles to replicate Frankenstein’s head and then decorate them with chocolate and candies for facial features. Let your creativity shine as you give each treat its own unique expression, turning an ordinary dessert into a Halloween masterpiece.
Ingredients (Serving Size: 4-6 people):
- 6 cups Rice Krispies cereal
- 4 cups mini marshmallows
- 3 tablespoons butter
- Green food coloring
- 1 cup semi-sweet chocolate chips
- Candy eyes
- Black decorating gel
- Pretzel sticks
Cooking Instructions:
- Prepare the Base: In a large saucepan, melt the butter over low heat. Once melted, add the mini marshmallows and stir continuously until they’re completely melted and the mixture is smooth.
- Color the Mix: Add a few drops of green food coloring to the melted marshmallow mixture. Stir well until the color is evenly distributed, adjusting the color intensity by adding more drops as needed.
- Combine with Cereal: Remove the saucepan from heat and gradually add the Rice Krispies cereal. Stir until all the cereal is well-coated with the green marshmallow mixture.
- Shape the Treats: Pour the mixture into a greased 9×13-inch baking dish. Press the mixture down evenly using a greased spatula or wax paper. Allow it to cool slightly before cutting.
- Cut and Decorate: Once cooled, cut the Rice Krispie mixture into rectangles. Melt the chocolate chips in a microwave-safe bowl in 30-second intervals, stirring in between, until smooth. Dip the top of each rectangle into the melted chocolate to create Frankenstein’s hair.
- Add Features: Place candy eyes below the chocolate hair on each treat. Use black decorating gel to draw a mouth and stitches on the face. Break pretzel sticks in half and insert one on each side of the head to resemble Frankenstein’s bolts.
- Set and Serve: Let the decorated treats sit for about 10 minutes for the chocolate to set before serving. Enjoy your spooky creations!
Extra Tips: When cutting and shaping the treats, wet your hands slightly to prevent the mixture from sticking to your skin. For added fun, you can use other candies to create different facial features or expressions. If you don’t have candy eyes, improvise with small candies or chocolate chips. Enjoy the process and embrace any imperfections, as they add to the charm of these festive treats!
Skeleton Veggie Platter
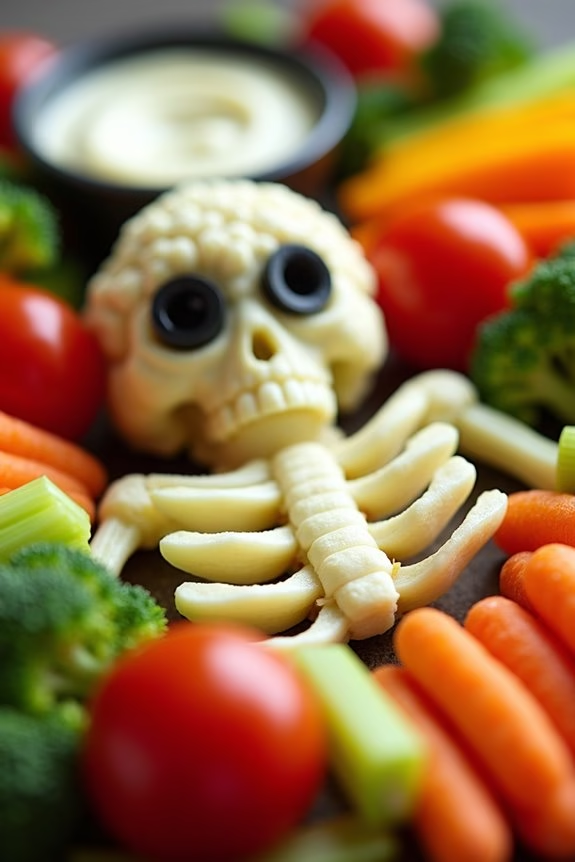
Creating a festive and spooky Skeleton Veggie Platter is an excellent way to celebrate Halloween while guaranteeing there are healthy options available at your party. This platter isn’t only visually appealing but also packed with fresh vegetables, making it a nutritious choice for guests of all ages.
Using a variety of colorful veggies, you can easily assemble a skeleton shape that will be the centerpiece of your Halloween spread. The Skeleton Veggie Platter is perfect for serving 4-6 people and can be customized to include your favorite vegetables. It’s a simple and fun way to encourage everyone to eat their greens. Kids and adults alike will enjoy picking their favorite veggies from the platter, and the accompanying dip adds an extra layer of flavor.
Now, let’s explore the ingredients and steps needed to create this delightful dish.
Ingredients:
- 1 head of cauliflower
- 1 cucumber
- 1 red bell pepper
- 1 yellow bell pepper
- 1 bunch of celery
- 1 bunch of baby carrots
- 1 cup cherry tomatoes
- 1 small bunch of broccoli
- 1 container of hummus or ranch dip
- 1 small black olive
Instructions:
- Prepare the Vegetables: Begin by washing all your vegetables thoroughly. Pat them dry with a clean towel to guarantee they’re ready for assembly.
- Cauliflower Head: Break the cauliflower into small florets. This will serve as the “skull” of your skeleton. Arrange the florets in a rounded shape at the top of your serving platter.
- Cucumber Spine: Slice the cucumber into thin rounds. Arrange these in a straight line down the center of the platter to form the spine of your skeleton.
- Bell Pepper Ribs: Cut the red and yellow bell peppers in half, remove the seeds, and slice them into strips. Place these on either side of the cucumber spine to represent the ribs.
- Celery Limbs: Cut celery stalks into pieces of varying lengths. Use these to form the arms and legs of the skeleton, extending from the main cucumber spine.
- Carrot Fingers and Toes: Position baby carrots at the ends of the celery to create fingers and toes.
- Cherry Tomato Joints: Use cherry tomatoes to represent joints, placing them where the celery arms and legs bend.
- Broccoli Feet and Hands: Break the broccoli into small florets and place them at the ends of the celery arms and legs to form the hands and feet.
- Dip and Olive Eyes: Place a small bowl of hummus or ranch dip where the mouth should be, just below the cauliflower skull. Cut a small black olive in half and place the halves as eyes on the cauliflower skull.
- Final Touches: Adjust the arrangement if needed, ensuring the skeleton shape is clear and visually appealing.
Extra Tips: To make your Skeleton Veggie Platter even more appealing, consider adding decorative touches such as a small pumpkin or Halloween-themed props around the platter.
You can also use different dips for variety, like guacamole or tzatziki, and experiment with other vegetables like radishes or sugar snap peas to add more color and texture. Serve the platter immediately after assembly to keep everything fresh and crisp. Enjoy the fun and healthy treat with your guests!
Vampire Teeth Cookies
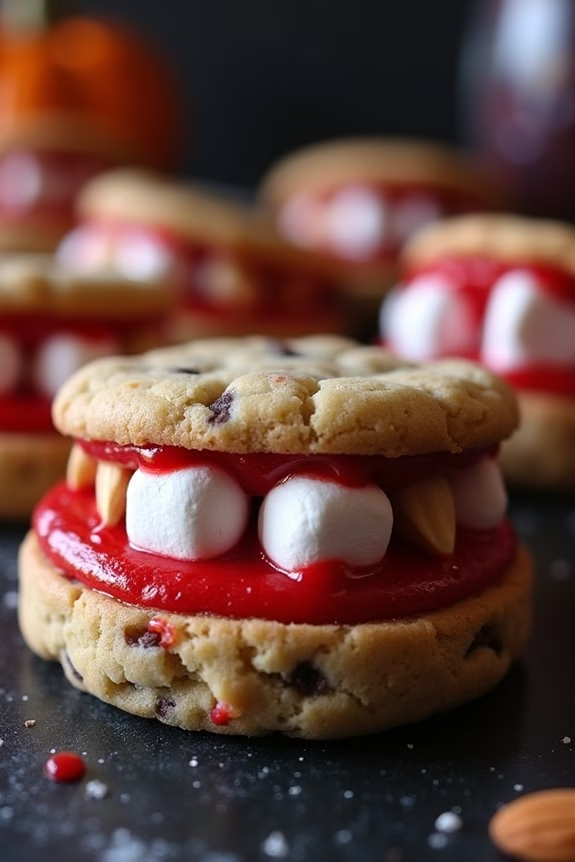
Vampire Teeth Cookies are a spooky and delicious treat perfect for Halloween festivities. These cookies are a fun and creative way to impress guests at a Halloween party or to delight children with a themed after-dinner snack. The combination of chewy cookies, gooey marshmallows, and sweetened almond slivers creates a delightful mix of flavors and textures reminiscent of classic vampire teeth. Not only are they a treat to eat, but they’re also visually striking, adding a playful element to your Halloween spread.
This recipe is easy to follow and can be made with store-bought ingredients, saving you time and effort. By using pre-made chocolate chip cookies as the base, you can focus on assembling these fang-tastic treats without any baking hassle. The serving size for this recipe is perfect for a group of 4-6 people, making it an ideal choice for small gatherings or family events. The simplicity of the recipe also makes it a great activity for kids to participate in, enhancing their Halloween experience with a hands-on culinary adventure.
Ingredients (serving size: 4-6 people):
- 12 pre-made chocolate chip cookies
- 1/2 cup red frosting or icing
- 24 mini marshmallows
- 24 almond slivers
Instructions:
- Prepare the Cookies: Begin by taking your pre-made chocolate chip cookies and carefully slicing each one in half to create two semi-circular halves. This will form the top and bottom of the vampire mouths.
- Add the Gums: Spread a thin layer of red frosting or icing along the cut side of each cookie half. This will act as the gums and help hold the marshmallows in place.
- Position the Teeth: Place 3-4 mini marshmallows along the curved edge of one cookie half to represent the vampire teeth. Make sure the marshmallows are evenly spaced and slightly protruding over the edge for a more realistic effect.
- Complete the Mouth: Place the second cookie half on top of the marshmallows, frosting-side down, to complete the mouth. Press gently to secure the marshmallows in place without squishing them too much.
- Add the Fangs: For the finishing touch, insert an almond sliver on each side of the marshmallows to act as the vampire fangs. Position them slightly angled for a more dramatic look.
- Set and Serve: Allow the cookies to sit for a few minutes to let the frosting set. Arrange them on a serving platter and watch as your guests delight in these spooky, edible vampire teeth!
Extra Tips: For an even more realistic look, opt for gel-based red frosting, which can give the appearance of blood. If you’d like to make the cookies from scratch, any chewy cookie recipe can be used as a base. Additionally, you can experiment with different types of nuts for the fangs, depending on dietary restrictions or personal preferences.
Remember to handle the almond slivers carefully to avoid any breakage, and if you’re serving these to small children, make sure to supervise them due to the small parts involved. Enjoy your creative and eerie Halloween treat!
Zombie Brain Jello

Transform your Halloween party with an eerie dessert that’s as delicious as it’s spooky: Zombie Brain Jello. This gory-looking treat is sure to be a hit with your guests, combining the fun of themed food with the sweet, wobbly delight of jello.
This recipe is perfect for adding a touch of the macabre to your Halloween festivities while being surprisingly simple to prepare. With a little creativity and the right mold, you can create a realistic brain-shaped dessert that’s both creepy and fun to eat.
Zombie Brain Jello isn’t only visually striking but also boasts a tasty combination of flavors. The base of the jello can be any flavor you prefer, but for authenticity, a light red or pink hue works best to mimic the look of a brain.
The addition of condensed milk gives the jello a slightly opaque appearance, enhancing the gory effect. This dessert is ideal for a serving size of 4-6 people, making it a great centerpiece for a small Halloween gathering or family dinner.
Ingredients (Serves 4-6 people)
- 2 packages (3 oz each) strawberry or raspberry flavored gelatin
- 2 cups boiling water
- 1 cup cold water
- 1 cup sweetened condensed milk
- A few drops of red food coloring (optional)
- Cooking spray
- Brain-shaped gelatin mold
Cooking Instructions
- Prepare the gelatin mix: In a large mixing bowl, dissolve the two packages of strawberry or raspberry flavored gelatin in 2 cups of boiling water. Stir thoroughly until the gelatin is completely dissolved.
- Add cold ingredients: Once the gelatin is dissolved, add 1 cup of cold water and 1 cup of sweetened condensed milk to the mixture. Stir until fully combined. The condensed milk will give the jello a slightly cloudy, brain-like appearance.
- Adjust the color: If desired, add a few drops of red food coloring to deepen the color of the jello mixture. Stir until the color is evenly distributed.
- Prepare the mold: Lightly spray the brain-shaped gelatin mold with cooking spray to guarantee the jello releases easily when set.
- Fill the mold: Carefully pour the jello mixture into the prepared brain mold. Make sure the mixture is evenly distributed and reaches all the nooks and crannies of the mold.
- Chill the jello: Place the filled mold in the refrigerator and allow it to set for at least 4 hours, or until the jello is firm to the touch.
- Unmold the jello: Once the jello is fully set, gently pull the edges away from the mold to release the suction. Place a serving platter over the mold, invert it, and gently shake to release the jello onto the platter.
- Serve and enjoy: Your Zombie Brain Jello is now ready to serve. Slice and enjoy this spooky, delicious dessert.
Extra Tips
To guarantee your Zombie Brain Jello comes out perfectly, make sure the jello is fully set before attempting to unmold it.
If you have trouble releasing the jello, try dipping the bottom of the mold in warm water for a few seconds to loosen it. Be careful not to overdo it, as too much warm water can melt the jello.
For added realism, consider using a small paintbrush to add veins or red streaks with food coloring on the surface of the jello once unmolded. This will enhance the spooky effect and impress your guests even more!
Haunted House Candy Bark

Looking for a spooky yet delicious treat to delight both kids and adults this Halloween? Haunted House Candy Bark is the perfect combination of fun and flavor, bringing together a colorful mix of candies and chocolate.
This easy-to-make recipe requires minimal effort and creates a visually striking dessert that’s sure to be the star of any Halloween party. Not only does it satisfy a sweet tooth, but it also adds a festive touch to your seasonal celebrations.
This recipe is designed to serve 4-6 people, making it ideal for small gatherings or family treats. The base of the candy bark is a smooth layer of chocolate, which is adorned with a variety of candies that mimic the chaotic, festive aura of a haunted house.
The best part? You can customize it with your favorite candies to add a personal touch. Let’s plunge into the ingredients and steps required to make this spooky delight.
Ingredients:
- 12 ounces semi-sweet chocolate chips
- 1/2 cup white chocolate chips
- 1/2 cup candy corn
- 1/2 cup mini marshmallows
- 1/4 cup Halloween-themed sprinkles
- 1/4 cup crushed pretzels
- 1/4 cup gummy worms
- 1/4 cup mini peanut butter cups, halved
Instructions:
- Prepare the Baking Sheet: Line a baking sheet with parchment paper. This will prevent the chocolate from sticking and make it easier to remove the bark once it’s set.
- Melt the Chocolate: In a microwave-safe bowl, melt the semi-sweet chocolate chips in 30-second intervals, stirring after each interval until smooth. Be careful not to overheat the chocolate as it can seize.
- Spread the Chocolate: Pour the melted semi-sweet chocolate onto the prepared baking sheet. Use a spatula to spread it into an even layer, about 1/4 inch thick.
- Add White Chocolate Drizzle: Melt the white chocolate chips in a similar fashion. Once melted, use a spoon to drizzle it over the semi-sweet chocolate layer in a random pattern.
- Decorate the Bark: Quickly, while the chocolate is still soft, sprinkle the candy corn, mini marshmallows, Halloween-themed sprinkles, crushed pretzels, gummy worms, and halved mini peanut butter cups evenly over the top. Press down lightly to confirm they stick.
- Set the Bark: Place the baking sheet in the refrigerator for about 1 hour, or until the chocolate is completely set and firm.
- Break Into Pieces: Once set, remove the bark from the refrigerator and break it into irregular pieces. Serve immediately or store in an airtight container at room temperature.
Extra Tips:
When making Haunted House Candy Bark, feel free to get creative with your candy choices to suit your preferences or theme. You can use different types of chocolate, such as dark or milk chocolate, depending on your taste.
To confirm your bark has a good texture, be sure to press the candies lightly into the chocolate before it sets, ensuring they adhere properly. If you’re preparing this in advance, it can be stored for up to a week in an airtight container, making it a convenient option for pre-party prep.
Enjoy the process and have fun with the spooky decorations!
Jack-O’-Lantern Stuffed Peppers
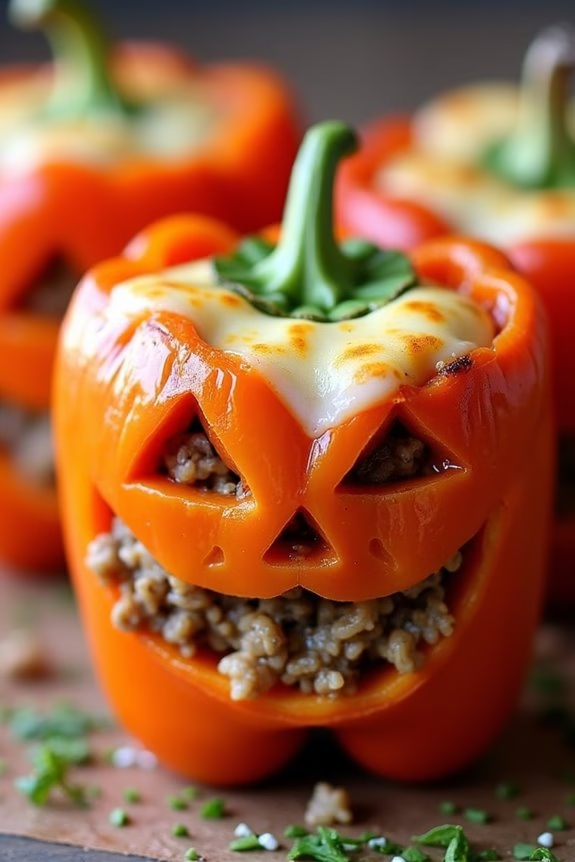
Jack-O’-Lantern Stuffed Peppers are a fun and festive way to celebrate Halloween with a savory twist. These adorable and delicious stuffed peppers are carved to look like classic jack-o’-lanterns, making them the perfect addition to your spooky celebration.
Not only are they visually appealing, but they’re also packed with a flavorful mixture of ground meat, rice, vegetables, and spices, offering a hearty and nutritious meal that everyone will enjoy.
Preparing these stuffed peppers is a delightful activity that can involve the whole family. Kids will love helping out with carving the faces on the peppers and stuffing them with the delicious filling. The process is simple and straightforward, allowing you to focus on the fun of creating your own edible jack-o’-lanterns.
Serve them as a main dish or a festive side, and watch as they become a hit at your Halloween gathering.
Ingredients (Serves 4-6 people):
- 6 medium orange bell peppers
- 1 lb ground beef or turkey
- 1 cup cooked rice
- 1 medium onion, chopped
- 2 cloves garlic, minced
- 1 can (14.5 oz) diced tomatoes, drained
- 1 cup shredded mozzarella cheese
- 1 tablespoon olive oil
- 1 teaspoon dried oregano
- 1 teaspoon dried basil
- 1 teaspoon salt
- 1/2 teaspoon black pepper
- 1/4 teaspoon red pepper flakes (optional)
Cooking Instructions:
- Preheat the Oven: Preheat your oven to 375°F (190°C) to guarantee it’s ready once your peppers are stuffed and carved.
- Prepare the Peppers: Carefully cut the tops off the bell peppers and set them aside. Remove the seeds and membranes inside. Using a small paring knife, carve jack-o’-lantern faces into one side of each pepper. Be gentle to avoid breaking the peppers.
- Cook the Filling: In a large skillet over medium heat, heat olive oil. Add the chopped onion and minced garlic, and sauté for about 3 minutes until the onion is translucent.
- Brown the Meat: Add the ground beef or turkey to the skillet. Cook until the meat is browned and cooked through, breaking it up with a spoon as it cooks. Drain any excess fat.
- Mix in Remaining Ingredients: Stir in the cooked rice, diced tomatoes, oregano, basil, salt, black pepper, and red pepper flakes. Let the mixture cook for an additional 5 minutes, stirring occasionally.
- Stuff the Peppers: Carefully fill each carved pepper with the meat and rice mixture. Place them upright in a baking dish. Sprinkle the shredded mozzarella cheese over the top of each stuffed pepper.
- Bake: Cover the baking dish with aluminum foil and bake in the preheated oven for 30 minutes. Remove the foil and bake for an additional 10-15 minutes, or until the peppers are tender and the cheese is melted and bubbly.
- Serve: Remove the peppers from the oven and let them cool slightly before serving. Replace the tops of the peppers for presentation or serve them on the side.
Extra Tips:
When carving the faces on the peppers, consider using a small, sharp knife for more precision. If the peppers have trouble standing upright in the baking dish, slice a small piece off the bottom to create a flat surface.
For a vegetarian version, substitute the meat with black beans or lentils. Additionally, feel free to customize the filling with your favorite herbs and spices to make it your own.
Enjoy these Jack-O’-Lantern Stuffed Peppers as a festive and delicious Halloween treat!
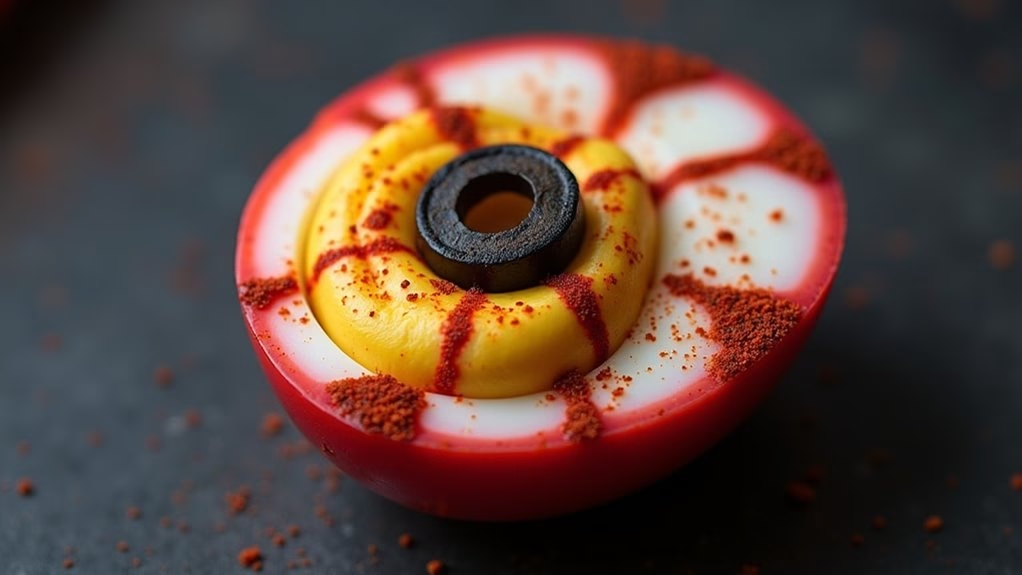
Bloodshot Deviled Eggs

Bloodshot Deviled Eggs are a spooky and delightful treat perfect for any Halloween gathering. This eerie twist on the classic deviled egg is sure to impress your guests with its gory appearance and creamy, savory filling. The bloodshot effect is achieved through the use of red food coloring, which creates a striking contrast against the white of the eggs, making them look like creepy eyeballs staring back at you.
Whether you’re hosting a Halloween party or simply want to add a macabre touch to your holiday menu, these bloodshot deviled eggs are a must-try.
Creating these creepy deviled eggs is as easy as it’s fun. The process involves hard-boiling eggs, preparing a tangy and flavorful filling, and using a few simple techniques to achieve the bloodshot effect. With just a handful of ingredients and a bit of creativity, you can transform ordinary eggs into a frightful centerpiece that’s sure to be a conversation starter.
Let’s plunge into the recipe and make this thrilling dish for 4-6 people.
Ingredients:
- 12 large eggs
- Red food coloring
- 1/2 cup mayonnaise
- 1 tablespoon Dijon mustard
- 1 tablespoon white vinegar
- Salt and pepper to taste
- Paprika for garnish
- Black olives (optional, for pupil effect)
Instructions:
- Boil the Eggs: Place the eggs in a large pot and cover them with cold water. Bring the water to a gentle boil over medium-high heat. Once boiling, cover the pot, turn off the heat, and let the eggs sit for 10-12 minutes. Transfer the eggs to a bowl of ice water to cool for at least 5 minutes.
- Crack and Dye the Eggs: Gently crack the eggshells all over without peeling the eggs. Fill a bowl with water and add a few drops of red food coloring until you achieve a deep red color. Submerge the cracked eggs in the colored water and let them sit for about an hour to create the bloodshot effect.
- Peel and Halve the Eggs: After soaking, carefully peel the eggs to reveal the bloodshot pattern on the egg whites. Slice each egg in half lengthwise, and remove the yolks, placing them in a separate bowl.
- Prepare the Filling: Mash the egg yolks with a fork and add mayonnaise, Dijon mustard, white vinegar, salt, and pepper. Mix until smooth and creamy. Adjust the seasoning as needed.
- Fill the Egg Whites: Spoon or pipe the yolk mixture back into the egg white halves. If desired, garnish each egg with a slice of black olive to create a “pupil” effect.
- Garnish and Serve: Lightly sprinkle paprika over the filled eggs for extra flavor and a touch of color. Arrange the Bloodshot Deviled Eggs on a serving platter and serve immediately or refrigerate until ready to serve.
Extra Tips:
For a more intense bloodshot look, allow the eggs to soak longer in the red dye. You can also experiment with different shades of red by adjusting the amount of food coloring.
If you prefer a spicier filling, consider adding a dash of hot sauce or a pinch of cayenne pepper to the yolk mixture. Additionally, using a piping bag to fill the eggs can give a more polished look, but a spoon works just as well.
Be sure to handle the eggs gently throughout the process to maintain the integrity of the bloodshot pattern.