
When it comes to Halloween, treats that are both festive and fuss-free are a must-have. Monster Mash Cupcakes with vibrant sprinkles are sure to steal the show. Ghostly Brownie Bites that practically melt in your mouth will have everyone coming back for more. And don’t forget the Creepy Crawly Rice Krispie Treats, a visual delight that’s simply irresistible. These quick-to-make delights will add a spooky charm to any gathering.
Monster Mash Cupcakes

Celebrate Halloween with these spooky and delightful Monster Mash Cupcakes. These fun and whimsical cupcakes are perfect for a Halloween party or a family gathering. With vibrant colors and playful decorations, these cupcakes will be a hit with kids and adults alike.
The cupcakes are made from a moist chocolate base, topped with a rich buttercream frosting, and decorated to resemble adorable monsters with googly eyes and colorful sprinkles.
Creating these Monster Mash Cupcakes is an enjoyable activity that everyone can participate in. Not only are they visually striking, but they also taste delicious with a perfect balance of sweetness and chocolatey goodness. The recipe is simple enough for novice bakers, while still allowing room for creativity in decorating.
Gather the kids, set up a cupcake decorating station, and enjoy making some Halloween memories together.
Ingredients for 4-6 Servings:
- 1 cup all-purpose flour
- 1 cup granulated sugar
- 1/2 cup unsweetened cocoa powder
- 1 teaspoon baking powder
- 1/2 teaspoon baking soda
- 1/4 teaspoon salt
- 1/2 cup vegetable oil
- 2 large eggs
- 1/2 cup whole milk
- 1 teaspoon vanilla extract
- 1/2 cup boiling water
- 1 cup unsalted butter, softened (for frosting)
- 4 cups powdered sugar (for frosting)
- 1/4 cup heavy cream (for frosting)
- Food coloring (green, purple, and orange)
- Candy eyes
- Sprinkles
Cooking Instructions:
1. Prepare the Cupcake Batter: Preheat your oven to 350°F (175°C) and line a muffin tin with cupcake liners. In a large bowl, sift together the flour, sugar, cocoa powder, baking powder, baking soda, and salt.
Add the vegetable oil, eggs, milk, and vanilla extract, and mix until well combined. Carefully stir in the boiling water until the batter is smooth and slightly thin.
2. Bake the Cupcakes: Pour the batter into the prepared cupcake liners, filling each about two-thirds full. Bake in the preheated oven for 18-20 minutes, or until a toothpick inserted into the center of a cupcake comes out clean.
Remove from the oven and let them cool in the pan for about 5 minutes before transferring to a wire rack to cool completely.
3. Make the Frosting: In a large mixing bowl, beat the softened butter until creamy. Gradually add the powdered sugar, one cup at a time, beating well after each addition.
Pour in the heavy cream and beat until the frosting is light and fluffy. Divide the frosting into three separate bowls and add food coloring to each to create green, purple, and orange frostings.
4. Decorate the Cupcakes: Once the cupcakes are completely cool, use a piping bag fitted with a star tip to frost each cupcake with your desired color.
Mix and match the colors for variety. Decorate with candy eyes and sprinkles to give each cupcake a unique monster personality.
Extra Tips:
When making Monster Mash Cupcakes, feel free to get creative with your decoration. You can use different types of candies for eyes and mouths or even add small chocolate chips for extra texture.
If you don’t have a piping bag, you can use a plastic sandwich bag with the corner snipped off to apply the frosting. For an extra Halloween touch, consider adding a dash of edible glitter to make your monster cupcakes sparkle.
Remember to let the cupcakes cool completely before frosting to prevent the buttercream from melting. Enjoy making these fun treats, and have a monstrously good time!
Ghostly Brownie Bites
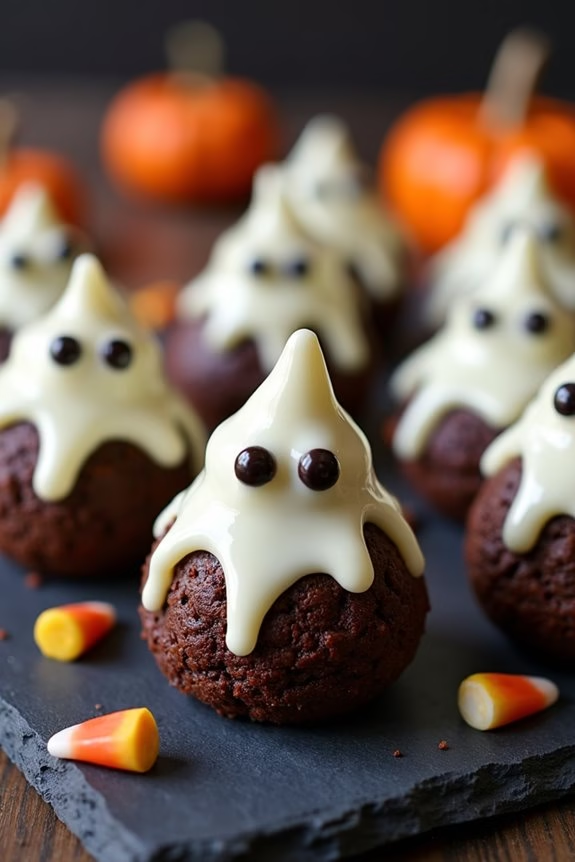
Transform your Halloween festivities into a ghoulish delight with these Ghostly Brownie Bites. Perfect for a Halloween party or a spooky night in with the family, these mini treats combine the rich, fudgy goodness of brownies with a playful, ghostly twist. Not only are they delicious, but their small size makes them ideal for sharing—or scaring!
Whether you’re an experienced baker or a kitchen novice, these Ghostly Brownie Bites are simple to make and certain to impress. The key to these ghostly goodies is in the decoration. Once the brownies are baked and cooled, transform them into eerie apparitions with white chocolate and candy eyes. This recipe yields enough for 4-6 people, guaranteeing that everyone gets a taste of the Halloween fun.
Grab your mixing bowls and get ready to whip up a batch of these spine-chilling treats!
Ingredients (Serves 4-6):
- 1/2 cup unsalted butter
- 1 cup granulated sugar
- 2 large eggs
- 1 teaspoon vanilla extract
- 1/3 cup unsweetened cocoa powder
- 1/2 cup all-purpose flour
- 1/4 teaspoon salt
- 1/4 teaspoon baking powder
- 1 cup white chocolate chips
- Candy eyes (or mini chocolate chips)
Cooking Instructions:
- Preheat and Prep: Preheat your oven to 350°F (175°C). Grease a mini muffin tin or line with mini cupcake liners to prepare for baking.
- Mix Wet Ingredients: In a medium saucepan over low heat, melt the butter. Remove from heat and stir in the sugar, eggs, and vanilla extract until the mixture is smooth and well blended.
- Combine Dry Ingredients: In a separate bowl, sift together the cocoa powder, flour, salt, and baking powder. Gradually add this dry mixture to the wet mixture, stirring until just combined.
- Fill the Tin: Spoon the batter evenly into the prepared mini muffin tin, filling each cup about two-thirds full to allow room for rising.
- Bake: Place the muffin tin in the preheated oven and bake for 12-15 minutes, or until a toothpick inserted into the center of the brownies comes out clean.
- Cool: Allow the brownie bites to cool in the tin for about 10 minutes before transferring them to a wire rack to cool completely.
- Melt and Decorate: Melt the white chocolate chips in a microwave-safe bowl in 20-second intervals, stirring in between until smooth. Drizzle or pipe the melted white chocolate over each brownie bite to create ghostly shapes. Immediately place candy eyes onto the chocolate before it sets.
- Set and Serve: Let the chocolate set completely before serving. Enjoy your spooky, sweet creations!
Extra Tips:
For an extra touch of Halloween fun, add a few drops of green or orange food coloring to the brownie batter for a surprise pop of color inside.
If you don’t have candy eyes, mini chocolate chips or even small dots of black icing can be used as alternatives. When melting the white chocolate, be careful not to overheat it as it can seize up; stirring frequently helps guarantee a smooth consistency.
These Ghostly Brownie Bites can be made a day in advance and stored in an airtight container to keep them fresh for your Halloween gathering.
Creepy Crawly Rice Krispie Treats
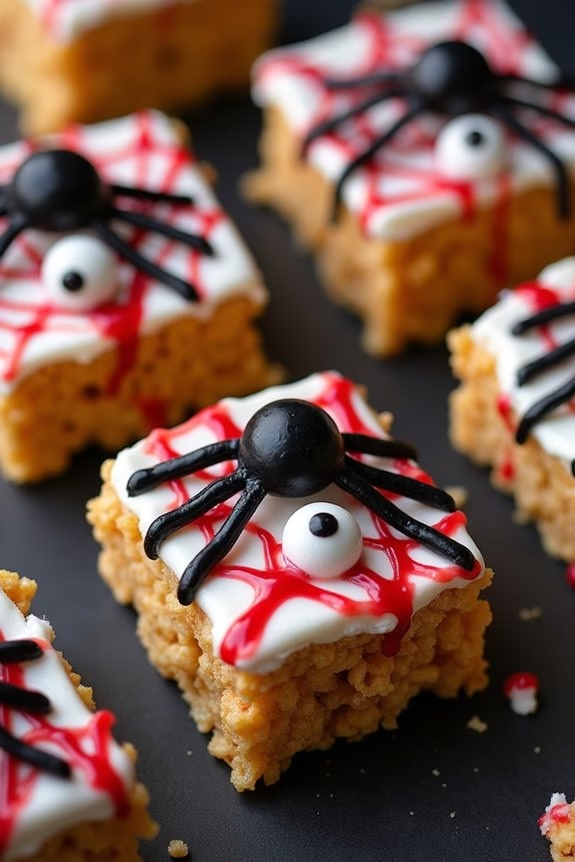
Creepy Crawly Rice Krispie Treats are the perfect Halloween dessert to add a fun and spooky twist to your festive celebrations. These treats aren’t only delicious, but they also bring a playful element to your dessert table with their creepy crawly appearance.
Combining the classic flavors of marshmallow and rice cereal with a creative decorative touch, these treats will surely be a hit among both kids and adults at your Halloween party.
Making Creepy Crawly Rice Krispie Treats is an easy and enjoyable process, even for those who may not consider themselves expert bakers. With a few basic ingredients and some creativity, you can craft these eerie treats in no time.
The recipe is designed to serve 4-6 people, making it perfect for a small gathering or as part of a larger dessert spread. Get ready to surprise and delight your guests with these spooky snacks!
Ingredients (Serves 4-6 people):
- 3 tablespoons butter
- 1 package (10 oz) marshmallows
- 6 cups Rice Krispies cereal
- Black licorice strings
- Candy eyeballs
- Assorted colored icing (black, red, green, etc.)
- Non-stick cooking spray or parchment paper
Cooking Instructions:
- Prepare Your Workspace: Start by lining a 9×13-inch baking pan with parchment paper or lightly coat it with non-stick cooking spray to guarantee easy removal of the treats later.
- Melt the Butter and Marshmallows: In a large saucepan, melt the butter over low heat. Add the marshmallows and stir continuously until completely melted and smooth. Remove from heat immediately to prevent overcooking.
- Combine with Rice Krispies: Quickly add the Rice Krispies cereal to the melted marshmallow mixture. Stir with a spatula until the cereal is fully coated, working swiftly before the mixture begins to set.
- Press into Pan: Transfer the cereal mixture into the prepared baking pan. Press it down evenly using a spatula or your hands (lightly greased with cooking spray to prevent sticking) to form an even layer.
- Cool and Cut: Allow the mixture to cool at room temperature for about 30 minutes. Once set, cut into rectangles or squares, depending on your preference.
- Decorate: Use the black licorice strings to create spider legs or worm-like shapes on each treat. Attach candy eyeballs using a small dab of icing. Use assorted colored icing to add further creepy details like spider webs or blood drips.
- Serve and Enjoy: Arrange the Creepy Crawly Rice Krispie Treats on a festive platter and serve to your guests.
Extra Tips: To make your Creepy Crawly Rice Krispie Treats even more delightful, consider using different colored Rice Krispies or adding a drop of food coloring to the melted marshmallow mixture to create a more vibrant base.
For added flavor, you can mix in a handful of chocolate chips or candy corn with the cereal. When working with candy eyeballs and icing, use a toothpick for precision in decorating.
These treats can be stored in an airtight container for up to two days, but they’re best enjoyed fresh.
Witch Hat Cookies

Witch Hat Cookies are a delightful and whimsical treat perfect for Halloween festivities. These cookies combine the rich flavors of chocolate with a hint of vanilla, all topped with a colorful, sugary twist that mimics the iconic pointy hat of a witch. Not only are they delicious, but they also add a touch of magic to any Halloween party or gathering, making them a hit with both kids and adults alike.
Crafting these cookies is as much fun as devouring them, and they’re sure to become a favorite in your Halloween dessert repertoire.
The beauty of Witch Hat Cookies lies in their simplicity and creativity. By using basic ingredients that are easy to find, you can create an impressive dessert that looks like you’ve spent hours in the kitchen. This recipe is designed to make enough cookies to serve 4-6 people, perfect for a small gathering or as a part of a larger dessert spread.
Whether you’re an experienced baker or a novice in the kitchen, you’ll find these cookies easy to make and even easier to enjoy.
Ingredients for 4-6 Servings:
- 24 chocolate wafer cookies
- 24 Hershey’s Kisses
- 1 cup semisweet chocolate chips
- 24 orange or green candy melts
- 1/4 cup powdered sugar
- 1 tablespoon milk
- Assorted sprinkles
Cooking Instructions:
- Prepare the Chocolate Glaze: In a small microwave-safe bowl, melt the semisweet chocolate chips at 30-second intervals, stirring in between, until smooth. This will be used to attach the Hershey’s Kisses to the wafer cookies.
- Assemble the Cookies: Take one chocolate wafer and place it flat on a work surface. Dab a small amount of the melted chocolate in the center of the wafer. Immediately press a Hershey’s Kiss onto the melted chocolate, holding it in place for a few seconds to guarantee it adheres properly.
- Prepare the Icing: In another bowl, combine the powdered sugar and milk to make a thick icing. Add the food coloring of your choice to match the Halloween theme, such as orange or green.
- Create the Hat Band: Fill a small piping bag or a plastic zip-top bag with the colored icing. Snip a small corner off the bag to use as a piping tool. Carefully pipe a band around the base of each Kiss, where it meets the wafer, to create the illusion of a hat band.
- Add the Sprinkles: Before the icing dries, sprinkle a small amount of sprinkles along the icing band to add a decorative touch. The sprinkles should stick to the icing and add an extra pop of color to your cookies.
- Set and Serve: Allow the cookies to set at room temperature or chill them in the refrigerator for about 10 minutes until the chocolate and icing are firm. Serve your delightful Witch Hat Cookies on a festive plate and enjoy!
Extra Tips:
For an even more festive look, consider using different colored candy melts for the hat bands or experimenting with different types of sprinkles to match your Halloween decor.
If you’re short on time, you can use pre-made icing instead of making it from scratch. Also, verify that the chocolate isn’t too hot when attaching the Kisses, as this may cause them to melt.
With these simple tips, you’ll have a batch of Witch Hat Cookies that are both visually stunning and irresistibly tasty!
Pumpkin Patch Dirt Cups
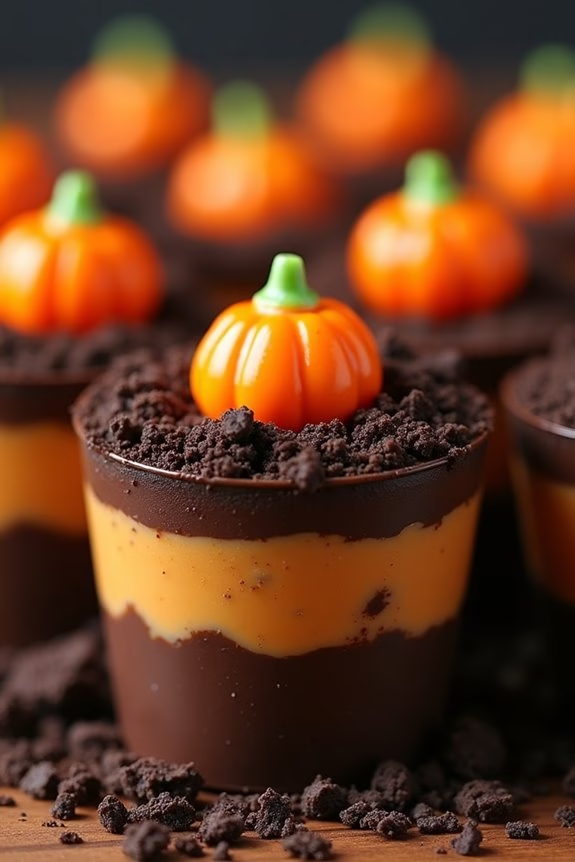
Get ready to delight your friends and family with these fun and festive Pumpkin Patch Dirt Cups, a perfect Halloween treat that’s both creative and delicious. This no-bake dessert combines layers of chocolate pudding, crushed cookies, and a creamy pumpkin-flavored topping, all adorned with candy pumpkins to mimic a pumpkin patch. Not only are they visually appealing, but these cups also offer a delightful mix of textures and flavors that will have everyone asking for seconds.
These Pumpkin Patch Dirt Cups are easy to make and perfect for getting the kids involved in the kitchen. The recipe can be prepared ahead of time, making it ideal for Halloween parties or gatherings. Plus, the individual servings are convenient and mess-free, ensuring that your spooky celebration goes off without a hitch. Now, let’s plunge into creating these delightful, eerie treats!
Ingredients (Serves 4-6):
- 1 box (3.9 oz) instant chocolate pudding mix
- 2 cups cold milk
- 1 cup canned pumpkin puree
- 1 cup whipped topping (such as Cool Whip)
- 1 teaspoon pumpkin pie spice
- 18 chocolate sandwich cookies (such as Oreos)
- 12-18 candy pumpkins
- 6 clear plastic cups or small glass jars
Instructions:
- Prepare the Pudding: In a large bowl, whisk together the instant chocolate pudding mix and cold milk until the mixture thickens, about 2 minutes. Set aside to allow it to set completely.
- Make the Pumpkin Layer: In another bowl, combine the canned pumpkin puree, whipped topping, and pumpkin pie spice. Stir until the mixture is smooth and well-blended. This will be your pumpkin-flavored layer.
- Crush the Cookies: Place the chocolate sandwich cookies in a resealable plastic bag. Using a rolling pin or the bottom of a glass, crush the cookies into fine crumbs. These crumbs will mimic the “dirt” for your pumpkin patch.
- Assemble the Cups: Start by adding a layer of chocolate pudding to each clear plastic cup or jar, filling about one-third of the cup. Next, spoon a layer of the pumpkin mixture over the pudding. Top with a generous layer of crushed cookies to create the “dirt.” Repeat the layers if your cup size allows.
- Decorate: Press 2-3 candy pumpkins into the top layer of “dirt” in each cup. Arrange them to resemble pumpkins growing in a patch.
- Chill: Place the completed Pumpkin Patch Dirt Cups in the refrigerator for at least 30 minutes to allow all the flavors to meld together. Serve chilled and enjoy!
Extra Tips:
For an extra touch of Halloween fun, consider using gummy worms as an additional decoration, letting them peek out from the dirt.
If you prefer a lighter version, use reduced-fat pudding, skim milk, and a light whipped topping. You can also experiment with different flavors of sandwich cookies or add a layer of crushed graham crackers for added texture.
These cups are highly customizable, so feel free to get creative and adapt the recipe to suit your taste!
Mummy Marshmallow Pops
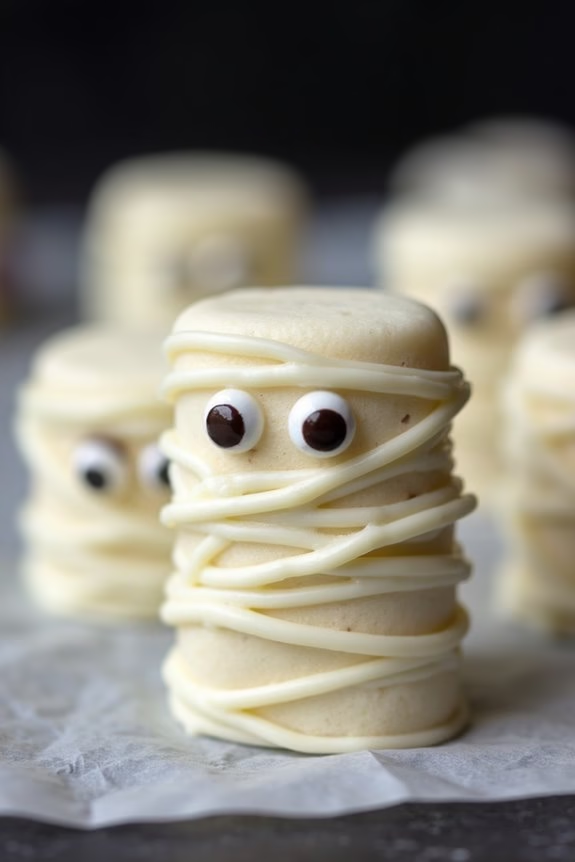
Mummy Marshmallow Pops are a spook-tacular treat perfect for any Halloween gathering! These adorable confections aren’t only delicious but also easy to make, making them ideal for getting the whole family involved in the kitchen.
With their ghostly white chocolate bandages and eerie candy eyes, Mummy Marshmallow Pops will add a festive touch to your Halloween dessert table and are sure to delight both kids and adults alike.
The process of making Mummy Marshmallow Pops is simple and requires just a handful of ingredients. The marshmallows serve as the base, while white chocolate adds the perfect mummy wrap effect. The candy eyes give these pops their fun and spooky character.
Whether you’re hosting a Halloween party or just want to surprise your family with a fun treat, these Mummy Marshmallow Pops are sure to impress!
Ingredients (Serves 4-6)
- 12 large marshmallows
- 12 lollipop sticks
- 1 cup white chocolate chips
- 1 tablespoon coconut oil
- 24 candy eyes
- Wax paper
Cooking Instructions
- Prepare the Marshmallows: Insert a lollipop stick into the center of each marshmallow, making sure it’s secure but not poking through the top. Place the prepared marshmallows on a plate lined with wax paper.
- Melt the Chocolate: In a microwave-safe bowl, combine the white chocolate chips and coconut oil. Microwave in 20-second intervals, stirring in between, until the chocolate is fully melted and smooth.
- Coat the Marshmallows: Dip each marshmallow into the melted white chocolate, ensuring it’s completely covered. Allow any excess chocolate to drip off, then place the coated marshmallow back onto the wax paper.
- Create the Mummy Effect: Using a spoon or a piping bag, drizzle additional melted white chocolate over the coated marshmallows in a crisscross pattern to mimic mummy bandages.
- Add the Candy Eyes: Before the chocolate hardens, press two candy eyes onto each marshmallow, pressing gently so they stick.
- Set the Pops: Allow the pops to set on the wax paper until the chocolate hardens completely. You can speed up this process by placing them in the refrigerator for about 10-15 minutes.
Extra Tips
For the best results, make sure that the white chocolate is at the right consistency for drizzling; it should be smooth and not too thick.
If your chocolate begins to harden while you’re working, simply reheat it slightly in the microwave. When adding the candy eyes, be gentle to prevent them from sliding off.
If desired, you can add a drop of food coloring to the melted chocolate for a fun twist on the classic mummy look. Enjoy your spooky and sweet Mummy Marshmallow Pops!
Spooky Spiderweb Cheesecake

Spooky Spiderweb Cheesecake is a delightful and eerie dessert perfect for Halloween celebrations. This decadent treat combines the creamy richness of a classic cheesecake with a spooky spiderweb design made of chocolate, bound to impress both kids and adults alike. Its smooth texture and delicious taste make it an irresistible addition to any Halloween party spread.
Whether you’re hosting a haunted house gathering or simply enjoying a quiet night in with a few friends, this cheesecake is bound to bring a touch of spooky charm to your festivities.
Crafting the perfect Spooky Spiderweb Cheesecake requires attention to detail and a bit of creativity. The cheesecake base is made from a mix of cream cheese and sugar, with a hint of vanilla, all resting on a buttery graham cracker crust. The spiderweb effect is created using melted chocolate, which is artfully drizzled over the top of the cheesecake to create a hauntingly beautiful design.
This recipe will serve 4-6 people, making it an ideal option for small get-togethers or a family dessert.
Ingredients (Serves 4-6):
- 1 ½ cups graham cracker crumbs
- ¼ cup granulated sugar (for crust)
- 6 tablespoons unsalted butter, melted
- 24 oz cream cheese, softened
- 1 cup granulated sugar (for filling)
- 3 large eggs
- 1 teaspoon vanilla extract
- 1 cup sour cream
- ½ cup heavy cream
- ½ cup semi-sweet chocolate chips
Cooking Instructions:
- Preheat Oven: Begin by preheating your oven to 325°F (163°C). This guarantees the oven is at the right temperature when the cheesecake is ready to bake.
- Prepare the Crust: In a medium bowl, mix together the graham cracker crumbs, ¼ cup of granulated sugar, and melted butter until evenly combined. Press this mixture firmly into the bottom of a 9-inch springform pan to form the crust. Bake for 10 minutes and then allow it to cool.
- Make the Cheesecake Filling: Using an electric mixer, beat the softened cream cheese and 1 cup of granulated sugar together until smooth and creamy. Add the eggs one at a time, mixing well after each addition. Then mix in the vanilla extract, sour cream, and heavy cream until fully combined.
- Bake the Cheesecake: Pour the cheesecake filling over the cooled crust in the springform pan. Smooth out the top with a spatula. Bake in the preheated oven for about 55-60 minutes, or until the center is set but still slightly jiggly.
- Create the Spiderweb: While the cheesecake is cooling, melt the chocolate chips in a microwave-safe bowl in 30-second intervals, stirring in between, until smooth. Once the cheesecake has cooled slightly, pour the melted chocolate into a piping bag or a small ziplock bag with a tiny corner snipped off. Starting from the center, pipe concentric circles of chocolate on top of the cheesecake. Drag a toothpick from the center to the outer edge of the cheesecake to create a spiderweb effect.
- Chill the Cheesecake: Allow the cheesecake to cool to room temperature, then refrigerate it for at least 4 hours or overnight to set completely.
Extra Tips: For best results, all ingredients should be at room temperature before you begin mixing. This helps to achieve a smooth, lump-free cheesecake filling. If you don’t have a piping bag, a small ziplock bag with a corner snipped off works well for creating the spiderweb design.
Be sure to drag the toothpick gently through the chocolate to avoid tearing the cheesecake. If the cheesecake cracks during baking, don’t worry — the spiderweb design can help to disguise minor imperfections. Enjoy your Spooky Spiderweb Cheesecake with a touch of Halloween spirit!
Haunted Graveyard Pudding

The beauty of this dessert is that it requires minimal cooking skills and can be assembled in no time. It combines rich chocolate pudding with a crumbly cookie topping to mimic soil, while gummy worms and tombstone cookies add an eerie touch. You can personalize your haunted graveyard with additional spooky decorations like candy pumpkins, coconut “grass,” or even marshmallow ghosts. This recipe serves 4-6 people, making it an ideal choice for small gatherings or family parties.
Ingredients (Serves 4-6):
- 2 cups of chocolate pudding (store-bought or homemade)
- 1 cup of crushed chocolate sandwich cookies
- 6 rectangular cookies (for tombstones)
- 1/2 cup of gummy worms
- Edible green gel or icing (for writing on tombstones)
- Small candy pumpkins
- 1/4 cup of shredded coconut
- Green food coloring
Instructions:
- Prepare the Pudding: If using store-bought pudding, simply open and set aside. If making homemade pudding, follow your favorite recipe and allow it to cool completely before use.
- Create the “Soil”: Place the chocolate sandwich cookies in a zip-top bag and crush them using a rolling pin until they resemble fine crumbs. These will act as the “soil” for your graveyard.
- Prepare the Tombstones: Use the edible green gel or icing to write spooky messages or names on the rectangular cookies, turning them into tombstones. Set aside to let the writing dry.
- Color the Coconut: Place the shredded coconut in a bowl and add a few drops of green food coloring. Mix until the coconut turns a vibrant green, resembling grass.
- Assemble the Graveyard: Divide the pudding evenly among 4-6 serving cups or bowls. Sprinkle a generous layer of the crushed cookie “soil” over each pudding cup.
- Decorate: Insert the decorated tombstone cookies into the pudding, allowing them to stand upright. Add gummy worms, candy pumpkins, and sprinkle the green coconut around to mimic grass.
- Finish and Serve: Once all elements are in place, your haunted graveyard pudding is ready to serve. You can refrigerate it for a bit if you prefer it chilled.
Extra Tips:
- Let your creativity shine by adding different candies and decorations to your graveyard pudding. Use mini marshmallows to create ghostly figures or chocolate chips for creepy critters.
- If you’re running short on time, instant pudding mix can be a quick and easy alternative.
- For a more personalized touch, allow kids to decorate their own graveyard cups by providing a variety of candies and decorations to choose from.
- Remember, the key to this dessert is having fun with its presentation, so don’t be afraid to get spooky and creative!
Candy Corn Parfaits
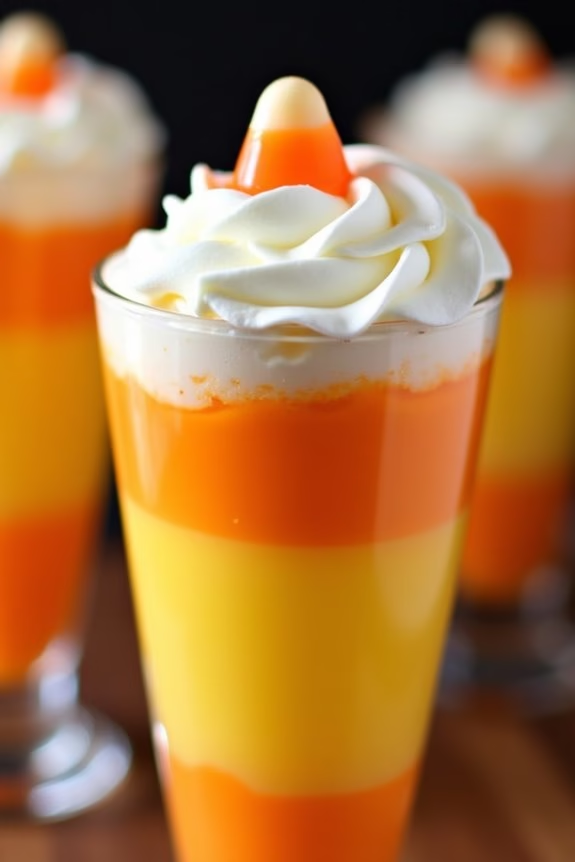
Candy Corn Parfaits are a delightful Halloween dessert that combines layers of creamy pudding with vibrant colors reminiscent of classic candy corn. This no-bake treat isn’t only visually appealing but also quick and easy to make, making it perfect for Halloween parties or a festive family dessert.
Whether you’re catering to children or adults, these parfaits provide a fun and delicious way to celebrate the spooky season. The parfaits are built with layers of vanilla pudding tinted with food coloring to mimic the traditional candy corn colors: yellow, orange, and white.
Topped with whipped cream and a few candy corns for garnish, each serving brings both taste and texture, making it a crowd-pleaser. With a serving size of 4-6 people, this recipe is perfect for sharing with family and friends.
Ingredients (for 4-6 servings):
- 2 cups of cold milk
- 1 package (3.4 oz) instant vanilla pudding mix
- Yellow food coloring
- Orange food coloring
- 1 cup whipped cream or whipped topping
- Candy corn for garnish
Instructions:
1. Prepare the Pudding:
In a mixing bowl, whisk together the instant vanilla pudding mix and cold milk. Stir until the mixture thickens, approximately 2 minutes. Divide the pudding evenly into three separate bowls.
2. Color the Pudding:
Add a few drops of yellow food coloring to the first bowl and mix until the desired shade is achieved. In the second bowl, add orange food coloring and mix well. Leave the third bowl plain to represent the white of the candy corn.
3. Layer the Parfaits:
Take 4-6 clear glasses or jars for the parfaits. Start by spooning the yellow pudding into the bottom of each glass, filling about a third of each glass. Next, add the orange pudding layer, filling another third of each glass, and finally, top with the plain (white) pudding layer.
4. Chill the Parfaits:
Place the parfaits in the refrigerator for at least 1 hour to set and chill.
5. Add the Toppings:
Just before serving, top each parfait with a dollop of whipped cream and garnish with a few pieces of candy corn for decoration.
Extra Tips:
To make these Candy Corn Parfaits even more festive, consider using themed Halloween cups or jars. If you want to add a bit of crunch, you can layer some crushed graham crackers or cookies between the pudding layers.
For those watching sugar intake, you can opt for sugar-free pudding mix and low-fat or sugar-free whipped topping. Adjust the food coloring as needed to achieve the perfect candy corn colors, and be sure to chill the parfaits thoroughly for the best texture and taste.
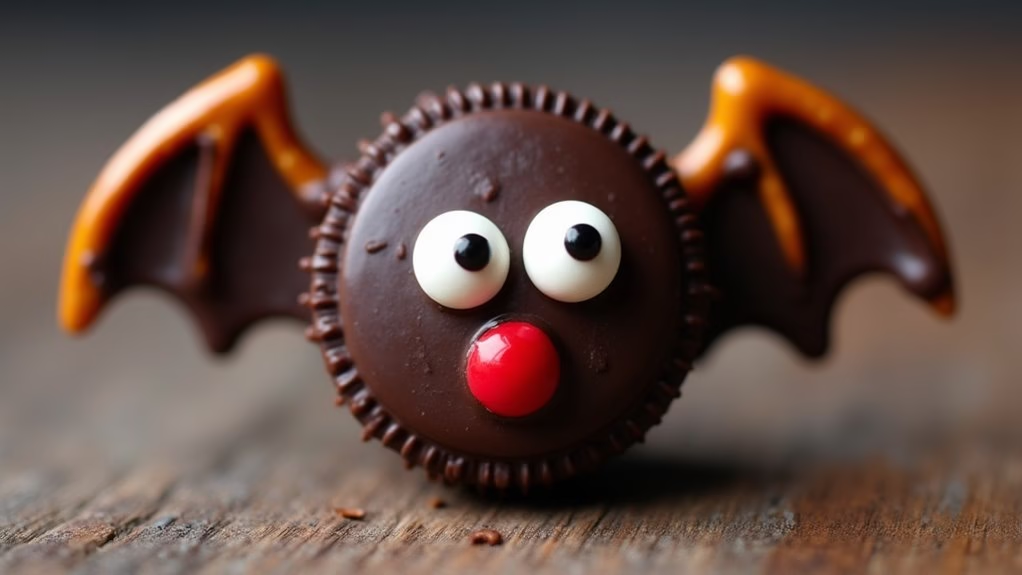
Vampire Bat Oreos

Get ready to delight your guests with a spooky and delicious treat this Halloween: Vampire Bat Oreos. These adorable and festive snacks aren’t only easy to make but are also a hit with both kids and adults alike. Perfect for a Halloween party or a fun family activity, these Vampire Bat Oreos bring together the classic taste of Oreo cookies with a creative twist, transforming them into little batty creatures.
The combination of dark chocolate, creamy filling, and a hint of candy sweetness makes this dessert both tasty and visually appealing. Creating Vampire Bat Oreos is a simple process that involves minimal ingredients and effort, making it an ideal project for Halloween festivities.
The decorative aspect of this recipe allows for creativity, so you can tailor the design to your liking. Whether you want to make them cute or slightly spooky, these bat cookies will surely add a whimsical touch to your Halloween spread. With a serving size of 4-6 people, this treat is perfect for sharing with family and friends.
Ingredients (Serves 4-6)
- 12 Oreo cookies
- 1 cup of dark chocolate melts or chips
- 24 candy eyes
- 6 small candies (like M&M’s) for the noses
- 2 tablespoons of red gel icing
- 6 mini pretzel twists
Instructions
- Prepare the Oreos: Start by carefully twisting apart each Oreo cookie. Try to keep the cream filling intact on one side of the cookies.
- Melt the Chocolate: Place the dark chocolate melts or chips in a microwave-safe bowl. Heat them in the microwave in 30-second intervals, stirring in between, until fully melted and smooth.
- Create Bat Wings: Break each mini pretzel twist in half to form bat wings. Dip the broken ends of the pretzel pieces into the melted chocolate and attach them to the cream side of one half of the Oreo. Repeat with the remaining Oreos.
- Assemble the Bats: Place the other half of the Oreo with the cream side down onto the pretzels so that they stick together. This will form the base of your bat.
- Add Eyes and Nose: Using a small drop of melted chocolate, attach two candy eyes to the top of each Oreo bat. For the nose, place a small candy in the center, just below the eyes, securing it with a dab of chocolate.
- Decorate: Use the red gel icing to draw little fangs beneath the nose on each cookie for that vampire effect.
- Set the Bats: Place the completed Vampire Bat Oreos on a tray lined with parchment paper. Let them sit at room temperature or refrigerate them for about 20 minutes until the chocolate is fully set.
Extra Tips
When making Vampire Bat Oreos, make certain that you handle the Oreos gently while twisting them apart to avoid breaking them. If possible, use a toothpick or skewer to apply the melted chocolate when attaching the eyes and nose for better precision.
If you want to add some extra color or flair, consider using colored candy eyes or experimenting with different flavors of Oreos. Finally, these treats can be made a day ahead, making them a convenient option for party planning. Enjoy your creative Halloween treats!