

Hey, lovely friends! 🎃 If you’re anything like me, you adore hosting a Halloween bash that leaves your guests buzzing with excitement. I’ve stumbled upon an amazing idea that I have to share: Halloween charcuterie boards. They’re not just a treat to eat but a joy to create, with spooky cheeses and eerie meats taking center stage. Let’s get those creative juices flowing with 15 spectacular boards that will cater to every craving and set the mood for a delightfully haunting evening. Are you ready to get started?
Spooky Cheese and Meat Platter
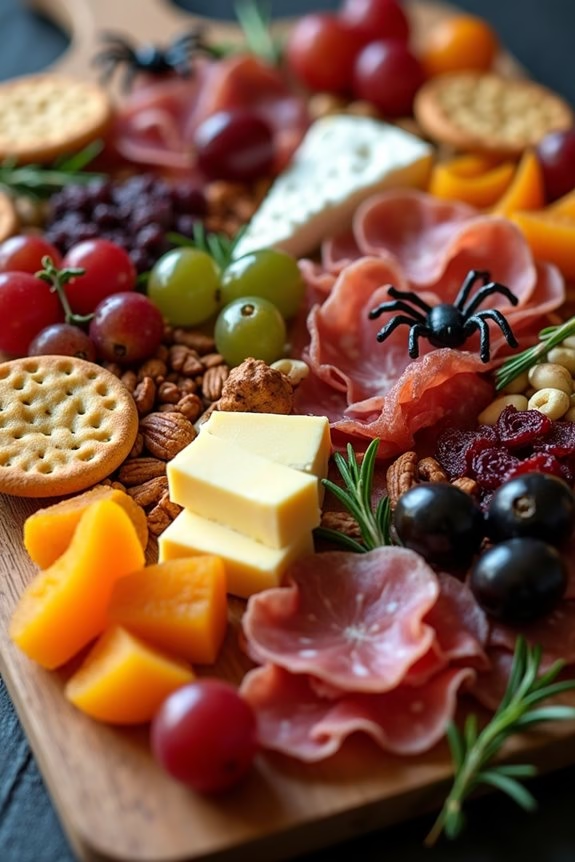
Halloween is the perfect time to get creative in the kitchen, and a Spooky Cheese and Meat Platter is a fantastic way to impress your guests with a deliciously eerie appetizer. This charcuterie board combines a variety of cheeses, cured meats, and themed decorations to create a visually striking and flavorful spread.
Whether you’re hosting a Halloween party or just want to enjoy a festive snack, this platter is sure to be a hit with both kids and adults.
To create the Spooky Cheese and Meat Platter, you’ll need to choose a selection of cheeses and meats that offer a variety of flavors and textures. Consider using a mix of soft, hard, and semi-soft cheeses, along with a selection of cured meats such as salami and prosciutto.
Add in some Halloween-themed touches, like olives shaped like eyeballs or crackers cut into bat shapes, to make the platter both spooky and appetizing.
Ingredients for 4-6 people:
- 8 oz aged cheddar cheese
- 8 oz brie cheese
- 8 oz gouda cheese
- 8 oz salami
- 8 oz prosciutto
- 1 cup black olives
- 1 cup green olives
- 1/2 cup dried apricots
- 1/2 cup mixed nuts
- 1 cup grapes
- A handful of rosemary sprigs
- Halloween-themed crackers
- Edible fake spiders or other spooky decorations
Instructions:
- Prepare the Board: Select a large wooden or slate board as your base. This will give the platter a rustic look and allow for easy arrangement of items.
- Cut the Cheese: Slice the cheddar, brie, and gouda into assorted shapes like cubes, wedges, and triangles to add visual interest. Arrange them evenly across the board.
- Arrange the Meats: Roll the salami and prosciutto into individual rosettes and place them in clusters around the cheese. This adds depth and a touch of elegance to the platter.
- Add the Olives: Create “eyeballs” by cutting a small slit in each black olive and inserting a small piece of green olive. Scatter these around the board for a spooky effect.
- Incorporate Fruits and Nuts: Place the grapes, dried apricots, and mixed nuts around the board for added color and texture. These will provide a sweet contrast to the savory cheeses and meats.
- Decorate with Rosemary: Tuck rosemary sprigs around the platter to mimic creepy branches and add a fragrant touch.
- Finish with Crackers and Decorations: Arrange the Halloween-themed crackers in empty spaces and add edible fake spiders or other spooky decorations for the final eerie touch.
Extra Tips:
For the best presentation, aim to balance the colors and textures across the board, ensuring each section is visually appealing.
Feel free to customize the cheese and meat selections based on your preferences or dietary restrictions. You can also add other spooky touches, such as using cookie cutters to shape cheese slices into ghosts or pumpkins.
Remember to serve the platter at room temperature for peak flavor, and consider pairing with a selection of wines or themed cocktails for a complete Halloween experience. Enjoy creating this ghoulishly delightful platter!
Ghoulish Fruit and Nut Medley

Create a hauntingly delicious addition to your Halloween spread with a Ghoulish Fruit and Nut Medley. This charcuterie board is a delightful mix of sweet, savory, and spooky elements that will charm your guests.
With a blend of seasonal fruits, nuts, and a touch of creativity, this dish transforms ordinary ingredients into a festive masterpiece that’s both nutritious and visually enchanting. Perfect for a gathering of 4-6 people, this medley combines the natural sweetness of fruits with the earthy crunch of nuts, all presented in a way that echoes the mysterious spirit of Halloween.
The Ghoulish Fruit and Nut Medley isn’t only a feast for the eyes but also a treat for the palate. The vibrant colors and varied textures offer a sensory adventure, while the clever presentation brings a touch of whimsy to your Halloween celebration.
Whether you’re hosting a party or enjoying a cozy night in, this dish adds a festive flair to your charcuterie board. With easy-to-find ingredients and straightforward preparation, it’s the perfect way to impress guests of all ages.
Ingredients (Serves 4-6):
- 1 cup dried apricots
- 1 cup dried cranberries
- 1 cup almonds
- 1 cup cashews
- 1 cup pecans
- 2 fresh pears, sliced
- 2 fresh apples, sliced
- 1 cup black grapes
- 1 cup green grapes
- 1/2 cup dark chocolate chips
- 1/2 cup pumpkin seeds
- 1/4 cup honey
- 1/4 teaspoon ground cinnamon
- 1/4 teaspoon ground nutmeg
Instructions:
- Prepare the Fruits: Start by washing the pears, apples, black grapes, and green grapes thoroughly. Slice the pears and apples into thin wedges, making sure to remove the core and seeds. Leave the grapes whole for a burst of juicy flavor.
- Mix the Nuts: In a large bowl, combine the almonds, cashews, and pecans. Add the pumpkin seeds and toss everything together to create an even mix.
- Add Spices and Sweetener: Drizzle the honey over the mixed nuts and seeds. Sprinkle the ground cinnamon and ground nutmeg over the mixture. Stir well to coat the nuts evenly with the honey and spices.
- Assemble the Medley: On a large serving platter or charcuterie board, arrange the sliced fruits and mixed nuts in alternating sections. This creates an attractive pattern and allows guests to easily pick their favorites.
- Add Final Touches: Scatter the dried apricots, dried cranberries, and dark chocolate chips over the top of the fruit and nut sections. This not only enhances the visual appeal but also adds layers of flavor to the medley.
- Chill and Serve: Place the board in the refrigerator for about 15 minutes before serving. This helps the flavors meld together while keeping the fruits crisp and fresh. Serve chilled for the best taste.
Extra Tips:
For an extra spooky touch, you can carve small jack-o’-lantern faces into the apple slices using a small paring knife. This adds an eerie charm to the board without requiring extra ingredients.
If you want to add more variety, consider incorporating other seasonal fruits like figs or persimmons. Additionally, for a more indulgent twist, you can melt some of the dark chocolate chips and drizzle the chocolate over the fruit before chilling. This not only looks appealing but also adds a rich flavor contrast to the fruity elements.
Creepy Crawly Candy Spread
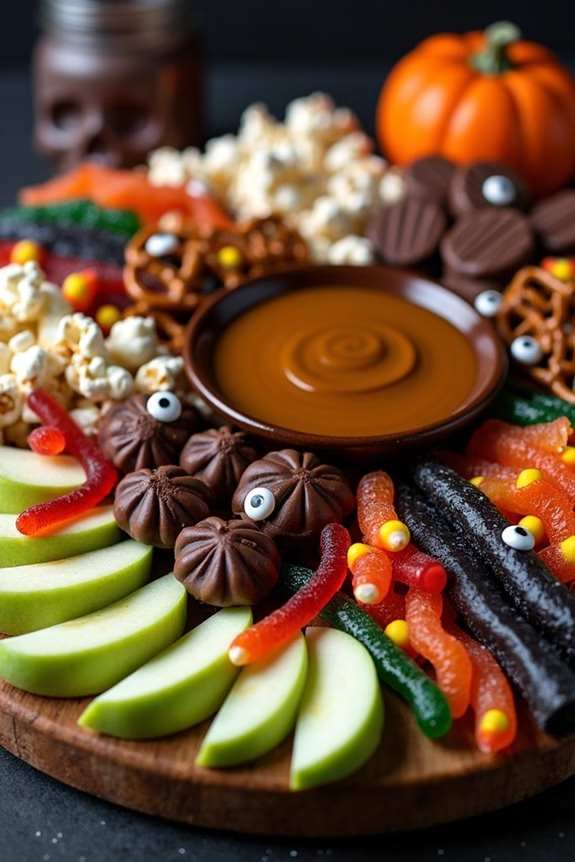
Celebrate Halloween in a deliciously eerie fashion with a Creepy Crawly Candy Spread that will delight and frighten your guests. This charcuterie board isn’t only a feast for the eyes but also a treat for the taste buds, combining an array of sweet and slightly spooky candies and snacks that perfectly capture the spirit of the season.
Whether you’re hosting a Halloween party or simply want to enjoy a themed snack night with family, this spread is bound to be a hit. Designed for 4-6 people, it offers a fantastic variety of flavors and textures, from gooey gummies to crunchy chocolate bites, all presented in a playful and creepy way.
The key to creating an impressive Halloween charcuterie board lies in the selection of candies and the creative arrangement that brings the spooky theme to life. With a focus on vibrant colors and varied shapes that resemble creepy crawlies, you can build a delightful display that’s both tasty and visually compelling. This recipe will guide you through selecting the right ingredients and arranging them to create a board that guests will remember long after Halloween is over.
Ingredients for 4-6 people:
- Gummy worms
- Gummy spiders
- Chocolate-covered pretzels
- Candy corn
- Mini marshmallows
- Black licorice ropes
- Popcorn
- Assorted Halloween-themed chocolates (e.g., pumpkins, skulls)
- Pretzel sticks
- Green apple slices
- Edible candy eyes
- Caramel dip
Cooking Instructions:
- Prepare the Board: Start with a large, flat serving tray or a wooden board. This will serve as the base for your candy display. Verify it’s clean and dry before you begin arranging your items.
- Place Larger Items First: Begin by placing the larger candies and snacks like the chocolate-covered pretzels and Halloween-themed chocolates on the board. Distribute them evenly across the board to create balance.
- Add Candies with Texture: Next, add the gummy worms and gummy spiders. These will add a creepy element to your board. Drape the gummy worms over the edges of the other candies and intertwine the gummy spiders among them for a realistic effect.
- Fill in Gaps with Smaller Items: Use the candy corn, mini marshmallows, and popcorn to fill in any gaps left on the board. These will add pops of color and texture.
- Create a Centerpiece: Arrange the green apple slices in a small circle on one section of the board and place a small bowl of caramel dip in the center. This acts as an enticing centerpiece and offers a fresh contrast to the candies.
- Add Decorative Elements: Place the black licorice ropes in long, looping patterns across the board. Scatter pretzel sticks throughout to mimic the appearance of twigs.
- Finish with Edible Eyes: Ultimately, add the edible candy eyes on top of various candies and snacks to enhance the eerie, Halloween vibe. Be creative with their placement to create a playful yet spooky effect.
Extra Tips:
For an even more thrilling presentation, consider using a dark-colored board or a black tablecloth as your base to make the vibrant colors of the candies pop.
If you want to add more variety, consider including additional Halloween-themed snacks like ghost-shaped chips or bat-shaped pretzels. To make the Creepy Crawly Candy Spread interactive, provide small tongs or spoons so guests can easily serve themselves without touching the entire display.
Finally, verify that all candies and snacks are fresh and check for any allergies your guests might’ve to make sure everyone can enjoy the spread safely.
Eerie Veggie and Hummus Tray

This Halloween, elevate your appetizer game by preparing an Eerie Veggie and Hummus Tray. This dish combines the freshness of vegetables with the creamy richness of hummus, presented in a spooky yet appetizing way. Perfect for a Halloween gathering, this tray will be a hit with both kids and adults. The key is in the presentation—arranging the veggies and hummus in a way that adds a ghoulish touch to your table setting.
In creating this Halloween-themed dish, you’ll experiment with various vegetables, slicing and arranging them to resemble eerie shapes and figures. The hummus acts as a canvas, allowing you to use it creatively to enhance the spooky design. This recipe isn’t only visually enchanting but also nutritious and delicious, making it a perfect addition to your Halloween feast.
Ingredients (Serving size: 4-6 people):
- 2 cups of hummus
- 1 cucumber
- 1 red bell pepper
- 1 yellow bell pepper
- 1 cup of cherry tomatoes
- 1 cup of baby carrots
- 1 small broccoli crown
- 1 small cauliflower crown
- 1 bunch of radishes
- Black olives (for decoration)
- 1 tablespoon of olive oil (optional)
- Salt and pepper to taste
Instructions:
- Prepare the Vegetables: Start by washing all the vegetables thoroughly. Peel the cucumber and slice it into thin rounds. Slice the red and yellow bell peppers into strips. Halve the cherry tomatoes and trim the stems off the radishes. Break the broccoli and cauliflower into bite-sized florets.
- Design Your Tray: On a large platter or tray, begin by placing the hummus in the center. Use a spoon to swirl it into a ghostly shape or smooth it flat if you prefer. Arrange the cucumber slices around the hummus to form a border.
- Create Spooky Shapes: Use the bell pepper strips to create creepy figures such as spiders, or use them to spell out a spooky word like “Boo!” or “Eek!” Position the radishes and cherry tomatoes to form eyes and mouths on the hummus, turning it into a ghostly face.
- Add Vegetables for Depth: Place the broccoli and cauliflower florets around the edges of the tray. Use the baby carrots to add color and variety, arranging them in a fan shape or scattered pattern.
- Finishing Touches: Add black olives as pupils on the ghostly face or scatter them for additional decoration. Drizzle a little olive oil over the hummus for extra flavor if desired. Sprinkle salt and pepper over the vegetables to enhance their taste.
Extra Tips: When crafting your Eerie Veggie and Hummus Tray, consider using cookie cutters to shape vegetables into bats, pumpkins, or other Halloween motifs. Keep the hummus and vegetables chilled until serving to maintain freshness and crispness.
If you want to add a bit more flair, consider using flavored hummus varieties or adding a sprinkle of paprika for a pop of color. Adjust the types of vegetables according to the preferences of your guests, ensuring a variety of textures and flavors.
Bewitched Bread and Dip Assortment
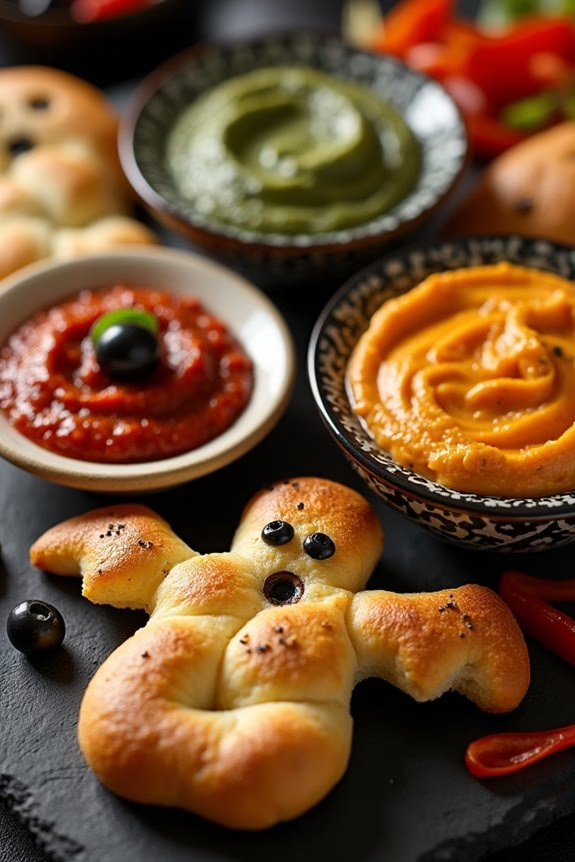
Bewitched Bread and Dip Assortment is a perfect addition to your Halloween charcuterie board, combining spooky charm with delightful flavors. This dish features an array of creatively shaped breads paired with a variety of dips, each selected to complement the textures and tastes of the breads. With a little imagination, you can transform everyday ingredients into a thrilling centerpiece for your Halloween gathering.
Ideal for sharing, this assortment promises to delight guests young and old with its bewitching presentation and delicious flavors.
To create a Bewitched Bread and Dip Assortment, you’ll need a selection of breads shaped like ghosts, pumpkins, and other Halloween-themed figures. These can be made from store-bought dough or homemade recipes, depending on your preference and time. The dips should provide a mix of flavors and textures, such as a creamy spinach dip, a spicy roasted red pepper hummus, and a rich, cheesy queso.
Arrange the breads and dips artfully, adding edible decorations like olives for eyes or pepper strips for additional color and flair. This recipe serves 4-6 people, making it perfect for a small gathering or as part of a larger Halloween feast.
Ingredients:
- 1 loaf of store-bought or homemade bread dough
- 1 cup spinach dip
- 1 cup roasted red pepper hummus
- 1 cup queso dip
- Black olives (for decoration)
- Red and green bell peppers (for decoration)
- Olive oil
- Salt
- Pepper
- Garlic powder
Instructions:
- Prepare the Bread: Preheat your oven to 375°F (190°C). Roll out the bread dough on a lightly floured surface to about 1/4-inch thickness. Use Halloween-themed cookie cutters to cut out shapes like ghosts, pumpkins, and bats. Place the shaped dough on a baking sheet lined with parchment paper.
- Season the Bread: Lightly brush the shaped dough with olive oil. Sprinkle with salt, pepper, and garlic powder to add flavor. This will give the bread a nice golden finish and a subtle taste.
- Bake the Bread: Bake in the preheated oven for 12-15 minutes or until the bread is golden brown and fully cooked. Remove from the oven and let cool on a wire rack.
- Prepare the Dips: While the bread is baking, prepare your dips. If using store-bought dips, verify they’re at room temperature. If making from scratch, follow your favorite recipes for spinach dip, roasted red pepper hummus, and queso.
- Arrange the Board: On a large serving board or platter, arrange the cooled bread shapes. Place the dips in small bowls or ramekins and distribute them around the board. Garnish with black olives and sliced bell peppers to enhance the visual appeal.
- Decorate: Use black olives for eyes or other facial features on the bread shapes. Slice bell peppers into thin strips to create pumpkin vines or spooky accents around the board.
Extra Tips:
For an even more magical touch, consider using food coloring to tint your dips in Halloween colors like orange, green, or purple. If you have extra time, try making bread with activated charcoal for a hauntingly dark appearance.
Make sure to label the dips if any contain allergens such as dairy or nuts. Finally, keep the bread covered until serving time to prevent it from drying out. With these tips, your Bewitched Bread and Dip Assortment will be a showstopper at your Halloween event!
Monster-Themed Sweet Treat Board

Celebrate Halloween with a spooktacular Monster-Themed Sweet Treat Board that’s certain to delight both kids and adults alike. This imaginative charcuterie board combines a variety of sweet treats arranged in a way that’s both visually appealing and deliciously engaging. Perfect for a Halloween party or a fun family gathering, this board invites everyone to indulge in the playful spirit of the holiday with a selection of candies, fruits, and baked goods all dressed up in their most monstrous attire.
The Monster-Themed Sweet Treat Board is crafted to serve 4-6 people, featuring an assortment of delightful sweets in vibrant colors and shapes that resemble adorable little monsters. This board offers a balance of textures and flavors, from the crunchiness of decorated cookies to the smoothness of chocolate-dipped fruits. Whether it’s spooky eyes made from candy or ghoulish grins formed by clever arrangements, this board will surely be the centerpiece of your Halloween festivities.
Ingredients for Serving Size of 4-6 People:
- 12 decorated monster cookies
- 1 cup chocolate-covered pretzels
- 1 cup gummy worms
- 1/2 cup candy eyeballs
- 1 cup assorted Halloween candies (e.g., candy corn, mini chocolate bars)
- 1 cup fresh strawberries, halved
- 1/2 cup melon balls (cantaloupe or watermelon)
- 1/2 cup blackberries
- 1/2 cup chocolate chips
- 1 tube of store-bought vanilla icing
- Food coloring (green, purple, orange)
- 1/4 cup crushed graham crackers
- 1/4 cup marshmallow fluff
Cooking Instructions:
- Prepare the Board Base: Begin by selecting a large serving board or platter. This will be the base for your sweet treat arrangement. Clear enough space on a table or counter to comfortably work on your board.
- Decorate the Cookies: Use the store-bought vanilla icing and divide it into three small bowls. Add a few drops of green, purple, and orange food coloring to each bowl and mix until the desired colors are achieved. Decorate the cookies with the colored icing and add candy eyeballs to create monster faces. Allow them to set for a few minutes.
- Arrange the Fruits: Halve the strawberries and create melon balls. Lay them out on the board in clusters. Add the blackberries alongside the melon balls, creating small groups of fruit to balance out the candy.
- Assemble the Sweet Treats: Place the chocolate-covered pretzels and gummy worms around the fruits. Scatter the assorted Halloween candies throughout the board, making sure to fill any gaps.
- Add Extra Details: Sprinkle the crushed graham crackers over the board to mimic a “monster dust” effect. Use the marshmallow fluff to create small “cobweb” designs around the board’s edges. Finally, distribute the chocolate chips in small piles or lines for added texture.
- Finalize the Arrangement: Take a moment to adjust the placement of the treats, guaranteeing that the board looks balanced and appealing. Make sure that each section of the board is easily accessible to guests.
Extra Tips:
When creating your Monster-Themed Sweet Treat Board, feel free to get creative with the monster decorations. You can use different shapes of candy or even mini marshmallows to add variety.
If you want to add a personalized touch, consider making homemade cookies instead of store-bought ones and decorating them with unique monster designs.
To guarantee the board remains fresh throughout your event, consider chilling fruits and certain candies in the refrigerator before arranging them. This will help maintain their shape and prevent them from becoming too sticky.
Haunted Chocolate and Pretzel Mix
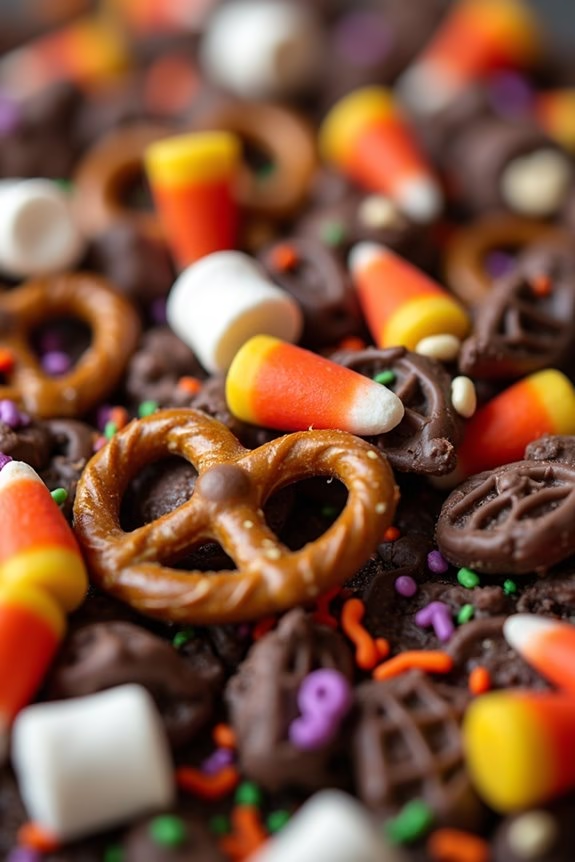
If you’re looking to add a touch of spooky charm to your Halloween charcuterie board, a Haunted Chocolate and Pretzel Mix is the perfect treat. This delightful combination of sweet and salty flavors is easy to make and will definitely be a hit with your guests. With just a few ingredients, you can create a festive and delicious snack that captures the essence of Halloween.
The Haunted Chocolate and Pretzel Mix combines the rich, velvety taste of chocolate with the satisfying crunch of pretzels, accented by the sweetness of candy corn and the eerie appeal of gummy worms. It’s an irresistible treat that caters to both children and adults alike. This recipe serves 4-6 people, making it ideal for a small Halloween gathering or a cozy night in with family.
Ingredients:
- 2 cups pretzel twists
- 1 cup semi-sweet chocolate chips
- 1/2 cup white chocolate chips
- 1 cup candy corn
- 1 cup gummy worms
- 1/2 cup mini marshmallows
- 1/4 cup Halloween-themed sprinkles
Cooking Instructions:
- Prepare the Pretzels: Spread the pretzel twists evenly on a large baking sheet lined with parchment paper. This will help prevent the chocolate from sticking and make cleanup easier.
- Melt the Chocolate: In a microwave-safe bowl, melt the semi-sweet chocolate chips in 30-second intervals, stirring after each interval, until smooth and fully melted. Be careful not to overheat the chocolate, as it can seize.
- Coat the Pretzels: Drizzle the melted semi-sweet chocolate over the pretzels, using a spoon or small spatula to guarantee even coverage. Allow the chocolate to set slightly, but not completely.
- Add the White Chocolate: Melt the white chocolate chips in the same manner as the semi-sweet chocolate. Drizzle the melted white chocolate over the chocolate-coated pretzels to create a ghostly effect.
- Incorporate Additional Ingredients: While the chocolate is still soft, sprinkle the candy corn, gummy worms, and mini marshmallows over the pretzels. Press them gently into the chocolate to adhere.
- Finish with Sprinkles: Top the mix with Halloween-themed sprinkles to add a festive touch. Allow the chocolate to fully set at room temperature or place the tray in the refrigerator for quicker setting.
- Break and Serve: Once the chocolate is firm, break the mix into clusters or pieces. Serve in a bowl or arrange on a Halloween charcuterie board for a spooky presentation.
Extra Tips:
When melting chocolate, make sure that no water comes in contact with it, as even a small amount can cause the chocolate to seize and become unworkable. If you prefer, you can use a double boiler as an alternative to the microwave for melting chocolate, which provides more control over the process.
Additionally, feel free to customize your Haunted Chocolate and Pretzel Mix with other Halloween candies or nuts to suit your taste preferences. Enjoy the creative process and have fun making this deliciously eerie treat!
Frightful Popcorn and Snack Display

Transform your Halloween charcuterie board into an eerie yet delightful feast with this Frightful Popcorn and Snack Display. Perfect for a gathering of 4-6 people, this snack board is brimming with spooky-themed treats that are as fun to look at as they’re to eat. With a mix of savory and sweet elements, this display offers a perfect balance that caters to all taste buds. From ghostly popcorn to creepy critter crackers, every component is designed to add an element of spookiness to your Halloween celebration.
This Frightful Popcorn and Snack Display isn’t only about taste but also about presentation. You can use a variety of themed serving dishes and props to enhance the Halloween ambiance. Utilizing different textures and colors will make your board visually appealing and exciting for guests to explore. The board is easy to customize based on dietary preferences and can include a range of homemade and store-bought elements for a quick and impressive spread.
Ingredients (Serving Size: 4-6 people):
- 6 cups of plain popcorn
- 1 cup of caramel popcorn
- 1 cup of chocolate-covered pretzels
- 1 cup of candy corn
- 1 cup of gummy worms
- 1 cup of salted nuts (e.g., almonds or peanuts)
- 1 cup of cheese crackers
- 1 cup of vegetable chips
- 1/2 cup of dried cranberries
- 1/2 cup of dark chocolate chips
- Small plastic spiders or Halloween-themed props (for decoration)
Cooking Instructions:
- Prepare the Popcorn: Start by popping your plain popcorn using your preferred method, whether it’s an air popper, stovetop, or microwave. Once popped, let it cool completely.
- Assemble the Base Layer: On a large serving board or platter, spread out the plain popcorn evenly to create the base of your display. This will serve as the foundation for layering other snacks.
- Add Savory Elements: Scatter the cheese crackers and salted nuts across the popcorn base. Confirm they’re evenly distributed to complement the popcorn and add a savory touch.
- Incorporate Sweet Treats: Add the chocolate-covered pretzels, caramel popcorn, and candy corn. Position these sweet elements in separate clusters to create visual interest and flavor variety.
- Introduce Gummy and Crunchy Textures: Place gummy worms and vegetable chips in different sections of the board. This will add chewy and crunchy textures, enhancing the snacking experience.
- Finish with Dried Fruit and Chocolate: Sprinkle dried cranberries and dark chocolate chips over the entire board. These add a pop of color and a hint of tartness and sweetness.
- Decorate with Props: Finally, strategically place small plastic spiders or Halloween-themed props among the snacks to enhance the spooky atmosphere without compromising the food’s edibility.
Extra Tips:
When creating your Frightful Popcorn and Snack Display, consider the dietary preferences of your guests. You can easily substitute ingredients to accommodate gluten-free or nut-free needs.
Also, think about how you’ll serve the snacks—having small serving spoons or tongs available can help guests easily grab what they want without disturbing the entire display.
For an extra touch of spookiness, you can use a black or dark-colored board to create a dramatic contrast with the colorful snacks. Don’t forget to have fun with the arrangement, as it’s all about creating a festive and inviting atmosphere for your Halloween gathering.
Ghostly Marshmallow and Graham Arrangement

This Halloween, delight your guests with a spooky yet sweet Ghostly Marshmallow and Graham Arrangement. This festive charcuterie board combines the classic flavors of marshmallows and graham crackers with a Halloween twist. Perfect for a crowd of 4-6 people, it features an assortment of ghost-shaped marshmallows, a variety of graham crackers, and different sweet treats that will make your Halloween party hauntingly delicious.
The Ghostly Marshmallow and Graham Arrangement isn’t only easy to prepare but also fun to assemble, making it an ideal activity to enjoy with friends and family. Designed to be visually appealing, it brings together a variety of textures and flavors, perfect for both children and adults to enjoy. This arrangement will surely be the highlight of your Halloween dessert table, enchanting guests with its ghostly charm and sweet indulgence.
Ingredients for 4-6 people:
- 12 ghost-shaped marshmallows
- 1 cup mini marshmallows
- 1 box (approximately 14.4 oz) of graham crackers
- 1 cup chocolate chips
- 1 cup white chocolate chips
- 1 cup caramel sauce
- 1/2 cup candy corn
- 1/2 cup chocolate-covered pretzels
- 1/2 cup assorted Halloween-themed candies (e.g., gummy worms, spooky sprinkles)
- 1/4 cup chopped nuts (optional)
Cooking Instructions:
- Prepare the Marshmallows: Begin by arranging the ghost-shaped marshmallows on a large platter or charcuterie board. Position them in a way that they’re evenly distributed, creating a focal point for the arrangement.
- Arrange the Graham Crackers: Break the graham crackers into smaller sections and arrange them around the marshmallows. Create sections or patterns to add visual interest, ensuring easy access for guests to grab.
- Melt the Chocolates: In separate microwave-safe bowls, melt the chocolate chips and white chocolate chips in 30-second intervals, stirring in between until smooth. Be careful not to overheat to prevent burning.
- Drizzle the Sauces: Drizzle the melted chocolates and caramel sauce over the marshmallows and graham crackers. Use a spoon for control, creating a web-like effect to enhance the spooky theme.
- Add Additional Treats: Scatter mini marshmallows, candy corn, chocolate-covered pretzels, and other Halloween-themed candies across the board. Incorporate chopped nuts if desired, ensuring a balanced mix of sweets and textures.
- Finalize the Arrangement: Inspect the board for any empty spaces and fill them with additional candies or pretzels to complete the look. Adjust the items as necessary to maintain an appealing presentation.
Extra Tips:
When preparing the Ghostly Marshmallow and Graham Arrangement, consider the colors and shapes of your candies and treats to create a visually appealing board. Feel free to customize the arrangement with your favorite Halloween-themed candies or add fruits like strawberries and apples for a fresh contrast.
Confirm that your board is sturdy enough to hold the weight of the items, and remember that presentation is key—so have fun arranging your spooky creation!
Sinister Seafood and Citrus Array

Create a haunting centerpiece for your Halloween gathering with our Sinister Seafood and Citrus Array. This charcuterie board combines the fresh and zesty flavors of the ocean with the tartness and vibrance of citrus fruits, providing a unique and chilling addition to your spooky soiree.
The juxtaposition of colors and textures will both delight and surprise your guests, leaving them in awe of your culinary creativity. The Sinister Seafood and Citrus Array is perfect for serving 4-6 people, making it ideal for smaller gatherings or as a part of a larger spread.
The rich flavors of the seafood, combined with the invigorating citrus, create a balanced dish that’s both savory and tangy. As you assemble the board, focus on creating an eerie aesthetic with careful placement of each component. This not only enhances the visual appeal but also guarantees every bite is a harmonious blend of flavors.
Ingredients:
- 1 lb cooked shrimp, peeled and deveined
- 1 lb smoked salmon
- 1/2 lb crab meat
- 2 lemons, thinly sliced
- 2 limes, thinly sliced
- 1 orange, thinly sliced
- 1 small bunch of fresh dill
- 1/2 cup black olives
- 1 cup mixed cherry tomatoes
- 1/4 cup capers
- 1/2 cup cocktail sauce
- 1/2 cup aioli
- Charcoal crackers or dark bread slices
- Fresh parsley for garnish
Cooking Instructions:
- Prepare the Board: Choose a large, flat board or platter to arrange your charcuterie. Begin by placing small bowls or ramekins on the board for the cocktail sauce and aioli.
- Arrange the Seafood: Start with the smoked salmon, folding or rolling slices to create visual interest. Place the cooked shrimp in clusters around the board. Position the crab meat in small mounds, ensuring an even distribution across the board.
- Add Citrus Slices: Interspace the seafood with slices of lemon, lime, and orange. The citrus not only adds flavor but also enhances the eerie theme with its bright, contrasting colors.
- Incorporate Fresh Elements: Scatter fresh dill and parsley around the board to add a touch of greenery. Place mixed cherry tomatoes and black olives in clusters for added color and texture.
- Finish with Accents: Sprinkle capers over the seafood, giving a salty punch to the arrangement. Add the charcoal crackers or dark bread slices around the edges for guests to enjoy alongside the seafood.
- Serve: Ensure everything is evenly spaced for easy access. Serve immediately or refrigerate until ready to serve, allowing the vibrant flavors to meld together.
Extra Tips:
For an added spooky effect, consider using a black or dark-themed board to enhance the Halloween aesthetic. You can also incorporate edible flowers or microgreens for added color and visual interest.
If you prefer a more intense citrus flavor, squeeze additional lemon or lime juice over the seafood just before serving. Remember, this dish is as much about presentation as it’s about flavor, so take your time in arranging each element for maximum impact.
Wickedly Witchy Cookie Compilation
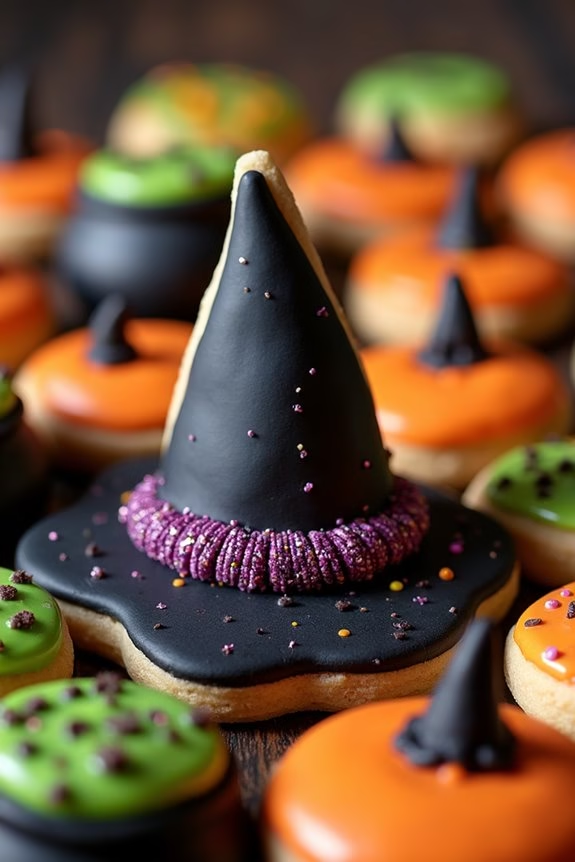
Halloween is a time for creativity, fun, and delicious treats, and nothing embodies these elements more than a Wickedly Witchy Cookie Compilation. This delightful concoction is a perfect addition to your Halloween charcuterie board, offering a variety of spooky cookies that will enchant both children and adults alike.
The idea is to create an assortment of cookies, each designed with a different wicked witch theme in mind, such as witch hats, broomsticks, and cauldrons. With a mix of flavors and colors, this treat not only satisfies the taste buds but also serves as an eye-catching centerpiece for your Halloween festivities.
The Wickedly Witchy Cookie Compilation is versatile, allowing you to play with different cookie bases, icing colors, and decorative elements to suit your party’s theme. This recipe will guide you through creating an assortment of 24-36 cookies, serving approximately 4-6 people. Whether you’re a baking novice or a seasoned pro, this easy-to-follow recipe will help you craft a bewitching cookie selection that adds a touch of magic to your Halloween celebration.
Ingredients
For the cookie dough:
- 2 1/2 cups all-purpose flour
- 1 cup unsalted butter, softened
- 1 cup granulated sugar
- 1 large egg
- 1 teaspoon vanilla extract
- 1/2 teaspoon baking powder
- 1/4 teaspoon salt
For the royal icing:
- 3 cups powdered sugar
- 2 large egg whites
- 1 teaspoon lemon juice
- Food coloring (black, purple, green, orange)
For decoration:
- Black licorice strings
- Mini chocolate chips
- Edible glitter
- Sprinkles
Instructions
1. Prepare the Cookie Dough: In a large mixing bowl, cream together the softened butter and granulated sugar until light and fluffy. Add the egg and vanilla extract, mixing well.
In a separate bowl, whisk together the flour, baking powder, and salt. Gradually add the dry ingredients to the wet ingredients, mixing until just combined. Divide the dough into two disks, wrap in plastic wrap, and refrigerate for at least 1 hour.
2. Preheat and Shape: Preheat your oven to 350°F (175°C). Line two baking sheets with parchment paper. Roll out the chilled dough on a lightly floured surface to about 1/4 inch thickness. Use witch-themed cookie cutters (hat, broom, cauldron shapes) to cut out cookies and place them on the prepared baking sheets.
3. Bake: Bake the cookies in the preheated oven for 10-12 minutes, or until the edges are golden brown. Remove from the oven and allow to cool on the baking sheets for 5 minutes before transferring to a wire rack to cool completely.
4. Make the Royal Icing: While the cookies cool, prepare the royal icing by beating the powdered sugar, egg whites, and lemon juice together in a clean bowl until smooth and thick. Divide the icing into separate bowls and tint each with your desired food coloring.
5. Decorate: Once the cookies are completely cool, use the colored royal icing to pipe designs onto each cookie. For added detail, use black licorice strings as broomstick handles, mini chocolate chips for buttons on witch hats, and sprinkle edible glitter for a magical touch. Allow the icing to set completely before serving.
Extra Tips: When working with royal icing, keep it covered with a damp cloth or plastic wrap to prevent it from drying out while you work. If the icing is too thick, add a few drops of water to achieve your desired consistency. Conversely, add more powdered sugar if it’s too thin.
For a more vibrant color, use gel food coloring instead of liquid to avoid altering the consistency of the icing. Finally, let the cookies dry completely before stacking or storing to preserve the intricate designs.
Bone-Chilling Cheese and Cracker Stack

Transform your Halloween party table into a spooky spectacle with a Bone-Chilling Cheese and Cracker Stack. This eerie charcuterie board combines a haunting selection of cheeses, artisanal crackers, and ghoulish garnishes to delight your guests. The key to this dish is its artful arrangement, creating a visually striking centerpiece that balances flavor and fright. Perfect for 4-6 people, this dish combines savory cheeses, crispy crackers, and a few surprise ingredients to keep your guests on their toes.
The Bone-Chilling Cheese and Cracker Stack is perfect for a Halloween gathering, offering a mix of creamy, sharp, and tangy flavors. The cheeses in this recipe are selected not only for their taste but also for their potential to be carved or shaped into spooky designs. Pair these with an array of crackers that add texture and structure to your board. With a few simple touches, you can elevate this classic appetizer into a theme-appropriate dish that captures the spirit of the season.
Ingredients (serves 4-6):
- 8 oz aged cheddar cheese
- 8 oz brie cheese
- 8 oz blue cheese
- 8 oz gouda cheese
- 1 pack assorted artisan crackers
- 1 cup green grapes
- 1 cup black grapes
- 1/2 cup dried apricots
- 1/2 cup fig jam
- 1/4 cup roasted almonds
- 1/4 cup candied pecans
- 1/4 cup black olives
- 1/4 cup dried cranberries
- Fresh rosemary sprigs for garnish
Instructions:
1. Prepare the Cheeses:
Begin by slicing the aged cheddar into thin, rectangular pieces. For a Halloween touch, use small cookie cutters to create bat or pumpkin shapes from the cheddar. Cut the brie into wedges. For the blue cheese and gouda, crumble them into bite-sized pieces, making certain there are varied shapes and sizes for texture.
2. Arrange the Crackers:
On a large wooden board or platter, lay out the assorted crackers in circular or wavy patterns, leaving space in between for the cheeses and other elements. Mixing the cracker shapes and sizes will add visual interest.
3. Place the Cheeses:
Strategically place the cheeses around the board, making sure of an even distribution of colors and textures. Position the shaped cheddar pieces prominently to showcase their festive designs.
4. Add Fruits and Nuts:
Fill the gaps between the cheeses and crackers with clusters of green and black grapes, dried apricots, and small dollops of fig jam. Scatter the roasted almonds and candied pecans across the board for crunch.
5. Incorporate Spooky Elements:
Add the black olives and dried cranberries in small piles, providing a dark contrast and tangy flavor. Garnish the board with fresh rosemary sprigs, arranging them in a way that mimics eerie branches.
6. Final Touches:
Before serving, inspect the board to verify a balanced look, adjusting elements as needed to maintain an aesthetically pleasing and spooky arrangement.
Extra Tips:
For an added thrill, consider incorporating small, themed props like plastic spiders or faux cobwebs, keeping them clear of the food. If you want to enhance the flavors, consider drizzling a bit of honey over the blue cheese for a sweet counterpoint.
Finally, provide small cheese knives and spreaders to make serving easier for your guests. This attention to detail will guarantee your Bone-Chilling Cheese and Cracker Stack is as delightful to eat as it’s to behold.
Phantom Fruit and Yogurt Dipping Set

Phantom Fruit and Yogurt Dipping Set is the ultimate addition to your Halloween charcuterie board, bringing a spooky twist to a classic snack. This dish combines an assortment of fresh fruits with a hauntingly delicious yogurt dip, creating a balance of sweet and creamy flavors that are certain to delight guests of all ages.
The fruits are carefully chosen to reflect the colors and themes of the season, while the yogurt dip is enhanced with a touch of honey and vanilla, transforming it into a ghostly white treat that complements the vibrant fruits.
This dish is perfect for a serving size of 4-6 people, making it an ideal choice for small gatherings or family celebrations. The preparation is simple and requires minimal cooking, allowing you to focus on presentation and creativity.
With its eye-catching appearance and delightful taste, the Phantom Fruit and Yogurt Dipping Set is bound to become a Halloween favorite, offering a healthier option amidst the candy and sweets typically found at festive parties.
Ingredients (Serving Size: 4-6 people):
- 1 cup of strawberries, hulled and halved
- 1 cup of green grapes
- 1 cup of blueberries
- 1 cup of pineapple chunks
- 2 kiwis, peeled and sliced
- 1 cup of vanilla yogurt
- 2 tablespoons of honey
- 1 teaspoon of vanilla extract
- Wooden skewers (optional, for serving)
Cooking Instructions:
- Prepare the Fruits: Wash all the fruits thoroughly. Hull and halve the strawberries, slice the kiwis, and cut the pineapple into chunks. Confirm the grapes and blueberries are free from stems.
- Mix the Yogurt Dip: In a medium-sized bowl, combine the vanilla yogurt with honey and vanilla extract. Stir well until the ingredients are fully integrated and the dip is smooth.
- Assemble the Board: Arrange the prepared fruits artfully on a large serving platter or board. You can use wooden skewers to create fruit kabobs, alternating the different fruits for color variety.
- Serve the Dip: Pour the yogurt dip into a small bowl and place it on the board alongside the fruits. Confirm it’s easily accessible for dipping.
- Final Touches: To add a spooky touch, you can decorate the board with small Halloween-themed props like plastic spiders or miniature pumpkins, ensuring they don’t come into contact with the food directly.
Extra Tips:
When creating your Phantom Fruit and Yogurt Dipping Set, consider using a variety of fruits to cater to different tastes and dietary needs. You can substitute or add seasonal fruits such as apples or pears if desired.
To keep the fruits fresh and vibrant, prepare them just before serving. For an extra spooky touch, consider using a cookie cutter to cut the fruits into Halloween shapes like bats or ghosts. Additionally, if you want to make the yogurt dip thicker, you can strain it using a cheesecloth to remove excess liquid before adding the honey and vanilla.
Vampire-Inspired Antipasto Collection
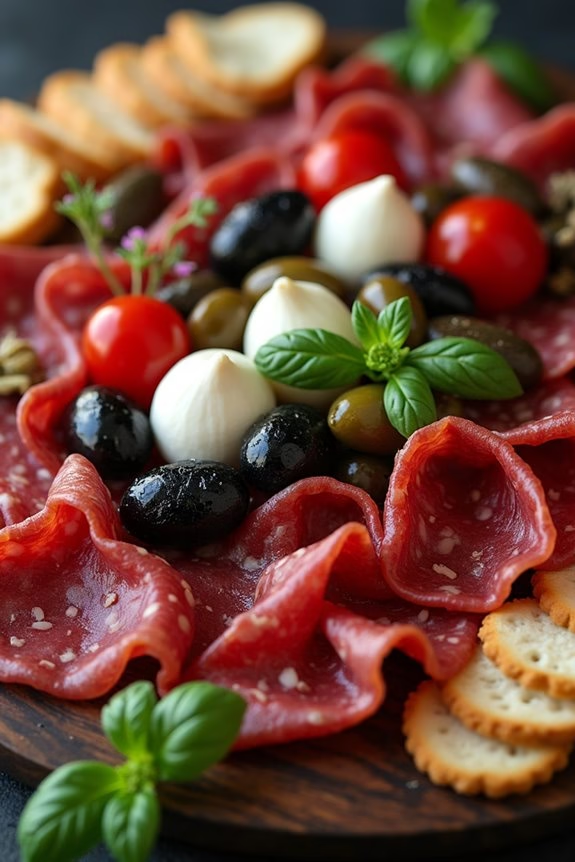
Embrace the eerie elegance of Halloween with a Vampire-Inspired Antipasto Collection. This charcuterie board brings together a tantalizing mix of flavors and textures, offering a feast for both the eyes and the palate. Featuring a variety of classic Italian antipasto elements with a sinister twist, this board is designed to captivate your guests and elevate your Halloween festivities.
Imagine a spread where deep red hues mimic the allure of the vampire‘s favorite drink, while a selection of cheeses, cured meats, and marinated vegetables offer a savory bite.
Creating this ghoulishly delightful spread requires a careful selection of ingredients that play on the theme of the undead. The rich reds of roasted red peppers, sun-dried tomatoes, and spicy salami mimic the color of blood, while the creamy textures of mozzarella balls and the sharp bite of blue cheese add complexity to the board.
Accompanied by olives, artichokes, and an assortment of crackers and breadsticks, this board serves 4-6 people, making it perfect for a small gathering or as a part of a larger feast.
Ingredients for 4-6 people:
- 1 cup marinated mozzarella balls
- 1 cup sun-dried tomatoes, drained
- 1 cup roasted red peppers, sliced
- 1/2 cup black olives
- 1/2 cup green olives
- 1/2 cup artichoke hearts
- 6 slices spicy salami
- 6 slices prosciutto
- 6 slices coppa
- 1/2 cup blue cheese, crumbled
- 1 baguette, sliced
- Assorted crackers and breadsticks
- Fresh basil leaves for garnish
- Optional: edible flowers for decoration
Cooking Instructions:
- Prepare the Board: Begin by selecting a large wooden board or platter to assemble your antipasto collection. Verify it’s clean and dry.
- Arrange the Cheeses: Place the marinated mozzarella balls and blue cheese crumbles in separate small bowls or directly on the board. Position these bowls strategically around the board to create balance.
- Layer the Meats: Fold or roll the slices of salami, prosciutto, and coppa, and arrange them in clusters around the cheese. This creates a visually appealing display and makes it easier for guests to pick their desired meats.
- Add the Vegetables: Scatter the sun-dried tomatoes, roasted red peppers, black and green olives, and artichoke hearts around the meats and cheeses. This adds vibrant color and varied textures to the board.
- Include the Bread and Crackers: Slice the baguette and arrange it alongside an assortment of crackers and breadsticks. Place these items near the cheeses for easy pairing.
- Garnish and Decorate: Finish the board with fresh basil leaves placed intermittently for a splash of green. If using, add edible flowers for an extra spooky yet elegant touch.
- Serve and Enjoy: Present the board to your guests, ensuring they’ve small plates and utensils to help themselves. Encourage them to mix and match the elements for a unique flavor experience.
Extra Tips:
When assembling your Vampire-Inspired Antipasto Collection, consider the balance of flavors and textures. The board should have a good mix of spicy, savory, and tangy elements.
Feel free to customize the selection based on your guests’ preferences or dietary restrictions. For a more immersive experience, dim the lights and use red candles to enhance the vampire theme.
Chilling Cheddar and Salami Selection

When it comes to conjuring up a spooky yet sophisticated spread for your Halloween festivities, a Chilling Cheddar and Salami Selection Charcuterie Board is the perfect choice. This dish combines the rich, creamy texture of aged cheddar with the savory, spicy notes of salami, all enhanced by an array of seasonal and eerie accompaniments. Not only is this board visually engaging, but it also offers a harmonious blend of flavors that will delight your guests and keep them coming back for more.
Creating this dish requires careful attention to detail, guaranteeing that each element complements the others while enhancing the overall Halloween theme. The key is to select high-quality ingredients and arrange them thoughtfully on the board, creating an enticing display. With the right balance of textures and flavors, your Chilling Cheddar and Salami Selection will be the star of your Halloween spread, providing a versatile and engaging experience for a serving size of 4-6 people.
Ingredients:
- 8 oz aged cheddar cheese
- 8 oz spicy salami, thinly sliced
- 1 cup black olives
- 1 cup green olives stuffed with red pimentos
- 1/2 cup dried cranberries
- 1/2 cup mixed nuts (such as almonds and walnuts)
- 1 small baguette, sliced
- 1 cup assorted crackers
- 1/4 cup fig jam or apple butter
- Fresh rosemary sprigs for garnish
- Edible candy eyes or small Halloween-themed decorations
Instructions:
- Prepare the Cheddar and Salami: Begin by slicing the aged cheddar cheese into thin squares or triangles. Arrange the spicy salami in circular layers or rolled up for added visual appeal.
- Assemble the Olives and Nuts: Place the black and green olives into small bowls or ramekins and position them on the board. Scatter the mixed nuts around the edges for a crunchy texture contrast.
- Add the Sweet Elements: Distribute the dried cranberries evenly across the board to add a pop of color and sweetness. Include a small bowl of fig jam or apple butter for spreading, placed near the bread and crackers.
- Arrange the Bread and Crackers: Fan out the sliced baguette and assorted crackers around the cheese and meats. Guarantee there’s a variety of textures and shapes for interest.
- Garnish and Decorate: Tuck fresh rosemary sprigs between the elements for a fragrant touch. Add edible candy eyes or small Halloween-themed decorations to create a spooky atmosphere.
- Final Touches: Step back and confirm everything is visually balanced, making adjustments as necessary to create an inviting and hauntingly beautiful presentation.
Extra Tips:
For an even more chilling effect, consider using a slate or dark-colored board to enhance the Halloween theme. You can also experiment with different types of cured meats and cheeses, such as prosciutto or gouda, to add variety to your board.
If you want to make your board more interactive, provide small tongs or toothpicks for guests to easily pick up their selections. Finally, consider pairing your Chilling Cheddar and Salami Selection with a robust red wine or a spiced cider to complement the flavors and complete the festive experience.