

The holiday season is just around the corner, and I’m on the hunt for some adorable Christmas appetizer ideas that will charm both kids and adults alike. This year, I discovered a collection of cute recipes that are perfect for adding a touch of festive fun to any gathering. Picture a table filled with Reindeer Cheese Balls and Snowman Mozzarella Sticks, each one crafted to delight. Are you as excited as I am about these festive treats? Let’s explore these tasty possibilities together!
Reindeer Cheese Balls
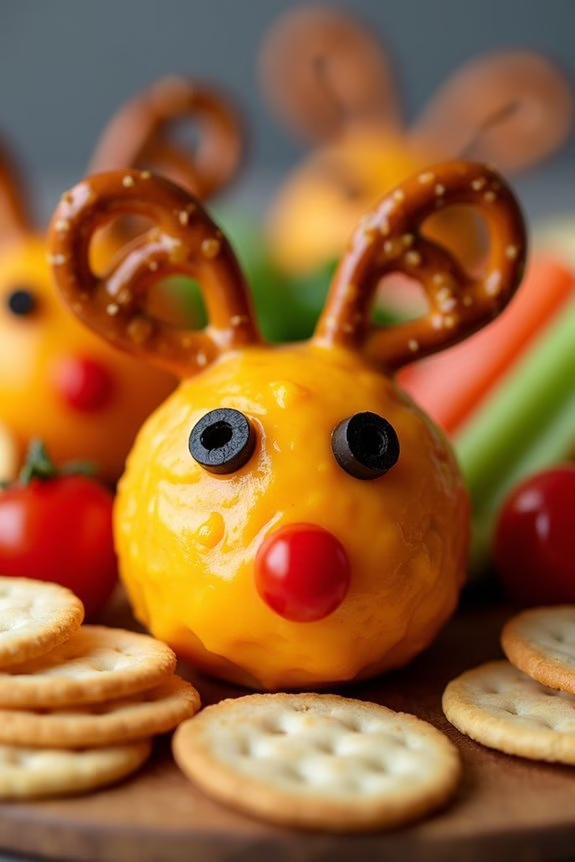
Reindeer Cheese Balls are a delightful and festive appetizer perfect for your Christmas gatherings. These adorable and delicious cheese balls not only bring a playful element to your holiday table, but they’re also packed with flavor. Ideal for serving a crowd of 4-6 people, these cheese balls are made with a blend of creamy cheeses and savory seasonings, all decorated with fun edible antlers and faces to resemble cute little reindeer.
The preparation of Reindeer Cheese Balls is simple yet allows room for creativity. By combining various cheeses and seasonings, you’ll create a smooth and flavorful mixture that can be easily molded into spherical shapes.
Once formed, the cheese balls are decorated with pretzels for antlers, olives for eyes, and a small cherry tomato or a piece of red bell pepper for the nose, completing their festive look. Serve them with crackers or vegetable sticks for a perfect holiday appetizer.
Ingredients for 4-6 servings:
- 16 oz cream cheese, softened
- 8 oz sharp cheddar cheese, shredded
- 2 teaspoons Worcestershire sauce
- 1 teaspoon garlic powder
- 1 teaspoon onion powder
- 1/2 teaspoon black pepper
- 1/4 cup chopped green onions
- 1/2 cup chopped pecans
- Pretzel sticks or mini pretzels
- Whole black olives
- Cherry tomatoes or red bell pepper
- Crackers or vegetable sticks for serving
Cooking Instructions:
- Prepare the Cheese Mixture: In a large bowl, combine the softened cream cheese, shredded cheddar cheese, Worcestershire sauce, garlic powder, onion powder, and black pepper. Mix thoroughly until all ingredients are well blended and smooth.
- Shape the Cheese Balls: Stir in the chopped green onions and pecans into the cheese mixture. Using your hands, shape the mixture into small balls, approximately 2 inches in diameter, and place them on a parchment-lined tray.
- Chill the Cheese Balls: Cover the cheese balls with plastic wrap and refrigerate for at least one hour. This will help them firm up and make them easier to handle when decorating.
- Decorate the Cheese Balls: Once the cheese balls are chilled and firm, it’s time to decorate. Insert pretzel sticks or mini pretzels into the top of each cheese ball to create antlers. Cut small pieces of black olives for eyes and use cherry tomatoes or red bell pepper pieces for noses. Gently press these into the cheese balls to create reindeer faces.
- Serve: Arrange the decorated reindeer cheese balls on a platter and serve them with crackers or vegetable sticks for dipping.
Extra Tips:
When making Reindeer Cheese Balls, verify that your cream cheese is at room temperature before mixing to achieve a smooth and creamy texture.
You can also customize the flavor by adding your favorite herbs or spices. If you want to prepare these cheese balls in advance, you can make them a day ahead and store them in the refrigerator until you’re ready to serve.
Just wait to add the pretzel antlers until right before serving, as they can become soft if left in the cheese for too long. Enjoy this whimsical and tasty addition to your holiday spread!
Snowman Mozzarella Sticks
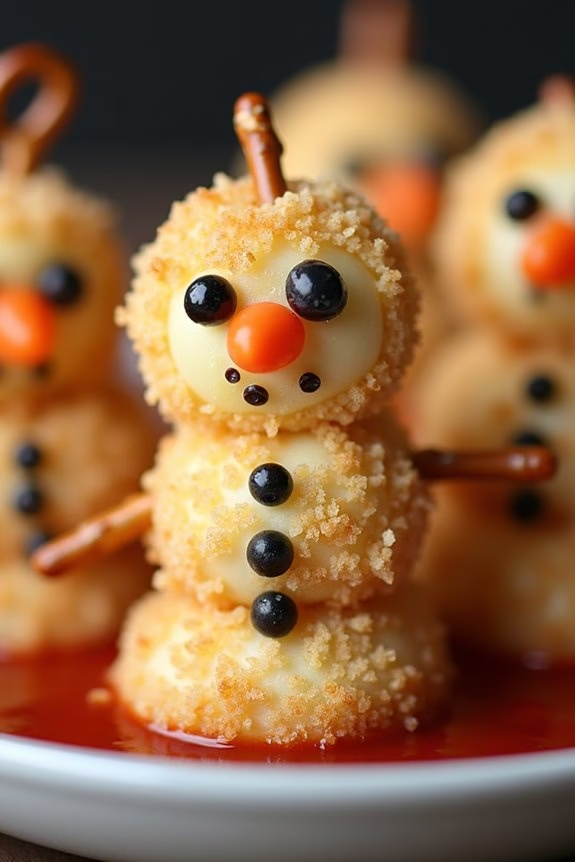
Snowman Mozzarella Sticks are a delightful and whimsical appetizer perfect for any Christmas gathering. These adorable snacks not only serve as a delicious treat but also double as charming table decor, bringing a smile to both kids and adults. The snowman motif adds a festive touch to your spread, making them a hit at any holiday party. With gooey mozzarella inside and a crispy, golden exterior, these snowman sticks are bound to be a crowd-pleaser.
Crafting Snowman Mozzarella Sticks is a fun activity that can involve the whole family. Whether you’re an experienced cook or a novice in the kitchen, this recipe is straightforward and enjoyable to make. The key is to assemble the snowmen with care, guaranteeing they hold their shape during the cooking process. Once baked to perfection, they can be served with marinara sauce or your favorite dip for an extra burst of flavor.
Ingredients (Serves 4-6):
- 12 string cheese sticks
- 1 cup all-purpose flour
- 2 large eggs
- 2 cups panko breadcrumbs
- 1 teaspoon garlic powder
- 1 teaspoon Italian seasoning
- Salt and pepper to taste
- 24 mini pretzel sticks (for arms)
- 12 small carrot pieces (for noses)
- 24 black olive slices or peppercorns (for eyes and buttons)
- Cooking spray
- Marinara sauce, for serving
Cooking Instructions:
- Prepare the Cheese: Cut each string cheese stick into three equal parts. These will form the sections of the snowman.
- Set Up Coating Stations: In three separate shallow bowls, place flour in the first bowl, beat the eggs in the second bowl, and mix the panko breadcrumbs with garlic powder, Italian seasoning, salt, and pepper in the third bowl.
- Coat the Cheese: Roll each cheese piece in the flour, then dip into the beaten eggs, and finally coat with the seasoned panko mixture. Make sure each piece is fully covered for a crispy texture.
- Assemble the Snowmen: For each snowman, stack three coated cheese pieces vertically and secure them with a toothpick. Insert two pretzel sticks on either side of the middle section for arms, and place a carrot piece as a nose on the top section. Use olive slices or peppercorns to create eyes and buttons.
- Freeze Assembled Snowmen: Place the snowmen on a baking sheet and freeze for at least 30 minutes. This helps them maintain their shape during baking.
- Preheat the Oven: Preheat your oven to 400°F (200°C).
- Bake the Snowmen: Lightly spray the frozen snowmen with cooking spray and bake for 10-12 minutes, or until golden brown and crispy.
- Serve: Allow the snowmen to cool slightly before serving with warm marinara sauce for dipping.
Extra Tips: To guarantee your Snowman Mozzarella Sticks turn out perfectly, make sure to freeze them thoroughly before baking. This step is vital for preventing the cheese from melting too quickly in the oven.
Additionally, if you want to make them ahead of time, you can prepare and freeze the assembled snowmen, then bake them just before serving. Experiment with different dips like ranch or garlic aioli to find the perfect pairing for your holiday appetizer.
Christmas Tree Veggie Platter

The Christmas Tree Veggie Platter is a festive and healthy appetizer perfect for holiday gatherings. This vibrant and colorful dish is designed to resemble a Christmas tree, making it a delightful addition to your holiday table. Not only does it look spectacular, but it also offers a nutritious option for guests, featuring a variety of fresh vegetables and a creamy dip to complement the crisp flavors.
Whether you’re hosting a large holiday party or an intimate family dinner, this platter is sure to impress.
Creating the Christmas Tree Veggie Platter isn’t only fun but also incredibly simple. You can customize the selection of vegetables based on your preferences or what’s in season. The key is to choose a variety of colors to create a vibrant “tree” appearance. This dish is suitable for serving 4-6 people, making it an ideal choice for small gatherings. Additionally, it can be prepared in advance, allowing you to focus on other aspects of your holiday meal.
Ingredients (serving size of 4-6 people):
- 1 broccoli head
- 1 pint cherry tomatoes
- 1 yellow bell pepper
- 1 red bell pepper
- 1 cucumber
- 1/2 cup baby carrots
- 1/4 cup black olives
- 1/2 cup cauliflower florets
- 1 cup hummus or ranch dip
- Fresh parsley for garnish
Instructions:
- Prepare the Vegetables: Start by washing all your vegetables thoroughly. Cut the broccoli into small florets, slice the cucumber into thin rounds, and chop the bell peppers into strips. Halve the cherry tomatoes and slice the baby carrots lengthwise for easier placement.
- Arrange the Base: On a large serving platter, begin by arranging the broccoli florets in a triangular shape to form the “tree”. This will serve as the base of your Christmas tree.
- Add Decorations: Place cherry tomato halves sporadically over the broccoli to mimic ornaments. Incorporate slices of bell peppers and cucumber rounds to add more color and texture to the tree.
- Create the Star and Trunk: Use the yellow bell pepper to cut out a star shape for the top of the tree. Place the star securely at the peak of the broccoli triangle. For the tree trunk, arrange a few baby carrots at the bottom center of the broccoli.
- Add Finishing Touches: Scatter black olives and cauliflower florets around the tree for added decoration and texture. Use fresh parsley to garnish the tree, simulating tree branches and adding a fresh aroma.
- Serve with Dip: Place the hummus or ranch dip in a small bowl and position it next to or on the platter for easy access. This dip will provide a creamy contrast to the crisp vegetables.
Extra Tips:
For a more vibrant presentation, consider using a variety of colored bell peppers, such as orange or green, in addition to the red and yellow. If you’re preparing this dish ahead of time, cover the platter with plastic wrap and store it in the refrigerator to keep the vegetables fresh.
Additionally, feel free to experiment with different dips like guacamole or tzatziki to suit your guests’ preferences. Be creative with the vegetable arrangement; the goal is to have fun while creating a beautiful and appetizing display.
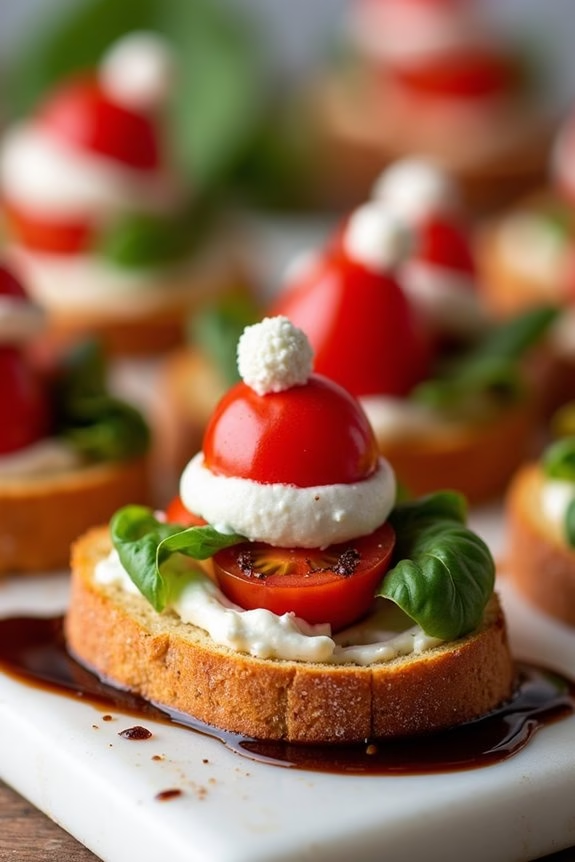
Santa Hat Bruschetta
Santa Hat Bruschetta is a delightful and festive appetizer perfect for your Christmas gatherings. This dish combines the classic flavors of bruschetta with a whimsical holiday twist, making it a hit with both adults and children. The vibrant colors and fresh ingredients make it not only a visual treat but also a flavorful bite that captures the essence of the holiday season.
Imagine the crispness of toasted baguette slices topped with creamy ricotta cheese, juicy cherry tomatoes, and fresh basil, all artfully arranged to resemble Santa hats. This appetizer isn’t only easy to prepare but also adds a touch of holiday cheer to your table. Serve Santa Hat Bruschetta at your next holiday party, and you’re sure to impress your guests with both your culinary skills and festive spirit.
Ingredients for 4-6 people:
- 1 French baguette
- 1 cup ricotta cheese
- 1 pint cherry tomatoes
- Fresh basil leaves
- 2 tablespoons olive oil
- Salt and pepper to taste
- 1 teaspoon balsamic glaze (optional)
Cooking Instructions:
- Prepare the Baguette: Preheat your oven to 375°F (190°C). Slice the baguette into 1/2-inch thick rounds. Arrange the slices on a baking sheet, and lightly brush each piece with olive oil. Season with a pinch of salt and pepper. Toast in the oven for about 8-10 minutes, or until the edges are golden brown and crisp. Remove from the oven and allow them to cool slightly.
- Prepare the Cherry Tomatoes: While the baguette slices are toasting, wash and dry the cherry tomatoes. Cut each tomato in half, and if desired, scoop out the seeds to prevent the bruschetta from becoming too watery.
- Assemble the Bruschetta: Spread a generous layer of ricotta cheese on each toasted baguette slice. Place a basil leaf on top of the ricotta. Then, set a cherry tomato half (cut side down) on the basil to mimic a Santa hat. If desired, add a small dollop of ricotta on top of each cherry tomato to resemble the pom-pom of Santa’s hat.
- Finish with a Drizzle: For added flavor, drizzle a small amount of balsamic glaze over the assembled bruschetta. This step is optional but adds a delightful tangy sweetness that complements the other flavors.
Extra Tips:
When making Santa Hat Bruschetta, verify the baguette slices are evenly toasted; this provides a sturdy base for the toppings. Using fresh, high-quality ricotta and tomatoes will enhance the overall taste of the dish.
You can prepare the components ahead of time and assemble just before serving to maintain the freshness and crispness of the bruschetta. If you want to add a bit of heat, consider sprinkling a dash of red pepper flakes over the ricotta before adding the basil and tomatoes.
Holly Jolly Deviled Eggs

Holly Jolly Deviled Eggs are a delightful and festive appetizer that’s perfect for your Christmas gatherings. These deviled eggs aren’t only delicious but also visually appealing with a touch of holiday cheer. The creamy egg yolk filling is infused with traditional flavors and garnished with a sprig of parsley or a sprinkle of paprika, making them a perfect addition to your holiday table.
Whether you’re hosting a small get-together or a large family dinner, these Holly Jolly Deviled Eggs are certain to be a crowd-pleaser.
Deviled eggs are a classic appetizer that can be easily dressed up for special occasions. To make them more festive, you can add a hint of color or a seasonal garnish. This recipe is designed to serve 4-6 people, making it an ideal choice for an intimate holiday gathering.
With simple ingredients and straightforward preparation, you’ll have these tasty bites ready in no time, allowing you to enjoy the festivities with your loved ones.
Ingredients for Holly Jolly Deviled Eggs (serving size: 4-6 people):
- 6 large eggs
- 3 tablespoons mayonnaise
- 1 teaspoon Dijon mustard
- 1 teaspoon white vinegar
- Salt and pepper to taste
- Paprika for garnish
- Fresh parsley for garnish
Cooking Instructions:
- Boil the Eggs: Place the eggs in a single layer in a saucepan and cover them with cold water. Bring the water to a boil over medium-high heat, then reduce the heat to low and let the eggs simmer for about 10 minutes.
- Cool and Peel the Eggs: Once the eggs are cooked, immediately transfer them to a bowl of ice water to stop the cooking process. After about 5 minutes, gently tap each egg on a hard surface to crack the shell, and carefully peel off the shell.
- Prepare the Filling: Slice each egg in half lengthwise and carefully remove the yolks, placing them in a mixing bowl. Set the egg whites aside on a serving platter.
- Mix the Filling: Mash the egg yolks with a fork until they’re crumbly. Add mayonnaise, Dijon mustard, white vinegar, salt, and pepper. Mix until the filling is smooth and creamy.
- Fill the Egg Whites: Using a spoon or a piping bag, fill each egg white half with the yolk mixture. Be generous with the filling to guarantee each bite is flavorful.
- Garnish and Serve: Sprinkle a dash of paprika over each deviled egg for a touch of color. Add a small sprig of fresh parsley to give them a festive look. Serve immediately or refrigerate until ready to serve.
Extra Tips:
For an extra festive touch, consider using red or green paprika to enhance the holiday theme. You can also experiment with the yolk mixture by adding a dash of hot sauce or a bit of horseradish for a spicy kick.
If you prefer a smoother filling, use a food processor to blend the yolk mixture until it reaches your desired consistency. Make sure to prepare the eggs in advance and store them in the refrigerator until serving to keep them fresh and delicious.
Festive Fruit Wreath

Creating a Festive Fruit Wreath is a delightful way to bring color and flavor to your holiday table. This appetizer combines a variety of fresh, vibrant fruits arranged beautifully to resemble a wreath. It’s not only visually appealing but also offers a revitalizing taste that contrasts nicely with the rich and savory dishes typically found at Christmas gatherings. This dish is ideal for serving a crowd of 4-6 people and makes for a healthy and eye-catching centerpiece.
The beauty of the Festive Fruit Wreath lies in its versatility. You can choose fruits based on personal preference or seasonal availability, making it easy to customize. The fruits are arranged on a platter in a circular pattern to mimic the shape of a traditional wreath, and you can add a bow made from fruit for an extra festive touch. This appetizer isn’t only easy to make but also allows for creativity in presentation, guaranteeing your guests are impressed before they even take their first bite.
Ingredients (serving size: 4-6 people):
- 1 cup of green grapes
- 1 cup of red grapes
- 2 kiwis, peeled and sliced
- 1 cup of strawberries, hulled and halved
- 1/2 cup of blueberries
- 1/2 cup of raspberries
- 1/4 cup of pomegranate seeds
- Fresh mint leaves for garnish
- Toothpicks or small skewers
Instructions:
1. Prepare the Fruits:
Begin by washing all the fruits thoroughly under cold water to remove any dirt or pesticides. Pat them dry with a clean kitchen towel. Peel and slice the kiwis into thin rounds, hull and halve the strawberries, and confirm the grapes are removed from their stems.
2. Arrange the Base:
On a large circular platter, start by arranging the green and red grapes in a circular pattern to form the base of your wreath. Alternate the colors to create a visually appealing mix.
3. Add Additional Fruits:
Next, layer the kiwi slices evenly on top of the grape base, followed by the strawberry halves. Scatter the blueberries and raspberries over the top, ensuring an even distribution.
4. Finishing Touches:
Sprinkle the pomegranate seeds over the entire wreath for a pop of color and texture. Tuck fresh mint leaves sporadically around the wreath to enhance the festive look.
5. Secure with Toothpicks:
If necessary, use toothpicks or small skewers to hold the fruit in place. This is particularly helpful if you need to transport the dish or if the fruit arrangement feels unstable.
6. Add a Bow:
For an extra festive touch, consider creating a bow shape using slices of strawberries or kiwi at the bottom of the wreath.
Extra Tips:
When assembling your Festive Fruit Wreath, consider the color scheme and balance of flavors. Opt for a mix of sweet and tart fruits to keep the palate interested. If you want to add a touch of sweetness, consider drizzling a bit of honey or a citrus glaze over the top just before serving.
You can also add other fruits such as pineapple or orange slices, depending on availability and personal preference. Remember, the key to a successful fruit wreath is freshness and vibrant colors, so choose the freshest fruits available for the best results.
Elf Hat Crescent Rolls

Elf Hat Crescent Rolls are a whimsical and festive addition to your Christmas appetizer spread. These delightful treats not only look like adorable elf hats but also pack a delicious, savory punch. Perfect for a holiday gathering, these crescent rolls are filled with a flavorful combination that will have your guests coming back for more.
Whether you’re hosting a large family dinner or a cozy get-together, Elf Hat Crescent Rolls are certain to impress with their unique presentation and taste. The crescent rolls are shaped into cones and filled with a mixture of cream cheese, herbs, and spices, then baked to golden perfection. The key is in the shaping and filling of the rolls to guarantee they hold their elf hat appearance.
This recipe serves 4-6 people, making it an ideal appetizer for a small to medium-sized holiday party. With a little creativity and festive spirit, these Elf Hat Crescent Rolls will be the star of your Christmas table.
Ingredients (serving size: 4-6 people):
- 1 can of refrigerated crescent roll dough
- 4 oz cream cheese, softened
- 1/4 cup grated Parmesan cheese
- 1/4 cup chopped fresh basil
- 1 clove garlic, minced
- 1/4 teaspoon salt
- 1/4 teaspoon black pepper
- 1/4 cup sun-dried tomatoes, finely chopped
- 1 egg, beaten (for egg wash)
- 1 tablespoon poppy seeds (optional, for garnish)
Instructions:
- Preheat Oven: Start by preheating your oven to 375°F (190°C). This guarantees the rolls bake evenly and come out golden brown.
- Prepare Filling: In a mixing bowl, combine the softened cream cheese, Parmesan cheese, chopped basil, minced garlic, salt, and black pepper. Mix until well blended and creamy. Stir in the sun-dried tomatoes until evenly distributed throughout the mixture.
- Shape the Crescent Rolls: Unroll the crescent roll dough and separate it into triangles. To create the elf hat shape, slightly stretch and manipulate each triangle to form a cone-like shape. Confirm the base of each triangle is wider to hold the filling.
- Fill the Rolls: Spoon about a tablespoon of the cream cheese mixture onto the wider end of each triangle. Gently roll the dough towards the pointed end, encasing the filling within the dough. Pinch the edges to seal the filling inside.
- Egg Wash and Garnish: Place the filled rolls on a baking sheet lined with parchment paper. Brush each roll with beaten egg to give them a shiny finish. If desired, sprinkle poppy seeds on top for added texture and a festive appearance.
- Bake: Place the baking sheet in the preheated oven and bake for 10-12 minutes, or until the rolls are golden brown and cooked through.
- Cool and Serve: Once baked, remove the rolls from the oven and let them cool slightly on a wire rack. Serve warm for the best flavor and texture.
Extra Tips:
When shaping the crescent rolls, be gentle to avoid tearing the dough, which could cause the filling to spill out during baking. If you’re preparing these rolls ahead of time, you can assemble them and store them in the refrigerator until you’re ready to bake. Just be sure to add the egg wash and poppy seeds right before baking.
Additionally, feel free to customize the filling with other herbs or add a sprinkle of red pepper flakes for a hint of spice. These Elf Hat Crescent Rolls aren’t only delicious but also a fun and festive way to celebrate the holiday season!
Gingerbread Man Meatballs

Transform your holiday appetizer spread with these delightful Gingerbread Man Meatballs. Infused with the warming spices of gingerbread, these meatballs offer a festive twist to the traditional fare. Perfect for a Christmas gathering, they combine the savory flavors of ground meat with the sweet and spicy notes of ginger, cinnamon, and nutmeg, all balanced with a hint of molasses.
They’re bound to be a hit among guests of all ages, providing a playful and tasty start to your holiday festivities. The Gingerbread Man Meatballs are crafted to please a crowd of 4-6 people, making them ideal for smaller gatherings or as part of a larger appetizer selection.
The recipe is straightforward, yet full of flavor, guaranteeing that you can spend more time enjoying the company of your loved ones rather than being stuck in the kitchen. Pair these meatballs with a tangy dipping sauce for an extra burst of flavor, and watch as they disappear from the platter in no time.
Ingredients:
- 1 pound ground beef or turkey
- 1/2 cup breadcrumbs
- 1/4 cup milk
- 1 large egg
- 2 tablespoons molasses
- 1 tablespoon Worcestershire sauce
- 1 teaspoon ground ginger
- 1 teaspoon ground cinnamon
- 1/2 teaspoon ground nutmeg
- 1/2 teaspoon salt
- 1/4 teaspoon black pepper
- 1/4 cup chopped fresh parsley
- 2 tablespoons olive oil
Cooking Instructions:
- Preheat the Oven: Begin by preheating your oven to 375°F (190°C). This guarantees that the oven is ready when your meatballs are prepared and will cook them evenly.
- Prepare the Breadcrumb Mixture: In a large mixing bowl, combine the breadcrumbs and milk. Allow them to sit for about 5 minutes until the breadcrumbs absorb the milk and become soft.
- Mix the Meatball Ingredients: Add the ground meat, egg, molasses, Worcestershire sauce, ground ginger, cinnamon, nutmeg, salt, black pepper, and chopped parsley to the breadcrumb mixture. Use your hands or a wooden spoon to mix everything together until well combined. Be careful not to overmix, as this can make the meatballs tough.
- Shape the Meatballs: Form the mixture into small, even-sized meatballs, approximately 1 inch in diameter. This should yield about 20-24 meatballs, depending on the size.
- Brown the Meatballs: Heat the olive oil in a large skillet over medium heat. Add the meatballs in batches, being careful not to overcrowd the pan. Cook for about 5 minutes, turning occasionally, until the meatballs are browned on all sides.
- Bake the Meatballs: Transfer the browned meatballs to a baking sheet lined with parchment paper. Place the sheet in the preheated oven and bake for 15-20 minutes, or until the meatballs are cooked through.
- Serve: Once cooked, remove the meatballs from the oven and transfer them to a serving platter. Garnish with additional chopped parsley if desired, and serve with your favorite dipping sauce.
Extra Tips:
When making Gingerbread Man Meatballs, it’s important to use ground meat with a bit of fat content, such as an 85/15 beef-to-fat ratio, to keep them juicy and flavorful.
If you find the meatballs sticking to your hands while shaping them, try wetting your hands slightly with water. This will help in making smoother meatballs without the mixture sticking. Additionally, these meatballs can be made ahead of time and stored in the refrigerator for up to 2 days or frozen for longer storage, making them a convenient appetizer option during the busy holiday season.
Cranberry Brie Bites

Cranberry Brie Bites are a delightful and festive appetizer perfect for the holiday season. These bites are a harmonious blend of creamy brie cheese and tangy cranberry sauce, all encased in a golden, flaky puff pastry. They aren’t only visually appealing but also offer a perfect balance of flavors that will impress your guests at any Christmas gathering.
This easy-to-make recipe is ideal for those looking to add a touch of elegance to their holiday menu without spending hours in the kitchen. These bites can be prepared in advance and quickly baked just before serving, making them a convenient option for holiday parties. The combination of gooey cheese and the sweet-tartness of cranberries is a match made in heaven, and the addition of puff pastry adds a delightful texture that complements the other ingredients beautifully.
Serve these Cranberry Brie Bites warm for the best experience and watch them disappear from the serving platter in no time.
Ingredients (serving size: 4-6 people):
- 1 sheet of puff pastry, thawed
- 1 wheel of Brie cheese (approximately 8 ounces)
- 1 cup cranberry sauce (homemade or store-bought)
- 1/4 cup chopped walnuts (optional)
- Fresh rosemary sprigs for garnish (optional)
- 1 egg, beaten (for egg wash)
Cooking Instructions:
- Preheat the Oven: Begin by preheating your oven to 375°F (190°C). This guarantees your oven is ready once the bites are assembled and can bake evenly.
- Prepare the Puff Pastry: Roll out the puff pastry sheet on a lightly floured surface to smooth out any creases. Using a sharp knife or a pizza cutter, divide the sheet into 12 equal squares.
- Cut the Brie Cheese: Cut the Brie cheese into small cubes, approximately 1/2 inch in size. You’ll need about 12 cubes to fill each piece of puff pastry.
- Assemble the Bites: Grease a muffin tin lightly with cooking spray. Place each puff pastry square into a muffin tin cavity, gently pressing down to form a cup. Place a cube of Brie cheese in the center of each puff pastry square.
- Add Cranberry Sauce: Spoon approximately a teaspoon of cranberry sauce over each Brie cube. If using, sprinkle chopped walnuts on top for an added crunch.
- Apply Egg Wash: Brush the edges of the puff pastry with the beaten egg to enhance browning and give a glossy finish.
- Bake: Transfer the muffin tin to the preheated oven and bake for 15-20 minutes, or until the pastry is puffed and golden brown.
- Garnish and Serve: Remove the muffin tin from the oven and let the bites cool slightly before removing them. Garnish with fresh rosemary sprigs if desired, and serve warm.
Extra Tips:
For an extra burst of flavor, consider adding a small piece of cooked bacon or a dash of balsamic reduction on top of the cranberry sauce before baking. To save time, you can assemble the bites up to a day in advance, cover them tightly with plastic wrap, and store them in the refrigerator until you’re ready to bake.
Just remember to add a couple of extra minutes to the baking time if baking straight from the fridge.
Rudolph’s Red-Nosed Sliders

Rudolph’s Red-Nosed Sliders are the perfect festive appetizer to bring a touch of holiday cheer to your table. These mini burgers aren’t only adorable but also packed with flavor, making them a hit with both kids and adults.
With their cute little “red noses” made from cherry tomatoes, these sliders are certain to become a Christmas tradition in your household. Serve them at your next holiday party or family gathering for a delightful treat that captures the spirit of the season.
In this recipe, we’ll guide you through creating these charming sliders from scratch, including a savory beef patty, a slice of cheese, and all the fixings to make Rudolph proud. The sliders are easy to prepare and can be customized to suit your taste.
Whether you prefer a classic beef slider or want to experiment with different types of meat, this recipe is versatile and straightforward. Let’s get started on crafting these merry little bites for a serving size of 4-6 people.
Ingredients:
- 1 pound ground beef
- 1 teaspoon salt
- 1/2 teaspoon black pepper
- 1 teaspoon garlic powder
- 1 teaspoon onion powder
- 6 slider buns
- 6 slices cheddar cheese
- 6 cherry tomatoes
- Lettuce leaves
- Pickle slices
- Ketchup
- Mustard
- Toothpicks
Instructions:
- Prepare the Patty Mixture: In a large bowl, combine the ground beef, salt, black pepper, garlic powder, and onion powder. Mix well until all ingredients are evenly incorporated.
- Form the Patties: Divide the beef mixture into 6 equal portions and shape them into small patties, slightly larger than the diameter of the buns. This guarantees that the patties will fit perfectly once cooked.
- Cook the Patties: Preheat a grill or skillet over medium-high heat. Cook the patties for about 3-4 minutes on each side, or until they reach your desired level of doneness. Place a slice of cheddar cheese on each patty during the last minute of cooking to allow it to melt.
- Prepare the Buns: While the patties are cooking, lightly toast the slider buns on the grill or in a toaster.
- Assemble the Sliders: Spread a thin layer of ketchup and mustard on the bottom half of each bun. Place a lettuce leaf, followed by a pickle slice, on top. Add the cooked patty with melted cheese, then top it with a cherry tomato “nose” secured with a toothpick.
- Finish and Serve: Place the top half of the bun on each slider and secure it with the toothpick through the cherry tomato. Serve immediately while warm.
Extra Tips:
For an extra festive touch, you can use pretzel sticks as “antlers” by inserting them into the top of the sliders. If you want to try different flavors, consider adding bacon or caramelized onions to the patties.
Make sure not to overwork the beef mixture when forming patties, as this can make them tough. Enjoy your Rudolph’s Red-Nosed Sliders with a side of crispy fries or a fresh salad for a complete and satisfying holiday meal.