
I’ve discovered a delightful selection of vegetarian snacks that are perfect for any time of day. From zesty avocado toast bites to savory spinach muffins, these recipes offer bold flavors and easy prep. Picture the spicy crunch of roasted cauliflower or the refreshing taste of caprese salad skewers. These snacks cater to various tastes while being nutritious and customizable. Curious to know more?
Zesty Avocado Toast Bites
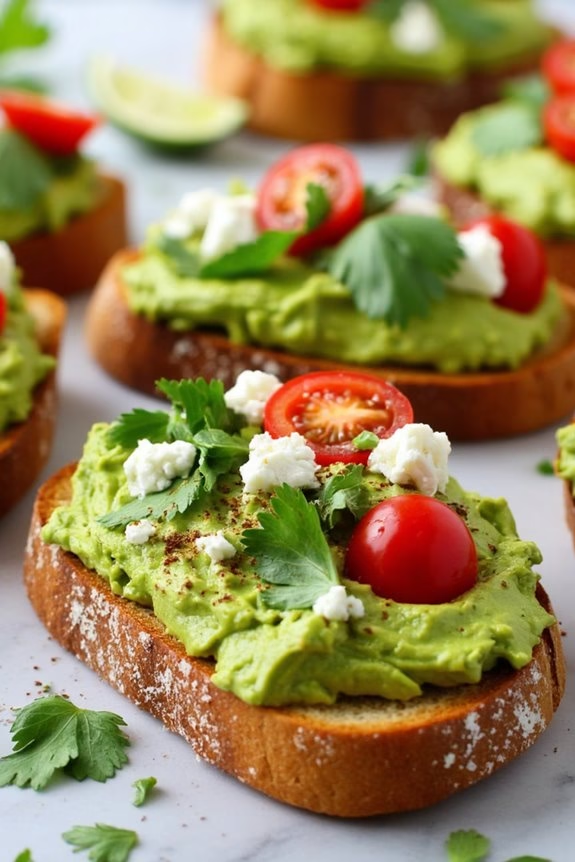
Zesty Avocado Toast Bites are a delightful and nutritious snack that’s perfect for any occasion. These bite-sized treats are a modern twist on the classic avocado toast, offering a burst of zesty flavors in every bite. Ideal for entertaining or simply enjoying as a quick snack, these bites are both satisfying and simple to prepare. The creamy avocado is enhanced by tangy lime, a hint of spice, and the crunch of toasted bread, creating a harmonious blend of textures and tastes.
This recipe is designed to serve 4-6 people, making it a great choice for small gatherings or family snacks. The Zesty Avocado Toast Bites aren’t only delicious but also packed with healthy fats, fiber, and essential nutrients. Whether you’re a seasoned cook or a kitchen novice, this recipe is easy to follow and can be whipped up in no time. The ingredients are easily accessible and can be adjusted to suit your personal taste preferences, ensuring that you’ll want to make these bites time and time again.
Ingredients:
- 4 ripe avocados
- 1 lime, juiced
- 1 teaspoon garlic powder
- 1 teaspoon onion powder
- 1/2 teaspoon cayenne pepper
- Salt and pepper to taste
- 1 baguette or sourdough loaf, sliced into 1/2-inch thick rounds
- 2 tablespoons olive oil
- 1/4 cup chopped fresh cilantro
- 1/4 cup diced cherry tomatoes
- 1/4 cup crumbled feta cheese (optional)
- Red pepper flakes (optional, for garnish)
Cooking Instructions:
- Prepare the Bread: Preheat your oven to 375°F (190°C). Arrange the baguette or sourdough slices on a baking sheet. Brush each slice lightly with olive oil on both sides. Toast in the oven for about 10 minutes, flipping halfway through, until they’re golden and crispy.
- Mash the Avocados: While the bread is toasting, cut the avocados in half, remove the pits, and scoop the flesh into a medium-sized bowl. Add the lime juice, garlic powder, onion powder, cayenne pepper, salt, and pepper. Use a fork to mash the avocados until you reach your desired consistency—smooth or slightly chunky.
- Assemble the Toast Bites: Once the bread is toasted, remove it from the oven and allow it to cool slightly. Spread a generous amount of the avocado mixture onto each slice.
- Add Toppings: Top each avocado-covered slice with a sprinkle of chopped cilantro, a few diced cherry tomatoes, and a little crumbled feta cheese if using. For an extra kick, add a pinch of red pepper flakes.
- Serve and Enjoy: Arrange the Zesty Avocado Toast Bites on a platter and serve immediately to enjoy the best texture and flavor.
Extra Tips:
For extra flavor, consider rubbing a clove of garlic on the toasted bread before adding the avocado mixture. If you’re preparing these bites ahead of time, keep the avocado mixture covered with plastic wrap, pressing it directly onto the surface to prevent browning.
Feel free to experiment with toppings; sliced radishes, pickled onions, or even a drizzle of balsamic glaze can add a unique twist. Adjust the level of spice to suit your taste, and remember that fresh ingredients make all the difference in this simple yet delicious dish.
Crispy Chickpea Snacks
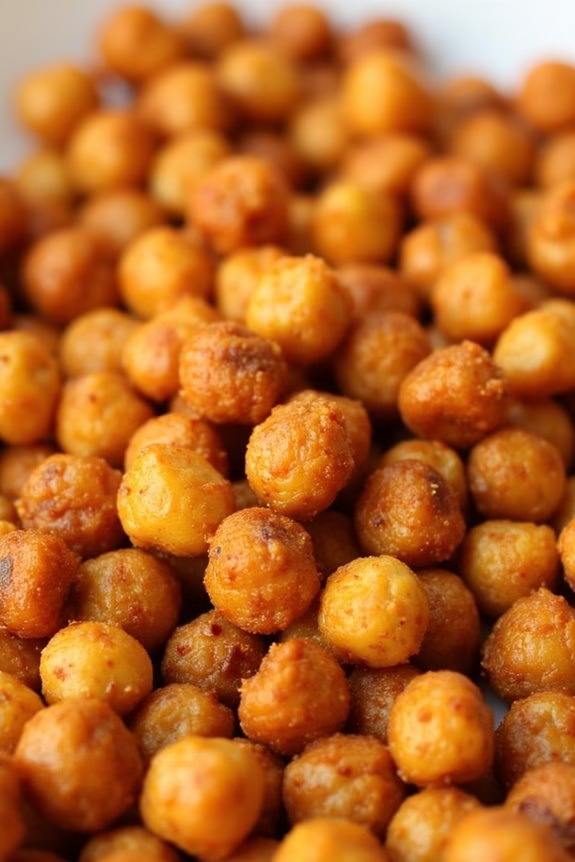
Crispy Chickpea Snacks are a delightful and nutritious option for those looking for a satisfying and crunchy vegetarian treat. Perfect for snacking, these chickpeas are seasoned to perfection, offering a burst of flavor with every bite.
Whether you’re hosting a gathering or simply craving a healthy snack, these crispy chickpeas are sure to please. They’re not only easy to make but also packed with protein and fiber, keeping you full and energized.
This recipe serves 4-6 people and can be easily adjusted to accommodate more or less depending on your needs. The key to achieving the perfect crunch is verifying the chickpeas are thoroughly dried before roasting. An array of spices can be used to suit your taste preferences, making this snack versatile and customizable.
Whether you like them spicy, savory, or with a hint of sweetness, these crispy chickpeas are a crowd-pleaser.
Ingredients:
- 2 cans of chickpeas (15 oz each), drained and rinsed
- 2 tablespoons olive oil
- 1 teaspoon paprika
- 1 teaspoon garlic powder
- 1 teaspoon onion powder
- 1/2 teaspoon cumin
- 1/2 teaspoon salt
- 1/4 teaspoon black pepper
Cooking Instructions:
- Preheat the Oven: Preheat your oven to 400°F (200°C). This temperature is ideal for achieving a crispy texture.
- Prepare the Chickpeas: Drain and rinse two cans of chickpeas thoroughly. Pat them dry with paper towels, removing as much moisture as possible for extra crispiness.
- Season the Chickpeas: In a large bowl, combine the dried chickpeas with olive oil, paprika, garlic powder, onion powder, cumin, salt, and black pepper. Toss well to verify each chickpea is evenly coated with the seasoning.
- Roast the Chickpeas: Spread the seasoned chickpeas in a single layer on a baking sheet. Verify there’s enough space between them to allow for even roasting.
- Bake: Place the baking sheet in the preheated oven and bake for 30-40 minutes, stirring halfway through to verify even cooking. The chickpeas should be golden and crispy when done.
- Cool and Serve: Once baked, remove the chickpeas from the oven and allow them to cool on the baking sheet. This helps them crisp up further. Serve warm or store in an airtight container for later snacking.
Extra Tips:
To verify your chickpeas are as crispy as possible, make sure they’re completely dry before seasoning and roasting. You can experiment with different spices and herbs to create unique flavor profiles, such as adding cayenne pepper for heat or rosemary for an herby touch.
If you prefer a sweeter snack, consider adding a sprinkle of cinnamon and a dash of brown sugar. Store any leftovers in an airtight container to maintain their crispiness, and remember that while these chickpeas are best enjoyed fresh, they can be stored for a few days.
Spicy Roasted Cauliflower Florets

Spicy Roasted Cauliflower Florets are a delightful vegetarian snack that combines the natural nuttiness of cauliflower with a bold, spicy kick. This dish is perfect for those who enjoy a little heat and are looking for a healthy, satisfying snack option.
Roasting the cauliflower brings out its sweetness and creates a crispy texture that pairs wonderfully with a blend of spices. Whether you’re serving it as an appetizer, side dish, or enjoying it on its own, these spicy florets will surely be a hit.
This recipe is designed for a serving size of 4-6 people, making it ideal for a small gathering or family snack. The preparation is straightforward, and the result is a flavorful, spicy treat that you can enjoy guilt-free.
The combination of spices can be adjusted to suit your taste preferences, allowing you to control the level of heat and flavor intensity. With just a few simple ingredients and easy steps, you’ll have a delicious snack ready in no time.
Ingredients:
- 1 large head of cauliflower, cut into florets
- 3 tablespoons olive oil
- 1 teaspoon smoked paprika
- 1 teaspoon ground cumin
- 1/2 teaspoon cayenne pepper
- 1 teaspoon garlic powder
- Salt and pepper to taste
- 2 tablespoons fresh lemon juice
- Fresh parsley, chopped (for garnish)
Cooking Instructions:
- Preheat the Oven: Start by preheating your oven to 425°F (220°C). A hot oven is essential for roasting, as it helps to achieve the desired crispy texture.
- Prepare the Cauliflower: Wash and thoroughly dry the cauliflower. Cut it into evenly-sized florets to guarantee even roasting. Place the florets in a large mixing bowl.
- Season the Cauliflower: Drizzle the olive oil over the cauliflower florets. Add smoked paprika, ground cumin, cayenne pepper, garlic powder, salt, and pepper. Toss everything together until the florets are evenly coated with the oil and spices.
- Roasting: Spread the seasoned cauliflower florets in a single layer on a baking sheet lined with parchment paper. Roast in the preheated oven for 25-30 minutes, or until the cauliflower is tender and golden brown, flipping halfway through for even roasting.
- Finishing Touches: Once roasted, remove the cauliflower from the oven and drizzle with fresh lemon juice for a bright, tangy contrast to the spices. Garnish with chopped fresh parsley before serving.
Extra Tips:
When roasting cauliflower, make sure not to overcrowd the baking sheet. This guarantees that the florets roast evenly and become crispy rather than steaming. If necessary, use two baking sheets to provide enough space.
You can also adjust the level of spice by increasing or decreasing the amount of cayenne pepper according to your preference. For added flavor, consider incorporating other spices like turmeric or coriander.
Finally, serving the roasted cauliflower with a cooling dip, such as tzatziki or a yogurt-based sauce, can offer a revitalizing balance to the spiciness.
Sweet Potato and Black Bean Quesadillas

Sweet Potato and Black Bean Quesadillas are a delicious and nutritious vegetarian snack that will satisfy your craving for something hearty and flavorful. Combining the natural sweetness of sweet potatoes with the hearty texture of black beans, these quesadillas pack a punch with spices and creamy cheese, making them a perfect snack or meal for any time of the day.
Not only are they easy to prepare, but they also provide a great source of fiber and protein, ensuring you stay full and energized. Perfect for a family gathering or a cozy night at home, these quesadillas are designed to serve 4-6 people.
They’re versatile and can be adjusted according to personal taste, whether adding extra spice or swapping out the cheese for a dairy-free alternative. The following recipe outlines the ingredients you’ll need, along with clear, step-by-step instructions to guide you through preparing this delightful dish.
Ingredients
- 2 large sweet potatoes
- 1 can (15 oz) black beans, drained and rinsed
- 1 cup shredded cheese (cheddar or Mexican blend)
- 1 teaspoon ground cumin
- 1 teaspoon chili powder
- 1/2 teaspoon garlic powder
- Salt and pepper to taste
- 8 large flour tortillas
- 2 tablespoons olive oil
- 1/4 cup chopped fresh cilantro
- Optional: sour cream, salsa, or guacamole for serving
Instructions
- Prepare the Sweet Potatoes: Preheat your oven to 400°F (200°C). Peel and dice the sweet potatoes into small cubes. Spread them evenly on a baking sheet, drizzle with 1 tablespoon of olive oil, and sprinkle with salt, pepper, cumin, and chili powder. Toss until well coated. Roast in the oven for 20-25 minutes or until tender and slightly caramelized.
- Prepare the Filling: While the sweet potatoes are roasting, heat the remaining tablespoon of olive oil in a skillet over medium heat. Add the black beans and garlic powder, stirring occasionally until heated through. Once the sweet potatoes are done, combine them with the black beans, mixing well.
- Assemble the Quesadillas: Lay out a tortilla and spread a generous amount of the sweet potato and bean mixture on one half. Sprinkle some shredded cheese and fresh cilantro over the top. Fold the tortilla in half to enclose the filling.
- Cook the Quesadillas: Heat a large skillet or griddle over medium heat. Place the assembled quesadilla in the skillet and cook for 2-3 minutes on each side or until the tortilla is crispy and the cheese is melted. Repeat with the remaining tortillas.
- Serve: Cut each quesadilla into wedges and serve warm with optional sour cream, salsa, or guacamole on the side.
Extra Tips
For an even richer flavor, consider adding some chopped jalapeños or a squeeze of lime juice to the sweet potato and bean mixture before assembling the quesadillas.
If you prefer a gluten-free option, use corn tortillas instead of flour tortillas. Remember not to overfill the tortillas, as this can make them difficult to handle and may result in the filling spilling out during cooking.
Finally, these quesadillas can also be frozen for a quick future meal; simply reheat them in the oven or on a skillet until heated through.
Mediterranean Stuffed Mini Peppers
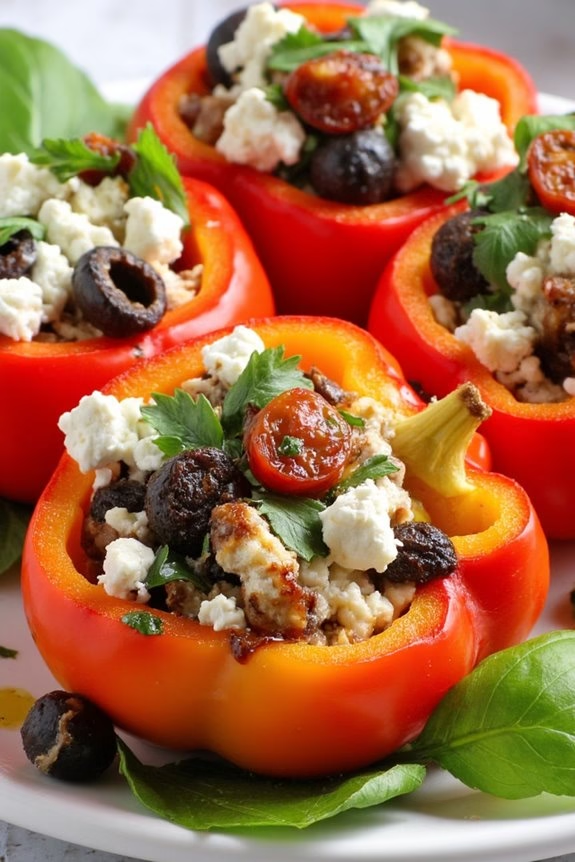
Mediterranean Stuffed Mini Peppers are a delightful vegetarian snack that brings together the vibrant flavors of the Mediterranean in a convenient, bite-sized treat.
These colorful mini peppers are filled with a delicious mix of creamy feta cheese, tangy sun-dried tomatoes, and aromatic herbs, creating an appetizer that’s both visually appealing and satisfying. They’re perfect for parties, gatherings, or even as a quick and healthy snack option.
These stuffed mini peppers aren’t only delicious but also incredibly easy to prepare. They offer a great balance of textures and flavors – the sweetness of the roasted peppers pairs beautifully with the savory stuffing.
This versatile dish can be served warm or at room temperature, making it a flexible addition to any menu. Whether you’re hosting a casual get-together or looking for a unique dish to bring to a potluck, these Mediterranean Stuffed Mini Peppers are bound to be a hit.
Ingredients (Serves 4-6):
- 20-24 mini sweet peppers
- 1 cup crumbled feta cheese
- 1/2 cup sun-dried tomatoes, finely chopped
- 1/4 cup kalamata olives, pitted and chopped
- 2 tablespoons fresh basil, chopped
- 2 tablespoons fresh parsley, chopped
- 1 tablespoon olive oil
- 1 tablespoon lemon juice
- Salt and pepper to taste
Cooking Instructions:
1. Preheat the oven: Begin by preheating your oven to 375°F (190°C). This will guarantee it’s ready for the peppers once they’re stuffed.
2. Prepare the peppers: Wash the mini peppers thoroughly and pat them dry with a paper towel. Carefully slice each pepper in half lengthwise and remove the seeds and membranes using a small spoon or your fingers.
3. Make the filling: In a medium-sized mixing bowl, combine the feta cheese, sun-dried tomatoes, kalamata olives, basil, parsley, olive oil, and lemon juice. Mix everything together until well combined.
Season the filling with salt and pepper to taste.
4. Stuff the peppers: Using a small spoon, carefully fill each pepper half with the prepared filling. Be sure to press the filling gently into the peppers to confirm it’s well-packed.
5. Bake the peppers: Arrange the stuffed peppers on a baking sheet lined with parchment paper or lightly greased. Bake them in the preheated oven for 15-20 minutes, or until the peppers are tender and the filling is slightly golden on top.
6. Serve: Once baked, remove the peppers from the oven and allow them to cool for a few minutes. Transfer them to a serving platter and enjoy them warm or at room temperature.
Extra Tips:
For an added layer of flavor, consider drizzling the stuffed peppers with a balsamic glaze right before serving. This will add a slight sweetness that complements the savory filling.
If you’re preparing this dish ahead of time, you can stuff the peppers and store them in the refrigerator for a few hours before baking. This makes it a convenient option for entertaining, as you can have them ready to pop into the oven when guests arrive.
Additionally, feel free to experiment with the filling by adding ingredients like pine nuts or spinach for extra texture and nutrition.
No-Bake Energy Balls

Looking for a quick and nutritious snack that can keep you energized throughout the day? No-Bake Energy Balls are the perfect solution. These bite-sized treats are packed with protein, healthy fats, and fiber, making them an ideal snack to fuel your body.
They’re incredibly easy to make, requiring no baking, and can be customized with your favorite ingredients. Whether you’re heading to the office, packing a school lunch, or need a post-workout snack, these energy balls are convenient to carry and deliciously satisfying.
The beauty of No-Bake Energy Balls is in their versatility. With a base of oats and nut butter, you can get creative by adding different mix-ins like chocolate chips, dried fruits, seeds, or coconut flakes. These energy balls are perfect for meal prep, as they can be stored in the fridge for up to a week or frozen for longer shelf life.
Plus, since they require no cooking, they’re a fun and easy recipe to make with kids. Here’s how you can make a batch that serves 4-6 people.
Ingredients:
- 1 cup rolled oats
- 1/2 cup nut butter (such as almond or peanut)
- 1/3 cup honey or maple syrup
- 1/4 cup chia seeds
- 1/4 cup flaxseed meal
- 1/2 cup mini chocolate chips
- 1/4 cup unsweetened shredded coconut (optional)
- 1 teaspoon vanilla extract
- Pinch of salt
Instructions:
- Prepare the Mixing Bowl: Start by gathering a large mixing bowl. This will be your main workspace for combining all the ingredients.
- Combine Ingredients: In the mixing bowl, add the rolled oats, nut butter, honey or maple syrup, chia seeds, flaxseed meal, mini chocolate chips, shredded coconut (if using), vanilla extract, and a pinch of salt.
- Mix Thoroughly: Use a spatula or your hands to mix all the ingredients together. Confirm that the mixture is well combined. It should be sticky enough to hold its shape when pressed together but not too wet.
- Form the Balls: Once the mixture is ready, use a tablespoon or a small cookie scoop to portion out the mixture. Roll each portion between your palms to form a small ball. Continue this process until all the mix is used up.
- Chill the Balls: Place the formed energy balls on a baking sheet lined with parchment paper. Refrigerate them for at least 30 minutes to allow them to firm up.
- Store: Once the energy balls are set, transfer them to an airtight container. Store in the refrigerator for up to a week or freeze for longer storage.
Extra Tips:
If the mixture seems too dry and isn’t sticking together well, try adding a bit more nut butter or honey to achieve the right consistency. Conversely, if it’s too sticky, you can add more oats or flaxseed meal.
Feel free to experiment with different add-ins like raisins, chopped nuts, or even a scoop of protein powder to suit your taste and dietary needs. Remember to taste the mixture before forming the balls to adjust sweetness or salt to your liking.
Caprese Salad Skewers
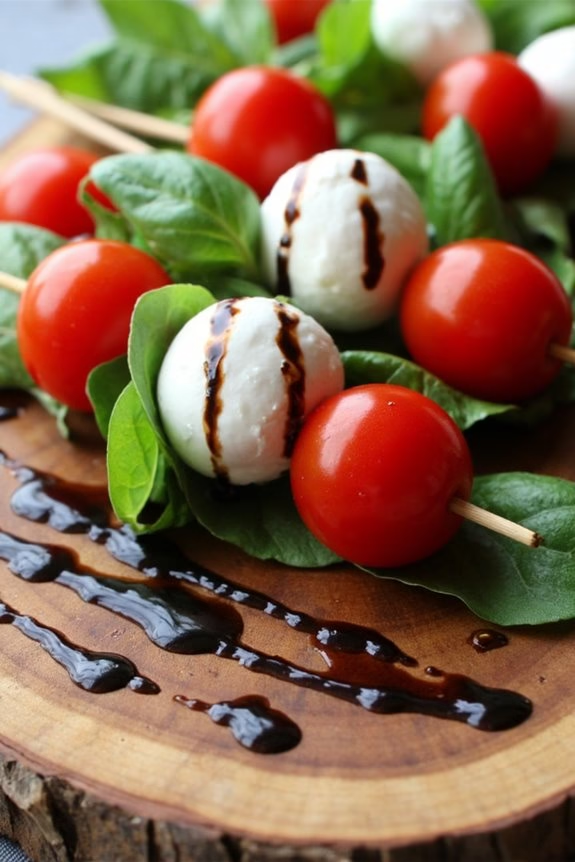
Caprese Salad Skewers are a delightful and easy-to-make vegetarian snack that’s perfect for any occasion. Combining the classic flavors of fresh mozzarella, ripe tomatoes, and fragrant basil, these skewers offer a revitalizing taste that captures the essence of Italian cuisine.
Whether you’re hosting a party, attending a potluck, or simply enjoying a light snack, Caprese Salad Skewers are sure to impress your guests with their visual appeal and delicious taste.
These skewers aren’t only pleasing to the palate but also incredibly simple to assemble, making them a great option for quick preparation. The balance of creamy mozzarella, juicy tomatoes, and aromatic basil leaves, all drizzled with a hint of balsamic glaze, creates a harmonious blend of flavors.
The skewers can be prepared in advance, allowing you to spend more time enjoying the company of your family and friends.
Ingredients (serving size: 4-6 people):
- 20 cherry tomatoes
- 20 fresh basil leaves
- 20 mini mozzarella balls (bocconcini)
- 1 tablespoon olive oil
- Salt and pepper to taste
- Balsamic glaze for drizzling
- 10 wooden or bamboo skewers
Instructions:
- Prepare the Ingredients: Start by washing the cherry tomatoes and fresh basil leaves thoroughly. Pat them dry with a paper towel to remove any excess moisture. Drain the mini mozzarella balls from their packaging and set them aside.
- Assemble the Skewers: Take a wooden or bamboo skewer and begin assembling by threading one cherry tomato onto the skewer. Follow with a fresh basil leaf and then a mini mozzarella ball. Repeat this sequence until the skewer is filled, leaving a little space at each end for handling. Continue this process with the remaining skewers.
- Season the Skewers: Once all the skewers are assembled, place them on a serving platter. Drizzle olive oil evenly over the skewers, ensuring that each one is lightly coated. Season with salt and pepper to taste.
- Add the Finishing Touch: Just before serving, drizzle a small amount of balsamic glaze over the skewers. This adds a sweet and tangy flavor that complements the other ingredients beautifully.
- Serve and Enjoy: Serve the Caprese Salad Skewers immediately as a revitalizing appetizer or snack. They can be enjoyed at room temperature or slightly chilled.
Extra Tips:
For the best flavor, try to use the freshest ingredients available. Selecting vine-ripened tomatoes and high-quality mozzarella will enhance the taste of your skewers.
If possible, make your own balsamic glaze by reducing balsamic vinegar on the stove until it thickens, which will add a personal touch to the dish. Additionally, if you prefer a more substantial skewer, consider adding a slice of avocado or cucumber for extra texture and flavor.
Savory Spinach and Feta Muffins

Savory Spinach and Feta Muffins are a delightful vegetarian snack that combines the rich flavors of feta cheese and fresh spinach into a moist and satisfying muffin. Perfect for breakfast, brunch, or an afternoon snack, these muffins aren’t only delicious but also packed with nutrients.
The combination of salty feta and the earthiness of spinach makes for a savory treat that’s both flavorful and healthy. Whether you’re hosting a gathering or simply looking for a quick and easy snack, these muffins are bound to please any crowd.
The recipe is simple and straightforward, requiring basic ingredients that are likely already in your pantry. With a blend of whole wheat flour and all-purpose flour, these muffins have a hearty texture that complements the creamy feta and succulent spinach.
The addition of herbs like dill and chives adds an aromatic touch, enhancing the overall taste. This recipe makes enough muffins to serve 4-6 people, making them perfect for sharing or enjoying on your own over a few days.
Ingredients (serves 4-6):
- 1 1/2 cups all-purpose flour
- 1/2 cup whole wheat flour
- 2 teaspoons baking powder
- 1/2 teaspoon baking soda
- 1/2 teaspoon salt
- 1/4 teaspoon black pepper
- 1 cup fresh spinach, chopped
- 1 cup crumbled feta cheese
- 2 tablespoons fresh dill, chopped
- 2 tablespoons fresh chives, chopped
- 2 large eggs
- 1 cup buttermilk
- 1/4 cup olive oil
Cooking Instructions:
- Preheat the Oven: Start by preheating your oven to 375°F (190°C). Line a 12-cup muffin tin with paper liners or lightly grease with cooking spray to prevent sticking.
- Mix Dry Ingredients: In a large mixing bowl, combine all-purpose flour, whole wheat flour, baking powder, baking soda, salt, and black pepper. Stir well to guarantee all dry ingredients are evenly mixed.
- Prepare Add-ins: In a separate bowl, toss together the chopped spinach, crumbled feta cheese, dill, and chives. This guarantees the cheese and spinach are evenly distributed throughout the muffins.
- Combine Wet Ingredients: In another bowl, whisk together the eggs, buttermilk, and olive oil until smooth. Make sure the eggs are fully incorporated into the mixture.
- Create the Muffin Batter: Pour the wet ingredients into the bowl of dry ingredients and stir gently until just combined. Be careful not to overmix. Fold in the spinach and feta mixture until evenly distributed throughout the batter.
- Fill the Muffin Tin: Spoon the batter into the prepared muffin tin, filling each cup about 3/4 full. This will allow room for the muffins to rise without overflowing.
- Bake: Place the muffin tin in the preheated oven and bake for 20-25 minutes, or until a toothpick inserted into the center of a muffin comes out clean. The tops should be lightly golden brown.
- Cool and Serve: Once baked, remove the muffins from the oven and let them cool in the tin for about 5 minutes. Then transfer them to a wire rack to cool completely. Serve warm or at room temperature.
Extra Tips:
For best results, confirm that the spinach is thoroughly washed and dried before chopping to avoid adding excess moisture to the batter. If you prefer a spicier kick, consider adding a pinch of red pepper flakes to the dry ingredients.
These muffins can also be stored in an airtight container at room temperature for up to two days or frozen for longer storage. Reheat in the oven or microwave for a fresh-out-of-the-oven taste.
Rainbow Vegetable Sushi Rolls
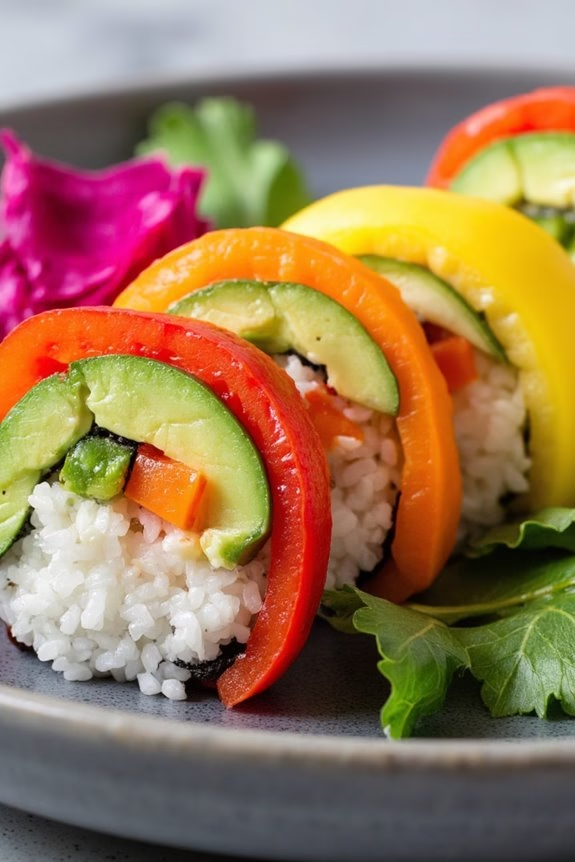
Rainbow Vegetable Sushi Rolls are a vibrant and healthy twist on traditional sushi, perfect for a light meal or snack. These sushi rolls are packed with a variety of colorful vegetables, making them not only visually appealing but also nutrient-rich. The combination of fresh ingredients provides a delightful crunch and a burst of flavors with every bite.
These rolls are a great way to enjoy sushi without the need for fish, appealing to vegetarians and anyone looking to incorporate more vegetables into their diet. Making Rainbow Vegetable Sushi Rolls is surprisingly simple and can be a fun activity to do with family or friends. The key is to prepare all the ingredients beforehand, guaranteeing a smooth rolling process.
This dish is versatile, allowing you to customize the fillings based on your preferences and what you have available at home. Whether you’re a sushi-making novice or a seasoned pro, these rolls are sure to impress both in taste and presentation.
Ingredients for 4-6 servings:
- 2 cups sushi rice
- 2 1/2 cups water
- 1/4 cup rice vinegar
- 2 tablespoons sugar
- 1 teaspoon salt
- 1 package of nori sheets (about 10 sheets)
- 1 large avocado, sliced
- 1 cucumber, julienned
- 1 red bell pepper, julienned
- 1 yellow bell pepper, julienned
- 1 medium carrot, julienned
- 1 small beet, julienned
- Soy sauce, for serving
- Pickled ginger, for serving
- Wasabi, optional
Instructions:
- Prepare the Sushi Rice: Rinse the sushi rice under cold water until the water runs clear. Combine the rice and water in a pot and bring to a boil. Once boiling, reduce the heat to low, cover, and simmer for 20 minutes or until the water is absorbed and the rice is tender. Remove from heat and let it sit, covered, for 10 minutes.
- Season the Rice: In a small bowl, mix the rice vinegar, sugar, and salt until dissolved. Gently fold this mixture into the cooked rice using a wooden spatula, taking care not to mash the rice. Allow it to cool to room temperature.
- Prepare the Vegetables: While the rice is cooling, prepare the vegetables. Slice the avocado and julienne the cucumber, bell peppers, carrot, and beet. Guarantee the slices are uniform for even distribution in the rolls.
- Assemble the Sushi Rolls: Place a nori sheet on a bamboo sushi mat, shiny side down. Spread a thin, even layer of sushi rice over the nori, leaving a 1-inch border at the top edge. Arrange a strip of each vegetable horizontally across the rice.
- Roll the Sushi: Starting from the edge closest to you, use the bamboo mat to carefully roll the sushi into a tight log, pressing gently as you roll. Seal the edge with a bit of water to help the nori adhere.
- Slice the Rolls: Using a sharp knife, slice the roll into bite-sized pieces. Clean the knife with a damp cloth between cuts to guarantee clean edges.
- Serve: Arrange the sushi rolls on a platter and serve with soy sauce, pickled ginger, and wasabi if desired.
Extra Tips:
When making Rainbow Vegetable Sushi Rolls, guarantee that your knife is sharp to avoid squashing the rolls while cutting. If you find the rice sticking to your hands as you spread it on the nori, keep a small bowl of water nearby to dip your fingers in.
Additionally, feel free to experiment with different vegetables or even add tofu for extra protein. Remember, the key to a successful roll isn’t to overfill it, which will make rolling difficult and messy. Enjoy the process and have fun creating your colorful sushi masterpieces!
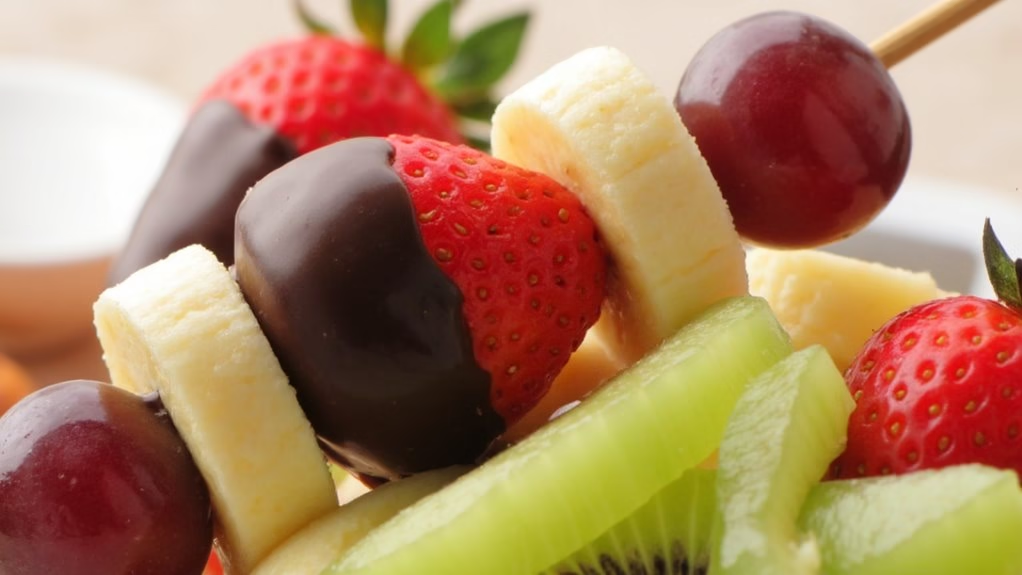
Chocolate-Dipped Fruit Skewers

Chocolate-Dipped Fruit Skewers are a delightful and healthy treat that combines the natural sweetness of fresh fruits with the rich, decadent taste of chocolate. Perfect for parties, gatherings, or as a simple snack, these skewers are easy to prepare and can be customized to suit individual taste preferences.
The combination of colors and flavors makes them not only delicious but visually appealing as well, making them a great addition to any snack table. This recipe will guide you through the process of creating these delectable skewers, suitable for 4-6 servings.
You’ll need a selection of your favorite fruits, good-quality chocolate, and a little bit of creativity. Once assembled and dipped, these skewers can be enjoyed immediately or stored for later enjoyment. Let’s get started on creating this tasty vegetarian snack!
Ingredients (for 4-6 servings):
- 2 cups strawberries, hulled
- 2 bananas, peeled and sliced into thick rounds
- 2 kiwis, peeled and cut into chunks
- 1 cup seedless grapes
- 8 ounces dark chocolate, chopped
- 1 tablespoon coconut oil
- 12-18 wooden skewers
Cooking Instructions:
- Prepare the Fruits: Wash all the fruits thoroughly. Hull the strawberries, peel and slice the bananas into thick rounds, peel and chop the kiwis into chunks, and guarantee the grapes are seedless. Pat them dry with a paper towel to remove any excess moisture.
- Assemble the Skewers: Thread the prepared fruits onto the wooden skewers. Alternate the fruits to create a colorful pattern. For example, start with a grape, followed by a banana slice, a kiwi piece, and a strawberry. Repeat this pattern until the skewer is filled, leaving some space at each end for easy handling.
- Prepare the Chocolate: In a microwave-safe bowl, combine the chopped dark chocolate and coconut oil. Microwave in 30-second increments, stirring in between, until the chocolate is completely melted and smooth.
- Dip the Skewers: Line a baking sheet with parchment paper. Dip each fruit skewer into the melted chocolate, turning to coat the fruits evenly. Allow any excess chocolate to drip off before placing the skewer onto the prepared baking sheet.
- Set the Chocolate: Once all skewers are coated, place the baking sheet in the refrigerator for about 15-20 minutes, or until the chocolate has hardened and set.
Extra Tips:
For a different flavor profile, consider using milk or white chocolate instead of dark chocolate. If you wish to add a bit of texture, sprinkle the freshly dipped skewers with chopped nuts or shredded coconut before the chocolate sets.
Be sure to use ripe but firm fruits to guarantee they hold up well during the skewering process. If preparing ahead of time, keep the skewers refrigerated and serve them cold for the best taste and texture.