As the holiday season draws near, I’m always on the lookout for appetizers that will wow my guests. Picture Festive Cranberry Brie Bites or adorable Mini Christmas Tree Quiches adorning your table. These recipes not only taste amazing but also add a touch of holiday cheer with their presentation. Can you see the smiles on your guests’ faces when they see these treats? Ready to discover how these unique recipes can make your gathering unforgettable?
Festive Cranberry Brie Bites

Cranberry Brie Bites are a delightful and elegant appetizer that perfectly captures the festive spirit of the holiday season. They’re an ideal choice for your Christmas gathering, offering a harmonious blend of creamy brie, tart cranberry sauce, and the subtle crunch of phyllo pastry.
These bites aren’t only delicious but also simple to assemble, making them a stress-free addition to your holiday menu. Whether you’re hosting a large party or a cozy family dinner, these Cranberry Brie Bites will surely impress your guests with their rich flavors and beautiful presentation.
The combination of warm, gooey brie cheese and sweet, tangy cranberry sauce nestled in a crispy phyllo shell is irresistible. The best part is that these bites can be prepared ahead of time and baked just before serving, allowing you to spend more time enjoying the company of your loved ones.
Perfect for a serving size of 4-6 people, this recipe guarantees that everyone will have their fill of these delectable treats.
Ingredients:
- 1 package (15-count) phyllo pastry cups
- 1 wheel of brie cheese (about 8 ounces)
- 1/2 cup cranberry sauce (homemade or store-bought)
- 1/4 cup chopped pecans or walnuts
- Fresh rosemary sprigs (optional, for garnish)
Instructions:
- Preheat the Oven: Start by preheating your oven to 350°F (175°C). This guarantees that the phyllo cups will bake evenly and become perfectly crispy.
- Prepare the Brie: Cut the brie cheese into small cubes, approximately 1-inch in size. This allows for easy melting and guarantees each bite is cheesy and delicious.
- Fill the Phyllo Cups: Arrange the phyllo pastry cups on a baking sheet. Place one cube of brie cheese into each phyllo cup.
- Add Cranberry Sauce: Top each brie-filled cup with a spoonful of cranberry sauce. Be generous to guarantee every bite has a balance of creamy and tart flavors.
- Sprinkle Nuts: Sprinkle the chopped pecans or walnuts over the cranberry-topped brie. The nuts add a delightful crunch and enhance the flavors of the cheese and fruit.
- Bake: Place the baking sheet in the preheated oven and bake for about 10-12 minutes, or until the brie has melted and the phyllo cups are golden brown.
- Garnish and Serve: Once baked, remove from the oven and let cool slightly. Garnish with fresh rosemary sprigs for an extra touch of holiday flavor and presentation. Serve warm.
Extra Tips:
For a more intense flavor, consider using a flavored brie, such as one infused with herbs or truffles. If you prefer a homemade touch, you can make your own cranberry sauce with fresh cranberries, sugar, and orange zest for added depth of flavor.
To prevent the phyllo cups from getting soggy, avoid overfilling with cranberry sauce. These bites are best enjoyed warm, so serve them fresh from the oven or keep them warm in a low-temperature oven until ready to serve.
Caprese Christmas Wreath

Caprese Christmas Wreath is a festive and visually stunning appetizer that’s perfect for your holiday gatherings. This dish combines the classic flavors of a Caprese salad with a creative presentation that resembles a Christmas wreath. It’s not only delicious but also an impressive centerpiece for your holiday table.
The combination of fresh mozzarella, ripe tomatoes, and aromatic basil drizzled with balsamic glaze creates a revitalizing yet satisfying appetizer that’s sure to delight your guests.
This Caprese Christmas Wreath is simple to prepare and requires minimal cooking, making it an ideal choice for those looking to spend more time with family and friends during the holiday season. The vibrant colors of the red tomatoes, white mozzarella, and green basil mimic the hues of Christmas, enhancing the festive ambiance of your gathering.
This dish serves 4-6 people, making it perfect for small to medium-sized get-togethers.
Ingredients for 4-6 people:
- 20 cherry tomatoes
- 20 small fresh mozzarella balls (bocconcini)
- Fresh basil leaves (approximately 20 leaves)
- 1/4 cup extra virgin olive oil
- Salt and freshly ground black pepper to taste
- Balsamic glaze for drizzling
- Optional: sprigs of rosemary for garnish
Cooking Instructions:
- Prepare the Ingredients: Begin by washing the cherry tomatoes and basil leaves thoroughly. Pat them dry with a clean kitchen towel. Drain the mozzarella balls from their liquid and set them aside.
- Assemble the Wreath Base: On a large, round serving platter, arrange the cherry tomatoes and mozzarella balls in an alternating pattern around the edge, forming a circle to mimic the shape of a wreath. Place a basil leaf between each tomato and mozzarella ball.
- Drizzle with Olive Oil: Drizzle the assembled wreath with extra virgin olive oil, making sure each component is lightly coated. This will enhance the flavor and appearance of your dish.
- Season the Wreath: Sprinkle the wreath with salt and freshly ground black pepper to taste. This will enhance the natural flavors of the tomatoes, mozzarella, and basil.
- Add the Finishing Touches: If desired, tuck small sprigs of rosemary in various spots around the wreath for an extra festive touch. Finally, drizzle the balsamic glaze over the entire wreath for a hint of sweetness and visual appeal.
Extra Tips:
To guarantee the best flavor, use the freshest ingredients you can find. Opt for ripe, juicy tomatoes and high-quality mozzarella for maximum taste.
Adjust the amount of balsamic glaze to your preference, keeping in mind that a little goes a long way. If you want to get creative, consider adding other ingredients like sliced olives or roasted red peppers to add more color and flavor to your Caprese Christmas Wreath.
Enjoy this appetizer with a side of crusty bread to soak up the delightful juices and oil.
Spiced Sweet Potato Rounds

Spiced Sweet Potato Rounds are a delightful and festive appetizer perfect for Christmas gatherings. These rounds offer a harmonious blend of sweet and savory flavors, with the natural sweetness of the sweet potatoes enhanced by a medley of spices.
The crispy exterior and tender interior create a satisfying texture that’s sure to please your guests. Easy to prepare and visually appealing, these rounds can be served as a standalone appetizer or paired with a variety of dips.
Perfect for a serving size of 4-6 people, Spiced Sweet Potato Rounds aren’t only delicious but also nutritious, making them an excellent choice for a holiday menu. The spices used in this recipe add warmth and depth to the dish, making it ideal for the winter season.
Whether you’re hosting a large gathering or an intimate dinner, these rounds are sure to be a hit.
Ingredients:
- 3 large sweet potatoes
- 2 tablespoons olive oil
- 1 teaspoon ground cinnamon
- 1 teaspoon smoked paprika
- 1/2 teaspoon ground cumin
- 1/2 teaspoon garlic powder
- Salt and pepper to taste
- 2 tablespoons fresh parsley, chopped (for garnish)
- Optional: sour cream or Greek yogurt for serving
Instructions:
- Preheat the Oven: Start by preheating your oven to 425°F (220°C). This guarantees the oven is hot enough to properly crisp the sweet potato rounds.
- Prepare the Sweet Potatoes: Wash and peel the sweet potatoes. Slice them into 1/4-inch thick rounds. Try to keep the slices uniform for even cooking.
- Season the Rounds: In a large mixing bowl, combine the olive oil, ground cinnamon, smoked paprika, ground cumin, garlic powder, salt, and pepper. Add the sweet potato rounds to the bowl and toss until they’re well-coated with the spice mixture.
- Arrange on Baking Sheet: Line a baking sheet with parchment paper or a silicone baking mat. Arrange the sweet potato rounds in a single layer on the prepared baking sheet, making sure they don’t overlap.
- Bake the Rounds: Place the baking sheet in the preheated oven and bake for 20-25 minutes. Flip the rounds halfway through the cooking time to guarantee both sides become golden brown and crisp.
- Garnish and Serve: Once baked, remove the rounds from the oven and let them cool slightly. Garnish with chopped fresh parsley. Serve warm, optionally with a side of sour cream or Greek yogurt for dipping.
Extra Tips:
For a more robust flavor, consider adding a pinch of cayenne pepper to the spice mix for a subtle kick. If you prefer your rounds to be extra crispy, you can broil them for an additional 2-3 minutes after baking.
Be sure to keep an eye on them to avoid burning. Finally, if you have any leftovers, these rounds reheat well in the oven, maintaining their crispiness. Enjoy your Spiced Sweet Potato Rounds as a delightful addition to your holiday spread!
Mini Christmas Tree Quiches

Mini Christmas Tree Quiches are a delightful and festive appetizer perfect for holiday gatherings. These bite-sized quiches aren’t only visually appealing with their Christmas tree shape, but they also pack a flavorful punch with a combination of savory ingredients.
They’re easy to prepare and can be made ahead of time, making them a convenient choice for entertaining guests during the busy holiday season.
Each quiche is filled with a creamy egg mixture, enhanced by a selection of vegetables and cheese, all encased in a flaky pastry crust. The quiches are baked to perfection, resulting in a golden and crispy exterior with a soft and flavorful interior.
These Mini Christmas Tree Quiches won’t only impress your family and friends with their festive appearance but also with their irresistible taste.
Ingredients for 4-6 servings:
- 1 sheet of puff pastry
- 4 large eggs
- 1/2 cup heavy cream
- 1/2 cup shredded cheddar cheese
- 1/4 cup diced bell peppers (red and green for festive colors)
- 1/4 cup chopped spinach
- 1/4 cup chopped cooked ham or bacon
- Salt and pepper to taste
- 1 tablespoon olive oil
- Non-stick cooking spray
Cooking Instructions:
- Prepare the Puff Pastry: Preheat your oven to 375°F (190°C). On a lightly floured surface, roll out the puff pastry sheet to about 1/8 inch thick. Using a Christmas tree-shaped cookie cutter, cut out shapes from the dough and place them into a greased muffin tin to form the base of each quiche.
- Prepare the Filling: In a medium-sized mixing bowl, whisk together the eggs, heavy cream, salt, and pepper until well combined. Stir in the shredded cheddar cheese, diced bell peppers, chopped spinach, and chopped ham or bacon.
- Assemble the Quiches: Spoon the egg mixture into each of the puff pastry-lined muffin cups, filling them almost to the top. Be careful not to overfill to prevent spillage during baking.
- Bake the Quiches: Place the muffin tin in the preheated oven and bake for 15-20 minutes, or until the quiches are puffed up and the tops are golden brown. Insert a toothpick into the center of one quiche to verify it comes out clean, indicating they’re fully cooked.
- Cool and Serve: Remove the muffin tin from the oven and let the quiches cool for a few minutes before gently removing them. Serve warm or at room temperature, garnished with additional chopped herbs if desired.
Extra Tips:
To guarantee perfectly shaped quiches, make sure the puff pastry is well chilled before cutting and placing it into the muffin tin. If the dough becomes too warm, it may lose its shape.
Additionally, you can customize the filling by adding other vegetables such as mushrooms or onions, or by using different types of cheese. For a more robust flavor, consider adding a pinch of nutmeg or garlic powder to the egg mixture.
These quiches can also be made a day in advance and reheated in the oven before serving, making them an excellent time-saving option for holiday gatherings.
Holiday Deviled Egg Snowmen
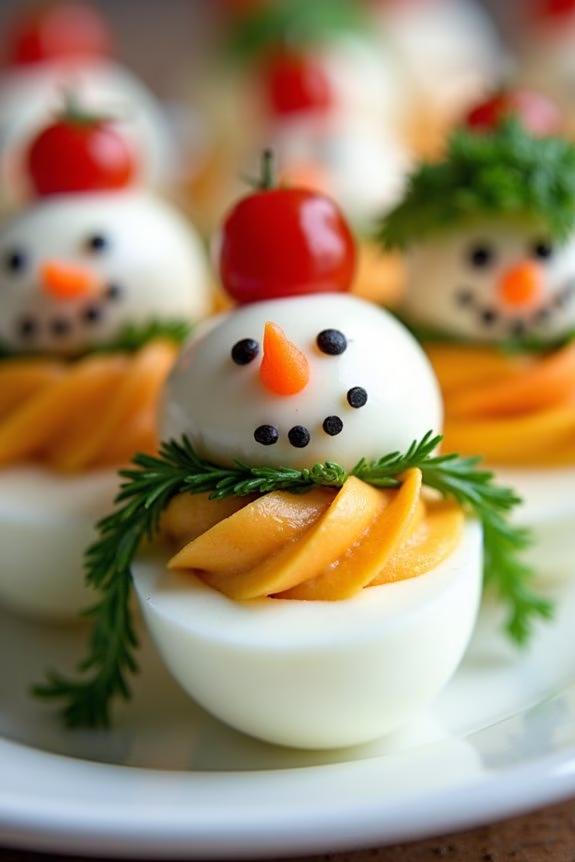
Holiday Deviled Egg Snowmen are a delightful twist on the classic deviled egg, adding a festive and whimsical touch to your holiday appetizer spread. These charming little appetizers aren’t only delicious but also fun to make, making them the perfect addition to any Christmas gathering.
By combining the creamy richness of deviled eggs with playful snowman decorations, you can create a visually appealing dish that will impress your guests and bring a smile to their faces.
Perfect for a serving size of 4-6 people, these Holiday Deviled Egg Snowmen are both simple to prepare and customize with your favorite flavors. The recipe below provides detailed instructions to guide you through the process of creating these adorable appetizers, ensuring that even those new to cooking can achieve delightful results.
Gather your ingredients and get ready to embrace the holiday spirit with this creative and tasty recipe.
Ingredients (Serves 4-6)
- 6 large eggs
- 1/4 cup mayonnaise
- 1 teaspoon Dijon mustard
- Salt and pepper to taste
- 12 whole black peppercorns (for eyes and buttons)
- 6 small orange carrot slivers (for noses)
- 6 sprigs of fresh parsley or dill (for scarves)
- 6 small cherry tomatoes or radishes (for hats)
- Toothpicks (for assembly)
Instructions
- Boil the Eggs: Place the eggs in a saucepan and cover them with cold water. Bring the water to a boil over medium-high heat. Once boiling, turn off the heat, cover the pan, and let the eggs sit for 10-12 minutes. Afterward, transfer the eggs to a bowl of ice water to cool.
- Prepare the Filling: Once the eggs are cooled, peel them and slice each egg in half lengthwise. Carefully remove the yolks and place them in a small mixing bowl. Mash the yolks with a fork and add mayonnaise, Dijon mustard, salt, and pepper. Mix until smooth and creamy.
- Assemble the Snowmen: To create the snowman body, take one egg white half and fill it with the yolk mixture. Place another egg white half on top, securing together with a toothpick. Repeat this process to assemble all the snowmen.
- Decorate the Snowmen: For the eyes and buttons, gently press whole black peppercorns into the top egg white. Insert a small carrot sliver into the yolk mixture as the nose. Wrap a sprig of parsley or dill around the “neck” as a scarf. Place a cherry tomato or radish on top of the snowman’s head as a hat. Secure with a toothpick if needed.
- Serve and Enjoy: Arrange the finished Holiday Deviled Egg Snowmen on a festive platter and serve immediately. Watch as your guests delight in these charming appetizers.
Extra Tips
When making Holiday Deviled Egg Snowmen, it’s important to handle the egg whites carefully to avoid tearing. If you find that your yolk mixture is too thick, you can add a little more mayonnaise to achieve the desired consistency.
Feel free to get creative with the snowman decorations by using different edible items, like capers for eyes or strips of bell pepper for scarves. These snowmen can be prepared a few hours in advance and stored in the refrigerator until serving, making them a convenient option for busy holiday gatherings.
Savory Puff Pastry Stars

Delight your guests this Christmas with the perfect appetizer: Savory Puff Pastry Stars. These light and flaky pastries are filled with a delicious combination of creamy cheese, fresh herbs, and a hint of garlic, making them both elegant and irresistible.
Perfect for a festive gathering, these stars aren’t only easy to prepare but also offer a visually stunning addition to your holiday spread. Whether you’re hosting a large party or an intimate family dinner, these savory stars are bound to be a hit.
The key to these puff pastry stars lies in the quality of the ingredients and the simplicity of the preparation process. Using store-bought puff pastry saves time without sacrificing taste, and the filling can be customized to suit your preferences.
The result is a golden, crispy pastry encasing a rich filling that will have your guests reaching for seconds. With a serving size suitable for 4-6 people, these stars are perfect for sharing and enjoying the festive spirit together.
Ingredients for 4-6 servings:
- 1 sheet of puff pastry, thawed
- 4 oz cream cheese, softened
- 1/2 cup shredded mozzarella cheese
- 1/4 cup grated Parmesan cheese
- 1 clove garlic, minced
- 2 tablespoons chopped fresh parsley
- 1 tablespoon chopped fresh thyme
- 1 egg, beaten
- Salt and pepper to taste
Cooking Instructions:
- Preheat the Oven: Begin by preheating your oven to 400°F (200°C). Line a baking sheet with parchment paper to prevent sticking and guarantee even baking.
- Prepare the Filling: In a medium bowl, combine the softened cream cheese, shredded mozzarella, grated Parmesan, minced garlic, chopped parsley, and thyme. Mix well until all ingredients are thoroughly combined. Season with salt and pepper to taste.
- Roll and Cut the Puff Pastry: Lightly flour your work surface and roll out the puff pastry sheet to smooth out any creases. Using a star-shaped cookie cutter, cut out as many stars as you can from the sheet. You may need to gather the scraps, roll them out again, and cut additional stars.
- Assemble the Stars: Place half of the pastry stars onto the prepared baking sheet. Spoon a small amount of the cheese filling into the center of each star, being careful not to overfill. Place another star on top of each filled star and press the edges gently to seal.
- Brush with Egg Wash: Using a pastry brush, lightly brush the tops of the stars with the beaten egg. This will give them a beautiful golden color as they bake.
- Bake: Bake in the preheated oven for 12-15 minutes, or until the stars are puffed and golden brown. Keep an eye on them to prevent over-browning.
- Cool and Serve: Allow the stars to cool slightly on a wire rack before serving. They can be enjoyed warm or at room temperature.
Extra Tips:
To guarantee your puff pastry stars come out perfectly, work quickly with the dough to prevent it from becoming too warm and sticky. If the pastry becomes difficult to handle, place it back in the refrigerator for a few minutes to firm up.
Additionally, feel free to experiment with different herbs or add a pinch of chili flakes for a spicy kick. These stars are versatile and can be adapted to suit your taste preferences. Enjoy them as part of your Christmas celebration or any festive occasion!
Roasted Garlic and Herb Cheese Ball
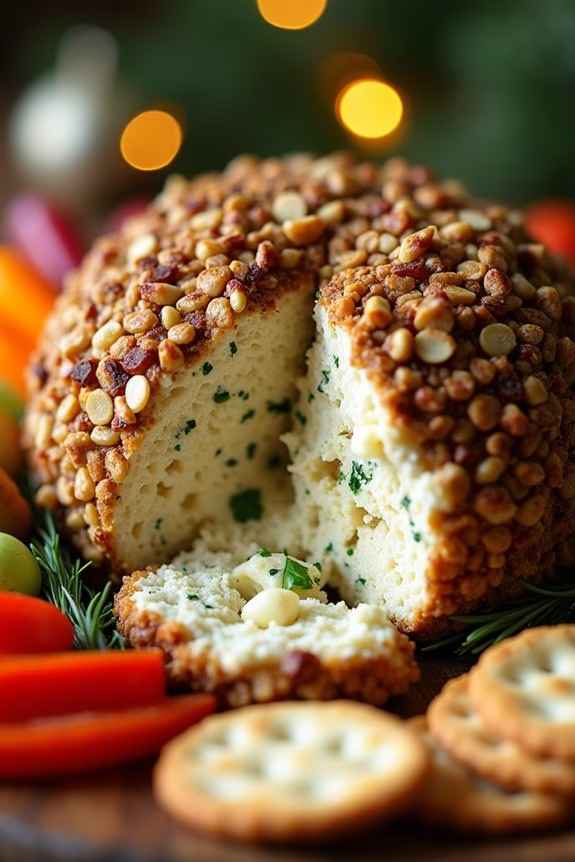
The Roasted Garlic and Herb Cheese Ball is a delightful and savory appetizer that’s perfect for Christmas gatherings. This dish combines the rich, creamy texture of cheese with the aromatic flavors of roasted garlic and fresh herbs, making it an irresistible treat for your holiday table.
It’s not only delicious but also visually appealing, adding a touch of elegance to your appetizer spread. The cheese ball can be prepared in advance, leaving you with more time to enjoy the festivities with your family and friends.
This recipe serves 4-6 people, making it an ideal choice for a small get-together or as part of a larger appetizer assortment. The key to a successful cheese ball lies in the balance of flavors and the quality of ingredients.
By carefully selecting fresh herbs and high-quality cheese, you can create a dish that’s both flavorful and satisfying. The roasted garlic adds a subtle sweetness and depth of flavor that pairs beautifully with the creamy cheese and fresh herbs, making each bite a delightful experience.
Ingredients for 4-6 people:
- 1 head of garlic
- 1 tablespoon olive oil
- 8 ounces cream cheese, softened
- 1 cup shredded sharp cheddar cheese
- 1/4 cup grated Parmesan cheese
- 1 tablespoon fresh parsley, finely chopped
- 1 tablespoon fresh chives, finely chopped
- 1 teaspoon fresh thyme leaves
- 1/4 teaspoon salt
- 1/4 teaspoon black pepper
- 1/2 cup chopped nuts (such as pecans or walnuts)
- Crackers or sliced vegetables for serving
Cooking Instructions:
- Roast the Garlic: Preheat your oven to 400°F (200°C). Cut the top off the head of garlic to expose the cloves. Drizzle with olive oil and wrap in aluminum foil. Roast in the oven for about 30-35 minutes until the garlic is soft and golden brown. Allow it to cool before handling.
- Prepare the Cheese Mixture: In a large mixing bowl, combine the softened cream cheese, shredded cheddar cheese, and grated Parmesan cheese. Squeeze the roasted garlic cloves out of their skins and add them to the cheese mixture. Mix well until smooth and combined.
- Add Herbs and Seasoning: Stir in the chopped parsley, chives, thyme, salt, and black pepper. Mix until the herbs are evenly distributed throughout the cheese mixture.
- Shape the Cheese Ball: Lay a piece of plastic wrap on a flat surface. Spoon the cheese mixture onto the plastic wrap and shape it into a ball using your hands. Wrap it tightly in the plastic wrap and refrigerate for at least 1 hour to allow it to firm up.
- Coat with Nuts: Once the cheese ball is firm, remove it from the refrigerator and unwrap it. Roll the cheese ball in the chopped nuts, pressing gently to guarantee they adhere to the surface.
- Serve: Place the cheese ball on a serving platter and surround it with crackers or sliced vegetables. Allow it to sit at room temperature for about 15 minutes before serving to soften slightly.
Extra Tips:
To enhance the flavor of your Roasted Garlic and Herb Cheese Ball, consider using a combination of your favorite herbs or adding a pinch of red pepper flakes for a bit of heat.
You can also experiment with different types of cheese, such as blue cheese or goat cheese, to personalize the flavor profile. If you’re short on time, prepare the cheese ball a day in advance and store it in the refrigerator until you’re ready to serve.
This appetizer is versatile and can be easily adapted to suit your taste preferences, making it a wonderful addition to any holiday celebration.
Prosciutto-Wrapped Asparagus Spears
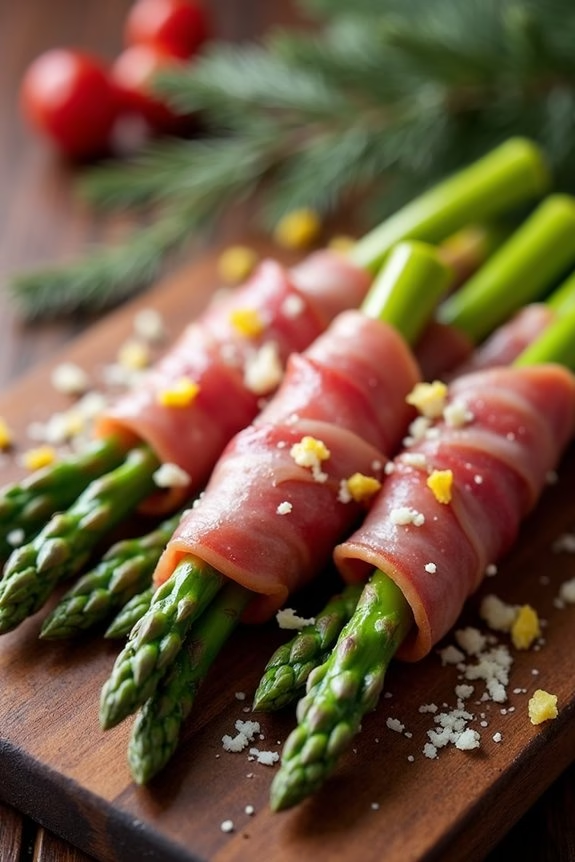
Prosciutto-wrapped asparagus spears are a delicious and elegant appetizer that perfectly complements the festive spirit of Christmas. This dish combines the savory richness of prosciutto with the fresh, earthy flavor of asparagus.
It’s not only a feast for the taste buds but also visually appealing with its vibrant green and delicate pink hues. Whether you’re hosting a holiday gathering or simply enjoying a cozy family dinner, these spears make for a delightful start to any meal.
The preparation of Prosciutto-Wrapped Asparagus Spears is straightforward, allowing you to spend more time enjoying the company of your loved ones. By wrapping tender asparagus spears in thin prosciutto, you’ll create a delightful contrast of textures and flavors.
You can serve these spears warm or at room temperature, making them versatile and convenient for any occasion. With just a few simple ingredients and steps, you can create an appetizer that will impress your guests and add a touch of sophistication to your holiday table.
Ingredients (Serves 4-6):
- 24 asparagus spears
- 12 slices of prosciutto
- 2 tablespoons olive oil
- 1 teaspoon lemon zest
- 1/2 teaspoon freshly ground black pepper
- Optional: grated Parmesan cheese for garnish
Cooking Instructions:
- Preheat the Oven: Preheat your oven to 400°F (200°C) to make sure it’s hot enough for roasting the asparagus and prosciutto.
- Prepare the Asparagus: Wash the asparagus spears thoroughly and trim the woody ends. You can do this by gently bending each spear until it naturally snaps where the tender part begins.
- Wrap the Asparagus: Cut each slice of prosciutto in half lengthwise. Wrap one-half slice of prosciutto around each asparagus spear, starting at the base and spiraling up to the tip. Make sure the prosciutto is wrapped tightly but not so tightly that it tears.
- Season and Drizzle: Place the wrapped asparagus spears on a baking sheet lined with parchment paper. Drizzle them with olive oil and sprinkle the lemon zest and black pepper evenly over the top.
- Roast the Asparagus: Place the baking sheet in the preheated oven and roast for 12-15 minutes, or until the asparagus is tender and the prosciutto is crispy. Keep an eye on them to prevent the prosciutto from burning.
- Serve: Once done, remove the spears from the oven and let them cool for a few minutes. If desired, sprinkle grated Parmesan cheese over the top for an extra layer of flavor. Serve the spears warm or at room temperature.
Extra Tips:
To achieve the best results, choose fresh and firm asparagus spears. Thicker spears are preferable as they hold up better during the roasting process.
When wrapping with prosciutto, avoid over-stretching the slices to prevent tearing. If you’re preparing these in advance, you can wrap the asparagus and refrigerate them for up to 4 hours before roasting. Simply add a few extra minutes to the roasting time if they’re cold from the fridge.
Finally, for added flavor, consider serving with a lemon aioli dipping sauce or a balsamic glaze drizzle.
Cranberry Pecan Cheese Log
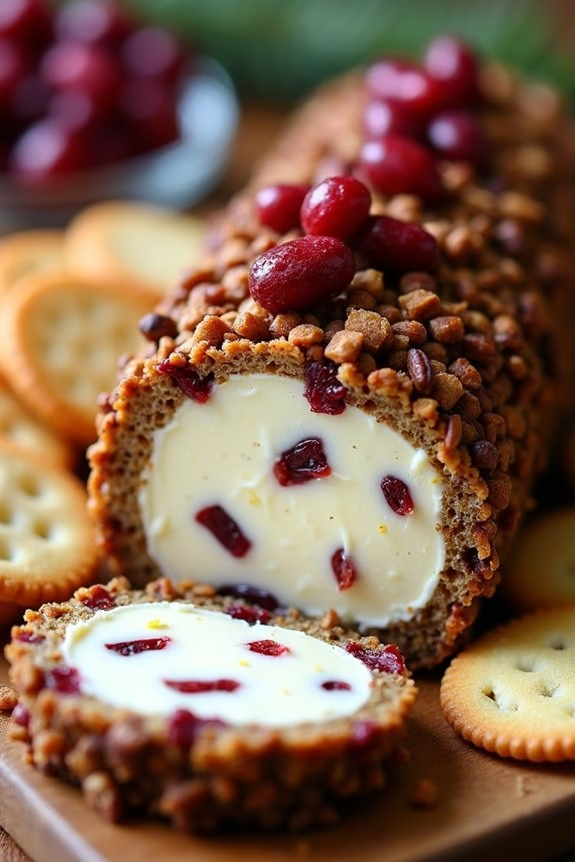
Cranberry Pecan Cheese Log is a delightful appetizer that brings together the creamy richness of cheese with the tart sweetness of cranberries and the crunch of pecans. This festive dish is perfect for holiday gatherings, providing a burst of flavors that are certain to please your guests.
The combination of textures and tastes makes it an irresistible addition to your Christmas appetizer table. Serve it with an assortment of crackers or fresh bread for a complete experience.
This recipe is designed to serve 4-6 people, making it an ideal choice for a small gathering or as part of a larger spread. The preparation is simple and can be done ahead of time, allowing you to focus on other holiday preparations.
The key to a perfect Cranberry Pecan Cheese Log is balancing the ingredients so that each bite offers a harmonious blend of flavors.
Ingredients:
- 8 oz cream cheese, softened
- 1 cup sharp cheddar cheese, shredded
- 1/2 cup dried cranberries, chopped
- 1/2 cup pecans, chopped
- 1 tablespoon honey
- 1 teaspoon orange zest
- 1/4 teaspoon salt
- 1/4 teaspoon black pepper
Instructions:
- Prepare the Base: In a large mixing bowl, combine the softened cream cheese and shredded sharp cheddar cheese. Mix well until the mixture is smooth and well blended. This will be the creamy base of your cheese log.
- Add Sweetness and Flavor: Stir in the chopped dried cranberries, honey, and orange zest. These ingredients will provide a sweet and tangy contrast to the creamy cheese, enhancing the overall flavor profile.
- Season the Mixture: Add salt and black pepper to the cheese mixture, mixing thoroughly. Adjust the seasoning to taste, making sure that the flavors are balanced but not overpowering.
- Shape the Log: Transfer the cheese mixture onto a sheet of plastic wrap. Shape it into a log, using the wrap to help form a smooth, even cylinder. Close the wrap tightly around the log and refrigerate for at least 1 hour, or until firm.
- Coat with Pecans: Once the cheese log is firm, spread the chopped pecans on a flat surface. Roll the cheese log in the pecans, pressing gently to guarantee they adhere to the surface. The pecans add a delicious crunch and nutty flavor to the exterior.
- Serve and Enjoy: Place the completed cheese log on a serving platter and pair it with crackers or sliced bread. It’s ready to be enjoyed by your guests!
Tips:
- For a spicier kick, consider adding a pinch of cayenne pepper or a dash of hot sauce to the cheese mixture.
- The cheese log can be made a day in advance. Just keep it wrapped in plastic wrap in the refrigerator until you’re ready to serve.
- If you prefer a milder flavor, substitute the sharp cheddar with a milder cheese like Monterey Jack or Colby.
- Need a nut-free option? Roll the cheese log in crushed pretzels or toasted breadcrumbs instead of pecans.
Cranberry and Pistachio Crostini

Cranberry and Pistachio Crostini is a delightful appetizer that combines the rich flavors of tart cranberries and nutty pistachios, all atop a crisp crostini base. This dish is perfect for the holiday season, offering a burst of festive colors and flavors that will impress your guests.
The combination of textures and tastes makes it an ideal starter for any Christmas gathering, ensuring that your celebration begins on a high note. This recipe is simple to prepare, yet it delivers an elegant and sophisticated dish that appeals to a wide range of palates.
The sweet and tart cranberries pair beautifully with the creamy richness of the cheese and the satisfying crunch of the pistachios. When served on a toasted crostini, this appetizer not only looks beautiful but also offers a delightful contrast of flavors and textures. It’s sure to be a crowd-pleaser at your holiday party.
Ingredients for 4-6 servings:
- 1 baguette, sliced into 1/4-inch rounds
- 1/4 cup olive oil
- 1 cup fresh cranberries
- 1/4 cup granulated sugar
- 1/4 cup water
- 1/2 cup cream cheese, softened
- 1/4 cup crumbled goat cheese
- 1/2 cup shelled pistachios, roughly chopped
- 1 tablespoon honey
- Zest of 1 orange
- Salt and pepper to taste
Cooking Instructions:
- Prepare the Cranberry Sauce: In a small saucepan over medium heat, combine the cranberries, sugar, and water. Cook for about 10 minutes, stirring occasionally, until the cranberries have burst and the mixture has thickened. Remove from heat and let cool to room temperature.
- Prepare the Crostini: Preheat your oven to 375°F (190°C). Arrange the baguette slices on a baking sheet. Brush each slice with olive oil and season with a pinch of salt and pepper. Bake in the preheated oven for 8-10 minutes, or until the slices are golden brown and crisp. Remove from oven and let cool slightly.
- Prepare the Cheese Mixture: In a bowl, combine the softened cream cheese and goat cheese. Mix until smooth and creamy. Add the orange zest and mix until well incorporated.
- Assemble the Crostini: Spread a generous amount of the cheese mixture onto each toasted baguette slice. Top with a spoonful of the cranberry sauce and a sprinkle of chopped pistachios. Drizzle lightly with honey.
- Serve: Arrange the assembled crostini on a platter and serve immediately.
Extra Tips:
For added flavor, you can toast the pistachios lightly in a dry pan over medium heat for a few minutes before chopping. This enhances their nutty aroma and adds depth to your dish.
Additionally, if you prefer a sweeter taste, you can adjust the amount of sugar in the cranberry sauce to your liking. For a touch of spice, consider adding a pinch of cinnamon or nutmeg to the cranberry mixture as it cooks.
These small adjustments can personalize the appetizer to your taste preferences, making it even more enjoyable for your guests.
Smoked Salmon Cucumber Bites

These cucumber bites are light yet satisfying, offering a revitalizing contrast to the heavier dishes typically found at holiday feasts. The combination of textures and flavors makes them a standout appetizer that’s both healthy and delicious.
The smoked salmon provides a luxurious touch, while the cucumber adds a crunchy freshness. The herbed cream cheese binds these components together, creating a harmonious blend of flavors that will leave your guests reaching for more.
Ingredients (Serves 4-6):
- 1 large cucumber
- 4 oz smoked salmon
- 8 oz cream cheese
- 1 tablespoon fresh dill, chopped
- 1 tablespoon fresh chives, chopped
- 1 tablespoon lemon juice
- Salt and pepper to taste
Instructions:
- Prepare the Cucumber: Wash the cucumber thoroughly and slice it into 1/4-inch thick rounds. Arrange the slices on a serving platter, slightly overlapping each one.
- Make the Herbed Cream Cheese: In a medium bowl, combine the cream cheese, chopped dill, chopped chives, and lemon juice. Mix until the ingredients are well-incorporated and smooth. Season the mixture with salt and pepper to taste.
- Assemble the Bites: Using a small spoon or piping bag, place a dollop of the herbed cream cheese mixture onto each cucumber slice.
- Add the Smoked Salmon: Cut the smoked salmon into small, bite-sized pieces. Gently place a piece of smoked salmon on top of the cream cheese layer on each cucumber slice.
- Garnish and Serve: Optionally, garnish each bite with a small sprig of dill or a sprinkle of chopped chives for extra color and flavor. Serve immediately or refrigerate until ready to serve.
Extra Tips:
For the best results, select a large, firm cucumber to guarantee sturdy slices that can hold the toppings without becoming soggy.
If you prefer, you can substitute the cream cheese with a light or low-fat version to reduce the calorie content. Additionally, these bites can be made a few hours in advance and stored in the refrigerator, making them a convenient option for stress-free holiday entertaining.
Just remember to cover them with plastic wrap to prevent the bites from drying out. Enjoy your festive Smoked Salmon Cucumber Bites!

