
Hosting holiday gatherings is one of my favorite things to do, and a spread of cold appetizers always sets the perfect tone. Think about the lively flavors of zesty shrimp cocktails and smoked salmon cucumber bites on your table. These appetizers are not only delicious, but they’re also visually stunning. Picture vibrant Caprese skewers and elegant prosciutto-wrapped melon balls. Looking to impress your guests with minimal effort? These recipes will be your secret weapon.
Shrimp Cocktail With Zesty Dipping Sauce
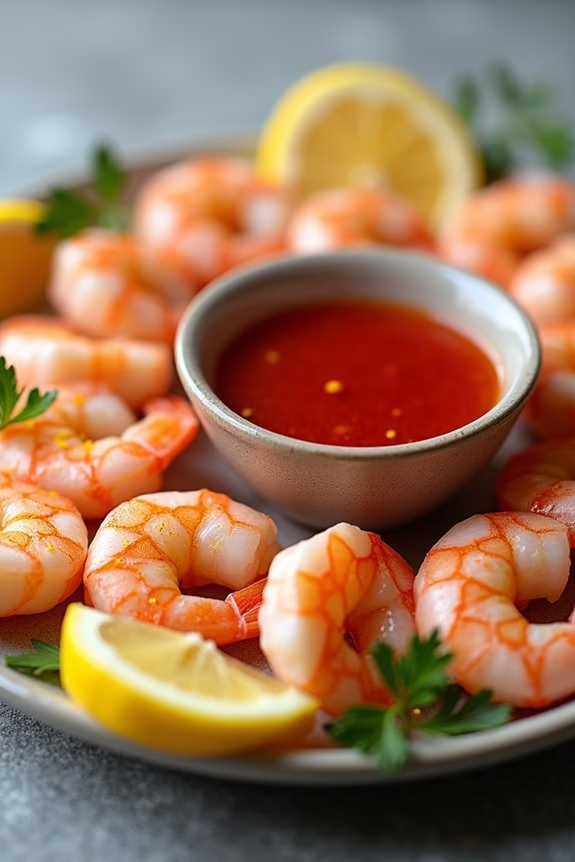
Shrimp Cocktail is a classic appetizer that brings a touch of elegance to any holiday gathering. This dish isn’t only visually appealing but also incredibly flavorful, thanks to the succulent shrimp paired with a zesty dipping sauce. Perfect for a cold Christmas celebration, this dish is easy to prepare and is bound to impress your guests.
The freshness of the shrimp combined with the tanginess of the sauce creates a delightful balance that makes it a crowd favorite. For a serving size of 4-6 people, this recipe is designed to be both simple and satisfying. The key to a great shrimp cocktail lies in the quality of the shrimp and the bold flavors of the dipping sauce.
The shrimp should be cooked to perfection—plump and juicy—while the sauce should be a harmonious blend of spicy, tangy, and sweet. This dish can be prepared in advance, allowing you to enjoy the festivities without being tied to the kitchen.
Ingredients:
- 1 1/2 pounds large shrimp, peeled and deveined
- 1 tablespoon olive oil
- 1 teaspoon salt
- 1 teaspoon black pepper
- 1 cup ketchup
- 2 tablespoons prepared horseradish
- 1 tablespoon fresh lemon juice
- 1 tablespoon Worcestershire sauce
- 1 teaspoon hot sauce (optional)
- Lemon wedges, for garnish
- Fresh parsley, for garnish
Instructions:
- Prepare the Shrimp: Preheat your oven to 400°F (200°C). Toss the peeled and deveined shrimp with olive oil, salt, and black pepper in a large bowl until evenly coated.
- Cook the Shrimp: Arrange the shrimp in a single layer on a baking sheet. Place the sheet in the preheated oven and roast the shrimp for 8-10 minutes, or until they’re pink and opaque. Be careful not to overcook them, as this will make the shrimp tough.
- Make the Dipping Sauce: While the shrimp are cooking, prepare the dipping sauce. In a medium bowl, mix together the ketchup, horseradish, lemon juice, Worcestershire sauce, and hot sauce (if using). Stir until the ingredients are well combined and the sauce is smooth.
- Chill and Serve: Once the shrimp are cooked, remove them from the oven and let them cool slightly. Arrange the shrimp on a serving platter with the dipping sauce in the center. Garnish with lemon wedges and fresh parsley. Serve chilled or at room temperature for the best flavor.
Extra Tips:
When preparing the shrimp, make sure they’re fresh or properly thawed if using frozen. Fresh lemon juice is essential for the dipping sauce, as it adds a bright and fresh flavor that complements the shrimp beautifully.
For an added layer of flavor, consider adding a pinch of smoked paprika or cayenne pepper to the dipping sauce. If preparing ahead of time, keep the shrimp and sauce refrigerated separately until just before serving to maintain freshness.
Enjoy your Shrimp Cocktail With Zesty Dipping Sauce as a sophisticated start to your holiday meal!
Caprese Skewers With Balsamic Glaze
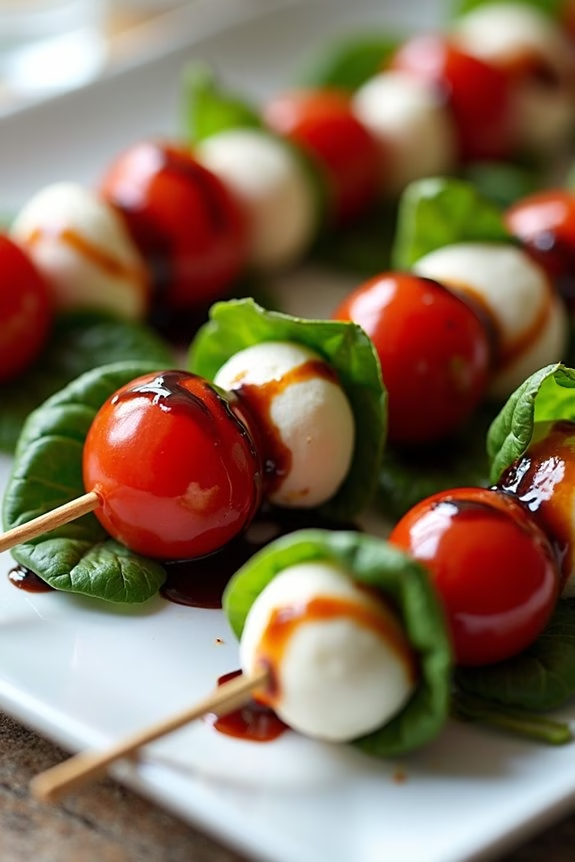
Caprese Skewers With Balsamic Glaze are a delightful and colorful appetizer that brings a touch of elegance to any holiday gathering. Perfect for a cold Christmas appetizer, these skewers embody the classic combination of fresh mozzarella, juicy cherry tomatoes, and fragrant basil, all drizzled with a tangy balsamic glaze.
The simplicity of this dish allows the fresh flavors of the ingredients to shine, making it a favorite among guests. Not only are these skewers delicious, but they’re also visually appealing, adding a festive touch to your table.
Preparing Caprese Skewers is straightforward and requires minimal kitchen skills, making it an ideal dish to prepare in advance for your Christmas festivities. The balsamic glaze adds a sweet and tangy finish that perfectly complements the creamy mozzarella and fresh tomatoes.
Whether you’re hosting a large party or an intimate family gathering, this appetizer is sure to impress your guests and leave them wanting more. Serve them on a platter for an easy-to-grab snack that everyone will enjoy.
Ingredients for 4-6 people:
- 20 cherry tomatoes
- 20 fresh basil leaves
- 20 bite-sized mozzarella balls (bocconcini)
- 1/2 cup balsamic vinegar
- Salt and pepper to taste
- 20 wooden skewers (or toothpicks)
Cooking Instructions:
- Prepare the Balsamic Glaze: Pour the balsamic vinegar into a small saucepan and bring it to a boil over medium heat. Once boiling, reduce the heat and let it simmer until the vinegar has reduced by half and has a syrupy consistency, about 10-15 minutes. Remove from heat and let it cool.
- Assemble the Skewers: On each skewer, thread one cherry tomato followed by a fresh basil leaf and a mozzarella ball. Repeat this sequence until all the skewers are prepared. This layering provides a beautiful color contrast that’s both festive and appetizing.
- Season the Skewers: Lightly season the prepared skewers with salt and pepper to enhance the natural flavors of the ingredients.
- Drizzle with Balsamic Glaze: Once the glaze has cooled, drizzle it generously over the skewers. The sweet and tangy glaze ties all the flavors together and adds a lovely sheen.
- Serve: Arrange the skewers on a platter and serve immediately. If preparing in advance, cover and refrigerate, drizzling the glaze just before serving to keep the skewers looking fresh.
Extra Tips:
For an extra burst of flavor, consider adding a light sprinkle of dried Italian herbs or a few drops of olive oil on the skewers before serving. If you’re short on time, you can also use a store-bought balsamic glaze.
To make the skewers more festive, use a mix of cherry and yellow grape tomatoes for a pop of color. Remember to choose fresh ingredients, as their quality greatly impacts the taste of the dish. Enjoy these easy-to-make Caprese Skewers With Balsamic Glaze as a delicious and visually stunning addition to your holiday spread.
Smoked Salmon and Cream Cheese Cucumber Bites
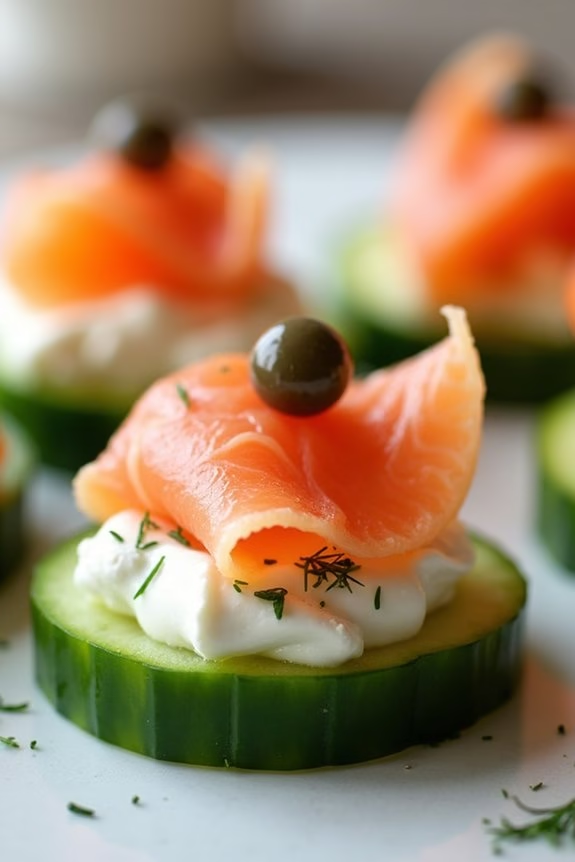
Smoked Salmon and Cream Cheese Cucumber Bites are a delightful and elegant appetizer perfect for a festive Christmas gathering. These bite-sized treats aren’t only visually appealing but also pack a punch of flavor with the rich and creamy texture of the cream cheese paired with the savory smokiness of the salmon. The crispness of the cucumber provides a revitalizing contrast, making it an ideal cold appetizer that’s both light and satisfying.
Whether you’re hosting a holiday party or simply want to add a sophisticated touch to your Christmas menu, these cucumber bites are sure to impress your guests. This recipe is straightforward and requires minimal preparation, allowing you more time to spend with your loved ones during the holiday season. The ingredients are simple yet elegant, and the assembly process is quick and easy, making it a perfect choice for those who want to serve something delicious without spending hours in the kitchen.
With a serving size of 4-6 people, this recipe is ideal for small gatherings or can be easily doubled to accommodate a larger crowd.
Ingredients (serving size: 4-6 people):
- 2 large cucumbers
- 8 oz cream cheese, softened
- 8 oz smoked salmon, thinly sliced
- 1 tablespoon lemon juice
- 1 tablespoon fresh dill, chopped
- Salt and pepper to taste
- Optional: capers for garnish
Cooking Instructions:
- Prepare the Cucumbers: Wash the cucumbers thoroughly under cold water. Slice each cucumber into 1/4-inch thick rounds. You should aim for approximately 24-30 slices depending on the size of the cucumbers.
- Make the Cream Cheese Mixture: In a medium-sized bowl, combine the softened cream cheese, lemon juice, and chopped dill. Mix until the ingredients are well combined and the mixture is smooth. Add salt and pepper to taste.
- Assemble the Bites: Spread a small dollop of the cream cheese mixture onto each cucumber slice using a small spoon or a piping bag for a more elegant presentation.
- Add the Smoked Salmon: Cut the smoked salmon into small pieces that fit nicely onto the cucumber slices. Place a piece of smoked salmon on top of the cream cheese on each cucumber slice.
- Garnish and Serve: If desired, add a small caper or a sprinkle of extra dill on top of each bite for garnish. Arrange the cucumber bites on a serving platter and refrigerate until ready to serve.
Extra Tips:
For the best flavor, ascertain that the cream cheese is fully softened before mixing to achieve a smooth consistency. If you prefer a bit of spice, consider adding a dash of horseradish or a sprinkle of freshly ground black pepper to the cream cheese mixture.
These cucumber bites can be made a few hours in advance and stored in the refrigerator, making them an excellent choice for stress-free entertaining. Just be sure to cover them tightly with plastic wrap to prevent the cucumbers from drying out. Enjoy your festive and flavorful Smoked Salmon and Cream Cheese Cucumber Bites!
Prosciutto-Wrapped Melon Balls
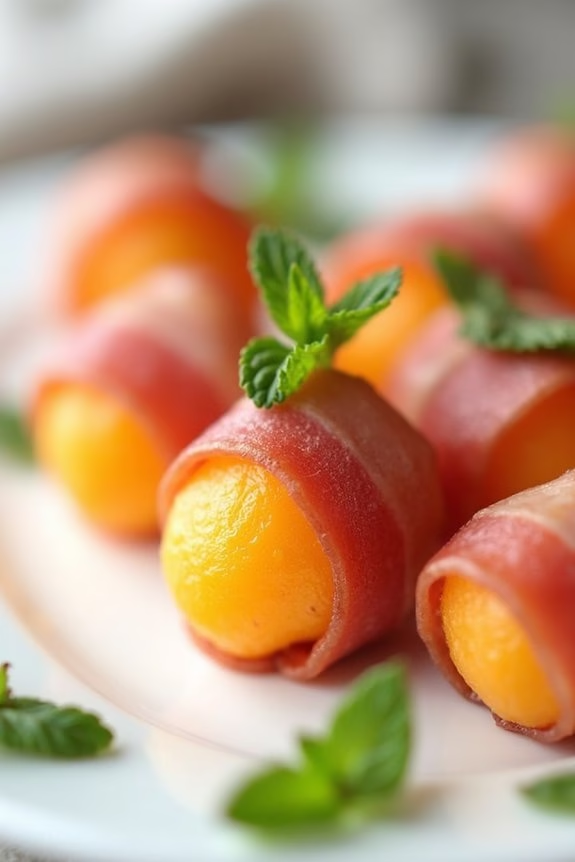
Prosciutto-Wrapped Melon Balls are a delightful cold appetizer that perfectly balances the sweetness of ripe melon with the savory richness of prosciutto. This dish is an ideal choice for a festive Christmas gathering, offering a revitalizing taste that’s both sophisticated and simple to prepare.
The contrast of flavors and textures makes it a crowd-pleaser, and its elegant presentation will add a touch of class to your holiday table. This recipe is quick to assemble, requiring minimal cooking skills, making it a fantastic option for hosts who want to impress without spending hours in the kitchen.
The key is to use high-quality ingredients: a juicy, ripe melon and thinly sliced, flavorful prosciutto. When combined, these elements create a harmonious bite-sized treat that will leave your guests reaching for more. This recipe serves 4-6 people, making it perfect for a small gathering or as part of a larger spread of appetizers.
Ingredients:
- 1 ripe cantaloupe or honeydew melon
- 12 slices of prosciutto
- Fresh mint leaves (optional, for garnish)
- Toothpicks or small skewers
Instructions:
- Prepare the Melon:
- Cut the melon in half and remove the seeds with a spoon. Using a melon baller, scoop out round balls of melon and set them aside in a bowl. If you don’t have a melon baller, you can alternatively cut the melon into small, bite-sized cubes.
- Wrap with Prosciutto:
- Take each slice of prosciutto and cut it lengthwise into two or three strips, depending on the size of the melon balls. Wrap a strip of prosciutto around each melon ball, making sure it overlaps slightly to secure. If needed, use a toothpick to hold the prosciutto in place.
- Assemble and Garnish:
- Arrange the prosciutto-wrapped melon balls on a serving platter. If desired, add fresh mint leaves as a garnish for an extra pop of color and flavor. The mint will also add an invigorating aroma that complements the dish well.
- Chill Before Serving:
- Place the platter in the refrigerator for at least 30 minutes before serving. This step allows the flavors to meld and guarantees the appetizer is served cold, enhancing its invigorating qualities.
Extra Tips:
When selecting your melon, look for one that’s fragrant and slightly soft to the touch, as this indicates ripeness and sweetness.
If you want to add a touch of sophistication, consider drizzling a small amount of balsamic glaze over the finished dish just before serving. This adds a subtle tang that beautifully complements the sweet and salty notes.
Additionally, you can experiment with different types of prosciutto or even substitute it with a similar cured meat like Serrano ham for a slightly different flavor profile.
Goat Cheese and Cranberry Crostini
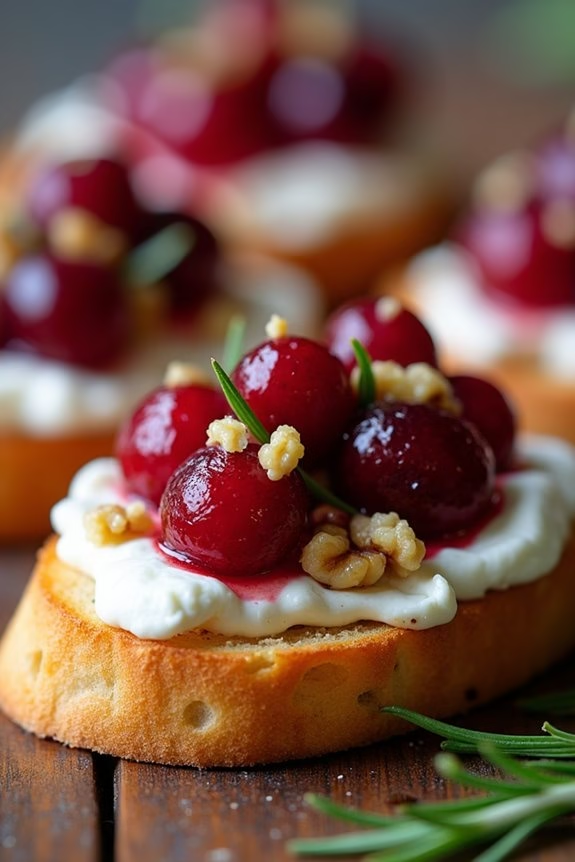
Impress your holiday guests with these delightful Goat Cheese and Cranberry Crostini, a perfect cold Christmas appetizer that combines tangy goat cheese with the sweet and tart flavors of cranberries.
This elegant and easy-to-make dish is ideal for serving at festive gatherings, allowing you to enjoy the company of your guests without spending too much time in the kitchen. The crunch of the crostini paired with the creamy goat cheese and the burst of cranberry will surely make this appetizer a crowd favorite.
The simplicity of this dish is one of its greatest strengths, requiring only a few quality ingredients to create something truly special. The goat cheese and cranberry topping can be prepared in advance, making it a convenient choice for busy hosts.
Serve these crostinis at room temperature for maximum flavor, and watch them disappear from the platter in no time. This recipe yields enough for 4-6 people, making it a great addition to any holiday spread.
Ingredients:
- 1 French baguette
- 8 oz goat cheese
- 1 cup fresh cranberries
- 1/4 cup honey
- 1/4 cup water
- 1 tablespoon fresh rosemary, chopped
- 1/4 cup walnuts, chopped
- Salt to taste
- Black pepper to taste
- Olive oil for brushing
Cooking Instructions:
1. Preheat the Oven:
Preheat your oven to 350°F (175°C). This will be used to toast the crostini.
2. Prepare the Baguette:
Slice the baguette into 1/2-inch thick slices. Aim for about 12-16 slices to serve 4-6 people. Arrange the slices on a baking sheet.
3. Toast the Crostini:
Lightly brush both sides of the baguette slices with olive oil. Place the baking sheet in the preheated oven and toast for about 10 minutes, flipping halfway through, until the slices are golden brown and crispy.
4. Make the Cranberry Topping:
In a small saucepan, combine the cranberries, honey, and water. Cook over medium heat, stirring occasionally, until the cranberries start to burst and the mixture thickens, about 10 minutes.
Stir in the chopped rosemary and cook for an additional 2 minutes. Remove from heat and let it cool.
5. Prepare the Goat Cheese:
While the cranberry topping is cooling, place the goat cheese in a small bowl. Stir in a pinch of salt and black pepper to taste to enhance the flavor.
6. Assemble the Crostini:
Spread a generous amount of goat cheese on each toasted baguette slice. Top each with a spoonful of the cranberry mixture.
7. Add Walnuts:
Sprinkle the chopped walnuts over the cranberry-topped crostini for added texture and flavor.
8. Serve:
Arrange the crostini on a serving platter and garnish with additional rosemary if desired. Serve at room temperature.
Extra Tips:
For the best results, use fresh and high-quality ingredients, particularly the goat cheese and cranberries.
If you prefer a more savory taste, consider adding a sprinkle of cracked black pepper on top of the cranberries before serving.
To save time on the day of your event, you can prepare the cranberry topping a day in advance and store it in the refrigerator. Just make sure to bring it to room temperature before assembling the crostini.
Additionally, if you have leftover cranberry sauce from a holiday meal, feel free to use that as a convenient substitute for making the cranberry topping.
Avocado and Pomegranate Salsa
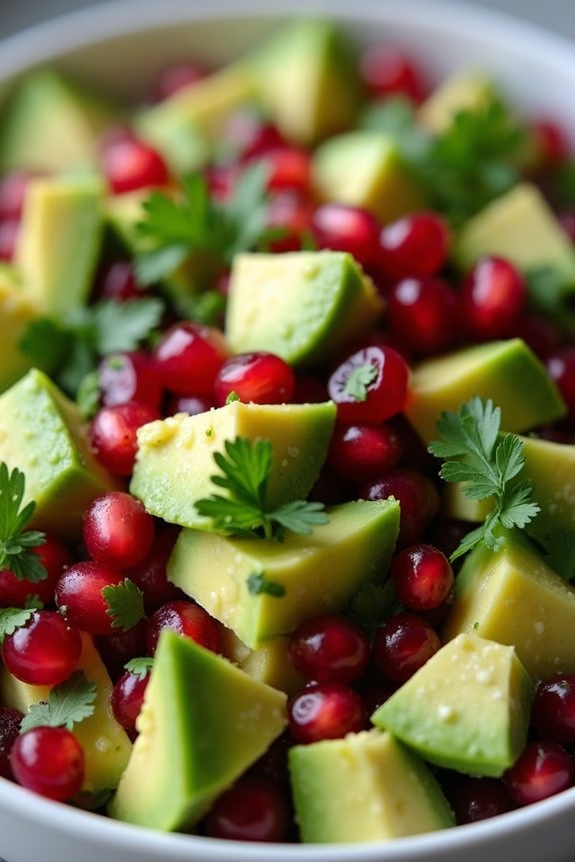
Looking for a revitalizing and vibrant appetizer to kick off your Christmas feast? This Avocado and Pomegranate Salsa is the perfect choice! Combining creamy avocados with the tart sweetness of pomegranate seeds and a hint of lime, this dish is a delicious blend of textures and flavors that will delight your guests.
Not only is it visually stunning with its rich array of colors, but it’s also incredibly easy to prepare, making it a fantastic option for a stress-free holiday gathering.
This salsa is versatile and can be served with a variety of accompaniments such as tortilla chips, crusty bread, or even as a topping for grilled meats. The combination of fresh ingredients offers a healthy, gluten-free, and vegan-friendly option that caters to a wide range of dietary preferences, guaranteeing everyone at your table can enjoy.
Prepare this dish for 4-6 people and watch it disappear in no time!
Ingredients:
- 3 ripe avocados, diced
- 1 cup pomegranate seeds
- 1/2 cup red onion, finely chopped
- 1/4 cup fresh cilantro, chopped
- 1-2 jalapeños, seeded and finely chopped
- Juice of 2 limes
- Salt and pepper to taste
Instructions:
- Prepare the Avocados: Begin by cutting the avocados in half, removing the pits, and carefully scooping out the flesh. Dice the avocados into small, bite-sized pieces and place them in a large mixing bowl.
- Add the Pomegranate Seeds: Measure out one cup of pomegranate seeds and add them to the bowl with the avocado. These seeds provide a burst of sweetness and a beautiful color contrast.
- Chop the Vegetables: Finely chop the red onion and fresh cilantro, then add them to the bowl. For a bit of heat, finely chop one or two jalapeños, depending on your spice preference, and add them to the mixture.
- Add Lime Juice: Squeeze the juice of two fresh limes over the ingredients in the bowl. The lime juice will help prevent the avocados from browning and will add a revitalizing citrus flavor.
- Season and Mix: Season the salsa with salt and pepper to taste. Gently toss all the ingredients together until they’re well combined, being careful not to mash the avocado.
- Chill and Serve: For the best flavor, let the salsa chill in the refrigerator for at least 30 minutes before serving. This allows the flavors to meld together beautifully. Serve it with your choice of tortilla chips, bread, or as a topping.
Extra Tips:
To keep the avocado from browning, make sure that you add the lime juice immediately after cutting the avocado. If pomegranates aren’t in season, you can use pre-packaged pomegranate seeds available at most grocery stores.
For a milder salsa, substitute the jalapeños with bell peppers. Remember to adjust the seasoning to your taste, as the salt content can vary depending on the ripeness of the avocados. Enjoy this dish fresh for the best taste and texture!
Deviled Eggs With a Twist
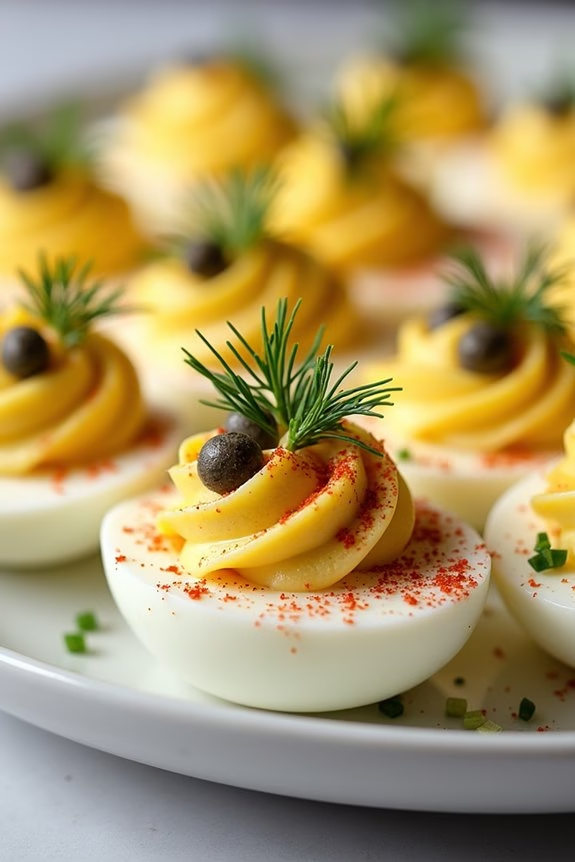
Deviled eggs are a classic appetizer that never fails to please, but this holiday season, why not give them a little twist? This recipe for Zesty Deviled Eggs adds a burst of flavor with a unique combination of ingredients that will leave your guests asking for more. The key to these zesty deviled eggs is the addition of tangy ingredients like Dijon mustard and a hint of smoked paprika, which elevate the traditional flavors to something extraordinary.
Perfect for a cold Christmas appetizer, these deviled eggs aren’t only delicious but also easy to prepare ahead of time, making them a stress-free addition to your holiday spread. They’re the ideal finger food, providing a creamy and savory bite with a delightful pop of zest. This recipe serves 4-6 people, making it a convenient choice for small gatherings or as part of a larger holiday feast.
Ingredients (Serves 4-6):
- 6 large eggs
- 2 tablespoons mayonnaise
- 1 tablespoon Dijon mustard
- 1 teaspoon apple cider vinegar
- 1/2 teaspoon smoked paprika
- Salt and pepper to taste
- 1 tablespoon finely chopped chives
- 1 tablespoon capers, drained and chopped
- Paprika for garnish
- Fresh dill for garnish
Cooking Instructions:
- Boil the Eggs: Place the eggs in a single layer in a saucepan and cover them with cold water. Bring the water to a rolling boil over medium-high heat. Once boiling, cover the saucepan, remove it from the heat, and let the eggs sit for 10-12 minutes.
- Cool the Eggs: After the eggs have cooked, transfer them to a bowl of ice water to cool for about 5 minutes. This will stop the cooking process and make them easier to peel.
- Prepare the Filling: Peel the eggs gently and slice them in half lengthwise. Carefully remove the yolks and place them in a mixing bowl. Set the egg whites aside.
- Mix the Filling: Mash the egg yolks with a fork until smooth. Add the mayonnaise, Dijon mustard, apple cider vinegar, smoked paprika, salt, and pepper. Mix until the filling is creamy and well combined.
- Add the Zesty Ingredients: Stir in the chopped chives and capers into the yolk mixture, guaranteeing they’re evenly distributed.
- Fill the Egg Whites: Using a spoon or a piping bag, fill the egg white halves with the yolk mixture. Be generous with the filling for each egg half.
- Garnish: Lightly sprinkle the tops with additional paprika and place a small sprig of fresh dill on each deviled egg for garnish.
- Chill and Serve: Refrigerate the deviled eggs for at least 30 minutes before serving to allow the flavors to meld together. Serve chilled.
Extra Tips:
To achieve perfectly smooth and creamy filling, verify that the egg yolks are thoroughly mashed before mixing in the other ingredients. If you prefer a smoother texture, you can use a food processor to blend the yolk mixture.
For a touch of heat, consider adding a dash of cayenne pepper to the filling. Additionally, if you’re preparing these deviled eggs ahead of time, store them in an airtight container in the refrigerator to maintain freshness. Garnish them just before serving to keep the herbs vibrant and fresh.
Mediterranean Hummus Platter
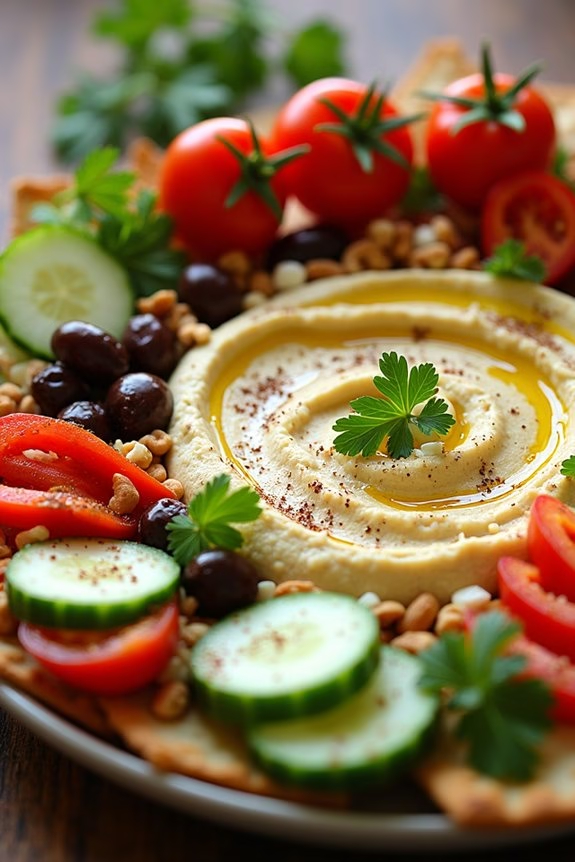
The Mediterranean Hummus Platter is an enticing and vibrant dish that brings together a variety of flavors and textures, making it a perfect addition to your cold Christmas appetizer lineup. This platter isn’t only visually stunning, but it also caters to a wide range of dietary preferences, being naturally vegan and gluten-free.
It’s an ideal choice for serving a crowd during the holidays, offering a delightful fusion of creamy hummus, fresh vegetables, tangy olives, and crispy pita chips.
This platter is all about balance and presentation. While the hummus serves as the creamy centerpiece, the accompanying toppings and dippers add color and variety, ensuring that every bite is a new experience.
The Mediterranean Hummus Platter is easy to assemble, requiring minimal cooking, which is a huge advantage when you’re juggling multiple dishes during the festive season. The combination of ingredients not only delights the palate but also provides a healthy option amidst the holiday indulgence. This recipe serves 4-6 people.
Ingredients:
- 2 cups hummus (store-bought or homemade)
- 1 cucumber, sliced
- 1 cup cherry tomatoes, halved
- 1 red bell pepper, sliced
- 1 cup mixed olives
- 1/4 cup feta cheese, crumbled (optional)
- 1/4 cup roasted red peppers
- 2 tablespoons pine nuts
- 1 tablespoon olive oil
- 1 teaspoon za’atar seasoning
- Fresh parsley, chopped
- Pita bread or pita chips
Instructions:
- Prepare the Base: Spread the hummus evenly across a large serving platter. Using the back of a spoon, create swirls or a slight well in the center to hold any extra toppings or olive oil.
- Arrange the Vegetables: Neatly arrange the cucumber slices, cherry tomato halves, and red bell pepper strips around the hummus. Try to alternate colors for a visually appealing presentation.
- Add the Toppings: Scatter the mixed olives, roasted red peppers, and crumbled feta cheese (if using) over the hummus. Sprinkle the pine nuts across the top for added crunch.
- Season and Garnish: Drizzle olive oil over the hummus and vegetables. Sprinkle the za’atar seasoning over the entire platter for an authentic Mediterranean flavor. Finish by garnishing with freshly chopped parsley.
- Serve with Dippers: Arrange pita bread triangles or pita chips around the edge of the platter for easy dipping.
Extra Tips:
For the best flavor, allow the hummus to come to room temperature before serving, as this enhances its creamy texture and taste.
You can prepare the platter a few hours in advance and keep it covered in the refrigerator, but be sure to add the pita bread or chips just before serving to keep them fresh and crispy.
If you prefer a more personalized touch, you can make your own hummus by blending chickpeas, tahini, lemon juice, garlic, and olive oil. Experiment with additional toppings like artichoke hearts or sun-dried tomatoes to further customize your platter.
Mini Lobster Rolls
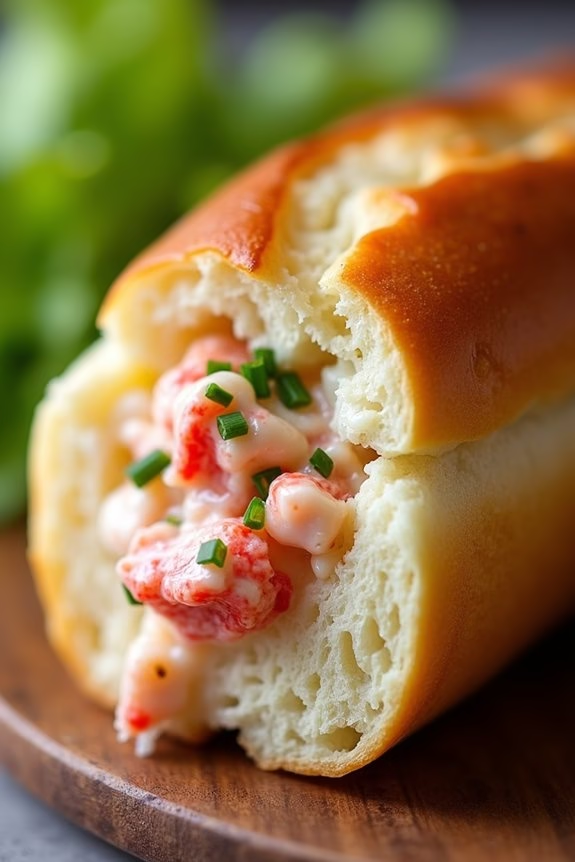
Mini Lobster Rolls are the perfect cold appetizer to wow your guests this Christmas. These bite-sized delights bring a taste of luxury to your holiday gathering without requiring extensive preparation. The sweet and tender lobster meat, combined with a creamy mayo dressing and a hint of lemon, is nestled inside buttery, toasted rolls to create a mouthwatering experience.
Whether served as a starter or as part of a festive buffet, Mini Lobster Rolls are sure to become a favorite at your celebration.
Lobster rolls are traditionally associated with summer, but their irresistible flavor makes them an excellent choice for winter festivities as well. The freshness of the lobster, combined with the richness of the other ingredients, creates a harmonious blend that’s both satisfying and elegant.
Perfect for a serving size of 4-6 people, these Mini Lobster Rolls are easy to prepare ahead of time, allowing you to enjoy the party without spending all your time in the kitchen.
Ingredients:
- 1 pound cooked lobster meat, chopped
- 1/4 cup mayonnaise
- 1 tablespoon lemon juice
- 1 tablespoon finely chopped fresh chives
- Salt and pepper to taste
- 6 mini brioche rolls
- 2 tablespoons unsalted butter, melted
- Lettuce leaves (optional)
Instructions:
- Prepare the Lobster Mixture: In a medium-sized bowl, mix the chopped lobster meat with mayonnaise, lemon juice, and chopped chives. Season the mixture with salt and pepper to taste. Stir until all ingredients are well combined and the lobster is evenly coated.
- Toast the Rolls: Preheat a griddle or a large skillet over medium heat. Brush the inside of each mini brioche roll with melted butter. Place the rolls on the griddle, buttered side down, and toast until golden brown and crispy, about 2-3 minutes. Remove from the heat and allow to cool slightly.
- Assemble the Rolls: Open the toasted rolls slightly and, if desired, place a small piece of lettuce inside each roll. Spoon a generous amount of the lobster mixture into each roll, ensuring each one is well filled.
- Serve: Arrange the Mini Lobster Rolls on a serving platter. Garnish with additional chives if desired. Serve immediately, or cover and refrigerate until ready to serve.
Extra Tips:
For the best flavor, use fresh lobster meat if possible. If you can’t find fresh lobster, high-quality frozen lobster meat will work as well. Be sure to thaw it properly before using.
When toasting the rolls, keep an eye on them to avoid burning; they should be golden brown for the perfect crunch. If you’re preparing these rolls in advance, store the lobster mixture and rolls separately in the refrigerator, and assemble just before serving to maintain the crispness of the rolls.
Fresh Herb and Cheese Stuffed Cherry Tomatoes
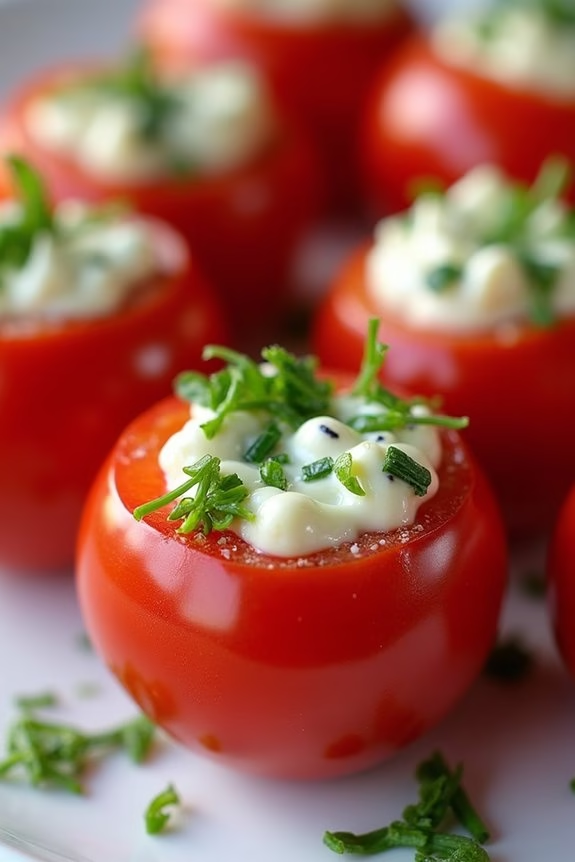
Fresh Herb and Cheese Stuffed Cherry Tomatoes are a delightful and visually appealing cold appetizer perfect for your Christmas gatherings. These bite-sized treats are bursting with flavor, combining the juicy sweetness of cherry tomatoes with a creamy, herb-infused cheese filling. Not only are they a breeze to prepare, but they also add a pop of color to your holiday spread, making them an ideal choice for festive entertaining.
The key to making these appetizers truly shine is using fresh, high-quality ingredients. The combination of fresh herbs like basil and chives with creamy goat cheese creates a deliciously savory filling that complements the natural acidity of the tomatoes. Whether you’re hosting a large holiday party or a small family gathering, these Fresh Herb and Cheese Stuffed Cherry Tomatoes are sure to impress your guests with their elegant simplicity.
Ingredients (Serves 4-6):
- 24 cherry tomatoes
- 1 cup goat cheese, softened
- 2 tablespoons fresh basil, finely chopped
- 2 tablespoons fresh chives, finely chopped
- 1 tablespoon fresh parsley, finely chopped
- 1 tablespoon olive oil
- Salt and pepper to taste
Cooking Instructions:
- Prepare the Cherry Tomatoes: Carefully wash and dry the cherry tomatoes. Slice off the top of each tomato and use a small spoon or melon baller to gently scoop out the seeds and pulp, creating a hollow space for the filling. Be careful not to puncture the sides of the tomatoes.
- Make the Cheese Filling: In a medium-sized bowl, combine the softened goat cheese, chopped basil, chives, parsley, and olive oil. Mix well until all ingredients are thoroughly incorporated. Season the mixture with salt and pepper to taste, adjusting the seasoning as necessary.
- Fill the Tomatoes: Using a small spoon or a piping bag fitted with a plain tip, fill each hollowed-out cherry tomato with the herb and cheese mixture. Make sure to fill each tomato to the brim without overflowing.
- Chill Before Serving: Arrange the stuffed cherry tomatoes on a serving platter. Cover the platter with plastic wrap and refrigerate for at least 30 minutes to allow the flavors to meld and the cheese to firm up slightly.
- Serve: Before serving, you may garnish with additional chopped herbs for an extra touch of color and flavor. Serve the stuffed tomatoes chilled as part of your holiday appetizer spread.
Extra Tips:
When selecting cherry tomatoes for this recipe, try to choose those that are firm and similar in size for even presentation and ease of filling. If goat cheese isn’t to your taste, cream cheese or ricotta can be used as alternatives, though they’ll slightly alter the flavor profile.
Additionally, if you prefer a bit of a kick, consider adding a pinch of red pepper flakes to the cheese mixture. These appetizers are versatile and can be prepared a few hours in advance, making them a convenient choice for busy holiday hosts.
Antipasto Skewers
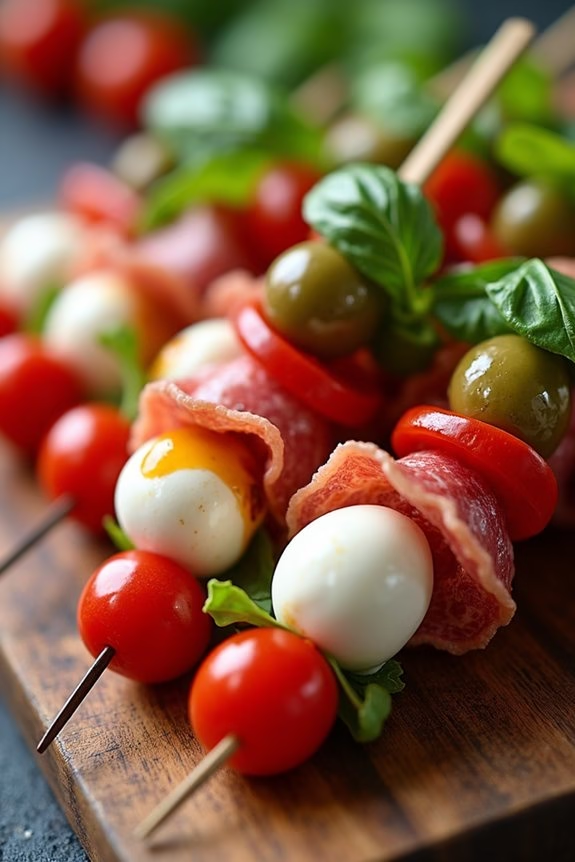
Antipasto Skewers are perfect for a festive cold appetizer during the holiday season. These skewers are a delightful medley of Italian-inspired flavors, vibrant colors, and varied textures that come together to please both the eye and the palate. They’re simple to assemble and can be prepared ahead of time, making them a stress-free addition to your Christmas spread. The combination of cured meats, cheese, and marinated vegetables offers a rich and satisfying taste that will certainly impress your guests.
This recipe serves 4-6 people and allows for easy customization. You can mix and match your favorite antipasto ingredients to create skewers that suit your personal taste preferences. The key is to balance flavors and textures, guaranteeing each skewer is as delicious as the last. Whether you’re serving them as a starter or as part of a larger buffet, these antipasto skewers are sure to be a hit.
Ingredients:
- 12 cherry or grape tomatoes
- 12 pieces of marinated mozzarella balls
- 12 slices of salami or prosciutto
- 12 stuffed green olives
- 12 artichoke hearts (canned or jarred, drained)
- 12 fresh basil leaves
- 12 small skewers or toothpicks
- Olive oil, for drizzling
- Balsamic glaze, for drizzling (optional)
- Salt and pepper, to taste
Cooking Instructions:
- Prepare Ingredients: Begin by laying out all ingredients on a clean surface. Drain the marinated mozzarella balls and artichoke hearts to remove excess liquid. Pat them dry with paper towels if necessary.
- Assemble Skewers: Take a skewer or toothpick and thread a cherry tomato onto it. Follow with a piece of mozzarella, a slice of salami (folded into quarters if using large slices), a stuffed olive, an artichoke heart, and a fresh basil leaf. Ensure all ingredients are securely skewered and repeat the process until all ingredients are used.
- Plate and Season: Arrange the assembled skewers on a serving platter. Drizzle lightly with olive oil, ensuring each skewer gets a bit of shine and additional flavor. If desired, add a drizzle of balsamic glaze for extra sweetness and tanginess.
- Final Touches: Season the skewers with a pinch of salt and pepper to enhance the flavors. If preparing in advance, cover the platter with plastic wrap and refrigerate until ready to serve.
Extra Tips:
When selecting ingredients, opt for high-quality cured meats and fresh, vibrant vegetables for the best flavor. You can customize these skewers by adding other ingredients such as roasted peppers, sun-dried tomatoes, or different types of cheese.
If you’re making these skewers ahead of time, keep them refrigerated and only add the basil leaves just before serving to prevent them from wilting. Additionally, soaking the skewers in water for about 30 minutes before assembling can help prevent them from splitting.
Enjoy these antipasto skewers as a delightful, no-cook appetizer that captures the essence of Italian cuisine.
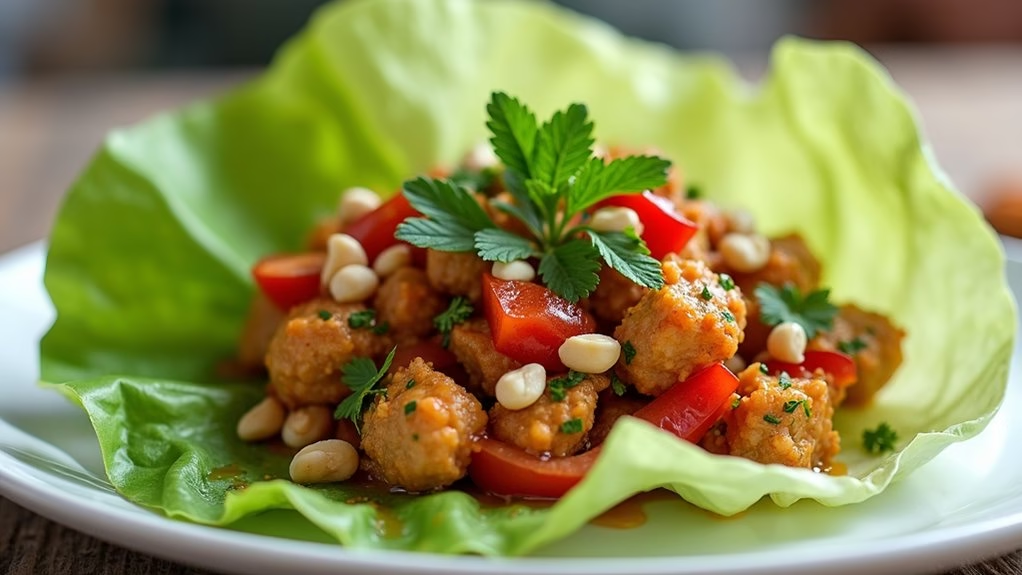
Thai Chicken Lettuce Wraps

Thai Chicken Lettuce Wraps make for a revitalizing and flavorful appetizer, perfect for a cold Christmas gathering. This dish offers a delightful combination of savory chicken mixed with aromatic herbs and spices, all wrapped in crisp lettuce leaves.
It’s a light yet satisfying option that balances freshness with the warmth of traditional Thai flavors, making it ideal for those looking to celebrate the holiday season with a touch of international flair.
Preparing these wraps is both simple and rewarding. The key lies in the vibrant mix of ingredients that come together to create this delicious dish.
You’ll need to focus on creating a well-balanced filling that’s both flavorful and texturally appealing, while also guaranteeing that you have fresh, crisp lettuce to serve as the perfect vessel for the chicken mixture.
With the right preparation, these wraps will become a crowd favorite at your Christmas gathering.
Ingredients (Serves 4-6):
- 1 pound ground chicken
- 2 tablespoons vegetable oil
- 1 medium onion, finely chopped
- 2 garlic cloves, minced
- 1 tablespoon ginger, minced
- 1 red bell pepper, finely diced
- 1 tablespoon soy sauce
- 2 tablespoons fish sauce
- 2 tablespoons lime juice
- 1 tablespoon brown sugar
- 1 teaspoon chili flakes (adjust to taste)
- 1/4 cup chopped fresh cilantro
- 1/4 cup chopped fresh mint
- 1/4 cup chopped peanuts
- 1 head butter lettuce or romaine lettuce, leaves separated
Cooking Instructions:
- Prepare the Chicken: Begin by heating the vegetable oil in a large skillet over medium heat. Once the oil is hot, add the ground chicken and cook for about 5-7 minutes, breaking it apart with a spatula until it’s fully cooked and no pink remains.
- Cook the Aromatics: Add the chopped onion, garlic, and ginger to the skillet with the chicken. Sauté for about 3 minutes until the onion becomes translucent and the mixture is fragrant.
- Add the Vegetables and Sauces: Stir in the diced red bell pepper and cook for an additional 2 minutes. Then, pour in the soy sauce, fish sauce, lime juice, brown sugar, and chili flakes. Stir everything together and let it cook for another 2-3 minutes to allow the flavors to meld.
- Finish with Fresh Herbs: Remove the skillet from heat and stir in the cilantro, mint, and chopped peanuts. Toss to combine well.
- Assemble the Wraps: To serve, spoon the chicken mixture into the center of each lettuce leaf. Arrange them on a platter for your guests to enjoy.
Extra Tips:
For an extra kick, consider offering a side of sliced chili peppers or a small dish of hot sauce for guests to customize their wraps.
Confirm the lettuce leaves are washed and dried thoroughly to prevent any residual water from affecting the texture of the wraps.
Additionally, you can prepare the chicken mixture in advance and reheat it gently before serving, making it a convenient option for a stress-free holiday appetizer.