

The holiday season is the perfect time to impress with a spread of elegant appetizers.
I’m always searching for those chic and festive recipes that make any gathering feel special.
Think Smoked Salmon and Dill Cream Cheese Blinis or Prosciutto-Wrapped Asparagus Spears.
These delectable bites not only delight the palate but also add a touch of sophistication to your table.
Ready to explore more exquisite options?
Smoked Salmon and Dill Cream Cheese Blinis

Smoked Salmon and Dill Cream Cheese Blinis are a delightful and elegant appetizer perfect for any festive gathering. These bite-sized treats combine the rich, smoky flavor of salmon with the creamy, aromatic taste of dill-infused cream cheese, all atop fluffy, warm blinis. This dish not only looks stunning on a holiday table but also offers a sophisticated taste that will impress your guests.
Whether you’re hosting a Christmas party or enjoying a cozy evening with family, these blinis are sure to be a hit.
The key to making perfect Smoked Salmon and Dill Cream Cheese Blinis is in balancing the flavors and guaranteeing each component is prepared with care. The blinis serve as a soft, neutral base that complements the robust flavors of the salmon and cream cheese. Fresh dill adds a touch of brightness, while a hint of lemon juice brings a revitalizing tanginess to the dish.
This recipe serves 4-6 people, making it ideal for small gatherings or as part of a larger appetizer spread.
Ingredients:
- 1 cup all-purpose flour
- 1 teaspoon baking powder
- 1/2 teaspoon salt
- 3/4 cup milk
- 1 large egg
- 2 tablespoons unsalted butter, melted
- 8 ounces cream cheese, softened
- 2 tablespoons fresh dill, chopped
- 1 tablespoon lemon juice
- 8 ounces smoked salmon, thinly sliced
- 1 tablespoon capers (optional)
- Fresh dill sprigs for garnish
Cooking Instructions:
- Prepare the Blini Batter: In a mixing bowl, whisk together the flour, baking powder, and salt. In a separate bowl, combine the milk, egg, and melted butter, then gradually mix into the dry ingredients, stirring until the batter is smooth. Let the batter rest for about 10 minutes.
- Cook the Blinis: Heat a non-stick skillet over medium heat. Lightly brush the surface with a little butter. Spoon about a tablespoon of batter onto the skillet for each blini. Cook for 1-2 minutes until bubbles form on the surface, then flip and cook for another minute until golden brown. Remove from the skillet and repeat with the remaining batter.
- Make the Dill Cream Cheese: In a bowl, mix the softened cream cheese with the chopped dill and lemon juice until well combined. Adjust the seasoning with salt and pepper to taste.
- Assemble the Blinis: Once the blinis have cooled slightly, spread a dollop of dill cream cheese on each one. Top with a slice of smoked salmon and a few capers, if using. Garnish with a small sprig of fresh dill.
- Serve: Arrange the blinis on a serving platter and serve immediately for the best texture and flavor.
Extra Tips:
To guarantee the blinis are perfectly fluffy, avoid overmixing the batter as this can result in a denser texture. If you’re preparing the blinis in advance, keep them warm in a low oven or reheat them briefly before assembling.
For an added touch of elegance, consider adding a small dollop of crème fraîche or a sprinkle of finely chopped chives on top of each blini. If you want to make the dish gluten-free, you can substitute the all-purpose flour with a gluten-free flour blend, though the texture might slightly differ.
Prosciutto-Wrapped Asparagus Spears
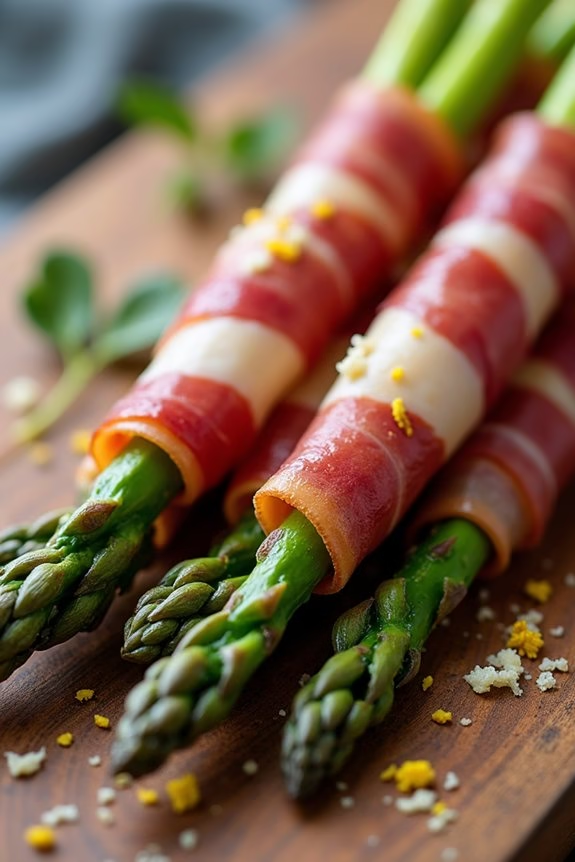
Prosciutto-Wrapped Asparagus Spears are a delightful and elegant appetizer perfect for Christmas gatherings. The combination of tender asparagus and savory prosciutto creates a harmony of flavors that’s both simple and sophisticated. This appetizer isn’t only visually appealing with its vibrant green and pink hues but also offers a crunchy texture from the roasted asparagus wrapped in the delicate, salty prosciutto.
It’s a dish that’s sure to impress your guests and add a touch of class to your holiday table. This recipe is quick and easy to prepare, making it an ideal choice for holiday entertaining. With minimal ingredients and effort, you can create a dish that looks and tastes like it took hours to prepare.
The key to this recipe is using fresh, high-quality ingredients and guaranteeing that the asparagus is cooked to perfection. The prosciutto crisps up beautifully in the oven, enveloping the asparagus in a deliciously savory embrace. Perfect for serving 4-6 people, this dish will surely become a staple in your holiday recipe collection.
Ingredients (Serves 4-6):
- 1 pound fresh asparagus, trimmed
- 8-12 slices of prosciutto
- 2 tablespoons olive oil
- Salt and freshly ground black pepper to taste
- 1 lemon, zested and juiced
- Optional: grated Parmesan cheese for garnish
Instructions:
- Preheat the Oven: Start by preheating your oven to 400°F (200°C). This guarantees that the asparagus spears will roast evenly and the prosciutto will become nice and crispy.
- Prepare the Asparagus: Wash and trim the asparagus. To trim, simply snap off the woody ends of the asparagus where they naturally break. This guarantees that only the tender parts are used.
- Season the Asparagus: Place the asparagus in a large mixing bowl. Drizzle with olive oil, then sprinkle with salt, pepper, and lemon zest. Toss the asparagus to guarantee each spear is evenly coated with the seasoning.
- Wrap with Prosciutto: Take a slice of prosciutto and wrap it around each asparagus spear, starting just below the tip and spiraling down to the base. The prosciutto should cover the asparagus but not overlap too much, as it will shrink slightly during cooking.
- Place on Baking Sheet: Arrange the wrapped asparagus spears in a single layer on a baking sheet lined with parchment paper. Guarantee there’s space between each spear for even cooking.
- Roast in the Oven: Roast in the preheated oven for 10-12 minutes. Check halfway through to guarantee the prosciutto is crisping and the asparagus is tender. You may turn the spears over once during cooking for even browning.
- Finish with Lemon: Once done, remove from the oven and drizzle with fresh lemon juice. This step adds a revitalizing zing that complements the savory flavors beautifully.
- Serve: Arrange on a platter and, if desired, sprinkle with grated Parmesan cheese before serving.
Extra Tips:
When selecting asparagus, look for firm stalks with bright green tips. Avoid any asparagus that appears wilted or slimy. Prosciutto can vary in saltiness, so be cautious with additional salt during seasoning.
If you prefer a slightly sweeter flavor, you can drizzle a bit of balsamic glaze over the spears just before serving. Additionally, these Prosciutto-Wrapped Asparagus Spears can be prepared a few hours in advance and stored in the refrigerator until ready to bake, making them an excellent make-ahead option for busy holiday hosting.
Cranberry Brie Puff Pastry Bites
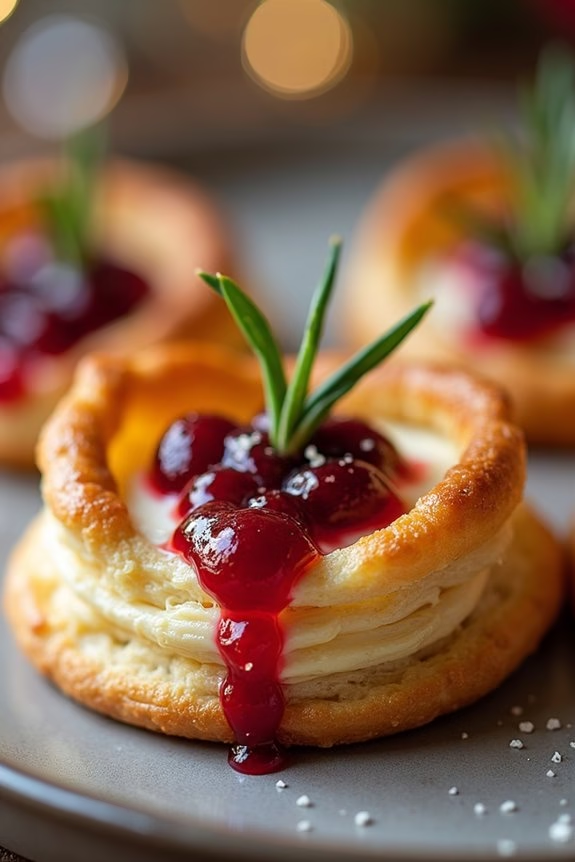
Cranberry Brie Puff Pastry Bites are the perfect festive appetizer, combining the creamy richness of Brie cheese with the tart sweetness of cranberries, all encased in flaky puff pastry.
These delightful bites are a crowd-pleaser at any holiday gathering and are incredibly easy to prepare, making them ideal for both novice and experienced cooks. With just a few simple ingredients and minimal prep time, you can create an impressive dish that’s sure to be the talk of the party.
The combination of flavors in Cranberry Brie Puff Pastry Bites is truly irresistible. The buttery, flaky pastry provides the perfect vessel for the meltingly soft Brie and the tangy cranberry sauce.
As they bake, the cheese becomes oozy and the pastry puffs up to golden perfection. These bites are a great way to start off a holiday meal, or they can be served as a delightful snack throughout the day.
Whether you’re hosting a small family gathering or a large festive party, these little morsels are sure to disappear quickly.
Ingredients for 4-6 people:
- 1 sheet of puff pastry, thawed
- 1/2 cup cranberry sauce (store-bought or homemade)
- 1 small wheel of Brie cheese (approximately 8 ounces)
- 1 egg, beaten (for egg wash)
- Fresh rosemary sprigs (optional, for garnish)
Cooking Instructions:
- Preheat the Oven: Start by preheating your oven to 400°F (200°C). Line a baking sheet with parchment paper for easy cleanup and set aside.
- Prepare the Puff Pastry: Roll out the thawed puff pastry on a lightly floured surface to smooth out any creases. Cut the pastry into 2-inch squares using a sharp knife or a pizza cutter.
- Assemble the Bites: Place a small piece of Brie (approximately 1-inch cube) in the center of each pastry square. Top each piece of cheese with about a teaspoon of cranberry sauce.
- Seal the Pastry: Fold the corners of the pastry squares over the filling to form little packages. Pinch the edges to seal them tightly, ensuring the filling stays inside during baking.
- Egg Wash: Brush the tops of the pastry bites with the beaten egg. This will give them a beautiful golden color once baked.
- Bake the Bites: Arrange the assembled pastry bites on the prepared baking sheet, leaving some space between each one. Bake in the preheated oven for 15-18 minutes, or until the pastry is puffed and golden brown.
- Cool and Garnish: Remove the bites from the oven and let them cool slightly on the baking sheet. Garnish each bite with a small sprig of fresh rosemary before serving, if desired.
Extra Tips:
For best results, use a high-quality Brie cheese and puff pastry, as they’ll greatly affect the flavor and texture of the bites.
If you prefer a homemade touch, consider making your own cranberry sauce with fresh cranberries, sugar, and a hint of orange zest for added depth of flavor.
Be sure to keep an eye on the puff pastry as it bakes to prevent over-browning. These bites are best served warm, so plan to bake them just before your guests arrive.
If you need to prepare them in advance, assemble the bites and refrigerate them until you’re ready to bake.
Fig and Goat Cheese Crostini
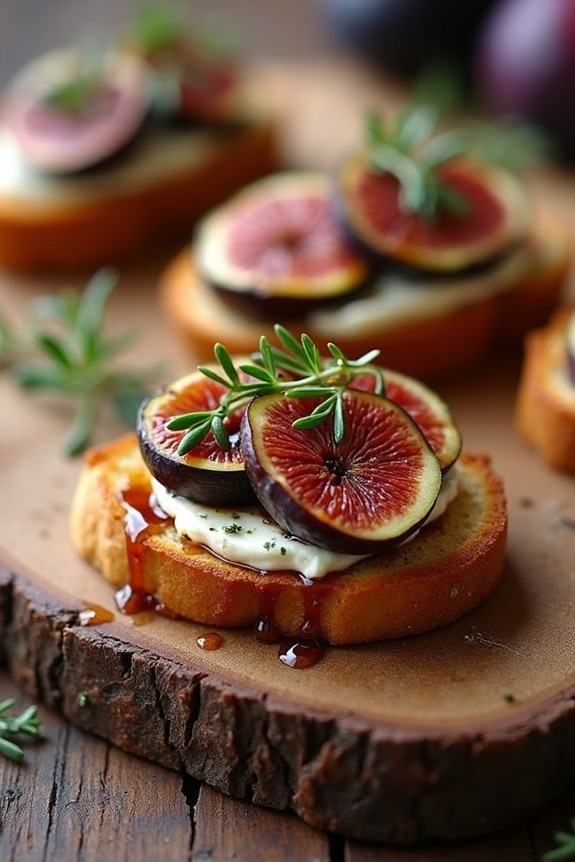
Fig and Goat Cheese Crostini is a delightful appetizer that perfectly balances the sweetness of figs with the creamy tanginess of goat cheese. This elegant dish isn’t only easy to prepare but also adds a touch of sophistication to any holiday gathering.
The crunchy texture of the toasted baguette provides a wonderful contrast to the soft cheese and figs, making it an irresistible treat for your guests. Whether you’re hosting a Christmas party or simply want to enjoy a festive snack, these crostini are bound to impress.
The combination of flavors in this appetizer is truly unique. The figs bring a natural sweetness that complements the rich, savory notes of the goat cheese. A hint of honey and a sprinkle of fresh thyme elevate the taste, creating a harmonious blend of flavors.
Finished with a drizzle of balsamic glaze, these crostini aren’t only visually appealing but also incredibly delicious. This recipe serves 4-6 people, making it perfect for small gatherings or as part of a larger spread of appetizers.
Ingredients:
- 1 French baguette
- 8 oz goat cheese, softened
- 6-8 fresh figs, sliced
- 2 tablespoons honey
- Fresh thyme leaves
- Olive oil
- Salt and pepper to taste
- Balsamic glaze
Cooking Instructions:
- Preheat the Oven: Start by preheating your oven to 375°F (190°C). This guarantees that the baguette slices will toast evenly and have a nice, golden-brown finish.
- Prepare the Baguette: Slice the French baguette into ½-inch thick pieces. You should have about 12-16 slices, depending on the size of your baguette. Arrange them on a baking sheet in a single layer.
- Toast the Baguette: Drizzle a little olive oil over each slice and season lightly with salt and pepper. Place the baking sheet in the preheated oven and toast the slices for about 8-10 minutes, or until they’re golden and crispy. Remove from the oven and let them cool slightly.
- Prepare the Fig and Cheese Topping: While the baguette is toasting, slice the fresh figs into thin slices. In a small bowl, mix the softened goat cheese with a tablespoon of honey until smooth and creamy.
- Assemble the Crostini: Spread a generous amount of the goat cheese mixture onto each toasted baguette slice. Top with 2-3 slices of fig, depending on their size. Sprinkle fresh thyme leaves over each crostino.
- Finish with a Drizzle: Drizzle the remaining honey over the assembled crostini, and finish with a light drizzle of balsamic glaze. This adds a lovely sweetness and acidity that enhances the flavors of the dish.
- Serve: Arrange the Fig and Goat Cheese Crostini on a serving platter and serve immediately. They’re best enjoyed warm or at room temperature.
Extra Tips:
- For a more flavorful dish, consider using a flavored goat cheese, such as herbed or peppered varieties.
- If fresh figs aren’t in season, dried figs can be rehydrated in warm water and used as a substitute.
- For added texture, you can sprinkle some crushed nuts, such as walnuts or pecans, over the top before serving.
- To save time, you can prepare the goat cheese mixture and slice the figs in advance. Just keep them refrigerated until you’re ready to assemble the crostini.
Truffle Mushroom Tartlets
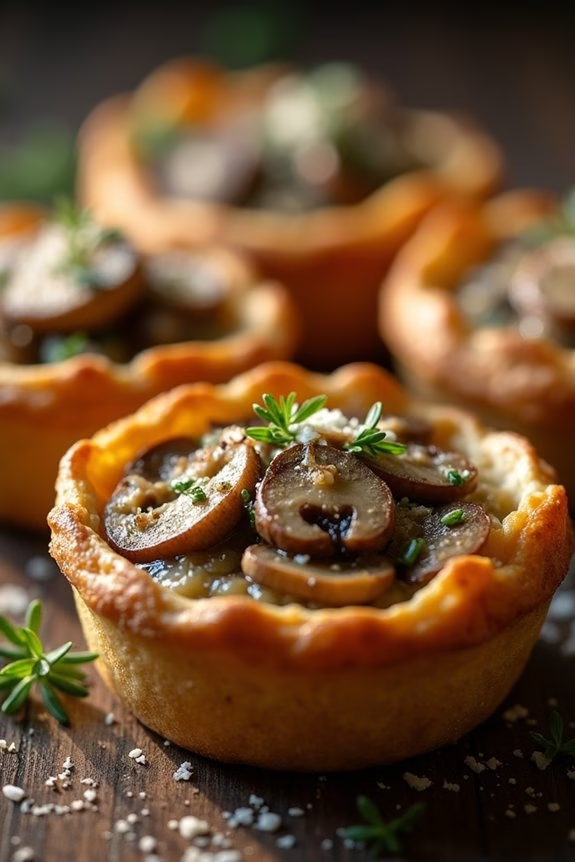
Truffle Mushroom Tartlets are an elegant and delicious appetizer perfect for any Christmas gathering. These bite-sized treats combine the earthy flavors of mushrooms with the luxurious aroma of truffle oil, all encased in a golden, flaky pastry shell. The contrast of textures and the depth of flavors make these tartlets an irresistible addition to any holiday menu. They aren’t only visually appealing but also a delight to the taste buds, guaranteeing they’ll be a hit with your guests.
Preparing Truffle Mushroom Tartlets is relatively simple and can be done in advance, allowing you to focus on other aspects of your Christmas celebration. The recipe combines sautéed mushrooms, shallots, and garlic with a hint of thyme, all enhanced by the richness of truffle oil. These ingredients are then spooned into pre-baked tart shells and topped with a sprinkle of parmesan cheese before being baked to perfection. The following recipe serves 4-6 people, making it ideal for a small gathering or as part of a larger spread.
Ingredients for Truffle Mushroom Tartlets (Serves 4-6):
- 1 package (about 12) ready-to-use tart shells
- 2 tablespoons olive oil
- 1 shallot, finely chopped
- 2 cloves garlic, minced
- 8 ounces cremini mushrooms, finely chopped
- 1 teaspoon fresh thyme leaves
- Salt and pepper to taste
- 2 tablespoons truffle oil
- 1/4 cup grated parmesan cheese
Cooking Instructions:
- Preheat and Prepare Tart Shells: Preheat your oven to 375°F (190°C). Arrange the tart shells on a baking sheet and pre-bake for about 5 minutes until they’re lightly golden. This will guarantee they stay crisp after adding the filling. Remove from the oven and set aside.
- Sauté Aromatics and Mushrooms: In a large skillet, heat the olive oil over medium heat. Add the finely chopped shallot and minced garlic. Sauté for about 2 minutes until they become fragrant and translucent.
- Cook the Mushrooms: Add the finely chopped cremini mushrooms to the skillet. Cook for about 8-10 minutes, stirring occasionally, until the mushrooms release their moisture and begin to brown. Add the fresh thyme leaves and season with salt and pepper to taste.
- Add Truffle Oil: Remove the skillet from the heat and stir in the truffle oil, making sure that the mushrooms are evenly coated. This will infuse the mixture with a delightful truffle aroma.
- Fill the Tart Shells: Using a spoon, fill each pre-baked tart shell with the mushroom mixture. Ensure the filling is evenly distributed among the shells.
- Top with Parmesan and Bake: Sprinkle the grated parmesan cheese over the top of each tartlet. Return the filled tartlets to the oven and bake for an additional 8-10 minutes until the cheese is melted and bubbly.
- Serve and Enjoy: Remove from the oven and allow to cool slightly before serving. These tartlets can be enjoyed warm or at room temperature.
Extra Tips:
When preparing Truffle Mushroom Tartlets, make sure to finely chop the mushrooms so they fit well into the small tart shells. If you can’t find cremini mushrooms, you can substitute with button mushrooms or a mix of wild mushrooms for added flavor complexity.
Also, be careful not to overfill the tart shells to prevent spilling during baking. If you prefer, you can make the mushroom mixture a day ahead and store it in the refrigerator, then simply assemble and bake the tartlets on the day of your event.
These tartlets pair beautifully with a crisp white wine or a sparkling champagne, adding a touch of sophistication to your holiday festivities.
Caprese Skewers With Basil Pesto Drizzle
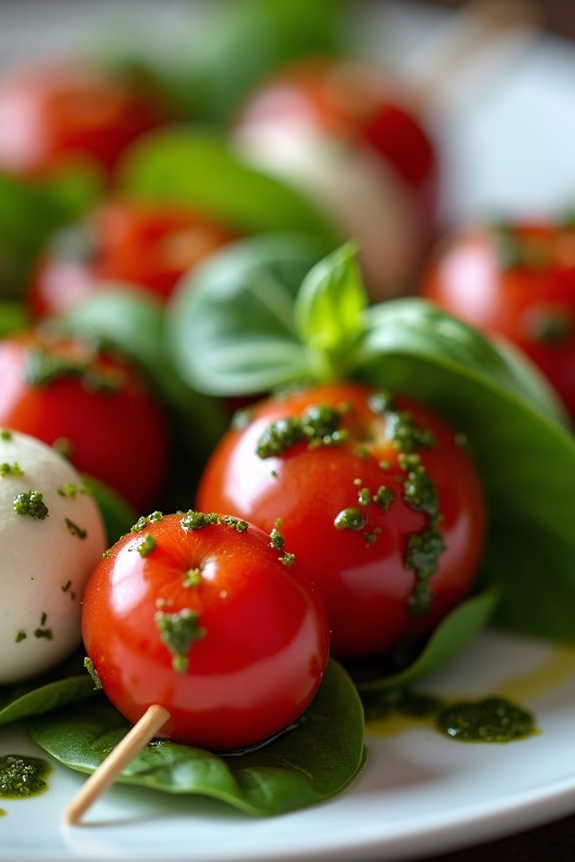
Caprese Skewers With Basil Pesto Drizzle are a delightful and visually appealing appetizer perfect for any Christmas gathering. These skewers combine the classic flavors of a Caprese salad with a festive twist, making them a crowd favorite. The vibrant colors of cherry tomatoes, fresh mozzarella, and basil leaves aren’t only a treat for the eyes but also offer a rejuvenating taste that complements the richness of holiday meals.
Drizzling homemade basil pesto over the skewers adds an aromatic layer of flavor that elevates the dish and brings all the ingredients together beautifully. This recipe is simple to prepare and doesn’t require any cooking, making it a stress-free option during the busy holiday season. The use of fresh ingredients guarantees that each bite is bursting with flavor and freshness.
Whether you’re hosting a large Christmas dinner or a cozy family gathering, these Caprese Skewers will surely impress your guests and add a touch of elegance to your appetizer spread. They can be prepared ahead of time and assembled just before serving, allowing you to enjoy the festivities without being stuck in the kitchen.
Ingredients for 4-6 servings:
- 16 cherry tomatoes
- 16 small fresh mozzarella balls (bocconcini)
- 16 fresh basil leaves
- 16 wooden skewers or toothpicks
- 1/2 cup fresh basil leaves (for pesto)
- 1/4 cup grated Parmesan cheese
- 1/4 cup pine nuts
- 1 clove garlic
- 1/2 cup extra virgin olive oil
- Salt and pepper, to taste
Cooking Instructions:
- Prepare the Basil Pesto: In a food processor, combine 1/2 cup of fresh basil leaves, 1/4 cup of grated Parmesan cheese, 1/4 cup of pine nuts, and 1 clove of garlic. Pulse until the ingredients are finely chopped.
- Add Olive Oil: With the food processor running, slowly drizzle in 1/2 cup of extra virgin olive oil until the mixture is smooth. Season the pesto with salt and pepper to taste. Set aside.
- Assemble the Skewers: Take a wooden skewer or toothpick and thread one cherry tomato, followed by a basil leaf, and then a mozzarella ball. Repeat this process until all ingredients are used up.
- Drizzle with Pesto: Arrange the assembled skewers on a serving platter. Just before serving, drizzle the prepared basil pesto over the skewers, making sure each one is coated with a generous amount of pesto.
- Serve Immediately: Serve the skewers immediately to ensure the freshness of the ingredients is maintained.
Extra Tips:
For an extra burst of flavor, consider using a variety of heirloom cherry tomatoes for a colorful presentation. If pine nuts aren’t available, walnuts or almonds can be used as a substitute in the pesto. Additionally, if you prefer a more robust flavor, consider adding a splash of balsamic glaze over the skewers.
To save time, the pesto can be made a day in advance and stored in the refrigerator; just bring it to room temperature before drizzling over the skewers. Remember to taste and adjust the seasoning of the pesto to suit your preference.
Caviar-Stuffed Deviled Eggs
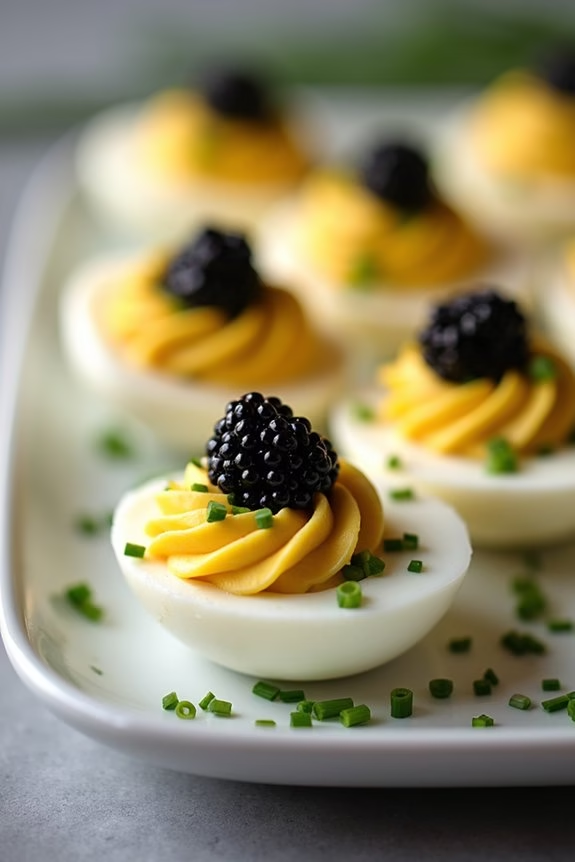
Caviar-Stuffed Deviled Eggs are an elegant and luxurious twist on the classic appetizer, perfect for adding a touch of sophistication to your Christmas gathering.
These delightful bites combine the creamy richness of deviled eggs with the delicate, briny flavor of caviar, offering a taste experience that’s both indulgent and refined. Whether you’re hosting an intimate family dinner or a festive holiday party, these deviled eggs are sure to impress your guests and elevate your appetizer spread.
The blend of traditional ingredients with the luxurious addition of caviar creates a harmonious balance of flavors and textures, making this dish a standout. The creamy yolk mixture is enhanced with tangy mustard and a hint of lemon, providing a revitalizing contrast to the salty caviar topping.
Not only do these eggs taste exquisite, but they also make for a visually stunning presentation with the vibrant caviar nestled atop each golden yolk-filled egg white. Here’s how you can make Caviar-Stuffed Deviled Eggs for 4-6 people:
Ingredients:
- 6 large eggs
- 1/4 cup mayonnaise
- 1 teaspoon Dijon mustard
- 1 teaspoon lemon juice
- Salt and pepper to taste
- 2 tablespoons finely chopped chives
- 2 ounces of good-quality caviar
Cooking Instructions:
- Boil the Eggs: Place the eggs in a single layer in a saucepan and cover them with water by about an inch. Bring the water to a rolling boil over medium-high heat. Once boiling, remove the pan from the heat, cover it, and let the eggs sit for 10-12 minutes.
- Cool and Peel the Eggs: After the eggs have cooked, transfer them to a bowl of ice water and let them cool for at least 5 minutes. Gently crack the shells and peel each egg carefully under cold running water to prevent tearing the whites.
- Prepare the Egg Halves: Slice each egg in half lengthwise. Carefully remove the yolks and place them in a mixing bowl. Arrange the egg white halves on a serving platter.
- Make the Filling: Mash the yolks with a fork until smooth. Add mayonnaise, Dijon mustard, lemon juice, salt, and pepper. Mix until fully combined and creamy. Stir in half of the chopped chives.
- Fill the Egg Whites: Using a spoon or a piping bag with a star tip, fill each egg white half with the yolk mixture. Aim for an elegant presentation by slightly overfilling each cavity.
- Add the Caviar: Just before serving, top each deviled egg with a small dollop of caviar. Garnish with the remaining chives for a touch of color.
- Serve Immediately: Serve the caviar-stuffed deviled eggs on a chilled platter to maintain the freshness and texture of the caviar.
Extra Tips:
When selecting caviar, opt for a good-quality variety that fits your budget. It’s important to handle the caviar gently and add it just before serving to preserve its texture and flavor.
If you can, prepare the eggs a few hours in advance, but wait until the last minute to add the caviar to prevent it from becoming watery. Additionally, you can experiment with different types of mustard or add a pinch of smoked paprika to the yolk mixture for added depth of flavor.
Roasted Red Pepper and Feta Bruschetta

Roasted Red Pepper and Feta Bruschetta is a delightful appetizer that’s perfect for adding a splash of color and flavor to your Christmas spread. This dish combines the sweetness of roasted red peppers with the tangy, creamy goodness of feta cheese, all atop a crispy slice of baguette.
Whether you’re hosting a festive gathering or simply enjoying a cozy meal with family, this bruschetta is bound to impress with its vibrant appearance and delicious taste. Ideal for a serving size of 4-6 people, this recipe is both simple to prepare and full of fresh flavors.
The combination of roasted peppers and feta creates a harmonious blend that’s enhanced by the addition of garlic, olive oil, and fresh herbs. Serve these delightful bruschettas as a starter for your holiday feast or as a delightful snack to keep your guests satisfied until the main course is ready.
Ingredients:
- 1 French baguette
- 2 large red bell peppers
- 1 cup crumbled feta cheese
- 2 cloves garlic, minced
- 3 tablespoons olive oil
- 1 tablespoon balsamic vinegar
- 1 tablespoon fresh basil, chopped
- Salt and pepper to taste
Instructions:
- Preheat the Oven: Begin by preheating your oven to 400°F (200°C). This will guarantee that your baguette slices and red peppers are cooked to perfection.
- Roast the Red Peppers: Place the red peppers on a baking sheet and roast in the oven for about 25-30 minutes, or until the skins are charred and the peppers are soft. Once done, remove from the oven and allow them to cool. Peel off the skins, remove the seeds, and slice the peppers into thin strips.
- Prepare the Baguette: While the peppers are roasting, slice the baguette into 1/2-inch thick slices. Arrange the slices on a baking sheet, brush them lightly with olive oil, and toast them in the oven for about 5 minutes or until they’re golden and crisp.
- Mix the Toppings: In a small bowl, combine the sliced roasted peppers, crumbled feta cheese, minced garlic, olive oil, balsamic vinegar, and chopped basil. Season with salt and pepper to taste.
- Assemble the Bruschetta: Spoon the red pepper and feta mixture onto each toasted baguette slice. Confirm that each slice is generously topped for a burst of flavor in every bite.
- Serve and Enjoy: Arrange the bruschettas on a serving platter and garnish with a few extra basil leaves for a festive touch. Serve immediately while the baguette is still warm.
Extra Tips:
For an added depth of flavor, consider grilling the baguette slices instead of toasting them in the oven. This will add a smoky element to the bruschetta.
Additionally, you can prepare the red pepper and feta mixture in advance and refrigerate it for up to a day. Simply assemble the bruschetta just before serving.
If you prefer a creamier texture, mix the feta with a tablespoon of Greek yogurt before combining it with the other ingredients. This dish is versatile and can be adjusted to personal taste preferences, so feel free to experiment with different herbs or add a sprinkle of red pepper flakes for a spicy kick.
Lobster and Avocado Canapés
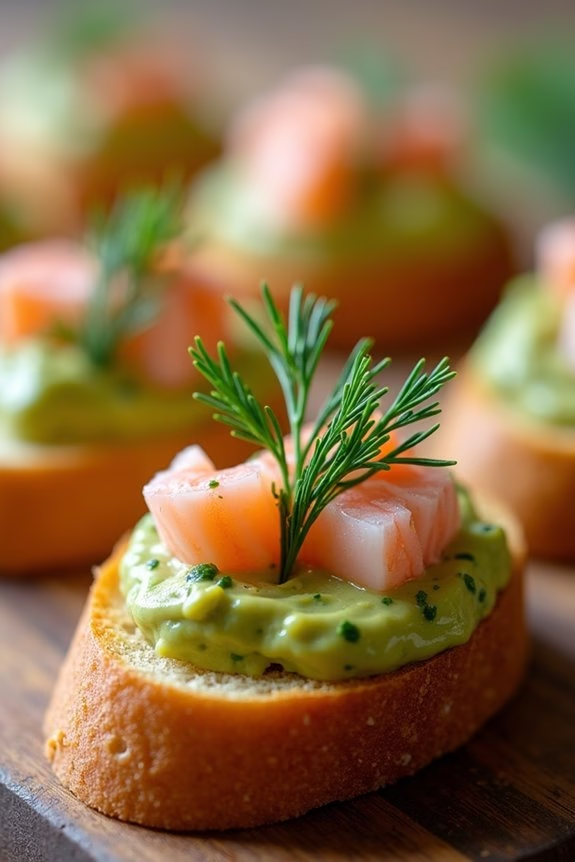
Lobster and Avocado Canapés are an exquisite appetizer, perfect for elevating your Christmas party spread. These bite-sized delights combine the rich, buttery taste of lobster with the creamy texture of avocado, all served on a crisp bread base. This combination not only looks elegant but also offers a delightful burst of flavors and textures that guests will love.
Whether hosting a casual gathering or a formal dinner, these canapés are certain to impress your family and friends.
The preparation of Lobster and Avocado Canapés is straightforward, yet the result is a sophisticated and visually appealing dish. Fresh lobster meat is unquestionably the star of this recipe, providing a luxurious touch, while ripe avocados add a smooth, mellow contrast.
The canapés are finished with a hint of citrus and a sprinkle of fresh herbs, balancing the richness of the key ingredients. This recipe serves 4-6 people, making it ideal for small gatherings or as part of a larger appetizer selection.
Ingredients (Serves 4-6):
- 1 large cooked lobster (about 1 pound of lobster meat)
- 2 ripe avocados
- 1 tablespoon fresh lemon juice
- 1 tablespoon fresh lime juice
- 1/4 cup mayonnaise
- Salt and pepper to taste
- 1 baguette, sliced into 1/4-inch rounds
- 2 tablespoons olive oil
- Fresh dill or cilantro for garnish
- Lemon wedges for serving
Cooking Instructions:
- Prepare the Lobster: Begin by removing the lobster meat from the shell. Make certain all shell fragments are removed, then chop the lobster meat into small, bite-sized pieces.
- Make the Avocado Mixture: In a bowl, mash the avocados with a fork until smooth. Add the lemon and lime juice to the mashed avocado to prevent browning, and season with salt and pepper to taste.
- Combine Lobster and Avocado: Gently fold the chopped lobster meat into the avocado mixture. Add the mayonnaise and mix until all ingredients are well combined. Adjust seasoning if necessary.
- Prepare the Bread Base: Preheat the oven to 350°F (175°C). Arrange the baguette slices on a baking sheet and brush both sides with olive oil. Toast in the oven for about 5-7 minutes, or until golden brown and crisp.
- Assemble the Canapés: Once the bread slices have cooled slightly, spread a generous amount of the lobster and avocado mixture onto each slice. Garnish with fresh dill or cilantro for an added touch of color and flavor.
- Serve: Arrange the canapés on a serving platter with lemon wedges on the side. Serve immediately for the best taste and texture.
Extra Tips:
To guarantee the best flavor, use fresh, high-quality lobster and avocados. If fresh lobster isn’t available, pre-cooked frozen lobster can be used, but make sure it’s thoroughly thawed before using.
When selecting avocados, choose ones that are ripe but not overly soft for the perfect creamy consistency. Additionally, prepare the avocado mixture right before serving to maintain its fresh green color.
If you need to prepare in advance, keep the mixture covered with plastic wrap against the surface to minimize oxidation.
Stuffed Mini Bell Peppers With Herbed Cream Cheese
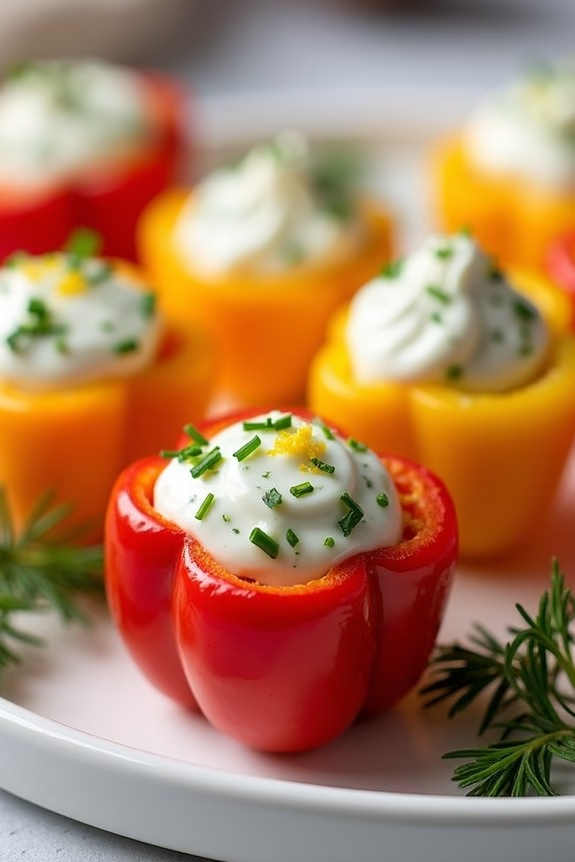
Stuffed Mini Bell Peppers with Herbed Cream Cheese is a delightful appetizer that brings a burst of flavor and color to your Christmas table. These bite-sized treats are perfect for festive gatherings and are sure to impress your guests with their vibrant appearance and creamy, herby filling. The combination of sweet mini bell peppers and tangy cream cheese, accentuated with fresh herbs, creates a harmonious balance that’s both invigorating and satisfying.
Ideal for serving 4-6 people, this recipe is simple yet elegant, making it a great choice for both novice and experienced cooks. The mini bell peppers are easy to handle and prepare, while the herbed cream cheese filling can be made ahead of time, allowing you more time to enjoy the festivities.
Whether served as a starter or as part of a larger spread of holiday appetizers, these stuffed peppers are sure to become a favorite in your holiday repertoire.
Ingredients:
- 12-16 mini bell peppers
- 8 oz cream cheese, softened
- 1 tablespoon olive oil
- 2 tablespoons fresh chives, chopped
- 2 tablespoons fresh parsley, chopped
- 1 tablespoon fresh dill, chopped
- 1 garlic clove, minced
- 1 teaspoon lemon zest
- Salt and pepper to taste
Instructions:
- Prepare the Peppers: Preheat your oven to 350°F (175°C). Wash the mini bell peppers thoroughly and pat them dry. Cut each pepper in half lengthwise and remove the seeds and membranes to create a hollow space for the filling.
- Make the Herbed Cream Cheese: In a mixing bowl, combine the softened cream cheese, olive oil, chopped chives, parsley, dill, minced garlic, and lemon zest. Mix well until all ingredients are fully incorporated. Season with salt and pepper to taste.
- Stuff the Peppers: Using a spoon or a piping bag, fill each pepper half with the herbed cream cheese mixture. Be generous with the filling, making sure each pepper is nicely filled but not overflowing.
- Bake: Arrange the stuffed peppers on a baking sheet lined with parchment paper. Bake in the preheated oven for about 10-15 minutes, or until the peppers are slightly tender and the cream cheese is warmed through.
- Serve: Remove the peppers from the oven and let them cool slightly before serving. Arrange them on a serving platter and garnish with additional fresh herbs if desired.
Extra Tips: To save time, you can prepare the herbed cream cheese filling up to two days in advance and store it in the refrigerator until you’re ready to stuff the peppers. If you prefer a bit more crunch, you can serve the stuffed peppers raw without baking them, which will maintain the peppers’ natural crispness.
For added flavor, consider adding a pinch of red pepper flakes to the cream cheese mixture for a hint of heat. Finally, make sure the cream cheese is fully softened before mixing, as this will make it easier to blend with the herbs and other ingredients.
Pomegranate and Walnut Stuffed Endive Leaves
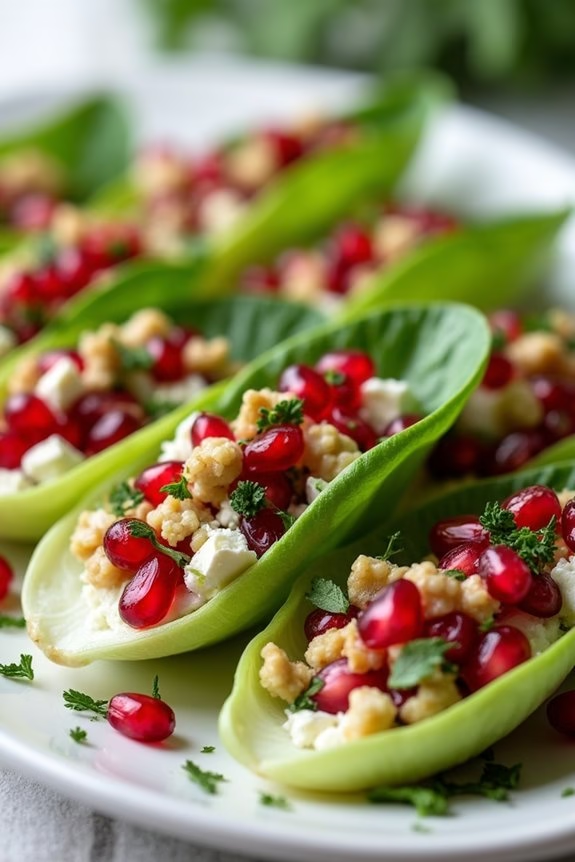
Pomegranate and Walnut Stuffed Endive Leaves are a delightful appetizer perfect for the festive season. This dish combines the crisp texture of endive leaves with a flavorful stuffing of pomegranate seeds and walnuts, creating a revitalizing and visually appealing bite. The contrasting flavors of sweet pomegranate and nutty walnuts, paired with a hint of citrus and herbs, make this appetizer a hit at any Christmas gathering.
This recipe isn’t only simple to prepare but also adds a touch of elegance to your holiday table. The vibrant red and green colors of the ingredients are reminiscent of Christmas, making it a fitting addition to your holiday menu. With a few fresh ingredients and minimal preparation time, you can serve a dish that’s both healthy and sophisticated.
Ingredients (serves 4-6):
- 12-16 endive leaves
- 1 cup pomegranate seeds
- 1/2 cup walnuts, chopped
- 1/4 cup crumbled feta cheese
- 1 tablespoon fresh mint, finely chopped
- 1 tablespoon fresh parsley, finely chopped
- 2 tablespoons olive oil
- 1 tablespoon lemon juice
- Salt and pepper to taste
Instructions:
- Prepare the Endive Leaves: Carefully separate the endive leaves, making sure they remain intact. Rinse them under cold water and pat dry with a paper towel. Arrange them on a serving platter in a single layer.
- Mix the Stuffing: In a medium-sized bowl, combine the pomegranate seeds, chopped walnuts, and crumbled feta cheese. Add the finely chopped mint and parsley for a burst of revitalization.
- Make the Dressing: In a small bowl, whisk together the olive oil, lemon juice, salt, and pepper. Adjust seasoning to taste.
- Combine Ingredients: Pour the dressing over the pomegranate and walnut mixture. Toss gently to make sure all ingredients are well coated without crushing the pomegranate seeds.
- Stuff the Endive Leaves: Spoon the pomegranate and walnut mixture into each endive leaf. Make sure the stuffing is evenly distributed among the leaves.
- Serve: Once all leaves are stuffed, garnish with a sprinkle of additional chopped herbs if desired. Serve immediately to maintain the crispness of the endive.
Extra Tips:
When selecting endives, choose ones that are firm and have tightly packed leaves for the best presentation. If you can’t find endives, you can substitute with Belgian endives or even romaine lettuce leaves for a different texture.
To save time, you can prepare the pomegranate and walnut mixture a few hours in advance and refrigerate it until ready to stuff the leaves. However, it’s best to assemble the appetizer just before serving to ensure maximum freshness and crunch.
Spinach and Artichoke Phyllo Cups

Spinach and Artichoke Phyllo Cups are a delightful appetizer perfect for adding a touch of elegance to your Christmas gathering. These bite-sized treats combine the rich flavors of spinach, artichoke, and cheese, all encased in a crispy phyllo pastry shell. Their creamy filling and crunchy exterior make them irresistibly delicious, and they’re sure to be a hit with your guests.
Not only are they easy to prepare, but they also present beautifully on a festive platter, making them a crowd-pleaser at any holiday event.
These phyllo cups are ideal for serving a group of 4-6 people, providing a generous serving of flavor-packed bites. The combination of spinach and artichoke is a classic that never fails to impress, especially when paired with the light, flaky texture of phyllo dough.
This recipe is also quite versatile, allowing you to prepare the filling in advance and assemble the cups just before baking, guaranteeing they’re fresh and warm for your guests to enjoy.
Ingredients:
- 1 package (15 sheets) phyllo pastry
- 1 tablespoon olive oil
- 1 cup frozen chopped spinach, thawed and drained
- 1 cup canned artichoke hearts, chopped
- 1/2 cup cream cheese, softened
- 1/3 cup sour cream
- 1/2 cup grated Parmesan cheese
- 1/2 cup shredded mozzarella cheese
- 2 cloves garlic, minced
- 1/4 teaspoon salt
- 1/4 teaspoon black pepper
- 1/4 teaspoon red pepper flakes (optional)
- Cooking spray or melted butter for brushing
Instructions:
- Preheat Oven: Preheat your oven to 375°F (190°C) to guarantee it’s ready for baking the phyllo cups.
- Prepare Phyllo Sheets: Carefully unroll the phyllo dough sheets and cover them with a damp cloth to prevent drying. Take one sheet, brush it lightly with olive oil, and layer another sheet on top. Repeat this process until you have a stack of 5 sheets.
- Cut and Shape Phyllo: Using a sharp knife or a pizza cutter, cut the layered phyllo sheets into 3-inch squares. Gently press each square into a mini-muffin tin to form a cup. Repeat with the remaining phyllo sheets until all the muffin cups are filled.
- Make the Filling: In a mixing bowl, combine the spinach, artichoke hearts, cream cheese, sour cream, Parmesan cheese, mozzarella cheese, garlic, salt, pepper, and red pepper flakes. Mix until well combined and creamy.
- Fill Phyllo Cups: Spoon about a tablespoon of the spinach and artichoke mixture into each phyllo cup, filling them generously.
- Bake: Place the muffin tin in the preheated oven and bake for 15-20 minutes, or until the phyllo cups are golden brown and the filling is bubbly.
- Cool and Serve: Allow the phyllo cups to cool slightly in the tin before removing them. Serve warm on a festive platter.
Extra Tips:
When working with phyllo dough, it’s important to keep it covered with a damp cloth while assembling to prevent it from drying out and becoming brittle.
If you prefer, you can prepare the spinach and artichoke filling up to a day in advance and refrigerate it until ready to use. Additionally, you can customize the filling by adding ingredients like chopped sun-dried tomatoes or a sprinkle of nutmeg for a unique twist.
Always handle the delicate phyllo dough gently to maintain its flaky texture, and be sure to serve the phyllo cups warm for the best taste and texture.