
I remember the first time I baked a classic vanilla cake; the aroma filled my kitchen and instantly transported me back to my grandmother’s cozy kitchen.
There’s something magical about the simplicity of vanilla—a flavor that never goes out of style.
As I perfected my batter, I realized the secret lies in the quality of the vanilla extract and the patience in mixing.
From the moist vanilla sponge to the elegant layered cake, each recipe in this collection offers its own twist.
Curious about how these variations can transform your baking game? Let’s explore them together.
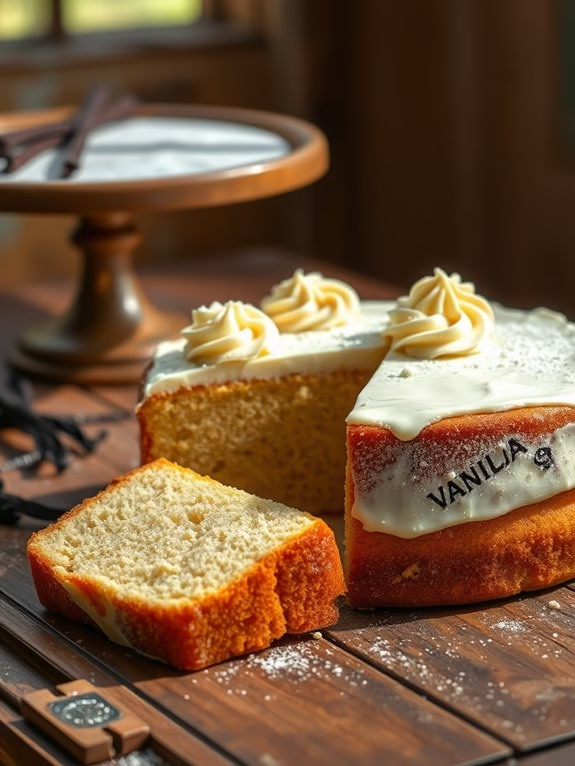
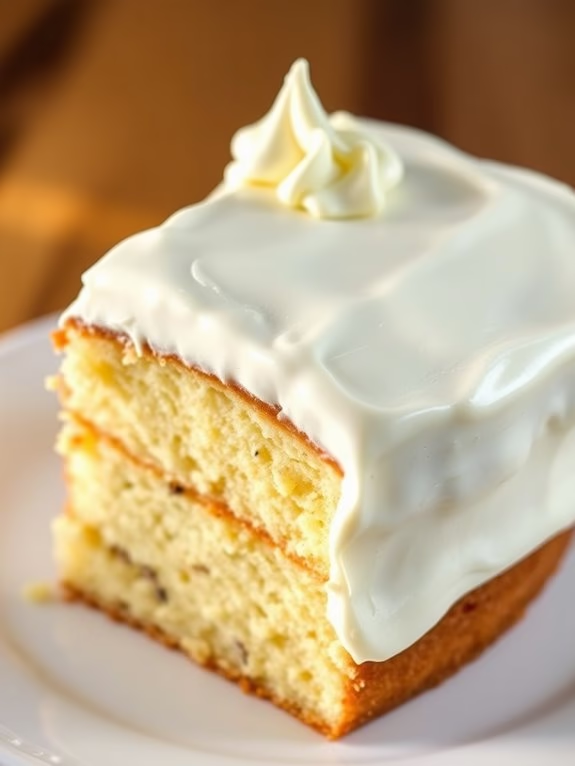
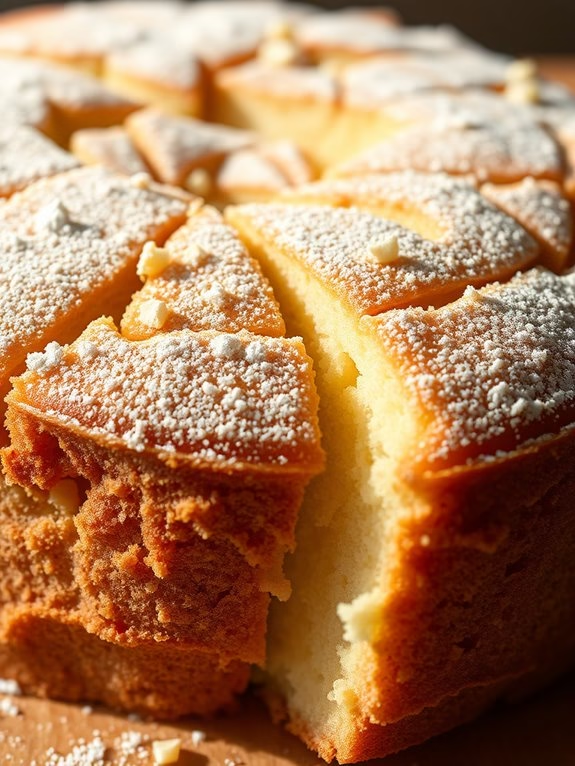
Traditional Vanilla Cake

Recipe: Traditional Vanilla Cake****
The Traditional Vanilla Cake is a timeless classic that brings a touch of elegance to any occasion. Known for its tender crumb and rich vanilla flavor, this cake serves as a perfect base for a variety of frostings and toppings.
Whether it’s a birthday celebration, a casual get-together, or just a sweet treat for yourself, this cake is sure to impress everyone with its simplicity and delightful taste.
This recipe yields a moist and fluffy cake that’s perfect for serving 4-6 people. It combines the perfect balance of ingredients to create a light and airy texture, while the vanilla extract enhances the flavor profile, making it both comforting and satisfying.
Follow this recipe to create a delightful dessert that will become a cherished favorite in your baking repertoire.
Ingredients for Traditional Vanilla Cake (Serves 4-6):
- 1 ½ cups all-purpose flour
- 1 cup granulated sugar
- 1 ½ teaspoons baking powder
- ½ teaspoon salt
- ½ cup unsalted butter, softened
- ½ cup whole milk
- 1 ½ teaspoons pure vanilla extract
- 2 large eggs
Cooking Instructions:
- Preheat the Oven: Begin by preheating your oven to 350°F (175°C). Grease and flour an 8-inch round cake pan, making sure that the sides and bottom are well-coated to prevent the cake from sticking.
- Mix Dry Ingredients: In a medium-sized bowl, combine the all-purpose flour, baking powder, and salt. Whisk them together until they’re evenly mixed. This helps to evenly distribute the leavening agents throughout the flour.
- Cream Butter and Sugar: In a large mixing bowl, beat the softened butter and granulated sugar together using an electric mixer on medium speed for about 3-4 minutes, or until the mixture is light and fluffy. This step is essential for incorporating air into the batter, which contributes to the cake’s light texture.
- Add Eggs and Vanilla: Add the eggs one at a time, beating well after each addition. Mix in the vanilla extract until well combined. This guarantees that the eggs are fully incorporated and the vanilla flavor is evenly distributed.
- Combine Wet and Dry Ingredients: Gradually add the dry flour mixture to the wet ingredients, alternating with the milk. Begin and end with the flour mixture. Mix on low speed until just combined, being careful not to overmix, as this can make the cake dense.
- Bake the Cake: Pour the batter into the prepared cake pan and smooth the top with a spatula. Bake in the preheated oven for 30-35 minutes, or until a toothpick inserted into the center comes out clean. Allow the cake to cool in the pan for 10 minutes, then transfer it to a wire rack to cool completely.
Extra Tips:
To guarantee your Traditional Vanilla Cake is as delightful as possible, make sure all your ingredients are at room temperature before you start mixing. This helps them blend more easily and results in a smoother batter.
If you prefer a more pronounced vanilla flavor, you can increase the vanilla extract to 2 teaspoons. Additionally, for a special twist, consider adding a teaspoon of almond extract for a subtle nutty flavor.
Finally, always confirm your oven is properly preheated before baking, as this affects the rising and texture of your cake.
Vanilla Buttercream Delight
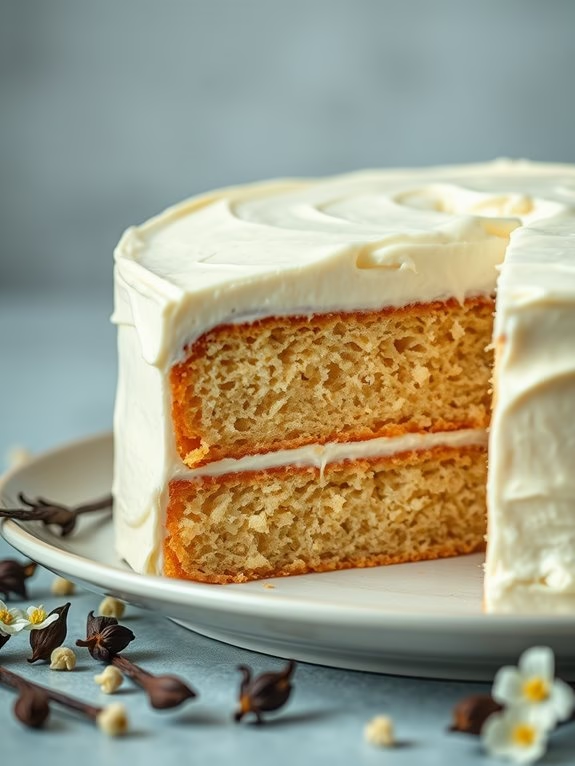
Vanilla Buttercream Delight
A classic vanilla cake is a timeless dessert that never goes out of style, and when paired with a luscious vanilla buttercream, it becomes an irresistible delight. This Vanilla Buttercream Delight recipe brings together a moist and fluffy cake with a rich, creamy frosting, perfect for any occasion. Whether you’re celebrating a birthday, anniversary, or simply indulging in a sweet treat, this recipe is sure to satisfy your cravings.
The key to achieving the perfect vanilla cake lies in using high-quality ingredients and precise measurements. The cake layers are airy and tender, while the buttercream frosting is smooth and melts in your mouth. With a subtle hint of vanilla in both the cake and the frosting, this dessert offers a harmonious blend of flavors that will please everyone’s palate. Follow this simple recipe to create a Vanilla Buttercream Delight that serves 4-6 people.
Ingredients
*For the Cake:*
- 1 ½ cups all-purpose flour
- 1 ½ teaspoons baking powder
- ¼ teaspoon salt
- ½ cup unsalted butter, softened
- 1 cup granulated sugar
- 2 large eggs
- 2 teaspoons vanilla extract
- ¾ cup whole milk
For the Vanilla Buttercream:
- 1 cup unsalted butter, softened
- 4 cups powdered sugar
- 2 teaspoons vanilla extract
- 2 tablespoons heavy cream
Instructions
- Preheat the Oven: Begin by preheating your oven to 350°F (175°C). Grease and flour two 8-inch round cake pans, or line them with parchment paper to guarantee easy removal of the cakes.
- Mix Dry Ingredients: In a medium-sized bowl, sift together the all-purpose flour, baking powder, and salt. This will confirm that the dry ingredients are well incorporated and free of lumps.
- Cream Butter and Sugar: In a large mixing bowl, beat the softened butter and granulated sugar together using an electric mixer until light and fluffy, about 3-4 minutes. This step is vital for creating a fluffy cake texture.
- Add Eggs and Vanilla: Add the eggs one at a time to the creamed butter and sugar mixture, beating well after each addition. Stir in the vanilla extract until fully combined.
- Combine Wet and Dry Ingredients: Gradually add the dry ingredients to the wet mixture, alternating with the whole milk. Start and end with the dry ingredients, mixing just until combined after each addition. Be careful not to overmix to maintain a tender cake crumb.
- Bake the Cake: Divide the batter evenly between the prepared cake pans. Smooth the tops with a spatula and bake in the preheated oven for 25-30 minutes, or until a toothpick inserted into the center comes out clean. Allow the cakes to cool in the pans for 10 minutes before transferring them to a wire rack to cool completely.
- Prepare the Buttercream: While the cakes are cooling, prepare the buttercream. In a large bowl, beat the softened butter using an electric mixer until creamy. Gradually add the powdered sugar, one cup at a time, beating well after each addition.
- Add Vanilla and Cream: Stir in the vanilla extract and heavy cream, and continue to beat the mixture on high speed for an additional 3-4 minutes, until the buttercream is light and fluffy.
- Assemble the Cake: Once the cake layers are completely cool, place one layer on a serving plate. Spread a generous amount of buttercream over the top, then place the second cake layer on top. Frost the top and sides of the cake with the remaining buttercream, smoothing it with a spatula.
Extra Tips
For an extra burst of flavor, consider adding a layer of fruit preserves or fresh berries between the cake layers before frosting.
When making the buttercream, confirm the butter is at room temperature to achieve the perfect creamy texture. If the frosting becomes too soft, chill it in the refrigerator for a few minutes before spreading it on the cake.
Finally, for a professional finish, use a cake turntable while frosting to achieve smooth, even coverage. Enjoy your Vanilla Buttercream Delight with a cup of tea or coffee for an indulgent treat.
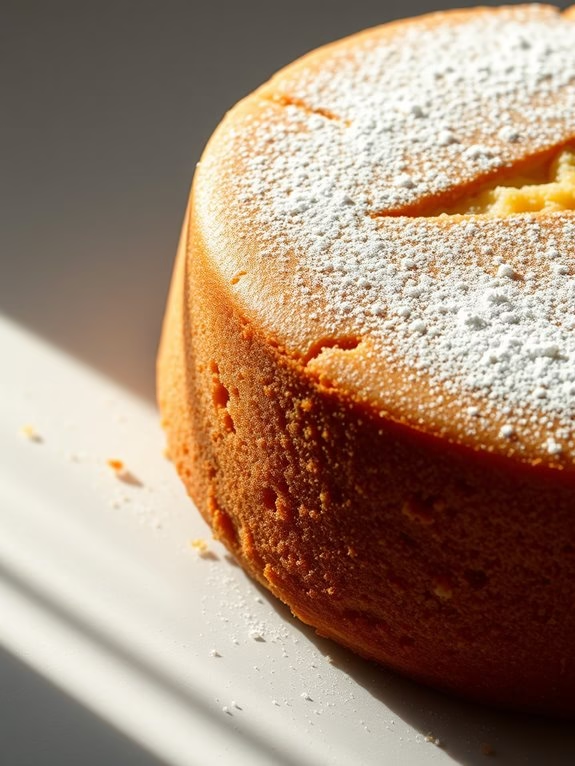
Moist Vanilla Sponge
Moist Vanilla Sponge Cake is a timeless classic that graces many occasions with its simple yet elegant flavor. Known for its light and fluffy texture, this cake is a versatile base for any celebration, whether layered with fresh cream and berries or simply enjoyed on its own. With the perfect balance of sweetness and a hint of vanilla, this cake is sure to delight anyone who takes a bite.
Creating a Moist Vanilla Sponge Cake involves a few key techniques to guarantee its signature airy texture. The secret lies in properly beating the eggs to incorporate air and using the right amount of flour to maintain that fluffiness. Patience and precision are key, as the batter needs to be handled gently to preserve the tiny air bubbles that form the cake’s structure.
Ingredients (Serves 4-6):
- 1 cup all-purpose flour
- 1 cup granulated sugar
- 4 large eggs
- 1 teaspoon vanilla extract
- 1/2 cup unsalted butter, melted
- 1/2 cup whole milk
- 1 teaspoon baking powder
- 1/4 teaspoon salt
Cooking Instructions:
- Preheat and Prepare: Preheat your oven to 350°F (175°C). Grease and line an 8-inch round cake pan with parchment paper to prevent sticking.
- Mix Dry Ingredients: In a medium bowl, sift together the all-purpose flour, baking powder, and salt. This guarantees even distribution of the leavening agent and removes any lumps.
- Beat Eggs and Sugar: In a large mixing bowl, beat the eggs and granulated sugar at medium-high speed using an electric mixer until the mixture is thick, pale, and tripled in volume. This should take about 5-7 minutes.
- Add Vanilla and Butter: Gently fold in the vanilla extract and melted butter into the egg mixture using a spatula, taking care not to deflate the air bubbles.
- Incorporate Dry Ingredients: Gradually add the flour mixture to the wet ingredients, folding gently with a spatula until just combined. Avoid overmixing to keep the batter light.
- Add Milk: Warm the milk slightly and fold it into the batter until smooth and homogenous. This adds moisture and helps create a tender crumb.
- Bake: Pour the batter into the prepared cake pan and bake in the preheated oven for 25-30 minutes, or until a toothpick inserted into the center comes out clean.
- Cool: Allow the cake to cool in the pan for 10 minutes before transferring it to a wire rack to cool completely.
Extra Tips:
To achieve the best results with your Moist Vanilla Sponge Cake, confirm that all ingredients are at room temperature before you begin. This helps them blend more smoothly, producing a more even texture.
Additionally, be gentle when folding the ingredients to maintain the airiness of the batter. If you’d like to add a touch of extra flavor, consider incorporating a hint of almond extract or a splash of lemon zest into the batter.
Finally, if you notice the top browning too quickly during baking, simply tent it with aluminum foil to prevent over-browning.
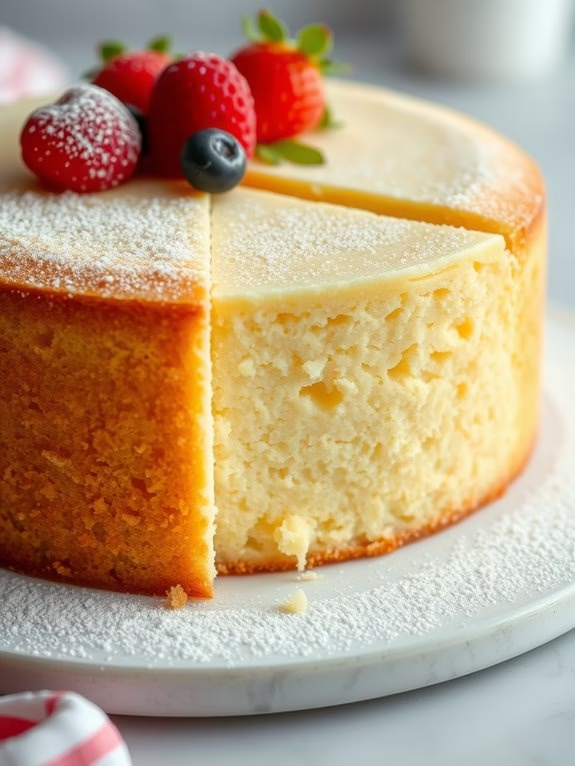
Vanilla Bean Perfection
Vanilla Bean Perfection
Vanilla Bean Perfection is a timeless dessert that captures the essence of classic baking with its rich, fragrant flavors and moist, tender crumb. This cake is perfect for any occasion, whether you’re celebrating a special event or simply indulging in a sweet treat at home. The use of real vanilla beans elevates this cake, infusing it with an aromatic depth that bottled extracts simply can’t match.
Paired with a creamy vanilla bean frosting, this cake promises to be a crowd-pleaser, delighting both young and old alike. This recipe yields a cake that serves 4-6 people, making it a great choice for small gatherings or family dinners. With straightforward instructions and a list of easily accessible ingredients, you can whip up this delightful cake without fuss, enjoying the process of creating a dessert that looks as beautiful as it tastes.
Follow the steps below to bring this Vanilla Bean Perfection to your table, and watch it disappear before your eyes as everyone goes back for seconds!
Ingredients:
- 2 1/2 cups all-purpose flour
- 2 1/2 tsp baking powder
- 1/2 tsp salt
- 1 cup unsalted butter, softened
- 1 3/4 cups granulated sugar
- 2 vanilla beans, seeds scraped
- 4 large eggs
- 1 cup whole milk
- 1 tsp pure vanilla extract
Vanilla Bean Frosting:
- 1 cup unsalted butter, softened
- 4 cups powdered sugar
- 2 vanilla beans, seeds scraped
- 1/4 cup heavy cream
- 1 tsp pure vanilla extract
Instructions:
- Preheat and Prepare Pans: Preheat your oven to 350°F (175°C). Grease and flour two 8-inch round cake pans, then line the bottoms with parchment paper for easy removal.
- Mix Dry Ingredients: In a medium bowl, whisk together the flour, baking powder, and salt. This guarantees even distribution of the leavening agent, which is essential for a uniform rise.
- Cream Butter and Sugar: In a large mixing bowl, beat the softened butter with a hand mixer or stand mixer on medium speed until creamy and smooth. Gradually add the sugar, continuing to beat until the mixture is light and fluffy, about 3-4 minutes.
- Incorporate Vanilla and Eggs: Add the scraped vanilla bean seeds to the butter mixture, followed by the eggs, one at a time, beating well after each addition to make sure the batter is smooth and emulsified.
- Combine Wet and Dry Mixtures: Alternately add the dry flour mixture and the milk to the butter-sugar mixture, starting and ending with the dry ingredients. Mix until just combined; don’t overmix to avoid a dense cake.
- Bake the Cake: Divide the batter evenly between the prepared pans. Smooth the tops with a spatula, then bake for 25-30 minutes, or until a toothpick inserted into the center comes out clean. Let the cakes cool in the pans for 10 minutes before transferring them to a wire rack to cool completely.
- Prepare the Frosting: In a medium bowl, beat the softened butter until smooth. Gradually add the powdered sugar, vanilla bean seeds, heavy cream, and vanilla extract. Beat until fluffy and spreadable, adding more cream if necessary for desired consistency.
- Assemble and Frost: Place one cake layer on a serving plate and spread a generous layer of frosting on top. Place the second layer on top and spread frosting over the top and sides of the cake.
Extra Tips:
For best results, make certain that all your ingredients are at room temperature before starting; this helps them incorporate more easily and results in a smoother batter.
When scraping vanilla beans, use the back of a knife to get every bit of the seeds, as they’re packed with flavor. If you don’t have vanilla beans, high-quality vanilla paste can be a suitable substitute.
Be cautious not to overmix the batter after adding the flour, as this can lead to a tough cake. Finally, if you find the cake layers doming, level them with a serrated knife for a more professional finish. Enjoy your Vanilla Bean Perfection!
Classic Victoria Sponge
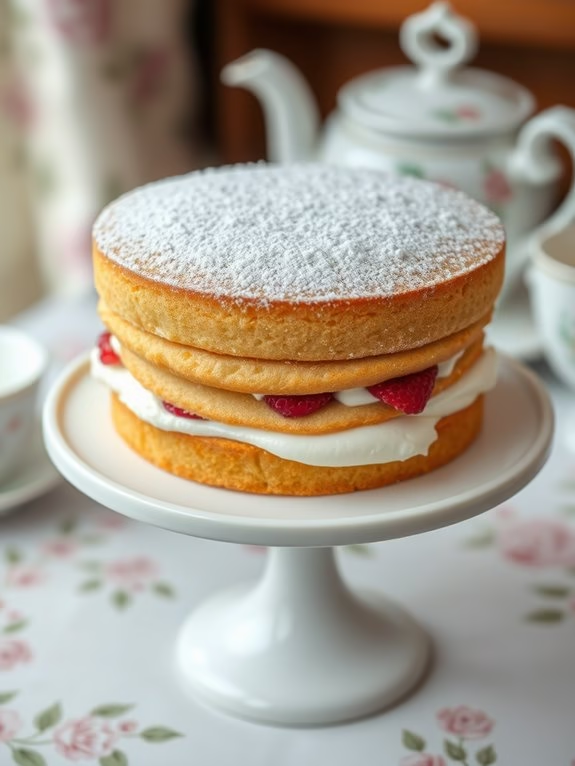
Classic Victoria Sponge
The Classic Victoria Sponge is a quintessential English cake that exudes simplicity and elegance. Named after Queen Victoria, who was said to enjoy a slice with her afternoon tea, this cake is characterized by its light and airy texture. The cake consists of two layers of sponge cake filled with a luscious spread of jam and whipped cream. Often dusted with powdered sugar, the Victoria Sponge isn’t only a treat for the taste buds but also a feast for the eyes.
Crafting a Classic Victoria Sponge requires careful attention to the balance of ingredients and the technique of mixing. The cake’s texture is achieved by creaming the butter and sugar until light and fluffy, followed by the gradual addition of eggs and sifted flour. This attention to detail guarantees a soft, spongy texture that pairs perfectly with the sweet and tangy jam and rich cream filling.
Whether served as a casual afternoon snack or a dessert centerpiece, the Victoria Sponge is a timeless classic that delights cake lovers of all ages.
Ingredients (serves 4-6 people):
- 200g unsalted butter, softened
- 200g caster sugar
- 4 large eggs
- 200g self-raising flour
- 1 tsp baking powder
- 2 tbsp milk
- 1 tsp vanilla extract
- 100g strawberry or raspberry jam
- 200ml double cream
- Icing sugar, for dusting
Cooking Instructions:
- Preheat the Oven: Begin by preheating your oven to 180°C (350°F) or 160°C (320°F) for fan ovens. Grease and line two 20cm (8 inch) round cake tins with baking parchment.
- Cream Butter and Sugar: In a large mixing bowl, cream together the softened butter and caster sugar using an electric mixer or wooden spoon until the mixture is light and fluffy. This should take about 3-5 minutes.
- Add Eggs: Gradually add the eggs one at a time, beating well after each addition. This helps to incorporate air into the batter, guaranteeing a light sponge. If the mixture starts to curdle, add a tablespoon of flour to bring it back together.
- Incorporate Dry Ingredients: Sift the self-raising flour and baking powder into the bowl. Gently fold in the dry ingredients using a spatula or a large metal spoon, taking care not to knock out the air. Add the milk and vanilla extract, folding until the batter is smooth and well combined.
- Divide and Bake: Evenly divide the batter between the prepared cake tins, smoothing the tops with a spatula. Bake in the preheated oven for 20-25 minutes or until the sponges are golden brown and a skewer inserted into the center comes out clean.
- Cool the Cakes: Remove the cakes from the oven and allow them to cool in the tins for 5 minutes. Then, transfer them to a wire rack to cool completely.
- Prepare the Filling: While the cakes are cooling, whip the double cream until it forms soft peaks. Set aside.
- Assemble the Cake: Once the sponges are completely cool, spread the jam evenly over the bottom layer. Next, spread the whipped cream over the jam. Place the second sponge layer on top.
- Final Touches: Dust the top of the cake with icing sugar before serving. This adds a classic touch to your Victoria Sponge.
Extra Tips:
To achieve the best possible sponge, verify that all your ingredients are at room temperature before you begin. This helps them to combine more smoothly and prevents the mixture from curdling.
When folding in the flour, be gentle and use a figure-eight motion to retain as much air as possible for a lighter cake. If your sponges domed a bit during baking, you can level them off with a serrated knife before assembling the cake for a more professional finish.
Enjoy your classic Victoria Sponge with a cup of tea for the full British experience!
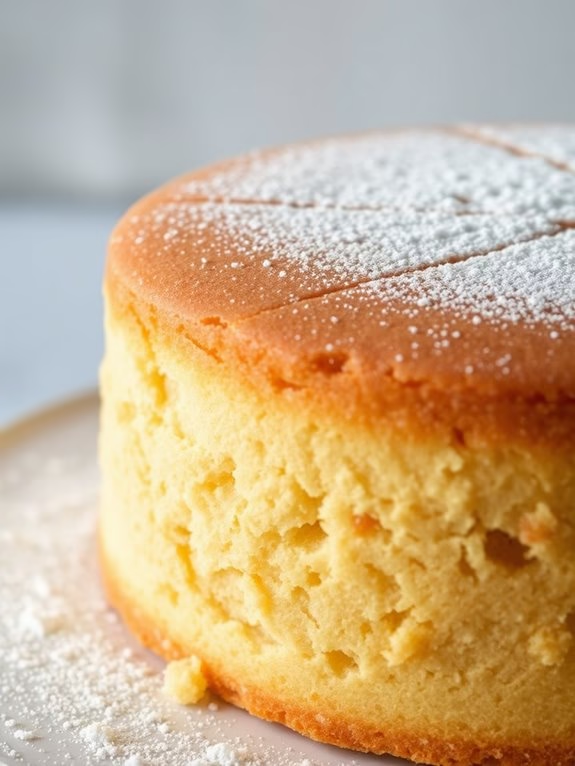
Eggless Vanilla Cake
Eggless Vanilla Cake is a delightful treat that retains the soft, fluffy texture and rich vanilla flavor of a classic cake while being suitable for those who avoid eggs in their diet. This cake is perfect for birthdays, tea parties, or any occasion where you want to enjoy a sweet, satisfying dessert without the use of eggs.
It’s a versatile recipe that can be paired with a variety of frostings and toppings, allowing you to customize it according to your taste and preference. The key to a successful eggless vanilla cake is to guarantee the right balance of ingredients to achieve the perfect rise and texture.
Using ingredients like yogurt or buttermilk can help mimic the binding and leavening properties of eggs, while a good quality vanilla extract will enhance the cake’s flavor. This recipe serves 4-6 people, making it ideal for small gatherings or family meals.
Ingredients:
- 1 ½ cups all-purpose flour
- 1 cup granulated sugar
- 1 cup plain yogurt
- ½ cup vegetable oil
- 1 ½ teaspoons baking powder
- ½ teaspoon baking soda
- 1 teaspoon vanilla extract
- ¼ teaspoon salt
- ¼ cup milk
Cooking Instructions:
1. Preheat the oven and prepare the pan: Preheat your oven to 350°F (175°C). Grease a 9-inch round cake pan or line it with parchment paper to guarantee easy removal of the cake after baking.
2. Mix dry ingredients: In a medium-sized bowl, sift together the all-purpose flour, baking powder, baking soda, and salt. This will guarantee that the dry ingredients are evenly distributed and will help prevent clumps in the batter.
3. Combine wet ingredients: In a large mixing bowl, whisk together the yogurt, granulated sugar, and vanilla extract until the mixture is smooth and the sugar has dissolved. Then, add the vegetable oil and mix until well combined.
4. Incorporate dry ingredients: Gradually add the dry ingredients to the wet ingredients, alternating with the milk. Start by adding a third of the flour mixture, then a splash of milk, and continue this process until all the flour and milk have been incorporated.
Mix gently to avoid overworking the batter, which can result in a dense cake.
5. Pour and bake: Pour the batter into the prepared cake pan, smoothing the top with a spatula. Tap the pan gently on the counter to remove any air bubbles. Place the pan in the preheated oven and bake for 30-35 minutes, or until a toothpick inserted into the center comes out clean.
6. Cool and serve: Once baked, remove the cake from the oven and let it cool in the pan for about 10 minutes. Then, carefully transfer the cake to a wire rack to cool completely before serving or frosting.
Extra Tips:
To guarantee your Eggless Vanilla Cake is extra moist and flavorful, consider adding a tablespoon of lemon juice to the wet ingredients, which will react with the baking soda to enhance the cake’s rise.
For a richer flavor, you can also replace half of the vegetable oil with melted butter. If you’re looking to add a bit of texture, a handful of chopped nuts or chocolate chips can be gently folded into the batter before baking.
Always use fresh baking powder and soda for the best results, as these ingredients lose their effectiveness over time.
Gluten-Free Vanilla Treat
Gluten-Free Vanilla Treat
Indulging in a slice of classic vanilla cake doesn’t have to be off-limits for those with gluten sensitivities. This Gluten-Free Vanilla Treat is a delightful alternative that maintains the moistness and rich vanilla flavor you love, without compromising on texture. Perfect for a family gathering or a cozy afternoon tea, this cake is sure to please everyone, whether they’re gluten-free or not.
The combination of almond flour and gluten-free flour blend creates a light, fluffy cake with a tender crumb, while the aromatic vanilla extract enhances its classic taste.
Making this cake is both simple and rewarding. With a few easily accessible ingredients, you can whip up a delicious dessert that will leave your guests asking for seconds. This recipe is designed to serve 4-6 people, making it an ideal choice for small celebrations or intimate get-togethers.
Whether you choose to top it with a light dusting of powdered sugar or your favorite frosting, this Gluten-Free Vanilla Treat is a versatile dessert that’s sure to become a staple in your recipe collection.
Ingredients for 4-6 People:
- 1 cup almond flour
- 1 cup gluten-free all-purpose flour
- 1 cup granulated sugar
- 1/2 cup unsalted butter, softened
- 3 large eggs
- 1 cup milk of choice (dairy or non-dairy)
- 2 teaspoons vanilla extract
- 1 teaspoon baking powder
- 1/2 teaspoon baking soda
- 1/4 teaspoon salt
Cooking Instructions:
- Preheat and Prepare: Preheat your oven to 350°F (175°C). Grease a 9-inch round cake pan with butter or line it with parchment paper to prevent the cake from sticking.
- Mix Dry Ingredients: In a medium-sized bowl, whisk together the almond flour, gluten-free all-purpose flour, baking powder, baking soda, and salt until well combined. Set aside.
- Cream Butter and Sugar: In a large mixing bowl, beat the softened butter and granulated sugar together using an electric mixer until the mixture is light and fluffy, about 2-3 minutes.
- Incorporate Eggs: Add the eggs one at a time to the butter and sugar mixture, beating well after each addition. This helps to incorporate air into the batter, making the cake lighter.
- Add Vanilla and Milk: Stir in the vanilla extract. Gradually add the milk, mixing on low speed until just combined. Be careful not to overmix.
- Combine Ingredients: Slowly add the dry ingredient mixture to the wet ingredients, mixing on low speed until the batter is smooth and free of lumps.
- Pour and Bake: Pour the batter into the prepared cake pan and level the top with a spatula. Bake in the preheated oven for 30-35 minutes, or until a toothpick inserted into the center of the cake comes out clean.
- Cool and Serve: Remove the cake from the oven and let it cool in the pan for about 10 minutes. Transfer the cake to a wire rack to cool completely before serving.
Extra Tips:
When making this Gluten-Free Vanilla Treat, verify that all your ingredients are at room temperature before beginning the mixing process. This allows for better integration and a smoother batter.
Be cautious not to overmix the batter once the dry ingredients are added, as this can lead to a denser cake. If you’re planning to frost the cake, let it cool completely to avoid melting the frosting.
For an added touch, consider adding a tablespoon of lemon zest to the batter for a revitalizing citrusy note. Enjoy your deliciously moist and gluten-free vanilla cake!
Vegan Vanilla Creation
Vegan Vanilla Creation
Indulging in a classic vanilla cake doesn’t mean having to compromise on a plant-based lifestyle. This Vegan Vanilla Creation is a delightful cake that embodies the traditional flavors of a vanilla cake, without the use of any animal-derived ingredients. Perfect for any occasion, this cake is moist, fluffy, and rich in vanilla flavor, guaranteeing that it remains a crowd-pleaser for both vegans and non-vegans alike.
Whether you’re celebrating a birthday, hosting a gathering, or simply craving a sweet treat, this recipe provides the perfect balance of sweetness and texture. Using simple ingredients that are easy to find, the Vegan Vanilla Creation isn’t only delicious but also straightforward to prepare. This recipe serves 4-6 people, making it ideal for small parties or family desserts.
Ingredients:
- 1 1/2 cups all-purpose flour
- 1 cup granulated sugar
- 1 teaspoon baking powder
- 1/2 teaspoon baking soda
- 1/4 teaspoon salt
- 1 cup unsweetened almond milk
- 1/3 cup vegetable oil
- 1 tablespoon apple cider vinegar
- 2 teaspoons vanilla extract
Instructions:
- Preheat the Oven: Preheat your oven to 350°F (175°C). This guarantees that your oven is at the right temperature when your batter is ready, promoting even baking.
- Prepare the Baking Pan: Lightly grease an 8-inch round cake pan with vegetable oil or line it with parchment paper to prevent the cake from sticking and guarantee easy removal once baked.
- Mix Dry Ingredients: In a large mixing bowl, whisk together the all-purpose flour, granulated sugar, baking powder, baking soda, and salt until well combined. This step guarantees that the leavening agents and sugar are evenly distributed throughout the flour.
- Combine Wet Ingredients: In a separate bowl, mix the unsweetened almond milk, vegetable oil, apple cider vinegar, and vanilla extract. The vinegar will react with the baking soda to help the cake rise and add some fluffiness to the texture.
- Combine Wet and Dry Mixtures: Pour the wet ingredients into the bowl of dry ingredients. Stir gently with a spatula or wooden spoon until just combined. Avoid overmixing to prevent a dense cake.
- Transfer to Baking Pan: Pour the batter into the prepared cake pan, smoothing the top with the back of a spoon to guarantee even baking.
- Bake the Cake: Place the cake pan in the preheated oven and bake for 30-35 minutes. Check for doneness by inserting a toothpick into the center of the cake; it should come out clean or with a few crumbs attached.
- Cool the Cake: Once baked, remove the cake from the oven and allow it to cool in the pan for about 10 minutes. Then transfer it to a wire rack to cool completely before serving or frosting.
Extra Tips:
To enhance the flavor of your Vegan Vanilla Creation, consider adding a pinch of cinnamon or a few drops of almond extract to the batter. This cake pairs beautifully with a simple vegan frosting or a dusting of powdered sugar.
Additionally, make sure to measure your flour correctly by spooning it into the measuring cup and leveling it off with a knife to prevent a dense cake. For an extra moist texture, you can substitute half of the vegetable oil with unsweetened applesauce. Enjoy your plant-based vanilla delight!
Vanilla Layered Elegance
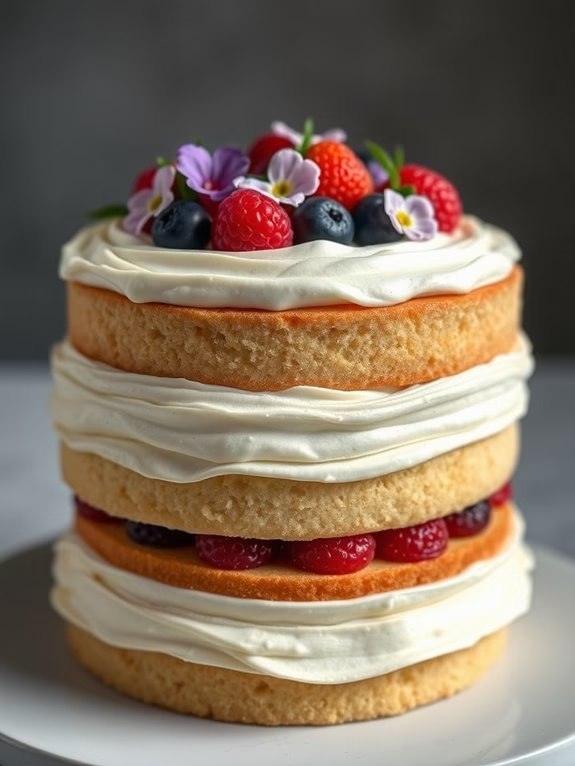
Vanilla Layered Elegance
Indulge in the timeless charm of a Vanilla Layered Elegance cake, where each bite promises a delicate symphony of flavors. This classic cake combines the simplicity of vanilla with the richness of layered textures, creating an unforgettable dessert perfect for any special occasion.
With its light, fluffy interior and a creamy, smooth frosting, this cake is sure to be the centerpiece of your dessert table. Whether it’s a birthday celebration, an anniversary, or just a weekend treat, this Vanilla Layered Elegance cake will delight your taste buds and leave your guests requesting seconds.
This recipe serves 4-6 people, ideal for a small gathering or a family feast. It begins with a tender vanilla sponge cake, which is then carefully layered with a luscious vanilla buttercream. The cake is a beautiful canvas for any additional decorations, such as fresh fruits or edible flowers, making it as visually stunning as it’s delicious.
Gather your ingredients and prepare for a baking adventure that will result in a masterpiece of flavor and presentation.
Ingredients:
- 1 1/2 cups all-purpose flour
- 1 cup granulated sugar
- 1/2 cup unsalted butter, softened
- 3 large eggs
- 1 tablespoon vanilla extract
- 1/2 cup whole milk
- 1 1/2 teaspoons baking powder
- 1/4 teaspoon salt
- 2 cups powdered sugar
- 1/2 cup unsalted butter, softened (for frosting)
- 2-3 tablespoons heavy cream (for frosting)
- 1 teaspoon vanilla extract (for frosting)
Cooking Instructions:
- Preheat the Oven: Start by preheating your oven to 350°F (175°C). Grease and flour two 8-inch round cake pans to guarantee the cakes don’t stick.
- Prepare the Cake Batter: In a large mixing bowl, cream together the softened butter and granulated sugar until light and fluffy. This should take about 3-4 minutes. Add the eggs one at a time, beating well after each addition. Stir in the vanilla extract.
- Combine Dry Ingredients: In another bowl, whisk together the flour, baking powder, and salt.
- Mix Wet and Dry Ingredients: Gradually add the dry ingredients to the creamed mixture, alternating with milk, starting and ending with the flour mixture. Mix until just combined to avoid overmixing.
- Bake the Cake Layers: Divide the batter evenly between the prepared cake pans. Smooth the tops with a spatula. Bake in the preheated oven for 25-30 minutes, or until a toothpick inserted into the center comes out clean. Allow the cakes to cool in the pans for 10 minutes, then turn them out onto wire racks to cool completely.
- Prepare the Frosting: In a medium bowl, beat the softened butter until creamy. Gradually add the powdered sugar, beating continuously. Add the vanilla extract and 2 tablespoons of heavy cream. Beat until light and fluffy, adding more cream if needed to reach the desired consistency.
- Assemble the Cake: Once the cakes are completely cool, place one layer on a serving plate and spread a generous amount of frosting on top. Place the second layer on top, then frost the top and sides of the cake with the remaining frosting.
- Decorate: Optionally, decorate the cake with fresh berries, edible flowers, or sprinkles to enhance its visual appeal.
Extra Tips:
When baking the cake layers, make certain the oven temperature is consistent to avoid uneven rising. Always let the cakes cool completely before frosting to prevent the frosting from melting.
For a smoother frosting finish, use a long offset spatula. If you prefer a richer flavor, consider adding a tablespoon of vanilla bean paste to the frosting. Finally, if you plan to make this cake ahead of time, store it in an airtight container to keep it moist and fresh.
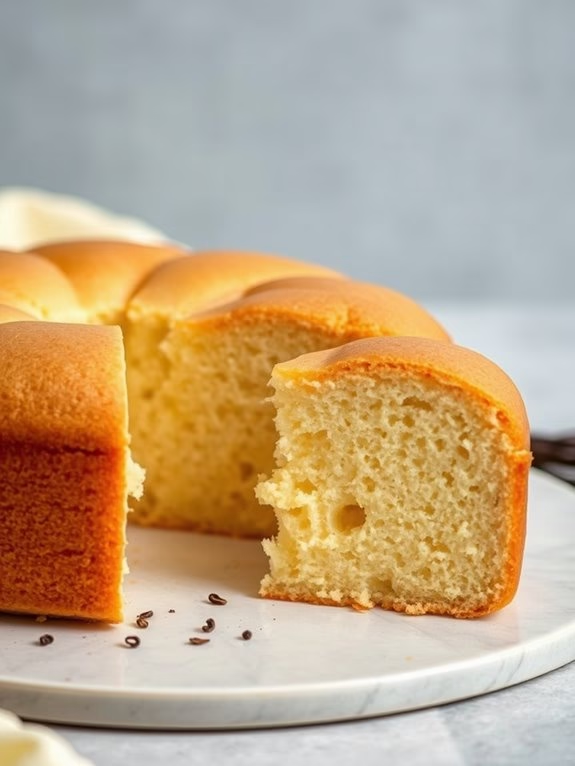
Vanilla Chiffon Cake
Vanilla Chiffon Cake
The Vanilla Chiffon Cake is a light and airy classic that combines the richness of a traditional cake with the fluffiness of an angel food cake. Originating in the mid-20th century, this cake stands out due to its unique texture, which is achieved by using beaten egg whites that are gently folded into the batter. The cake is ideal for any occasion, whether it’s a birthday celebration or an afternoon tea. Its delicate crumb pairs beautifully with a variety of frostings or can be enjoyed simply with a dusting of powdered sugar.
The secret to a perfect Vanilla Chiffon Cake lies in the balance of ingredients and the technique of folding. This cake is traditionally baked in a tube pan, which helps it rise evenly, guaranteeing a uniform texture throughout. When served, the cake is a delightful treat with a subtle vanilla flavor that appeals to both kids and adults. For the best results, follow the recipe carefully and allow the cake to cool completely before serving.
Ingredients (Serves 4-6):
- 1 1/2 cups cake flour
- 1 cup granulated sugar (divided)
- 1 tablespoon baking powder
- 1/2 teaspoon salt
- 1/2 cup vegetable oil
- 5 large eggs, separated
- 3/4 cup water
- 2 teaspoons vanilla extract
- 1/2 teaspoon cream of tartar
Instructions:
- Preheat and Prepare: Preheat your oven to 325°F (163°C). Confirm your tube pan is clean and ungreased, as this helps the cake climb and hold its structure.
- Mix Dry Ingredients: In a large mixing bowl, sift together the cake flour, 3/4 cup of sugar, baking powder, and salt. Sifting helps to aerate the flour and remove any lumps.
- Combine Wet Ingredients: In a separate bowl, whisk together the egg yolks, vegetable oil, water, and vanilla extract until well combined and smooth.
- Form the Batter: Pour the wet ingredients into the dry ingredients and mix until you achieve a smooth batter. Be careful not to over-mix as this can toughen the cake.
- Beat Egg Whites: In another clean, dry bowl, beat the egg whites with the cream of tartar until soft peaks form. Gradually add the remaining 1/4 cup of sugar, continuing to beat until stiff peaks form.
- Fold Egg Whites: Gently fold a third of the egg whites into the batter to lighten it, then carefully fold in the remaining whites. Use a spatula and a light hand to maintain the airiness of the egg whites.
- Bake: Pour the batter evenly into the tube pan. Bake for 50 to 60 minutes, or until the cake springs back when lightly pressed, and a toothpick inserted into the center comes out clean.
- Cool and Serve: Invert the cake pan onto a bottle or a wire rack to cool completely. Once cooled, run a knife around the edges to release the cake. Serve plain or with your favorite frosting or toppings.
Extra Tips:
For the best results, confirm that your egg whites are completely free of any yolk or grease, as this can prevent them from whipping properly. Using room-temperature eggs can also help achieve the desired volume.
When folding the egg whites into the batter, be gentle to avoid deflating them. If you don’t have a tube pan, you can use a round cake pan, but be sure to adjust the baking time accordingly and monitor the cake closely.
Almond Vanilla Twist
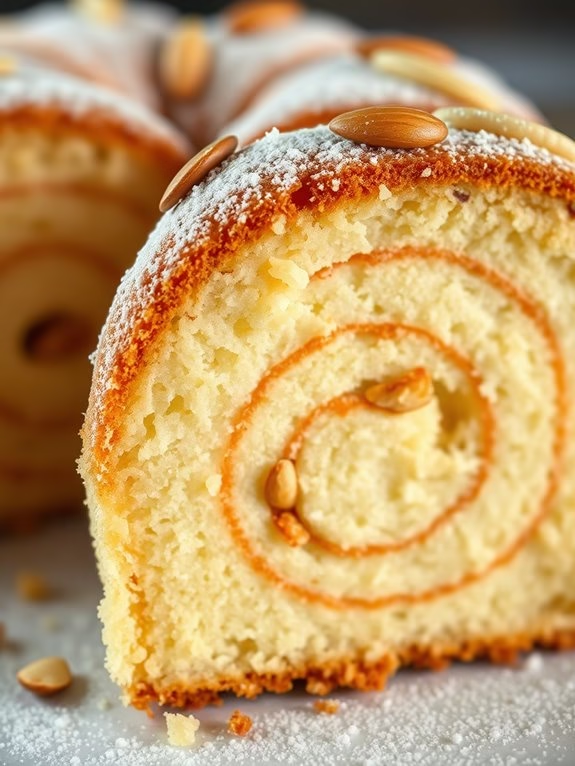
Almond Vanilla Twist Cake Recipe
The Almond Vanilla Twist is a delightful variation of the classic vanilla cake, infused with the delicate flavor of almonds. This recipe combines the rich, creamy taste of vanilla with the subtle nuttiness of almonds, creating a cake that’s both fragrant and moist. Perfect for any occasion, this cake is sure to impress with its unique flavor profile and elegant appearance.
The addition of slivered almonds not only adds a beautiful texture but also enhances the cake’s overall taste, making it a favorite among almond lovers. To create this exquisite cake, you’ll need to gather a variety of ingredients that come together to form a harmonious blend of flavors.
The base of the cake consists of classic ingredients like flour, sugar, and eggs, but the almond essence and slivered almonds add a special twist. This recipe serves 4-6 people, making it an ideal choice for small gatherings or family dinners. The cake is relatively simple to prepare, allowing even novice bakers to achieve professional results.
Ingredients:
- 1 ¾ cups all-purpose flour
- 1 ¼ cups granulated sugar
- ¾ cup unsalted butter, softened
- 3 large eggs
- ½ cup milk
- 2 teaspoons vanilla extract
- 1 teaspoon almond extract
- 2 teaspoons baking powder
- ¼ teaspoon salt
- ½ cup slivered almonds
Cooking Instructions:
- Preheat and Prepare Pans: Preheat your oven to 350°F (175°C). Grease and flour an 8-inch round cake pan or line it with parchment paper to facilitate easy removal of the cake.
- Mix Dry Ingredients: In a medium-sized bowl, whisk together the all-purpose flour, baking powder, and salt. This helps to evenly distribute the leavening agent and salt throughout the flour.
- Cream Butter and Sugar: In a large mixing bowl, use an electric mixer to cream the softened butter and granulated sugar together until the mixture is light and fluffy. This will take about 3-4 minutes and is vital for a tender crumb.
- Add Eggs and Extracts: Beat in the eggs one at a time, making sure that each egg is fully incorporated before adding the next. Mix in the vanilla and almond extracts, which will impart the cake with its signature flavors.
- Combine Wet and Dry Ingredients: Gradually add the dry ingredients to the wet mixture, alternating with the milk. Begin and end with the flour mixture, mixing just until combined. Avoid overmixing to maintain a light texture.
- Fold in Almonds: Gently fold the slivered almonds into the batter using a spatula, ensuring they’re evenly distributed throughout the mixture.
- Bake the Cake: Pour the batter into the prepared cake pan, smoothing the top with a spatula. Bake in the preheated oven for 30-35 minutes, or until a toothpick inserted into the center of the cake comes out clean.
- Cool and Serve: Allow the cake to cool in the pan for about 10 minutes before transferring it to a wire rack to cool completely. Once cooled, the cake can be served as is or dusted with powdered sugar for a decorative touch.
Extra Tips:
To achieve the best results with your Almond Vanilla Twist cake, verify that all ingredients are at room temperature before you begin. This will help the ingredients blend together more smoothly, resulting in a uniform batter.
Additionally, when folding in the almonds, be gentle to maintain the airiness of the batter. If you prefer a more pronounced almond flavor, consider toasting the slivered almonds before folding them into the batter. This will add a deeper, more robust almond taste and a delightful crunch to each bite.
Vanilla Cupcake Surprise
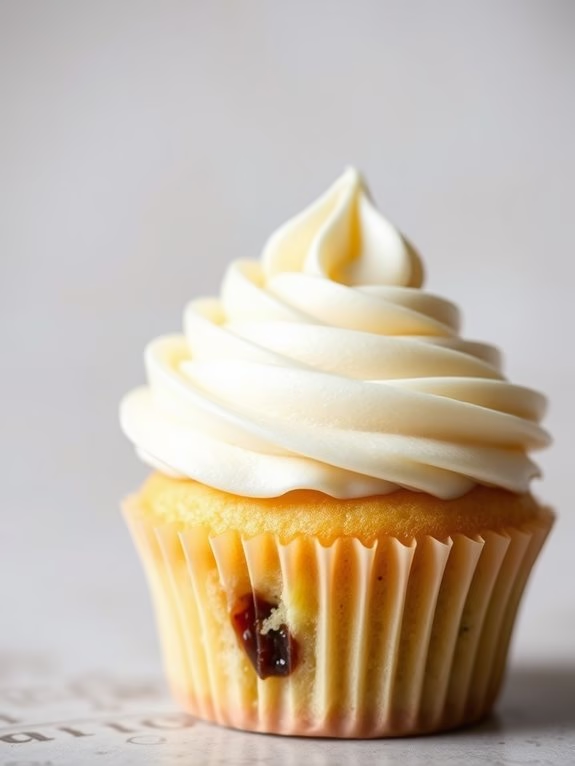
Vanilla Cupcake Surprise is a delightful take on the classic vanilla cake, offering a whimsical twist perfect for any occasion. These cupcakes are known for their moist, tender crumb and rich vanilla flavor, topped with a creamy frosting that hides a surprise filling inside.
Whether you’re baking for a family gathering, birthday party, or just a special treat, these cupcakes will surely impress your guests with their delightful presentation and delicious taste.
The surprise element can vary depending on your creativity and the occasion. From fruit preserves to chocolate ganache or even a dollop of your favorite nut butter, the hidden center adds an exciting twist to the classic vanilla cupcake. This recipe yields 12-15 cupcakes, serving approximately 4-6 people.
Ingredients:
- 1 ½ cups all-purpose flour
- 1 ½ teaspoons baking powder
- ¼ teaspoon salt
- ½ cup unsalted butter, softened
- 1 cup granulated sugar
- 2 large eggs
- 2 teaspoons pure vanilla extract
- ½ cup whole milk
- 1 cup surprise filling of choice (fruit preserves, chocolate ganache, etc.)
- 1 ½ cups vanilla frosting
Instructions:
- Preheat the Oven: Begin by preheating your oven to 350°F (175°C). Line a muffin tin with cupcake liners to guarantee easy removal after baking.
- Prepare Dry Ingredients: In a medium-sized bowl, whisk together the flour, baking powder, and salt. This helps distribute the leavening agent evenly through the flour, making sure of a consistent rise in your cupcakes.
- Cream Butter and Sugar: In a large mixing bowl, use an electric mixer to cream the softened butter and sugar together until light and fluffy, about 3-4 minutes. This step is essential for incorporating air into the batter, which contributes to the cake’s light texture.
- Add Eggs and Vanilla: Beat in the eggs one at a time, mixing well after each addition. Stir in the vanilla extract to infuse the batter with its rich flavor.
- Combine Dry and Wet Ingredients: Gradually add the dry ingredients to the creamed mixture alternately with the milk, starting and ending with the flour mixture. Mix on low speed until just combined, being careful not to overmix.
- Fill Cupcake Liners: Divide the batter evenly among the cupcake liners, filling each about 2/3 full. This allows room for the cupcakes to rise without overflowing.
- Bake: Place the muffin tin in the preheated oven and bake for 18-20 minutes, or until a toothpick inserted into the center of a cupcake comes out clean.
- Cool and Core: Let the cupcakes cool in the pan for 5 minutes before transferring them to a wire rack to cool completely. Once cooled, use a small knife or a cupcake corer to remove a small section from the center of each cupcake.
- Add the Surprise Filling: Fill each cored cupcake with about a tablespoon of your chosen filling.
- Frost Cupcakes: Pipe or spread vanilla frosting over the top of each cupcake, covering the filled center. Decorate as desired.
Extra Tips:
For the perfect Vanilla Cupcake Surprise, make certain all your ingredients are at room temperature before you begin. This helps them to incorporate more easily and evenly.
When adding your surprise filling, don’t overfill the holes or the cupcakes may become too heavy and collapse. If you’re using a fruit preserve or jam, try to choose one with a complementary flavor to the vanilla base.
Finally, if you prefer a less sweet cupcake, you can reduce the sugar in the batter slightly without affecting the overall texture.