
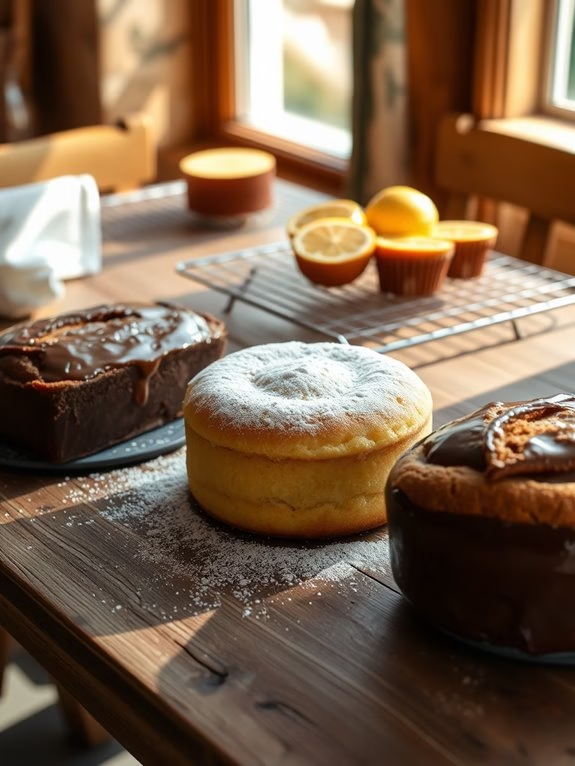
When I first tried my hand at baking, I was enchanted by how a few simple ingredients could create such wonders.
Picture the inviting aroma of a Vanilla Sponge Cake wafting through the kitchen, its golden edges just visible over the tin, calling out for a taste. Or the rich, dreamy texture of a Classic Chocolate Cake that simply melts in your mouth. Each recipe holds a special place in my heart, and I’m excited to share these timeless treasures with you.
Let’s explore these cherished cakes and uncover the secrets that make them so beloved.

Vanilla Sponge Cake
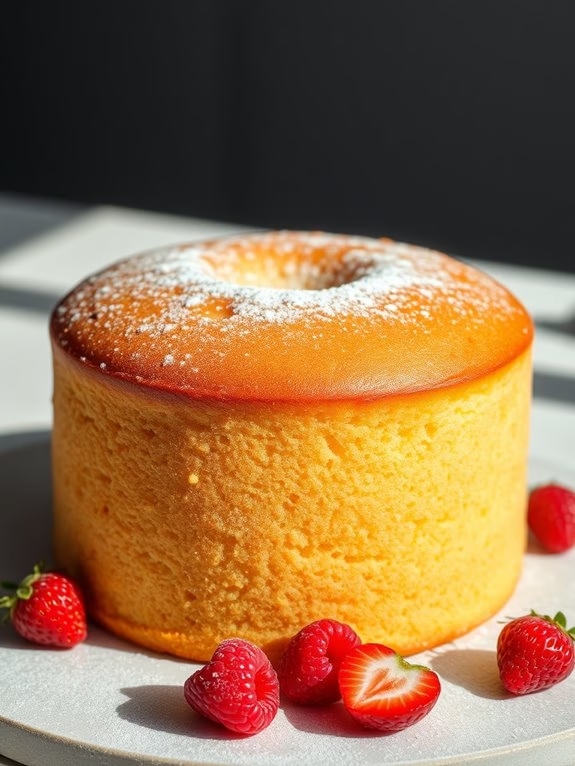
Vanilla Sponge Cake Recipe
Vanilla Sponge Cake is a classic dessert that’s perfect for any occasion. Its light and fluffy texture, combined with a rich vanilla flavor, makes it a favorite among cake lovers.
Whether you’re celebrating a birthday, hosting a party, or simply craving something sweet, this cake is an excellent choice. The simplicity of the recipe guarantees that even novice bakers can achieve a delightful result with minimal effort.
This Vanilla Sponge Cake recipe serves 4-6 people and requires basic ingredients that are likely already in your pantry. The cake is versatile and can be enjoyed plain or dressed up with a variety of toppings like whipped cream, fresh fruit, or a dusting of powdered sugar.
With a few simple steps, you can create a delicious homemade cake that will surely impress your family and friends.
Ingredients:
- 1 cup all-purpose flour
- 1 cup granulated sugar
- 4 large eggs
- 1 teaspoon vanilla extract
- 1/2 teaspoon baking powder
- 1/4 teaspoon salt
- 1/4 cup milk
- 1/4 cup unsalted butter, melted
Instructions:
- Preheat the oven and prepare the pan: Preheat your oven to 350°F (175°C). Grease a 9-inch round cake pan with butter or cooking spray, and line the bottom with parchment paper to guarantee easy removal.
- Combine dry ingredients: In a medium bowl, whisk together the flour, baking powder, and salt. Set aside.
- Beat eggs and sugar: In a large mixing bowl, beat the eggs and granulated sugar together using an electric mixer on high speed for about 5-7 minutes, or until the mixture becomes thick, pale, and doubles in volume.
- Add vanilla: Gently mix in the vanilla extract to the egg and sugar mixture until well incorporated.
- Fold in dry ingredients: Gradually add the dry ingredients to the egg mixture, gently folding with a spatula to retain the airiness of the batter. Be careful not to overmix.
- Incorporate milk and butter: Combine the melted butter and milk in a small bowl. Gently fold this mixture into the batter until just combined.
- Bake the cake: Pour the batter into the prepared cake pan and smooth the top with a spatula. Bake in the preheated oven for 25-30 minutes, or until a toothpick inserted into the center comes out clean.
- Cool and serve: Allow the cake to cool in the pan for about 10 minutes, then invert it onto a wire rack to cool completely. Once cooled, slice and serve as desired.
Extra Tips:
For an even lighter texture, guarantee all your ingredients are at room temperature before starting.
If you prefer a moister cake, you can brush the cooled cake with a simple syrup made from equal parts sugar and water. Additionally, make sure to fold the ingredients gently to maintain the cake’s fluffiness.
For a fun twist, consider adding lemon zest or almond extract to the batter for an extra layer of flavor.
Classic Chocolate Cake
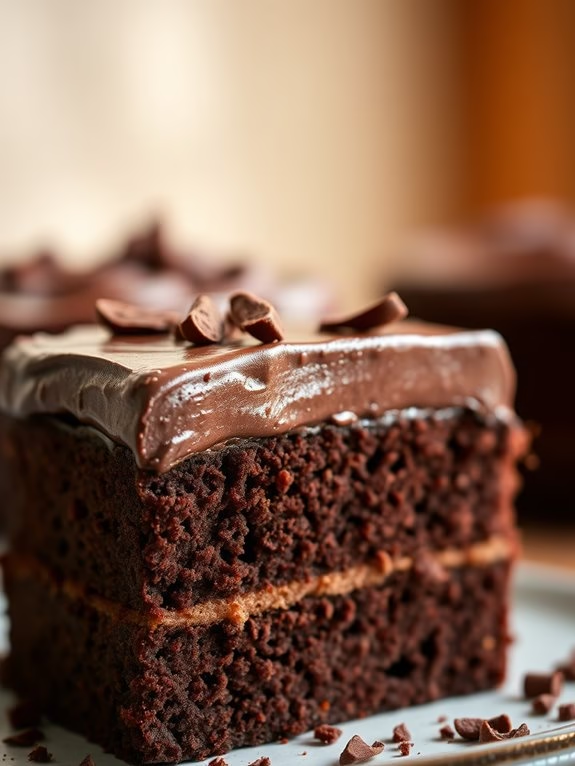
Classic Chocolate Cake
Chocolate cake is a timeless dessert that brings joy to any occasion. This classic chocolate cake recipe isn’t only simple to make but also incredibly delicious. With its rich, moist texture and deep chocolate flavor, it’s perfect for birthdays, celebrations, or just to satisfy a sweet craving. The beauty of this recipe lies in its simplicity and the use of basic ingredients that you likely already have in your pantry.
Whether you’re a seasoned baker or a novice in the kitchen, this classic chocolate cake recipe is easy to follow and guarantees a delectable outcome. The cake is versatile and pairs beautifully with a variety of frostings, from a simple chocolate glaze to a luxurious buttercream. For a serving size of 4-6 people, follow the ingredient list and instructions below to create a delightful dessert that will surely impress your family and friends.
Ingredients:
- 1 ¾ cups all-purpose flour
- 1 ½ cups granulated sugar
- ¾ cup unsweetened cocoa powder
- 1 ½ teaspoons baking powder
- 1 ½ teaspoons baking soda
- 1 teaspoon salt
- 2 large eggs
- 1 cup whole milk
- ½ cup vegetable oil
- 2 teaspoons vanilla extract
- 1 cup boiling water
Cooking Instructions:
- Preheat the Oven: Begin by preheating your oven to 350°F (175°C). Grease and flour two 9-inch round cake pans, or line them with parchment paper to guarantee the cakes release easily after baking.
- Mix Dry Ingredients: In a large mixing bowl, combine the flour, sugar, cocoa powder, baking powder, baking soda, and salt. Stir these dry ingredients together using a whisk or a fork to guarantee even distribution.
- Add Wet Ingredients: Add the eggs, milk, vegetable oil, and vanilla extract to the dry ingredients. Use an electric mixer on medium speed or a whisk to mix until well combined and smooth.
- Incorporate Boiling Water: Carefully pour in the boiling water while mixing on low speed. The batter will be thin, but this is expected. The boiling water enhances the chocolate flavor and helps create a moist texture.
- Bake the Cake: Divide the batter evenly between the prepared cake pans. Place the pans on the middle rack of your preheated oven and bake for 30 to 35 minutes, or until a toothpick inserted in the center comes out clean.
- Cool the Cakes: Once baked, remove the cakes from the oven and allow them to cool in the pans for about 10 minutes. Then, carefully remove them from the pans and transfer to a wire rack to cool completely.
- Frost and Serve: Once cooled, frost the cake with your choice of chocolate frosting or glaze. Serve and enjoy your homemade classic chocolate cake.
Extra Tips:
For the best results, verify all your ingredients are at room temperature before mixing. This helps create a smoother batter and a more even bake.
To enhance the chocolate flavor, consider adding a teaspoon of instant espresso powder to the dry ingredients. Additionally, if you prefer a richer cake, substitute half of the whole milk with sour cream or buttermilk.
Moist Carrot Cake
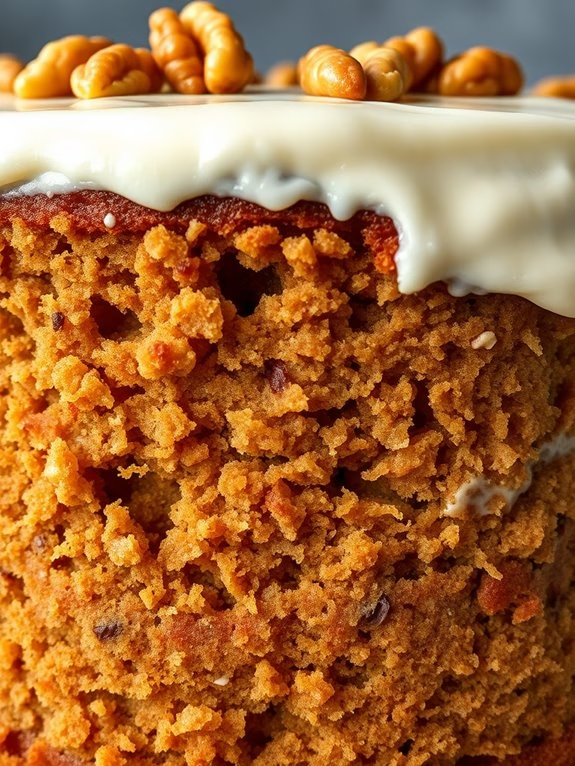
Moist Carrot Cake is a classic dessert that combines the natural sweetness of carrots with a medley of spices, creating a flavorful and dense treat. This cake is perfect for any occasion, whether it’s a family gathering, a celebration, or just a simple dessert for a cozy evening at home.
The moist texture of the cake, complemented by a creamy frosting, makes it a favorite among cake lovers. With its rich flavor and delightful aroma, this carrot cake recipe is bound to impress your family and friends.
The beauty of this Moist Carrot Cake recipe is its simplicity and the use of fresh ingredients that enhance the taste and texture of the cake. It’s an easy homemade cake recipe that even beginners can master.
The combination of grated carrots, warm spices, and a luscious cream cheese frosting creates a well-balanced dessert that’s both satisfying and delicious. This recipe is designed to serve 4-6 people, making it an ideal choice for a small gathering or a special treat for your loved ones.
Ingredients
- 2 cups all-purpose flour
- 1 cup granulated sugar
- 1 cup brown sugar, packed
- 1 teaspoon baking powder
- 1 teaspoon baking soda
- 1/2 teaspoon salt
- 1 teaspoon ground cinnamon
- 1/2 teaspoon ground nutmeg
- 1/4 teaspoon ground ginger
- 1/2 cup vegetable oil
- 4 large eggs
- 2 teaspoons vanilla extract
- 3 cups grated carrots
- 1 cup crushed pineapple, drained
- 1/2 cup chopped walnuts (optional)
Cooking Instructions
- Preheat the Oven: Start by preheating your oven to 350°F (175°C). Grease and flour two 9-inch round cake pans, then set them aside.
- Mix Dry Ingredients: In a large mixing bowl, combine the all-purpose flour, granulated sugar, brown sugar, baking powder, baking soda, salt, ground cinnamon, nutmeg, and ginger. Whisk the ingredients together until they’re well-incorporated.
- Combine Wet Ingredients: In a separate bowl, whisk together the vegetable oil, eggs, and vanilla extract until the mixture is smooth and well-blended.
- Mix Wet and Dry Ingredients: Gradually add the wet ingredients to the dry ingredients, mixing until just combined. Be careful not to overmix the batter.
- Fold in Carrots and Pineapple: Gently fold in the grated carrots and crushed pineapple until they’re evenly distributed throughout the batter. If desired, add the chopped walnuts for extra texture and flavor.
- Pour Batter into Pans: Divide the batter evenly between the prepared cake pans, smoothing the tops with a spatula.
- Bake the Cake: Place the cake pans in the preheated oven and bake for 25-30 minutes, or until a toothpick inserted into the center of each cake comes out clean.
- Cool the Cakes: Once baked, remove the cakes from the oven and let them cool in the pans for about 10 minutes. Then, transfer them to a wire rack to cool completely.
- Frost the Cake: Once the cakes are completely cooled, frost with your favorite cream cheese frosting. Spread frosting evenly over the first layer, place the second cake layer on top, and then frost the top and sides.
Extra Tips
For the best results, verify that the carrots are freshly grated and not too finely shredded, as this will help retain moisture in the cake.
If you prefer a less sweet cake, you can reduce the sugar slightly without affecting the texture. Additionally, to enhance the flavor, consider toasting the walnuts before adding them to the batter.
Finally, allowing the cake to sit in the refrigerator for a few hours after frosting will make it easier to slice and serve.
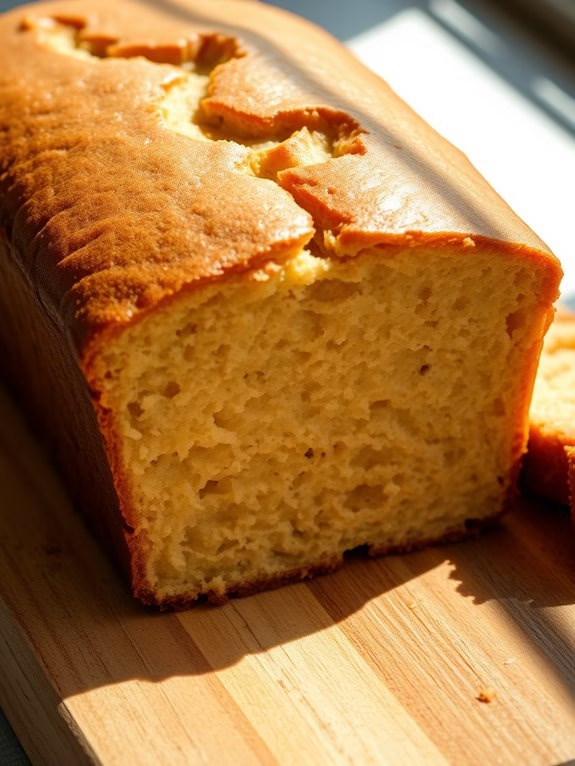
Lemon Drizzle Cake
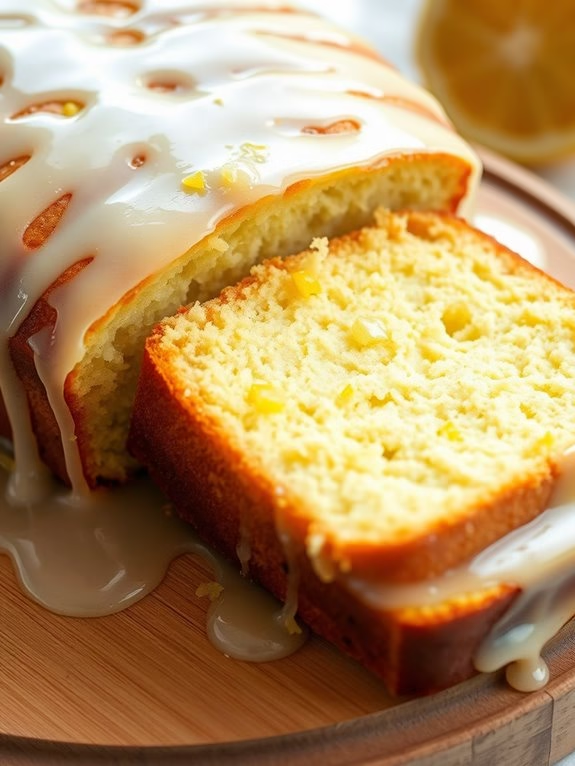
Lemon Drizzle Cake is a classic dessert that combines the zesty flavor of lemons with the comforting sweetness of a traditional cake. Perfect for an afternoon tea or a simple dessert, this cake is known for its moist texture and the delightful tangy glaze that tops it off.
Lemon Drizzle Cake isn’t only a treat for the taste buds but also a feast for the eyes with its golden hue and glossy finish. Whether you’re baking for a special occasion or just to satisfy a sweet craving, this cake is sure to impress with its invigorating taste and inviting aroma.
The beauty of Lemon Drizzle Cake lies in its simplicity and the way the lemon syrup seeps into the cake, creating a moist and flavorful experience with every bite. This cake is typically baked in a loaf tin, making it easy to slice and serve.
With just a few basic ingredients and a little bit of time, you can create a cake that’s both elegant and delicious. Let’s explore the recipe and discover how you can make this delightful cake at home.
Ingredients (Serves 4-6)
- 225g unsalted butter, softened
- 225g caster sugar
- 4 large eggs
- 225g self-raising flour
- Zest of 2 lemons
- Juice of 1 lemon
- 85g icing sugar
- Juice of 2 lemons (for the drizzle)
Cooking Instructions
- Preheat the Oven: Start by preheating your oven to 180°C (350°F). Grease and line a 2lb loaf tin with baking parchment to prevent the cake from sticking.
- Cream Butter and Sugar: In a large bowl, beat together the softened butter and caster sugar until the mixture is light and fluffy. This should take about 3-4 minutes using an electric mixer.
- Add Eggs: Gradually add the eggs, one at a time, beating well after each addition to confirm the mixture remains smooth. If the mixture curdles, add a tablespoon of the flour to bring it back together.
- Fold in Flour and Lemon Zest: Sift the self-raising flour over the mixture, then gently fold it in using a spatula. Add the lemon zest and fold until everything is well combined.
- Transfer to Tin: Pour the cake batter into the prepared loaf tin, smoothing the top with the back of a spoon or a spatula.
- Bake the Cake: Place the tin in the preheated oven and bake for 45-50 minutes, or until the cake is golden and a skewer inserted into the center comes out clean.
- Prepare the Drizzle: While the cake is baking, mix the icing sugar with the juice of two lemons to create the drizzle. Stir until smooth.
- Drizzle the Cake: Once the cake is baked, remove it from the oven and immediately prick it all over with a skewer. Pour the lemon drizzle evenly over the hot cake, allowing it to soak in.
- Cool and Serve: Let the cake cool in the tin for about 10 minutes, then remove it and let it cool completely on a wire rack before slicing and serving.
Extra Tips
For an even more intense lemon flavor, consider adding a few drops of lemon extract to the cake batter. If you prefer a more refined texture, sift the icing sugar before making the drizzle.
The cake can be stored in an airtight container for up to three days, but it’s best enjoyed fresh. If you want the cake to look extra glossy, you can add an additional layer of drizzle after the first layer has set. Enjoy your Lemon Drizzle Cake with a cup of tea or coffee for the ultimate treat.
Red Velvet Cake
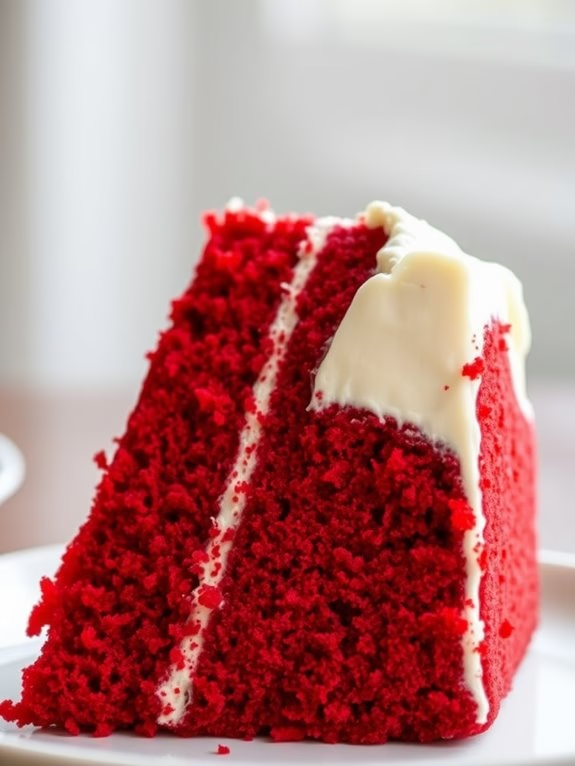
Red Velvet Cake is a classic dessert known for its vibrant red color and rich, velvety texture. Its origins are rooted in the early 20th century, and it has since become a popular choice for celebrations and gatherings. The combination of cocoa powder and buttermilk gives this cake its distinct flavor, while the cream cheese frosting adds a tangy sweetness that complements the cake perfectly.
Whether you’re a seasoned baker or a novice in the kitchen, this recipe will guide you through creating a delicious Red Velvet Cake that will impress your family and friends. Making Red Velvet Cake at home allows you to enjoy the freshness and quality that store-bought versions often lack.
This recipe is designed to serve 4-6 people, making it perfect for small gatherings or an intimate dessert treat. By following this guide, you’ll learn how to achieve the perfect balance of flavors and the iconic red hue that makes this cake so special. So, gather your ingredients, preheat your oven, and get ready to bake a delightful Red Velvet Cake that will surely become a favorite.
Ingredients (Serves 4-6)
- 2 1/2 cups all-purpose flour
- 1 1/2 cups granulated sugar
- 1 teaspoon baking soda
- 1 teaspoon salt
- 1 teaspoon cocoa powder
- 1 1/2 cups vegetable oil
- 1 cup buttermilk, at room temperature
- 2 large eggs, at room temperature
- 2 tablespoons red food coloring
- 1 teaspoon vanilla extract
- 1 teaspoon white vinegar
For the Cream Cheese Frosting:
- 8 oz cream cheese, softened
- 1/2 cup unsalted butter, softened
- 4 cups powdered sugar
- 1 teaspoon vanilla extract
Instructions
- Preheat the Oven: Begin by preheating your oven to 350°F (175°C). Grease and flour two 9-inch round cake pans to prevent the cake from sticking.
- Mix Dry Ingredients: In a medium-sized bowl, whisk together the flour, sugar, baking soda, salt, and cocoa powder. Set aside.
- Combine Wet Ingredients: In a large bowl, mix the vegetable oil, buttermilk, eggs, food coloring, vanilla extract, and vinegar until well combined.
- Combine Mixtures: Gradually add the dry ingredients to the wet ingredients, mixing gently until the batter is smooth and free of lumps.
- Divide and Bake: Divide the batter evenly between the prepared cake pans. Bake in the preheated oven for 25-30 minutes, or until a toothpick inserted into the center comes out clean.
- Cool the Cakes: Allow the cakes to cool in the pans for about 10 minutes. Then, remove them from the pans and let them cool completely on a wire rack.
- Prepare the Frosting: In a large bowl, beat the cream cheese and butter together until smooth. Gradually add the powdered sugar and vanilla extract, mixing until the frosting is creamy and spreadable.
- Assemble the Cake: Once the cakes have cooled completely, spread a layer of frosting on top of one of the cakes. Place the second cake on top, and then frost the top and sides of the entire cake.
- Decorate: If desired, you can decorate the cake with additional frosting designs, or sprinkle with cake crumbs for a classic look.
Extra Tips
When making Red Velvet Cake, it’s important to use room temperature ingredients, especially for the wet ingredients like eggs and buttermilk, as this helps achieve a smoother batter.
If you don’t have buttermilk on hand, you can make a substitute by mixing one cup of milk with a tablespoon of white vinegar or lemon juice and letting it sit for a few minutes. Additionally, when adding food coloring, start with less and add more as needed to achieve your desired shade of red.
Finally, to guarantee even baking, rotate your cake pans halfway through the baking time. Enjoy your homemade Red Velvet Cake!
Simple White Cake
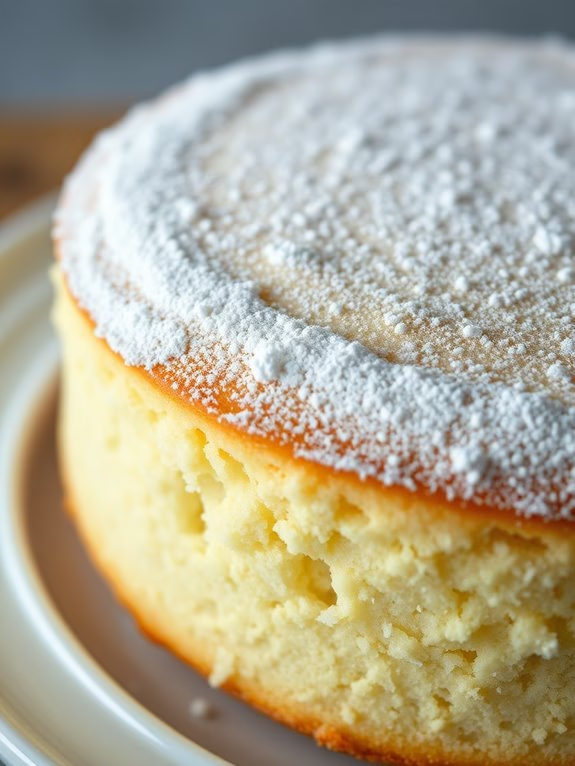
Simple White Cake
There is nothing like a classic Simple White Cake to satisfy your sweet tooth with its fluffy texture and delightful taste. This cake is perfect for any occasion, be it a birthday party, a family gathering, or simply as a treat for yourself. The beauty of this recipe lies in its simplicity and the fact that it requires only a handful of ingredients that you most likely already have in your pantry.
Whether you’re an experienced baker or a novice in the kitchen, this recipe is straightforward and easy to follow, making certain that you achieve a perfect cake every time. The Simple White Cake is known for its moist crumb and subtle vanilla flavor, making it a versatile base for a variety of toppings and fillings. You can enjoy it as is, or dress it up with a layer of frosting, fresh fruit, or a dusting of powdered sugar.
This cake serves 4-6 people, making it a great option for smaller gatherings or family desserts. With this recipe, you can whip up a homemade delight that will make you rethink ever buying a store-bought cake again.
Ingredients (Serves 4-6 people):
- 1 cup white sugar
- 1/2 cup butter, softened
- 2 eggs
- 2 teaspoons vanilla extract
- 1 1/2 cups all-purpose flour
- 1 3/4 teaspoons baking powder
- 1/2 cup milk
Instructions:
- Preheat and Prepare: Preheat your oven to 350°F (175°C). Grease and flour a 9×9 inch pan or line a muffin pan with paper liners if you prefer cupcakes.
- Cream Butter and Sugar: In a medium bowl, cream together the sugar and butter until smooth. This should take about 3-4 minutes. The mixture should be light and fluffy, making certain that your cake will have the perfect texture.
- Add Eggs and Vanilla: Beat in the eggs, one at a time, making sure each is fully incorporated before adding the next. Stir in the vanilla extract, mixing until everything is well combined.
- Mix Dry Ingredients: In a separate bowl, combine the flour and baking powder. Gradually add this dry mixture to the creamed mixture and mix well until it’s fully incorporated.
- Add Milk: Stir in the milk until the batter is smooth. Make sure there are no lumps and the batter is well mixed.
- Pour and Bake: Pour the batter into the prepared pan. Bake in the preheated oven for 30 to 40 minutes, or until a toothpick inserted into the center of the cake comes out clean.
- Cool and Serve: Allow the cake to cool in the pan for a few minutes before transferring it to a wire rack to cool completely. Once cooled, it’s ready to serve or to be topped with your choice of frosting or decorations.
Extra Tips:
For an even moister cake, consider adding a tablespoon of sour cream or yogurt to the batter. This will enhance the texture without altering the taste considerably.
If you’re aiming for a more robust flavor, try adding a pinch of salt to the dry ingredients to balance the sweetness. When measuring flour, be sure to spoon it into your measuring cup and level it off with a knife to avoid adding too much, which can result in a dense cake.
Finally, feel free to experiment with extracts; almond extract can be a delightful alternative to vanilla for a different twist on this classic cake.
Banana Cake Delight
Banana Cake Delight
Banana Cake Delight is a scrumptious and moist cake that’s perfect for any occasion, whether it be a casual family gathering or a special celebration. This delightful cake is packed with the natural sweetness of ripe bananas, which not only adds flavor but also guarantees a tender crumb.
It’s an easy-to-make dessert that pairs beautifully with a cup of tea or coffee, making it an ideal choice for an afternoon treat or a cozy dessert after dinner. This recipe yields a cake that serves 4-6 people, making it perfect for a small group.
The recipe includes simple ingredients that you likely have in your pantry, with the addition of ripe bananas to enhance the flavor profile. With a few easy steps, you can have a delicious homemade Banana Cake Delight that will impress your taste buds and those of your guests.
Ingredients:
- 1 1/2 cups all-purpose flour
- 1 cup granulated sugar
- 1/2 cup unsalted butter, softened
- 2 large eggs
- 1 cup mashed ripe bananas (about 2-3 bananas)
- 1/4 cup buttermilk
- 1 teaspoon vanilla extract
- 1 teaspoon baking soda
- 1/2 teaspoon baking powder
- 1/4 teaspoon salt
Cooking Instructions:
1. Preheat the Oven: Start by preheating your oven to 350°F (175°C). This guarantees that the oven is hot and ready to bake your cake evenly once the batter is prepared.
2. Prepare the Baking Pan****: Grease a 9-inch round cake pan with butter or non-stick spray. You can also line the bottom with parchment paper to make it easier to remove the cake after baking.
3. Mix Dry Ingredients: In a medium-sized bowl, whisk together the all-purpose flour, baking soda, baking powder, and salt. This helps to evenly distribute the leavening agents throughout the flour.
4. Cream Butter and Sugar: In a large mixing bowl, using an electric mixer, cream together the softened butter and granulated sugar until light and fluffy. This should take about 3-4 minutes.
5. Add Eggs and Vanilla: Beat in the eggs one at a time, guaranteeing each is well incorporated before adding the next. Stir in the vanilla extract for added flavor.
6. Incorporate Bananas: Add the mashed bananas to the butter mixture and mix until well combined. The bananas should be completely integrated into the batter.
7. Combine Wet and Dry Ingredients: Gradually add the dry ingredients to the banana mixture, alternating with the buttermilk. Start and end with the dry ingredients, mixing gently until just combined.
Be careful not to overmix as this can make the cake dense.
8. Pour and Bake: Pour the batter into the prepared cake pan and smooth the top with a spatula. Place the pan in the preheated oven and bake for 30-35 minutes, or until a toothpick inserted into the center comes out clean.
9. Cool and Serve: Allow the cake to cool in the pan for about 10 minutes, then transfer it to a wire rack to cool completely. Once cooled, slice and serve your Banana Cake Delight.
Extra Tips:
For the best flavor, use overripe bananas with plenty of brown spots. They’re much sweeter and will enhance the cake’s taste.
If you don’t have buttermilk, you can make a quick substitute by adding 1 tablespoon of lemon juice or vinegar to 1 cup of milk and letting it sit for 5 minutes.
This cake can be stored in an airtight container at room temperature for up to 3 days or in the refrigerator for up to a week. For an extra treat, top with cream cheese frosting or a dusting of powdered sugar before serving.
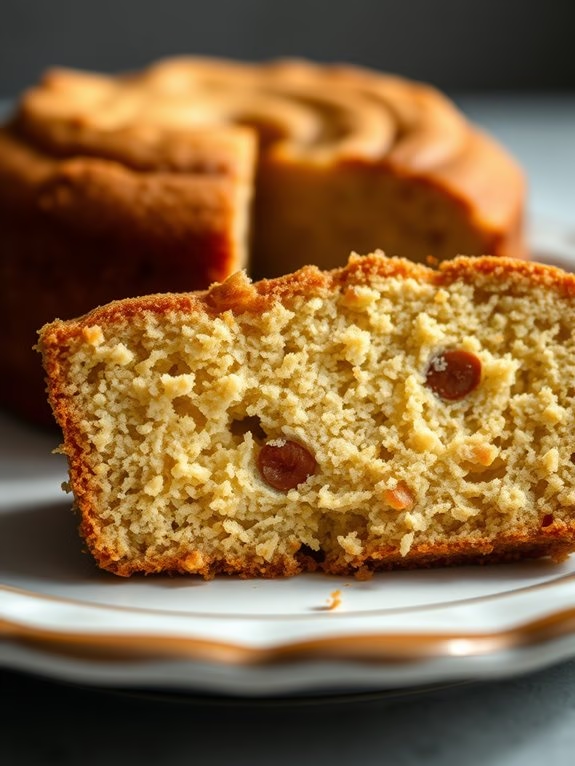
Easy Pound Cake
Easy Pound Cake Recipe
Pound cake is a timeless classic that’s beloved for its rich, buttery flavor and dense, moist texture. This easy pound cake recipe is perfect for a cozy afternoon tea or a special dessert occasion. With just a few simple ingredients, you can whip up a delicious pound cake that will impress your family and friends.
Whether you’re a seasoned baker or a beginner, this recipe is straightforward and yields a delightful cake that everyone will enjoy.
The name “pound cake” originates from the traditional recipe that called for one pound each of flour, butter, sugar, and eggs. While modern recipes have been modified for convenience, the essence of the cake remains the same.
Our version of the pound cake is slightly lighter but still maintains that classic richness you expect from a pound cake. It’s perfect for serving 4-6 people, making it ideal for small gatherings or family desserts.
Ingredients for Easy Pound Cake (serving size: 4-6 people):
- 1 cup (2 sticks) unsalted butter, softened
- 1 cup granulated sugar
- 4 large eggs
- 2 cups all-purpose flour
- 1/2 teaspoon baking powder
- 1/4 teaspoon salt
- 1 teaspoon vanilla extract
- 1/4 cup whole milk
Cooking Instructions:
- Preheat and Prepare Pan: Preheat your oven to 350°F (175°C). Grease and flour a 9×5-inch loaf pan to prevent the cake from sticking.
- Cream Butter and Sugar: In a large mixing bowl, use an electric mixer to cream the softened butter and sugar together until the mixture is light and fluffy. This should take about 3-5 minutes.
- Add Eggs: Add the eggs one at a time, beating well after each addition. This helps to incorporate air into the mixture, making the cake lighter.
- Mix Dry Ingredients: In a separate bowl, whisk together the all-purpose flour, baking powder, and salt.
- Combine Wet and Dry Ingredients: Gradually add the dry ingredients to the creamed mixture, alternating with the milk. Begin and end with the flour mixture. Mix on low speed until just combined.
- Add Vanilla Extract: Stir in the vanilla extract, verifying even distribution throughout the batter.
- Pour Batter into Pan: Pour the batter into the prepared loaf pan, smoothing the top with a spatula.
- Bake: Bake in the preheated oven for 50-60 minutes, or until a toothpick inserted into the center of the cake comes out clean.
- Cool and Serve: Allow the cake to cool in the pan for about 10 minutes, then transfer it to a wire rack to cool completely. Slice and serve.
Extra Tips:
For the best results, confirm that all your ingredients are at room temperature before you begin. This will help the batter mix more evenly and result in a better texture for your cake.
You can also add a pinch of nutmeg or lemon zest to enhance the flavor of the pound cake. If you prefer a sweeter cake, consider adding a simple glaze made from powdered sugar and lemon juice.
Marble Cake Magic
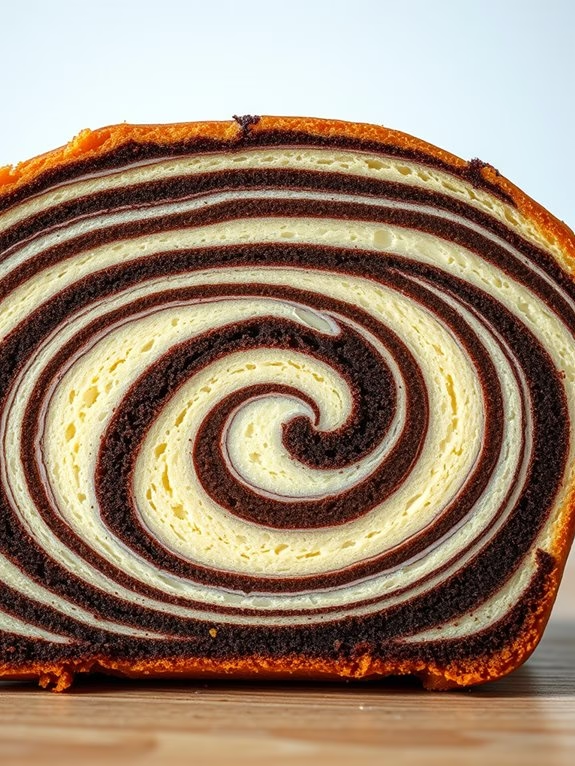
Marble Cake Magic
Marble cake is a delightful treat that combines the rich flavors of vanilla and chocolate in a mesmerizing swirl pattern. It’s a perfect choice for those who can’t decide between a vanilla or chocolate cake since it offers the best of both worlds. This cake isn’t only beautiful to look at, but also incredibly moist and flavorful, making it a favorite for both family gatherings and special occasions.
With its intricate marbling effect, this cake is sure to impress your guests, yet it’s surprisingly simple to make at home. To achieve the perfect marble effect, you’ll need to prepare both vanilla and chocolate batters separately and then artfully swirl them together before baking. The key to a successful marble cake is verifying that both batters are of similar consistency, allowing them to blend seamlessly.
This recipe yields a generous serving for 4-6 people, making it an ideal dessert for a small party or an intimate family dinner. Let’s plunge into the magical process of creating this classic cake.
Ingredients (serves 4-6 people):
- 1 ¾ cups all-purpose flour
- 2 teaspoons baking powder
- ½ teaspoon salt
- ½ cup unsalted butter, softened
- 1 cup granulated sugar
- 3 large eggs
- 2 teaspoons vanilla extract
- ½ cup milk
- 3 tablespoons unsweetened cocoa powder
- 2 tablespoons boiling water
Cooking Instructions:
- Preheat the Oven: Preheat your oven to 350°F (175°C). Grease a 9-inch loaf pan or line it with parchment paper for easy removal.
- Mix Dry Ingredients: In a medium bowl, whisk together the flour, baking powder, and salt. Set aside.
- Cream Butter and Sugar: In a large mixing bowl, beat the butter and sugar together using an electric mixer until the mixture is light and fluffy, about 3-4 minutes.
- Add Eggs and Vanilla: Add the eggs, one at a time, beating well after each addition. Stir in the vanilla extract until fully incorporated.
- Combine Wet and Dry Ingredients: Gradually add the flour mixture to the butter mixture, alternating with the milk, beginning and ending with the flour mixture. Mix until just combined.
- Prepare Chocolate Batter: In a small bowl, mix the cocoa powder with boiling water until smooth. Take about 1 cup of the vanilla batter and stir it into the cocoa mixture until well blended.
- Create Marble Effect: Pour half of the vanilla batter into the prepared loaf pan. Drop spoonfuls of the chocolate batter on top. Cover with the remaining vanilla batter, and then add the rest of the chocolate batter in dollops.
- Swirl Batters: Use a butter knife to gently swirl the chocolate and vanilla batters together. Be careful not to over-mix; you want distinct swirls.
- Bake the Cake: Bake in the preheated oven for 50-60 minutes, or until a toothpick inserted into the center comes out clean.
- Cool and Serve: Allow the marble cake to cool in the pan for 10 minutes, then transfer it to a wire rack to cool completely before slicing and serving.
Extra Tips:
While making marble cake, it’s important to avoid over-mixing the batters when swirling them together, as this can lead to a muddled look rather than distinct swirls.
For a more pronounced chocolate flavor, you can increase the cocoa powder by an extra tablespoon, adjusting the consistency with a bit more boiling water if needed. If you’re feeling adventurous, you can also experiment by adding a hint of coffee to the chocolate batter for a mocha twist.
Finally, ascertain that the cake is fully cooled before slicing to maintain its shape and to achieve clean, beautiful slices.
Coconut Cake Bliss
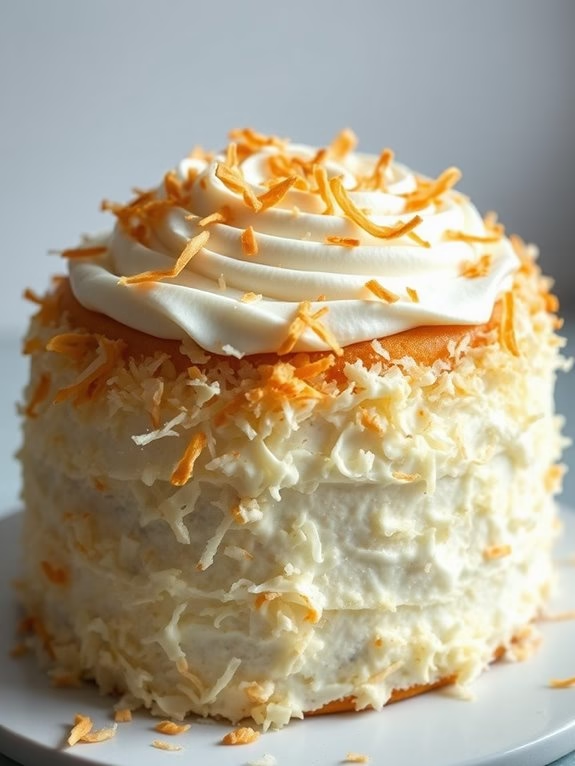
Coconut Cake Bliss
Indulge yourself in a tropical delight with this easy homemade Coconut Cake Bliss. This cake is perfect for any occasion and is sure to impress your family and friends with its light, fluffy texture and rich coconut flavor. The combination of moist cake layers and creamy coconut frosting will transport your taste buds straight to paradise.
Whether you’re celebrating a special event or simply treating yourself, this coconut cake is a surefire way to make any day feel extraordinary. Designed to serve 4-6 people, this Coconut Cake Bliss recipe is straightforward and requires only a handful of ingredients that you might already have in your pantry.
The preparation time is minimal, making it an excellent choice for both novice bakers and seasoned pros. Each bite offers a perfect balance of sweetness and coconut richness, making it a favorite for coconut lovers everywhere. So, roll up your sleeves and get ready to create a masterpiece that will leave everyone asking for seconds!
Ingredients (Serves 4-6):
- 1 1/2 cups all-purpose flour
- 1 cup granulated sugar
- 1/2 cup unsalted butter, softened
- 1/2 cup coconut milk
- 2 large eggs
- 1 teaspoon vanilla extract
- 1 teaspoon baking powder
- 1/2 teaspoon baking soda
- 1/4 teaspoon salt
- 1 cup shredded coconut (divided)
- 1 cup heavy cream
- 2 tablespoons powdered sugar
Cooking Instructions:
- Preheat Your Oven: Begin by preheating your oven to 350°F (175°C). This will guarantee that your oven is at the right temperature when the cake is ready to bake.
- Prepare the Cake Batter: In a large mixing bowl, cream together the softened butter and granulated sugar until light and fluffy. Add in the eggs, one at a time, beating well after each addition. Stir in the vanilla extract.
- Combine Dry Ingredients: In a separate bowl, whisk together the flour, baking powder, baking soda, and salt. Gradually add the dry ingredient mixture to the butter mixture, alternating with the coconut milk, beginning and ending with the dry ingredients. Mix until just combined.
- Add Coconut: Fold in 3/4 cup of shredded coconut into the batter until evenly distributed. Be careful not to overmix, as this can result in a dense cake.
- Bake the Cake: Grease and flour a 9-inch round cake pan. Pour the batter into the prepared pan, smoothing the top with a spatula. Bake in the preheated oven for 25-30 minutes, or until a toothpick inserted into the center comes out clean.
- Cool the Cake: Allow the cake to cool in the pan for about 10 minutes before transferring it to a wire rack to cool completely.
- Prepare the Frosting: While the cake cools, whip the heavy cream and powdered sugar together in a bowl until stiff peaks form.
- Assemble the Cake: Once the cake is completely cooled, spread the whipped cream frosting evenly over the top and sides. Sprinkle the remaining shredded coconut over the frosting, gently pressing it into the cream to adhere.
- Serve and Enjoy: Slice the cake and serve it to your delighted guests. Enjoy the blissful coconut flavors!
Extra Tips:
For an even richer coconut flavor, consider toasting the shredded coconut before incorporating it into the recipe. Simply spread the coconut evenly on a baking sheet and bake in a 350°F oven for 5-7 minutes until golden brown, stirring occasionally.
Be sure to watch it closely to prevent burning. Additionally, using full-fat coconut milk will enhance the creaminess and depth of coconut flavor in your cake. Finally, if you prefer a layer cake, you can double the recipe and bake in two separate pans, stacking the cakes with frosting in between for an impressive presentation.
Rich Coffee Cake
Rich Coffee Cake is a delightful treat that combines the bold flavor of coffee with the subtle sweetness of cake, creating a perfect harmony for any occasion. This cake is ideal for those who love the aromatic allure of coffee and want to enjoy it in a sweet and satisfying form.
Whether you’re looking for a dessert to impress guests or a special weekend treat for yourself, this coffee cake recipe is sure to be a hit.
This homemade recipe is straightforward and doesn’t require any fancy equipment, making it accessible for bakers of all skill levels. The cake’s moist texture is complemented by the rich coffee-infused flavor, and the crumbly topping adds a delightful crunch.
It’s an excellent choice for a coffee break, brunch, or even as an after-dinner dessert. Let’s plunge into the ingredients and instructions needed to make this delicious Rich Coffee Cake.
Ingredients (serving size: 4-6 people):
- 1 cup all-purpose flour
- 1 cup granulated sugar
- 1/2 cup unsalted butter, softened
- 1 teaspoon baking powder
- 1/2 teaspoon baking soda
- 1/4 teaspoon salt
- 2 large eggs
- 1/2 cup brewed strong coffee, cooled
- 1 teaspoon vanilla extract
- 1/2 cup sour cream
Cooking Instructions:
- Preheat the Oven: Begin by preheating your oven to 350°F (175°C). Grease and flour an 8-inch square baking pan to guarantee the cake doesn’t stick.
- Mix Dry Ingredients: In a medium bowl, sift together the flour, baking powder, baking soda, and salt. This ensures that the leavening agents are evenly distributed throughout the flour.
- Cream Butter and Sugar: In a large bowl, use an electric mixer to cream the softened butter and granulated sugar until the mixture is light and fluffy. This should take about 3-5 minutes.
- Add Eggs and Vanilla: Add the eggs one at a time to the butter-sugar mixture, beating well after each addition. Stir in the vanilla extract to combine.
- Incorporate Coffee and Sour Cream: Gradually mix in the cooled brewed coffee and sour cream. This will add moisture and a rich flavor to the cake.
- Combine Wet and Dry Ingredients: Slowly add the dry ingredients to the wet mixture, stirring gently until just combined. Be careful not to overmix, as this can make the cake tough.
- Bake the Cake: Pour the batter into the prepared baking pan and smooth the top with a spatula. Bake for 30-35 minutes, or until a toothpick inserted into the center comes out clean.
- Cool and Serve: Once baked, remove the cake from the oven and let it cool in the pan for about 10 minutes. Then, transfer it to a wire rack to cool completely before serving.
Extra Tips:
For the best flavor, use freshly brewed coffee that has been allowed to cool to room temperature. You can also experiment with different types of coffee to adjust the intensity of the flavor.
To add an extra dimension, consider sprinkling some cinnamon or chocolate chips into the batter before baking. If you prefer a more decadent version, drizzle a simple glaze made of powdered sugar and coffee over the cooled cake.
This Rich Coffee Cake pairs wonderfully with a cup of hot coffee or tea. Enjoy!
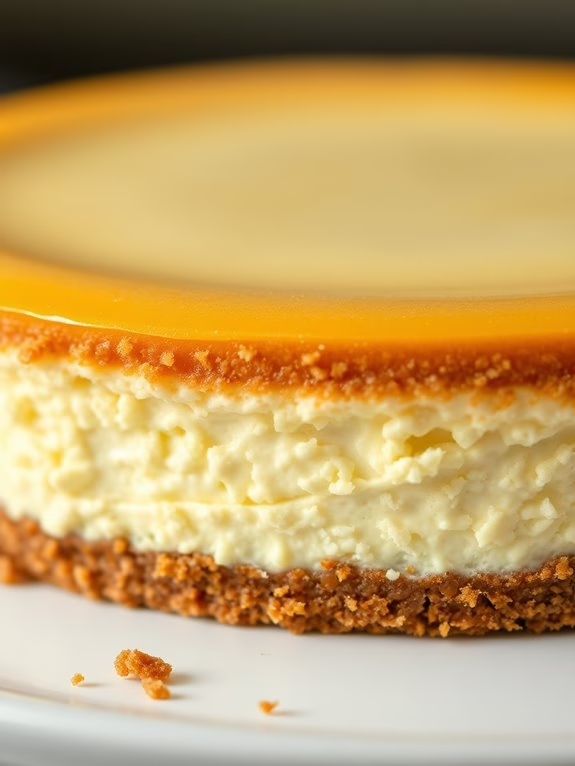
Basic Cheesecake
Basic Cheesecake
Cheesecake is a classic dessert that boasts a rich, creamy texture and a delicate balance of flavors. This basic cheesecake recipe is perfect for those who crave a traditional, no-frills dessert that’s both simple to make and absolutely delicious. With just a handful of ingredients, you can create a dessert that will impress your family and friends.
Whether you’re making it for a special occasion or just to satisfy a sweet tooth, this cheesecake is bound to be a hit. This recipe yields a creamy and smooth cheesecake with a buttery graham cracker crust. It’s perfect for serving 4-6 people, making it an ideal dessert for a small gathering or family dinner.
The process is straightforward, and with a little patience, you’ll have a homemade cheesecake that rivals any bakery. Follow the steps below to create this delectable treat in your very own kitchen.
Ingredients:
- 1 1/2 cups graham cracker crumbs
- 1/4 cup unsalted butter, melted
- 1 tablespoon granulated sugar
- 2 (8-ounce) packages cream cheese, softened
- 3/4 cup granulated sugar
- 2 large eggs
- 1 teaspoon vanilla extract
- 1/4 cup sour cream
Instructions:
1. Prepare the Crust: Preheat your oven to 325°F (163°C). In a medium bowl, combine the graham cracker crumbs, melted butter, and 1 tablespoon of granulated sugar. Mix until the crumbs are evenly coated.
Press the mixture firmly into the bottom of a 9-inch springform pan, guaranteeing an even layer. Bake for 10 minutes, then remove from the oven and let cool while you prepare the filling.
2. Make the Filling: In a large mixing bowl, beat the softened cream cheese with a hand mixer until smooth and creamy. Gradually add 3/4 cup of granulated sugar, continuing to beat until well combined.
Add the eggs, one at a time, beating well after each addition. Stir in the vanilla extract and sour cream, mixing until the filling is smooth and homogeneous.
3. Assemble the Cheesecake: Pour the cream cheese filling over the prepared crust in the springform pan. Use a spatula to smooth out the top, guaranteeing an even layer.
4. Bake the Cheesecake: Place the springform pan on a baking sheet to catch any drips. Bake in the preheated oven for 45-50 minutes, or until the center is set and the edges are lightly golden.
The center should still have a slight jiggle when you lightly shake the pan.
5. Cool and Chill: Remove the cheesecake from the oven and let it cool in the pan for about 10 minutes. Run a knife around the edge of the pan to loosen the cheesecake, then let it cool to room temperature.
Cover and refrigerate for at least 4 hours, or overnight for the best results.
Extra Tips:
To ascertain a smooth cheesecake without any cracks, make sure your cream cheese is at room temperature before you start mixing. This will help it blend more easily with the other ingredients.
Additionally, avoid overbaking your cheesecake; the center should still jiggle slightly when you take it out of the oven, as it will continue to set as it cools.
If you’re feeling adventurous, you can add a fruit topping or a drizzle of chocolate sauce for an extra touch of flavor. Enjoy your delicious homemade basic cheesecake!
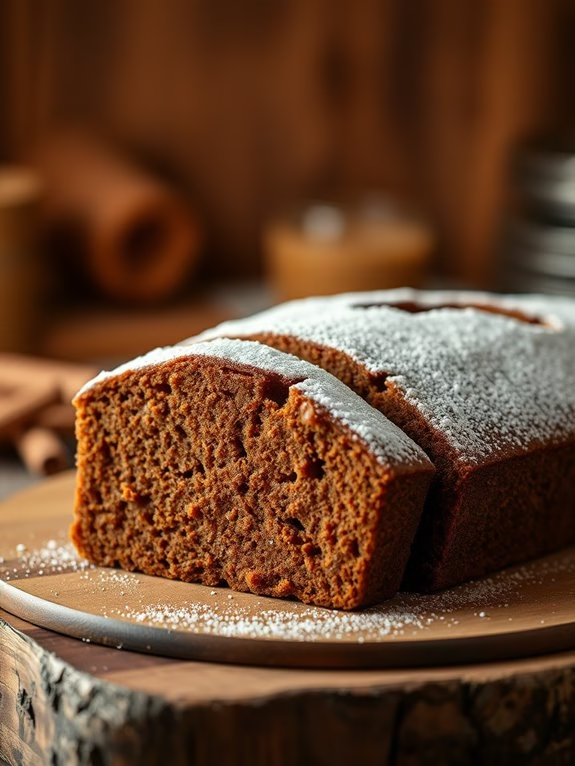
Gingerbread Cake
Gingerbread Cake
Gingerbread cake is a delightful dessert that’s perfect for any occasion, especially during the festive season. The warm spices and rich molasses flavor make this cake a comforting treat that pairs wonderfully with a dollop of whipped cream or a scoop of vanilla ice cream.
This easy homemade recipe allows you to enjoy the nostalgic taste of gingerbread in cake form, bringing a cozy and inviting aroma to your kitchen.
This gingerbread cake recipe is designed to serve 4-6 people, making it ideal for a family gathering or a small party. The cake is moist and fluffy, with just the right amount of spice to tantalize your taste buds. Follow these simple steps and gather the ingredients listed below to create your own delicious gingerbread cake from scratch.
Ingredients:
- 1 1/2 cups all-purpose flour
- 1 teaspoon baking soda
- 1 teaspoon ground cinnamon
- 1 teaspoon ground ginger
- 1/2 teaspoon ground cloves
- 1/4 teaspoon salt
- 1/2 cup unsalted butter, softened
- 1/2 cup brown sugar
- 1/2 cup molasses
- 1 large egg
- 1 teaspoon vanilla extract
- 3/4 cup hot water
Instructions:
- Preheat and Prepare: Preheat your oven to 350°F (175°C). Grease and flour an 8-inch square baking pan to prevent the cake from sticking.
- Mix Dry Ingredients: In a medium bowl, whisk together the flour, baking soda, cinnamon, ginger, cloves, and salt. This guarantees the spices are evenly distributed throughout the cake.
- Cream Butter and Sugar: In a large bowl, use an electric mixer to cream the softened butter and brown sugar together until light and fluffy. This process should take about 3 minutes.
- Add Molasses and Egg: Beat in the molasses, followed by the egg and vanilla extract. Mix until well combined, ensuring a smooth consistency.
- Combine Wet and Dry Ingredients: Gradually add the dry ingredients to the wet mixture, alternating with the hot water. Begin and end with the dry ingredients, mixing just until combined after each addition. The hot water helps to create a smooth batter.
- Pour and Bake: Pour the batter into the prepared baking pan, spreading it evenly with a spatula. Bake for 35-40 minutes, or until a toothpick inserted into the center of the cake comes out clean.
- Cool and Serve: Allow the cake to cool in the pan for about 10 minutes before transferring it to a wire rack to cool completely. Serve warm or at room temperature, optionally with whipped cream or ice cream.
Extra Tips:
To enhance the flavor of your gingerbread cake, consider adding a pinch of nutmeg for a deeper spice profile. If you prefer a sweeter cake, increase the brown sugar to 3/4 cup.
For an added texture and flavor, you can fold in a half-cup of raisins or chopped nuts into the batter before baking. Remember, the key to a moist gingerbread cake isn’t over-mixing the batter and guaranteeing the oven is properly preheated before baking.
Enjoy your homemade gingerbread cake with a cup of spiced tea or coffee for the ultimate cozy treat.
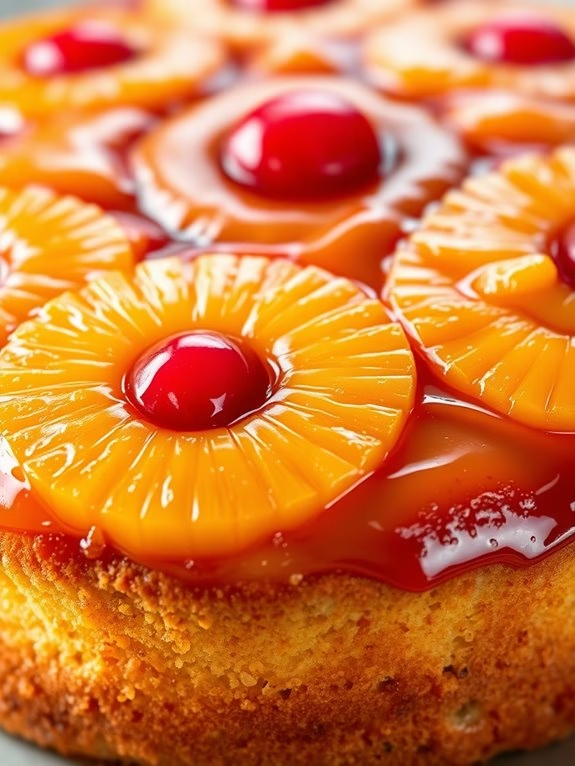
Pineapple Upside-Down Cake
Pineapple Upside-Down Cake
Pineapple Upside-Down Cake is a classic dessert that combines the tropical sweetness of pineapple with the rich flavors of caramelized sugar and butter. The cake is known for its stunning presentation, with golden pineapple slices and bright maraschino cherries adorning the top once it’s flipped out of its baking pan.
Perfect for a cozy family gathering or a festive occasion, this moist and flavorful cake is a delightful treat that’s surprisingly easy to prepare at home. This homemade version of the Pineapple Upside-Down Cake brings a nostalgic twist to your kitchen with simple ingredients that you likely already have on hand.
The recipe creates a light and fluffy cake base that perfectly complements the sweet and tangy topping. Suitable for a serving size of 4-6 people, this cake is sure to impress your family and guests alike. Enjoy the process of baking this delightful cake, which is as much fun to make as it’s to eat.
Ingredients (Serves 4-6):
- 1/4 cup unsalted butter
- 1/2 cup packed light brown sugar
- 1 can (20 oz) pineapple slices in juice, drained
- Maraschino cherries
- 1 1/2 cups all-purpose flour
- 2 teaspoons baking powder
- 1/4 teaspoon salt
- 1/2 cup unsalted butter, softened
- 1 cup granulated sugar
- 2 large eggs
- 1 teaspoon vanilla extract
- 1/2 cup whole milk
Cooking Instructions:
1. Prepare the Pan and Topping: Preheat your oven to 350°F (175°C). In a 9-inch round cake pan, melt 1/4 cup of unsalted butter over low heat. Once melted, remove from heat and sprinkle with 1/2 cup of packed light brown sugar evenly across the bottom.
Arrange the pineapple slices in a single layer over the sugar mixture. Place a maraschino cherry in the center of each pineapple slice and any additional cherries in the gaps between slices.
2. Mix Dry Ingredients: In a medium bowl, whisk together 1 1/2 cups of all-purpose flour, 2 teaspoons of baking powder, and 1/4 teaspoon of salt. Set aside.
3. Cream Butter and Sugar: In a large bowl, cream together 1/2 cup of softened unsalted butter and 1 cup of granulated sugar until light and fluffy. This should take about 3-4 minutes using an electric mixer on medium speed.
4. Add Eggs and Vanilla: Beat in the eggs, one at a time, making sure each is fully incorporated before adding the next. Stir in 1 teaspoon of vanilla extract.
5. Combine Wet and Dry: Gradually add the dry ingredients to the butter mixture, alternating with 1/2 cup of whole milk. Begin and end with the flour mixture. Mix until just combined, being careful not to overmix.
6. Bake the Cake: Pour the batter over the arranged pineapple and cherries in the cake pan, spreading it evenly. Tap the pan gently on the countertop to remove any air bubbles. Bake in the preheated oven for 35-40 minutes, or until a toothpick inserted into the center comes out clean.
7. Cool and Invert: Allow the cake to cool in the pan on a wire rack for 5 minutes. Run a knife around the edges to loosen it, then carefully invert the cake onto a serving plate. Let it sit for a few minutes so the topping can settle before removing the pan.
Extra Tips:
For the best results, make sure to drain the pineapple slices thoroughly to avoid making the cake soggy. If you prefer a more caramelized flavor, you can increase the brown sugar topping slightly.
Additionally, using room temperature ingredients, particularly the eggs and butter, helps achieve a smoother batter and better rise. Remember to let the cake cool slightly before inverting to make sure the topping stays intact.
Enjoy your homemade Pineapple Upside-Down Cake warm or at room temperature, possibly with a dollop of whipped cream or a scoop of vanilla ice cream for an extra indulgent treat.