

I’m so excited to share a collection of Christmas tree appetizer recipes that will brighten up your holiday table. Picture spinach and cheese nestled in golden puff pastry or vibrant guacamole shaped into a festive tree. These dishes taste amazing and add a playful touch to your gatherings. Whether you’re craving something savory or sweet, each recipe brings its own twist on holiday flavors. Ready to explore these delightful creations?
Spinach and Cheese Christmas Tree Puff Pastry

Spinach and Cheese Christmas Tree Puff Pastry is a festive and delicious appetizer that’s perfect for holiday gatherings. This dish combines the creamy richness of cheese with the earthy tones of spinach, all wrapped in a golden, flaky puff pastry. The presentation resembles a Christmas tree, making it not only a tasty treat but also a decorative centerpiece for your holiday table.
This appetizer is easy to prepare and will undoubtedly impress your guests with its delightful combination of flavors and its charming appearance. The recipe is designed to serve 4-6 people, making it an ideal starter for a small holiday party or family gathering.
The preparation involves simple steps, allowing you to enjoy more time with your loved ones during the holiday season. With readily available ingredients, this recipe is convenient to whip up without the need for extensive planning or shopping trips. Whether you’re hosting a festive dinner or attending a potluck, this Spinach and Cheese Christmas Tree Puff Pastry will undoubtedly be a hit.
Ingredients (Serves 4-6):
- 1 sheet of puff pastry, thawed
- 1 cup of fresh spinach, chopped
- 1/2 cup of ricotta cheese
- 1/2 cup of grated mozzarella cheese
- 1/4 cup of grated Parmesan cheese
- 1 clove of garlic, minced
- 1 egg, beaten
- Salt and pepper to taste
- 1 tablespoon of olive oil
- 1 tablespoon of milk (for egg wash)
Cooking Instructions:
- Preheat the Oven: Start by preheating your oven to 400°F (200°C). Line a baking sheet with parchment paper to prevent sticking.
- Prepare the Filling: In a skillet, heat olive oil over medium heat. Add the minced garlic and sauté for a minute until fragrant. Add the chopped spinach and cook until wilted. Remove from heat and let it cool slightly.
- Mix Cheese and Spinach: In a bowl, combine the ricotta, mozzarella, and Parmesan cheese. Add the cooked spinach and garlic mixture to the cheese and mix well. Season with salt and pepper to taste.
- Roll Out the Puff Pastry: On a lightly floured surface, roll out the thawed puff pastry sheet to a large rectangle, about 12×18 inches. Cut the pastry into two equal halves.
- Assemble the Christmas Tree: On one half of the pastry, spread the spinach and cheese filling evenly, leaving about an inch border. Place the second half of the pastry on top and press the edges to seal.
- Shape the Tree: Using a sharp knife, cut out the shape of a Christmas tree. You can use the excess dough to create ornaments or a star for decoration.
- Create Branches: On each side of the tree, make horizontal cuts from the edge towards the center, leaving the middle intact to form branches. Twist each branch gently for a decorative effect.
- Apply Egg Wash: Mix the beaten egg with a tablespoon of milk and brush the entire surface of the pastry with the mixture. This will give it a golden color as it bakes.
- Bake: Transfer the pastry tree to the prepared baking sheet. Bake in the preheated oven for 20-25 minutes or until the pastry is puffed and golden brown.
- Serve: Once baked, let it cool slightly before serving. It can be served warm or at room temperature.
Extra Tips:
For added flavor, consider sprinkling some dried herbs such as oregano or thyme over the filling before sealing the pastry. If you prefer a spicier kick, a pinch of red pepper flakes can also be added to the spinach and cheese mixture.
Confirm the puff pastry is adequately thawed before rolling it out to prevent it from cracking. If you’re short on time, the filling can be prepared a day in advance and stored in the refrigerator. Just assemble and bake on the day of your event for a fresh, warm appetizer.
Caprese Salad Christmas Tree Skewers
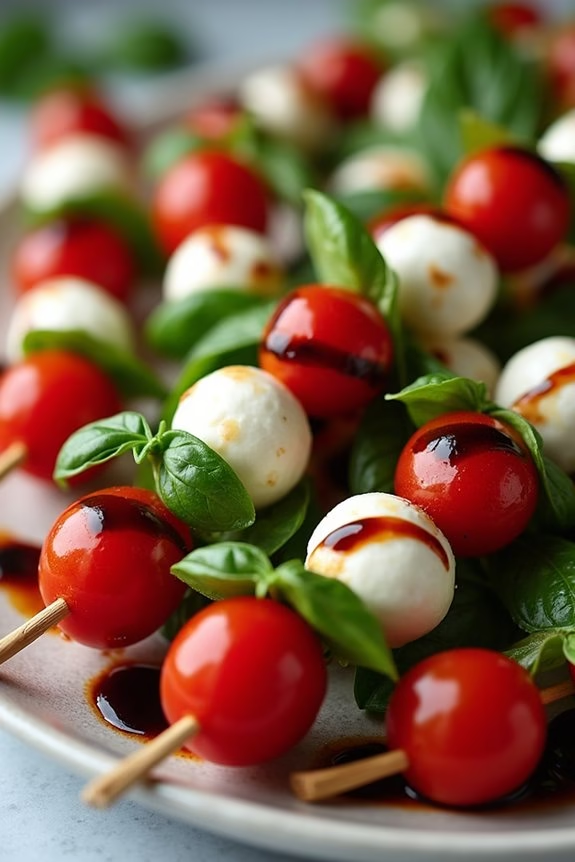
Caprese Salad Christmas Tree Skewers are a festive and delicious appetizer perfect for your holiday gatherings. These skewers bring together the classic flavors of a traditional Caprese salad, including fresh mozzarella, juicy cherry tomatoes, and fragrant basil, all arranged in the whimsical shape of a Christmas tree. Not only do they taste amazing, but they also add a fun and colorful touch to your holiday table, making them a hit with both adults and kids alike.
This dish is incredibly easy to prepare, requiring minimal cooking and allowing you to spend more time with your guests. The combination of fresh ingredients guarantees a burst of flavor in every bite, while a drizzle of balsamic glaze adds a touch of sweetness and tang. Serve these Caprese Salad Christmas Tree Skewers as a starter or as part of a larger holiday spread, and watch them disappear in no time.
Ingredients (Serves 4-6):
- 24 cherry tomatoes
- 24 mini mozzarella balls (bocconcini)
- 24 fresh basil leaves
- 12 wooden skewers
- 2 tablespoons extra virgin olive oil
- Salt and pepper to taste
- Balsamic glaze for drizzling
Instructions:
- Prepare Ingredients: Start by rinsing the cherry tomatoes and basil leaves under cold water. Pat them dry with a paper towel. Drain the mozzarella balls from their liquid.
- Assemble Skewers: Take a wooden skewer and begin by threading a cherry tomato onto it. Follow with a basil leaf, then a mozzarella ball. Repeat this sequence two more times, so each skewer has three of each ingredient, creating a pattern that resembles the branches of a tree.
- Repeat the Process: Continue assembling the rest of the skewers in the same manner until all ingredients are used up. You should have 12 skewers in total.
- Season Skewers: Arrange the skewers on a serving platter in the shape of a Christmas tree. Drizzle the skewers with extra virgin olive oil, and sprinkle lightly with salt and pepper to enhance the flavors.
- Add Finishing Touch: Just before serving, drizzle each skewer with balsamic glaze for a festive and flavorful finish.
Extra Tips:
For best results, use the freshest mozzarella and basil you can find, as their flavors will really shine in this dish. If you prefer a more intense flavor, consider using marinated mozzarella balls.
You can make these skewers a few hours in advance and store them in the refrigerator; just be sure to add the balsamic glaze right before serving to keep them looking their best. If you’re serving a larger crowd, simply double the ingredient amounts to accommodate more guests.
Guacamole Christmas Tree Platter
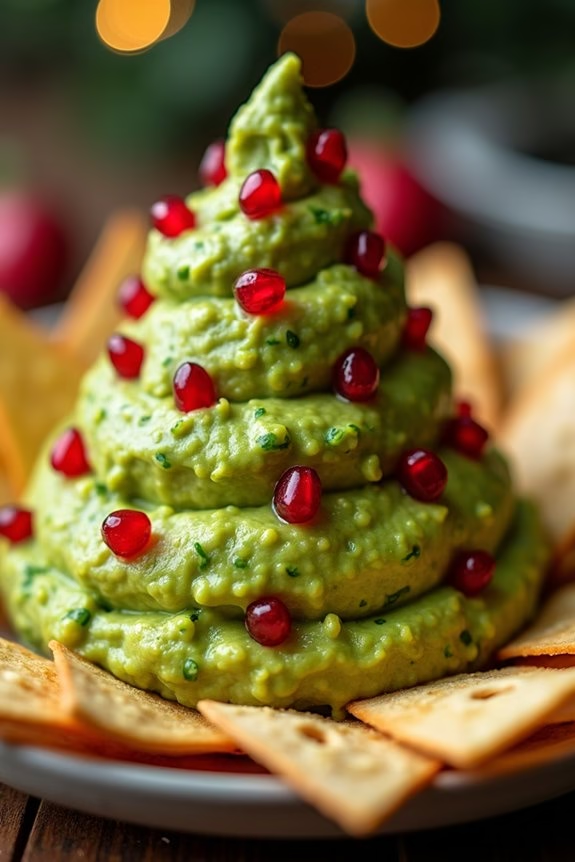
Guacamole Christmas Tree Platter is a festive and delicious way to serve a classic appetizer during the holiday season. This dish combines the creamy richness of homemade guacamole with the visual appeal of a Christmas tree, complete with colorful vegetable decorations to mimic ornaments. Perfect for a holiday gathering, this platter not only satisfies the taste buds but also serves as a stunning centerpiece on your table.
Crafting this Guacamole Christmas Tree Platter is both simple and fun, making it an ideal recipe to prepare with family or friends. The combination of fresh avocados, juicy tomatoes, and crisp bell peppers guarantees a burst of flavor in every bite. Serve this dish with your favorite tortilla chips or sliced baguette for a complete appetizer that your guests will love. This recipe serves 4-6 people, making it perfect for intimate holiday gatherings.
Ingredients:
- 3 ripe avocados
- 1 lime, juiced
- 1/2 teaspoon salt
- 1/2 teaspoon ground cumin
- 1/4 teaspoon cayenne pepper
- 1/2 medium onion, diced
- 2 Roma tomatoes, diced
- 1 tablespoon fresh cilantro, chopped
- 1 clove garlic, minced
- 1 small bell pepper (red or yellow), diced
- 1/4 cup pomegranate seeds
- Tortilla chips or sliced baguette for serving
Instructions:
- Prepare the Avocados: Cut the avocados in half, remove the pits, and scoop the flesh into a mixing bowl. Use a fork to mash the avocados to your desired consistency, either smooth or slightly chunky.
- Season the Guacamole: Add the lime juice, salt, ground cumin, and cayenne pepper to the mashed avocados. Mix well to ascertain all the ingredients are evenly distributed.
- Add the Vegetables: Stir in the diced onion, tomatoes, chopped cilantro, and minced garlic. Mix until all ingredients are well incorporated.
- Shape the Christmas Tree: On a large serving platter, spread the guacamole in the shape of a Christmas tree. Use a spatula or the back of a spoon to smooth the edges and create a triangular shape with a flat base.
- Decorate the Tree: Sprinkle the diced bell pepper over the guacamole to mimic the look of Christmas lights or ornaments. Add pomegranate seeds for a pop of color and festive touch.
- Serve: Arrange tortilla chips or sliced baguette around the base of the guacamole tree for easy dipping.
Extra Tips:
When choosing avocados, verify they’re ripe but firm to the touch for the best guacamole texture. If you prefer a spicier version, feel free to add diced jalapeños to the mix.
To prevent the guacamole from browning, press a piece of plastic wrap directly on the surface before refrigerating. This platter is best served fresh, but if you need to prepare it in advance, keep the guacamole covered and add the bell pepper and pomegranate seeds just before serving to maintain their crispness and color.
Christmas Tree Cheese Ball
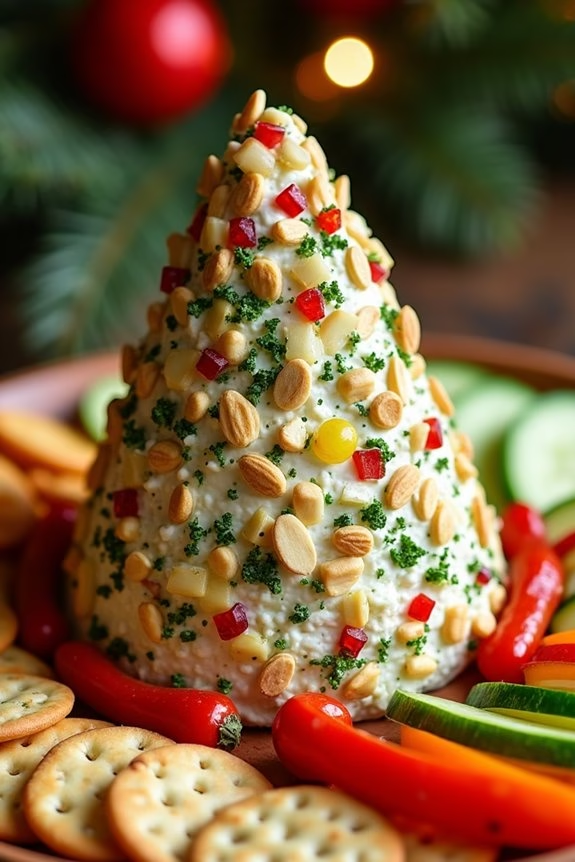
The Christmas Tree Cheese Ball is a festive and delightful appetizer that captures the spirit of the holiday season. This dish isn’t only visually appealing with its Christmas tree shape but also bursting with flavor, making it a perfect centerpiece for your holiday gatherings.
The creamy cheese mixture, combined with a variety of herbs and spices, offers a savory taste that pairs wonderfully with crackers or fresh vegetables. This recipe is designed to serve 4-6 people, making it an ideal choice for small to medium-sized gatherings.
Whether you’re hosting a Christmas party or looking for a fun dish to bring to a potluck, this cheese ball will certainly impress your guests. Its preparation is straightforward, allowing you to create a masterpiece without spending hours in the kitchen.
Ingredients:
- 16 oz cream cheese, softened
- 1 ½ cups sharp cheddar cheese, shredded
- 2 tablespoons sour cream
- 1 teaspoon garlic powder
- 1 teaspoon onion powder
- 1 teaspoon Worcestershire sauce
- 1 tablespoon fresh parsley, chopped
- 2 tablespoons fresh chives, chopped
- ¼ cup finely chopped red bell pepper
- ¼ cup finely chopped green bell pepper
- ¼ cup finely chopped green onions
- ½ cup sliced almonds
- Crackers or sliced vegetables, for serving
Instructions:
- Mix the Base: In a large mixing bowl, combine the softened cream cheese, shredded cheddar cheese, sour cream, garlic powder, onion powder, and Worcestershire sauce. Mix until all the ingredients are well incorporated and the mixture is smooth.
- Add Herbs and Veggies: Gently fold in the chopped parsley, chives, red bell pepper, green bell pepper, and green onions. Confirm that the vegetables and herbs are evenly distributed throughout the cheese mixture.
- Shape the Cheese Ball: Transfer the cheese mixture onto a piece of plastic wrap. Shape it into a cone to resemble a Christmas tree. Wrap the plastic wrap tightly around the cheese ball to help it maintain its shape. Refrigerate for at least 2 hours or until firm.
- Decorate the Tree: Once the cheese ball is firm, remove the plastic wrap. Press the sliced almonds gently into the cheese ball to resemble tree bark or branches. Arrange additional pieces of chopped bell peppers and herbs to decorate the tree, mimicking ornaments.
- Serve: Place the cheese tree on a serving platter. Surround it with an assortment of crackers or sliced vegetables for dipping. Serve immediately or refrigerate until ready to serve.
Extra Tips:
To achieve the best flavor, it’s recommended to prepare the Christmas Tree Cheese Ball a day in advance. This allows the flavors to meld together beautifully.
If you’re short on time, you can also use store-bought herb cheese spread as a base and simply shape and decorate it as directed. Be creative with your decorations; you can add pomegranate seeds for a pop of color or use pretzel sticks as a tree trunk.
Don’t forget to taste and adjust the seasoning before shaping the cheese ball, confirming it’s perfectly balanced to your taste.
Antipasto Christmas Tree Platter

The Antipasto Christmas Tree Platter is a festive and visually appealing appetizer that brings a touch of holiday spirit to any gathering. This dish combines a variety of Italian antipasto elements arranged creatively in the shape of a Christmas tree. Not only does it look stunning on the table, but it also provides a delightful array of flavors, offering a perfect balance of savory, tangy, and fresh tastes.
It’s an ideal choice for those who want to impress their guests with minimal effort and maximum impact. This platter is versatile and allows you to customize it with your favorite antipasto ingredients. It’s a great way to serve a variety of flavors and textures in a single dish. The key is to choose ingredients that complement each other well and arrange them thoughtfully to resemble a holiday tree.
This recipe will serve 4-6 people, making it perfect for small gatherings or as a part of a larger spread at a holiday party.
Ingredients:
- 8 ounces of cured meats (such as salami, prosciutto, or pepperoni)
- 8 ounces of assorted cheeses (such as mozzarella, provolone, or cheddar)
- 1 cup of cherry tomatoes
- 1 cup of mixed olives (green and black)
- 1 cup of marinated artichoke hearts
- 1/2 cup of roasted red peppers
- 1/2 cup of pickled mushrooms
- Fresh basil leaves for garnish
- Crackers or breadsticks for serving
Instructions:
- Prepare the Ingredients: Begin by slicing the cured meats and cheeses into bite-sized pieces. Halve the cherry tomatoes and drain the olives, artichoke hearts, roasted red peppers, and pickled mushrooms to remove excess liquid.
- Create the Tree Base: On a large platter or cutting board, start forming the base of the Christmas tree by placing a layer of crackers or breadsticks in a triangular shape, leaving room at the bottom for a tree trunk.
- Layer the Meats and Cheeses: Arrange the sliced cured meats and cheeses over the cracker base in alternating rows. Start with a layer of meats, followed by a layer of cheese, ensuring the layers taper towards the top to maintain the tree shape.
- Add the Vegetables: Distribute the cherry tomatoes, mixed olives, marinated artichoke hearts, roasted red peppers, and pickled mushrooms over the layers of meats and cheeses. Scatter them in a way that resembles ornaments on the tree.
- Garnish: Finish the platter by tucking fresh basil leaves in between the layers to add a pop of green and a festive touch. Place a few basil leaves at the top to mimic a star.
- Final Touches: If desired, you can add additional garnishes such as a sprinkle of freshly ground black pepper or a drizzle of olive oil for extra flavor.
Extra Tips:
When assembling the Antipasto Christmas Tree Platter, aim for a balance of colors and textures to make the presentation more appealing. Feel free to substitute or add any other antipasto favorites such as marinated mozzarella balls, sun-dried tomatoes, or artichoke dip.
For easy serving, have toothpicks available for guests to pick up individual bites. If preparing in advance, cover the platter with plastic wrap and store it in the refrigerator until ready to serve, but add the fresh basil leaves just before serving to keep them fresh and vibrant.
Christmas Tree Veggie Tray

Celebrate the festive season with a healthy and fun Christmas Tree Veggie Tray that will be the centerpiece of your holiday appetizer spread. This delightful creation isn’t only visually appealing but also packed with fresh, crunchy vegetables that everyone will love.
Perfect for a crowd, this veggie tray is a great way to encourage kids and adults alike to enjoy their veggies in a playful and creative manner.
The Christmas Tree Veggie Tray is designed to be simple yet impressive, using a variety of colorful vegetables to mimic the lush green branches of a Christmas tree adorned with vibrant decorations. It’s a versatile dish that allows you to customize the veggies according to your preference or what’s readily available.
Serve it with a delicious dip of your choice to add an extra layer of flavor, and you’ll have a winning appetizer for your holiday celebrations.
Ingredients (Serves 4-6 people):
- 1 large head of broccoli
- 1 large cucumber
- 1 red bell pepper
- 1 yellow bell pepper
- 1 cup cherry tomatoes
- 1 cup baby carrots
- 1/2 cup sliced black olives
- 1 small head of cauliflower
- 1 block of cheddar cheese (for star and decorations)
- Fresh parsley or dill (for garnish)
- Your choice of dip (e.g., ranch, hummus, or yogurt dip)
Instructions:
1. Prepare the Vegetables:
Begin by washing all the vegetables thoroughly under cold running water. Pat them dry with a clean towel or paper towels to remove any excess moisture.
2. Cut the Broccoli and Cauliflower:
Separate the broccoli and cauliflower into small florets. These will form the bulk of your Christmas tree and snowy base, respectively.
3. Slice the Cucumber:
Cut the cucumber into thin, round slices. These will be used to create the garlands on your tree.
4. Chop the Bell Peppers:
Dice the red and yellow bell peppers into small squares. These colorful pieces will act as ornaments for your Christmas tree.
5. Prepare the Cherry Tomatoes and Carrots:
Halve the cherry tomatoes and arrange the baby carrots as they are, to add more variety and color to your tray.
6. Create the Tree Base:
On a large platter or cutting board, arrange the broccoli florets in a triangular shape to form the Christmas tree. Place the cauliflower florets at the bottom to simulate snow.
7. Decorate the Tree:
Use cucumber slices to create garlands across the broccoli tree. Scatter the red and yellow bell pepper pieces along the tree as if they were ornaments. Add halved cherry tomatoes and sliced black olives for additional decoration.
8. Form the Tree Star:
Cut a star shape out of the cheddar cheese block and place it at the top of the tree.
9. Garnish and Serve:
Add sprigs of fresh parsley or dill around the tree for a more festive look. Place your chosen dip in a small bowl at the base of the tree or alongside the tray, and your Christmas Tree Veggie Tray is ready to serve!
Extra Tips:
To keep your Christmas Tree Veggie Tray looking fresh, prepare all the vegetables and arrange them on the tray just before serving.
If you need to prepare in advance, store vegetables in airtight containers in the refrigerator and assemble the tray close to serving time.
For added crunch, consider including other vegetables like sugar snap peas or radishes, and experiment with different shapes and sizes for the cheese decorations.
With a bit of creativity, this veggie tray can easily adapt to any dietary preference or theme.
Pesto Christmas Tree Pizza

Pesto Christmas Tree Pizza is a delightful and festive appetizer perfect for holiday gatherings. This dish combines the rich flavors of pesto with the cheesy goodness of a classic pizza, all shaped into a charming Christmas tree. It’s not only a feast for the taste buds but also a visual treat that will surely impress your family and friends.
The flaky, golden-brown pastry serves as the canvas for this culinary masterpiece, topped with vibrant green pesto and finished with a scattering of mozzarella cheese and cherry tomatoes that mimic the decorations on a Christmas tree.
Making Pesto Christmas Tree Pizza is both fun and easy, making it a great activity to involve kids in holiday preparations. This recipe is designed to serve 4-6 people, so adjust the quantities if you’re hosting a larger party. The key to a successful Christmas tree pizza lies in the presentation, so take your time shaping and decorating it to perfection.
With the right ingredients and a little creativity, you’ll have a festive appetizer that looks as good as it tastes.
Ingredients (Serving Size: 4-6 people):
- 1 sheet of puff pastry, thawed
- 1/2 cup pesto sauce
- 1 cup shredded mozzarella cheese
- 10-12 cherry tomatoes, halved
- 1 egg, beaten (for egg wash)
- Fresh basil leaves for garnish (optional)
Instructions:
- Prepare the Puff Pastry: Preheat your oven to 400°F (200°C). Roll out the puff pastry on a lightly floured surface to approximately a 12×16 inch rectangle. Cut the pastry into the shape of a Christmas tree, making sure to include the trunk and branches.
- Add the Pesto: Spread the pesto sauce evenly over the entire surface of the pastry tree, leaving a small margin around the edges to prevent overflow during baking.
- Sprinkle Cheese: Generously sprinkle the shredded mozzarella cheese over the pesto layer, ensuring an even distribution for each bite to be cheesy and delicious.
- Decorate with Tomatoes: Arrange the halved cherry tomatoes on top of the cheese, mimicking the look of ornaments on a tree. Press them gently into the cheese so they adhere during baking.
- Egg Wash and Bake: Brush the edges of the pastry with the beaten egg to give it a nice golden color once baked. Transfer the pastry to a baking sheet lined with parchment paper and bake in the preheated oven for 15-20 minutes, or until the pastry is puffed and golden brown.
- Garnish and Serve: Once baked, remove the Pesto Christmas Tree Pizza from the oven and let it cool slightly. Garnish with fresh basil leaves, if desired, to enhance the festive look. Serve warm and enjoy!
Extra Tips:
When preparing the Pesto Christmas Tree Pizza, verify your puff pastry is properly thawed but still cold to the touch; this makes it easier to handle and shape.
Consider using a sharp knife for precise cutting of the pastry into a tree shape. If you prefer a more robust flavor, you can sprinkle a bit of parmesan cheese along with the mozzarella.
Additionally, for a more colorful presentation, you might add other toppings like red bell pepper strips or olives to mimic additional decorations.
Remember to watch the pizza closely while baking to prevent over-browning, and serve it fresh from the oven for the best taste and texture.
Christmas Tree Fruit Platter
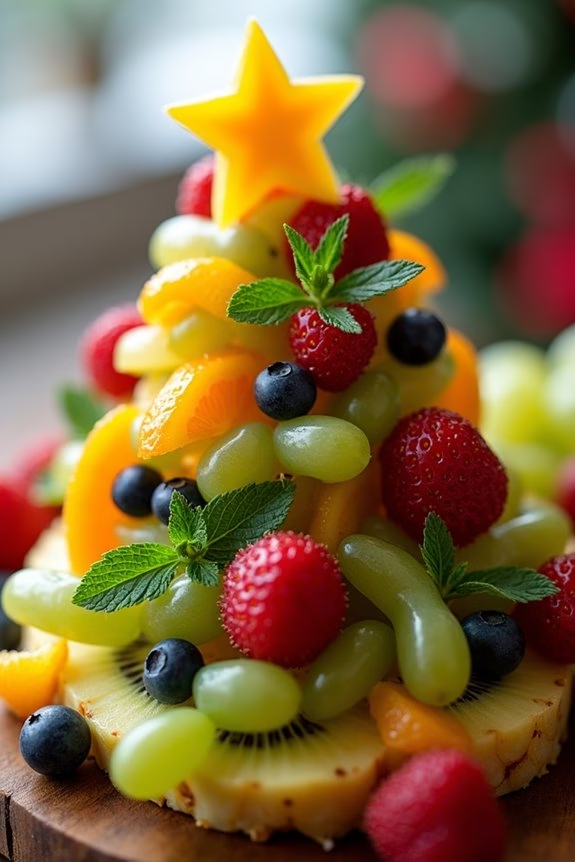
Create a stunning centerpiece for your holiday table with a Christmas Tree Fruit Platter. This festive and healthy appetizer isn’t only eye-catching but also delicious and invigorating. Perfect for family gatherings or holiday parties, this platter will add a burst of color to your spread and offer a healthier alternative to more indulgent holiday treats.
With a variety of fruits arranged to resemble a Christmas tree, it’s sure to be a crowd-pleaser. The Christmas Tree Fruit Platter is both simple to assemble and customizable to your taste. By using a combination of vibrant fruits, you can create a festive and nutritious option that appeals to guests of all ages.
The key to a successful platter is choosing an assortment of fruits that offer a range of colors and flavors. This recipe serves 4-6 people, making it ideal for small gatherings or as part of a larger buffet.
Ingredients:
- 1 large pineapple
- 1 pint of strawberries
- 1 cup of red grapes
- 1 cup of green grapes
- 2 kiwis
- 1 small starfruit
- 1 cup of blueberries
- Fresh mint leaves (optional, for garnish)
- 1 small orange
Instructions:
- Prepare the Pineapple Base:
- Start by cutting the top and bottom off the pineapple, so it stands upright. Slice the skin off the sides, and then cut the pineapple into thick slices. These slices will form the base of your Christmas tree.
- Shape the Tree:
- Arrange the pineapple slices on a large serving platter in a triangular shape to form the pyramid structure of a Christmas tree. Make sure the widest slice is at the bottom and the narrowest at the top.
- Add the Greenery:
- Peel and slice the kiwis into thin rounds and arrange them over the pineapple to create the appearance of tree foliage. Distribute them evenly to cover most of the pineapple surface.
- Decorate with Fruits:
- Wash the strawberries, remove the stems, and slice them in half. Place them decoratively across the tree. Add clusters of red and green grapes and sprinkle blueberries to fill in gaps and add color contrast.
- Top with a Star:
- Slice the starfruit into thin star-shaped pieces and use one to top your fruit tree as the star.
- Finishing Touches:
- Slice the orange into thin rounds and cut them into smaller segments. Use these to add more color and ornament-like elements to your tree. Finally, tuck a few fresh mint leaves around the fruit for a festive touch.
- Serve:
- Present the platter as a centerpiece and allow guests to help themselves, ensuring each bite is a mix of the vibrant fruits.
Extra Tips:
For the best results, use fresh and ripe fruits for maximum flavor. Feel free to substitute fruits according to preference or availability, such as using raspberries instead of strawberries or adding slices of bananas.
Use a sharp knife for clean cuts, and consider chilling the fruit before assembly to enhance its invigorating quality. If preparing in advance, cover the platter with plastic wrap and refrigerate to keep the fruits fresh and vibrant.
Christmas Tree Sandwich Roll-Ups

Christmas Tree Sandwich Roll-Ups are a festive and delightful addition to your holiday table. These bite-sized treats are perfect as an appetizer or a fun snack for holiday gatherings. Shaped like little Christmas trees, they not only taste delicious but also add a touch of holiday spirit to your spread.
They’re easy to make, require minimal ingredients, and can be customized with your favorite fillings.
These roll-ups are made using soft tortillas filled with a creamy, flavorful spread, fresh veggies, and sliced meats or cheese. After rolling them up tightly, they’re sliced into pinwheels and arranged to resemble little Christmas trees. Perfect for serving 4-6 people, these roll-ups are sure to be a hit at your next holiday party or family gathering.
Ingredients for 4-6 People:
- 4 large spinach or plain flour tortillas
- 8 ounces cream cheese, softened
- 1 tablespoon mayonnaise
- 1 tablespoon Dijon mustard
- 1 teaspoon garlic powder
- 1 teaspoon onion powder
- Salt and pepper to taste
- 1 cup shredded cheese (cheddar or mozzarella)
- 6 slices of deli turkey or ham
- 1 cup baby spinach leaves or mixed greens
- 1 red bell pepper, julienned
- Toothpicks
Cooking Instructions:
- Prepare the Spread: In a mixing bowl, combine the softened cream cheese, mayonnaise, Dijon mustard, garlic powder, onion powder, salt, and pepper. Mix until smooth and well blended.
- Spread the Mixture: Lay one tortilla flat on a clean surface. Use a spatula to spread a generous layer of the cream cheese mixture over the entire surface of the tortilla.
- Add Fillings: Evenly sprinkle a quarter of the shredded cheese over the spread. Layer 1-2 slices of deli meat, a handful of spinach leaves, and a few strips of red bell pepper on top.
- Roll the Tortilla: Starting from one edge, tightly roll the tortilla into a log shape. Verify it’s rolled tightly so the fillings stay in place.
- Repeat the Process: Repeat steps 2 to 4 for the remaining tortillas.
- Chill the Rolls: Place the rolled tortillas in the refrigerator for about 30 minutes. This helps the roll-ups firm up and makes them easier to slice.
- Slice into Pinwheels: After chilling, use a sharp knife to slice each rolled tortilla into 1-inch thick pinwheels.
- Arrange and Serve: Arrange the pinwheels on a platter in a tree shape, starting with a wide base and tapering to a point at the top. Secure each pinwheel with a toothpick if needed.
Extra Tips:
For a more colorful and festive look, consider using a combination of spinach and tomato tortillas. You can also add more vegetables like shredded carrots or cucumbers for added crunch.
If you prefer vegetarian options, omit the deli meat and add more veggies or substitute with hummus for a different flavor profile.
To guarantee your roll-ups hold their shape, let them chill sufficiently before slicing. Adjust the fillings and spreads to suit your taste preferences and dietary needs, making these roll-ups a versatile and crowd-pleasing appetizer.
Christmas Tree Deviled Eggs

Bring a festive touch to your holiday table with these delightful Christmas Tree Deviled Eggs. Perfect as an appetizer or a playful addition to your holiday buffet, these deviled eggs are both delicious and visually appealing. By using simple ingredients and a few creative touches, you’ll transform ordinary deviled eggs into little edible Christmas trees, adding a touch of whimsy to your celebrations.
The bright colors and fun presentation make them a hit with both kids and adults, promising to provide smiles and good cheer to your gathering. The creamy yolk filling, flavored with classic ingredients like mayonnaise and mustard, is piped into egg white halves and adorned with tiny vegetable “ornaments” to resemble a Christmas tree. The addition of fresh herbs not only enhances the flavor but also gives the eggs a vibrant green hue.
This recipe is designed to serve 4-6 people, making it an ideal choice for a small holiday get-together or as part of a larger spread of appetizers.
Ingredients (serving size: 4-6 people):
- 6 large eggs
- 1/4 cup mayonnaise
- 1 teaspoon Dijon mustard
- 1/2 teaspoon white vinegar
- Salt and pepper to taste
- 1/2 teaspoon paprika
- 1 tablespoon finely chopped fresh parsley
- 1 tablespoon finely chopped fresh chives
- Cherry tomatoes, cut into small pieces
- Small broccoli florets
- 6 pretzel sticks (for tree trunks)
Cooking Instructions:
- Boil the Eggs: Place the eggs in a single layer in a saucepan and cover them with cold water. Bring the water to a rolling boil over medium-high heat. Once boiling, remove the saucepan from heat, cover it, and let the eggs sit for 10-12 minutes.
- Cool and Peel: Transfer the eggs to a bowl of ice water to cool for at least 5 minutes. Once cooled, gently tap the eggs on a hard surface and roll them to crack the shell. Peel the eggs carefully and set them aside.
- Prepare the Filling: Slice each egg in half lengthwise and remove the yolks, placing them in a small mixing bowl. Mash the yolks with a fork until smooth. Add the mayonnaise, Dijon mustard, white vinegar, salt, and pepper. Mix until the filling is creamy and well combined.
- Add Color and Flavor: Stir in the finely chopped parsley and chives to the yolk mixture, giving it a green hue reminiscent of a Christmas tree.
- Pipe the Filling: Spoon the yolk mixture into a piping bag fitted with a star tip. Pipe the filling into the egg white halves, forming a small peak to resemble a tree.
- Decorate the Trees: Decorate each “tree” with small pieces of cherry tomatoes and broccoli florets to mimic ornaments. Insert a pretzel stick at the base of each egg to act as the tree trunk.
- Serve: Arrange the deviled eggs on a serving platter. Sprinkle a light dusting of paprika over them for a touch of festive color and serve immediately.
Extra Tips:
For the best results, use eggs that are a few days old as they tend to peel more easily than fresh eggs. When piping the yolk mixture, make sure the filling is smooth to achieve a neat and defined tree shape.
Feel free to get creative with the decorations—use diced red bell pepper or pomegranate seeds for more vibrant “ornaments.” If you don’t have a piping bag, you can use a plastic sandwich bag with a small corner snipped off. Keep the deviled eggs refrigerated until ready to serve to guarantee they remain fresh.
Christmas Tree Nacho Platter

The Christmas Tree Nacho Platter is a festive and delicious appetizer that will undoubtedly be a hit at your holiday gatherings. This colorful and creative dish combines layers of crispy tortilla chips, melted cheese, and a variety of toppings arranged in the shape of a Christmas tree. Not only is it a feast for the eyes, but it’s also a delightful mix of flavors and textures that will leave your guests reaching for more.
Perfect for a serving size of 4-6 people, this platter is easy to assemble and can be customized with your favorite toppings to suit everyone’s taste buds.
To create this edible masterpiece, you’ll start by layering chips and cheese, then artfully arrange the toppings to resemble a decorated Christmas tree. While it’s a simple process, the key to success is selecting fresh ingredients and guaranteeing everything is chopped and prepped before assembling your masterpiece.
This recipe provides a great opportunity to get creative with presentation, as you can use different colored ingredients to mimic ornaments and garlands on your nacho Christmas tree.
Ingredients:
- 1 bag of tortilla chips
- 2 cups shredded cheddar cheese
- 1 cup cooked and seasoned ground beef or chicken (optional)
- 1 cup guacamole
- 1 cup salsa
- 1/2 cup sliced black olives
- 1/2 cup chopped tomatoes
- 1/4 cup chopped green onions
- 1/4 cup sliced jalapeños
- 1/2 cup sour cream
- 1/4 cup chopped cilantro
- Lime wedges for garnish
Cooking Instructions:
- Preheat the oven: Begin by preheating your oven to 350°F (175°C). This will guarantee that the cheese melts evenly over the nachos.
- Layer the chips and cheese: On a large baking sheet or platter, arrange the tortilla chips in a triangular shape resembling a Christmas tree. Sprinkle a generous layer of shredded cheddar cheese over the chips.
- Bake the nachos: Place the baking sheet in the preheated oven for about 5-7 minutes, or until the cheese has fully melted and is bubbly. Keep an eye on them to prevent burning.
- Add protein (optional): If using ground beef or chicken, sprinkle it evenly over the melted cheese layer. This step is optional but adds a hearty element to the dish.
- Decorate with toppings: Carefully spoon guacamole into several spots on the nachos to resemble garland. Add dollops of salsa to represent ornaments. Scatter the sliced black olives, chopped tomatoes, green onions, and sliced jalapeños over the nachos to complete the look.
- Add finishing touches: Drizzle sour cream over the nachos in a zigzag pattern to resemble snow. Sprinkle chopped cilantro over the top for a pop of green color.
- Serve: Garnish with lime wedges around the edges of the platter for an extra splash of color and to offer a zesty kick when squeezed over the nachos.
Extra Tips:
When preparing the Christmas Tree Nacho Platter, feel free to experiment with different toppings to suit your guests’ preferences or dietary needs.
Consider adding corn kernels or diced red and green bell peppers for extra color and flavor. If you prefer a vegetarian version, simply skip the meat and add more beans or grilled vegetables.
To make the nachos extra crispy, consider using a mix of regular and blue corn tortilla chips for a unique texture. This dish is best served immediately after assembly to maintain the crispiness of the chips, but you can prep your ingredients ahead of time to speed up the process.
Christmas Tree Cookie Cones

Celebrate the festive season with these delightful Christmas Tree Cookie Cones, a creative and delicious way to bring the holiday spirit to your table. These charming edible trees are a fun project for both kids and adults, combining the sweet flavors of sugar cookies and vibrant green frosting to mimic the look of a Christmas tree.
The cones are decorated with colorful sprinkles and edible ornaments, making them not only a treat for the taste buds but also a feast for the eyes. Perfect for a holiday party or as a centerpiece on your dessert table, these Christmas Tree Cookie Cones are sure to impress your guests.
The recipe is simple enough to prepare in advance, giving you more time to enjoy the festivities. Whether you’re hosting a family gathering or a festive get-together with friends, these cookie cones will add a touch of whimsy and cheer to your celebration.
Ingredients for 4-6 Servings:
- 1 cup unsalted butter, softened
- 1 cup granulated sugar
- 1 large egg
- 1 teaspoon vanilla extract
- 2 ½ cups all-purpose flour
- 1 teaspoon baking powder
- ¼ teaspoon salt
- 1 package of sugar cones (6 cones)
- 2 cups of green frosting (store-bought or homemade)
- Assorted sprinkles and edible decorations
- Powdered sugar (optional, for dusting)
Cooking Instructions:
- Prepare the Cookie Dough: In a large mixing bowl, cream together the softened butter and granulated sugar until light and fluffy. Add the egg and vanilla extract, mixing well until fully incorporated.
- Mix the Dry Ingredients: In a separate bowl, whisk together the all-purpose flour, baking powder, and salt. Gradually add the dry ingredients to the wet mixture, mixing until a smooth dough forms.
- Chill the Dough: Wrap the cookie dough in plastic wrap and refrigerate for at least 1 hour, or until firm. This will make the dough easier to roll out and shape.
- Bake the Cookie Cones: Preheat your oven to 350°F (175°C). Roll out the dough on a lightly floured surface to about 1/4-inch thickness. Cut the dough into small rectangles or triangles and wrap around the sugar cones, pressing the edges together gently. Place on a baking sheet lined with parchment paper.
- Bake and Cool: Bake in the preheated oven for about 10-12 minutes, or until the edges are lightly golden. Remove from the oven and let cool completely before proceeding to the next step.
- Frost and Decorate: Once the cookie cones are cooled, generously frost each cone with green frosting, using a spatula or piping bag to create a smooth, tree-like texture. Decorate with assorted sprinkles and edible decorations to resemble ornaments and lights.
- Finishing Touches: Optionally, dust the tops of the cones with powdered sugar to mimic freshly fallen snow.
Extra Tips:
For a more personalized touch, consider adding different flavors to your cookie dough, such as almond or peppermint extract. If you prefer homemade frosting, a simple buttercream recipe can be tinted with green food coloring for a natural look.
To make decorating easier, set up a decorating station with bowls of sprinkles and edible decorations. If you’re making these cones with children, let them express their creativity by decorating their own cones.
Finally, store any leftover cookie cones in an airtight container to maintain their freshness over the holiday season.
Christmas Tree Brownie Bites

Christmas Tree Brownie Bites are a delightful and festive treat that will add a touch of holiday cheer to your appetizer spread. These bite-sized brownies aren’t only delicious but also visually appealing, resembling mini Christmas trees adorned with colorful decorations. Perfect for a holiday party or family gathering, these brownie bites are guaranteed to impress your guests with their creativity and taste.
The base of this recipe is a rich, fudgy brownie that serves as the perfect foundation for the vibrant green icing and candy decorations. The brownies are cut into triangles to mimic the shape of a Christmas tree, and then topped with a luscious green frosting and sprinkles to resemble ornaments. This recipe serves 4-6 people, making it the perfect size for a small gathering or as an addition to a larger dessert table.
Ingredients:
- 1 box of brownie mix (for a 9×13 inch pan)
- 2 large eggs
- 1/2 cup vegetable oil
- 1/4 cup water
- 1 cup green frosting
- Mini M&M candies or assorted sprinkles
- 12-15 pretzel sticks
Cooking Instructions:
- Prepare the Brownie Mix: Preheat your oven to 350°F (175°C). In a large mixing bowl, combine the brownie mix, eggs, vegetable oil, and water. Stir until the mixture is smooth and all ingredients are well incorporated.
- Bake the Brownies: Pour the brownie batter into a greased 9×13 inch baking pan, spreading it evenly across the pan. Place the pan in the preheated oven and bake for 20-25 minutes or until a toothpick inserted into the center comes out clean. Allow the brownies to cool completely in the pan.
- Cut the Brownies: Once cooled, remove the brownies from the pan. Cut the entire brownie into triangles by first cutting into strips and then cutting each strip into triangles. You should get about 12-15 triangle pieces, depending on the size you desire.
- Frost the Brownies: Using a piping bag or a small spatula, spread a layer of green frosting over each brownie triangle, starting from the base and working your way to the top. This will be the “greenery” of your Christmas tree.
- Decorate the Trees: Press mini M&M candies or assorted sprinkles into the frosting, arranging them like ornaments on a Christmas tree. Be creative with your design to make each tree unique and festive.
- Add the Tree Trunks: Break pretzel sticks in half and gently insert one end into the base of each brownie triangle to serve as the tree trunk. Ascertain they’re secure but not pushed too far into the brownie.
Extra Tips: For an added touch of flavor, you can mix some crushed peppermint candies into the brownie batter before baking. If the green frosting is too thick for piping, you can add a teaspoon of milk to thin it out. To make cutting the brownies easier, use a sharp knife and wipe it clean between cuts to ensure clean edges. Feel free to experiment with different types of candy decorations to match your holiday theme.