
Get ready to transform your office Christmas potluck into a festive feast that will wow your colleagues. Start with savory Cranberry and Brie Bites or Festive Stuffed Mushrooms. Then move on to a show-stopping Cranberry Orange Glazed Ham. These dishes will spread holiday cheer and impress everyone around. Curious to know how each recipe comes together to create the ultimate holiday spread?
Savory Cranberry and Brie Bites
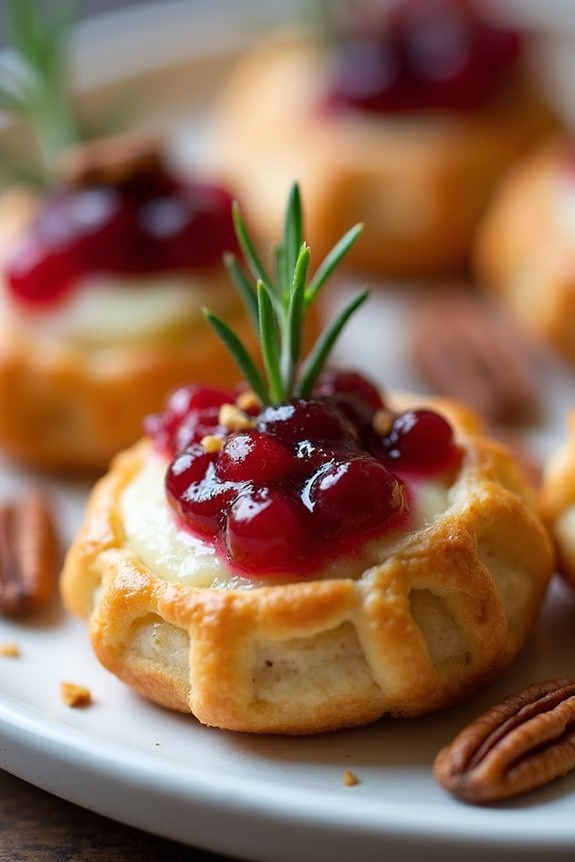
Savory Cranberry and Brie Bites are the perfect festive addition to any Christmas potluck at work. These delightful appetizers combine the creamy richness of Brie cheese with the tart sweetness of cranberry sauce, all nestled in a flaky puff pastry shell.
They’re not only quick and easy to make but also a guaranteed crowd-pleaser, offering a burst of flavor in every bite. Whether you’re hosting or attending a holiday gathering, these bites are bound to impress your colleagues with their gourmet appearance and delicious taste.
Ideal for serving 4-6 people, this recipe guarantees you have enough to share while still keeping preparation time to a minimum. The combination of textures and flavors makes these bites irresistible, and they’re versatile enough to be served warm or at room temperature.
With just a few simple ingredients, you can create a dish that looks and tastes like it took much more effort than it actually did.
Ingredients (Serves 4-6):
- 1 sheet of puff pastry, thawed
- 8 oz. Brie cheese, cut into small cubes
- 1/2 cup whole berry cranberry sauce
- 1/4 cup chopped pecans (optional)
- Fresh rosemary sprigs for garnish (optional)
Cooking Instructions:
- Preheat the Oven: Begin by preheating your oven to 375°F (190°C). This guarantees that once the bites are assembled, they can go straight into the oven.
- Prepare the Puff Pastry: Roll out the thawed puff pastry sheet on a lightly floured surface. Cut the sheet into approximately 12 equal squares. This will be the base of your bites.
- Assemble the Bites: Place each puff pastry square into the cups of a mini muffin tin, gently pressing down to form a small cup. Add a cube of Brie cheese into each cup.
- Add Cranberry Sauce: Spoon about a teaspoon of cranberry sauce over the Brie in each pastry cup. If desired, sprinkle a few chopped pecans on top for added crunch.
- Bake the Bites: Place the muffin tin in the preheated oven and bake for 12-15 minutes, or until the pastry is golden brown and the Brie has melted.
- Garnish and Serve: Once baked, remove the bites from the oven and let them cool slightly. Garnish with a small sprig of fresh rosemary if desired. Serve warm or at room temperature.
Extra Tips:
To make certain the puff pastry doesn’t become too soggy, make sure your Brie is cold when you begin assembling the bites. This helps it hold its shape better during baking.
If you’re preparing these ahead of time, you can assemble the bites and keep them in the refrigerator until you’re ready to bake. Just add a few extra minutes to the baking time if needed.
Additionally, feel free to experiment with flavors by substituting the cranberry sauce with other fruit preserves or adding a touch of honey for extra sweetness.
Festive Stuffed Mushrooms
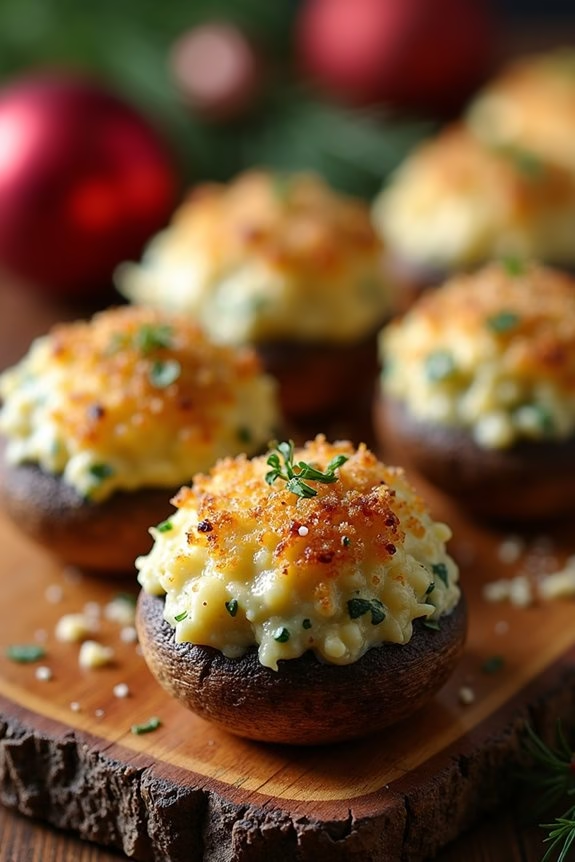
Bring a touch of holiday cheer to your workplace Christmas potluck with these delightful Festive Stuffed Mushrooms. This dish isn’t only easy to prepare but also a crowd-pleaser with its savory and aromatic filling. The bite-sized mushrooms are perfect for munching and mingling, making them an excellent choice for any festive gathering.
The combination of cream cheese, garlic, herbs, and a hint of parmesan creates a rich and flavorful stuffing that complements the earthiness of the mushrooms. Stuffed mushrooms are versatile and can be made ahead of time, making them ideal for busy holiday schedules. They can be served warm or at room temperature, allowing you to focus on enjoying the festivities with your colleagues.
Whether you’re a seasoned cook or a beginner, this simple yet sophisticated recipe will surely impress everyone at the potluck. Prepare to watch these savory morsels disappear quickly as your coworkers reach for seconds and thirds!
Ingredients (Serves 4-6):
- 24 medium-sized button mushrooms
- 2 tablespoons olive oil
- 1 small onion, finely chopped
- 2 cloves garlic, minced
- 1/4 cup breadcrumbs
- 1/4 cup grated Parmesan cheese
- 4 ounces cream cheese, softened
- 1 tablespoon chopped fresh parsley
- 1 tablespoon chopped fresh thyme
- Salt and pepper to taste
Cooking Instructions:
- Prepare the Mushrooms: Preheat your oven to 375°F (190°C). Gently clean the mushrooms with a damp cloth to remove any dirt. Carefully remove the stems from the mushrooms, setting the caps aside and finely chopping the stems.
- Cook Onion and Garlic: In a skillet over medium heat, add olive oil. Once hot, sauté the chopped onion and garlic until softened and fragrant, about 3-4 minutes. Add the chopped mushroom stems to the skillet and cook for an additional 2-3 minutes until they release their moisture and start to brown.
- Make the Filling: Remove the skillet from heat. In a mixing bowl, combine the cooked onion mixture, breadcrumbs, Parmesan cheese, cream cheese, parsley, and thyme. Season with salt and pepper to taste. Mix until all ingredients are well incorporated and creamy.
- Stuff the Mushrooms: Using a spoon or piping bag, fill each mushroom cap generously with the cream cheese mixture, pressing slightly to secure the filling.
- Bake the Mushrooms: Arrange the stuffed mushrooms on a baking sheet lined with parchment paper. Bake in the preheated oven for 18-20 minutes, or until the mushrooms are tender and the tops are golden brown.
- Serve: Allow the mushrooms to cool slightly before transferring them to a serving platter. Serve warm or at room temperature, garnished with extra parsley if desired.
Extra Tips:
To guarantee your Festive Stuffed Mushrooms are a hit, you can prepare the filling and clean the mushrooms a day in advance. Store them separately in the refrigerator until you’re ready to assemble and bake.
If you prefer a bit of a kick, consider adding a pinch of red pepper flakes to the filling. Additionally, feel free to experiment with other herbs like rosemary or chives for a personalized touch.
Holiday Spiced Deviled Eggs
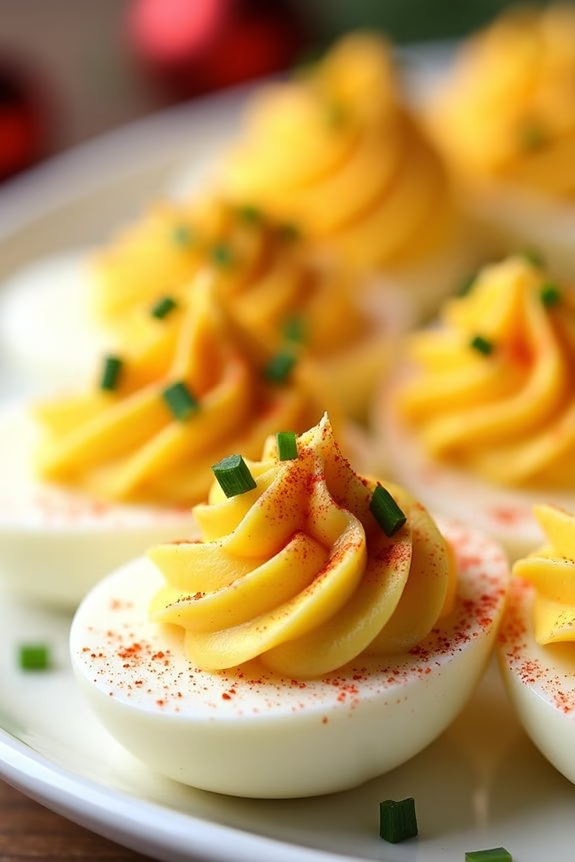
Deviled eggs are a classic appetizer that can be found at many gatherings, but adding a touch of holiday spice can transform this simple dish into a festive and memorable treat. With a delightful blend of warm spices, these Holiday Spiced Deviled Eggs are perfect for a Christmas potluck at work. The creamy yolk mixture is enhanced with a hint of nutmeg and cinnamon, offering a subtle seasonal twist to the traditional flavors.
This dish isn’t only delicious but also easy to prepare, making it a stress-free addition to your holiday menu. What makes these deviled eggs particularly special is the combination of both savory and slightly sweet spices that complement the richness of the egg yolks. The presentation is simple, allowing the flavors to shine through, while the garnishes add a pop of color and freshness.
This recipe serves 4-6 people, ensuring everyone at your potluck can enjoy a taste of the holiday spirit. The following ingredients and instructions will guide you through creating these delightful spiced eggs.
Ingredients (for 4-6 servings):
- 6 large eggs
- 3 tablespoons mayonnaise
- 1 teaspoon Dijon mustard
- 1/4 teaspoon ground nutmeg
- 1/4 teaspoon ground cinnamon
- 1/4 teaspoon smoked paprika
- Salt and black pepper to taste
- Fresh chives or parsley for garnish
- Paprika for garnish
Cooking Instructions:
- Boil the Eggs: Place the eggs in a single layer in a saucepan and cover them with cold water. Bring the water to a boil over medium-high heat. Once boiling, remove the saucepan from the heat, cover it with a lid, and let the eggs sit for 10-12 minutes.
- Cool and Peel the Eggs: After the eggs have rested, drain the hot water and transfer the eggs to a bowl of ice water. Let them cool for about 5 minutes. Once cooled, gently tap the eggs on a hard surface and peel off the shells under running water.
- Prepare the Filling: Cut each egg in half lengthwise and carefully scoop out the yolks into a mixing bowl. Place the egg whites on a serving platter. Mash the yolks with a fork until smooth.
- Mix the Seasonings: Add mayonnaise, Dijon mustard, ground nutmeg, ground cinnamon, smoked paprika, salt, and black pepper to the mashed yolks. Mix thoroughly until the mixture is creamy and well combined.
- Fill the Egg Whites: Use a spoon or a piping bag to fill each egg white half with the yolk mixture. Heap the filling slightly for a generous serving.
- Garnish and Serve: Sprinkle a little extra paprika over the filled eggs for color. Garnish with freshly chopped chives or parsley for a festive touch. Serve immediately or chill in the refrigerator until ready to serve.
Extra Tips:
When boiling the eggs, adding a teaspoon of baking soda to the water can make peeling easier by reducing the adherence of the shell to the egg whites. For a smoother filling, you can use an electric mixer to blend the yolk mixture.
If you plan to make these deviled eggs ahead of time, keep the filling separate from the egg whites and assemble them just before serving to maintain their freshness and presentation. Adjust the seasoning to your taste, and feel free to experiment with other spices or herbs to personalize the recipe further.
Maple-Glazed Carrots With Pecans
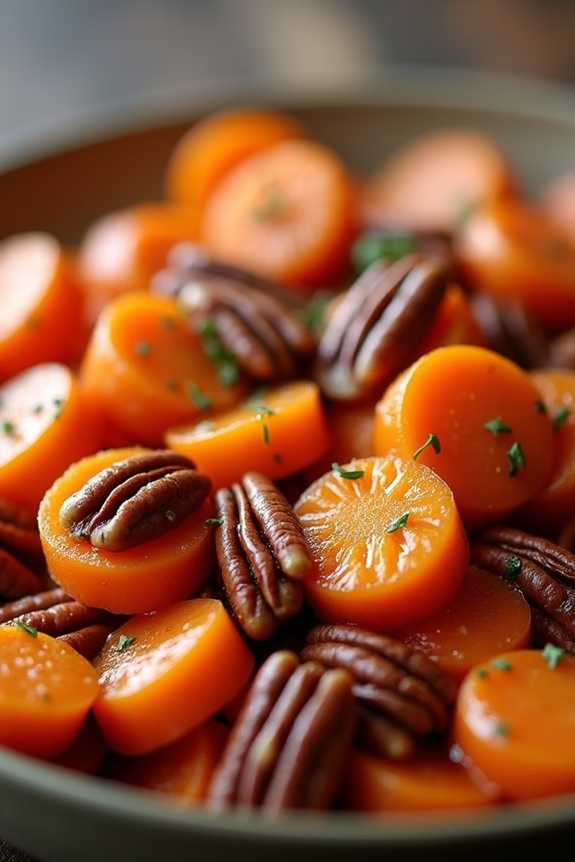
Maple-Glazed Carrots With Pecans is a delightful side dish that brings warmth and sweetness to any Christmas potluck. The natural sweetness of the carrots is enhanced by a luscious maple syrup glaze, while the pecans add a satisfying crunch, making this dish a festive favorite. Its vibrant color and rich flavors make it the perfect accompaniment to any holiday spread, guaranteeing it stands out at your work potluck.
This dish isn’t only delicious but also simple to prepare, allowing you to focus on enjoying the festive season rather than spending too much time in the kitchen. The combination of maple syrup, butter, and pecans creates a harmonious blend of flavors that complement the earthy taste of the carrots. The recipe serves 4-6 people, making it an ideal choice for gatherings and potlucks where you want to impress your colleagues with minimal effort.
Ingredients (Serves 4-6):
- 2 pounds of carrots, peeled and sliced into 1/4-inch rounds
- 1/4 cup pure maple syrup
- 2 tablespoons unsalted butter
- 1/2 cup pecans, roughly chopped
- Salt and pepper, to taste
- 1 tablespoon chopped fresh parsley (optional, for garnish)
Cooking Instructions:
- Prepare the Carrots: Begin by peeling and slicing the carrots into 1/4-inch rounds. Make sure the pieces are uniform to guarantee even cooking.
- Cook the Carrots: In a large pot of boiling salted water, add the sliced carrots. Cook them for about 5-7 minutes until they’re just tender but still have a slight crunch. Drain the carrots well and set them aside.
- Toast the Pecans: In a large skillet over medium heat, add the chopped pecans. Stir them continuously for about 3-4 minutes until they’re lightly toasted and fragrant. Be careful not to burn them. Remove the pecans from the skillet and set them aside.
- Make the Glaze: Using the same skillet, melt the butter over medium heat. Once melted, add the maple syrup and stir until the mixture is well combined and begins to bubble slightly.
- Combine Carrots and Glaze: Add the cooked carrots to the skillet, tossing them gently in the maple-butter mixture until they’re well coated. Continue to cook for about 2-3 minutes, allowing the glaze to thicken and adhere to the carrots.
- Add Pecans: Return the toasted pecans to the skillet, mixing them in with the glazed carrots. Season the dish with salt and pepper to taste, guaranteeing all the flavors are well balanced.
- Serve: Transfer the maple-glazed carrots with pecans to a serving platter. Garnish with freshly chopped parsley if desired, to add a touch of color and freshness.
Extra Tips: For an added depth of flavor, consider using a combination of orange and yellow carrots if available. This not only enhances the visual appeal but also adds subtle variations in taste.
If you wish to prepare this dish ahead of time, you can cook the carrots and toast the pecans in advance. Store them separately and combine with the glaze just before serving. This dish is versatile and can be served warm or at room temperature, making it convenient for transport to a potluck. Enjoy the delightful blend of sweet, nutty, and savory flavors that this dish brings to your holiday table!
Cranberry Orange Glazed Ham
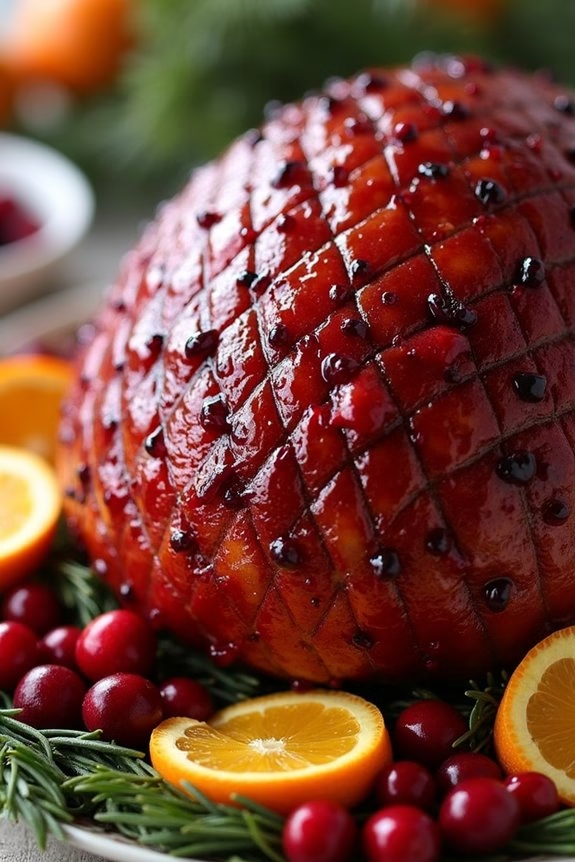
Celebrate the holiday season with a delicious Cranberry Orange Glazed Ham that’s sure to be a hit at your work potluck. This dish combines the classic flavors of ham with a sweet and tangy glaze made from cranberries and oranges, creating a festive and flavorful centerpiece for your gathering.
The glaze not only adds a beautiful shine to the ham but also enhances its natural flavors, making each bite a delightful experience. Perfect for a serving size of 4-6 people, this recipe is easy to prepare and will have your coworkers asking for seconds.
Whether you’re a seasoned chef or a novice cook, the simple steps and readily available ingredients make this dish a must-try for your holiday menu. With its rich aroma and mouthwatering taste, the Cranberry Orange Glazed Ham will certainly add a touch of elegance to your potluck spread.
Ingredients:
- 1 small bone-in ham (approximately 3-4 pounds)
- 1 cup cranberry sauce
- 1/2 cup freshly squeezed orange juice
- 1/4 cup brown sugar
- 1 tablespoon Dijon mustard
- 1 teaspoon ground cinnamon
- 1/2 teaspoon ground cloves
- Zest of one orange
Cooking Instructions:
1. Preheat the Oven: Begin by preheating your oven to 325°F (163°C). This temperature allows the ham to cook slowly and evenly, ensuring it remains juicy and tender.
2. Prepare the Glaze: In a medium saucepan, combine the cranberry sauce, orange juice, brown sugar, Dijon mustard, ground cinnamon, ground cloves, and orange zest. Stir the mixture over medium heat until the sugar has dissolved and the ingredients are well combined.
Allow the glaze to simmer for about 5 minutes to thicken and develop its flavors, then remove it from heat.
3. Score the Ham: Place the ham on a roasting pan. Using a sharp knife, score the surface of the ham in a diamond pattern, making shallow cuts about 1/4 inch deep and 1 inch apart. This step helps the glaze penetrate the ham, infusing it with flavor.
4. Apply the Glaze: Generously brush a portion of the glaze over the ham, ensuring it gets into the scored cuts. Reserve some glaze for basting during the cooking process.
5. Roast the Ham: Place the ham in the preheated oven and bake uncovered for 1.5 to 2 hours, or until the internal temperature reaches 140°F (60°C). Baste the ham with the remaining glaze every 30 minutes to keep it moist and flavorful.
6. Rest and Serve: Once cooked, remove the ham from the oven and let it rest for 10-15 minutes before slicing. This resting period allows the juices to redistribute, ensuring each slice is juicy and tender. Serve the ham warm with any extra glaze on the side.
Extra Tips:
When selecting a ham, opt for a bone-in variety as it tends to be more flavorful and juicy. If you’re short on time, you can prepare the glaze a day ahead and store it in the refrigerator. Just reheat it before using.
Additionally, if you prefer a slightly sweeter glaze, you can adjust the sugar content to your liking. To add an extra touch, garnish your serving platter with fresh cranberries and orange slices for a festive presentation.
Cheesy Garlic Pull-Apart Bread
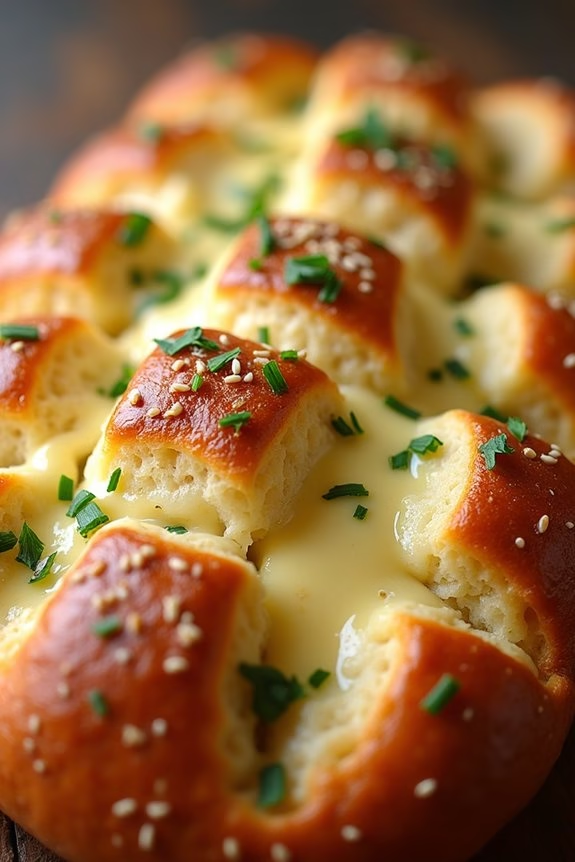
Cheesy Garlic Pull-Apart Bread is a delightful dish perfect for a Christmas potluck at work. This savory bread isn’t only easy to make but also a crowd-pleaser that will have everyone reaching for more. The combination of gooey cheese, aromatic garlic, and fresh herbs creates a mouth-watering experience that complements any holiday spread.
It’s a versatile dish that can be served as an appetizer or a side, and the pull-apart nature makes it fun and interactive for a communal setting. The beauty of this recipe lies in its simplicity and the capacity to customize it to your liking. You can add different types of cheese, spices, or even a sprinkle of chili flakes for a kick.
Best of all, this dish can be prepared in advance and simply baked at work, filling the room with an irresistible aroma. Whether you’re a seasoned cook or a beginner in the kitchen, Cheesy Garlic Pull-Apart Bread is a delightful and stress-free addition to your Christmas potluck menu.
Ingredients for 4-6 people:
- 1 large round sourdough bread loaf
- 1 cup shredded mozzarella cheese
- 1/2 cup grated Parmesan cheese
- 1/2 cup unsalted butter, melted
- 4 cloves garlic, minced
- 2 tablespoons fresh parsley, chopped
- 1 tablespoon fresh chives, chopped
- Salt and pepper to taste
Cooking Instructions:
- Preheat the Oven: Start by preheating your oven to 350°F (175°C) to guarantee it’s hot and ready for baking.
- Prepare the Bread: Take the sourdough loaf and make cuts in a crosshatch pattern, being careful not to slice all the way through the bottom. This will create little pockets for the filling.
- Make the Garlic Butter: In a small bowl, combine the melted butter, minced garlic, parsley, chives, salt, and pepper. Stir until well mixed.
- Stuff the Bread: Using your fingers or a small spoon, gently separate the bread pieces and drizzle the garlic butter mixture into the cuts. Be generous to guarantee every piece is seasoned.
- Add the Cheese: Stuff the shredded mozzarella and grated Parmesan into the cuts of the bread, making sure to distribute it evenly throughout.
- Wrap and Bake: Wrap the entire loaf in aluminum foil and place it on a baking sheet. Bake in the preheated oven for about 15 minutes.
- Finish Baking: After 15 minutes, open the foil to expose the top of the bread and bake for an additional 10 minutes, or until the cheese is fully melted and slightly golden.
- Serve Warm: Remove from the oven, let it cool slightly, and serve warm. Encourage guests to pull apart pieces to enjoy.
Extra Tips: For an extra crispy texture, you can finish the bread under the broiler for an additional 2-3 minutes after baking, but keep a close eye on it to prevent burning. If you like a bit of spice, consider adding a pinch of red pepper flakes to the garlic butter mixture.
Additionally, you can experiment with different cheese varieties such as cheddar or gouda for a unique twist. If preparing in advance, assemble the bread and store it in the refrigerator covered in foil, then bake just before serving.
Winter Vegetable Quinoa Salad
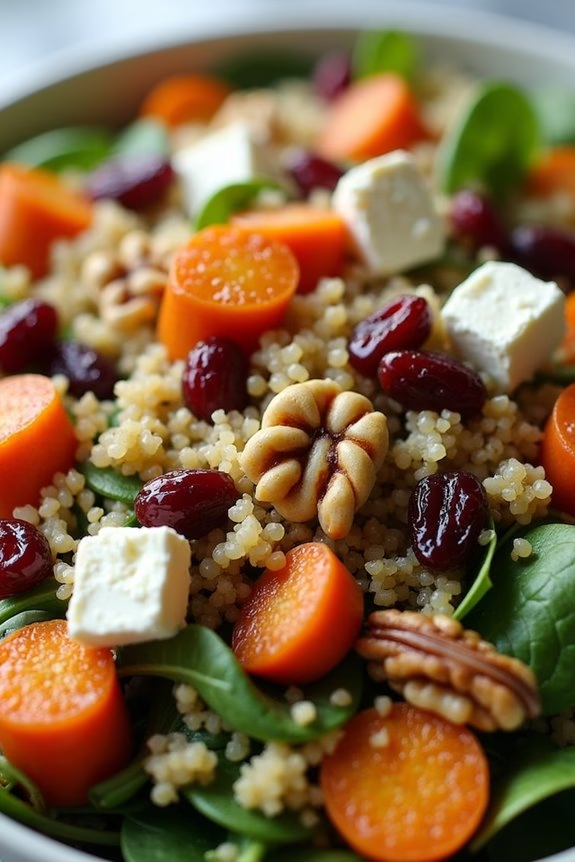
Winter Vegetable Quinoa Salad is a vibrant and nourishing dish perfect for a Christmas potluck at work. Packed with seasonal vegetables, protein-rich quinoa, and a tangy dressing, this salad isn’t only visually appealing but also incredibly satisfying. The harmony of roasted root vegetables, fresh greens, and the nutty flavor of quinoa makes it a delightful addition to any festive spread.
Best of all, it’s a dish that can be prepared in advance, giving you more time to enjoy the holiday festivities with your colleagues.
This salad is versatile and can be adapted to suit various dietary preferences. Whether you’re catering to vegans, vegetarians, or those with gluten sensitivities, Winter Vegetable Quinoa Salad is a dish that everyone can enjoy. The combination of textures and flavors, from the soft roasted vegetables to the crunchy nuts and seeds, guarantees that this salad will be a hit at your holiday gathering.
Furthermore, the bright colors of the ingredients make it a visually stunning centerpiece on any potluck table.
Ingredients for 4-6 people:
- 1 cup quinoa
- 2 cups vegetable broth or water
- 1 medium butternut squash, peeled and diced
- 2 medium carrots, peeled and sliced
- 1 medium sweet potato, peeled and diced
- 2 tablespoons olive oil
- Salt and pepper to taste
- 1 teaspoon ground cumin
- 1 teaspoon paprika
- 1/2 cup dried cranberries
- 1/2 cup chopped walnuts or pecans
- 3 cups baby spinach or mixed greens
- 1/4 cup crumbled feta cheese (optional)
- 2 tablespoons sunflower seeds
- Juice of 1 lemon
- 1 tablespoon honey or maple syrup
- 1 teaspoon Dijon mustard
Cooking Instructions:
- Preheat the Oven: Preheat your oven to 400°F (200°C). This will guarantee the vegetables roast evenly and develop a nice caramelized exterior.
- Prepare the Quinoa: Rinse the quinoa under cold water to remove any bitterness. In a medium saucepan, combine the rinsed quinoa with vegetable broth or water. Bring to a boil, then reduce the heat to low, cover, and simmer for about 15 minutes or until the quinoa is cooked and the liquid is absorbed. Fluff with a fork and set aside to cool.
- Roast the Vegetables: In a large bowl, toss the diced butternut squash, carrots, and sweet potato with olive oil, salt, pepper, cumin, and paprika. Spread the vegetables in a single layer on a baking sheet. Roast in the preheated oven for 25-30 minutes, or until tender and slightly caramelized, stirring halfway through cooking time.
- Assemble the Salad: In a large salad bowl, combine the cooked quinoa, roasted vegetables, dried cranberries, and chopped nuts. Add the baby spinach or mixed greens and gently toss to combine.
- Prepare the Dressing: In a small bowl, whisk together the lemon juice, honey or maple syrup, Dijon mustard, and a pinch of salt and pepper. Adjust seasoning as needed.
- Dress the Salad: Pour the dressing over the salad and toss to coat all the ingredients evenly. Sprinkle the crumbled feta cheese and sunflower seeds on top, if using.
- Serve: Transfer the salad to a serving dish and enjoy as a vibrant and healthy addition to your Christmas potluck.
Extra Tips:
For added flavor, consider roasting the nuts and seeds before adding them to the salad. This simple step enhances their natural flavors and adds a delightful crunch.
If you’re preparing the salad in advance, keep the dressing separate and toss it just before serving to maintain the freshness of the greens. Additionally, you can customize the salad by adding other winter vegetables, such as Brussels sprouts or parsnips, depending on availability and preference.
Chocolate Peppermint Bark
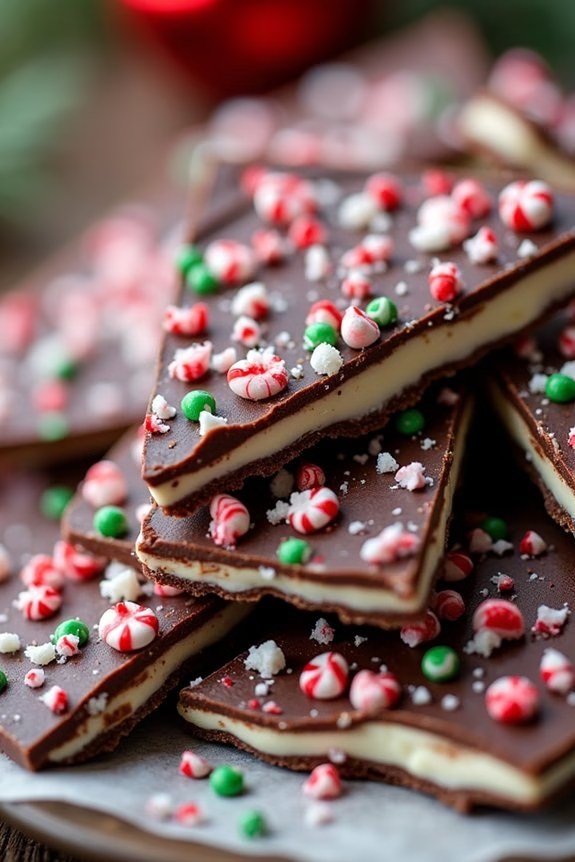
Chocolate Peppermint Bark is a festive and delightful treat that combines the rich, smooth flavor of chocolate with the invigorating crunch of peppermint. This easy-to-make dessert is perfect for a holiday potluck at work, where it’s sure to be a crowd-pleaser.
The contrast between the dark and white chocolate layers, sprinkled with crushed peppermint candies, offers a beautiful and delicious treat that both looks and tastes like Christmas.
The simplicity of this recipe not only makes it ideal for those short on time but also guarantees a stress-free preparation. This recipe serves approximately 4-6 people, making it a fitting choice for smaller gatherings or as a part of a larger dessert spread.
With just a few ingredients and minimal equipment needed, you’ll be able to whip up a batch of this tasty bark in no time.
Ingredients:
- 8 oz semi-sweet chocolate chips
- 8 oz white chocolate chips
- 1/2 teaspoon peppermint extract
- 1/2 cup crushed peppermint candies or candy canes
Cooking Instructions:
- Prepare the Base: Line a baking sheet with parchment paper. This will prevent the chocolate from sticking and makes it easy to remove once it has set.
- Melt the Semi-Sweet Chocolate: In a microwave-safe bowl, heat the semi-sweet chocolate chips in 30-second intervals, stirring after each interval, until completely melted and smooth. This should take about 1-2 minutes. Alternatively, you can melt the chocolate using a double boiler on the stovetop.
- Add Peppermint Extract: Stir in the peppermint extract into the melted semi-sweet chocolate. This will infuse the chocolate with an invigorating minty flavor.
- Spread the Chocolate: Pour the melted chocolate onto the prepared baking sheet and spread it evenly to a thickness of about 1/4 inch using a spatula.
- Melt the White Chocolate: Following the same method as with the semi-sweet chocolate, melt the white chocolate chips in a microwave-safe bowl or using a double boiler.
- Create the Bark Layers: Once the white chocolate is melted and smooth, pour it over the semi-sweet chocolate layer and spread evenly. Work quickly to guarantee that the layers don’t blend together but remain distinct.
- Add Crushed Peppermint Candies: While the chocolate is still warm, sprinkle the crushed peppermint candies evenly over the top. Gently press the candies into the chocolate to ensure they adhere as it cools.
- Set the Bark: Allow the chocolate to cool completely, about 1-2 hours, or until it’s firm. You can speed up the process by placing it in the refrigerator.
- Break into Pieces: Once the chocolate is fully set, remove it from the parchment paper and break it into bite-sized pieces.
Extra Tips: When melting chocolate, be cautious not to overheat it as this can cause it to seize, becoming grainy and unusable. If this happens, try adding a small amount of vegetable oil to smooth it out.
For a more vibrant presentation, consider using red and green peppermint candies. When crushing the candies, place them in a resealable plastic bag and use a rolling pin to gently break them into smaller pieces. This helps minimize mess and guarantees even-sized pieces for your bark.
Gingerbread Trifle
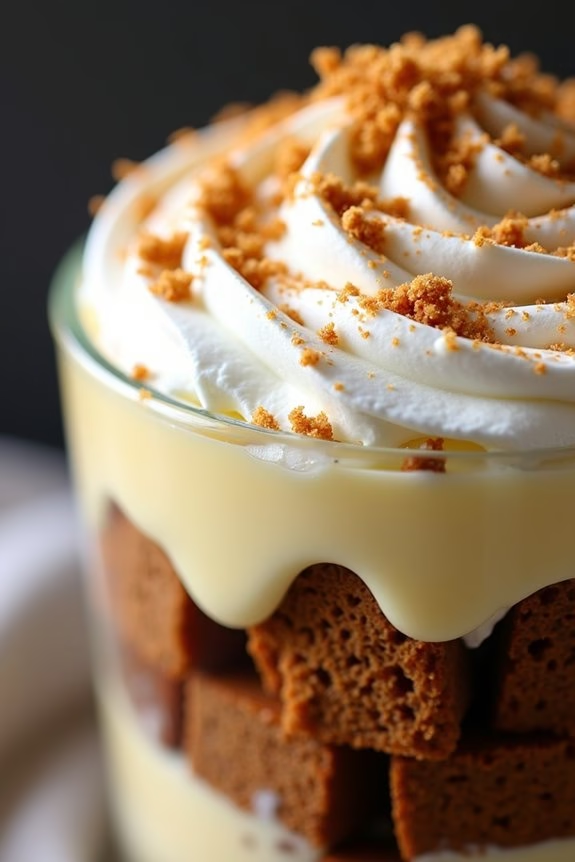
Gingerbread Trifle is a delightful and festive dessert that’s perfect for your Christmas potluck at work. This trifle combines the warm, spicy flavors of gingerbread with creamy layers of custard and whipped cream, topped off with a sprinkle of holiday cheer.
It’s an attractive, layered dessert that’s not only delicious but also visually appealing, making it a crowd-pleaser among colleagues. With its rich flavors and festive presentation, this trifle is sure to be the talk of the office holiday party.
This recipe is designed to serve 4-6 people, making it ideal for small gatherings or as part of a larger dessert spread. The preparation involves creating a flavorful gingerbread cake, a smooth and creamy custard, and assembling it all with luscious whipped cream.
The trifle can be made in a large trifle bowl or individual serving glasses for a more personalized touch. Let’s explore the ingredients and instructions to create this delectable holiday treat.
Ingredients:
- 1 1/2 cups all-purpose flour
- 1 teaspoon baking soda
- 1 teaspoon ground ginger
- 1 teaspoon ground cinnamon
- 1/2 teaspoon ground cloves
- 1/4 teaspoon salt
- 1/2 cup unsalted butter, softened
- 1/2 cup brown sugar
- 1/2 cup molasses
- 1 large egg
- 1/2 cup hot water
- 2 cups custard (store-bought or homemade)
- 2 cups heavy whipping cream
- 2 tablespoons powdered sugar
- 1 teaspoon vanilla extract
- Crushed gingerbread cookies or gingersnaps for garnish
Instructions:
- Prepare the Gingerbread Cake: Preheat your oven to 350°F (175°C). Grease and flour an 8×8 inch baking dish. In a medium bowl, sift together the flour, baking soda, ginger, cinnamon, cloves, and salt.
- Mix Wet Ingredients: In a large mixing bowl, cream together the butter and brown sugar until light and fluffy. Beat in the molasses and egg until well combined.
- Combine Ingredients: Gradually add the dry ingredients to the wet mixture, alternating with the hot water. Mix until the batter is smooth and well blended.
- Bake the Cake: Pour the batter into the prepared baking dish and smooth the top. Bake for 25-30 minutes, or until a toothpick inserted into the center comes out clean. Allow the cake to cool completely.
- Prepare the Whipped Cream: In a large mixing bowl, whip the heavy cream with powdered sugar and vanilla extract until soft peaks form. Set aside.
- Assemble the Trifle: Cut the cooled gingerbread cake into cubes. In a trifle bowl or individual glasses, layer the gingerbread cubes, custard, and whipped cream. Repeat the layers until all ingredients are used, finishing with a layer of whipped cream.
- Garnish and Serve: Top the trifle with crushed gingerbread cookies or gingersnaps for a festive touch. Chill in the refrigerator for at least 2 hours before serving to allow the flavors to meld.
Extra Tips:
For an added layer of flavor, consider adding a splash of bourbon or rum to the custard or whipped cream. If you don’t have time to make custard from scratch, a good-quality store-bought version will work just fine.
You can also prepare the gingerbread cake a day in advance to save time on the day of the potluck. When assembling the trifle, be sure to press the layers down gently to guarantee even distribution.
This trifle can be made the night before, allowing the flavors to deepen overnight.
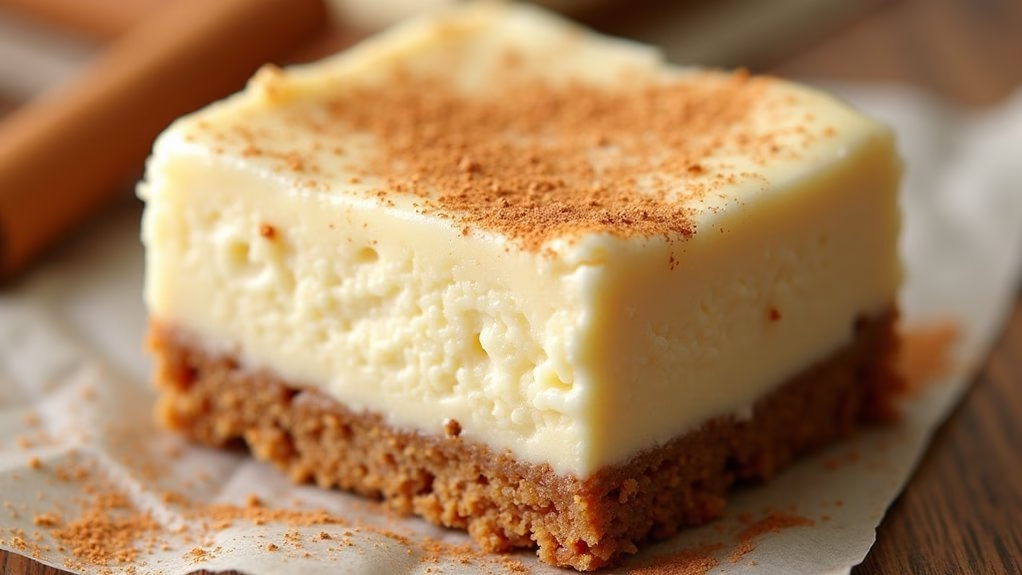
Eggnog Cheesecake Bars
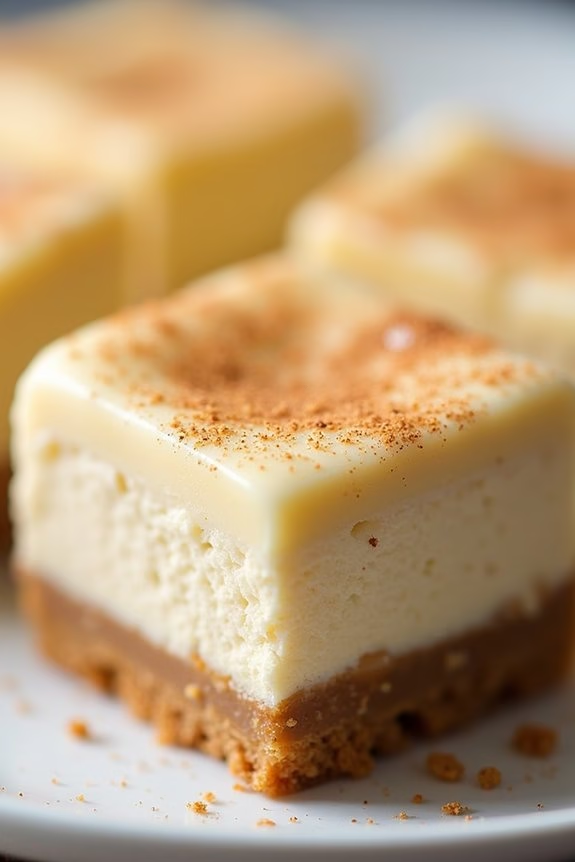
Eggnog Cheesecake Bars are the perfect festive treat to bring to your workplace Christmas potluck. Combining the rich, creamy texture of cheesecake with the spiced flavors of holiday eggnog, these bars are sure to be a hit among your colleagues.
The buttery graham cracker crust provides a delightful contrast to the smooth cheesecake filling, while a hint of nutmeg and cinnamon evokes the warmth of the season. These bars not only taste delicious but also look impressive, making them an appealing addition to any dessert spread.
Ideal for serving 4-6 people, this recipe is straightforward and can be prepared in advance, allowing you to focus on other holiday preparations. By keeping the ingredients simple and following the step-by-step instructions, you’ll find that these Eggnog Cheesecake Bars are both easy to make and delightful to share.
Plus, with a few extra tips, you can guarantee your cheesecake bars turn out perfectly every time, leaving your friends and coworkers asking for the recipe!
Ingredients:
- 1 cup graham cracker crumbs
- 1/4 cup unsalted butter, melted
- 2 tablespoons granulated sugar
- 16 oz cream cheese, softened
- 1/2 cup granulated sugar
- 1/2 cup eggnog
- 2 large eggs
- 1 tablespoon all-purpose flour
- 1/2 teaspoon vanilla extract
- 1/4 teaspoon ground nutmeg
- 1/4 teaspoon ground cinnamon
Instructions:
- Preheat the oven to 325°F (163°C). Line an 8×8 inch baking pan with parchment paper, allowing some to overhang for easy removal of the bars later.
- Prepare the crust by mixing the graham cracker crumbs, melted butter, and 2 tablespoons of sugar in a medium bowl. Stir until the mixture resembles wet sand.
- Press the crust mixture firmly into the bottom of the prepared baking pan to form an even layer. Use the bottom of a glass or measuring cup to help press it down. Bake for 10 minutes, then remove from the oven and set aside to cool slightly.
- In a large bowl, beat the cream cheese and 1/2 cup sugar with an electric mixer on medium speed until smooth and creamy.
- Add the eggnog, eggs, flour, vanilla extract, nutmeg, and cinnamon to the cream cheese mixture. Beat until everything is well combined and smooth, guaranteeing no lumps remain.
- Pour the cheesecake batter over the pre-baked crust, spreading it evenly with a spatula. Smooth the top to guarantee even baking.
- Bake in the preheated oven for 35-40 minutes, or until the edges are set and the center has just a slight jiggle. Avoid overbaking to prevent cracks.
- Remove from the oven and allow the bars to cool to room temperature in the pan. Once cooled, cover and refrigerate for at least 3 hours or overnight to fully set.
- Lift the cheesecake bars out of the pan using the parchment paper overhang. Use a sharp knife to cut into squares, wiping the knife clean between cuts for neat edges.
Extra Tips:
When making Eggnog Cheesecake Bars, guarantee that your cream cheese is fully softened to room temperature before mixing to avoid a lumpy batter.
If you prefer a stronger eggnog flavor, consider adding a tablespoon of rum or rum extract to the batter. For a festive touch, sprinkle a bit of additional nutmeg on top of the bars just before serving.