
I’m so excited to share a fabulous lineup of Christmas potluck desserts that will sweeten up any holiday get-together. Think about indulging in a decadent Peppermint Bark Brownie or a smooth Eggnog Cheesecake Bar. These desserts are not only delicious but also simple to prepare and share. Curious to explore more festive flavors to make your night memorable? Let’s uncover the magic together.
Peppermint Bark Brownies
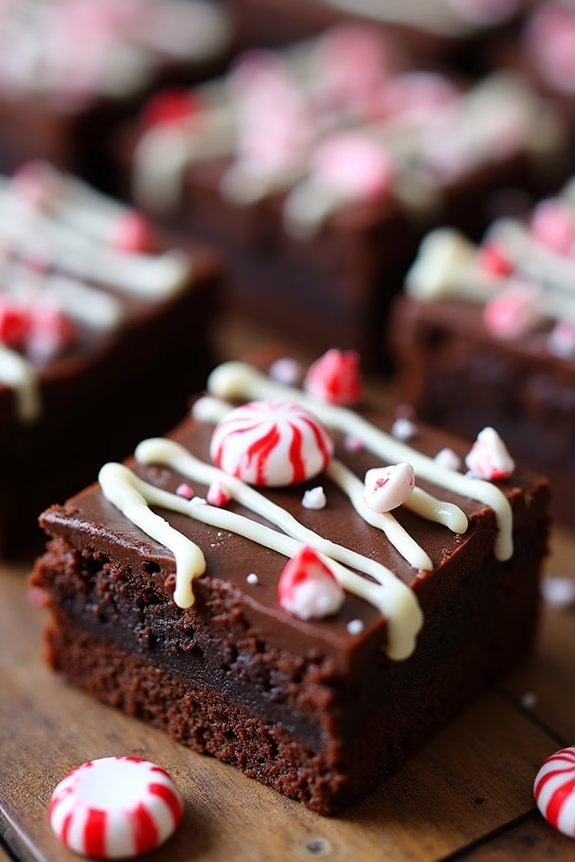
Peppermint Bark Brownies are a delightful holiday treat that combines the rich, fudgy texture of classic brownies with the invigorating crunch of peppermint bark. Perfect for a Christmas potluck, these brownies bring together the festive flavors of chocolate and peppermint, creating a dessert that’s sure to be a hit with friends and family.
The combination of dark chocolate, white chocolate, and crushed peppermint candies not only looks beautiful but also delivers a deliciously satisfying taste in every bite.
This recipe is designed to serve 4-6 people, making it an ideal choice for small gatherings or as a part of a larger dessert spread. The preparation involves baking a batch of chocolate brownies and topping them with a layer of homemade peppermint bark. Each piece is an indulgent square of holiday cheer that captures the spirit of the season.
Whether you’re an experienced baker or a novice in the kitchen, these Peppermint Bark Brownies are simple to make and impossible to resist.
Ingredients:
- 1/2 cup unsalted butter
- 1 cup granulated sugar
- 2 large eggs
- 1 teaspoon vanilla extract
- 1/3 cup unsweetened cocoa powder
- 1/2 cup all-purpose flour
- 1/4 teaspoon salt
- 1/4 teaspoon baking powder
- 8 ounces semisweet or dark chocolate chips
- 4 ounces white chocolate
- 1/2 cup crushed peppermint candies or candy canes
Instructions:
1. Preheat Oven and Prepare Pan:
Preheat your oven to 350°F (175°C). Line an 8×8-inch baking pan with parchment paper or lightly grease it to prevent the brownies from sticking.
2. Make the Brownie Batter:
In a medium saucepan over low heat, melt the butter. Remove from heat and stir in the sugar, eggs, and vanilla extract until well combined.
Add the cocoa powder, flour, salt, and baking powder. Mix until the batter is smooth and no dry ingredients are visible.
3. Bake the Brownies:
Pour the brownie batter into the prepared baking pan, spreading it evenly. Bake in the preheated oven for 20-25 minutes or until a toothpick inserted into the center comes out with a few moist crumbs.
Avoid overbaking to guarantee a fudgy texture. Allow the brownies to cool completely in the pan.
4. Prepare the Peppermint Bark Topping:
Once the brownies are cool, melt the semisweet or dark chocolate chips in a heatproof bowl over simmering water, or in the microwave in 30-second intervals, stirring frequently.
Evenly spread the melted chocolate over the cooled brownies.
5. Add the White Chocolate and Peppermint:
Melt the white chocolate using the same method. Drizzle or spread the white chocolate over the dark chocolate layer.
Immediately sprinkle the crushed peppermint candies on top, pressing gently so they adhere to the chocolate.
6. Set and Slice:
Allow the chocolate to set completely at room temperature or in the refrigerator for quicker results.
Once set, lift the brownies out of the pan using the parchment paper, and cut into squares or rectangles to serve.
Extra Tips:
For an extra peppermint kick, consider adding a drop or two of peppermint extract to the brownie batter.
Be careful not to over-mix the batter once the flour is added; over-mixing can result in tougher brownies.
If you prefer a thicker layer of peppermint bark, you can double the chocolate quantities for the topping.
Remember to store any leftovers in an airtight container to keep them fresh and delicious for up to a week.
Eggnog Cheesecake Bars
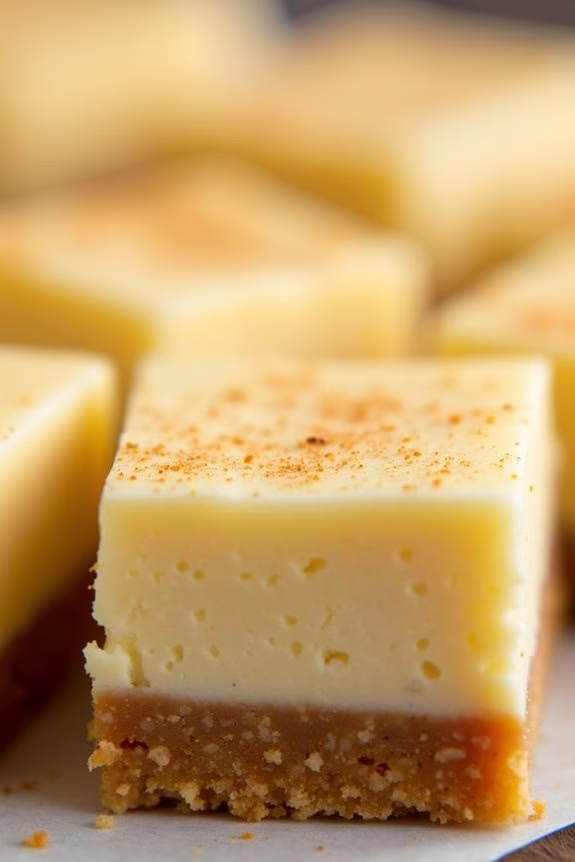
Eggnog Cheesecake Bars are a delightful fusion of traditional holiday flavors and creamy cheesecake goodness, making them a perfect addition to any Christmas potluck dessert table.
With a buttery graham cracker crust, a rich eggnog-infused cheesecake layer, and a hint of nutmeg, these bars capture the spirit of the season in every bite. They’re easy to transport and serve, making them a convenient yet festive choice for gatherings with family and friends.
These cheesecake bars are designed to serve 4-6 people, making them ideal for smaller potlucks or intimate holiday gatherings. By combining the creamy texture of cheesecake with the warm, spicy notes of eggnog, you’ll create a dessert that’s both nostalgic and indulgent.
Whether you’re a seasoned baker or trying your hand at a holiday recipe for the first time, these Eggnog Cheesecake Bars are sure to amaze.
Ingredients:
- 1 1/2 cups graham cracker crumbs
- 1/4 cup granulated sugar
- 1/2 cup unsalted butter, melted
- 16 oz cream cheese, softened
- 1 cup granulated sugar
- 1/2 cup eggnog
- 2 large eggs
- 1 tablespoon all-purpose flour
- 1 teaspoon vanilla extract
- 1/2 teaspoon ground nutmeg
Instructions:
- Preheat Oven: Start by preheating your oven to 325°F (163°C). This guarantees that your oven reaches the right temperature for baking your cheesecake bars evenly.
- Prepare the Crust: In a medium-sized bowl, combine the graham cracker crumbs, 1/4 cup granulated sugar, and melted butter. Mix until the crumbs are well coated and the mixture resembles wet sand.
- Form the Crust: Press the crumb mixture firmly into the bottom of a 9×9-inch baking pan lined with parchment paper. Use the back of a spoon or a glass to guarantee an even layer. Bake the crust for 10 minutes and then set aside to cool slightly.
- Make the Cheesecake Filling: In a large mixing bowl, beat the softened cream cheese with 1 cup sugar until smooth and creamy. Add the eggnog and mix until fully incorporated.
- Incorporate Eggs and Flavor: Add the eggs one at a time, beating well after each addition. Then, mix in the flour, vanilla extract, and ground nutmeg until just combined.
- Assemble and Bake: Pour the cheesecake filling over the pre-baked crust, spreading it evenly with a spatula. Bake for 30-35 minutes, or until the edges are set and the center has a slight jiggle.
- Cool and Chill: Allow the bars to cool at room temperature for about an hour. Then, refrigerate them for at least 2 hours or until fully chilled and set.
- Serve: Once chilled, lift the cheesecake out of the pan using the parchment paper, slice into bars, and serve.
Extra Tips:
For best results, confirm that your cream cheese is fully softened before mixing to avoid lumps in your cheesecake filling.
If you prefer a stronger nutmeg flavor, you can lightly dust the top of the bars with additional ground nutmeg just before serving.
Additionally, using parchment paper to line the baking pan makes it easier to remove the bars once they’re set, leading to cleaner cuts and presentation. Enjoy these delicious bars with a cup of hot cocoa or coffee for the ultimate holiday treat.
Gingerbread Trifle
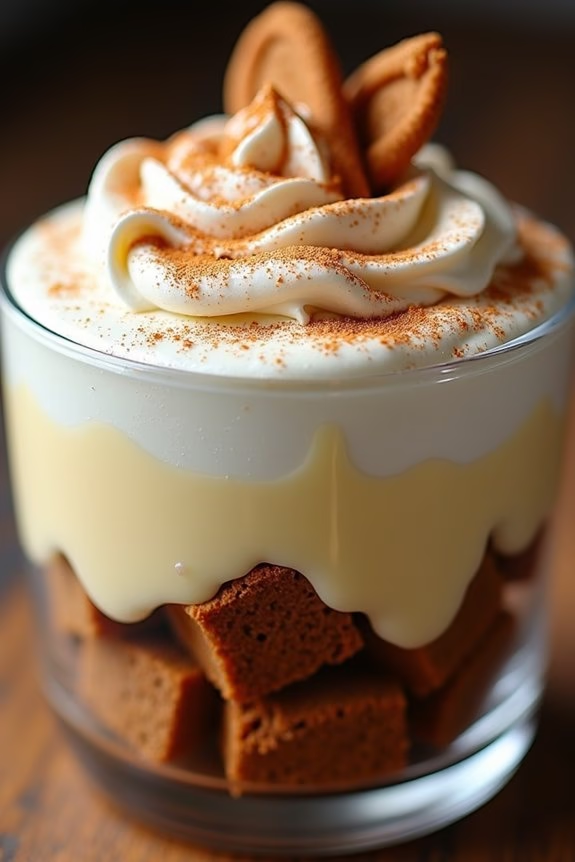
A Gingerbread Trifle is a delightful and festive dessert that combines the rich, spiced flavors of gingerbread with the creamy texture of vanilla pudding and the freshness of whipped cream. Perfect for a Christmas potluck, this layered dessert not only tastes divine but also looks beautiful with its distinct layers, making it a centerpiece for your holiday table.
The combination of textures and flavors in each bite is sure to impress your guests and leave them craving more. This dessert is ideal for serving a small crowd, with the recipe designed for 4-6 people. It combines the warmth of gingerbread cake, the smoothness of pudding, and the lightness of whipped cream, all topped with a sprinkle of festive spices for a perfect finish.
Prepare it in a large glass bowl or individual cups for a visually appealing presentation that highlights the layers and colors of the trifle.
Ingredients (Serves 4-6)
- 1 gingerbread cake mix (or homemade gingerbread cake)
- 2 cups milk
- 1 package (3.4 oz) instant vanilla pudding mix
- 2 cups heavy whipping cream
- 2 tablespoons powdered sugar
- 1 teaspoon vanilla extract
- 1 teaspoon ground cinnamon
- ½ teaspoon ground nutmeg
- ¼ teaspoon ground ginger
- Optional garnish: crushed gingersnap cookies or candied ginger
Cooking Instructions
- Prepare the Gingerbread Cake: Start by baking the gingerbread cake according to the package instructions or using your favorite homemade recipe. Allow the cake to cool completely before proceeding. Once cooled, cut the cake into 1-inch cubes.
- Make the Vanilla Pudding: In a medium-sized bowl, whisk together the milk and instant vanilla pudding mix until smooth. Allow the pudding to set for about 5 minutes, or until it thickens.
- Whip the Cream: In a large mixing bowl, combine the heavy whipping cream, powdered sugar, and vanilla extract. Use an electric mixer to whip the cream on medium speed until soft peaks form. Be careful not to over-whip the cream.
- Assemble the Trifle: In a large trifle bowl or individual serving glasses, begin layering the dessert. Start with a layer of gingerbread cake cubes at the bottom. Follow with a layer of vanilla pudding, spreading it evenly over the cake. Add a layer of whipped cream on top of the pudding. Repeat the layers until the ingredients are used up, finishing with a layer of whipped cream on top.
- Add the Spices: In a small bowl, mix the ground cinnamon, nutmeg, and ginger. Lightly sprinkle this spice mixture over the top layer of whipped cream for added flavor and decoration.
- Garnish and Chill: Optionally, garnish the top with crushed gingersnap cookies or candied ginger pieces for extra texture and flavor. Cover the trifle with plastic wrap and chill in the refrigerator for at least 2 hours before serving to allow the flavors to meld together.
Extra Tips
When making the gingerbread trifle, ascertain the cake is fully cooled before cutting to prevent the layers from becoming soggy. Pre-chilling the mixing bowl and beaters before whipping the cream can help achieve better results and quicker whipping.
For a more personalized touch, consider adding layers of fruits such as sliced bananas or berries, which complement the gingerbread flavor. Additionally, this trifle can be made a day in advance, making it a convenient dessert for busy holiday preparations.
Cranberry Pistachio Biscotti

Cranberry Pistachio Biscotti is a delightful treat perfect for any holiday potluck. These twice-baked Italian cookies are crunchy, nutty, and slightly sweet, with the festive colors of dried cranberries and pistachios making them the ideal addition to your Christmas dessert table. Not only are they delicious, but they also offer a wonderful, aromatic experience thanks to the addition of vanilla and almond extracts.
Whether you enjoy them with a cup of coffee or on their own, these biscotti are sure to be a hit. Biscotti are traditionally known for their long shelf life, making them a great choice for preparing ahead of time. The combination of cranberries and pistachios provides a delightful contrast of textures and flavors, with a hint of tartness from the cranberries and a rich, buttery flavor from the pistachios.
The recipe is simple, requiring basic baking ingredients and offering a creative twist with these festive additions. Perfect for serving 4-6 people, this recipe guarantees that everyone gets to enjoy a piece of the holiday cheer.
Ingredients for Cranberry Pistachio Biscotti (Serves 4-6):
- 2 cups all-purpose flour
- 1 cup granulated sugar
- 1 teaspoon baking powder
- 1/2 teaspoon salt
- 2 large eggs
- 1 teaspoon vanilla extract
- 1/2 teaspoon almond extract
- 1 cup dried cranberries
- 1 cup unsalted pistachios, shelled
- Zest of one orange (optional)
Cooking Instructions:
- Preheat the Oven: Begin by preheating your oven to 350°F (175°C). Line a baking sheet with parchment paper or a silicone baking mat for easy cleanup.
- Mix Dry Ingredients: In a large mixing bowl, combine the all-purpose flour, granulated sugar, baking powder, and salt. Stir these ingredients together until they’re evenly distributed.
- Whisk Wet Ingredients: In a separate bowl, whisk together the eggs, vanilla extract, and almond extract. If using, add the orange zest for an extra layer of flavor.
- Combine Mixtures: Gradually add the wet mixture to the dry ingredients, stirring until a dough begins to form. The dough should be slightly sticky but manageable.
- Add Cranberries and Pistachios: Fold in the dried cranberries and pistachios until they’re evenly incorporated throughout the dough.
- Shape the Dough: Transfer the dough to the prepared baking sheet and shape it into a log about 12 inches long and 3 inches wide. Flatten the top slightly with your hands.
- First Bake: Place the baking sheet in the preheated oven and bake for 25-30 minutes, or until the log is lightly golden brown. Remove from the oven and allow it to cool for about 10 minutes.
- Slice the Biscotti: Once cooled slightly, use a serrated knife to cut the log diagonally into 1/2-inch thick slices.
- Second Bake: Arrange the slices cut side down on the baking sheet. Return them to the oven and bake for an additional 10-15 minutes, flipping them halfway through to assure even crispness. The biscotti should be golden and firm to the touch.
- Cool: Remove the biscotti from the oven and transfer them to a wire rack to cool completely before serving.
Extra Tips:
For the best results, verify that your pistachios are fresh and unsalted to enhance the natural flavors of the biscotti. If you prefer a softer biscotti, reduce the second baking time slightly. You can also drizzle or dip the cooled biscotti in melted white or dark chocolate for an extra festive touch.
Remember to store your biscotti in an airtight container to maintain their crispness for several weeks. Enjoy your Cranberry Pistachio Biscotti with a warm cup of coffee or tea!
Chocolate Yule Log
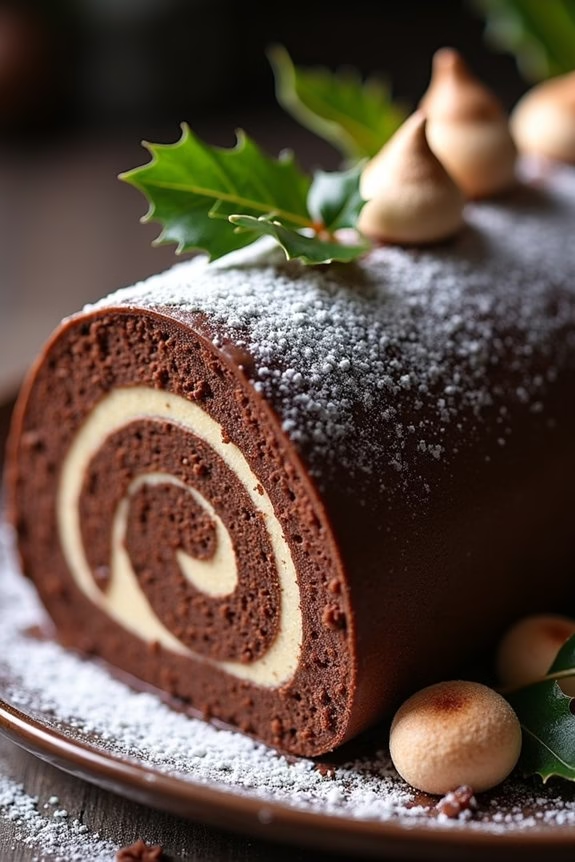
The Chocolate Yule Log, also known as Bûche de Noël, is a classic holiday dessert that brings a touch of elegance to any Christmas potluck. This delightful dessert features a light and fluffy chocolate sponge cake rolled with a rich and creamy chocolate filling, then covered in a velvety chocolate ganache. Resembling a festive log, it’s often decorated with powdered sugar to mimic snow, and garnished with festive elements like meringue mushrooms and holly sprigs. Perfect for serving at a cozy gathering, this dessert will surely impress both in taste and presentation.
Not only does the Chocolate Yule Log look visually stunning, but it also offers a harmonious balance of flavors and textures. The sponge cake is tender yet resilient, allowing it to roll seamlessly without cracking, while the filling provides a luscious contrast with its decadent chocolate richness. The ganache coating brings it all together with a glossy finish, making each bite a decadent experience. Ideal for serving 4-6 people, this recipe guarantees that everyone at your holiday table will have a chance to indulge in a slice of this festive treat.
Ingredients for 4-6 servings:
- 4 large eggs
- 1/2 cup granulated sugar
- 1/3 cup all-purpose flour
- 1/4 cup unsweetened cocoa powder
- 1 teaspoon baking powder
- 1/4 teaspoon salt
- 1 teaspoon vanilla extract
- 1/2 cup heavy cream
- 4 ounces semisweet chocolate, chopped
- 1 tablespoon butter
- Powdered sugar for dusting
- Optional decorations: meringue mushrooms, holly sprigs
Cooking Instructions:
- Preheat and Prepare: Preheat your oven to 350°F (175°C). Line a 10×15-inch jelly roll pan with parchment paper, making sure it hangs over the sides for easy removal. Lightly grease the paper.
- Make the Sponge Cake Batter: In a large bowl, beat the eggs using an electric mixer on high speed until thick and pale, about 5 minutes. Gradually add the granulated sugar, continuing to beat until well combined. Stir in the vanilla extract.
- Combine Dry Ingredients: In a separate bowl, sift together the flour, cocoa powder, baking powder, and salt. Gently fold the dry ingredients into the egg mixture with a spatula until just combined, being careful not to deflate the batter.
- Bake the Cake: Spread the batter evenly into the prepared pan, smoothing the top with a spatula. Bake for 10-12 minutes, or until the cake springs back when lightly touched.
- Roll the Cake: While the cake is still warm, use the parchment paper to lift the cake from the pan. Dust the top with powdered sugar. Place a clean kitchen towel over the cake and gently roll the cake from one short end to the other with the towel inside. Allow it to cool completely in this rolled position.
- Prepare the Filling: In a small saucepan, heat the heavy cream over medium heat until it just begins to simmer. Remove from heat and add the chopped chocolate and butter. Let it sit for a minute, then stir until smooth and glossy. Let it cool until thickened slightly but still spreadable.
- Assemble the Yule Log: Carefully unroll the cooled cake, remove the towel, and spread the chocolate filling evenly over the surface. Re-roll the cake (without the towel) and place it seam-side down on a serving platter.
- Make the Ganache: If desired, prepare additional ganache for topping by repeating the filling process. Spread over the rolled cake, covering it completely. Use a fork to create a bark-like texture.
- Decorate and Serve: Dust with additional powdered sugar and decorate with meringue mushrooms and holly sprigs if desired. Refrigerate for at least 1 hour before slicing and serving.
Extra Tips:
When making the Chocolate Yule Log, it’s crucial to roll the cake while it’s still warm to prevent cracking. If you find the cake starts to crack, don’t worry too much, as the ganache can help to hide imperfections. Confirm the filling is sufficiently cooled and thickened before spreading it on the cake to avoid a runny mess.
Finally, allow the assembled cake to chill, as this will help set the filling and make slicing easier. Enjoy your festive creation!
Spiced Rum Fruitcake
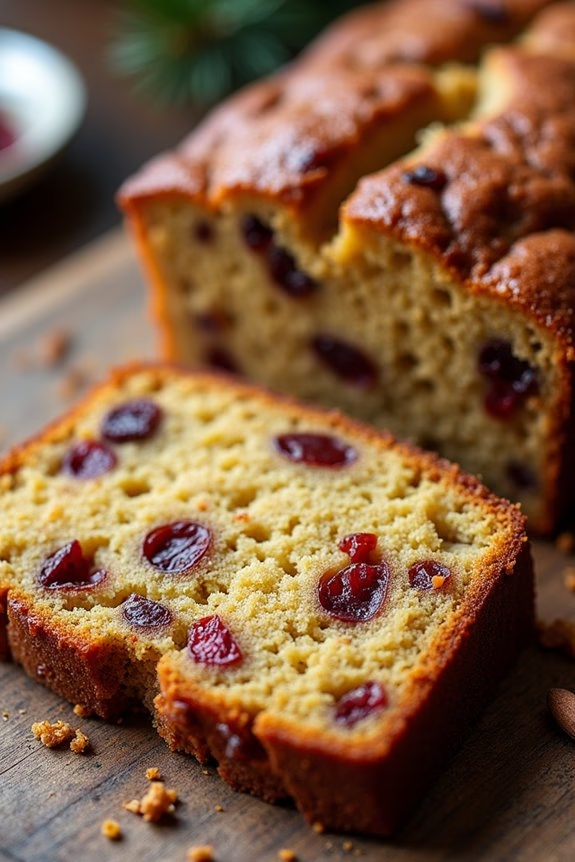
Spiced Rum Fruitcake is a traditional holiday dessert that brings warmth and flavor to any festive gathering. It’s a rich, moist cake that combines a medley of dried fruits, nuts, and warm spices, all soaked in a delightful spiced rum mixture. This cake is perfect for a Christmas potluck, as it embodies the essence of the holiday season and can be prepared ahead of time, allowing the flavors to meld beautifully.
The addition of spiced rum not only adds depth to the cake but also assists in preserving it, making it a delicious treat that can be enjoyed throughout the holiday season.
The key to a successful Spiced Rum Fruitcake is the balance of flavors and the use of quality ingredients. The dried fruits and nuts are first soaked in spiced rum, which infuses them with flavor and guarantees they remain plump and juicy. The cake batter is seasoned with a blend of spices such as cinnamon, nutmeg, and cloves, enhancing the warm, cozy feeling synonymous with Christmas.
Once baked, the fruitcake can be further brushed with spiced rum, guaranteeing every bite is a deliciously boozy treat. This recipe serves 4-6 people, making it ideal for small gatherings or as a contribution to a larger potluck spread.
Ingredients:
- 1 cup mixed dried fruits (raisins, currants, chopped dates, dried apricots)
- 1/2 cup spiced rum
- 1/2 cup unsalted butter, softened
- 1/2 cup brown sugar, packed
- 2 large eggs
- 1 cup all-purpose flour
- 1/4 teaspoon baking powder
- 1/2 teaspoon ground cinnamon
- 1/4 teaspoon ground nutmeg
- 1/8 teaspoon ground cloves
- 1/4 cup chopped nuts (walnuts or pecans)
- 1/4 cup candied peel or cherries, optional
- 1/4 teaspoon salt
Instructions:
- Pre-soak the Fruits: In a medium bowl, combine the mixed dried fruits with the spiced rum. Stir well, cover, and let the mixture soak for at least 4 hours or overnight for maximum flavor infusion.
- Prepare the Cake Batter: Preheat your oven to 325°F (160°C). Grease and line a 6-inch round cake pan with parchment paper. In a large bowl, cream together the softened butter and brown sugar until light and fluffy. Add the eggs one at a time, mixing well after each addition.
- Dry Ingredients: In another bowl, sift together the flour, baking powder, cinnamon, nutmeg, cloves, and salt. Gradually add the dry ingredients to the creamed butter mixture, folding gently until just combined.
- Combine Ingredients: Stir in the soaked fruit mixture, including any remaining liquid, along with the chopped nuts and candied peel or cherries if using. Mix until the fruits and nuts are evenly distributed throughout the batter.
- Bake the Cake: Pour the batter into the prepared cake pan, smoothing the top with a spatula. Bake in the preheated oven for about 50-60 minutes, or until a toothpick inserted into the center comes out clean.
- Cool and Finish: Allow the cake to cool in the pan for about 10 minutes before transferring it to a wire rack to cool completely. Once cooled, optionally brush the top of the cake with additional spiced rum for extra flavor and moisture.
Extra Tips:
For the best results, plan to make your Spiced Rum Fruitcake a few days in advance, as the flavors intensify and improve with time. If you prefer a non-alcoholic version, you can substitute the spiced rum with apple juice or orange juice.
Additionally, feel free to customize the dried fruits and nuts to your preference or what you have on hand. If storing the cake, wrap it tightly in plastic wrap or aluminum foil to prevent it from drying out. Enjoy your fruitcake with a dollop of whipped cream or a scoop of vanilla ice cream for an extra special treat!
Candy Cane Chocolate Tart
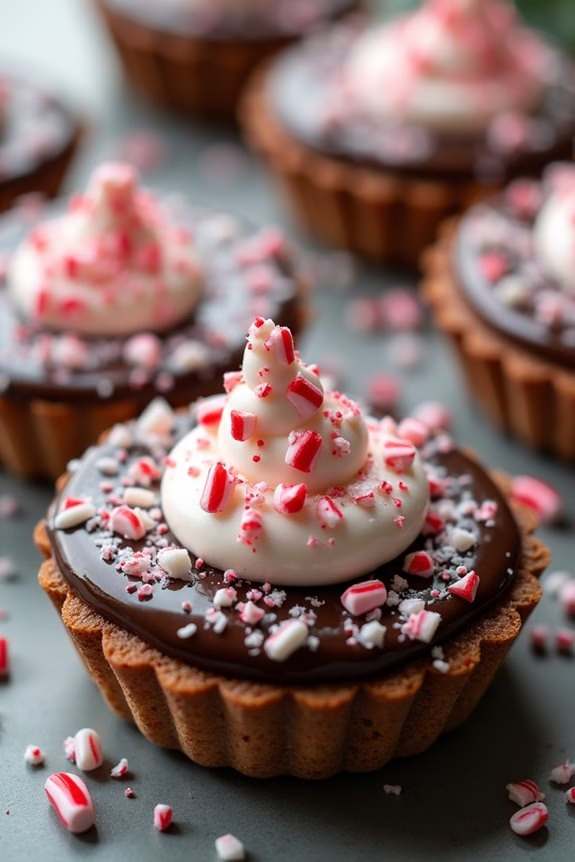
Indulge in the festive spirit with a decadent Candy Cane Chocolate Tart, a perfect centerpiece for your Christmas potluck dessert table. This tart combines the rich, velvety smoothness of chocolate with the invigorating minty crunch of candy cane, creating a delightful treat that’s both visually stunning and delicious.
Its buttery, crumbly crust serves as the ideal base, making every bite a harmonious balance of textures and flavors. With its elegant appearance and irresistible taste, this dessert is sure to be a crowd-pleaser for any gathering during the holiday season.
This Candy Cane Chocolate Tart is designed to serve 4-6 people, making it ideal for intimate gatherings or as part of a larger dessert spread. Whether you’re an experienced baker or a novice in the kitchen, this recipe is simple to follow and yields impressive results.
The combination of classic holiday flavors in a sophisticated tart form will leave your guests craving more. Gather your ingredients and follow the detailed instructions below to create a show-stopping dessert that will be the talk of your Christmas potluck.
Ingredients (serves 4-6):
- 1 1/4 cups all-purpose flour
- 1/4 cup unsweetened cocoa powder
- 1/4 cup granulated sugar
- 1/2 cup unsalted butter (cold, cut into cubes)
- 1 large egg yolk
- 2 tablespoons ice water
- 1 cup heavy cream
- 8 ounces bittersweet chocolate (chopped)
- 1/2 teaspoon peppermint extract
- 4 candy canes (crushed)
- Whipped cream (for serving, optional)
Cooking Instructions:
- Prepare the Crust: In a large mixing bowl, combine the flour, cocoa powder, and sugar. Add the cold, cubed butter and mix with a pastry cutter or your fingers until the mixture resembles coarse crumbs.
- Form the Dough: Add the egg yolk and ice water to the flour mixture. Stir until the dough begins to come together, then form it into a disk. Wrap the dough in plastic wrap and refrigerate for at least 30 minutes.
- Preheat the Oven: Set your oven to 350°F (175°C). Remove the dough from the refrigerator and roll it out on a lightly floured surface to fit a 9-inch tart pan.
- Bake the Crust: Gently press the dough into the tart pan, trimming any excess. Prick the bottom with a fork to prevent bubbles, and bake for 15 minutes. Let the crust cool completely.
- Make the Chocolate Filling: In a saucepan over medium heat, bring the heavy cream to a simmer. Remove from heat and add the chopped chocolate. Let it sit for a minute, then stir until smooth. Stir in the peppermint extract.
- Assemble the Tart: Pour the chocolate mixture into the cooled crust, spreading evenly. Sprinkle the crushed candy canes over the top for a festive touch.
- Chill the Tart: Refrigerate the tart for at least 2 hours, or until the filling is set. Before serving, you can add a dollop of whipped cream to each slice if desired.
Extra Tips:
When making the crust, make sure your butter is very cold to achieve the right crumbly texture. If the dough feels sticky when forming it, sprinkle a little more flour to make it manageable.
For the chocolate filling, use high-quality chocolate for the best flavor and texture. If you prefer a stronger mint flavor, you can increase the peppermint extract slightly, but be cautious as it can quickly become overpowering.
Finally, for a neat presentation, use a sharp knife to slice the tart and wipe the knife clean between cuts to maintain clean edges.
Red Velvet Snowball Cookies
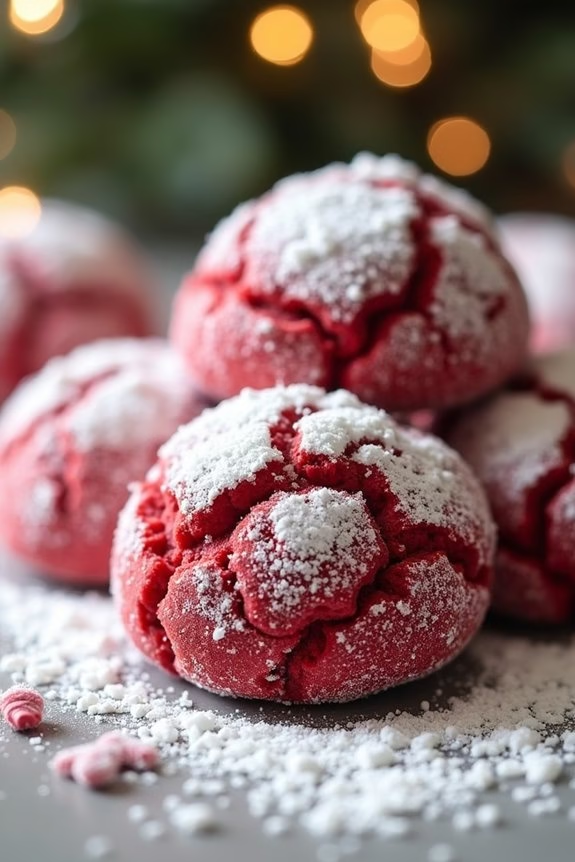
Adding a festive twist to your Christmas potluck with these delightful Red Velvet Snowball Cookies is certain to make the occasion merrier. These vibrant cookies, with their striking red hue and dusted with a snowy layer of powdered sugar, perfectly capture the holiday spirit. The combination of rich cocoa, cream cheese, and vanilla creates a delectable flavor profile, making them an irresistible treat for both kids and adults alike.
These cookies aren’t only visually appealing but also incredibly easy to make. They require minimal ingredients and can be whipped up in no time, making them ideal for those last-minute dessert contributions. Whether you’re a seasoned baker or a beginner, this recipe is straightforward and rewarding. The following ingredients and instructions will yield approximately 24 cookies, perfect for serving 4-6 people.
Ingredients:
- 1 cup unsalted butter, softened
- 1/2 cup powdered sugar (plus extra for rolling)
- 2 teaspoons vanilla extract
- 1/4 teaspoon red gel food coloring
- 2 cups all-purpose flour
- 1/4 cup unsweetened cocoa powder
- 1/4 teaspoon salt
- 1/2 cup finely chopped pecans (optional)
Instructions:
- Preheat the Oven: Start by preheating your oven to 350°F (175°C). Line a baking sheet with parchment paper or a silicone baking mat to prevent the cookies from sticking.
- Cream the Butter and Sugar: In a large mixing bowl, cream together the softened butter and 1/2 cup of powdered sugar using an electric mixer on medium speed. Mix until the mixture is light and fluffy, about 2-3 minutes.
- Add Flavorings: Add the vanilla extract and red gel food coloring to the butter mixture. Mix until the color is evenly distributed throughout the dough.
- Combine Dry Ingredients: In a separate bowl, whisk together the flour, cocoa powder, and salt. Gradually add the dry ingredients to the wet ingredients, mixing on low speed until a dough forms. If using, fold in the finely chopped pecans.
- Shape the Cookies: Scoop out tablespoon-sized portions of dough and roll them into balls using your hands. Place the balls onto the prepared baking sheet, spacing them about 2 inches apart.
- Bake the Cookies: Bake in the preheated oven for 12-15 minutes, or until the cookies are set but not browned. Remove from the oven and let them cool on the baking sheet for 5 minutes before transferring them to a wire rack to cool completely.
- Roll in Powdered Sugar: Once the cookies are completely cooled, roll them generously in powdered sugar until fully coated. For an extra snowy effect, roll them twice.
Extra Tips:
To guarantee your Red Velvet Snowball Cookies retain their vibrant red color, it’s important to use gel food coloring instead of liquid, as liquids can dilute the dough and affect the consistency.
If you prefer a nut-free version, feel free to omit the pecans. Additionally, these cookies can be made ahead of time and stored in an airtight container for up to a week, making them an excellent option for early holiday preparations.
Enjoy these festive treats with a glass of milk or a warm cup of hot cocoa for the ultimate holiday indulgence!
Pecan Pie Bars
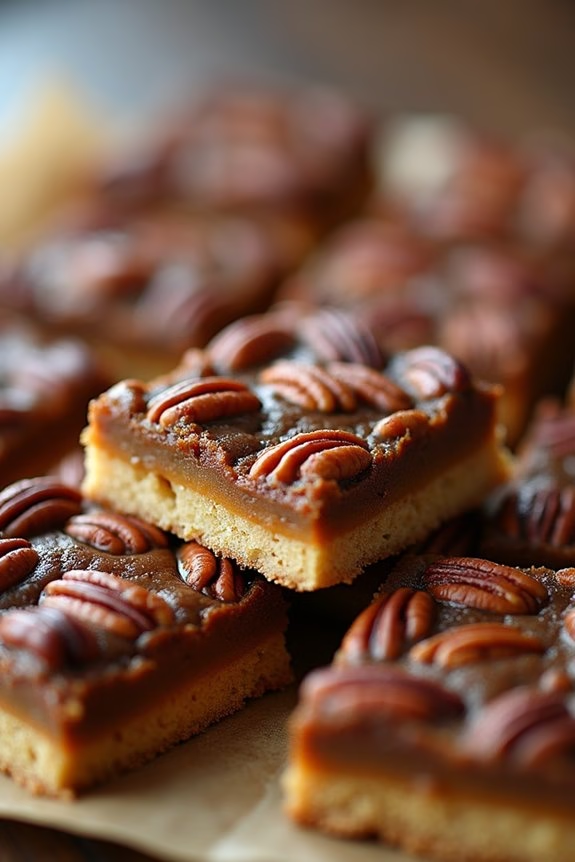
Pecan Pie Bars are a delightful twist on the classic pecan pie, perfect for sharing at a Christmas potluck. These bars combine a buttery, flaky crust with a gooey, caramel-like pecan filling, making them both delicious and easy to serve. The bars are perfectly portioned, so guests can enjoy just the right amount of sweetness without feeling overwhelmed. Ideal for a holiday gathering, these Pecan Pie Bars are sure to be a crowd favorite, leaving everyone coming back for more.
Not only are these bars incredibly tasty, but they’re also straightforward to make. They require minimal hands-on time, which is perfect during the busy holiday season. The combination of a shortbread-like base and a rich pecan topping is both satisfying and luxurious. Whether you’re a seasoned baker or someone new to dessert-making, these bars will be a hit. Let’s get started on creating these delectable treats.
Ingredients (Serves 4-6):
- 1 cup all-purpose flour
- 1/2 cup unsalted butter, softened
- 1/4 cup granulated sugar
- 1/4 teaspoon salt
- 3/4 cup packed brown sugar
- 1/2 cup light corn syrup
- 2 large eggs
- 1 teaspoon vanilla extract
- 1 1/2 cups pecan halves
Cooking Instructions:
- Preheat the Oven: Begin by preheating your oven to 350°F (175°C). This guarantees that the oven reaches the correct temperature by the time you’re ready to bake the bars.
- Prepare the Crust: In a medium bowl, combine the all-purpose flour, softened butter, granulated sugar, and salt. Mix until the ingredients form a crumbly dough. Press this mixture evenly into the bottom of an ungreased 9-inch square baking pan to form the crust layer.
- Bake the Crust: Place the crust in the preheated oven and bake for about 15 minutes or until it’s lightly golden. This initial bake helps create a sturdy base for the pecan filling.
- Make the Filling: While the crust is baking, prepare the pecan filling. In a large bowl, whisk together the brown sugar, light corn syrup, eggs, and vanilla extract until smooth. Stir in the pecan halves, ensuring they’re evenly coated.
- Assemble the Bars: Once the crust is done, remove it from the oven and pour the pecan filling over the hot crust. Spread the filling evenly to cover the entire crust.
- Bake the Bars: Return the pan to the oven and bake for an additional 25-30 minutes or until the filling is set and slightly firm to the touch. A toothpick inserted in the center should come out clean, indicating doneness.
- Cool and Serve: Allow the bars to cool completely in the pan on a wire rack. Once cooled, cut them into bars of your desired size and serve.
Extra Tips:
When making Pecan Pie Bars, it’s important to monitor the baking time closely, as ovens can vary. Overbaking can lead to a dry filling, so check for doneness a few minutes before the suggested time.
Also, for a twist, try adding a sprinkle of sea salt on top before baking for a sweet and salty flavor. If you prefer a thicker crust, consider doubling the crust ingredients.
Finally, store any leftovers in an airtight container at room temperature for up to three days, though they’re best enjoyed fresh.
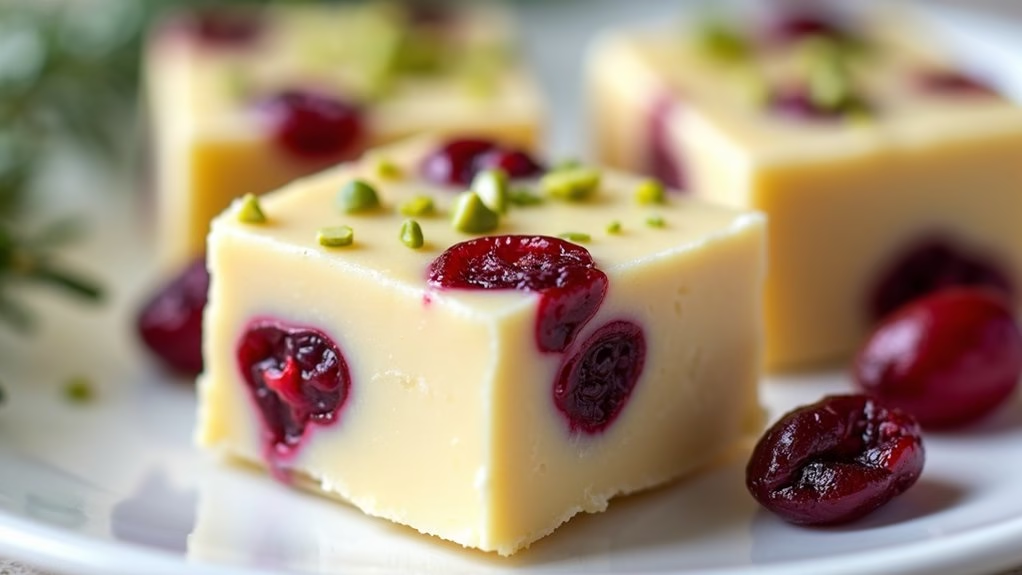
White Chocolate Cranberry Fudge
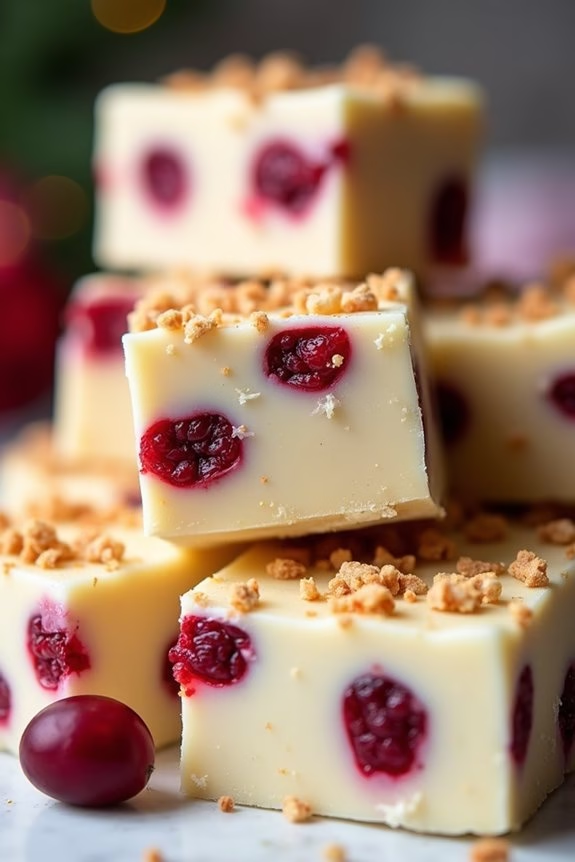
White Chocolate Cranberry Fudge is the perfect sweet treat to offer at a Christmas potluck. Combining the smooth, creamy texture of white chocolate with the tangy zing of dried cranberries, this fudge isn’t only a delight to the taste buds but also a visual treat with its festive colors.
It’s an easy-to-make dessert that requires minimal ingredients and effort, making it a convenient choice for busy holiday preparations. The fudge sets beautifully, providing a perfect balance of sweetness and tartness, and is sure to be a hit among guests of all ages.
This recipe yields enough White Chocolate Cranberry Fudge to serve 4-6 people. It’s a great option if you’re looking to prepare something ahead of time, as it can be made in advance and stored until it’s time to serve. The fudge can be dressed up with a drizzle of chocolate or a sprinkle of nuts if desired, allowing for customization to suit your taste or the tastes of your audience.
With its delightful flavor and festive appearance, this fudge is sure to become a holiday staple in your dessert repertoire.
Ingredients:
- 2 cups white chocolate chips
- 14 oz can sweetened condensed milk
- 1 teaspoon vanilla extract
- 3/4 cup dried cranberries
- 1/4 teaspoon salt
Cooking Instructions:
- Prepare the Pan: Line an 8×8 inch baking dish with parchment paper, leaving some overhang on the sides to make it easy to lift the fudge out later. This will guarantee the fudge doesn’t stick to the pan and is easy to remove once set.
- Melt Chocolate: In a medium saucepan, combine the white chocolate chips and the sweetened condensed milk over low heat. Stir continuously until the chocolate is completely melted and the mixture is smooth. Be careful not to overheat or burn the chocolate; keep the heat low and stir gently.
- Add Flavoring: Once the mixture is smooth, remove it from the heat and stir in the vanilla extract and salt. These ingredients will enhance the flavor of the fudge and balance the sweetness.
- Incorporate Cranberries: Gently fold in the dried cranberries, ensuring they’re evenly distributed throughout the mixture. The cranberries add a pleasant tartness and a festive touch to the fudge.
- Set the Fudge: Pour the mixture into the prepared baking dish, spreading it evenly with a spatula. Allow the fudge to cool slightly at room temperature before transferring it to the refrigerator.
- Chill: Place the dish in the refrigerator and let the fudge chill for at least 2 hours, or until it’s firm. This will help the fudge set properly and make it easier to cut.
- Cut and Serve: Once the fudge is set, use the parchment paper overhang to lift it out of the pan. Cut into small squares with a sharp knife and serve at room temperature.
Extra Tips:
For an extra festive touch, consider adding a sprinkle of chopped nuts, such as pistachios or almonds, on top of the fudge before it sets. This will add a bit of crunch and enhance the visual appeal.
If you prefer a smoother fudge, you can chop the cranberries into smaller pieces before folding them into the mixture. When melting the chocolate, you can also use a microwave-safe bowl and microwave in 30-second intervals, stirring between each, until the chocolate is melted and smooth.