

When it comes to Christmas potlucks, cookies are always a hit, and I’ve got ten recipes that will have everyone asking for more. From the classic chocolate chip to the festive peppermint bark thumbprints, there’s something here for every taste. Imagine the nostalgia of gingerbread spice or the vibrant color of red velvet crinkle cookies. Intrigued? There’s much more to discover about these crowd-pleasers and how they can sweeten your holiday gatherings.
Classic Chocolate Chip Cookies
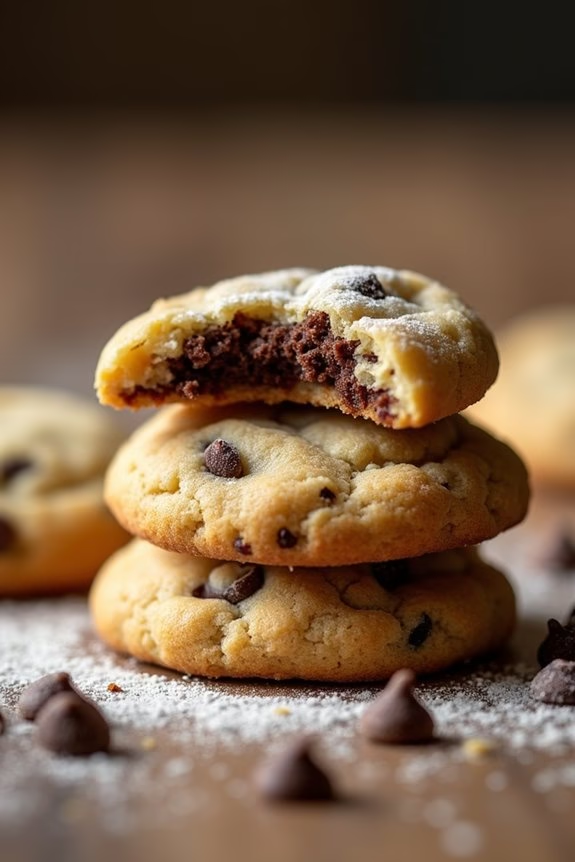
There’s something irresistibly nostalgic about biting into a classic chocolate chip cookie. Its golden-brown edges, chewy center, and pockets of melted chocolate make it a timeless favorite for any occasion, especially during the festive season.
Whether you’re attending a Christmas potluck or simply want to indulge in a sweet treat, these cookies offer the perfect blend of sweetness and texture that will satisfy any cookie lover’s cravings.
This version of the classic chocolate chip cookie recipe is designed to yield a serving size of 4-6 people, making it ideal for sharing with friends and family. By using the right balance of ingredients and following a few simple steps, you can create cookies that are crispy on the outside, chewy on the inside, and brimming with chocolatey goodness.
Below is a list of ingredients and detailed instructions to guide you in baking the perfect batch of cookies.
Ingredients for 4-6 Servings:
- 1 cup (2 sticks) unsalted butter, softened
- 3/4 cup granulated sugar
- 3/4 cup packed brown sugar
- 1 teaspoon vanilla extract
- 2 large eggs
- 2 1/4 cups all-purpose flour
- 1 teaspoon baking soda
- 1/2 teaspoon salt
- 2 cups semi-sweet chocolate chips
- 1 cup chopped nuts (optional)
Cooking Instructions:
- Preheat the Oven: Start by preheating your oven to 375°F (190°C). This guarantees that the oven is at the right temperature when you’re ready to bake the cookies, leading to even cooking.
- Mix the Wet Ingredients: In a large mixing bowl, cream together the softened butter, granulated sugar, brown sugar, and vanilla extract until the mixture is smooth and creamy. This process should take about 2-3 minutes using an electric mixer on medium speed.
- Add the Eggs: Beat in the eggs one at a time, making sure each egg is fully incorporated before adding the next. This helps in achieving a smooth and consistent batter.
- Combine Dry Ingredients: In a separate bowl, whisk together the flour, baking soda, and salt. Gradually add this dry mixture to the creamed butter and sugar mixture, blending well after each addition.
- Fold in the Chocolate Chips: Stir in the chocolate chips and nuts (if using) by hand using a spatula or wooden spoon. Confirm that the chips and nuts are evenly distributed throughout the dough.
- Prepare the Baking Sheets: Line baking sheets with parchment paper. Using a tablespoon or small ice cream scoop, drop rounded tablespoons of dough onto the prepared sheets, leaving about 2 inches between each cookie to allow for spreading during baking.
- Bake the Cookies: Place the baking sheets in the preheated oven and bake for 9-11 minutes, or until the cookies are golden brown around the edges. The centers should appear slightly undercooked; they’ll continue to firm up as they cool.
- Cool and Serve: Remove the baking sheets from the oven and allow the cookies to cool on the sheets for about 2 minutes before transferring them to wire racks to cool completely. Serve warm or store in an airtight container for later enjoyment.
Extra Tips:
For the best results, make sure your butter is at room temperature before starting, as this will help it cream more easily with the sugars.
Additionally, if you prefer your cookies to be extra chewy, try refrigerating the dough for at least 30 minutes before baking. This step helps the flavors to meld together and prevents excessive spreading in the oven.
Finally, feel free to experiment with different types of chocolate chips or add-ins, such as white chocolate chips or dried cranberries, to suit your taste preferences or to add a festive twist to your cookies.
Peppermint Bark Thumbprints
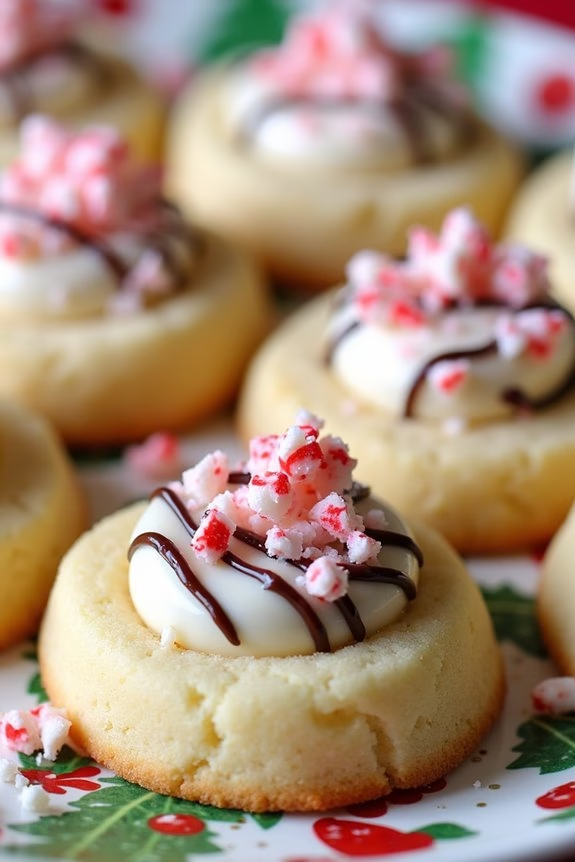
Peppermint Bark Thumbprints are a festive and delightful treat perfect for a Christmas potluck. These cookies combine the classic thumbprint cookie with the holiday favorite, peppermint bark, creating a sweet, minty, and chocolatey bite. The buttery shortbread base is complemented by a creamy peppermint filling and topped with crushed peppermint candies, making them a visually appealing and delicious addition to any holiday gathering.
These cookies aren’t only delicious but also simple to make, requiring just a few steps and common ingredients. With a serving size of 4-6 people, this recipe is perfect for small gatherings or as part of a larger dessert spread. Whip up a batch and watch them disappear from the plate as family and friends gather around to enjoy the holiday season.
Ingredients for 4-6 servings:
- 1 cup unsalted butter, softened
- 3/4 cup powdered sugar
- 1 teaspoon vanilla extract
- 1/4 teaspoon peppermint extract
- 2 cups all-purpose flour
- 1/4 teaspoon salt
- 1 cup white chocolate chips
- 1/2 cup crushed peppermint candies
- 1/2 cup semi-sweet chocolate chips
- 1 tablespoon heavy cream
Cooking Instructions:
- Preheat the oven: Set your oven to 350°F (175°C) and line two baking sheets with parchment paper.
- Prepare the cookie dough: In a large mixing bowl, beat the softened butter and powdered sugar together until light and fluffy. Add vanilla extract and peppermint extract, mixing until well combined.
- Mix the dry ingredients: In a separate bowl, whisk together the flour and salt. Gradually add the dry ingredients to the butter mixture, mixing until a soft dough forms.
- Shape the cookies: Roll the dough into 1-inch balls and place them 2 inches apart on the prepared baking sheets. Use your thumb or the back of a teaspoon to gently press an indentation into the center of each dough ball.
- Bake the cookies: Bake in the preheated oven for 10-12 minutes, or until the edges are lightly golden. Remove from the oven and allow to cool slightly on the baking sheets before transferring to a wire rack to cool completely.
- Prepare the filling: While the cookies are cooling, melt the white chocolate chips and heavy cream together in a microwave-safe bowl in 30-second intervals, stirring in between until smooth. Spoon the melted white chocolate into the indentations of the cooled cookies.
- Decorate the cookies: Melt the semi-sweet chocolate chips in a microwave-safe bowl and drizzle over the filled cookies. Before the chocolate sets, sprinkle the crushed peppermint candies on top of each cookie.
Extra Tips:
When making Peppermint Bark Thumbprints, verify your butter is at room temperature for easy mixing. If the dough feels too sticky, chill it in the refrigerator for 15-20 minutes before shaping.
For a more vibrant presentation, use a mix of red and green crushed peppermint candies. These cookies can be stored in an airtight container for up to a week, making them a convenient make-ahead option for holiday gatherings.
Enjoy the festive flavors and delightful textures that make these cookies a holiday favorite!
Gingerbread Spice Cookies
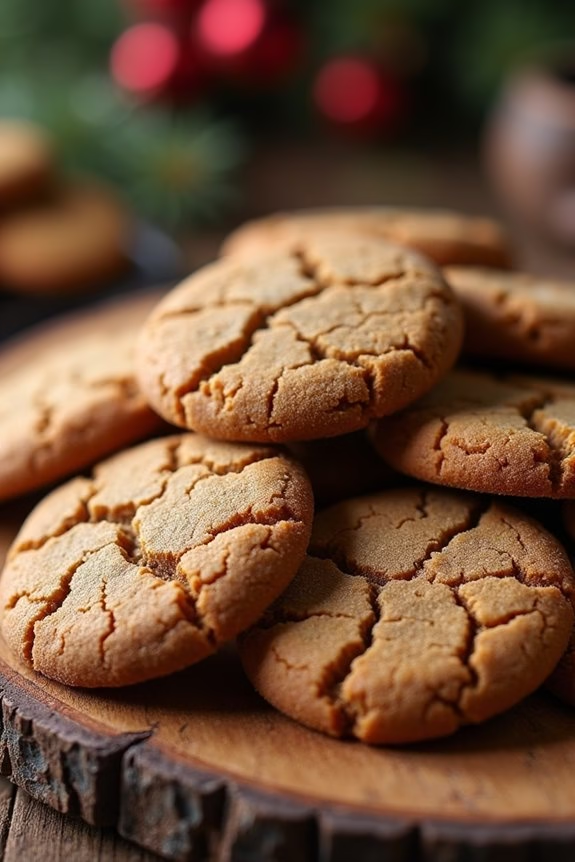
Gingerbread Spice Cookies are a beloved holiday treat that embody the warmth and coziness of the Christmas season. These cookies aren’t only delicious but also fill the kitchen with the rich, aromatic scent of spices like ginger, cinnamon, and cloves. Perfect for a Christmas potluck or any festive gathering, these cookies have a slightly crisp edge with a soft, chewy center, making them irresistible to both kids and adults alike.
Crafting these cookies is a delightful experience that brings together the essence of traditional holiday flavors. Whether you’re an experienced baker or a novice, this recipe is straightforward and rewarding. The dough is easy to work with, and the resulting cookies are perfect for decorating with royal icing or enjoyed plain with a glass of milk. Made with wholesome ingredients, these Gingerbread Spice Cookies make for a thoughtful homemade gift or a charming addition to your festive cookie platter.
Ingredients (Serving Size: 4-6 people):
- 2 3/4 cups all-purpose flour
- 1 teaspoon baking soda
- 1/2 teaspoon baking powder
- 1 tablespoon ground ginger
- 1 teaspoon ground cinnamon
- 1/2 teaspoon ground cloves
- 1/4 teaspoon ground nutmeg
- 1/2 teaspoon salt
- 3/4 cup unsalted butter, softened
- 1 cup packed brown sugar
- 1 egg
- 1 tablespoon vanilla extract
- 1/4 cup molasses
Cooking Instructions:
- Preheat the Oven: Begin by preheating your oven to 350°F (175°C). Line two baking sheets with parchment paper to prevent the cookies from sticking.
- Mix Dry Ingredients: In a medium-sized bowl, whisk together the flour, baking soda, baking powder, ginger, cinnamon, cloves, nutmeg, and salt. Set aside.
- Cream Butter and Sugar: In a large bowl, using an electric mixer, cream the softened butter and brown sugar together until light and fluffy, which should take about 3-4 minutes.
- Add Wet Ingredients: Beat in the egg, vanilla extract, and molasses until well combined. Make sure the mixture is smooth and homogenous.
- Combine Dry and Wet Mixtures: Gradually add the dry ingredients to the wet mixture, beating on low speed until just combined. Be careful not to overmix.
- Shape the Cookies: Using a tablespoon or a cookie scoop, portion out dough balls onto the prepared baking sheets, leaving about 2 inches between each cookie to allow for spreading.
- Bake the Cookies: Bake in the preheated oven for 8-10 minutes, or until the edges are set and the centers look slightly underdone. This will guarantee a chewy texture.
- Cool the Cookies: Remove from the oven and let them cool on the baking sheets for about 5 minutes before transferring to a wire rack to cool completely.
Extra Tips:
For an added festive touch, consider rolling the cookies in granulated sugar before baking for a sparkly finish. If you prefer a more robust spice flavor, feel free to adjust the spice quantities to your liking.
These cookies store well in an airtight container at room temperature for up to a week, making them perfect for preparing ahead of time. If decorating with icing, make sure the cookies are completely cooled to prevent the icing from melting. Enjoy these Gingerbread Spice Cookies with a hot cup of cocoa or coffee for a delightful holiday treat!
Red Velvet Crinkle Cookies
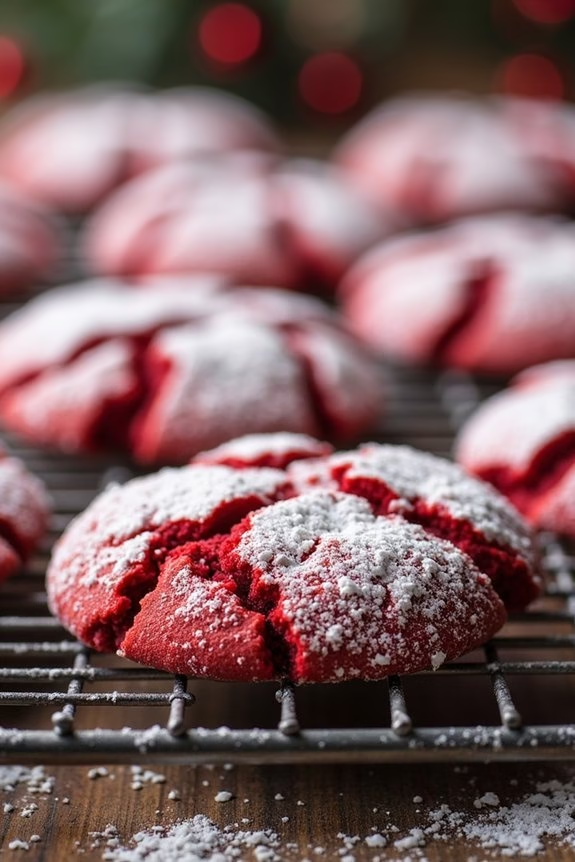
Red Velvet Crinkle Cookies are a delightful twist on the traditional crinkle cookie, combining the rich flavors of red velvet cake with the classic crinkled appearance. These cookies are perfect for a Christmas potluck, offering a festive red color that stands out on any dessert table. With a soft, chewy texture and a subtle cocoa flavor, they’re bound to be a hit with family and friends.
Creating these cookies is a straightforward process that involves mixing, chilling, and baking, guaranteeing they’ve the perfect crinkled appearance. The dough is rolled in powdered sugar before baking, giving them a snowy, wintry look that complements the holiday season. This recipe yields approximately 24-30 cookies, enough for a serving size of 4-6 people, making them an ideal contribution to any holiday gathering.
Ingredients (Serving size: 4-6 people, approximately 24-30 cookies)
- 1 cup all-purpose flour
- 1/4 cup unsweetened cocoa powder
- 1 teaspoon baking powder
- 1/4 teaspoon salt
- 1/2 cup unsalted butter, softened
- 3/4 cup granulated sugar
- 1 large egg
- 1 teaspoon vanilla extract
- 1 tablespoon red food coloring
- 1/2 cup powdered sugar
Cooking Instructions
- Preheat the Oven: Start by preheating your oven to 350°F (175°C). Line two baking sheets with parchment paper or silicone baking mats.
- Mix Dry Ingredients: In a medium-sized bowl, whisk together the flour, cocoa powder, baking powder, and salt. Set aside.
- Cream Butter and Sugar: In a large bowl, using a hand mixer or stand mixer, beat the softened butter and granulated sugar together on medium speed until light and fluffy. This should take about 3-4 minutes.
- Add Wet Ingredients: Add the egg, vanilla extract, and red food coloring to the butter-sugar mixture. Mix until fully combined and the color is even throughout.
- Combine Mixtures: Gradually add the dry ingredients to the wet ingredients, mixing on low speed until just combined. Be careful not to overmix.
- Chill the Dough: Cover the dough with plastic wrap and refrigerate for at least 1 hour. Chilling the dough helps the cookies maintain their shape while baking.
- Prepare for Baking: Once chilled, scoop tablespoon-sized amounts of dough and roll them into balls.
- Coat in Powdered Sugar: Pour the powdered sugar into a shallow dish. Roll each dough ball thoroughly in the powdered sugar until completely coated.
- Bake the Cookies: Place the sugar-coated dough balls on the prepared baking sheets, spacing them about 2 inches apart. Bake for 10-12 minutes, or until the edges are set and the cookies have the signature crinkle appearance.
- Cool and Serve: Allow the cookies to cool on the baking sheets for 5 minutes before transferring them to a wire rack to cool completely.
Extra Tips
To guarantee your Red Velvet Crinkle Cookies have a vibrant red color, use gel food coloring instead of liquid, as it provides a more intense color without altering the consistency of the dough.
If you find the cookies spreading too much during baking, try chilling the dough for a longer period. Additionally, for a more decadent version, consider adding white chocolate chips to the dough for a delightful contrast in flavor and texture.
Cranberry Orange Oatmeal Cookies
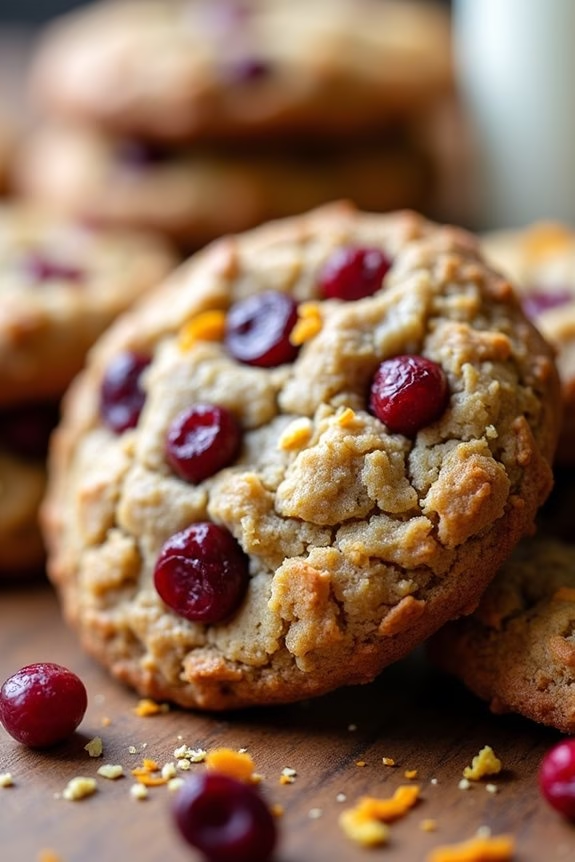
Cranberry Orange Oatmeal Cookies are a delightful treat that perfectly capture the essence of the holiday season. These cookies combine the tartness of dried cranberries with the zesty vibrancy of orange, all nestled within a comforting oatmeal base.
They’re the ideal addition to any Christmas potluck, bringing a burst of festive flavor that’s sure to be a hit with family and friends. Not only are they delicious, but they’re also relatively easy to make, allowing you to spend more time enjoying the festivities and less time in the kitchen.
The combination of oatmeal, cranberries, and orange zest provides a chewy yet slightly crisp texture that appeals to all palates. These cookies aren’t only delicious but are also visually appealing, with the vibrant red cranberries contrasting against the golden hue of the cookies.
Whether you’re serving them at a holiday gathering or gifting them as homemade treats, Cranberry Orange Oatmeal Cookies are a guaranteed success.
Ingredients (Serves 4-6 people):
- 1 cup all-purpose flour
- 1/2 teaspoon baking soda
- 1/4 teaspoon salt
- 1/2 cup unsalted butter, softened
- 1/2 cup brown sugar, packed
- 1/4 cup granulated sugar
- 1 large egg
- 1 teaspoon vanilla extract
- 1 tablespoon orange zest
- 1 tablespoon freshly squeezed orange juice
- 1 1/2 cups old-fashioned oats
- 3/4 cup dried cranberries
Cooking Instructions:
- Preheat the Oven: Preheat your oven to 350°F (175°C) and line two baking sheets with parchment paper to prevent the cookies from sticking.
- Prepare Dry Ingredients: In a medium bowl, whisk together the flour, baking soda, and salt. Set aside for later use.
- Cream the Butter and Sugars: In a large mixing bowl, use an electric mixer to cream together the softened butter, brown sugar, and granulated sugar until the mixture is light and fluffy, about 2-3 minutes.
- Add Wet Ingredients: Beat in the egg, vanilla extract, orange zest, and orange juice until well combined. The citrus elements will add a lively aroma and flavor to the cookies.
- Combine with Dry Ingredients: Gradually add the dry ingredients to the wet ingredients, mixing until just combined to avoid overworking the dough.
- Incorporate Oats and Cranberries: Stir in the oats and dried cranberries using a spatula or wooden spoon, ensuring they’re evenly distributed throughout the dough.
- Shape the Cookies: Drop rounded tablespoons of dough onto the prepared baking sheets, spacing them about 2 inches apart to allow for spreading.
- Bake: Bake in the preheated oven for 10-12 minutes, or until the edges are golden brown. The centers may appear slightly underdone, but they’ll firm up as they cool.
- Cool and Serve: Allow the cookies to cool on the baking sheets for 5 minutes before transferring them to a wire rack to cool completely. Serve and enjoy your festive creation!
Extra Tips:
To enhance the citrus flavor, you can add a bit more orange zest or a splash of orange extract to the dough. If you prefer a softer cookie, slightly reduce the baking time, keeping a close eye on them to prevent over-baking.
For a nutty twist, consider adding chopped walnuts or pecans to the dough. These cookies can be stored in an airtight container at room temperature for up to a week, making them a convenient make-ahead option for busy holiday schedules.
Almond Snowball Cookies

Almond Snowball Cookies are a delightful holiday treat that perfectly capture the essence of the festive season. These cookies, also known as Mexican wedding cookies or Russian tea cakes, are characterized by their rich, buttery texture and a delicate coating of powdered sugar that resembles freshly fallen snow.
Their subtle sweetness and nutty flavor make them a favorite on any Christmas cookie platter, adding a touch of elegance and tradition to your holiday celebrations. This recipe makes approximately 24 Almond Snowball Cookies, serving 4-6 people.
They’re easy to prepare and require only a handful of ingredients, making them perfect for a holiday potluck or a cozy family gathering. With their melt-in-your-mouth texture, these cookies are sure to become a cherished part of your holiday baking repertoire.
Ingredients:
- 1 cup unsalted butter, softened
- 1/2 cup powdered sugar, plus extra for rolling
- 1 teaspoon vanilla extract
- 2 1/4 cups all-purpose flour
- 1/4 teaspoon salt
- 1 cup finely chopped almonds
Instructions:
- Preheat the Oven: Begin by preheating your oven to 350°F (175°C). Line two baking sheets with parchment paper to prevent the cookies from sticking and to guarantee even baking.
- Cream the Butter and Sugar: In a large mixing bowl, beat the softened butter and 1/2 cup of powdered sugar together until the mixture is light and fluffy. This should take about 2-3 minutes. Add the vanilla extract and mix until well combined.
- Combine Dry Ingredients: In a separate bowl, whisk together the flour and salt. Gradually add the flour mixture to the butter mixture, mixing on low speed until just combined. Be careful not to overmix the dough.
- Add Almonds: Stir in the finely chopped almonds until evenly distributed throughout the dough. The dough should be slightly crumbly but hold together when pressed.
- Shape the Cookies: Using your hands, roll the dough into 1-inch balls and place them on the prepared baking sheets, leaving about 1 inch of space between each cookie.
- Bake: Bake the cookies in the preheated oven for 12-15 minutes, or until the bottoms are lightly golden. The tops of the cookies should remain pale.
- Cool and Roll in Sugar: Allow the cookies to cool on the baking sheet for about 5 minutes. While they’re still warm, roll each cookie in powdered sugar to coat completely, then transfer them to a wire rack to cool completely. Once cooled, roll them in powdered sugar again for a second coating.
For the best results when making Almond Snowball Cookies, confirm that your butter is properly softened for easy mixing. If you prefer a different nut flavor, you can substitute the almonds with pecans or walnuts.
Additionally, make sure the cookies are warm when you first roll them in powdered sugar, as the warmth helps the sugar adhere better. Store the cookies in an airtight container at room temperature, where they’ll keep for up to a week, maintaining their delightful texture and flavor.
White Chocolate Macadamia Nut Cookies
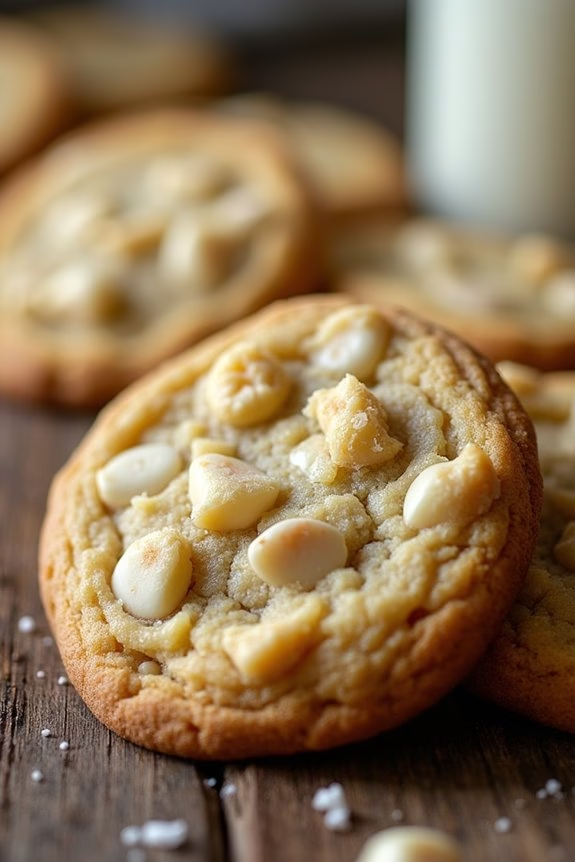
The holiday season is the perfect time to indulge in delicious treats, and White Chocolate Macadamia Nut Cookies are a classic favorite at any Christmas potluck. These cookies combine the rich, creamy sweetness of white chocolate with the buttery crunch of macadamia nuts, creating an irresistible flavor combination that will have guests reaching for seconds.
Ideal for sharing, this recipe yields a batch that’s perfect for serving 4-6 people, making it a great addition to any festive gathering.
Crafting these delightful cookies is both simple and satisfying. The process involves mixing a rich dough, folding in the luscious white chocolate chips and chopped macadamia nuts, and baking until golden brown. The end result is a batch of cookies that are soft on the inside with a slight crisp on the outside, bursting with flavor in every bite.
Whether you’re a seasoned baker or a beginner in the kitchen, this recipe is straightforward and certain to impress.
Ingredients (Serves 4-6):
- 1 cup unsalted butter, softened
- 3/4 cup granulated sugar
- 3/4 cup packed light brown sugar
- 2 large eggs
- 1 teaspoon vanilla extract
- 2 1/2 cups all-purpose flour
- 1 teaspoon baking soda
- 1/2 teaspoon salt
- 1 cup white chocolate chips
- 1 cup macadamia nuts, coarsely chopped
Cooking Instructions:
- Preheat the Oven: Begin by preheating your oven to 350°F (175°C). Line two baking sheets with parchment paper to guarantee the cookies don’t stick.
- Cream the Butter and Sugars: In a large mixing bowl, cream together the softened butter, granulated sugar, and brown sugar until the mixture is light and fluffy. This should take about 2-3 minutes using an electric mixer on medium speed.
- Add the Eggs and Vanilla: Beat in the eggs one at a time, making sure each egg is fully incorporated before adding the next. Then, add the vanilla extract and mix until everything is well combined.
- Mix Dry Ingredients: In a separate bowl, whisk together the flour, baking soda, and salt. Gradually add the dry mixture to the wet ingredients, mixing on low speed until just combined. Be careful not to overmix.
- Fold in the Add-Ins: Gently fold in the white chocolate chips and chopped macadamia nuts using a spatula or wooden spoon, ensuring they’re evenly distributed throughout the dough.
- Shape the Cookies: Scoop tablespoon-sized amounts of dough and roll them into balls. Place them spaced apart on the prepared baking sheets to allow room for spreading.
- Bake the Cookies: Place the baking sheets in the preheated oven and bake for 10-12 minutes, or until the cookies are lightly golden around the edges. Remove from the oven and let them cool on the baking sheets for a few minutes before transferring to a wire rack to cool completely.
Extra Tips:
When making White Chocolate Macadamia Nut Cookies, verify that your butter is at room temperature for easy mixing. If you prefer a softer cookie, slightly underbake them, as they’ll continue to firm up as they cool.
For a more festive touch, consider adding dried cranberries or a sprinkle of sea salt on top before baking. Additionally, store the cookies in an airtight container to maintain their freshness and keep them soft for several days.
Spiced Eggnog Cookies
These cookies aren’t only delicious but also easy to make, making them an ideal choice for both seasoned bakers and beginners alike. The recipe yields about 24 cookies, which is perfect for serving a group of 4-6 people. Gather your ingredients, preheat your oven, and get ready to fill your kitchen with the delightful aroma of freshly baked Spiced Eggnog Cookies.
Ingredients:
- 2 1/4 cups all-purpose flour
- 1 teaspoon baking powder
- 1/2 teaspoon ground cinnamon
- 1/2 teaspoon ground nutmeg
- 1/4 teaspoon salt
- 1/2 cup unsalted butter, softened
- 1 cup granulated sugar
- 1/2 cup packed brown sugar
- 2 large egg yolks
- 1 teaspoon vanilla extract
- 1/2 cup eggnog
- Optional: 1/4 teaspoon ground cloves or allspice for extra spice
Cooking Instructions:
- Preheat the Oven: Begin by preheating your oven to 350°F (175°C). Line two baking sheets with parchment paper or silicone baking mats to prevent the cookies from sticking.
- Mix Dry Ingredients: In a medium-sized bowl, whisk together the flour, baking powder, cinnamon, nutmeg, and salt. If you choose to add cloves or allspice, mix these in as well. Set the bowl aside.
- Cream Butter and Sugars: In a large mixing bowl, use an electric mixer to cream together the softened butter, granulated sugar, and brown sugar until the mixture is light and fluffy, about 3 minutes.
- Add Egg Yolks and Vanilla: Beat in the egg yolks one at a time, making certain each yolk is well incorporated before adding the next. Then add the vanilla extract and continue mixing.
- Incorporate Eggnog: Gradually add the eggnog to the butter mixture, mixing until fully combined. The mixture may look slightly curdled but this is normal.
- Combine Dry and Wet Ingredients: Slowly add the dry ingredients to the wet ingredients, mixing on low speed until just combined. Avoid overmixing to guarantee the cookies remain tender.
- Scoop and Bake: Use a tablespoon or cookie scoop to drop rounded tablespoons of dough onto the prepared baking sheets, spacing them about 2 inches apart to allow room for spreading. Bake in the preheated oven for 10-12 minutes, or until the edges are lightly golden.
- Cool: Remove the cookies from the oven and let them cool on the baking sheets for 5 minutes. Then transfer them to wire racks to cool completely.
Extra Tips:
For an added touch, you can glaze the cooled cookies with a simple eggnog icing. Mix 1 cup of powdered sugar with 2-3 tablespoons of eggnog until smooth, then drizzle over the cookies.
If you like your cookies to have a stronger spice flavor, consider increasing the amounts of cinnamon and nutmeg slightly. You can also experiment with different types of nutmeg, such as freshly grated, for a more intense aroma.
Remember to store the cookies in an airtight container to maintain their softness and flavor.
Salted Caramel Shortbread Bars
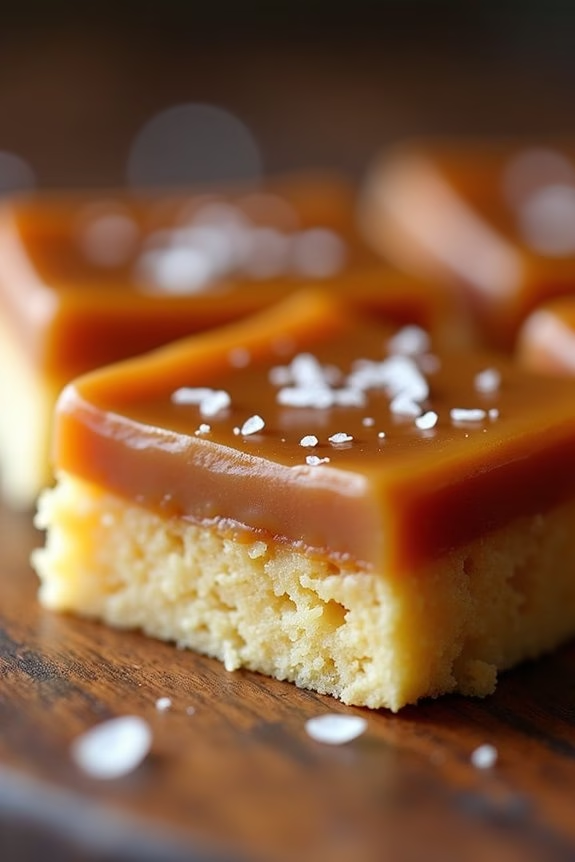
Salted Caramel Shortbread Bars are a delightful combination of buttery shortbread, rich caramel, and a sprinkle of sea salt that creates an irresistible treat perfect for a festive Christmas potluck.
These bars aren’t only visually appealing with their layered structure but also offer a melt-in-your-mouth experience that will have your guests reaching for seconds. The balance of sweet and salty flavors makes them a standout dessert that pairs wonderfully with a cup of coffee or hot cocoa.
This recipe is designed to serve 4-6 people, making it ideal for intimate gatherings or as part of a larger dessert spread. The process involves making a simple shortbread base, a luscious caramel layer, and finishing with a touch of sea salt to enhance the flavors.
With a little patience and attention to detail, you’ll have a batch of Salted Caramel Shortbread Bars that are certain to impress your friends and family.
Ingredients:
- 1 cup (2 sticks) unsalted butter, softened
- 1/2 cup granulated sugar
- 2 cups all-purpose flour
- 1/4 teaspoon salt
- 1 cup unsalted butter (for caramel)
- 1 cup packed light brown sugar
- 4 tablespoons light corn syrup
- 1 can (14 ounces) sweetened condensed milk
- 1 teaspoon vanilla extract
- Sea salt flakes, for topping
Instructions:
- Prepare the Shortbread Base: Preheat your oven to 350°F (175°C). Line a 9×9-inch baking pan with parchment paper, leaving an overhang on the sides for easy removal. In a large bowl, cream together 1 cup of softened butter and 1/2 cup of granulated sugar until light and fluffy. Add in 2 cups of all-purpose flour and 1/4 teaspoon of salt, mixing until a crumbly dough forms.
- Bake the Shortbread: Press the shortbread dough evenly into the prepared pan. Use the back of a spoon or your fingers to smooth the surface. Bake in the preheated oven for 20-25 minutes, or until the edges are lightly golden. Remove from the oven and allow it to cool completely in the pan.
- Make the Caramel Layer: In a medium-sized saucepan over medium heat, melt 1 cup of unsalted butter. Stir in 1 cup of packed light brown sugar, 4 tablespoons of light corn syrup, and 1 can of sweetened condensed milk. Bring the mixture to a gentle boil, then reduce the heat to low. Stir continuously for about 10-15 minutes, or until the caramel thickens and darkens in color. Remove from heat and stir in 1 teaspoon of vanilla extract.
- Assemble the Bars: Pour the hot caramel mixture over the cooled shortbread base, spreading it evenly with a spatula. Allow the caramel to cool and set at room temperature for about 2 hours. For quicker setting, place the pan in the refrigerator.
- Finish with Sea Salt: Once the caramel has set, remove the bars from the pan using the parchment overhang. Sprinkle the top with sea salt flakes to taste, then cut into squares or bars with a sharp knife.
Extra Tips:
To guarantee your caramel layer sets properly, be patient and allow it to cook until it reaches the right consistency. This may take a bit longer than expected, but avoiding rushing this step is essential.
If you prefer a softer shortbread, slightly underbake the base by a minute or two. For a cleaner cut, use a warm, sharp knife (run it under hot water and dry it) to slice the bars.
Store any leftovers in an airtight container at room temperature for up to a week, or freeze them for longer storage.
Double Chocolate Peppermint Cookies

Double Chocolate Peppermint Cookies are a delightful treat that combines the rich flavors of dark chocolate with the invigorating taste of peppermint.
These cookies are a perfect addition to any Christmas potluck, offering a festive twist on traditional chocolate cookies. The combination of cocoa and peppermint isn’t only irresistible but also adds a touch of holiday spirit to your dessert table.
These cookies are easy to make and will surely become a favorite among friends and family.
The recipe for Double Chocolate Peppermint Cookies is designed to serve 4-6 people, making it ideal for small gatherings or as a contribution to a larger potluck event.
The cookies are made with simple ingredients that you likely already have in your pantry, and the addition of crushed peppermint candies gives them a unique crunch and flavor.
Whether you’re an experienced baker or just starting out, this recipe is straightforward and rewarding, resulting in a batch of cookies that are sure to impress.
Ingredients (serves 4-6):
- 1 cup all-purpose flour
- 1/2 teaspoon baking soda
- 1/4 teaspoon salt
- 1/2 cup unsweetened cocoa powder
- 1/2 cup unsalted butter, softened
- 1/2 cup granulated sugar
- 1/2 cup packed brown sugar
- 1 large egg
- 1 teaspoon vanilla extract
- 1/2 teaspoon peppermint extract
- 1 cup semi-sweet chocolate chips
- 1/2 cup crushed peppermint candies
Instructions:
- Preheat the Oven: Preheat your oven to 350°F (175°C) and line two baking sheets with parchment paper to prevent the cookies from sticking.
- Mix Dry Ingredients: In a medium bowl, whisk together the flour, baking soda, salt, and cocoa powder until well combined. This guarantees that the dry ingredients are evenly distributed throughout the dough.
- Cream the Butter and Sugars: In a large mixing bowl, beat the softened butter, granulated sugar, and brown sugar together with an electric mixer on medium speed until light and fluffy, about 2-3 minutes.
- Add Wet Ingredients: Beat in the egg, vanilla extract, and peppermint extract until the mixture is smooth and creamy.
- Combine Wet and Dry Mixtures: Gradually add the dry ingredients to the wet mixture, mixing on low speed until just combined. Be careful not to overmix, as this can result in tough cookies.
- Fold in Chocolate and Peppermint: Gently fold in the chocolate chips and crushed peppermint candies using a spatula, making sure they’re evenly distributed throughout the dough.
- Scoop and Shape: Using a tablespoon or cookie scoop, drop rounded tablespoons of dough onto the prepared baking sheets, spacing them about 2 inches apart to allow for spreading.
- Bake: Bake in the preheated oven for 10-12 minutes, or until the cookies are set around the edges but still soft in the center. They’ll continue to firm up as they cool.
- Cool: Remove from the oven and let the cookies cool on the baking sheets for 5 minutes before transferring them to a wire rack to cool completely.
Extra Tips: For a more intense chocolate flavor, consider using dark cocoa powder instead of regular cocoa powder.
If you want to add an extra touch of festivity, drizzle melted white chocolate over the cooled cookies and sprinkle additional crushed peppermint candies on top.
Make sure to crush the peppermint candies well to avoid large chunks, which can make the cookies difficult to shape.
Store any leftovers in an airtight container to maintain their freshness.