
As the holiday season approaches, I’m excited to share my list of 14 Christmas dinner recipes perfect for two. Think about indulging in a tender Beef Wellington or savoring the rich flavors of Balsamic-Glazed Duck Breast. Each dish is designed to create a special and cozy evening. Ready to bring some charm to your festive celebrations? Let’s explore these recipes that are sure to make your holiday memorable.
Classic Beef Wellington for Two

Beef Wellington is a timeless dish that exudes elegance and sophistication, making it the perfect centerpiece for a special Christmas dinner for two. This classic recipe involves a juicy beef tenderloin wrapped in a flavorful layer of mushroom duxelles, encased in flaky puff pastry. The combination of tender beef, earthy mushrooms, and buttery pastry creates a symphony of flavors that’s sure to impress your dining companion.
Despite its reputation for being a complex dish, Beef Wellington can be successfully prepared at home with a bit of patience and attention to detail. While this version is scaled for two, the recipe can easily be adjusted to serve a larger group, making it a versatile option for various holiday gatherings.
Below, you’ll find a list of ingredients suitable for serving 4-6 people, followed by detailed instructions to guide you through the cooking process. With careful preparation and a few helpful tips, you can create a stunning Beef Wellington that will make your Christmas dinner truly memorable.
Ingredients for 4-6 servings:
- 1.5 kg (3.3 lbs) beef tenderloin
- Salt and black pepper, to taste
- 2 tablespoons olive oil
- 500g (1.1 lbs) cremini mushrooms, finely chopped
- 2 tablespoons unsalted butter
- 2 cloves garlic, minced
- 1 tablespoon fresh thyme leaves
- 1 tablespoon Dijon mustard
- 8 slices of prosciutto
- 500g (1.1 lbs) puff pastry
- 1 egg, beaten
- Flour, for dusting
Cooking Instructions:
- Prepare the Beef:
- Season the beef tenderloin generously with salt and black pepper.
- Heat olive oil in a large skillet over medium-high heat. Sear the beef on all sides until browned, about 2-3 minutes per side. Remove from heat and allow it to cool. Brush the tenderloin with Dijon mustard while it rests.
- Make the Mushroom Duxelles:
- In the same skillet, melt the butter over medium heat. Add the finely chopped mushrooms and cook until they release their moisture and become golden brown, about 10 minutes.
- Add the minced garlic and fresh thyme leaves, and cook for another 2 minutes. Season with salt and pepper, then set aside to cool.
- Assemble the Beef Wellington:
- Lay out a large piece of plastic wrap on a flat surface. Arrange the prosciutto slices, slightly overlapping, into a rectangle.
- Spread the cooled mushroom mixture evenly over the prosciutto. Place the beef tenderloin on top, then use the plastic wrap to tightly roll the prosciutto and mushrooms around the beef.
- Roll out the puff pastry on a lightly floured surface. Unwrap the beef from the plastic and place it in the center of the pastry. Wrap the pastry around the beef, sealing the edges with beaten egg.
- Bake the Wellington:
- Preheat the oven to 200°C (400°F). Place the wrapped beef seam-side down on a baking sheet lined with parchment paper.
- Brush the top of the pastry with beaten egg to create a golden crust. Use a sharp knife to score the top for decoration.
- Bake in the preheated oven for 25-30 minutes, or until the pastry is golden brown and the internal temperature of the beef reaches 52°C (125°F) for medium-rare.
- Rest and Serve:
- Remove the Beef Wellington from the oven and allow it to rest for 10 minutes before slicing. This helps the juices redistribute for a tender and juicy result.
Extra Tips:
When preparing Beef Wellington, it’s crucial to verify that the beef tenderloin is at room temperature before searing to promote even cooking.
Additionally, the mushroom mixture should be cooked until all the moisture is evaporated to prevent the pastry from becoming soggy. For an extra layer of flavor, consider incorporating a splash of white wine or brandy into the mushroom duxelles.
Finally, using a meat thermometer guarantees the beef is cooked to your desired level of doneness, making this dish a stress-free and impressive addition to your holiday menu.
Herb-Crusted Rack of Lamb
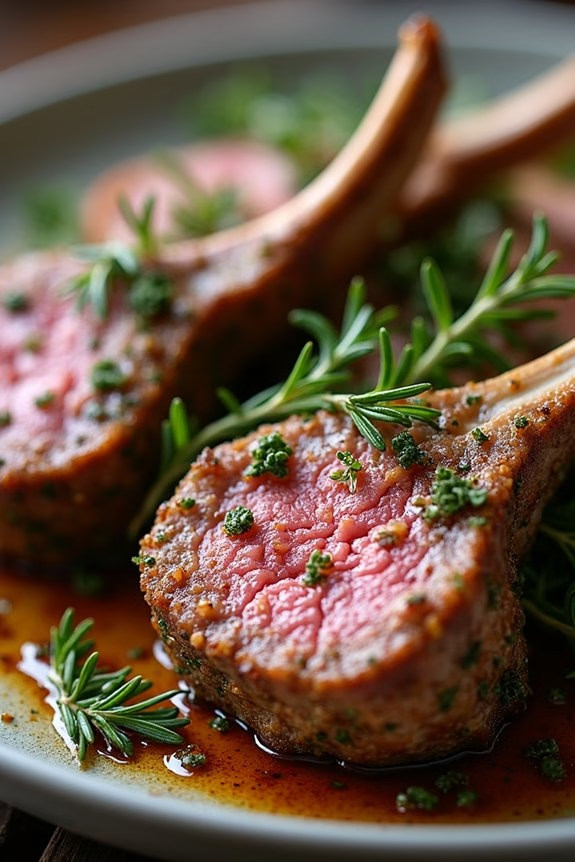
Herb-Crusted Rack of Lamb is an elegant and flavorful dish perfect for a special Christmas dinner for two. This recipe combines a tender rack of lamb with a savory herb crust, creating a mouthwatering meal that’s both sophisticated and easy to prepare. The herb crust is made with fresh herbs, garlic, and breadcrumbs, which add texture and aromatic flavors to the succulent lamb.
When roasted to perfection, the rack of lamb becomes a centerpiece dish that’s certain to impress, making it an ideal choice for an intimate holiday celebration. Lamb is a traditional choice for festive occasions, and this particular preparation highlights the meat’s natural flavors while complementing it with a crust that brings out its best qualities.
Whether you’re an experienced cook or a novice in the kitchen, this recipe is straightforward and rewarding. The key to a perfect Herb-Crusted Rack of Lamb lies in the quality of the ingredients and the attention to detail during the cooking process. By following the steps outlined below, you can create a meal that not only satisfies the palate but also brings a touch of luxury to your holiday table.
Ingredients (for 4-6 servings):
- 2 racks of lamb (about 1.5-2 pounds each), frenched
- Salt and freshly ground black pepper
- 2 tablespoons olive oil
- 1 cup fresh breadcrumbs
- 2 tablespoons Dijon mustard
- 3 cloves garlic, minced
- 2 tablespoons fresh rosemary, chopped
- 2 tablespoons fresh thyme, chopped
- 1 tablespoon fresh parsley, chopped
- 1 tablespoon unsalted butter, melted
Cooking Instructions:
- Prepare the Lamb: Preheat your oven to 425°F (220°C). Season the racks of lamb generously with salt and freshly ground black pepper on all sides. This will enhance the flavor of the meat.
- Sear the Lamb: Heat 2 tablespoons of olive oil in a large oven-safe skillet over medium-high heat. Once the oil is hot, add the lamb racks, fat side down. Sear each side for about 2-3 minutes, or until browned. Remove the lamb from the skillet and set aside to cool slightly.
- Prepare the Herb Crust: In a small bowl, combine the breadcrumbs, minced garlic, rosemary, thyme, parsley, and melted butter. Stir until the mixture is well combined and has a crumbly texture.
- Coat the Lamb: Spread a thin layer of Dijon mustard over the fat side of each lamb rack. Press the herb mixture onto the mustard-coated surface, ensuring an even coating.
- Roast the Lamb: Place the coated lamb racks back into the oven-safe skillet (or on a roasting pan if preferred) and roast in the preheated oven for 15-20 minutes for medium-rare, or until the internal temperature reaches 130°F (54°C). Adjust cooking time according to your preferred doneness.
- Rest the Lamb: Once cooked, remove the lamb racks from the oven and let them rest for about 10 minutes. This allows the juices to redistribute within the meat, ensuring a tender and juicy result.
- Serve: To serve, slice the racks into individual chops and arrange them on a serving platter. Garnish with additional fresh herbs if desired.
Extra Tips:
For a perfectly cooked Herb-Crusted Rack of Lamb, use a meat thermometer to ascertain the desired level of doneness. Allowing the lamb to come to room temperature before cooking helps with even cooking.
If you prefer a less traditional touch, experiment with different herbs like oregano or basil to customize the flavor profile. Pairing the lamb with a red wine sauce or a side of roasted vegetables can enhance the dish and create a complete and satisfying meal.
Balsamic-Glazed Duck Breast
Balsamic-Glazed Duck Breast is a delightful dish that offers a perfect balance of rich flavors and tenderness, making it an ideal choice for a special Christmas dinner for two.
Duck breast, with its flavorful and juicy meat, pairs beautifully with the sweet and tangy balsamic glaze, creating a sophisticated dish that’s sure to impress. The key to mastering this recipe lies in achieving a perfectly seared duck breast with a crispy skin, complemented by a luscious glaze that enhances the natural richness of the meat.
For this recipe, we’ll be preparing a serving size suitable for 4-6 people, allowing you to either enjoy leftovers or share this delectable dish with a small gathering. The combination of the succulent duck and the balsamic reduction makes for a festive and memorable dining experience.
Whether you’re a seasoned cook or a beginner looking to try something new, this Balsamic-Glazed Duck Breast is a wonderful addition to your holiday menu.
Ingredients (for 4-6 servings):
- 4 duck breasts (skin-on)
- Salt and black pepper, to taste
- 1 cup balsamic vinegar
- 2 tablespoons honey
- 2 tablespoons unsalted butter
- 2 cloves garlic, minced
- 1 teaspoon fresh thyme leaves
Cooking Instructions:
- Prepare the Duck Breasts: Pat the duck breasts dry with paper towels to remove excess moisture. Score the skin in a crosshatch pattern, being careful not to cut into the meat. Season both sides with salt and black pepper.
- Sear the Duck Breasts: Place a large, cold skillet over medium heat. Lay the duck breasts skin-side down in the skillet. Cook for about 6-8 minutes, or until the skin is golden brown and crispy. Flip the breasts and cook for another 4-5 minutes, or until the internal temperature reaches 135°F for medium-rare. Remove the duck breasts from the skillet and let them rest on a plate, loosely covered with foil.
- Make the Balsamic Glaze: In the same skillet, drain excess fat, leaving about 1 tablespoon. Add the minced garlic and sauté for about 1 minute until fragrant. Pour in the balsamic vinegar and honey, stirring to combine. Allow the mixture to simmer for about 5-7 minutes, or until it reduces by half and thickens to a syrupy consistency.
- Finish the Sauce: Remove the skillet from heat and stir in the butter and fresh thyme leaves until the butter is melted and the sauce is glossy.
- Serve the Duck: Slice the duck breasts thinly and transfer them to a serving platter. Drizzle the balsamic glaze generously over the sliced duck and serve immediately.
Extra Tips:
When cooking duck breasts, it’s important to start with a cold pan to render out the fat from the skin slowly. This technique guarantees a crispy skin without overcooking the meat.
If you prefer your duck more well-done, adjust the cooking time accordingly, but be mindful that duck is traditionally enjoyed medium-rare for the best texture and flavor.
Additionally, you can prepare the balsamic glaze ahead of time and reheat it gently before serving to save time during your holiday preparations.
Garlic Butter Shrimp Scampi

Garlic Butter Shrimp Scampi is a delightful dish that combines the rich flavors of garlic and butter with succulent shrimp, creating a perfect meal for a cozy Christmas dinner.
This dish isn’t only quick to prepare but also offers an elegant touch to your festive table without requiring extensive cooking skills. The combination of fresh lemon juice, white wine, and a hint of red pepper flakes elevates the shrimp, while the parsley adds a revitalizing finish.
Whether you’re planning a romantic dinner for two or simply want to enjoy a special meal with a loved one, Garlic Butter Shrimp Scampi is an excellent choice. The simplicity of the ingredients guarantees that the flavors of the shrimp are the stars of the dish, making it both satisfying and impressive.
For a serving size of 4-6 people, here’s what you’ll need to prepare this delectable dish.
Ingredients (for 4-6 servings):
- 1 1/2 lbs large shrimp, peeled and deveined
- 8 cloves garlic, minced
- 1/2 cup unsalted butter
- 1/4 cup extra-virgin olive oil
- 1/4 teaspoon red pepper flakes
- 1/2 cup white wine
- 1 tablespoon lemon juice
- Salt and pepper, to taste
- 1/4 cup fresh parsley, chopped
- Lemon wedges, for serving
- Cooked pasta or crusty bread, for serving
Cooking Instructions:
- Prepare the Shrimp: Begin by confirming the shrimp are thoroughly cleaned, peeled, and deveined. Pat them dry with a paper towel to remove any excess moisture.
- Cook the Garlic: In a large skillet over medium heat, melt the butter with the olive oil. Add the minced garlic and sauté for about 1-2 minutes until fragrant, being careful not to let it brown.
- Add Shrimp: Increase the heat to medium-high and add the shrimp to the skillet. Season with salt, pepper, and red pepper flakes. Cook for about 2-3 minutes on each side, or until the shrimp turn pink and opaque.
- Deglaze with Wine: Pour the white wine into the skillet and let it simmer for 1-2 minutes, allowing the alcohol to evaporate and the flavors to meld together.
- Finish with Lemon and Parsley: Stir in the lemon juice and chopped parsley, mixing well to coat the shrimp evenly. Taste and adjust seasoning if necessary.
- Serve: Remove from heat and serve immediately over cooked pasta or with crusty bread. Garnish with additional parsley and lemon wedges if desired.
Extra Tips:
When cooking Garlic Butter Shrimp Scampi, it’s important to not overcook the shrimp, as they can become rubbery. Keep an eye on them, and as soon as they turn pink and start to curl, they’re done.
Using fresh ingredients, particularly the garlic and parsley, will greatly enhance the flavor of the dish. If you prefer a non-alcoholic version, you can substitute chicken broth for the white wine.
This dish pairs beautifully with a crisp white wine or a light salad to complement its rich flavors.
Coq Au Vin Blanc
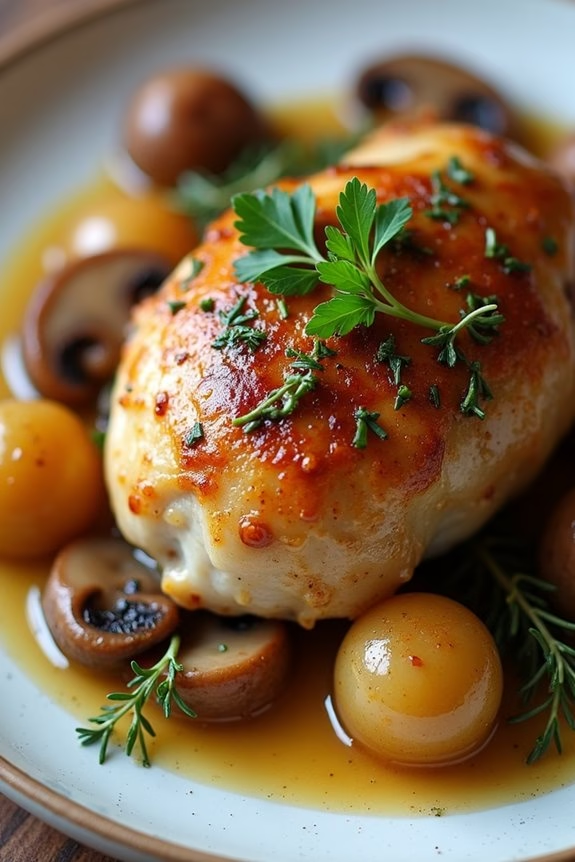
Coq Au Vin Blanc is a delightful twist on the classic French dish, traditionally made with red wine. This version uses white wine to create a lighter, yet equally flavorful meal. Perfect for a cozy Christmas dinner for two, this dish combines tender chicken with aromatic vegetables and a rich, savory sauce. The white wine adds a subtle acidity that complements the earthy notes of mushrooms and the sweetness of pearl onions, making it a perfect choice for an intimate holiday gathering.
This recipe is designed to serve 4-6 people, so you may enjoy leftovers or adjust the quantities for a smaller crowd. Coq Au Vin Blanc is an excellent choice for a special occasion, as it can be made a day in advance, allowing the flavors to meld and deepen overnight. Serve it with crusty bread or buttery mashed potatoes to soak up the delicious sauce, and you’ll have a memorable meal that will impress your guests.
Ingredients (Serves 4-6):
- 3-4 pounds bone-in, skin-on chicken thighs and drumsticks
- Salt and pepper, to taste
- 2 tablespoons olive oil
- 4 ounces pancetta or bacon, diced
- 2 cups pearl onions, peeled
- 8 ounces mushrooms, quartered
- 3 cloves garlic, minced
- 2 cups dry white wine
- 1 cup chicken broth
- 2 tablespoons all-purpose flour
- 2 tablespoons unsalted butter
- 1 teaspoon fresh thyme leaves
- 2 bay leaves
- 1/4 cup fresh parsley, chopped
Cooking Instructions:
- Prepare the Chicken: Season the chicken pieces generously with salt and pepper. Heat the olive oil in a large Dutch oven over medium-high heat. Add the chicken pieces skin-side down and brown them in batches, about 5-7 minutes per side. Transfer the browned chicken to a plate and set aside.
- Cook the Pancetta and Vegetables: In the same pot, add the pancetta and cook until crispy. Then add the pearl onions and mushrooms, cooking until the onions are just beginning to caramelize and the mushrooms are browned, about 5-7 minutes. Stir in the minced garlic and cook for an additional minute.
- Deglaze the Pot: Pour in the white wine and use a wooden spoon to scrape up any browned bits from the bottom of the pot. Let the wine simmer for a few minutes until it reduces slightly.
- Make the Sauce: Add the chicken broth, thyme, and bay leaves to the pot. Return the browned chicken to the pot, submerging it in the liquid. Bring to a gentle simmer, cover, and cook for 30-40 minutes until the chicken is cooked through and tender.
- Thicken the Sauce: In a small bowl, mash together the butter and flour to form a paste. Stir this mixture into the pot and let it simmer for another 5 minutes to thicken the sauce.
- Finish and Serve: Remove the bay leaves before serving. Taste and adjust seasoning with salt and pepper as needed. Sprinkle with fresh parsley before serving.
Extra Tips:
For best results, use a good quality dry white wine, such as Sauvignon Blanc or Chardonnay, as the flavor of the wine will greatly impact the final dish. If you can, prepare the dish a day in advance and refrigerate it overnight to allow the flavors to deepen. When reheating, do so gently to avoid drying out the chicken.
Additionally, peeling pearl onions can be time-consuming, so consider using frozen pearl onions to save time without sacrificing flavor.
Seared Scallops With Lemon Butter
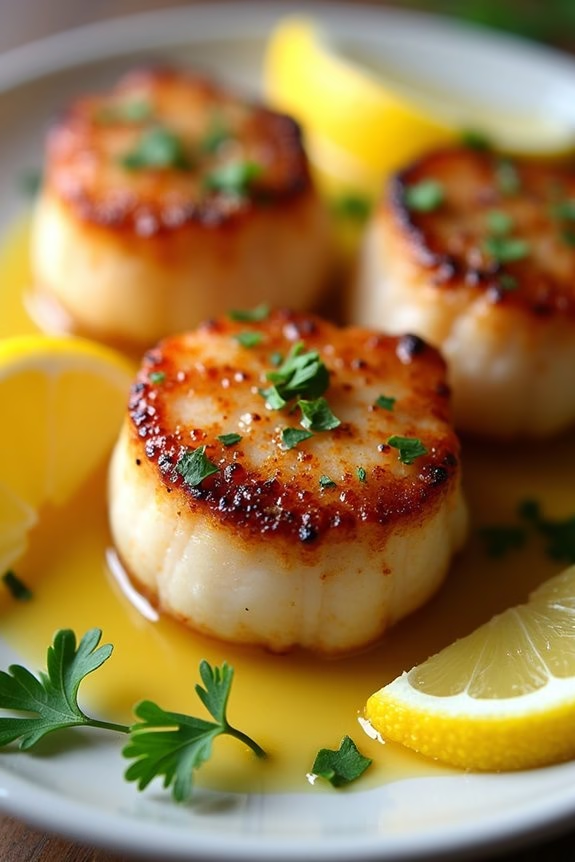
Seared Scallops With Lemon Butter is an elegant and simple dish that can elevate any Christmas dinner, making it perfect for an intimate celebration. The rich, buttery sauce complements the delicate sweetness of the scallops, while the lemon adds a revitalizing zing. This dish isn’t only impressive in presentation but also quick to prepare, allowing you to spend more time enjoying the festive occasion with your loved one.
For a serving size of 4-6 people, this recipe provides a generous portion and can be easily adjusted if you plan to have leftovers or entertain a few surprise guests. Seared Scallops With Lemon Butter is a versatile dish that pairs beautifully with a variety of sides, such as a fresh salad or roasted vegetables, to create a well-rounded meal. The following ingredients and instructions will guide you through crafting this delicious and elegant main course.
Ingredients (Serving size: 4-6 people):
- 2 lbs large sea scallops
- Salt and freshly ground black pepper
- 2 tablespoons olive oil
- 3 tablespoons unsalted butter
- 2 cloves garlic, minced
- 1/4 cup fresh lemon juice
- 2 tablespoons chopped fresh parsley
- Lemon wedges, for garnish
Cooking Instructions:
- Prepare the Scallops: Pat the scallops dry with paper towels to remove excess moisture. This step is essential for achieving a good sear. Season both sides of the scallops with salt and freshly ground black pepper.
- Heat the Pan: In a large skillet, heat the olive oil over medium-high heat. The oil should be hot but not smoking. Test the heat by adding a small piece of scallop; if it sizzles, the pan is ready.
- Sear the Scallops: Place the scallops in the skillet, making certain they aren’t touching each other. Sear the scallops for about 2-3 minutes on each side until they develop a golden-brown crust. Avoid overcrowding the pan; work in batches if necessary.
- Make the Lemon Butter Sauce: Once the scallops are cooked, transfer them to a plate and keep them warm. In the same skillet, reduce the heat to medium and add the unsalted butter. Allow the butter to melt before adding the minced garlic. Sauté the garlic for about 1 minute until fragrant.
- Add Lemon Juice and Parsley: Pour the fresh lemon juice into the skillet, stirring to combine with the butter and garlic. Let the mixture simmer for 1-2 minutes to thicken slightly. Stir in the chopped fresh parsley.
- Combine and Serve: Return the scallops to the skillet, gently tossing them in the lemon butter sauce to coat. Serve immediately, garnished with lemon wedges and additional parsley if desired.
Extra Tips:
For the best results, make sure that the scallops are as fresh as possible. If using frozen scallops, thaw them completely and pat them dry to prevent excess water from interfering with the searing process.
Additionally, avoid moving the scallops around in the pan while they sear; let them sit undisturbed to develop a beautiful crust. Finally, don’t skip the lemon wedges for garnish, as they allow each diner to add a touch of fresh lemon juice to their liking, enhancing the flavor of the dish.
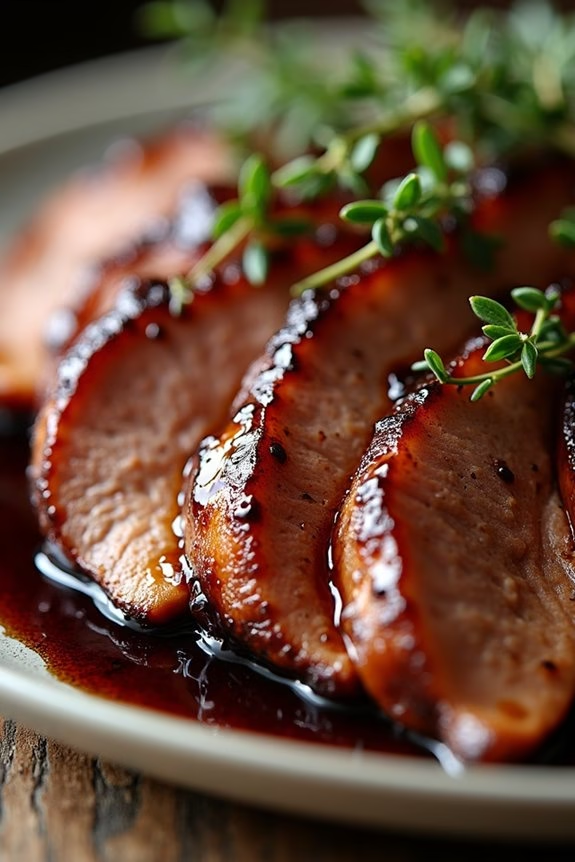
Cranberry Orange Glazed Ham
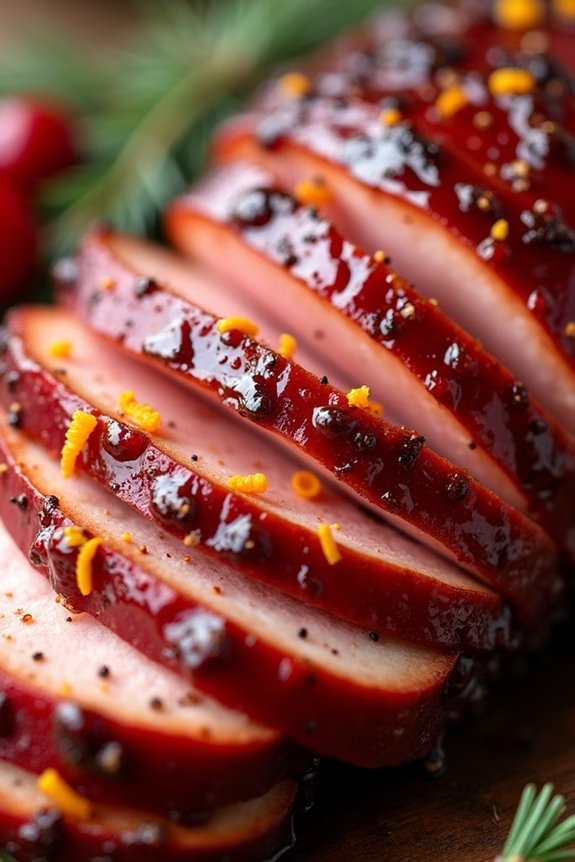
Cranberry Orange Glazed Ham is a delightful dish perfect for a cozy Christmas dinner for two. This dish combines the sweet and tangy flavors of cranberries and oranges with the savory richness of ham to create a memorable holiday meal. The glaze adds a beautiful, glossy finish to the ham, guaranteeing that not only does it taste delicious, but it also looks stunning on your festive table.
Whether you’re celebrating with a partner or a close friend, this dish will make your holiday dinner feel extra special.
The Cranberry Orange Glazed Ham is a versatile dish that can be easily adjusted to serve more people if you’re hosting a small gathering. This particular recipe is designed to serve 4-6 people, making it an excellent choice if you want leftovers to enjoy over the following days. With a balance of sweet, tart, and savory flavors, this ham is sure to become a beloved part of your Christmas traditions.
Ingredients (Serves 4-6):
- 1 small boneless fully cooked ham (about 2-3 pounds)
- 1 cup cranberry sauce (homemade or canned)
- 1/2 cup orange juice
- Zest of 1 orange
- 1/4 cup brown sugar
- 1/4 cup honey
- 1 tablespoon Dijon mustard
- 1/4 teaspoon ground cloves
- Salt and pepper to taste
Instructions:
- Preheat the Oven: Begin by preheating your oven to 325°F (165°C). This will guarantee that your ham cooks evenly and thoroughly.
- Prepare the Glaze: In a medium saucepan, combine the cranberry sauce, orange juice, orange zest, brown sugar, honey, Dijon mustard, ground cloves, and a pinch of salt and pepper. Stir the mixture over medium heat until the sugar is dissolved and the glaze is smooth and slightly thickened, about 5-7 minutes.
- Prepare the Ham: Place the ham in a roasting pan lined with aluminum foil for easy cleanup. Score the surface of the ham in a crisscross pattern, about 1/4 inch deep. This will allow the glaze to penetrate the ham and enhance the flavor.
- Apply the Glaze: Brush a generous amount of the cranberry orange glaze over the entire surface of the ham, guaranteeing it seeps into the scored cuts.
- Bake the Ham: Cover the ham loosely with aluminum foil and place it in the preheated oven. Bake for about 1 to 1 1/2 hours, basting with more glaze every 20 minutes. The ham is ready when it’s heated through and the glaze is caramelized.
- Rest and Serve: Once the ham is done, remove it from the oven and let it rest for about 10 minutes before slicing. This resting period allows the juices to redistribute, guaranteeing a moist and flavorful ham. Serve with additional glaze on the side if desired.
Extra Tips: When selecting your ham, a boneless variety works best for this recipe and makes slicing easier. If you prefer a less sweet glaze, you can reduce the amount of brown sugar or honey. For a more pronounced citrus flavor, add more orange zest or a splash of orange liqueur.
Leftover ham can be stored in an airtight container in the refrigerator for up to 5 days and is delicious in sandwiches or salads.
Stuffed Cornish Game Hens
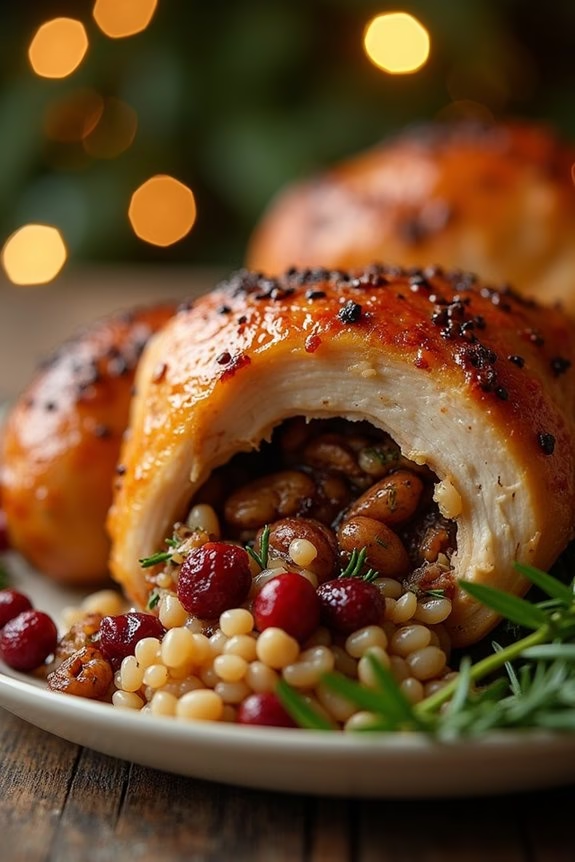
If you’re looking to create an intimate yet impressive Christmas dinner for two, stuffed Cornish game hens are a perfect choice. These small birds are wonderfully tender and packed with flavor, making them ideal for a special occasion. The stuffing, made with a blend of wild rice, cranberries, and pecans, adds a festive flair and a delightful texture contrast to the juicy meat. The recipe is simple yet elegant, allowing you to enjoy a gourmet meal without spending all day in the kitchen.
Cornish game hens are a great alternative to a full-sized roast for smaller gatherings. They’re easy to prepare and cook quickly, allowing you to focus on enjoying the holiday with your loved one. The combination of aromatic herbs and the sweet-tartness of cranberries makes each bite a burst of holiday spirit. Plus, the presentation of a whole stuffed hen on each plate is sure to impress your dinner companion.
Ingredients for 4-6 servings:
- 3 Cornish game hens (about 1 to 1.5 pounds each)
- Salt and freshly ground black pepper
- 3 tablespoons olive oil
- 1 cup wild rice, cooked
- 1/2 cup dried cranberries
- 1/2 cup pecans, chopped
- 1 small onion, finely chopped
- 2 cloves garlic, minced
- 1 teaspoon dried thyme
- 1 teaspoon dried rosemary
- 1/2 cup chicken broth
- 2 tablespoons unsalted butter, melted
Cooking Instructions:
- Preheat the Oven: Begin by preheating your oven to 375°F (190°C). This guarantees the hens will cook evenly and thoroughly.
- Prepare the Stuffing: In a large skillet, heat 1 tablespoon of olive oil over medium heat. Add the chopped onion and minced garlic, sautéing until softened and fragrant, about 3-4 minutes. Stir in the cooked wild rice, dried cranberries, chopped pecans, thyme, and rosemary. Pour in the chicken broth and mix thoroughly. Remove from heat and let it cool slightly.
- Stuff the Hens: Pat the Cornish game hens dry with paper towels, then season the cavity of each hen generously with salt and pepper. Carefully spoon the stuffing mixture into each hen, filling the cavity but not packing it too tightly to allow even cooking.
- Season the Hens: Rub the outside of each hen with the remaining olive oil, then season with additional salt and pepper to taste. This helps in crisping the skin and adding flavor.
- Roasting: Place the stuffed hens on a roasting pan or baking dish. Brush them with melted butter for added flavor and a beautiful golden finish. Roast in the preheated oven for about 50-60 minutes, or until the internal temperature reaches 165°F (74°C) and the skin is crispy and golden brown.
- Resting: Once cooked, remove the hens from the oven and let them rest for about 10 minutes. This allows the juices to redistribute, keeping the meat moist and flavorful.
Extra Tips:
When preparing stuffed Cornish game hens, make sure you don’t overstuff the cavities, as this can lead to uneven cooking. If you find you have leftover stuffing, it can be baked separately in a small dish alongside the hens.
For added flavor, you can also tuck a small sprig of fresh rosemary or thyme under the skin of each hen. Finally, if you prefer a sweeter stuffing, consider adding a tablespoon of honey or maple syrup to the wild rice mixture.
Lobster Tail With Drawn Butter
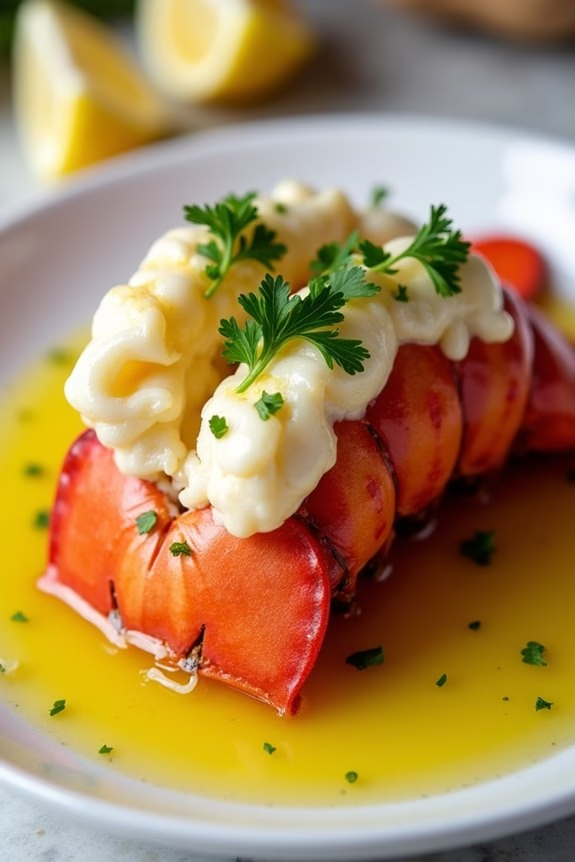
Indulge in a decadent Christmas dinner with Lobster Tail with Drawn Butter, a luxurious dish that brings elegance to your holiday table. This recipe is perfect for those intimate holiday celebrations, offering a rich and flavorful entrée that’s both simple and impressive. The succulent lobster tail is cooked to perfection and served with a classic drawn butter sauce, enhancing the natural sweetness of the seafood.
Whether you’re a seasoned chef or a culinary novice, this dish is a delightful way to celebrate the season with your loved ones.
To make Lobster Tail with Drawn Butter for a serving size of 4-6 people, you’ll need to start by selecting fresh lobster tails, which are the centerpiece of this meal. Paired with a luscious butter sauce and a squeeze of fresh lemon, this dish combines simplicity with sophistication. The key to achieving the perfect lobster tail lies in the cooking technique, ensuring the meat remains tender and juicy.
Follow the steps below to create a memorable Christmas dinner that you and your guests will savor.
Ingredients (Serving Size: 4-6 people):
- 6 lobster tails (6-8 ounces each)
- 1 cup unsalted butter
- 2 tablespoons fresh lemon juice
- Salt, to taste
- Black pepper, to taste
- Fresh parsley, chopped, for garnish
- Lemon wedges, for serving
Cooking Instructions:
- Prepare the Lobster Tails: Begin by preheating your oven to 425°F (220°C). Using kitchen shears, carefully cut through the top shell of each lobster tail, stopping just before the fin. Gently pull the shell apart and lift the meat, resting it on top of the shell for a beautiful presentation. Season each lobster tail with a pinch of salt and black pepper.
- Melt the Butter: In a small saucepan over low heat, melt the unsalted butter. Once melted, skim off the foam on the surface to clarify the butter, leaving a clear golden liquid. Stir in the fresh lemon juice and a pinch of salt for flavor.
- Bake the Lobster Tails: Place the prepared lobster tails on a baking sheet lined with parchment paper. Brush each tail generously with the melted butter mixture. Bake in the preheated oven for 12-15 minutes, or until the lobster meat is opaque and tender. Be careful not to overcook, as lobster can become tough.
- Serve and Garnish: Once cooked, remove the lobster tails from the oven and transfer them to a serving platter. Drizzle with additional drawn butter and garnish with chopped parsley. Serve immediately with lemon wedges on the side for a touch of brightness.
Extra Tips:
When cooking lobster tails, it’s important to keep a close eye on the timing to prevent overcooking, as lobster meat can quickly become rubbery.
If you prefer, you can also grill the lobster tails for a smoky flavor; simply follow the same preparation steps and grill over medium-high heat for about 10-12 minutes.
For an added touch of flavor, consider infusing the butter with garlic or herbs such as thyme or dill. Enjoy your Lobster Tail with Drawn Butter alongside a crisp green salad or buttery mashed potatoes for a complete festive meal.
Pomegranate-Braised Short Ribs
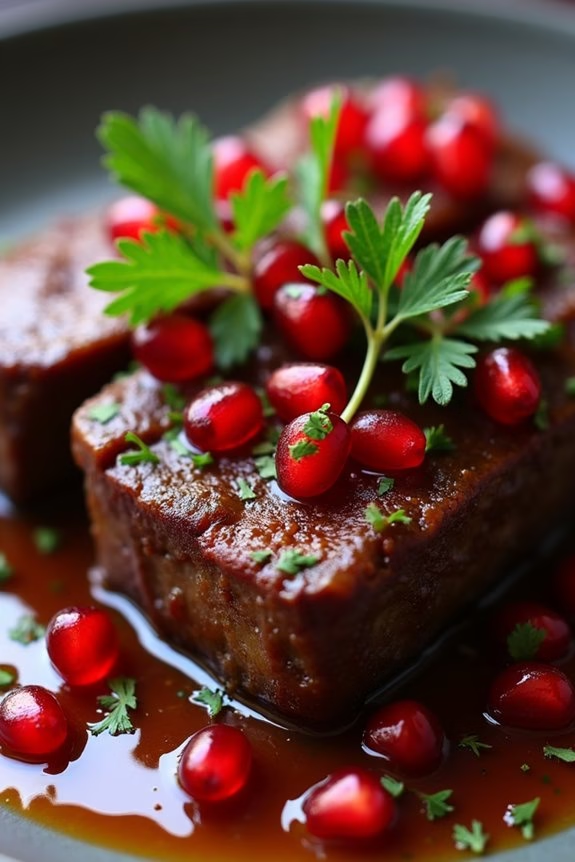
Pomegranate-braised short ribs offer a rich and flavorful option for a Christmas dinner for two, offering an elegant twist to traditional holiday meals. The short ribs are slowly cooked to perfection, allowing the pomegranate juice to infuse the meat with a sweet and tangy flavor that’s balanced by the depth of red wine and the warmth of aromatic spices. This dish provides a melt-in-your-mouth experience that’s sure to make the holiday special and memorable.
The beauty of this recipe lies in its simplicity and the ability to create a luxurious meal with minimal fuss, making it perfect for an intimate dinner. The deep flavors from the braise are complemented by the brightness of fresh herbs and the tartness of pomegranate seeds, creating a dish that feels festive and indulgent. Although designed for two, the recipe can be scaled up to serve four to six people, making it versatile for small gatherings.
Ingredients for 4-6 servings:
- 4-5 lbs beef short ribs
- Salt and freshly ground black pepper
- 2 tablespoons olive oil
- 1 large onion, finely chopped
- 4 cloves garlic, minced
- 2 cups pomegranate juice
- 1 cup red wine
- 2 tablespoons tomato paste
- 1 tablespoon honey
- 1 teaspoon ground cinnamon
- 1 teaspoon ground cumin
- 1 bay leaf
- 1 cup beef stock
- 1 cup pomegranate seeds
- Fresh parsley, chopped (for garnish)
Cooking Instructions:
- Prepare the Short Ribs: Preheat your oven to 325°F (163°C). Season the short ribs generously with salt and freshly ground black pepper on all sides.
- Sear the Ribs: Heat olive oil in a large Dutch oven or ovenproof pot over medium-high heat. Add the short ribs in batches, searing each side until browned, about 3-4 minutes per side. Remove the ribs and set them aside.
- Sauté the Aromatics: In the same pot, add the chopped onion, and sauté for about 5 minutes until translucent. Add the minced garlic and cook for another minute until fragrant.
- Deglaze the Pot: Pour in the pomegranate juice and red wine, scraping the bottom of the pot to release any browned bits. Stir in the tomato paste, honey, cinnamon, cumin, and bay leaf.
- Combine and Braise: Return the short ribs to the pot, ensuring they’re mostly submerged in the liquid. Add the beef stock to cover the ribs if necessary. Bring the mixture to a simmer.
- Bake the Ribs: Once simmering, cover the pot with a tight-fitting lid and transfer it to the preheated oven. Bake for 2.5 to 3 hours, or until the meat is tender and falling off the bone.
- Finish and Serve: Remove the pot from the oven and let it rest for a few minutes. Skim any excess fat from the surface. Serve the ribs garnished with pomegranate seeds and fresh parsley.
Extra Tips:
For the best results, choose short ribs with a good amount of marbling, as the fat will render down during cooking and contribute to the dish’s richness.
If you want a thicker sauce, you can remove the ribs once cooked and simmer the sauce on the stovetop until it reduces to your desired consistency.
For added complexity, consider adding a pinch of ground cloves or a splash of balsamic vinegar to the braising liquid.
Make sure to taste the sauce before serving, adjusting the seasoning with salt and pepper as needed.
Prosciutto-Wrapped Cod
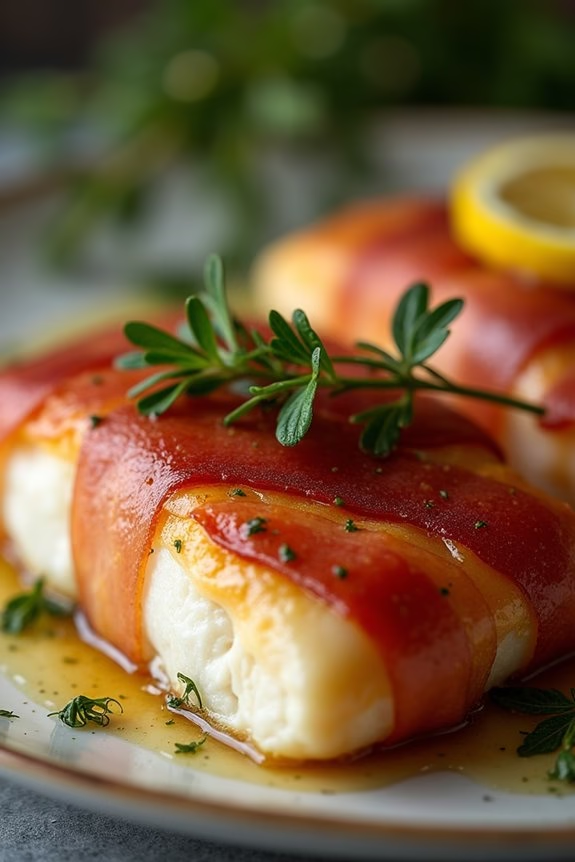
Prosciutto-Wrapped Cod is a delightful dish that combines the delicate flavor of cod with the rich, savory taste of prosciutto. This recipe is perfect for an intimate Christmas dinner for two, offering an elegant presentation and a burst of flavor in every bite. The saltiness of the prosciutto perfectly complements the mildness of the cod, while the addition of fresh herbs and a splash of lemon juice brings everything together beautifully.
This recipe is easy to prepare and requires minimal ingredients, making it an ideal choice for a stress-free holiday meal. Whether you’re a seasoned cook or a beginner in the kitchen, you’ll find that this dish is both impressive and easy to master. Follow the steps below to create a delicious prosciutto-wrapped cod for an unforgettable dining experience.
Ingredients (Serving Size: 4-6 people)
- 6 cod fillets (about 6 ounces each)
- 12 slices of prosciutto
- 2 tablespoons olive oil
- 1 tablespoon fresh lemon juice
- 1 tablespoon fresh thyme leaves
- 1 tablespoon fresh parsley, chopped
- Salt and pepper to taste
Instructions
- Preheat the Oven: Begin by preheating your oven to 400°F (200°C). This guarantees that your oven is hot and ready to cook your fish evenly.
- Prepare the Cod Fillets: Pat the cod fillets dry with a paper towel to remove any excess moisture. Season each fillet lightly with salt and pepper on both sides. Be cautious with the salt, as the prosciutto will add additional saltiness.
- Wrap the Cod: Lay out two slices of prosciutto slightly overlapping each other. Place a cod fillet at one end and sprinkle it with a few thyme leaves and parsley. Gently wrap the prosciutto around the cod, making sure it’s snug but not too tight.
- Sear the Cod: Heat the olive oil in a large ovenproof skillet over medium-high heat. Once hot, add the prosciutto-wrapped cod fillets. Sear them for about 2-3 minutes on each side, until the prosciutto is crisp and golden brown.
- Bake the Cod: Transfer the skillet to the preheated oven. Bake the cod for 10-12 minutes, or until the fish is opaque and flakes easily with a fork.
- Finish with Lemon Juice: Once cooked, remove the skillet from the oven. Drizzle the fresh lemon juice over the cod fillets to enhance the flavor.
- Garnish and Serve: Transfer the cod fillets to a serving platter and garnish with additional parsley if desired. Serve immediately for best results.
Extra Tips
When selecting your cod, opt for fresh, thick fillets, as they’ll hold up better during cooking and provide a more substantial bite.
If you can’t find fresh thyme, dried thyme can be used as an alternative, but use it sparingly as it’s more concentrated.
Additionally, if you’re cooking for a larger crowd, this recipe can easily be doubled or tripled without any extra effort.
For a complete meal, consider pairing the dish with roasted vegetables or a simple mixed green salad.
Mushroom Risotto With Truffle Oil
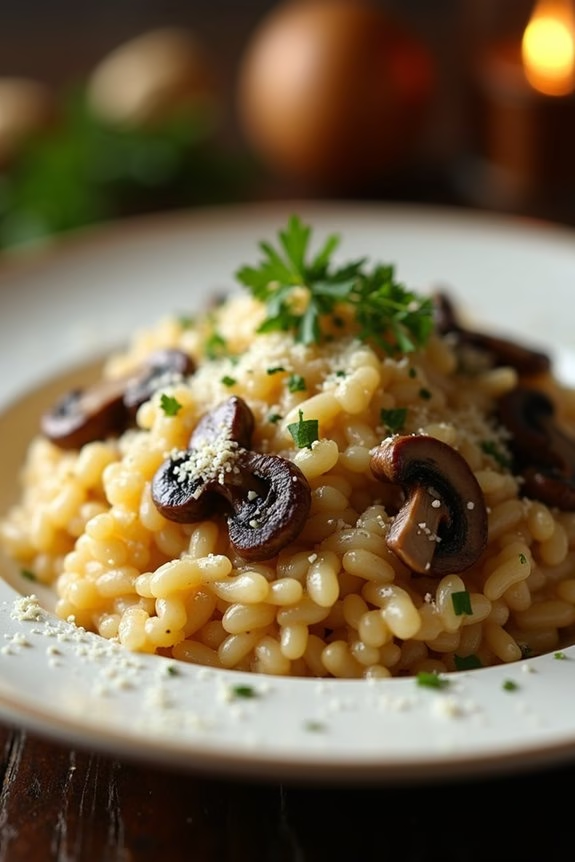
Mushroom Risotto With Truffle Oil is a luxurious and comforting dish, perfect for an intimate Christmas dinner for two. This creamy and aromatic risotto is infused with the earthy richness of mushrooms and the delicate, decadent flavor of truffle oil, elevating the dish to a festive level.
The key to a perfect risotto lies in the gradual addition of broth and constant stirring, which releases the starches from the rice, creating a creamy texture without the need for cream. Cooking risotto can be a meditative process, as it requires patience and attention.
It’s important to use a good quality arborio rice, which has high starch content, and to choose fresh, flavorful mushrooms such as cremini or shiitake. The truffle oil should be used sparingly, as a little goes a long way in imparting its unique aroma. This recipe serves 4-6 people, so it’s perfect for a small gathering or for having leftovers to enjoy the next day.
Ingredients for 4-6 servings:
- 2 cups arborio rice
- 6 cups chicken or vegetable broth
- 1 cup dry white wine
- 2 tablespoons olive oil
- 1 onion, finely chopped
- 3 cloves garlic, minced
- 12 ounces mixed mushrooms, cleaned and sliced
- 1/2 cup grated Parmesan cheese
- 2 tablespoons unsalted butter
- 2 tablespoons truffle oil
- Salt and freshly ground black pepper to taste
- Fresh parsley, chopped, for garnish
Cooking Instructions:
- Prepare the Broth: In a saucepan, heat the chicken or vegetable broth over medium heat until it’s hot but not boiling. Keep it warm on a low simmer throughout the cooking process.
- Sauté the Aromatics: In a large skillet or saucepan, heat the olive oil over medium heat. Add the chopped onion and cook until translucent, about 5 minutes. Stir in the garlic and cook for an additional minute until fragrant.
- Cook the Mushrooms: Add the sliced mushrooms to the pan and season with a pinch of salt and pepper. Cook, stirring occasionally, until the mushrooms are browned and have released their moisture, about 7-8 minutes.
- Toast the Rice: Add the arborio rice to the mushroom mixture and stir to coat the rice with the oil. Cook for about 2 minutes, allowing the rice to toast slightly, which adds a nutty flavor to the dish.
- Deglaze with Wine: Pour in the white wine and stir continuously until the wine is mostly absorbed by the rice. This step adds a depth of flavor to the risotto.
- Add the Broth Gradually: Begin adding the warm broth, one ladleful at a time, stirring constantly. Allow each addition to be absorbed before adding the next. This process should take about 18-20 minutes, and the risotto should be creamy and the rice tender, but still slightly al dente.
- Finish with Butter and Cheese: Remove the pan from the heat and stir in the butter and grated Parmesan cheese until melted and well combined. Adjust the seasoning with salt and pepper to taste.
- Add Truffle Oil and Serve: Drizzle the truffle oil over the risotto and give it a gentle stir. Serve immediately, garnished with freshly chopped parsley.
Extra Tips: When making Mushroom Risotto With Truffle Oil, it’s essential to use fresh ingredients for the best flavor. If you don’t have truffle oil, you can substitute with a small amount of truffle salt for a similar effect.
Always taste the risotto as it cooks, adjusting the seasoning as necessary. Remember, the risotto will continue to thicken as it sits, so serve it promptly for the best texture. If it thickens too much, a splash of extra broth can help loosen it up before serving.
Spinach and Ricotta Stuffed Shells

Spinach and Ricotta Stuffed Shells is a delightful and comforting dish perfect for a cozy Christmas dinner for two. This dish combines the rich and creamy flavors of ricotta cheese with the fresh and earthy taste of spinach, all encased in tender pasta shells. As the shells bake in a savory tomato sauce, they absorb the saucy goodness, creating a symphony of flavors that’s both satisfying and festive.
This recipe isn’t only delicious but also relatively easy to prepare, making it an ideal choice for an intimate holiday meal. The filling for the shells can be prepared ahead of time, allowing you to focus on other aspects of your holiday celebration. While this recipe is designed for two, it can easily be scaled up to serve 4-6 people, ensuring that everyone at your table can enjoy this delectable dish.
Ingredients for 4-6 servings:
- 20-24 jumbo pasta shells
- 15 ounces ricotta cheese
- 1 cup shredded mozzarella cheese
- 1/2 cup grated Parmesan cheese
- 10 ounces fresh spinach
- 1 egg
- 2 cups marinara sauce
- 2 cloves garlic, minced
- 1 tablespoon olive oil
- Salt and pepper, to taste
- 1 teaspoon dried Italian seasoning
- Fresh basil leaves, for garnish (optional)
Cooking Instructions:
- Preheat and Prep: Preheat your oven to 375°F (190°C). Cook the jumbo pasta shells according to package instructions until al dente. Drain and set aside to cool slightly.
- Prepare the Spinach: In a large skillet, heat olive oil over medium heat. Add minced garlic and sauté for about 1 minute until fragrant. Add the fresh spinach and cook until wilted, about 3-4 minutes. Remove from heat and let it cool. Once cooled, chop finely.
- Make the Filling: In a large mixing bowl, combine ricotta cheese, 1/2 cup mozzarella cheese, 1/4 cup Parmesan cheese, the chopped spinach, egg, Italian seasoning, salt, and pepper. Mix until well combined.
- Stuff the Shells: Spoon about 1 to 2 tablespoons of the ricotta-spinach mixture into each cooked shell, ensuring they’re generously filled.
- Assemble the Dish: Spread 1 cup of marinara sauce on the bottom of a baking dish. Arrange the stuffed shells in a single layer over the sauce. Pour the remaining marinara sauce over the top of the shells, ensuring they’re well covered.
- Add Toppings and Bake: Sprinkle the remaining mozzarella and Parmesan cheese over the top. Cover the dish with aluminum foil and bake in the preheated oven for 25 minutes. Remove the foil and bake for an additional 10 minutes, or until the cheese is bubbly and golden brown.
- Serve: Once baked, remove the dish from the oven and let it cool slightly. Garnish with fresh basil leaves before serving if desired.
Extra Tips: For added depth of flavor, consider using a variety of cheeses such as fontina or pecorino romano in the filling. You can also add a pinch of nutmeg to enhance the taste of the ricotta mixture. If fresh spinach is unavailable, frozen spinach can be used—just make sure to thaw and drain it well before adding to the filling. Adjust seasoning to your preference, and feel free to spice up the marinara sauce with red pepper flakes for a bit of heat.
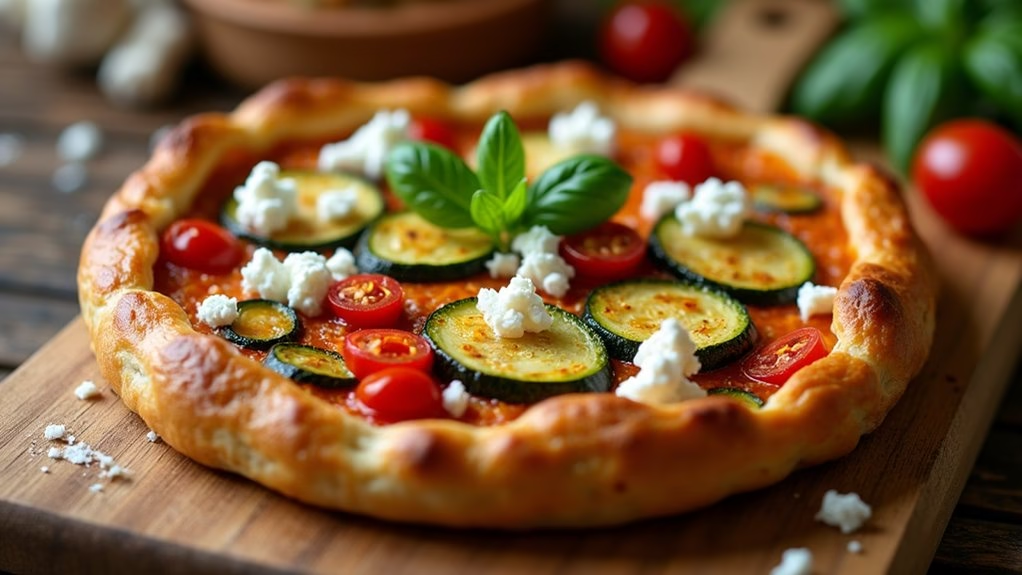
Roasted Vegetable Tart With Goat Cheese
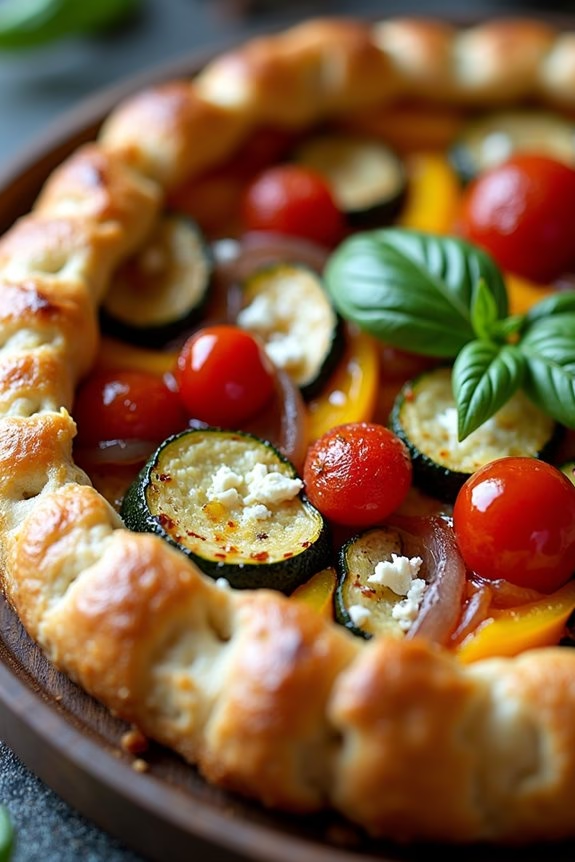
A Roasted Vegetable Tart with Goat Cheese is a delightful dish that combines the vibrant flavors of seasonal vegetables with the creamy tanginess of goat cheese, all nestled within a flaky pastry crust. This tart is perfect for those who wish to enjoy a festive meal that’s both elegant and satisfying without being overly heavy.
The beauty of this dish lies in its simplicity and the way it highlights the natural sweetness of roasted vegetables, complemented by the creamy and slightly tangy goat cheese.
This recipe is designed to serve 4-6 people, making it an ideal choice for a small gathering or a cozy Christmas dinner for two with leftovers. The tart is versatile and can be customized with your favorite vegetables, making it a great option for vegetarians or those looking to incorporate more plant-based meals into their holiday celebrations.
The combination of textures and flavors in this tart will surely impress your guests and bring a touch of gourmet flair to your Christmas dinner table.
Ingredients (Serves 4-6):
- 1 sheet of puff pastry, thawed
- 1 medium zucchini, sliced
- 1 medium red bell pepper, sliced into strips
- 1 medium yellow bell pepper, sliced into strips
- 1 small red onion, thinly sliced
- 1 cup cherry tomatoes, halved
- 2 tablespoons olive oil
- Salt and pepper to taste
- 1 teaspoon dried thyme
- 5 ounces goat cheese, crumbled
- 1 egg, beaten (for egg wash)
- Fresh basil leaves for garnish (optional)
Cooking Instructions:
- Preheat the Oven: Begin by preheating your oven to 400°F (200°C). This guarantees the oven is hot enough to roast the vegetables and bake the pastry evenly.
- Prepare the Vegetables: On a large baking sheet, toss the zucchini, bell peppers, red onion, and cherry tomatoes with olive oil, salt, pepper, and thyme. Spread the vegetables out in a single layer to ensure even roasting.
- Roast the Vegetables: Place the baking sheet in the preheated oven and roast the vegetables for about 20 minutes, or until they’re tender and slightly caramelized. Stir the vegetables halfway through the cooking time to ensure even roasting.
- Prepare the Puff Pastry: While the vegetables are roasting, roll out the puff pastry on a lightly floured surface to fit a 9×13 inch baking dish or similar-sized tart pan. Transfer the pastry to the pan, pressing it gently into the corners.
- Assemble the Tart: Once the vegetables are roasted, spread them evenly over the prepared puff pastry. Sprinkle the crumbled goat cheese over the top of the vegetables.
- Brush with Egg Wash: Brush the edges of the puff pastry with the beaten egg to promote a golden, glossy finish during baking.
- Bake the Tart: Return the tart to the oven and bake for an additional 20-25 minutes, or until the pastry is golden brown and puffed.
- Serve: Allow the tart to cool slightly before slicing. Garnish with fresh basil leaves if desired, and serve warm.
Extra Tips:
For the best results, verify your puff pastry is well-chilled before rolling it out; this helps maintain its flakiness.
Feel free to experiment with other vegetables such as asparagus or mushrooms, depending on your preference and seasonal availability.
To save time, you can roast the vegetables a day in advance and assemble the tart just before baking.
If you want to enhance the flavor, consider adding a drizzle of balsamic glaze over the top before serving.