
The holiday season is here, and it’s all about gathering around the table with our nearest and dearest. The aroma of a perfectly roasted turkey brings back so many fond memories of Christmases past. This year, I’m excited to share 13 Christmas dinner recipes that promise to make your holiday meal extra special. Each dish has its own unique story, inviting you to savor the flavors and create new memories. Ready to get cooking?
Classic Roast Turkey With Herb Butter
There’s nothing quite like a beautifully roasted turkey to center your Christmas dinner table. This Classic Roast Turkey with Herb Butter combines traditional flavors with a succulent, moist texture that will have your guests asking for seconds. The secret to this delicious dish is the herb-infused butter, which adds a rich, aromatic flavor to every bite.
While turkey can be an intimidating dish to prepare, this recipe breaks it down into simple steps, guaranteeing that your holiday meal is as stress-free as possible. Roasting a turkey is a time-honored tradition and with this recipe, you’ll be able to create an impressive centerpiece without any hassle.
With a crisp, golden skin and juicy meat, this turkey is seasoned to perfection. The herb butter not only keeps the turkey moist but also infuses it with savory notes of rosemary, thyme, and garlic. Suitable for serving 4-6 people, this recipe guarantees that everyone leaves the table satisfied.
Ingredients for Classic Roast Turkey With Herb Butter (Serves 4-6):
- 1 whole turkey (8-10 pounds)
- 1 cup unsalted butter, softened
- 2 tablespoons fresh rosemary, chopped
- 2 tablespoons fresh thyme, chopped
- 2 tablespoons fresh sage, chopped
- 4 cloves garlic, minced
- Salt and pepper to taste
- 1 lemon, quartered
- 1 onion, quartered
- 1 cup chicken broth
Cooking Instructions:
- Prepare the Herb Butter: In a medium bowl, combine the softened butter with chopped rosemary, thyme, sage, and minced garlic. Mix until all ingredients are well incorporated.
- Season the Turkey: Preheat your oven to 325°F (165°C). Remove the turkey from its packaging and pat it dry with paper towels. Season the inside of the turkey cavity with salt and pepper, then stuff it with the quartered lemon and onion for added flavor.
- Apply the Herb Butter: Carefully loosen the skin over the turkey breast by gently inserting your fingers between the skin and the meat. Spread about half of the herb butter mixture directly onto the breast meat under the skin, guaranteeing even coverage. Rub the remaining herb butter over the entire exterior of the turkey, guaranteeing the legs and wings are covered.
- Truss the Turkey: If desired, truss the turkey by tying the legs together with kitchen twine. This helps the turkey cook evenly and maintain its shape.
- Roast the Turkey: Place the turkey on a rack in a roasting pan. Pour the chicken broth into the bottom of the pan to keep the turkey moist during cooking. Roast in the preheated oven, basting every 30 minutes with the pan juices, until the internal temperature reaches 165°F (74°C) in the thickest part of the thigh (approximately 3 to 3.5 hours).
- Rest the Turkey: Once cooked, remove the turkey from the oven and tent loosely with aluminum foil. Allow it to rest for at least 20 minutes before carving. This resting period allows the juices to redistribute, guaranteeing a moist and flavorful turkey.
Extra Tips:
For best results, guarantee that your turkey is completely thawed before beginning the recipe. If using a frozen turkey, allow it to thaw in the refrigerator for several days prior to cooking.
To achieve an extra crispy skin, consider drying the turkey in the refrigerator, uncovered, for several hours or overnight before applying the herb butter. Don’t forget to save the pan drippings to make a delicious gravy to accompany your turkey, adding even more depth to the holiday meal.
Honey-Glazed Ham With Pineapple
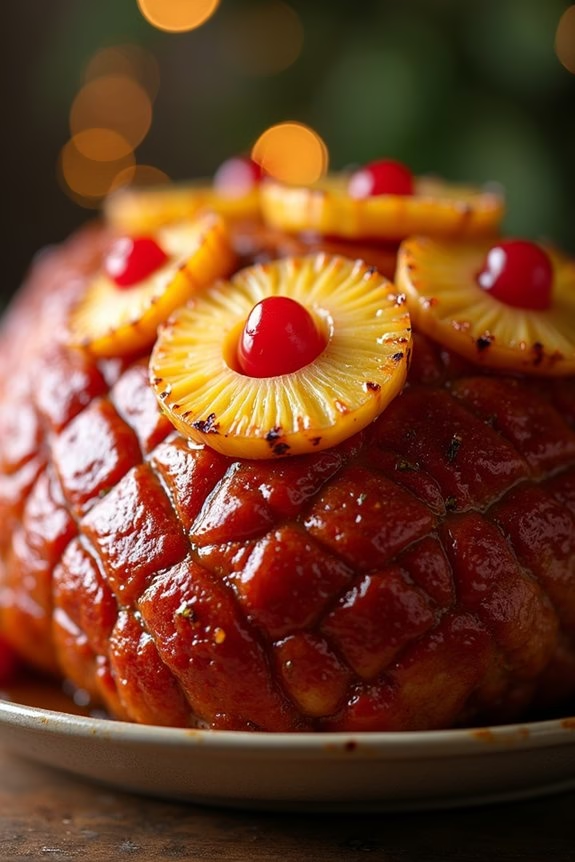
The Honey-Glazed Ham With Pineapple is a classic holiday centerpiece that brings a delightful balance of savory and sweet flavors to your Christmas dinner table. This dish combines the rich, savory taste of ham with the natural sweetness of honey and pineapple, making it a favorite among family and friends.
The caramelization of the honey glaze, paired with the invigorating bursts of pineapple, creates a dish that’s both visually stunning and deliciously satisfying. Perfect for serving 4-6 people, this dish is as much a feast for the eyes as it’s for the palate.
Whether you’re hosting a small gathering or a festive family meal, this honey-glazed ham is sure to impress. The key to achieving the perfect glaze is to allow the ham to bake slowly, letting the honey and pineapple juices infuse the meat, creating a tender and flavorful bite in every slice.
Ingredients (Serves 4-6):
- 1 (4-5 pound) fully cooked bone-in ham
- 1 cup honey
- 1/2 cup brown sugar
- 1/2 cup pineapple juice
- 1/4 cup Dijon mustard
- 1/4 teaspoon ground cloves
- 1 can (20 ounces) pineapple rings, drained
- Maraschino cherries (optional, for garnish)
- Toothpicks
Cooking Instructions:
- Preheat the Oven: Preheat your oven to 325°F (160°C). This guarantees that the ham will cook evenly throughout.
- Prepare the Ham: Place the ham in a large roasting pan. Score the surface of the ham in a diamond pattern, about 1/4 inch deep. This will allow the glaze to penetrate the meat.
- Make the Glaze: In a saucepan over medium heat, combine the honey, brown sugar, pineapple juice, Dijon mustard, and ground cloves. Stir continuously until the sugar has dissolved and the mixture is smooth.
- Apply the Glaze: Brush a generous amount of the glaze over the ham, making sure to coat it evenly. Reserve some glaze for basting during the cooking process.
- Add Pineapple and Cherries: Arrange the pineapple rings on the surface of the ham, using toothpicks to secure them. If desired, place a maraschino cherry in the center of each pineapple ring for an extra festive touch.
- Bake the Ham: Place the ham in the preheated oven and bake for about 1 1/2 to 2 hours, or until the internal temperature reaches 140°F (60°C). Baste the ham with the reserved glaze every 30 minutes to enhance the flavor and achieve a beautiful caramelized finish.
- Rest and Serve: Once cooked, remove the ham from the oven and let it rest for about 15 minutes before slicing. This allows the juices to redistribute, guaranteeing moist and tender slices.
Extra Tips:
For a more intense flavor, you can prepare the glaze a day in advance to allow the flavors to meld together. If you prefer a smokier taste, consider adding a splash of liquid smoke to the glaze.
When scoring the ham, be careful not to cut too deeply into the meat. This dish pairs beautifully with classic sides such as mashed potatoes or roasted vegetables, providing a well-rounded and satisfying meal.
Finally, if you’re planning on leftovers, the ham makes for delicious sandwiches or additions to breakfast dishes the next day.
Beef Wellington With Mushroom Duxelles

Beef Wellington is a classic dish that brings elegance and flair to any Christmas dinner table. It’s a luxurious combination of tender beef tenderloin, savory mushroom duxelles, and crispy puff pastry. The dish is renowned for its impressive presentation and rich flavors, making it a perfect centerpiece for a festive meal.
The combination of the buttery pastry and juicy beef creates a delightful contrast in textures, while the mushroom duxelles add a deep, earthy flavor profile that elevates the entire dish.
Making Beef Wellington can be a rewarding culinary experience. Although it requires attention to detail and a bit of finesse, the results are truly worth the effort. The key to a successful Beef Wellington is confirming the beef is cooked to perfection and the pastry remains golden and flaky.
With a few tips and the right techniques, you can create a dish that will be the star of your Christmas dinner. This recipe serves 4-6 people, making it ideal for a family gathering or a small festive dinner party.
Ingredients:
- 1.5 lb beef tenderloin
- Salt and pepper to taste
- 2 tablespoons olive oil
- 12 oz mushrooms (such as cremini or button), finely chopped
- 2 tablespoons unsalted butter
- 2 cloves garlic, minced
- 2 tablespoons fresh thyme leaves
- 1 tablespoon Dijon mustard
- 6 slices of prosciutto
- 1 sheet puff pastry, thawed
- 1 egg, beaten
Cooking Instructions:
- Prepare the Beef Tenderloin:
- Season the beef tenderloin generously with salt and pepper.
- Heat olive oil in a large skillet over medium-high heat. Sear the beef on all sides until browned, about 2-3 minutes per side. Remove from the skillet and let it cool.
- Make the Mushroom Duxelles:
- In the same skillet, melt butter over medium heat. Add the finely chopped mushrooms, garlic, and thyme.
- Sauté until the mushrooms release their moisture and become golden brown, about 8-10 minutes.
- Stir in the Dijon mustard and cook for an additional minute. Set aside to cool.
- Assemble the Wellington:
- Lay out a sheet of plastic wrap and arrange the prosciutto slices in a single layer, slightly overlapping.
- Spread the cooled mushroom duxelles evenly over the prosciutto.
- Place the seared beef tenderloin on top and wrap tightly with the plastic wrap, forming a log. Chill for 20 minutes.
- Wrap in Puff Pastry:
- Preheat the oven to 400°F (200°C).
- Roll out the puff pastry on a floured surface. Unwrap the beef and place it in the center of the pastry.
- Brush the edges of the pastry with beaten egg and fold over the beef, sealing the edges. Trim any excess pastry.
- Place the wrapped beef seam-side down on a baking sheet lined with parchment paper.
- Bake the Wellington:
- Brush the entire pastry with beaten egg for a golden finish.
- Make a few small slits on top to allow steam to escape.
- Bake for 25-30 minutes or until the pastry is golden brown and the beef reaches the desired doneness.
- Remove from the oven and let rest for 10 minutes before slicing and serving.
Extra Tips:
To confirm the perfect doneness, use a meat thermometer to check the internal temperature of the beef. For medium-rare, aim for 130-135°F (54-57°C).
If you prefer a more pronounced flavor, consider marinating the beef overnight with herbs and garlic before searing. When chopping the mushrooms for the duxelles, use a food processor to save time and achieve a fine texture.
Additionally, confirm the puff pastry remains cold before wrapping the beef to prevent it from becoming soggy. Enjoy your delicious homemade Beef Wellington as the highlight of your Christmas feast!
Maple-Glazed Roast Carrots
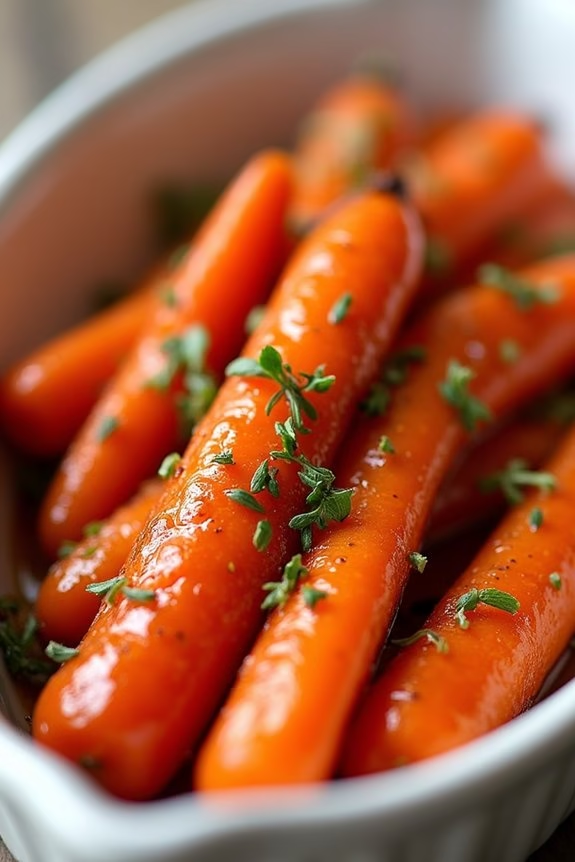
Maple-Glazed Roast Carrots are a delightful side dish that brings a touch of sweetness and a hint of earthiness to your Christmas dinner table. The natural sugars in the carrots are enhanced by the rich, syrupy glaze, creating a dish that’s both simple to prepare and impressive to serve. This recipe transforms ordinary carrots into a festive treat that pairs beautifully with a variety of main courses, from roasted meats to vegetarian entrees.
The secret to perfect Maple-Glazed Roast Carrots lies in the balance of flavors and the careful roasting process that brings out the best in each ingredient. Carrots are naturally sweet, but when combined with maple syrup, they take on a caramelized richness that’s truly irresistible. A touch of butter, a hint of salt, and a sprinkle of fresh herbs complete this dish, making it a standout on your holiday menu. This recipe serves 4-6 people, making it ideal for a family gathering or an intimate dinner with friends.
Ingredients:
- 2 pounds of carrots, peeled and cut into uniform sticks
- 3 tablespoons of pure maple syrup
- 2 tablespoons of unsalted butter, melted
- 1 tablespoon of olive oil
- 1 teaspoon of salt
- 1/2 teaspoon of freshly ground black pepper
- 1 teaspoon of fresh thyme leaves (or 1/2 teaspoon dried thyme)
- 1 tablespoon of fresh parsley, chopped (optional, for garnish)
Instructions:
- Preheat the Oven: Begin by preheating your oven to 400°F (200°C). This temperature guarantees that the carrots roast evenly and develop a lovely caramelized surface.
- Prepare the Carrots: Wash and peel the carrots, then cut them into uniform sticks, approximately 2-3 inches long. This guarantees that they cook evenly.
- Mix the Glaze: In a large bowl, combine the melted butter, olive oil, and maple syrup. Stir in the salt, pepper, and thyme, mixing until well combined.
- Coat the Carrots: Add the carrot sticks to the bowl, tossing them thoroughly to guarantee each piece is evenly coated with the maple glaze.
- Arrange on Baking Sheet: Spread the glazed carrots in a single layer on a baking sheet lined with parchment paper. This prevents sticking and makes cleanup easier.
- Roast the Carrots: Place the baking sheet in the preheated oven and roast for 25-30 minutes. Halfway through, toss the carrots to guarantee even roasting. They should be tender and slightly caramelized when done.
- Garnish and Serve: Once roasted, transfer the carrots to a serving dish. Garnish with freshly chopped parsley for a pop of color and additional flavor, if desired.
Extra Tips:
For the best results, choose fresh, firm carrots, as they’ll roast more evenly and taste better. If you prefer a stronger herb flavor, you can increase the amount of thyme or add other herbs such as rosemary or sage.
If you want a bit of extra sweetness or acidity, consider adding a splash of balsamic vinegar to the glaze. Finally, serve the Maple-Glazed Roast Carrots immediately for the best texture and flavor, as the glaze may thicken as it cools.
Cranberry and Orange Stuffed Pork Loin
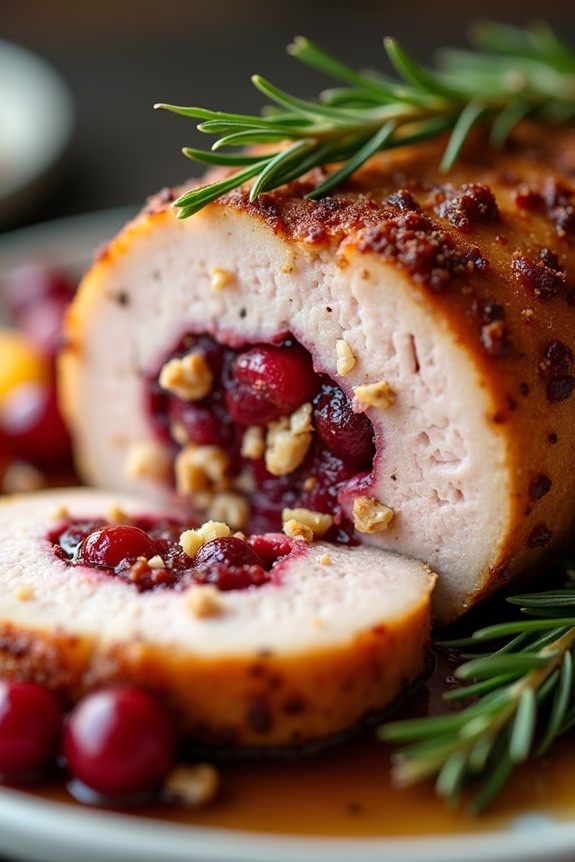
Cranberry and Orange Stuffed Pork Loin is a delightful and festive dish that’s perfect for a Christmas dinner. The succulent pork loin is beautifully complemented by the sweet and tangy flavors of cranberries and oranges, creating a flavor profile that’s both comforting and festive.
This dish not only looks impressive but is also packed with the seasonal flavors that everyone loves during the holiday season. Preparing this dish for Christmas dinner is a wonderful way to impress your guests with a main course that’s both delicious and visually stunning.
The stuffing is made with a combination of cranberries, oranges, and other flavorful ingredients that infuse the pork with moisture and flavor. When cooked to perfection, the pork loin becomes tender and juicy, making it a memorable centerpiece for your holiday table.
Ingredients (Serves 4-6):
- 1 boneless pork loin (about 2-3 pounds)
- 1 cup fresh cranberries
- 1 orange (zest and juice)
- 2 tablespoons honey
- 1/2 cup breadcrumbs
- 1/4 cup chopped pecans
- 1/4 cup diced onion
- 1 tablespoon chopped fresh rosemary
- 1 tablespoon olive oil
- Salt and pepper to taste
Cooking Instructions:
- Prepare the Stuffing: In a medium bowl, combine the fresh cranberries, orange zest, and juice. Add honey, breadcrumbs, chopped pecans, diced onion, and chopped rosemary. Mix well until all ingredients are evenly incorporated.
- Prepare the Pork Loin: Place the pork loin on a clean cutting board. Using a sharp knife, carefully slice the pork loin horizontally, creating a pocket for the stuffing. Be sure not to cut all the way through the meat.
- Stuff the Pork Loin: Spoon the cranberry and orange stuffing into the pocket of the pork loin, pressing it in gently to guarantee it’s evenly distributed.
- Secure the Pork Loin: Use kitchen twine to tie the pork loin at regular intervals, securing the stuffing inside and guaranteeing even cooking.
- Season the Pork Loin: Rub the outside of the pork loin with olive oil, then season generously with salt and pepper.
- Roast the Pork Loin: Preheat your oven to 375°F (190°C). Place the stuffed pork loin in a roasting pan and roast in the preheated oven for 60-75 minutes, or until the internal temperature reaches 145°F (63°C).
- Rest and Slice: Once cooked, remove the pork loin from the oven and allow it to rest for 10 minutes. This will help the juices redistribute throughout the meat. Carefully remove the kitchen twine, then slice the pork loin into 1-inch thick slices for serving.
Extra Tips: To guarantee that your Cranberry and Orange Stuffed Pork Loin is moist and flavorful, make sure not to overcook the pork. Using a meat thermometer is essential to achieving the perfect internal temperature.
Additionally, you can experiment with the stuffing by adding other dried fruits or nuts to customize the flavor to your liking. Preparing the stuffing in advance can also save you time on the day of your Christmas dinner. Enjoy your festive creation!
Garlic and Rosemary Mashed Potatoes
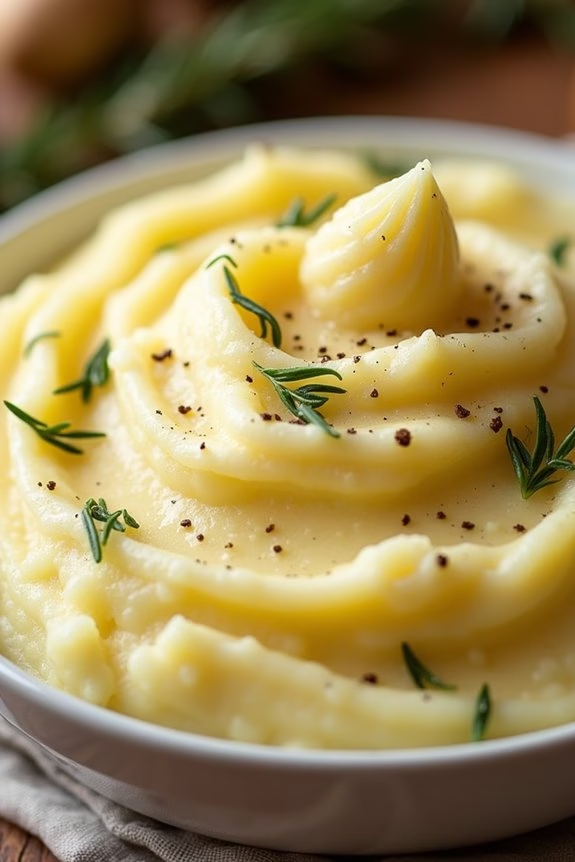
Bring warmth and flavor to your holiday table with our Garlic and Rosemary Mashed Potatoes. This classic side dish is elevated with aromatic garlic and fresh rosemary, making it the perfect accompaniment to your Christmas feast. The creamy texture and rich flavors blend beautifully, offering a delightful twist on traditional mashed potatoes.
Whether you’re serving it alongside roasted turkey or glazed ham, these mashed potatoes are bound to be a hit with family and friends.
Creating this dish is simple and rewarding, requiring just a few quality ingredients and a bit of love. The key to perfect mashed potatoes lies in using the right type of potato, such as Yukon Golds, which provide a buttery flavor and smooth texture. Infused with garlic and rosemary, these mashed potatoes are both fragrant and comforting, embodying the spirit of the season.
Follow the instructions below for a dish that will impress and satisfy your guests.
Ingredients (Serves 4-6):
- 2 pounds Yukon Gold potatoes
- 4 cloves garlic, smashed
- 1/4 cup unsalted butter
- 1/2 cup heavy cream
- 1/4 cup whole milk
- 2 teaspoons fresh rosemary, finely chopped
- Salt, to taste
- Freshly ground black pepper, to taste
Cooking Instructions:
- Prepare the Potatoes: Peel and cut the potatoes into uniform chunks. This guarantees they cook evenly. Place them in a large pot and cover with cold water. Add a generous pinch of salt to the water.
- Cook the Potatoes: Bring the pot to a boil over medium-high heat. Reduce the heat to medium-low and simmer until the potatoes are fork-tender, about 15-20 minutes.
- Infuse the Cream: While the potatoes are cooking, in a small saucepan, melt the butter over medium heat. Add the smashed garlic cloves and chopped rosemary. Cook until the garlic is fragrant, about 2 minutes. Add the heavy cream and milk, and warm through. Don’t let it boil. Remove from heat and set aside.
- Mash the Potatoes: Once the potatoes are tender, drain them and return them to the hot pot. Allow them to sit for a minute to evaporate any excess moisture. Begin mashing the potatoes using a potato masher or a ricer.
- Combine and Season: Gradually add the infused cream mixture to the mashed potatoes, stirring to combine. Season with salt and freshly ground black pepper to taste. Adjust the seasoning as needed.
- Serve: Transfer the mashed potatoes to a serving dish and garnish with a sprinkle of extra rosemary and a pat of butter, if desired.
Extra Tips: To guarantee the best texture, avoid over-mixing the potatoes, which can make them gluey. For an ultra-smooth consistency, a potato ricer or food mill can be used instead of a masher.
If you prepare the dish in advance, keep it warm in a slow cooker on the lowest setting, adding a splash of milk or cream if they begin to dry out. This dish pairs beautifully with a variety of main courses, making it a versatile addition to your Christmas menu.
Baked Brie With Cranberry Chutney
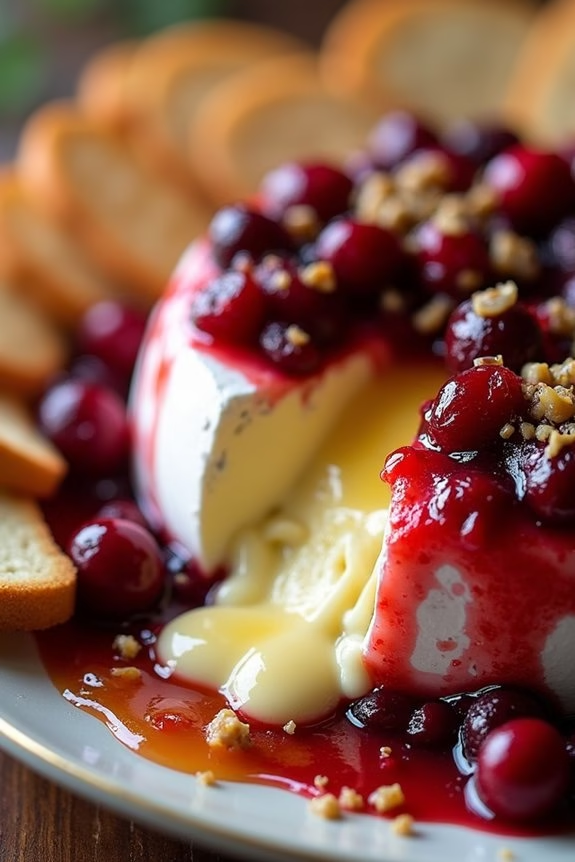
Baked Brie with Cranberry Chutney is a perfect appetizer for your Christmas dinner, combining the creamy richness of Brie cheese with the tangy and sweet flavors of cranberry chutney. This dish not only appeals to the taste buds but also adds a festive touch to your holiday table with its vibrant colors.
The warm, gooey brie pairs beautifully with the chutney’s texture, making it a delightful treat for guests to savor as they mingle and celebrate. This recipe serves 4-6 people and is wonderfully easy to prepare. The key is to use a good quality Brie and fresh ingredients for the chutney to guarantee the flavors are at their peak.
The aroma of this dish as it bakes is sure to entice everyone in the house. With just a few simple steps, you can create a memorable dish that complements the spirit of the festive season.
Ingredients:
- 1 wheel of Brie cheese (about 8 ounces)
- 1 cup fresh cranberries
- 1/4 cup granulated sugar
- 1/4 cup orange juice
- 1/4 teaspoon ground cinnamon
- 1/4 teaspoon ground ginger
- 1/4 cup chopped pecans (optional)
- 2 tablespoons honey
- Crackers or sliced baguette for serving
Instructions:
- Preheat the Oven: Start by preheating your oven to 350°F (175°C). This guarantees that your Brie will bake evenly and thoroughly.
- Prepare the Cranberry Chutney: In a medium saucepan, combine the fresh cranberries, granulated sugar, orange juice, ground cinnamon, and ground ginger. Cook over medium heat, stirring occasionally, until the cranberries burst and the mixture thickens, about 10-15 minutes. Remove from heat and let it cool slightly.
- Prepare the Brie: While the chutney is cooling, place the wheel of Brie on a baking dish or a parchment-lined baking sheet. You can slightly score the top of the Brie with a knife to help it melt evenly.
- Assemble the Dish: Spoon the prepared cranberry chutney over the top of the Brie. You can sprinkle the chopped pecans on top for added texture and flavor, if desired.
- Bake the Brie: Place the assembled Brie in the oven and bake for about 10-15 minutes, or until the Brie is soft and starting to ooze but not completely melted.
- Drizzle with Honey: Once the Brie is baked, remove it from the oven and drizzle honey on top to add a touch of sweetness that complements the tart chutney.
- Serve: Carefully transfer the Baked Brie with Cranberry Chutney to a serving platter. Serve immediately with crackers or slices of baguette for dipping.
Tips for Success:
When preparing the cranberry chutney, be sure to cook it until the cranberries have burst and the mixture has thickened, as this will guarantee a perfect consistency.
If you prefer a smoother chutney, you can mash the cranberries slightly with a fork. Feel free to adjust the amount of sugar in the chutney to suit your taste preference.
Also, be careful not to overbake the Brie; it should be soft and gooey, not completely melted. Finally, consider using a small cast-iron skillet or a ceramic baking dish for a rustic presentation straight from the oven to the table.
Festive Brussels Sprouts With Pecans and Bacon
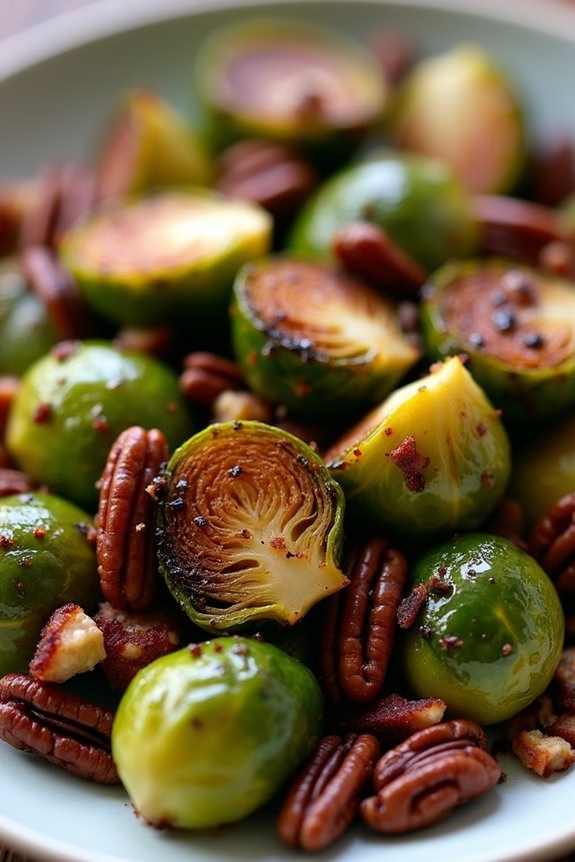
Brussels sprouts often get a bad rap, but when prepared correctly, they can become a standout side dish at your Christmas dinner. This recipe for Festive Brussels Sprouts With Pecans and Bacon elevates the humble sprout to new heights with a delightful combination of flavors and textures. The earthy taste of Brussels sprouts pairs beautifully with the smoky bacon and the sweet, nutty crunch of roasted pecans, creating a dish that’s both savory and satisfying.
Perfect for serving 4-6 people, this dish isn’t only delicious but also easy to prepare, making it an ideal addition to your holiday menu. Whether you’re looking to impress your family or add a new favorite to your holiday tradition, these Brussels sprouts will provide a wonderful burst of flavor and a touch of elegance to your Christmas feast.
Ingredients:
- 1 ½ pounds Brussels sprouts, trimmed and halved
- 4 slices of bacon, chopped
- 1 cup pecans, roughly chopped
- 3 tablespoons olive oil
- Salt and pepper, to taste
- 1 tablespoon balsamic vinegar
- 1 tablespoon maple syrup (optional)
Cooking Instructions:
- Preheat Oven: Preheat your oven to 400°F (200°C). This will guarantee that the Brussels sprouts cook evenly and develop a nice caramelization.
- Prepare Brussels Sprouts: In a large bowl, toss the halved Brussels sprouts with olive oil, salt, and pepper until they’re well coated.
- Cook Bacon: In a large ovenproof skillet over medium heat, cook the chopped bacon until crispy. Using a slotted spoon, remove the bacon and place it on a paper towel-lined plate to drain, leaving the rendered bacon fat in the skillet.
- Combine Ingredients: Add the Brussels sprouts to the skillet with the bacon fat. Stir to combine, making sure the sprouts are coated in the fat. Transfer the skillet to the preheated oven.
- Roast: Roast the Brussels sprouts for 20-25 minutes, stirring halfway through. This will allow them to become tender and slightly crispy on the edges.
- Add Pecans: About 5 minutes before the Brussels sprouts are done, add the chopped pecans to the skillet. Stir to combine and allow the pecans to toast lightly in the oven.
- Finish: Remove the skillet from the oven. Drizzle the Brussels sprouts with balsamic vinegar and maple syrup (if using), and stir in the cooked bacon. Adjust seasoning with additional salt and pepper if needed.
- Serve: Transfer the mixture to a serving dish and serve warm as part of your Christmas dinner spread.
Extra Tips:
To guarantee even cooking, try to select Brussels sprouts that are roughly the same size. If some are much larger than others, you can cut them into quarters instead of halves.
If you prefer a vegetarian version of this dish, simply omit the bacon and use a bit more olive oil or butter for roasting. You can also substitute the pecans with walnuts or almonds if desired.
This dish pairs wonderfully with a glass of chilled white wine or a robust red, complementing the flavors beautifully.
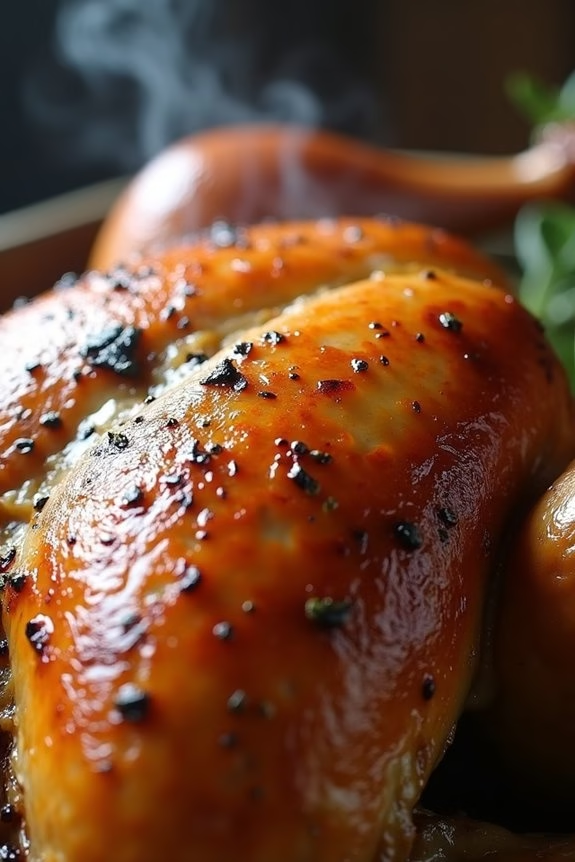
Herb-Crusted Rack of Lamb
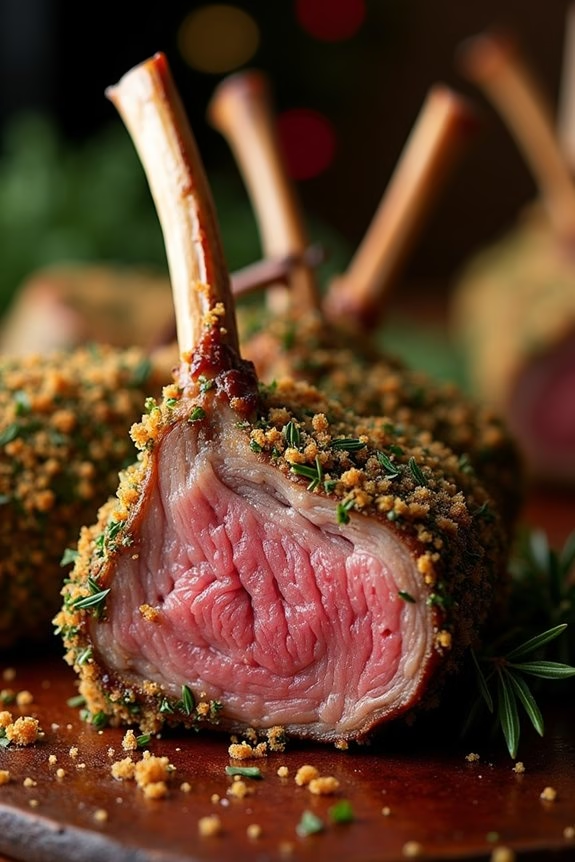
Herb-Crusted Rack of Lamb is an elegant and flavorful dish, perfect for a Christmas dinner that will impress your family and friends. This dish combines the tender and juicy flavors of lamb with a flavorful herb crust that enhances its natural taste. The herb crust not only adds a delightful texture but also infuses the meat with aromatic flavors, making every bite a festive treat.
Whether you’re hosting a large gathering or an intimate dinner, this rack of lamb promises to be a showstopper at your Christmas feast.
To achieve the perfect Herb-Crusted Rack of Lamb, it’s important to start with high-quality lamb, preferably grass-fed for the best flavor. The crust is made from a blend of fresh herbs, garlic, and breadcrumbs, which creates a beautifully crisp topping that complements the richness of the lamb.
This dish is surprisingly easy to prepare, and with a few simple steps, you can create a restaurant-quality meal in your own kitchen. Follow this recipe to create a memorable Christmas dinner centerpiece for 4-6 people.
Ingredients:
- 2 racks of lamb (8 ribs each, frenched)
- 2 tablespoons olive oil
- Salt and pepper, to taste
- 1 cup fresh breadcrumbs
- 2 tablespoons Dijon mustard
- 3 cloves garlic, minced
- 2 tablespoons fresh rosemary, chopped
- 2 tablespoons fresh thyme, chopped
- 1 tablespoon fresh parsley, chopped
- 1 teaspoon lemon zest
Cooking Instructions:
- Preheat the Oven: Start by preheating your oven to 400°F (200°C). This will guarantee your lamb is cooked evenly.
- Prepare the Lamb: Pat the lamb racks dry with paper towels, then season both sides generously with salt and pepper. Heat olive oil in a large skillet over medium-high heat. Once hot, sear the lamb racks for about 2-3 minutes on each side until browned. Remove from heat and set aside to cool slightly.
- Make the Herb Crust: In a bowl, combine the fresh breadcrumbs, minced garlic, chopped rosemary, thyme, parsley, and lemon zest. Mix well.
- Coat the Lamb: Brush the top side of each lamb rack with Dijon mustard. This will help the herb mixture adhere to the meat. Then, press the herb breadcrumb mixture onto the mustard-coated side of the lamb, ensuring it sticks well.
- Roast the Lamb: Place the crusted lamb racks on a baking sheet, herb side up. Roast in the preheated oven for about 18-22 minutes for medium-rare, or until the internal temperature reaches 135°F (57°C). Adjust cooking time if you prefer a different level of doneness.
- Rest the Lamb: Once cooked, remove the lamb from the oven and let it rest for 5-10 minutes. This allows the juices to redistribute, ensuring each slice is succulent.
- Slice and Serve: Cut the lamb into individual chops by slicing between the ribs. Arrange on a serving platter and serve immediately.
Extra Tips:
For the best results, allow the lamb to come to room temperature before searing. This guarantees even cooking throughout. If you prefer, you can prepare the herb crust mixture a day in advance, storing it in the refrigerator until ready to use.
Additionally, using a meat thermometer will help achieve the perfect doneness. Remember, the lamb will continue to cook slightly as it rests, so factor that into your timing. Serve the lamb with roasted vegetables or a fresh salad for a complete holiday meal.
Sweet Potato Casserole With Marshmallow Topping
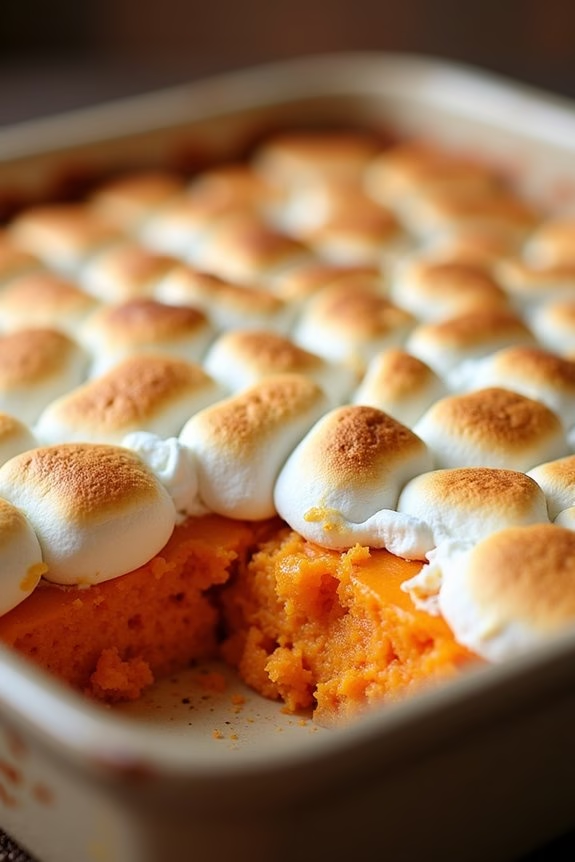
Sweet Potato Casserole with Marshmallow Topping is a classic holiday dish that combines the natural sweetness of sweet potatoes with a crunchy, sugary topping. This dish is a favorite at many Christmas dinners, offering a comforting blend of textures and flavors that both adults and children enjoy.
The sweet potatoes are mashed and seasoned with warm spices, while the marshmallow topping adds a delightful gooey contrast, making it a must-have side dish on your festive table. Perfect for serving 4-6 people, this recipe is simple to follow and can be prepared in advance, allowing you to focus on other aspects of your Christmas meal.
Whether you’re hosting a large gathering or a small family dinner, this Sweet Potato Casserole with Marshmallow Topping is sure to become a beloved tradition. Let’s explore the ingredients and steps needed to create this delicious dish.
Ingredients:
- 4 large sweet potatoes
- 1/2 cup of unsalted butter, melted
- 1/2 cup of brown sugar
- 1/4 cup of milk
- 1 teaspoon of vanilla extract
- 1/2 teaspoon of ground cinnamon
- 1/2 teaspoon of salt
- 1/4 teaspoon of ground nutmeg
- 2 cups of mini marshmallows
Cooking Instructions:
- Preheat and Prepare: Preheat your oven to 350°F (175°C). Start by peeling and chopping the sweet potatoes into large chunks.
- Boil the Sweet Potatoes: Place the chopped sweet potatoes in a large pot and cover them with water. Bring the water to a boil over high heat, then reduce the heat to medium and cook until the sweet potatoes are tender, about 15-20 minutes.
- Mash the Potatoes: Drain the sweet potatoes and transfer them to a large mixing bowl. Use a potato masher or electric mixer to mash the potatoes until smooth.
- Mix in the Ingredients: Add the melted butter, brown sugar, milk, vanilla extract, cinnamon, salt, and nutmeg to the mashed sweet potatoes. Mix well until all ingredients are fully combined and the mixture is smooth.
- Transfer to Baking Dish: Spoon the sweet potato mixture into a greased baking dish, spreading it evenly.
- Add the Marshmallow Topping: Sprinkle the mini marshmallows evenly over the top of the sweet potato mixture, covering the surface completely.
- Bake the Casserole: Place the baking dish in the preheated oven and bake for 20-25 minutes, or until the marshmallows are golden brown and the sweet potato mixture is heated through.
- Serve and Enjoy: Remove the casserole from the oven and let it cool for a few minutes before serving. Enjoy the sweet and savory flavors of this holiday favorite.
Extra Tips:
For an added crunch, consider adding a layer of chopped pecans underneath the marshmallows. This will provide a nutty contrast to the soft sweet potatoes and gooey marshmallows.
If preparing in advance, you can assemble the casserole without the marshmallows and refrigerate it for up to two days. When ready to bake, simply add the marshmallows before placing it in the oven.
Adjust the spices according to your preference for a more personalized dish, and enjoy the delightful harmony of flavors this casserole brings to your Christmas table.
Yorkshire Pudding With Onion Gravy
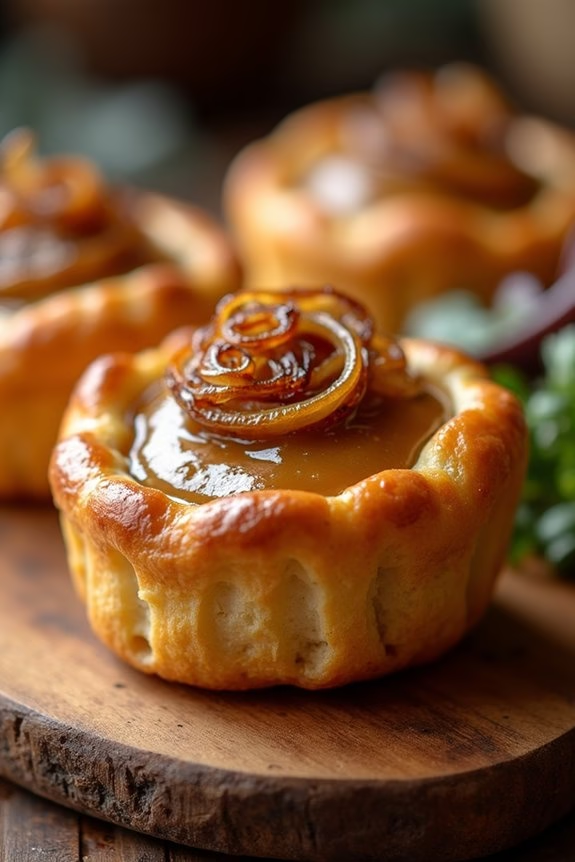
Yorkshire Pudding with Onion Gravy is a classic British side dish that perfectly complements a hearty Christmas dinner. These golden, puffed-up puddings are light and airy on the inside with a crisp outer layer, making them an ideal accompaniment to roast beef or any festive roast. The rich and savory onion gravy adds a depth of flavor that enhances the entire meal, making it a favorite at the holiday table.
The origins of Yorkshire pudding date back centuries, where it was originally served as a starter to fill people up before the main meal. Today, it holds its place as a beloved side dish in British cuisine. Making the perfect Yorkshire pudding requires a few simple ingredients, but the secret lies in the technique. The batter must be poured into piping-hot oil and cooked at a high temperature to achieve the signature rise and texture.
Paired with a luscious onion gravy, this dish is bound to be a crowd-pleaser at any Christmas gathering.
Ingredients (serves 4-6):
- 4 large eggs
- 200g plain flour
- 200ml whole milk
- 1/2 teaspoon salt
- 4 tablespoons vegetable oil
- 2 large onions, thinly sliced
- 2 tablespoons butter
- 2 tablespoons plain flour (for gravy)
- 500ml beef stock
- 1 tablespoon Worcestershire sauce
- Salt and pepper to taste
Cooking Instructions:
- Prepare the Batter: In a large bowl, whisk together the eggs, flour, milk, and salt until you have a smooth batter. Let it rest for at least 30 minutes to allow the flour to absorb the liquid fully.
- Preheat the Oven and Tin: Preheat your oven to 220°C (428°F). Place a muffin or Yorkshire pudding tin in the oven with a tablespoon of vegetable oil in each cup. This guarantees the oil gets very hot, which is essential for the rise of the puddings.
- Cook the Puddings: Once the oil is smoking hot, carefully pour the batter evenly into the tin. The batter should sizzle as it hits the oil. Bake for 20-25 minutes, or until the puddings are puffed and golden brown. Don’t open the oven door during cooking, as this can cause the puddings to deflate.
- Prepare the Onion Gravy: While the puddings are baking, melt the butter in a pan over medium heat. Add the sliced onions and a pinch of salt, cooking slowly until the onions are soft and caramelized, about 15-20 minutes.
- Make the Gravy: Stir in the flour and cook for another minute. Gradually add the beef stock while stirring continuously to avoid lumps. Add Worcestershire sauce, and season with salt and pepper. Let it simmer for 5-10 minutes until the gravy thickens to your liking.
- Serve: Serve the Yorkshire puddings hot, immediately from the oven, with the onion gravy drizzled over the top.
Extra Tips:
For the best rise in your Yorkshire puddings, make sure your batter is at room temperature before pouring it into the hot oil. The contrast in temperature helps with the rise.
Additionally, resting the batter not only improves its texture but also enhances the flavor. If you prefer a richer flavor, you can substitute some of the milk with water from boiled potatoes or even a splash of beer.
Finally, make sure your oven remains at a consistent high temperature throughout the cooking process to achieve the perfect puff.
Holiday Stuffed Acorn Squash
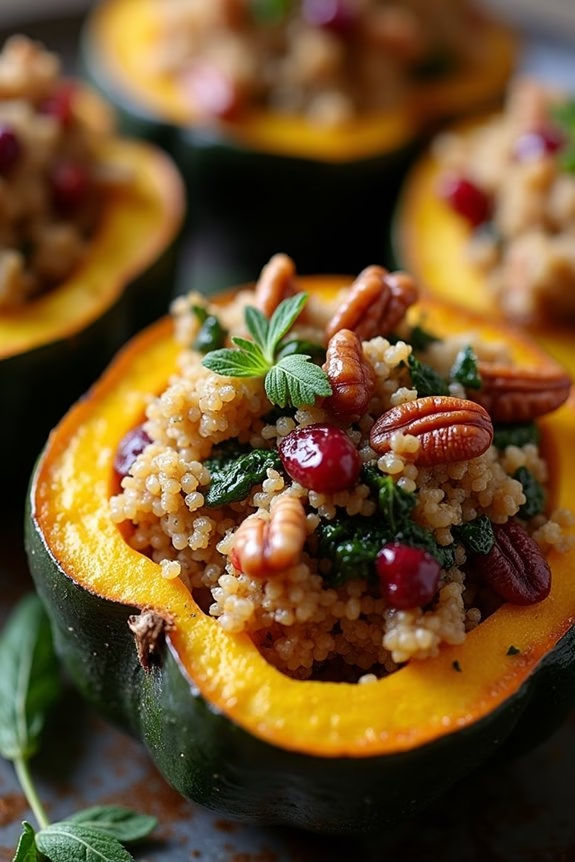
As the holiday season approaches, it’s the perfect time to explore festive dishes that capture the spirit of the season. Holiday Stuffed Acorn Squash is a delightful addition to your Christmas dinner table — it’s not only visually stunning but also packed with flavors that complement the chilly weather.
This dish combines the natural sweetness of acorn squash with a savory stuffing that includes ingredients like cranberries, pecans, and herbs, making it a wonderful side dish or even a main course for vegetarians.
The beauty of this recipe lies in its versatility and the ability to prepare it ahead of time, allowing you to focus on other holiday preparations. The acorn squash serves as a natural bowl, holding a medley of ingredients that come together in a symphony of taste and texture.
The stuffing is hearty and satisfying, with the added appeal of being both nutritious and delicious. This recipe is designed for a serving size of 4-6 people, ensuring that everyone at your table gets to enjoy this festive treat.
Ingredients for 4-6 People:
- 3 medium acorn squash
- 1 cup quinoa
- 2 cups vegetable broth
- 1 tablespoon olive oil
- 1 onion, finely chopped
- 2 cloves garlic, minced
- 1 cup fresh spinach, chopped
- 1/2 cup dried cranberries
- 1/2 cup pecans, chopped
- 1 teaspoon dried thyme
- 1 teaspoon dried sage
- Salt and pepper to taste
- 2 tablespoons maple syrup
Cooking Instructions:
1. Preheat and Prepare Squash: Preheat your oven to 400°F (200°C). Cut each acorn squash in half lengthwise and scoop out the seeds. Brush the inside of each squash half with olive oil and sprinkle with salt and pepper.
Place the squash halves cut side down on a baking sheet and roast in the oven for 25-30 minutes, or until tender.
2. Cook Quinoa: Rinse the quinoa under cold water. In a medium saucepan, bring the vegetable broth to a boil. Add the quinoa, reduce the heat to low, cover, and simmer for about 15 minutes, or until the broth is absorbed.
Fluff the quinoa with a fork and set aside.
3. Prepare Stuffing: In a large skillet, heat olive oil over medium heat. Add the onions and garlic, sautéing until the onions are translucent. Stir in the chopped spinach and cook until wilted.
Add the cooked quinoa, dried cranberries, pecans, thyme, sage, salt, and pepper. Mix well and cook for another 2-3 minutes to combine the flavors.
4. Stuff Squash and Bake: Turn the roasted squash halves over so they’re cut side up. Divide the quinoa stuffing evenly among the squash halves, pressing down lightly.
Drizzle each stuffed squash with maple syrup.
5. Final Bake: Return the stuffed squash to the oven and bake for an additional 15 minutes, allowing the flavors to meld together and the tops to become slightly crispy.
Extra Tips:
For a richer flavor, consider adding a sprinkle of grated parmesan cheese or a vegan cheese alternative on top before the final bake.
To save time on the day of your event, prepare the stuffing a day in advance and store it in the refrigerator. You can also experiment with different nuts and dried fruits to suit your preferences or dietary needs.
Finally, when selecting your acorn squash, look for ones that are heavy for their size with smooth, blemish-free skin for the best results.
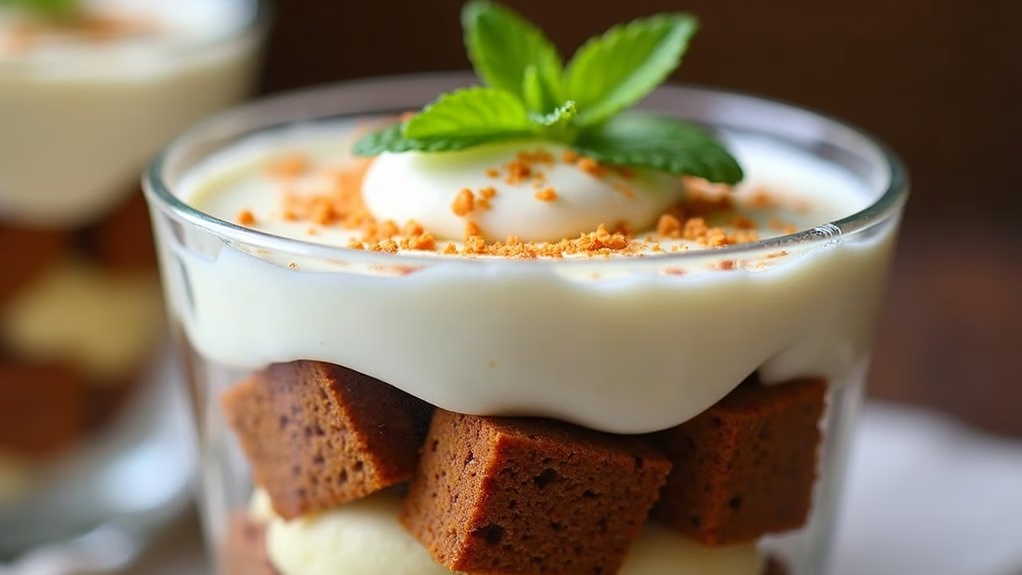
Gingerbread Trifle With Spiced Whipped Cream
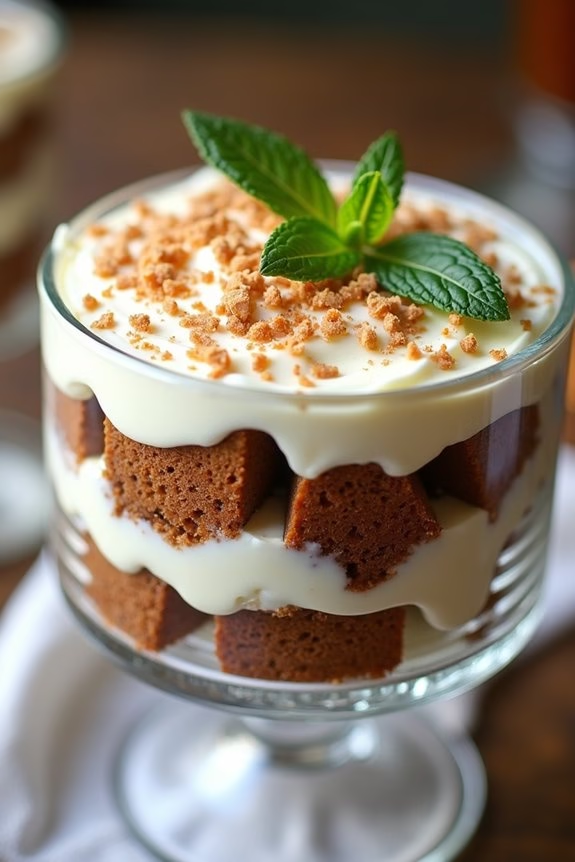
Gingerbread Trifle With Spiced Whipped Cream is a delightful dessert that brings the warmth of the holiday season to your table. This layered treat combines the rich, molasses-infused flavor of gingerbread with the light, airy texture of spiced whipped cream, creating a perfect balance of sweet and spice. The layers are accented with a creamy vanilla custard and a sprinkle of festive spices, making it a showstopping centerpiece for your Christmas dinner.
Perfect for serving 4-6 people, this trifle offers a beautiful presentation in a glass dish or individual parfait glasses, showcasing its elegant layers. Each spoonful delivers a burst of holiday cheer, making it a beloved tradition for many families.
Whether you’re an experienced chef or a novice in the kitchen, this recipe is straightforward and rewarding, sure to impress your guests with both its appearance and taste.
Ingredients:
- 1 pound of gingerbread cake, cut into 1-inch cubes
- 2 cups of vanilla custard (store-bought or homemade)
- 1 cup of heavy cream
- 2 tablespoons of powdered sugar
- 1 teaspoon of ground cinnamon
- 1/2 teaspoon of ground nutmeg
- 1/4 teaspoon of ground cloves
- 1 teaspoon of vanilla extract
- 1/4 cup of crystallized ginger, finely chopped (optional)
- Fresh mint leaves for garnish (optional)
Instructions:
- Prepare Spiced Whipped Cream: In a chilled mixing bowl, combine the heavy cream, powdered sugar, cinnamon, nutmeg, cloves, and vanilla extract. Using an electric mixer, whip the mixture on medium-high speed until soft peaks form. Be careful not to overwhip, as the cream can turn into butter.
- Assemble the Trifle: In a trifle dish or individual parfait glasses, begin by adding a layer of gingerbread cubes, covering the bottom evenly. Follow with a layer of vanilla custard, spreading it smoothly over the gingerbread.
- Add Whipped Cream: Spoon a layer of the prepared spiced whipped cream over the custard. Use a spatula or the back of a spoon to spread it evenly.
- Repeat Layers: Continue layering with gingerbread cubes, custard, and whipped cream until the dish is full, finishing with a layer of spiced whipped cream on top.
- Garnish: If desired, sprinkle finely chopped crystallized ginger over the top layer for added texture and flavor. Add a few fresh mint leaves as a festive garnish.
- Chill and Serve: Cover the trifle with plastic wrap and refrigerate for at least 2 hours to allow the flavors to meld. Serve chilled, allowing guests to admire the beautiful layers before diving in.
Extra Tips:
For a homemade touch, consider baking your gingerbread cake from scratch using a favorite recipe. This can enhance the freshness and flavor of the trifle.
If you’re short on time, store-bought gingerbread works perfectly well. Additionally, if you prefer a richer custard, consider making it with egg yolks and a touch of brandy for an adult twist.
Adjust the spices in the whipped cream to suit your taste, and remember that chilling the mixing bowl and beaters beforehand helps achieve the best whipped cream texture.