
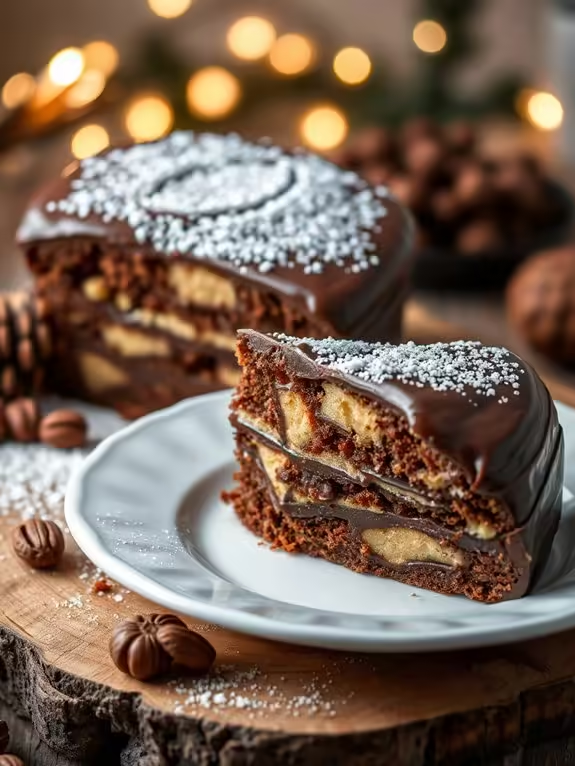
There’s something magical about a Christmas Chocolate Biscuit Cake that brings warmth to any holiday gathering. With its rich chocolate and crunchy biscuit pieces, this treat is not just delicious but also so easy to customize. Imagine adding your favorite nuts or a splash of liqueur. As it chills overnight, the flavors come together beautifully.
Ready to create a festive delight? Let’s dive into this simple process and make some holiday memories together!
Why You’re Gonna Love This Cake
When it comes to festive treats, you’re gonna love this Christmas Chocolate Biscuit Cake for its rich, indulgent layers that practically melt in your mouth.
Imagine biting into a slice, where the creamy chocolate blends seamlessly with crunchy biscuit pieces, creating a delightful texture that keeps you coming back for more. It’s not just a dessert; it’s a celebration on a plate!
Each layer is packed with flavor, making it a perfect centerpiece for your holiday table.
Plus, it’s incredibly versatile—add nuts, dried fruits, or even a splash of your favorite liqueur for an extra kick.
This cake is a crowd-pleaser, sure to impress family and friends alike.
Trust me, once you try it, you’ll be hooked!
Preparation Tips
Creating your Christmas Chocolate Biscuit Cake is as enjoyable as savoring each slice. Start by gathering all your ingredients—chocolate, biscuits, and any festive add-ins like dried fruit or nuts.
I always recommend using high-quality chocolate; it makes a world of difference in flavor. When you crush the biscuits, aim for a mix of large and small pieces to create texture.
For an extra touch, melt a bit of butter with the chocolate to enhance richness. Don’t forget to line your cake tin with parchment paper; it’ll make removal a breeze.
Chill the cake overnight to let the flavors meld beautifully. Trust me, the wait is worth it! So, roll up your sleeves and let the festive baking begin!
Recipe & Cooking Instructions
Christmas Chocolate Biscuit Cake
Christmas Chocolate Biscuit Cake is a festive favorite that combines rich chocolate flavor with the delightful crunch of biscuits. This no-bake cake is perfect for holiday gatherings, as it requires minimal cooking time while still delivering a stunning presentation.
The cake is typically layered with crushed biscuits and a creamy chocolate mixture, making it a treat that’s both easy to prepare and irresistibly delicious.
This cake isn’t only a crowd-pleaser but also a fantastic way to involve the whole family in the kitchen. Kids can help crush the biscuits, mix the chocolate, and decorate the cake.
With its rich flavor and delightful texture, this dessert is sure to become a holiday tradition in your home. So, gather your ingredients and get ready to create a beautiful and tasty Christmas treat that everyone will love!
Ingredients (Serves 4-6):
- 200g digestive biscuits
- 100g unsalted butter
- 200g dark chocolate (minimum 70% cocoa)
- 100g milk chocolate
- 100g golden syrup
- 50g chopped nuts (optional)
- 50g dried fruits (optional)
- Icing sugar (for dusting)
Cooking Instructions:
1. Prepare the Base: Begin by crushing the digestive biscuits into small pieces. You can place them in a zip-lock bag and use a rolling pin to break them down, or pulse them in a food processor. Aim for a mix of fine crumbs and larger chunks for texture. Set aside.
2. Melt the Chocolate: In a heatproof bowl, combine the dark chocolate, milk chocolate, unsalted butter, and golden syrup. Place the bowl over a pot of simmering water (double boiler method) and gently stir until everything is melted and well combined.
Remove from heat and allow it to cool slightly.
3. Combine Ingredients: Once the chocolate mixture has cooled a bit, add the crushed biscuits to the bowl. If you’re using nuts and dried fruits, fold them in as well.
Mix everything together until the biscuits are fully coated with the chocolate mixture.
4. Shape the Cake: Line a loaf tin or a round cake tin with parchment paper for easy removal. Transfer the biscuit and chocolate mixture into the prepared tin, pressing it down firmly with the back of a spoon to create an even layer.
Smooth the top with a spatula.
5. Chill the Cake: Cover the tin with plastic wrap or foil and place it in the refrigerator. Let the cake chill for at least 4 hours, or overnight if possible, to allow it to set properly.
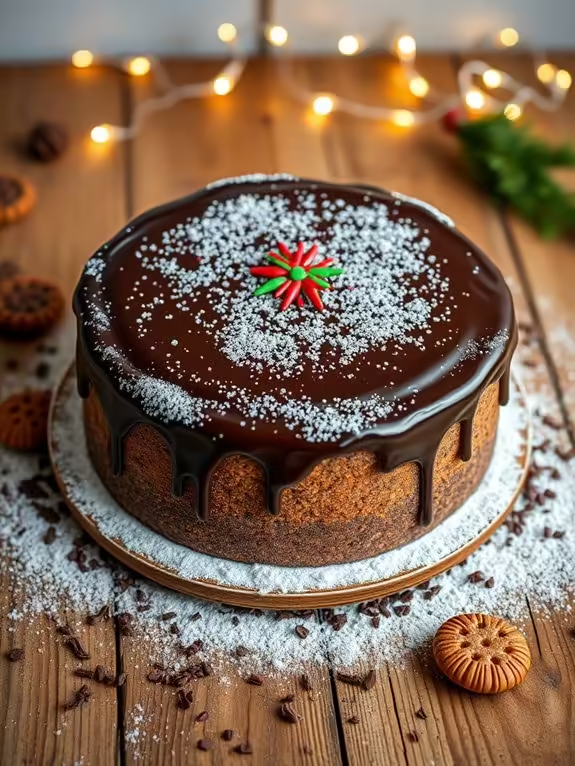
6. Serve: Once the cake has set, carefully remove it from the tin and peel away the parchment paper. Dust the top with icing sugar before slicing into pieces.
Serve chilled or at room temperature.
Extra Tips:
For added flavor, you can experiment with different types of chocolate or add a splash of your favorite liqueur to the chocolate mixture.
Be sure to let the cake chill adequately to achieve a firm texture, making it easier to slice. You can also decorate the cake with festive toppings like sprinkles or edible glitter for a more festive touch.
Enjoy your Christmas Chocolate Biscuit Cake with a cup of tea or coffee for a truly delightful holiday experience!
Chef’s Tips and Variations
To elevate your Christmas Chocolate Biscuit Cake, consider these chef’s tips and variations that can add a personal touch to this delightful dessert.
First, try adding a splash of coffee or a hint of orange zest to the chocolate mixture for a rich depth of flavor.
You could also mix in some crushed nuts or dried fruit, like cranberries, for texture and a festive twist.
For a more indulgent experience, drizzle melted chocolate over the top before it sets.
If you’re feeling adventurous, swap the biscuits for gingerbread or speculoos for a seasonal flavor.
Finally, don’t forget to let your cake chill overnight; it really enhances the taste and makes slicing easier.
Happy baking!
Serving Suggestions
When it comes to serving your Christmas Chocolate Biscuit Cake, I like to dress it up a bit for that festive touch. I often slice it into generous pieces and place them on a beautiful platter.
To add some holiday flair, I sprinkle crushed candy canes or chopped nuts over the top. A dollop of whipped cream or a scoop of vanilla ice cream on the side creates a delightful contrast to the rich chocolate flavor.
For an extra touch, I drizzle melted chocolate or caramel sauce on each slice. If I’m feeling adventurous, I’ll pair it with a warm cup of spiced hot chocolate.
Trust me, these simple serving suggestions will make your dessert the star of the holiday table!
Presentation Tips
There’s something magical about how a cake is presented that can elevate the whole dessert experience. To make my Christmas Chocolate Biscuit Cake stand out, I love using a beautiful cake stand. It adds height and draws attention.
I often dust the top with cocoa powder or icing sugar for a snowy effect, reminiscent of winter wonderlands. Adding festive touches like edible glitter or seasonal decorations like holly or candy canes makes it feel extra special.
For a more personal touch, I sometimes slice the cake into neat squares and arrange them on a platter, garnished with fresh berries or mint leaves.
Nutritional Info & Health Benefits
Indulgence can be savored even in a dessert like my Christmas Chocolate Biscuit Cake, which offers a delightful blend of flavor and nutrition. Packed with rich dark chocolate, this cake is a source of antioxidants that help combat free radicals.
The biscuits add a satisfying crunch and provide carbohydrates for energy, making it a treat that won’t leave you feeling sluggish. I often include nuts like walnuts or almonds, boosting the healthy fats and adding protein.
Plus, the dried fruits I throw in offer natural sweetness and fiber. While it’s a dessert, I believe it can fit into a balanced diet, allowing you to enjoy the festive flavors without guilt.
Final Thoughts
As the holiday season approaches, my Christmas Chocolate Biscuit Cake becomes a cherished staple on my dessert table. This delightful treat, with its rich chocolate and crunchy biscuit layers, never fails to impress my family and friends.
It’s so simple to whip up, yet it feels indulgently festive. Each bite transports me to cozy gatherings filled with laughter and joy.
I love how versatile it is; you can add nuts, dried fruits, or even a splash of your favorite liqueur to personalize it.
Plus, it’s the perfect make-ahead dessert, allowing me to focus on other holiday preparations.