
There’s something magical about gathering loved ones for a Christmas brunch that is both festive and light. Picture a table filled with colorful citrus salads, savory frittatas, and delicate scones. Last Christmas, my Spinach and Feta Frittata was a crowd-pleaser. I’m excited to share my top 13 go-to recipes that will surely lift your brunch game. Ready to explore these delightful dishes?
Spinach and Feta Frittata

The Spinach and Feta Frittata is a delightful dish that combines the rich flavors of feta cheese with the earthy taste of spinach, all encased in a fluffy egg base. This frittata is a perfect choice for a Christmas brunch, offering a savory option that’s both satisfying and nutritious.
The combination of fresh spinach and tangy feta cheese adds a festive touch to your holiday spread, guaranteeing your guests are left feeling full and happy.
This frittata isn’t only delicious but also simple to prepare, making it an ideal choice for a busy holiday morning. With minimal prep time, you can focus on enjoying the company of family and friends.
Whether served hot from the oven or at room temperature, this dish is versatile and sure to please a crowd.
Ingredients (Serves 4-6):
- 8 large eggs
- 1 cup fresh spinach, chopped
- 1 cup feta cheese, crumbled
- 1/2 cup milk
- 1/4 cup grated Parmesan cheese
- 1 small onion, finely chopped
- 2 tablespoons olive oil
- 1/4 teaspoon salt
- 1/4 teaspoon black pepper
- 1/4 teaspoon nutmeg (optional)
- 1 clove garlic, minced
Cooking Instructions:
- Prepare the Oven and Pan: Preheat your oven to 350°F (175°C). Heat the olive oil in an oven-safe skillet over medium heat.
- Sauté the Aromatics: Add the chopped onion and minced garlic to the skillet. Cook for 3-4 minutes until the onion becomes translucent and fragrant.
- Wilt the Spinach: Add the chopped spinach to the skillet with the onion and garlic. Stir gently until the spinach has wilted, about 2-3 minutes.
- Mix the Egg Base: In a large bowl, whisk together the eggs, milk, salt, black pepper, and nutmeg until well combined. Stir in the crumbled feta and grated Parmesan cheese.
- Combine and Cook: Pour the egg mixture into the skillet with the sautéed vegetables. Stir gently to distribute the ingredients evenly.
- Bake the Frittata: Transfer the skillet to the preheated oven. Bake for 20-25 minutes, or until the frittata is set and the top is lightly golden.
- Serve: Remove the frittata from the oven and let it cool for a few minutes before slicing. Serve warm or at room temperature.
Extra Tips:
To guarantee your frittata is light and fluffy, avoid over-mixing the eggs, as this can result in a denser texture.
If you don’t have an oven-safe skillet, you can transfer the cooked spinach and onion mixture to a greased baking dish before adding the egg mixture.
For added flavor, consider tossing in sun-dried tomatoes or a pinch of red pepper flakes.
Citrus Avocado Salad
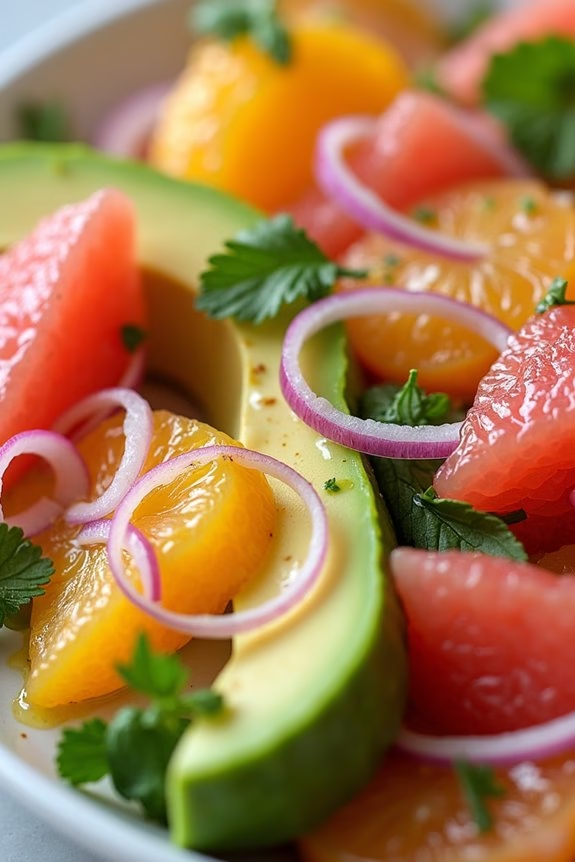
Start your Christmas brunch with a revitalizing and vibrant Citrus Avocado Salad. This dish brings together the zesty flavors of citrus fruits and the creamy texture of ripe avocados, making it a perfect light and healthy addition to your festive spread.
The combination of sweet, tangy, and creamy elements creates a delightful balance that pleases the palate and complements any main dish you serve. This salad isn’t only delicious but also visually appealing, featuring a colorful mix of pink grapefruit, oranges, and avocados, topped with a bright, tangy dressing.
It’s a simple yet sophisticated dish that requires minimal preparation, allowing you to spend more time enjoying the holiday with your loved ones. Ideal for 4-6 people, this salad can be effortlessly scaled up or down depending on your gathering size.
Ingredients for Citrus Avocado Salad (Serves 4-6):
- 2 ripe avocados
- 2 navel oranges
- 2 pink grapefruits
- 1 small red onion
- 1/4 cup fresh mint leaves
- 1/4 cup fresh cilantro leaves
- 3 tablespoons extra virgin olive oil
- 1 tablespoon honey
- Juice of 1 lime
- Salt and pepper to taste
Cooking Instructions:
- Prepare the Citrus Fruits: Start by segmenting the oranges and grapefruits. Using a sharp knife, cut off the top and bottom of each fruit. Stand them upright and slice off the peel and pith in strips. Carefully cut between the membranes to release the segments. Collect the citrus juice in a bowl for the dressing.
- Slice the Avocados: Halve the avocados, remove the pits, and peel them. Cut the avocado flesh into thin slices and set aside.
- Slice the Onion: Peel and thinly slice the red onion. If desired, soak the slices in cold water for 10 minutes to reduce their pungency, then drain and pat dry.
- Make the Dressing: In a small bowl, whisk together the olive oil, honey, lime juice, and 2 tablespoons of the collected citrus juice. Season with salt and pepper to taste.
- Assemble the Salad: On a large serving platter, arrange the citrus segments, avocado slices, and red onion. Drizzle the dressing evenly over the salad.
- Garnish: Sprinkle fresh mint and cilantro leaves over the top of the salad for added flavor and color.
- Serve Promptly: Serve the salad immediately to enjoy the fresh flavors at their peak.
Extra Tips:
To guarantee the best texture and flavor, choose avocados that are just ripe but still firm enough to slice easily. If avocados are too ripe, they may become mushy when mixed with the citrus segments.
Additionally, feel free to experiment with different types of citrus fruits, such as blood oranges or tangerines, to add a unique twist to your salad. When assembling the salad, handle the avocados and citrus segments gently to maintain their shape and presentation.
Smoked Salmon and Dill Tartines

Smoked Salmon and Dill Tartines are an elegant and delicious addition to any Christmas brunch table. These open-faced sandwiches feature a harmonious blend of flavors and textures, combining the rich and smoky taste of the salmon with the fresh and vibrant notes of dill and cream cheese.
Perfectly suited for a festive gathering, these tartines aren’t only visually appealing but also simple to prepare, making them an ideal choice for home cooks looking to impress their guests with minimal effort.
These tartines serve 4-6 people, making them a great option for a small to medium-sized brunch. Whether you’re hosting a cozy family gathering or an intimate brunch with friends, the Smoked Salmon and Dill Tartines will delight your guests and add a touch of sophistication to your holiday spread.
The following recipe guarantees that your tartines are perfectly balanced in flavor and beautifully presented.
Ingredients:
- 6 slices of crusty artisan bread
- 8 ounces cream cheese, softened
- 1 tablespoon fresh lemon juice
- 1 tablespoon freshly chopped dill
- 1 tablespoon capers, drained
- 8 ounces smoked salmon, thinly sliced
- 1 small red onion, thinly sliced
- Freshly ground black pepper
- Lemon wedges, for garnish (optional)
- Fresh dill sprigs, for garnish (optional)
Cooking Instructions:
- Prepare the Cream Cheese Mixture: In a medium-sized bowl, combine the softened cream cheese, fresh lemon juice, and freshly chopped dill. Mix until smooth and well combined. This will serve as the flavorful base for your tartines.
- Toast the Bread: Preheat your oven to 350°F (175°C). Place the slices of crusty artisan bread on a baking sheet and toast them in the oven for about 5-7 minutes, or until they’re golden brown and crisp. Remove from the oven and allow them to cool slightly.
- Assemble the Tartines: Spread a generous layer of the cream cheese mixture over each slice of toasted bread. Make sure to cover the surface evenly for a balanced taste in every bite.
- Add the Toppings: Layer the thinly sliced smoked salmon evenly over the cream cheese on each tartine. Arrange the red onion slices on top of the salmon, followed by a few capers for an added burst of flavor.
- Season and Garnish: Finish with a sprinkle of freshly ground black pepper to enhance the flavors. If desired, garnish with lemon wedges and fresh dill sprigs for an added touch of elegance.
Extra Tips:
When preparing the Smoked Salmon and Dill Tartines, verify that the cream cheese is at room temperature for easy mixing and spreading.
For added depth of flavor, you can incorporate a teaspoon of horseradish into the cream cheese mixture. If you prefer a more robust bread flavor, consider using a dark rye or pumpernickel bread as an alternative to the artisan bread.
These tartines are best served fresh, so assemble them just before serving to maintain their crispness and vibrant appearance.
Cranberry Orange Scones

Cranberry Orange Scones are a delightful addition to any Christmas brunch table. The combination of tart cranberries and the zesty flavor of orange creates a festive and invigorating treat.
These scones are perfect when served warm, accompanied by a dollop of clotted cream or a smear of butter. Their golden crust and tender interior make them a crowd-pleaser, and they pair wonderfully with a hot cup of tea or coffee. Whether you’re hosting a brunch or simply want to treat your family to a special holiday breakfast, these scones are an excellent choice.
The scones are relatively simple to make, requiring just a few key ingredients and a bit of time in the kitchen. The secret to their light and flaky texture lies in the careful handling of the dough and the use of cold butter, which creates pockets of steam during baking.
The addition of fresh orange zest and juice brings a bright and citrusy aroma, while the cranberries provide a delightful burst of tartness in every bite. With this recipe, you’ll be able to serve 4-6 people, making it ideal for a small gathering or a cozy family meal.
Ingredients for 4-6 Servings:
- 2 cups all-purpose flour
- 1/3 cup granulated sugar
- 1 tablespoon baking powder
- 1/2 teaspoon salt
- 1/2 cup unsalted butter, cold and cubed
- 1/2 cup dried cranberries
- 1 tablespoon orange zest
- 1/4 cup fresh orange juice
- 1/2 cup heavy cream
- 1 large egg
- 1 teaspoon vanilla extract
- Additional sugar for sprinkling
Cooking Instructions:
- Preheat and Prepare: Preheat your oven to 400°F (200°C). Line a baking sheet with parchment paper and set aside.
- Mix Dry Ingredients: In a large mixing bowl, combine the all-purpose flour, granulated sugar, baking powder, and salt. Whisk these ingredients together to confirm they’re evenly distributed.
- Cut in the Butter: Add the cold, cubed butter to the dry ingredients. Using a pastry cutter or your fingers, work the butter into the flour mixture until it resembles coarse crumbs. The butter should be evenly distributed but still visible in small pieces.
- Add Wet Ingredients: In a separate bowl, whisk together the heavy cream, egg, orange juice, and vanilla extract. Pour this mixture into the dry ingredients, and gently fold until the dough starts to come together.
- Incorporate Cranberries and Zest: Add the dried cranberries and orange zest to the dough. Mix until they’re incorporated evenly, being careful not to overwork the dough.
- Shape the Scones: Transfer the dough onto a lightly floured surface. Gently knead the dough a few times until it holds together. Shape the dough into a circle about 1 inch thick. Use a sharp knife to cut the circle into 8 wedges.
- Prepare for Baking: Place the scones on the prepared baking sheet, leaving space between each piece. Brush the tops with a little heavy cream and sprinkle with additional sugar for a crunchy topping.
- Bake: Bake in the preheated oven for 15-20 minutes or until the scones are golden brown and a toothpick inserted into the center comes out clean.
- Cool and Serve: Allow the scones to cool on the baking sheet for a few minutes before transferring them to a wire rack. Serve warm or at room temperature.
Extra Tips:
For the best results, make sure your butter is very cold before incorporating it into the flour mixture; this is vital for achieving the desired flaky texture.
If possible, chill the dough for about 15 minutes before baking to help the scones hold their shape and rise better. Additionally, if fresh cranberries are available, they can be used in place of dried ones for a juicier bite, just be sure to adjust the sugar accordingly to balance the tartness.
Enjoy your scones fresh out of the oven or store them in an airtight container for up to two days.
Holiday Vegetable Quiche

Holiday Vegetable Quiche is a delightful addition to any Christmas brunch, bringing together a mix of savory vegetables encased in a buttery, flaky crust. This dish isn’t only delicious but also versatile, allowing you to customize the filling with your favorite seasonal vegetables. It’s an excellent way to serve a dish that’s both satisfying and nutritious, making it a perfect centerpiece for your holiday spread.
Whether you’re catering to vegetarians or simply want to offer a lighter option alongside heartier fare, this quiche is sure to be a hit.
The key to a perfect Holiday Vegetable Quiche is the balance of flavors and textures. The creamy egg filling is enriched with a hint of cheese, while the vegetables provide a wonderful contrast with their natural sweetness and slight crispness. The crust, golden and tender, holds everything together, making this dish not only taste great but also look beautiful on your brunch table.
With a few fresh herbs for garnish, your quiche won’t only taste delicious but also look impressive.
Ingredients (Serves 4-6):
- 1 pre-made pie crust
- 6 large eggs
- 1 cup heavy cream
- 1 cup shredded cheese (such as Gruyère or cheddar)
- 1 cup chopped spinach
- 1/2 cup diced bell peppers
- 1/2 cup sliced mushrooms
- 1/4 cup chopped onion
- 1 tablespoon olive oil
- Salt and pepper to taste
- 1 teaspoon dried thyme
- Fresh herbs for garnish (optional)
Cooking Instructions:
1. Preheat the Oven: Begin by preheating your oven to 375°F (190°C). This guarantees that your quiche will bake evenly.
2. Prepare the Pie Crust: Roll out the pre-made pie crust and fit it into a 9-inch pie dish. Trim any excess dough and crimp the edges. Place it in the refrigerator to chill while you prepare the filling.
3. Cook the Vegetables: In a large skillet, heat the olive oil over medium heat. Add the chopped onion, diced bell peppers, and sliced mushrooms. Sauté for about 5-7 minutes until the vegetables are soft and any moisture from the mushrooms has evaporated.
Add the chopped spinach and cook for another 2 minutes until wilted. Season the vegetables with salt, pepper, and dried thyme.
4. Prepare the Egg Mixture: In a large mixing bowl, whisk together the eggs, heavy cream, and shredded cheese until well combined. Season with a pinch of salt and pepper.
5. Assemble the Quiche: Remove the pie crust from the refrigerator. Spread the cooked vegetable mixture evenly over the bottom of the crust. Pour the egg and cheese mixture over the vegetables, ensuring everything is evenly distributed.
6. Bake the Quiche: Place the quiche in the preheated oven and bake for 35-40 minutes, or until the filling is set and the top is lightly golden brown. A knife inserted into the center should come out clean.
7. Cool and Serve: Once baked, remove the quiche from the oven and allow it to cool for at least 10 minutes before slicing. This resting time helps the filling to set completely, making it easier to serve.
Extra Tips:
For a more flavorful crust, consider brushing it with a little beaten egg before baking to achieve a glossy finish.
Feel free to experiment with different vegetables based on what you have on hand or what’s in season. Zucchini, asparagus, or even roasted sweet potatoes can be great additions.
If you’re preparing this dish ahead of time, you can fully bake the quiche and store it in the refrigerator. Reheat it in a low oven before serving to maintain its deliciously flaky crust.
Winter Fruit Salad With Pomegranate
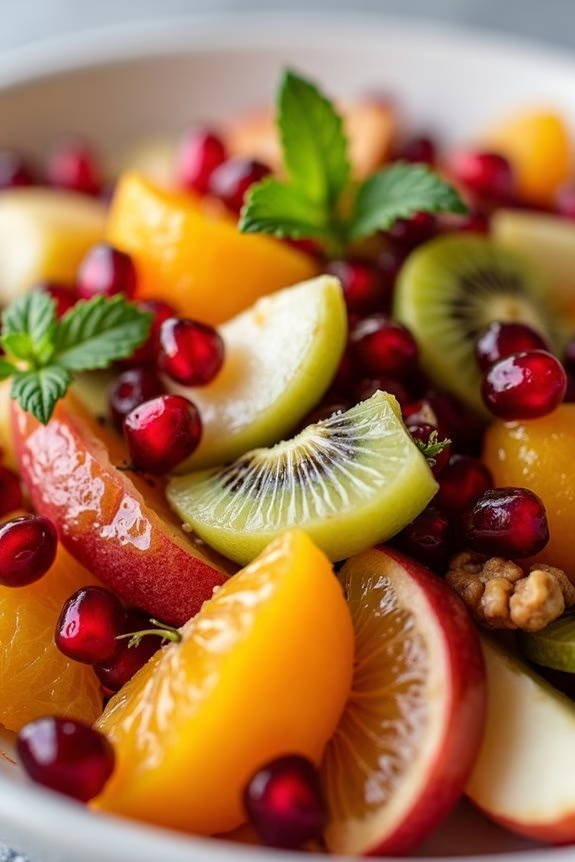
Winter is a wonderful time to enjoy the crisp and invigorating flavors of seasonal fruits. One delightful way to capture the essence of winter in a dish is by preparing a Winter Fruit Salad With Pomegranate. This colorful and vibrant salad combines the sweet and tart tastes of winter fruits, including pomegranates, citrus, and apples. The addition of pomegranate seeds not only adds a burst of flavor but also provides a festive touch, making it a perfect dish for a Christmas brunch.
This fruit salad isn’t only visually appealing but also incredibly nutritious, offering a range of vitamins and antioxidants to keep you feeling healthy during the holiday season. The combination of juicy oranges, crisp apples, and ruby-red pomegranate seeds creates an irresistible mix of textures and flavors. It’s a versatile dish that can be served as a starter, a side dish, or even an invigorating dessert.
Here’s how to make this delightful dish for a gathering of 4-6 people.
Ingredients:
- 2 large oranges
- 2 apples (any variety you like)
- 1 cup of pomegranate seeds
- 1 ripe pear
- 1 kiwi
- 1/4 cup of dried cranberries
- 1/4 cup of chopped walnuts
- 2 tablespoons of honey
- 1 tablespoon of fresh lemon juice
- 1/2 teaspoon of ground cinnamon
- Fresh mint leaves for garnish (optional)
Instructions:
- Prepare the Fruits: Begin by peeling the oranges and cutting them into bite-sized segments. Core and dice the apples and pear into similar-sized pieces. Peel and slice the kiwi into thin rounds.
- Mix the Fruits: In a large serving bowl, combine the orange segments, diced apples, diced pear, kiwi slices, and pomegranate seeds. Gently toss them together to guarantee even distribution.
- Add Dried Cranberries and Walnuts: Sprinkle the dried cranberries and chopped walnuts over the mixed fruits. These add a delightful chewiness and crunch to the salad.
- Prepare the Dressing: In a small bowl, whisk together the honey, fresh lemon juice, and ground cinnamon until well combined. This dressing will add a touch of sweetness and spice to the salad.
- Dress the Salad: Pour the honey-cinnamon dressing over the fruit mixture in the serving bowl. Gently toss everything together to guarantee the fruits are lightly coated with the dressing.
- Garnish and Serve: If desired, garnish the salad with fresh mint leaves for an extra pop of color and freshness. Serve immediately or refrigerate for up to an hour to allow the flavors to meld.
Extra Tips:
To guarantee the best flavor and texture, use ripe and fresh fruits. If preparing the salad in advance, you can prevent the apples and pear from browning by tossing them in a little lemon juice before adding them to the salad.
Adjust the sweetness of the dressing to your taste by adding more or less honey. Feel free to experiment with other fruits like grapes or persimmons if you want to vary the recipe. This salad is highly adaptable and can be modified based on the fruits available to you.
Zucchini and Goat Cheese Muffins

If you’re searching for a delightful and savory addition to your Christmas brunch spread, these Zucchini and Goat Cheese Muffins are a perfect choice. They combine the subtle sweetness of zucchini with the rich creaminess of goat cheese, creating a mouthwatering balance of flavors.
These muffins aren’t only easy to prepare, but they also add a unique twist to traditional brunch offerings, making them both a crowd-pleaser and a conversation starter. The texture of these muffins is moist and tender, thanks to the grated zucchini, which also adds a pop of color to the mix.
The goat cheese provides a tangy contrast that complements the zucchini’s mildness, and a hint of herbs brings everything together. They’re best served warm, and you can even make them a day ahead to save time on your busy holiday morning.
Whether you’re serving them as a side dish or enjoying them on their own, these muffins will make your brunch truly special.
Ingredients (serving size: 4-6 people):
- 2 medium zucchinis, grated
- 1 cup goat cheese, crumbled
- 2 cups all-purpose flour
- 1 tablespoon baking powder
- 1/2 teaspoon baking soda
- 1/2 teaspoon salt
- 1/4 teaspoon black pepper
- 1/2 teaspoon dried thyme
- 1/2 teaspoon dried oregano
- 2 large eggs
- 1/4 cup olive oil
- 3/4 cup buttermilk
- 1 teaspoon lemon zest
Instructions:
- Preheat the Oven: Start by preheating your oven to 350°F (175°C). Line a muffin tin with paper liners or lightly grease it with cooking spray to prevent sticking.
- Prepare the Zucchini: Grate the zucchinis using a box grater, then place them in a clean kitchen towel. Squeeze out as much moisture as possible to prevent the muffins from becoming too soggy.
- Mix Dry Ingredients: In a large mixing bowl, combine the flour, baking powder, baking soda, salt, black pepper, thyme, and oregano. Stir the ingredients together until well mixed.
- Mix Wet Ingredients: In a separate bowl, whisk the eggs, olive oil, buttermilk, and lemon zest together until smooth and well combined.
- Combine Ingredients: Gradually add the wet mixture into the dry ingredients, stirring gently until just combined. Be careful not to overmix, as this can make the muffins tough. Fold in the grated zucchini and crumbled goat cheese.
- Fill the Muffin Tin: Divide the batter evenly among the prepared muffin cups, filling each about two-thirds full.
- Bake the Muffins: Place the muffin tin in the preheated oven and bake for 20-25 minutes, or until the muffins are golden brown and a toothpick inserted into the center comes out clean.
- Cool and Serve: Allow the muffins to cool in the tin for about 5 minutes before transferring them to a wire rack to cool slightly. Serve warm or at room temperature.
Extra Tips:
For the best results, choose firm and fresh zucchinis for grating. If you prefer a stronger herb flavor, you can increase the amount of thyme or oregano slightly.
These muffins can be stored in an airtight container at room temperature for up to two days, or refrigerated for longer freshness. To reheat, simply warm them in the oven at a low temperature for a few minutes, which will help maintain their delightful texture.
Almond Flour Pancakes

Start your Christmas brunch with a delightful twist on the classic pancake: Almond Flour Pancakes. These fluffy delights offer a nutty flavor and a light texture thanks to the almond flour, making them a wonderful gluten-free option.
Whether you’re catering to dietary preferences or simply looking to try something new, these pancakes are bound to be a hit with family and friends. Serve them with your favorite toppings like fresh berries, maple syrup, or a dusting of powdered sugar for an indulgent morning feast.
Almond Flour Pancakes aren’t only delicious but also easy to prepare. With just a handful of ingredients and a few simple steps, you’ll have a stack of pancakes ready in no time. The nutty aroma and the subtle sweetness make them a perfect centerpiece for your festive brunch.
Plus, they pair beautifully with a variety of sides, from crispy bacon to scrambled eggs, allowing you to create a well-rounded meal. Here’s how to make Almond Flour Pancakes to serve 4-6 people.
Ingredients:
- 2 cups almond flour
- 1 teaspoon baking powder
- 1/4 teaspoon salt
- 3 large eggs
- 1/4 cup almond milk (or milk of choice)
- 1 tablespoon honey or maple syrup
- 1 teaspoon vanilla extract
- Butter or oil for cooking
Instructions:
- Prepare the Batter: In a large mixing bowl, whisk together the almond flour, baking powder, and salt until well combined. This guarantees that the leavening agent is evenly distributed throughout the dry ingredients.
- Mix Wet Ingredients: In a separate bowl, beat the eggs. Add the almond milk, honey or maple syrup, and vanilla extract. Mix until all the wet ingredients are fully incorporated.
- Combine Ingredients: Pour the wet mixture into the dry ingredients bowl. Stir gently until you achieve a smooth batter. Avoid over-mixing to prevent the pancakes from becoming dense.
- Heat the Pan: Place a non-stick skillet or griddle over medium heat. Add a small amount of butter or oil to coat the surface evenly.
- Cook the Pancakes: Pour about 1/4 cup of batter per pancake onto the skillet. Cook for 2-3 minutes, or until bubbles form on the surface and the edges look set. Flip the pancakes and cook for an additional 1-2 minutes, or until golden brown.
- Serve: Transfer the cooked pancakes to a plate and cover them with a clean kitchen towel to keep them warm while you cook the remaining batter. Serve immediately with your choice of toppings.
Extra Tips:
For the best texture, make sure your almond flour is finely ground, as coarser flours can make the pancakes gritty.
If you find that the batter is too thick, add a little more almond milk to reach your desired consistency. Additionally, maintain a consistent medium heat to avoid burning the pancakes, as almond flour can brown quickly.
Enjoy experimenting with different toppings and accompaniments to customize your Christmas brunch experience.
Prosciutto and Melon Skewers

Prosciutto and Melon Skewers are a delightful and invigorating appetizer that perfectly balances the sweet and savory flavors of ripe melon and salty prosciutto. This dish is an elegant addition to any Christmas brunch, offering a burst of flavor with minimal effort.
The combination of fresh melon, delicate slices of prosciutto, and a hint of mint leaves creates a harmonious taste that’s both light and satisfying. It’s a visually appealing dish that adds a touch of sophistication to your festive spread.
These skewers aren’t only easy to prepare but also require no cooking, making them a stress-free option when you’re juggling multiple dishes for a holiday meal. With just a few high-quality ingredients, you can create a dish that’s sure to impress your guests.
Perfect for serving 4-6 people, these skewers are ideal for those who want to enjoy the flavors of the season without spending too much time in the kitchen.
Ingredients (Serving Size: 4-6 people):
- 1 cantaloupe or honeydew melon
- 12 slices of prosciutto
- Fresh mint leaves
- 12 wooden skewers or toothpicks
Instructions:
- Prepare the Melon: Begin by cutting the melon in half and scooping out the seeds. Slice each half into wedges, then remove the rind. Cut the melon into bite-sized cubes or balls using a melon baller for a more refined look.
- Prepare the Prosciutto: Lay out the slices of prosciutto and cut each slice in half lengthwise. This will allow you to wrap each piece of melon with a thin layer of prosciutto.
- Assemble the Skewers: Start by threading a mint leaf onto the skewer, followed by a piece of melon wrapped in prosciutto. Repeat this process until each skewer has 2-3 pieces of prosciutto-wrapped melon, ending with another mint leaf for a fresh finish.
- Arrange and Serve: Once all the skewers are assembled, arrange them neatly on a platter. You can garnish with extra mint leaves for an added touch of color and freshness. Serve immediately to enjoy the full burst of flavors.
Extra Tips:
When selecting your melon, opt for one that’s ripe and fragrant to guarantee the sweetest flavor. If you’re preparing the skewers in advance, you can assemble them a few hours before serving and store them in the refrigerator. Just be sure to cover them to prevent the melon from drying out.
Also, consider experimenting with different types of melon or adding a drizzle of balsamic glaze for an extra layer of flavor. This dish is versatile and can be easily adapted to suit your taste preferences or dietary needs.
Egg White and Herb Omelette

Egg White and Herb Omelette is a light and fluffy dish perfect for a festive Christmas brunch. This healthy and satisfying omelette is packed with fresh herbs, making it a flavorful choice for those who prefer a lighter meal during the holiday season. Not only is it easy to prepare, but it also brings a touch of elegance to your brunch table with its vibrant colors and fresh flavors.
This omelette is a great option for those looking to reduce their cholesterol intake, as it uses only egg whites. The addition of fresh herbs like parsley, chives, and dill enhances the taste without overwhelming the delicate flavor of the egg whites. Serve it alongside a fresh salad or whole-grain toast to complete your Christmas brunch spread.
Ingredients (Serves 4-6):
- 12 egg whites
- 1/4 cup milk
- 1/4 cup fresh parsley, chopped
- 1/4 cup fresh chives, chopped
- 1/4 cup fresh dill, chopped
- Salt to taste
- Black pepper to taste
- 2 tablespoons olive oil or butter
- 1/2 cup cherry tomatoes, halved (optional)
- 1/2 cup feta cheese, crumbled (optional)
Instructions:
1. Prepare the Egg Mixture:
In a large bowl, whisk together the egg whites and milk until well blended. Add the chopped parsley, chives, dill, salt, and black pepper. Whisk again to guarantee the herbs are evenly distributed throughout the egg mixture.
2. Heat the Pan:
Heat a non-stick skillet over medium heat. Add olive oil or butter to the pan and allow it to melt, coating the bottom evenly.
3. Cook the Omelette:
Pour the egg mixture into the pan. Let it cook undisturbed for a couple of minutes until the edges start to set. Gently stir the center of the omelette with a spatula, pushing the cooked eggs from the edges towards the center, allowing the uncooked eggs to flow to the edges.
4. Add Optional Toppings:
If using, sprinkle cherry tomatoes and feta cheese evenly over one half of the omelette. Continue cooking until the omelette is mostly set but still slightly runny on top.
5. Fold and Serve:
Using a spatula, carefully fold the omelette in half over the fillings. Let it cook for another minute to guarantee everything is warmed through. Slide the omelette onto a serving platter and cut into portions. Serve immediately.
Extra Tips:
For a fluffier omelette, make sure to whisk the egg whites thoroughly to incorporate air, which will help them puff up as they cook. If you prefer a creamier texture, consider adding a tablespoon of cream cheese to the egg mixture before cooking.
Be cautious not to overcook the omelette, as egg whites can become rubbery if cooked too long. Adjust the herbs to your taste, experimenting with basil or cilantro for a different flavor profile.
Roasted Red Pepper and Hummus Wraps

Roasted Red Pepper and Hummus Wraps are the perfect addition to your Christmas brunch table. With their vibrant colors and delicious flavors, they aren’t only visually appealing but also incredibly satisfying.
These wraps are a fantastic option for guests who prefer a lighter, plant-based dish amidst the usual rich holiday fare. The combination of creamy hummus, sweet roasted red peppers, and fresh vegetables wrapped in a soft tortilla creates a delightful balance of textures and tastes.
This recipe is easy to prepare and can be assembled quickly, making it ideal for busy holiday mornings. You can even prepare some components ahead of time to make the process even more seamless.
Whether you’re serving them as a main dish or as a side, these wraps will surely impress your guests and leave them craving more. Let’s plunge into the recipe and get started on creating these delicious wraps for 4-6 people.
Ingredients:
- 6 large flour tortillas
- 1 cup hummus
- 3 roasted red peppers, sliced into strips
- 1 cucumber, thinly sliced
- 1 cup baby spinach leaves
- 1/2 red onion, thinly sliced
- 1/2 cup feta cheese, crumbled
- Salt and pepper to taste
- Olive oil, for brushing
Cooking Instructions:
- Prepare the Vegetables: Start by washing and drying all the fresh vegetables. Slice the cucumber and red onion thinly. Drain and slice the roasted red peppers into strips.
- Lay Out the Tortillas: Place the flour tortillas on a clean surface or large cutting board. Brush a light layer of olive oil on each tortilla to enhance flavor and prevent them from drying.
- Spread the Hummus: Using a spoon or spatula, evenly spread a generous layer of hummus over each tortilla, leaving a small border around the edges.
- Assemble the Wraps: Layer the baby spinach leaves, sliced cucumber, and roasted red pepper strips over the hummus. Add a few slices of red onion and sprinkle some crumbled feta cheese on top. Season with salt and pepper to taste.
- Roll the Wraps: Carefully roll each tortilla tightly, starting from one end and tucking in the sides as you go to create a secure wrap. Slice each wrap in half diagonally for easy serving.
- Serve: Arrange the wraps on a serving platter. They can be served immediately or refrigerated for up to an hour before serving.
Extra Tips:
For added flavor, consider adding a dash of smoked paprika or a squeeze of lemon juice to the hummus before spreading it on the tortillas.
If you’re preparing these wraps ahead of time, wrap them individually in plastic wrap to keep them fresh and prevent them from drying out.
Feel free to customize the wraps by adding other ingredients like avocado slices, roasted chicken, or your favorite herbs. Enjoy your delicious and festive Roasted Red Pepper and Hummus Wraps!
Chia Pudding With Berry Compote
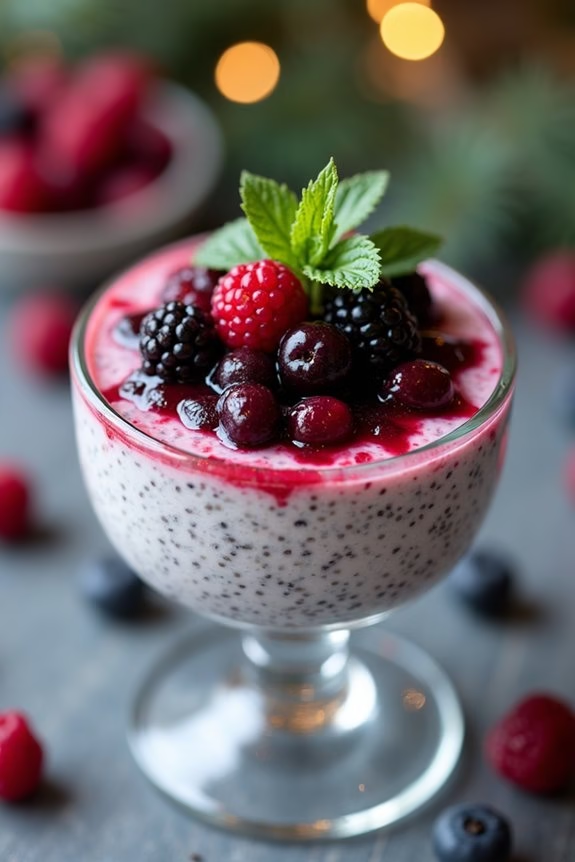
Chia pudding with berry compote is a delightful, nutritious, and festive dish perfect for a Christmas brunch. This recipe combines the creamy, rich texture of chia pudding with the sweet and tangy flavors of a homemade berry compote. It’s an easy-to-make dish that can be prepared ahead of time, allowing you to focus on entertaining your guests.
The chia seeds provide a healthy dose of omega-3 fatty acids, fiber, and protein, making it a great choice for a wholesome holiday treat. The berry compote, with its vibrant color and natural sweetness, complements the subtle flavor of the chia pudding beautifully. You can use a mix of your favorite berries, such as strawberries, blueberries, and raspberries, to create a stunning and flavorful topping.
This dish not only looks beautiful on the table but also offers a revitalizing contrast to the richer, more indulgent dishes often found at holiday brunches. Serve this chia pudding with berry compote for a memorable and healthy addition to your Christmas spread.
Ingredients (Serves 4-6):
- 1 cup chia seeds
- 4 cups almond milk (or any milk of your choice)
- 1/4 cup maple syrup or honey
- 1 teaspoon vanilla extract
- 2 cups mixed berries (fresh or frozen)
- 2 tablespoons sugar
- 1 tablespoon lemon juice
- 1 teaspoon lemon zest
- Fresh mint leaves for garnish (optional)
Cooking Instructions:
- Prepare the Chia Pudding: In a large mixing bowl, combine chia seeds, almond milk, maple syrup, and vanilla extract. Whisk the ingredients together thoroughly to guarantee the chia seeds are evenly distributed in the liquid. Cover the bowl and refrigerate for at least 4 hours or overnight to allow the chia seeds to absorb the liquid and form a pudding-like consistency.
- Make the Berry Compote: In a medium saucepan, add the mixed berries, sugar, lemon juice, and lemon zest. Cook over medium heat, stirring occasionally, until the berries break down and release their juices, roughly 10-15 minutes. Once the mixture has thickened to your liking, remove it from the heat and let it cool.
- Assemble the Dish: Once the chia pudding has set and thickened, give it a good stir to break up any clumps. Spoon the chia pudding into individual serving glasses or bowls. Top each serving with a generous amount of the cooled berry compote.
- Garnish and Serve: Optionally, garnish with fresh mint leaves for an added touch of color and flavor. Serve the chia pudding with berry compote chilled, or let it sit at room temperature for a few minutes before serving.
Extra Tips:
For an extra creamy chia pudding, consider using full-fat coconut milk or adding a dollop of Greek yogurt before serving. If you prefer a sweeter compote, adjust the amount of sugar according to your taste or add a touch of cinnamon for a warm, spiced flavor.
This dish can be made a day ahead, making it an ideal stress-free addition to your holiday menu. Enjoy experimenting with different berry combinations to find your favorite flavor profile!
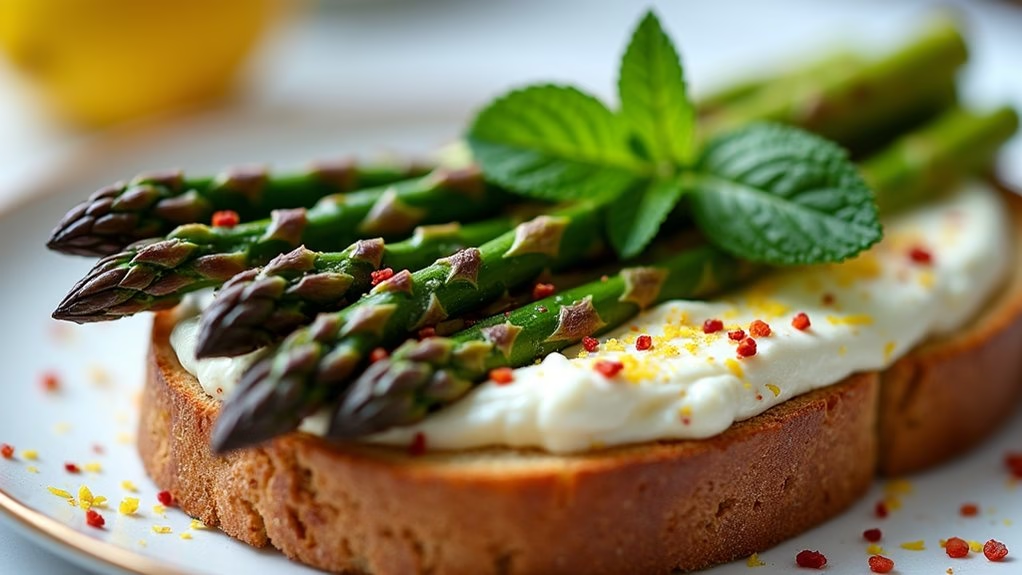
Grilled Asparagus and Lemon Ricotta Toasts
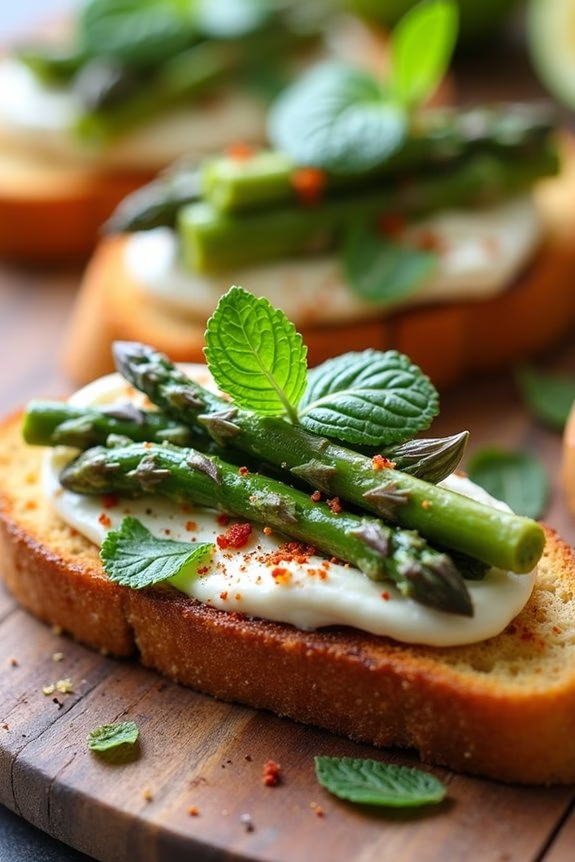
Grilled Asparagus and Lemon Ricotta Toasts is a delightful dish that combines the fresh, earthy flavors of asparagus with the creamy richness of lemon-infused ricotta. Perfect for a Christmas brunch, this recipe is light yet satisfying, offering a balance of textures and tastes. The toasts are easy to assemble and can be a wonderful addition to your holiday spread, providing a vibrant pop of color and flavor that complements other traditional holiday dishes.
The recipe begins with grilling the asparagus, which enhances its natural sweetness and adds a subtle charred flavor. This is paired with a creamy lemon ricotta spread that’s both tangy and invigorating. The combination is then served on crusty bread, creating an inviting appetizer or side dish that’s sure to impress your guests. With minimal preparation time and a simple assembly process, Grilled Asparagus and Lemon Ricotta Toasts are a stress-free yet elegant addition to your Christmas brunch menu.
Ingredients for 4-6 servings:
- 1 bunch of asparagus (about 1 pound)
- 2 tablespoons olive oil
- Salt and pepper to taste
- 1 cup ricotta cheese
- 1 lemon, zested and juiced
- 1 tablespoon honey
- 1 loaf of crusty bread (such as ciabatta or sourdough)
- 2 tablespoons fresh mint leaves, chopped
- Optional: red pepper flakes for garnish
Instructions:
- Prepare the asparagus: Wash and trim the woody ends of the asparagus. Toss the asparagus with olive oil, salt, and pepper in a large bowl until well coated.
- Grill the asparagus: Preheat a grill or grill pan over medium-high heat. Grill the asparagus for about 5-7 minutes, turning occasionally, until they’re tender and have grill marks. Remove from the grill and set aside.
- Prepare the ricotta spread: In a medium bowl, combine the ricotta cheese, lemon zest, lemon juice, and honey. Mix well until smooth and creamy. Season with salt and pepper to taste.
- Toast the bread: Slice the crusty bread into 1-inch thick slices. Lightly brush each side with olive oil and toast on the grill or in a toaster until golden brown and crispy.
- Assemble the toasts: Spread a generous amount of the lemon ricotta onto each slice of toasted bread. Top with grilled asparagus spears, trimming them to fit the bread if necessary.
- Garnish and serve: Sprinkle the toasts with chopped fresh mint leaves and, if desired, a pinch of red pepper flakes for a touch of heat. Serve immediately while warm.
Extra Tips:
For the best results, choose asparagus that’s bright green and firm. Thicker spears hold up better on the grill. If you don’t have a grill, you can roast the asparagus in the oven at 400°F for about 10-12 minutes.
The ricotta spread can be made ahead of time and stored in the refrigerator for up to two days. When selecting bread, opt for one that’s firm enough to hold the toppings without becoming soggy. For an added layer of flavor, consider rubbing the toasted bread with a cut clove of garlic before topping with the ricotta mixture.