
The holiday season is just around the corner, and it’s the perfect time to sprinkle a little magic into your kitchen. I’ve gathered 11 adorable Christmas appetizer recipes that are sure to delight both kids and adults. From a charming Snowman Cheese Ball to a colorful Christmas Tree Veggie Platter, these recipes blend creativity with delicious flavors. Each one is a surefire way to add joy and laughter to your festive gatherings. Let’s get ready to turn your kitchen into a holiday wonderland!
Snowman Cheese Balls
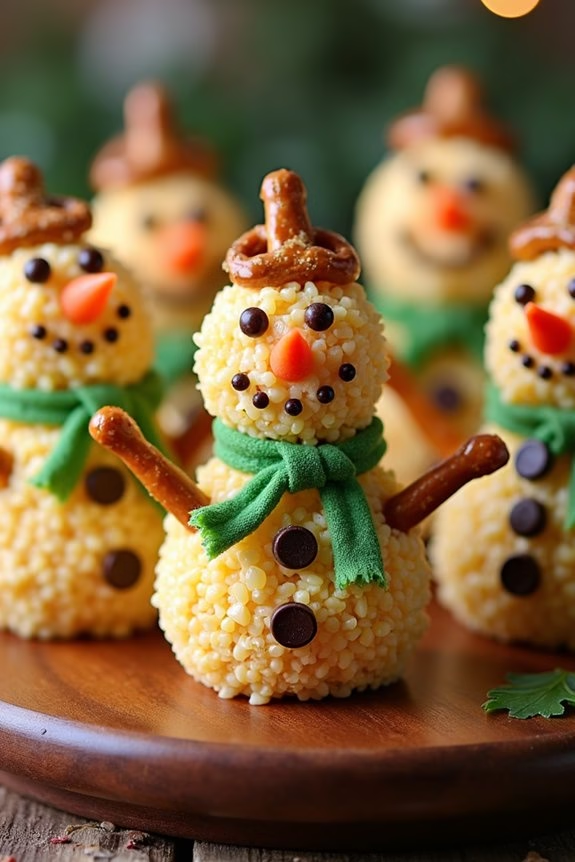
Snowman Cheese Balls are the perfect festive appetizer to bring joy and excitement to your Christmas celebration, especially for the little ones. These adorable and delicious cheese balls aren’t only fun to make but also a delightful treat for kids. Shaped like snowmen, they combine creamy cheese with a variety of flavors that are both savory and slightly sweet, making them a hit with children and adults alike.
The process of making Snowman Cheese Balls is straightforward and can be a fun activity to involve kids in the kitchen. They can help shape the snowmen, decorate them, and build their own cheesy creations. These Snowman Cheese Balls are an ideal starter for a holiday meal or can be served as a snack during a festive gathering. Here’s a simple recipe to make these charming cheese balls for 4-6 people.
Ingredients:
- 16 ounces cream cheese, softened
- 2 cups shredded cheddar cheese
- 1 teaspoon garlic powder
- 1 teaspoon onion powder
- 1/2 teaspoon salt
- 1/4 teaspoon black pepper
- 1 cup crushed pretzels
- 12 mini chocolate chips
- 6 small carrot sticks (for noses)
- 6 pretzel sticks (for arms)
- 6 mini pretzel twists (for hats)
- Fresh parsley or cilantro for scarves
Cooking Instructions:
- Prepare the Cheese Mixture: In a large mixing bowl, combine the softened cream cheese, shredded cheddar cheese, garlic powder, onion powder, salt, and black pepper. Mix thoroughly until all ingredients are well blended and smooth.
- Shape the Snowmen: Divide the cheese mixture into 18 equal parts. Roll each part into a small ball using your hands. For each snowman, you’ll need three cheese balls – one large, one medium, and one small.
- Coat the Cheese Balls: Roll each cheese ball in the crushed pretzels, making sure they’re evenly coated. This will give the snowmen a nice crunchy texture.
- Assemble the Snowmen: On a serving platter, stack three cheese balls on top of each other, starting with the largest ball on the bottom, the medium in the middle, and the smallest on top. Repeat for all six snowmen.
- Decorate: Use mini chocolate chips for the eyes and buttons on each snowman. Insert a small carrot stick as the nose. Stick pretzel sticks on either side of the middle cheese ball for arms. Add a mini pretzel twist on top of the smallest ball as a hat.
- Add Finishing Touches: Tie a small piece of fresh parsley or cilantro around the neck of each snowman to resemble a scarf.
Extra Tips:
For best results, make certain the cream cheese is completely softened before starting, as this will make mixing much easier. You can prepare the cheese mixture a day in advance and refrigerate it until you’re ready to assemble the snowmen.
When assembling, work quickly to prevent the cheese from softening too much at room temperature. If you want to add more flavor, consider incorporating herbs or spices into the cheese mixture. Finally, get creative with the decorations – let the kids use their imagination to personalize each snowman!
Reindeer Pretzel Bites

Reindeer Pretzel Bites are a delightful and festive treat that kids will absolutely love making and eating. These adorable snacks combine the salty crunch of pretzels with the sweetness of chocolate and candies, making them a perfect appetizer for a Christmas gathering. They aren’t only delicious but also fun to assemble, making them a great activity for children to get involved in holiday preparations.
The combination of simple ingredients creates a playful reindeer face that’s sure to bring a smile to everyone’s face. This recipe is designed for a serving size of 4-6 people, making it an ideal choice for small holiday parties or family gatherings. The bites are easy to make and don’t require any baking, which means they can be prepared quickly and with minimal fuss.
The use of pretzels for antlers and chocolate candies for eyes and noses make these bites a creative way to celebrate the season. With just a few steps, you’ll have a platter of adorable reindeer that will be the highlight of your Christmas appetizers.
Ingredients (Serving Size: 4-6 people):
- 48 mini pretzel twists
- 24 milk chocolate candy melts
- 24 small round chocolate candies (preferably dark for eyes)
- 12 red chocolate candies (for noses)
- 1/4 cup white chocolate chips (for melting)
- 24 square pretzels
Instructions:
- Prepare the Work Area: Line a baking sheet with parchment paper. This will be your workspace for assembling the Reindeer Pretzel Bites.
- Melt the White Chocolate: In a microwave-safe bowl, melt the white chocolate chips in 15-second intervals, stirring in between until smooth. Be careful not to overheat.
- Assemble the Reindeer Faces: Place a square pretzel on the prepared baking sheet. Top each square with a milk chocolate candy melt. Place in the microwave for about 10-15 seconds, just until the chocolate is slightly softened.
- Add the Antlers: Quickly press two mini pretzel twists into the top part of each softened chocolate melt to form antlers.
- Create the Eyes and Nose: While the chocolate is still soft, press two small round chocolate candies into the chocolate to form the eyes. Place one red chocolate candy below the eyes for the nose.
- Allow to Set: Let the assembled reindeer pretzel bites sit at room temperature until the chocolate hardens, or place them in the refrigerator for a quicker set.
- Decorate with White Chocolate: Once set, use a spoon or a small piping bag filled with the melted white chocolate to add a small dot on each eye candy for the pupils. Allow these to set completely.
Extra Tips:
To make the assembly process smoother, have all your ingredients prepped and ready before you begin melting the chocolate. This guarantees you can work quickly while the chocolate is still soft.
If your kitchen is warm, you may find it helpful to chill the chocolate in the fridge for a few minutes before adding the final details. Additionally, feel free to get creative with the design by using different colored candies or even adding a sprinkle of edible glitter for extra holiday sparkle.
Santa Hat Strawberry Dip
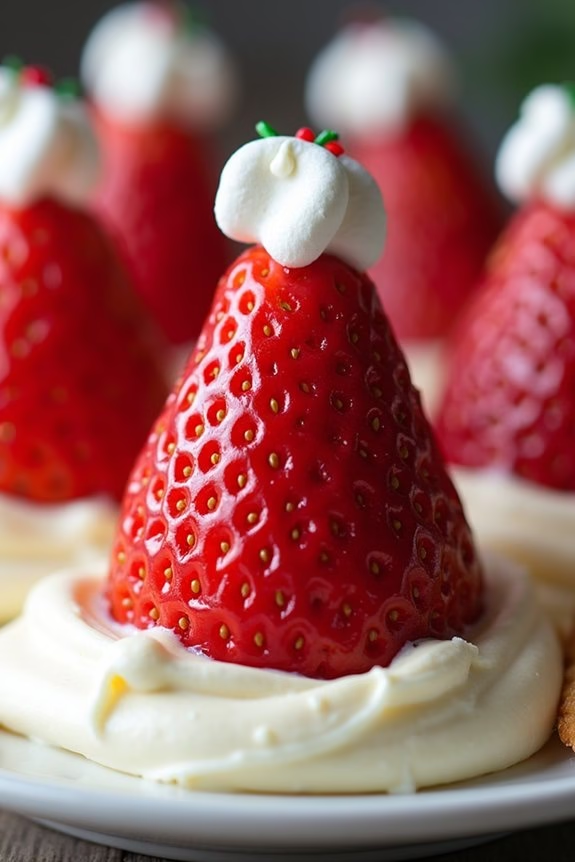
Santa Hat Strawberry Dip is a delightful and festive appetizer perfect for kids during the Christmas season. This fun and colorful dish combines the sweetness of strawberries with a creamy dip, topped with the iconic Santa hat design to bring a smile to any child’s face.
It’s a simple yet impressive treat that can be prepared quickly and easily, making it ideal for busy holiday gatherings or family parties. The Santa Hat Strawberry Dip not only looks adorable but also offers a delightful combination of flavors and textures that kids love.
The juicy strawberries provide a revitalizing contrast to the creamy, sweet dip, while the decorative whipped cream and mini marshmallows add a playful touch. This recipe is designed to serve 4-6 people, making it a great addition to your holiday appetizer spread.
Ingredients:
- 1 pint of fresh strawberries
- 1 cup of cream cheese, softened
- 1/2 cup of powdered sugar
- 1 teaspoon of vanilla extract
- 1 cup of whipped cream
- Mini marshmallows
Instructions:
- Prepare the Strawberries: Wash and hull the strawberries. Cut off the leafy tops so that each strawberry can stand upright on a flat surface. This will form the base of the Santa hats.
- Make the Dip: In a medium-sized mixing bowl, combine the softened cream cheese, powdered sugar, and vanilla extract. Beat the mixture with an electric mixer until smooth and creamy.
- Assemble the Santa Hat Dip: Spread your cream cheese mixture into a serving dish, smoothing it out evenly. This will be the “snow” base for your Santa hats.
- Create Santa Hats: Place each strawberry, pointed side up, onto the cream cheese dip.
- Add Whipped Cream: Using a piping bag or a spoon, add a small dollop of whipped cream to the tip of each strawberry to form the top of the Santa hat.
- Finish with Marshmallows: Place a mini marshmallow on top of each whipped cream dollop to complete the Santa hat look.
Extra Tips:
For an added touch of sweetness, consider drizzling a little honey or chocolate syrup over the cream cheese dip before placing the strawberries.
If you want to make the dish ahead of time, prepare the cream cheese dip and strawberries separately, and assemble them just before serving to keep everything fresh.
Additionally, make sure the strawberries are completely dry after washing to guarantee the whipped cream adheres properly. Enjoy this fun and festive treat with your family and friends!
Christmas Tree Veggie Platter
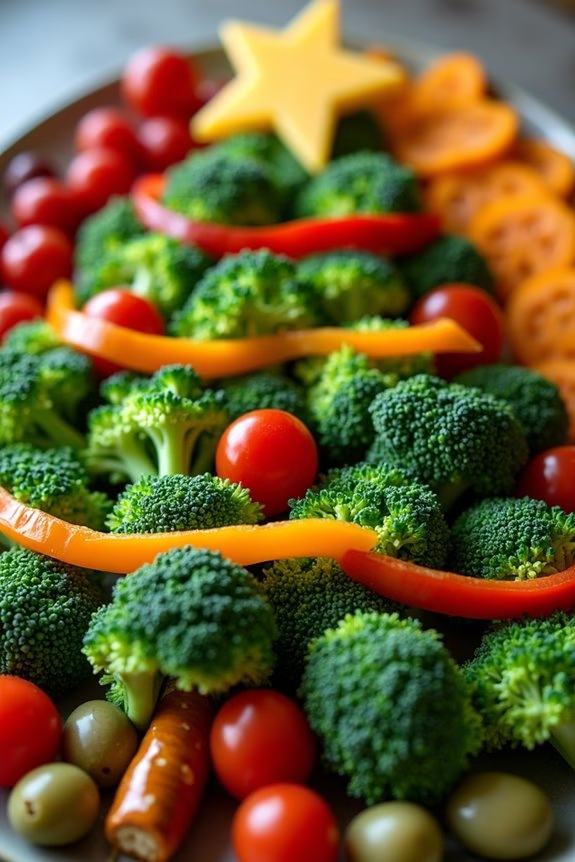
This Christmas Tree Veggie Platter is a delightful and healthy appetizer that will add a splash of festive cheer to your holiday gatherings. Perfect for kids and adults alike, this platter not only looks enchanting but is also a fun way to encourage everyone to eat their vegetables. The vibrant colors of fresh veggies are creatively arranged to resemble a Christmas tree, making it an eye-catching centerpiece for any holiday table.
The key to making this platter appealing is to use a variety of fresh, colorful vegetables that are easy for kids to pick up and eat. You can pair this platter with a delicious dip of your choice, such as ranch or hummus, to make it even more enticing. Whether you’re hosting a party or simply want to make a festive snack for your family, this Christmas Tree Veggie Platter is an easy-to-make and nutritious option.
Ingredients (serving size: 4-6 people):
- 1 head of broccoli
- 1 red bell pepper
- 1 yellow bell pepper
- 1 cucumber
- 1 small bunch of cherry tomatoes
- 1 small bunch of baby carrots
- 1 small block of cheddar cheese
- 1 small block of mozzarella cheese
- 1 small bunch of green olives
- 1 package of pretzel sticks
- 1 cup of ranch or hummus dip
Instructions:
- Prepare the Vegetables: Start by washing all the vegetables thoroughly. Cut the broccoli into small florets, slice the bell peppers into thin strips, and cut the cucumber into round slices. Halve the cherry tomatoes if they’re large.
- Arrange the Tree Base: On a large, flat platter, begin by arranging the broccoli florets in the shape of a Christmas tree. Start with a wide base and work your way up to a point at the top.
- Decorate the Tree: Use the red and yellow bell pepper strips to create a garland across the tree. Place cherry tomatoes sporadically over the broccoli to mimic ornaments. Add cucumber slices around the base to represent gifts or snow.
- Create the Star: Cut a star shape out of the cheddar cheese and place it at the top of the tree.
- Add the Tree Trunk: Use pretzel sticks to form the trunk of the tree at the base.
- Finish with Extras: Scatter some baby carrots and green olives around the platter for extra color and texture. You can also cut the mozzarella cheese into small cubes and place them sporadically as additional decorations.
- Serve with Dip: Place your chosen dip in a small bowl and position it next to the platter for easy dipping.
Extra Tips: For a more personalized touch, you can use cookie cutters to shape the cheese into different festive shapes like stars or snowflakes. Feel free to experiment with different vegetable varieties based on your family’s preferences or what’s in season.
To keep the vegetables fresh and crisp, prepare and assemble the platter shortly before serving. If you need to make it ahead of time, cover it with plastic wrap and store it in the refrigerator.
Rudolph’s Red-Nosed Pita Pizzas

Rudolph’s Red-Nosed Pita Pizzas are a delightful and festive treat perfect for the holiday season. These mini pizzas are an excellent way to involve kids in the kitchen, making them ideal for family gatherings or Christmas parties. Using pita bread as the base, these pizzas are quick to prepare and can be customized with various toppings, allowing children to express their creativity while guaranteeing a fun and tasty holiday appetizer.
This recipe transforms ordinary pita bread into a charming representation of Rudolph the Red-Nosed Reindeer by using simple ingredients to create his iconic features. The combination of savory toppings and a touch of sweetness makes these pizzas appealing to both kids and adults. With a serving size of 4-6 people, this recipe is perfect for sharing and enjoying during the festive season.
Ingredients for 4-6 servings:
- 6 whole wheat pita breads
- 1 cup pizza sauce
- 2 cups shredded mozzarella cheese
- 12 slices of pepperoni
- 12 cherry tomatoes
- 12 black olives, halved
- 1 green bell pepper
- 1 cup baby spinach leaves
- 1 tablespoon olive oil
Instructions:
- Preheat the Oven: Begin by preheating your oven to 375°F (190°C), guaranteeing it’s ready once the pizzas are assembled.
- Prepare the Pita: Place the pita breads on a large baking sheet. Brush each pita with a light layer of olive oil to enhance crispiness and flavor.
- Spread the Sauce: Evenly distribute the pizza sauce over each pita, using the back of a spoon to spread it close to the edges.
- Add Cheese: Sprinkle a generous amount of shredded mozzarella cheese over the sauce-covered pita breads, ensuring even coverage.
- Create Rudolph’s Face: For each pita, place two pepperoni slices as Rudolph’s eyes. Add a halved black olive on top of each pepperoni slice to complete the eyes. Position a cherry tomato at the bottom center of the pita to represent Rudolph’s red nose.
- Make Antlers: Slice the green bell pepper into thin strips. Arrange the strips at the top of the pita to resemble antlers.
- Add Spinach: Tuck a few baby spinach leaves around the edges of the pita for additional color and flavor.
- Bake: Place the baking sheet in the preheated oven and bake for 10-12 minutes, or until the cheese is melted and bubbly, and the edges of the pita are golden brown.
- Serve and Enjoy: Remove the pizzas from the oven and let cool slightly before serving. Enjoy your festive Rudolph’s Red-Nosed Pita Pizzas warm.
Extra Tips:
For added variety, consider using different types of cheese or incorporating additional toppings such as sliced mushrooms or diced bell peppers. If you prefer a spicier flavor, add a sprinkle of red pepper flakes or a dash of hot sauce before baking.
These pizzas are highly customizable, so feel free to adjust the ingredients to suit your family’s taste preferences. Make sure to supervise young children while they help with the preparation to guarantee safety, especially when using the oven and sharp utensils.
Candy Cane Caprese Skewers
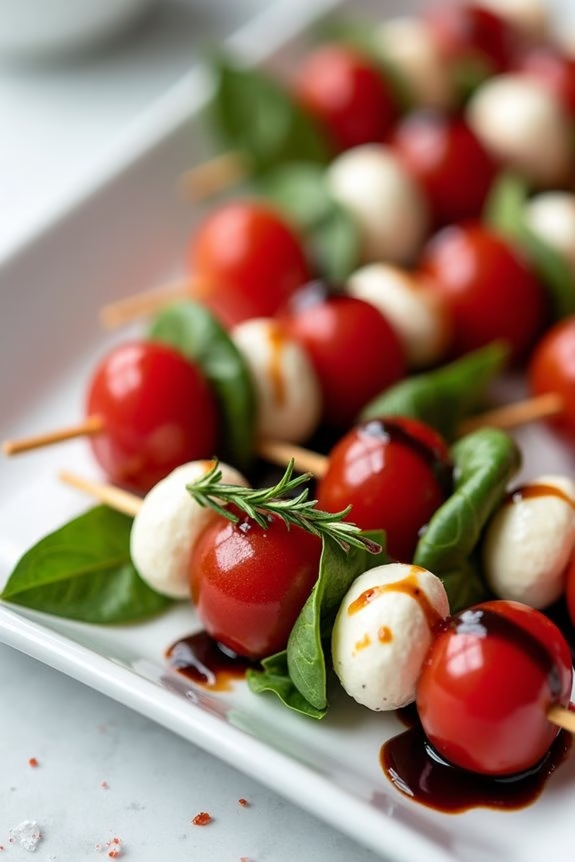
Candy Cane Caprese Skewers are a festive and delightful appetizer that’s perfect for kids during the Christmas season. These skewers aren’t only easy to prepare but also offer a fun twist on the classic Caprese salad. The vibrant red and white colors mimic the look of a candy cane, making them an attractive and edible holiday decoration.
These skewers are bound to be a hit with both kids and adults, adding a touch of whimsy and deliciousness to your holiday gatherings. The combination of fresh mozzarella, cherry tomatoes, and basil leaves provides a burst of flavor in each bite. By arranging these ingredients on skewers in a candy cane pattern, you create a visually appealing snack that’s also nutritious.
Whether you’re hosting a Christmas party or simply want to add some festive flair to your family dinner, Candy Cane Caprese Skewers are a great choice. They’re simple to assemble and can be prepared in advance, allowing you to enjoy the festivities without spending too much time in the kitchen.
Ingredients for 4-6 servings:
- 24 cherry tomatoes
- 24 small fresh mozzarella balls (bocconcini)
- 24 fresh basil leaves
- 2 tablespoons balsamic glaze
- Salt and pepper
- 12 skewers
Cooking Instructions:
- Prepare the Ingredients: Wash the cherry tomatoes and basil leaves thoroughly under running water. Pat them dry with a paper towel. Drain the mozzarella balls from their liquid and set aside.
- Assemble the Skewers: Start by threading a cherry tomato onto a skewer. Follow it with a basil leaf, then a mozzarella ball. Repeat this pattern (tomato, basil, mozzarella) until you’ve added four of each item to the skewer. Guarantee the ingredients are tightly packed together to create the candy cane pattern.
- Season the Skewers: Once all the skewers are assembled, lightly season them with salt and pepper to taste. Drizzle the balsamic glaze over the skewers just before serving to add a touch of sweetness and tang.
- Arrange for Presentation: Lay the skewers on a serving platter in a candy cane shape or line them up neatly for a beautiful presentation. This not only enhances the festive look but also makes it easy for guests to grab and enjoy.
Extra Tips:
To make your Candy Cane Caprese Skewers even more appealing, consider adding a small sprig of rosemary at the top of each skewer to mimic the candy cane hook.
If you prefer a more intense flavor, you can marinate the mozzarella balls in olive oil, garlic, and herbs for an hour before assembling the skewers. Additionally, if balsamic glaze isn’t available, you can create your own by reducing balsamic vinegar with a bit of sugar until it’s thick and syrupy.
These little touches can elevate the dish and make your holiday table truly stand out.
Festive Fruit Kabobs
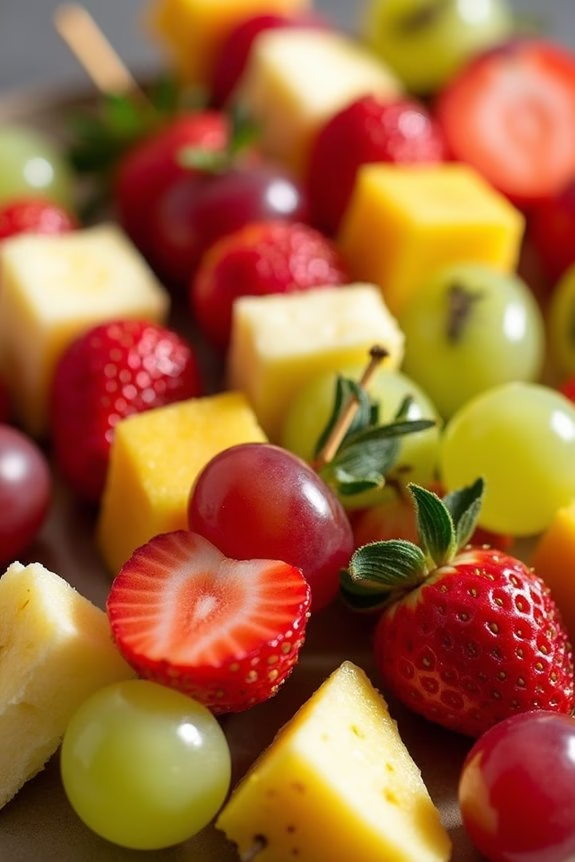
Christmas time is a season of joy, laughter, and delicious treats. For families with young children, the holiday season is the perfect opportunity to create festive and fun snacks that everyone can enjoy.
Festive Fruit Kabobs are a delightful way to bring a splash of color and a healthy twist to your holiday appetizer spread. These simple yet vibrant fruit skewers aren’t only appealing to the eye but are also a great way to get children involved in the kitchen. Kids will love assembling their own kabobs and eating their creations, making it a fun activity for the whole family.
The beauty of these Festive Fruit Kabobs lies in their versatility. You can use a variety of seasonal fruits to match the holiday theme, ensuring that the kabobs are both delicious and visually appealing. Consider using seasonal red and green fruits like strawberries, kiwi, and grapes to add that Christmas touch.
These kabobs are perfect as an appetizer for your Christmas gathering, a snack for the kids, or even a bright addition to your dessert table. Not only are they healthy and tasty, but they also require minimal preparation, making them an easy choice for busy holiday schedules.
Ingredients (Serves 4-6):
- 1 cup strawberries, hulled and halved
- 1 cup green grapes
- 1 cup red grapes
- 2 kiwis, peeled and sliced into rounds
- 1 banana, sliced
- 1/2 cup pineapple chunks
- Wooden skewers
Cooking Instructions:
- Prepare the Fruits: Wash all the fruits thoroughly under running water. Pat them dry with a paper towel or clean cloth to remove any excess water.
- Slice and Dice: Start by hulling and halving the strawberries. Peel the kiwis and slice them into even rounds. Slice the banana and cut the pineapple into chunks if not pre-cut.
- Assemble the Kabobs: Take a wooden skewer and begin threading the fruits onto it. Start with a red grape, followed by a slice of kiwi, then a strawberry half, a green grape, a banana slice, and finally a pineapple chunk. Repeat the sequence until the skewer is filled, leaving enough room at the bottom for handling.
- Repeat and Serve: Continue assembling the remaining skewers until all the fruit is used. Arrange the fruit kabobs on a festive platter and serve immediately for the best taste and presentation.
Extra Tips:
When preparing Festive Fruit Kabobs, consider soaking the wooden skewers in water for about 30 minutes before assembling. This helps prevent the skewers from splintering while threading the fruits.
To keep the banana slices from browning, you can lightly brush them with a bit of lemon juice. If you prefer a bit of variety, feel free to add other fruits like blueberries or raspberries.
For an extra festive touch, you can drizzle a bit of melted white chocolate over the kabobs before serving, making them even more irresistible to kids and adults alike.
Holiday Ham and Cheese Pinwheels

The holiday season is the perfect time to gather with family and friends, and what better way to start the festivities than with a delicious appetizer that everyone will love? Holiday Ham and Cheese Pinwheels aren’t only tasty but also fun to make, especially with kids. These delightful little bites combine savory ham and creamy cheese, all wrapped up in a flaky pastry that’s certain to please both children and adults alike.
They’re perfect for Christmas parties, family gatherings, or even as a simple snack to enjoy during the holiday season.
These pinwheels aren’t only easy to prepare but also versatile, allowing you to customize them with different ingredients or flavors to suit your taste. The combination of ham and cheese is a classic favorite, and when baked into golden, crispy pinwheels, they become irresistible.
Plus, involving kids in the kitchen to help roll and assemble the pinwheels can be a fun holiday activity that creates wonderful memories. Whether you’re a seasoned cook or a beginner, this recipe is straightforward and quick to make, guaranteeing you spend less time in the kitchen and more time enjoying the holiday spirit.
Ingredients for 4-6 servings:
- 1 sheet of puff pastry, thawed
- 1/2 cup of cream cheese, softened
- 1 tablespoon of Dijon mustard
- 1 cup of shredded cheddar cheese
- 8 slices of deli ham
- 1 egg, beaten (for egg wash)
- 1 tablespoon of poppy seeds (optional)
Instructions:
- Preheat the Oven: Start by preheating your oven to 400°F (200°C). Line a baking sheet with parchment paper to prevent the pinwheels from sticking and guarantee even baking.
- Prepare the Pastry: On a lightly floured surface, roll out the thawed puff pastry sheet into a rectangle approximately 10×12 inches in size. This will help create the perfect base for your pinwheels.
- Mix the Spread: In a small bowl, mix the softened cream cheese and Dijon mustard until smooth. This will add a flavorful layer to the pinwheels, giving them a creamy texture and a slight tang.
- Assemble the Pinwheels: Spread the cream cheese mixture evenly over the rolled-out puff pastry, leaving a small border around the edges. Layer the slices of ham evenly over the cream cheese mixture, followed by an even sprinkle of shredded cheddar cheese.
- Roll and Slice: Starting from one of the long edges, carefully roll the pastry into a tight log. Use a sharp knife to slice the log into 1-inch thick pinwheels. You should get about 12-15 pinwheels.
- Prepare for Baking: Place the sliced pinwheels onto the prepared baking sheet. Brush the tops with the beaten egg to give them a nice golden color when baked. If desired, sprinkle poppy seeds over the top for added texture and flavor.
- Bake: Bake in the preheated oven for 12-15 minutes, or until the pinwheels are puffed and golden brown. Allow them to cool on the baking sheet for a few minutes before serving.
Extra Tips:
For a more personalized touch, feel free to experiment with different types of cheese, such as Swiss or mozzarella, or add additional fillings like spinach or roasted red peppers.
If you’re preparing these pinwheels ahead of time, you can assemble them and keep them in the refrigerator until you’re ready to bake. This makes them an excellent make-ahead option for busy holiday schedules.
Finally, make sure the puff pastry is properly thawed but still cold when you start working with it—this will make it easier to handle and help achieve a light, flaky texture. Enjoy your festive Holiday Ham and Cheese Pinwheels!
Mini Christmas Quiches

Mini Christmas Quiches are the perfect festive appetizer for kids during the holiday season. These bite-sized delights are a fun and delicious way to get children involved in the kitchen, allowing them to participate in the holiday preparations. With a crispy pastry base and a creamy filling, these quiches can be customized with various ingredients to suit different tastes, making them an ideal choice for picky eaters.
These quiches can be easily prepared ahead of time and served warm or at room temperature, making them a versatile addition to any holiday table. The beauty of Mini Christmas Quiches lies in their simplicity and adaptability. By using ready-made pastry and a few staple ingredients, you can create a colorful and tasty appetizer that adds a festive touch to any gathering.
This recipe is designed to serve 4-6 people, perfect for family gatherings or small parties. The blend of flavors and textures offers a delightful experience for both children and adults. Whether you opt for traditional fillings or more creative combinations, these quiches are sure to be a hit during the Christmas festivities.
Ingredients (serving size: 4-6 people):
- 1 package of ready-made puff pastry sheets
- 4 large eggs
- 1 cup of milk
- 1 cup of grated cheese (cheddar, mozzarella, or a mix)
- 1/2 cup of diced cooked ham
- 1/2 cup of finely chopped spinach
- 1/4 cup of diced red bell pepper
- Salt and pepper to taste
- Cooking spray or butter for greasing
Cooking Instructions:
- Preheat the Oven: Begin by preheating your oven to 375°F (190°C). This guarantees the quiches will bake evenly and develop a golden crust.
- Prepare the Pastry: Roll out the puff pastry sheets on a lightly floured surface. Use a round cookie cutter or the rim of a glass to cut out circles that will fit into the cups of a mini muffin tin.
- Grease the Muffin Tin: Lightly grease the cups of the mini muffin tin with cooking spray or butter to prevent sticking.
- Line the Muffin Tin: Gently press the pastry circles into the cups of the mini muffin tin, ensuring they’re snugly fitted.
- Mix the Filling: In a mixing bowl, whisk together the eggs and milk until well combined. Stir in the grated cheese, diced ham, chopped spinach, and diced red bell pepper. Season with salt and pepper to taste.
- Fill the Pastry Cups: Spoon the egg mixture into each pastry-lined muffin cup, filling them about three-quarters full to allow for expansion during baking.
- Bake the Quiches: Place the muffin tin in the preheated oven and bake for 15-20 minutes, or until the quiches have puffed up and are golden brown on top. A toothpick inserted into the center should come out clean.
- Cool and Serve: Remove the quiches from the oven and let them cool in the tin for a few minutes before transferring them to a wire rack. Serve warm or at room temperature.
Extra Tips:
When making Mini Christmas Quiches, feel free to experiment with different fillings based on your kids’ preferences. You can substitute the ham with cooked bacon or sausage, or add other vegetables like mushrooms or onions.
For a vegetarian option, simply omit the meat and add extra vegetables or cheese. These quiches can also be made in advance and stored in the refrigerator for up to two days; simply reheat them in a warm oven before serving to restore their crispiness.
Cheesy Elf Breadsticks
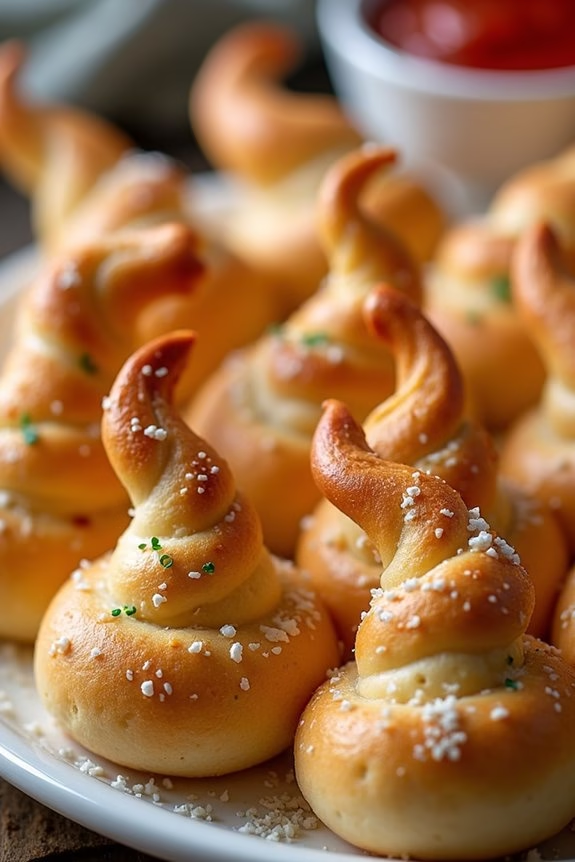
Cheesy Elf Breadsticks are a delightful and whimsical appetizer perfect for getting kids into the festive spirit of Christmas. These breadsticks aren’t only fun to make but also incredibly delicious with their cheesy, garlicky flavor. Shaped like little elf hats, they make a great addition to any holiday party spread.
Kids will love helping out in the kitchen to roll and shape the dough, sprinkling cheese, and getting creative with different toppings to make each “elf hat” unique. The magical combination of melted cheese, buttery garlic, and soft dough makes these breadsticks an irresistible snack for both kids and adults.
Serve them as an appetizer before a holiday meal or as a fun snack during a Christmas movie night. The recipe is simple enough for young chefs to participate in, making it a fun family activity. Plus, the festive presentation adds a playful touch to your holiday table, making it a memorable treat for all.
Ingredients (Serves 4-6):
- 1 package of refrigerated pizza dough
- 1 cup shredded mozzarella cheese
- 1/4 cup grated Parmesan cheese
- 2 tablespoons butter, melted
- 1 teaspoon garlic powder
- 1 teaspoon dried Italian herbs (such as oregano or basil)
- 1/2 teaspoon salt
- Red and green food coloring (optional)
- Marinara sauce for dipping (optional)
Instructions:
- Preheat the Oven: Start by preheating your oven to 375°F (190°C). Line a baking sheet with parchment paper to prevent the breadsticks from sticking.
- Prepare the Dough: Roll out the refrigerated pizza dough onto a lightly floured surface until it’s about 1/4 inch thick. If you want to add a festive touch, divide the dough into three portions and knead a few drops of red and green food coloring into two of the portions, leaving one plain.
- Shape the Breadsticks: Cut the dough into strips approximately 1 inch wide and 6 inches long. Twist each strip to form a spiral, then gently fold the top to create a pointed elf hat shape. Place the shaped dough on the prepared baking sheet.
- Add Cheese and Seasoning: In a small bowl, mix together the melted butter, garlic powder, Italian herbs, and salt. Brush this mixture generously over the breadsticks. Sprinkle the shredded mozzarella and Parmesan cheese evenly over the top.
- Bake: Place the baking sheet in the preheated oven and bake for 12-15 minutes or until the breadsticks are golden brown and the cheese is bubbly and slightly crispy.
- Serve: Once baked, remove the breadsticks from the oven and let them cool slightly before serving. Arrange them on a platter with a small bowl of marinara sauce for dipping, if desired.
Extra Tips:
For an extra festive touch, consider using cookie cutters to create different shapes with the dough, such as stars or trees. You can also let the kids use small cookie cutters to press shapes into the dough before baking.
If you want to make the breadsticks more colorful, use natural food coloring from vegetable powders to avoid artificial dyes. Additionally, for a spicier kick, add a pinch of red pepper flakes to the butter mixture.
Remember to keep an eye on the breadsticks as they bake, as oven temperatures can vary, and you don’t want them to burn. Enjoy the holiday spirit with these fun and tasty Cheesy Elf Breadsticks!
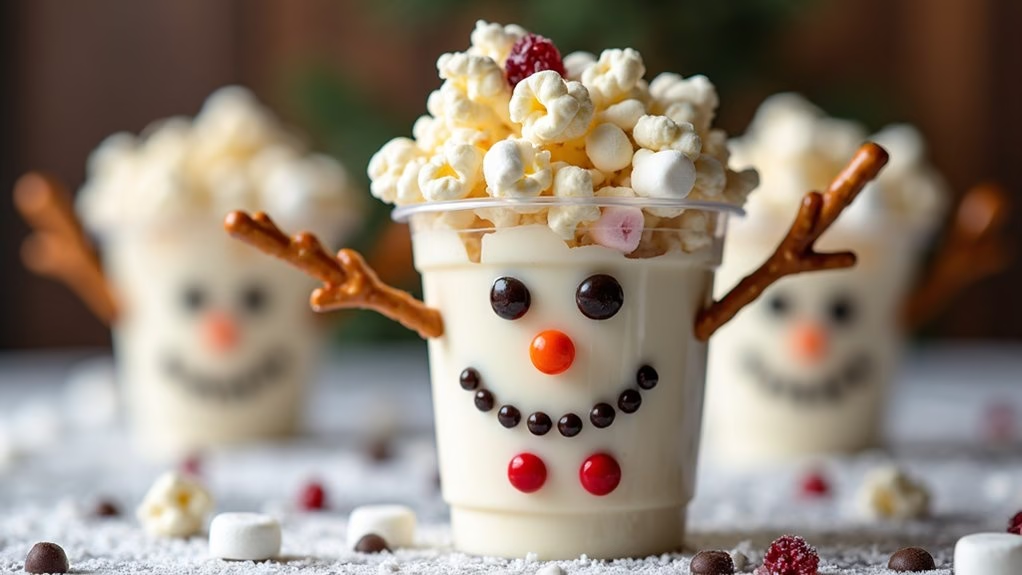
Frosty the Snowman Popcorn Cups

Frosty the Snowman Popcorn Cups are a delightful and fun appetizer perfect for kids during the Christmas season. These whimsical treats combine the crunchy goodness of popcorn with festive decorations to create a snack that’s as enjoyable to make as it’s to eat. Kids will love helping in the kitchen, assembling their own snowman creations, which makes it an excellent holiday activity for the whole family.
Not only are these popcorn cups visually appealing, but they also offer a delicious blend of sweet and savory flavors, making them an instant hit at any holiday gathering.
The Frosty the Snowman Popcorn Cups aren’t only easy to prepare but also offer a creative way to bring some holiday cheer to your table. You can customize the decorations to suit your own style, allowing for endless creativity.
With a few simple ingredients and a little bit of imagination, you can transform ordinary popcorn into a festive masterpiece that captures the spirit of winter and Christmas. This recipe is designed to serve 4-6 people, making it ideal for small family gatherings or as part of a larger holiday spread.
Ingredients:
- 8 cups popped popcorn
- 6 oz white chocolate chips
- 1/2 cup mini marshmallows
- 1/4 cup mini chocolate chips
- 1/4 cup dried cranberries
- 1/4 cup pretzel sticks
- 1/4 cup candy-coated chocolate pieces (such as M&Ms)
- 6 medium-sized clear plastic cups
- Orange candy-coated sunflower seeds or candy for noses
- Black edible marker or black icing for eyes and mouth
Instructions:
- Prepare the Popcorn Base: Begin by popping the popcorn and spreading it out on a large baking sheet. Make sure to remove any unpopped kernels so they don’t end up in the final mix.
- Melt the Chocolate: In a microwave-safe bowl, melt the white chocolate chips in 30-second intervals, stirring after each interval, until smooth and completely melted.
- Combine Ingredients: Pour the melted white chocolate over the popcorn. Gently stir to coat the popcorn evenly. Add mini marshmallows, mini chocolate chips, and dried cranberries, and continue to toss until everything is well combined.
- Assemble the Snowman Cups: Divide the popcorn mixture evenly among the clear plastic cups, filling each cup about two-thirds full.
- Decorate the Snowmen: Insert two pretzel sticks into each cup to resemble arms. Use candy-coated chocolate pieces for buttons, placing them along the front of the popcorn. Add an orange candy-coated sunflower seed or candy for the nose.
- Create the Face: Use the black edible marker or black icing to draw eyes and a mouth on the clear plastic cups, giving each snowman a friendly face.
- Chill and Set: Place the decorated popcorn cups in the refrigerator for about 15-20 minutes, allowing the chocolate to set and the snowman decorations to adhere well to the popcorn.
Extra Tips:
For a more colorful and festive look, consider adding sprinkles or edible glitter to the popcorn before the chocolate sets. You can also experiment with different flavors by adding a pinch of cinnamon or nutmeg to the popcorn mixture.
If you want to make these treats ahead of time, store them in an airtight container to keep them fresh and crunchy. Encourage kids to personalize their snowmen with different candy noses and expressions, making each one unique and special.