

The holiday season is the perfect time to bring out those crowd-pleasing appetizers that everyone loves. Cream cheese is my go-to ingredient for creating those festive bites that always get compliments. I’ve rounded up twelve amazing recipes that never fail to impress my friends and family. Think creamy stuffed mushrooms, elegant smoked salmon bites, and spicy jalapeño poppers—all easy to prepare in advance. Ready to explore these delightful recipes?
Stuffed Mushrooms With Cream Cheese and Herbs

Stuffed Mushrooms With Cream Cheese and Herbs is a delightful appetizer that brings a touch of elegance to any Christmas gathering. These bite-sized treats are packed with flavor and are sure to impress your family and friends. The creamy filling, made with tangy cream cheese and a medley of fresh herbs, is perfectly complemented by the earthy taste of the mushrooms. This dish isn’t only delicious but also easy to prepare, making it a great choice for holiday entertaining.
The stuffing for these mushrooms is a simple mixture of cream cheese, mixed herbs, garlic, and breadcrumbs, creating a rich and savory filling. The mushrooms themselves act as the perfect vessel, absorbing all the flavors while maintaining their shape. Whether you’re hosting a large Christmas party or a small family dinner, these stuffed mushrooms are sure to be a hit. They can be made ahead of time and quickly baked just before serving, making them a convenient option for busy holiday schedules.
Ingredients for 4-6 people:
- 24 large white or cremini mushrooms
- 8 ounces cream cheese, softened
- 1/4 cup grated Parmesan cheese
- 1/4 cup breadcrumbs
- 3 cloves garlic, minced
- 2 tablespoons chopped fresh parsley
- 1 tablespoon chopped fresh thyme
- 1 tablespoon chopped fresh chives
- Salt and pepper to taste
- 2 tablespoons olive oil
Cooking Instructions:
- Prepare the Mushrooms: Begin by preheating your oven to 375°F (190°C). Clean the mushrooms with a damp cloth to remove any dirt. Carefully remove the stems and set them aside for another use or discard them.
- Make the Filling: In a medium bowl, combine the softened cream cheese, Parmesan cheese, breadcrumbs, minced garlic, parsley, thyme, chives, salt, and pepper. Mix everything until well combined and smooth.
- Stuff the Mushrooms: Using a small spoon or your hands, fill each mushroom cap generously with the cream cheese mixture. Confirm each cap is packed tightly with the filling.
- Bake the Mushrooms: Arrange the stuffed mushrooms on a baking sheet lined with parchment paper. Drizzle the olive oil over the top of the stuffed mushrooms to enhance their flavor and help them brown. Bake in the preheated oven for 20-25 minutes, or until the mushrooms are tender and the tops are golden brown.
- Serve: Remove the mushrooms from the oven and allow them to cool slightly before serving. They can be served warm or at room temperature.
Extra Tips:
To guarantee the mushrooms don’t become soggy, avoid overfilling them with the cream cheese mixture. You can also pre-bake the mushroom caps for 5 minutes before stuffing them to help release excess moisture.
Feel free to experiment with different herbs or add a pinch of red pepper flakes for some heat. These stuffed mushrooms can be prepared a day in advance and stored in the refrigerator, then baked just before serving for convenience.
Smoked Salmon and Cream Cheese Cucumber Bites

Smoked Salmon and Cream Cheese Cucumber Bites are a delightful and elegant appetizer perfect for holiday gatherings. These bite-sized treats combine the rich, savory flavors of smoked salmon with the creamy texture of cream cheese, all perched atop crisp and invigorating cucumber slices. This combination not only offers a wonderful blend of flavors and textures, but it also provides a visually appealing addition to any festive spread.
Whether you’re hosting a Christmas party or attending one as a guest, these cucumber bites are sure to impress with their simplicity and gourmet appeal.
The preparation of Smoked Salmon and Cream Cheese Cucumber Bites requires minimal effort, making it an ideal choice for those seeking a quick yet sophisticated appetizer. The key is to use high-quality ingredients, as the flavors are clean and distinct, allowing the natural taste of each component to shine.
With just a few simple steps and ingredients, you can create a dish that looks and tastes as though it came straight from a professional kitchen, while still being enjoyable for all skill levels to prepare.
Ingredients (Serves 4-6):
- 2 medium cucumbers
- 8 ounces of cream cheese, softened
- 8 ounces of smoked salmon, thinly sliced
- 2 tablespoons of fresh dill, chopped
- 1 tablespoon of lemon juice
- Salt and pepper to taste
Instructions:
- Prepare the Cucumbers: Begin by washing the cucumbers thoroughly under cold water. Pat them dry with a clean towel. Using a sharp knife or a mandoline slicer, slice the cucumbers into 1/4-inch thick rounds. Arrange them in a single layer on a serving platter.
- Make the Cream Cheese Mixture: In a medium-sized mixing bowl, combine the softened cream cheese, lemon juice, and chopped dill. Mix well until smooth and creamy. Season the mixture with salt and pepper to taste.
- Assemble the Bites: Using a small spoon or a piping bag, spread or pipe about a teaspoon of the cream cheese mixture onto each cucumber slice. Be generous, as this will act as the base for the smoked salmon.
- Add the Smoked Salmon: Take a piece of smoked salmon and fold it into a small, attractive shape. Place it on top of the cream cheese mixture on each cucumber slice.
- Garnish and Serve: For an extra touch of flavor and presentation, sprinkle a bit more fresh dill over the top of each bite. Serve immediately for the best taste and texture.
Extra Tips:
When preparing Smoked Salmon and Cream Cheese Cucumber Bites, verify that the cream cheese is at room temperature before mixing. This makes it easier to combine with the other ingredients and results in a smoother consistency.
Additionally, consider using Persian or English cucumbers, which are seedless and have a firmer texture, making them ideal for this dish. If you prefer a bit of heat, you can add a dash of horseradish to the cream cheese mixture.
Finally, remember that these bites are best served fresh, so try to prepare them close to serving time to maintain their crispness and vibrant appearance.
Cranberry Cream Cheese Pinwheels

Cranberry Cream Cheese Pinwheels are a delightful holiday appetizer that combines the tartness of cranberries with creamy cheese, all wrapped in a soft, flaky tortilla. This festive treat isn’t only visually appealing with its vibrant red and white swirls but also incredibly easy to prepare, making it perfect for holiday gatherings or any special occasion.
The savory and sweet combination creates a flavor profile that both adults and children will love, making these pinwheels a must-have on your Christmas menu.
These pinwheels are made by spreading a creamy mixture over flour tortillas, then rolling them up with a layer of cranberries tucked inside. After chilling, they’re sliced into bite-sized pieces, perfect for serving at parties. The balance of flavors and textures makes them a versatile appetizer, and they can be made ahead of time, which is always a bonus during the busy holiday season.
Ingredients (for 4-6 people):
- 8 ounces cream cheese, softened
- 1/4 cup chopped green onions
- 1/2 cup dried cranberries
- 4 large flour tortillas (10-inch)
- 1/4 cup chopped pecans (optional)
- Salt and pepper to taste
Cooking Instructions:
- Prepare the Cream Cheese Mixture: In a medium-sized bowl, combine the softened cream cheese with chopped green onions. Mix well until the ingredients are fully incorporated. Season with a pinch of salt and pepper to taste.
- Chop the Cranberries: Roughly chop the dried cranberries into smaller pieces. This will make them easier to distribute evenly across the tortillas.
- Spread the Mixture: Lay out one flour tortilla on a flat surface. Spread a quarter of the cream cheese mixture evenly over the entire surface of the tortilla, leaving a small border around the edges.
- Add the Cranberries and Pecans: Sprinkle a quarter of the chopped cranberries over the cream cheese layer. If using, add a quarter of the chopped pecans for an extra crunch.
- Roll the Tortilla: Starting at one end, tightly roll up the tortilla, ensuring it stays snug to prevent any filling from falling out. Repeat this process with the remaining tortillas and filling.
- Chill the Rolls: Place the rolled tortillas in the refrigerator for at least 1 hour to firm up. This will make them easier to slice and help maintain their shape.
- Slice and Serve: Once chilled, remove from the refrigerator and slice each roll into 1-inch pinwheels. Arrange them on a serving platter and serve immediately or store them in the fridge until ready to serve.
Extra Tips:
For an added burst of flavor, consider adding a teaspoon of orange zest to the cream cheese mixture. This will complement the cranberries beautifully.
If you’re planning to make these pinwheels ahead of time, they can be stored in an airtight container in the refrigerator for up to 24 hours. This recipe is also versatile, so feel free to experiment with other ingredients such as spinach or different types of nuts to suit your taste preferences.
Cream Cheese and Jalapeño Poppers

Cream Cheese and Jalapeño Poppers are a delectable appetizer perfect for adding a bit of spice to your holiday table. These poppers are a crowd-pleaser, delivering a delightful combination of creamy, cheesy filling with a zesty kick from the jalapeños. They aren’t only delicious but also relatively simple to prepare, making them an ideal choice for your Christmas appetizer spread.
The crispiness of the bacon wrapping adds another layer of texture and flavor, guaranteeing these poppers will disappear quickly from the party platter.
The beauty of cream cheese and jalapeño poppers lies in their versatility. Whether you serve them as a spicy appetizer, or a side dish, or even include them in a larger spread of holiday snacks, they’re sure to stand out. The balance of flavors – creamy, spicy, and savory – makes them an irresistible treat that both spice lovers and those who typically shy away from heat can enjoy.
Perfectly portioned, these bite-sized delights can be prepped ahead of time, allowing you to enjoy the festivities with your friends and family.
Ingredients (serves 4-6):
- 12 large jalapeños
- 8 ounces cream cheese, softened
- 1 cup shredded cheddar cheese
- 1 teaspoon garlic powder
- 1 teaspoon onion powder
- 12 slices of bacon
- 1/4 cup chopped green onions (optional)
- Salt and pepper to taste
Cooking Instructions:
- Preparation: Preheat your oven to 400°F (200°C). While the oven is heating, wash the jalapeños thoroughly and pat them dry. Carefully slice each jalapeño in half lengthwise and remove the seeds and membranes using a small spoon. This will reduce the heat of the jalapeños, making them more palatable for those who prefer a milder spice level.
- Mix the Filling: In a medium-sized bowl, combine the softened cream cheese, shredded cheddar cheese, garlic powder, onion powder, salt, and pepper. Mix well until all ingredients are fully incorporated. For an added touch of flavor, you can stir in the chopped green onions if using.
- Stuff the Jalapeños: Using a spoon, fill each jalapeño half generously with the cheese mixture. Confirm each half is evenly filled, with a slight mound of cheese mixture over the top.
- Wrap with Bacon: Take a slice of bacon and wrap it around each stuffed jalapeño half, starting at one end and working toward the other. Secure the bacon with a toothpick if necessary to keep it in place during cooking.
- Bake the Poppers: Place the bacon-wrapped jalapeño poppers on a baking sheet lined with parchment paper or a silicone baking mat. Bake in the preheated oven for 20-25 minutes, or until the bacon is crispy and the cheese is melted and bubbly.
- Serve: Once done, remove the poppers from the oven and let them cool for a few minutes before serving. This will allow the cheese to set slightly and make them easier to handle.
Extra Tips: When choosing jalapeños, look for ones that are firm and have a consistent green color without blemishes. This guarantees freshness and the best possible flavor.
If you or your guests prefer a spicier popper, you can leave a few seeds in the jalapeños or choose larger, spicier varieties. For a smoky twist, consider using smoked bacon or adding a pinch of smoked paprika to the cheese mixture.
If you’re preparing these poppers ahead of time, assemble them and store them in the refrigerator until you’re ready to bake, assuring you have more time to enjoy the festivities.
Prosciutto-Wrapped Cream Cheese-Stuffed Dates
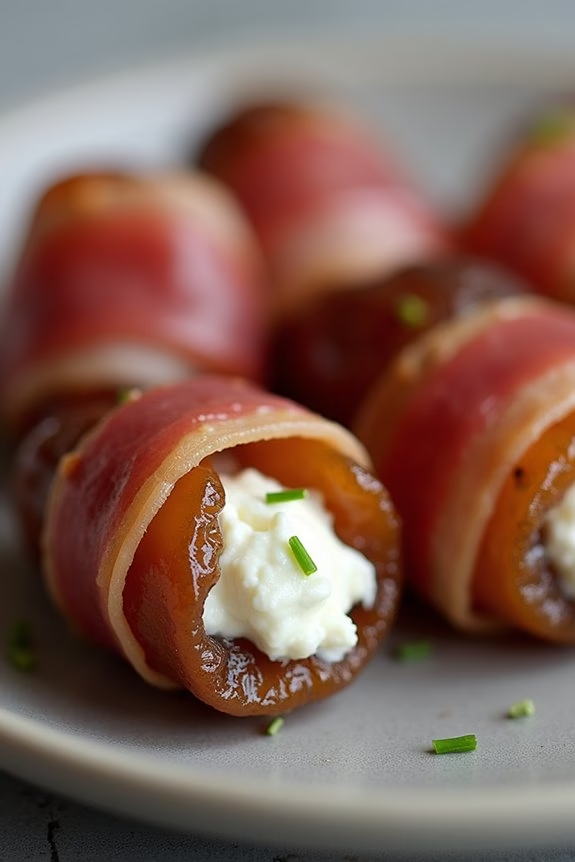
Prosciutto-Wrapped Cream Cheese-Stuffed Dates are the perfect combination of sweet and savory, making them an irresistible appetizer for your Christmas gatherings. This delightful dish features plump dates filled with a creamy cheese mixture and wrapped in salty prosciutto, creating a mouth-watering flavor profile that will impress your guests.
The contrast between the chewy texture of the dates and the crispiness of the prosciutto adds an extra layer of enjoyment with every bite. This recipe isn’t only delicious but also simple to prepare, allowing you more time to focus on enjoying the company of your friends and family during the holiday season.
Whether served warm or at room temperature, these stuffed dates are sure to be a hit at your Christmas party. With just a few ingredients and minimal preparation time, you can create a sophisticated appetizer that looks and tastes like it came from a gourmet kitchen.
Ingredients for 4-6 servings:
- 24 Medjool dates
- 8 oz cream cheese, softened
- 1/4 cup chopped fresh chives
- 1/4 teaspoon garlic powder
- 1/4 teaspoon black pepper
- 12 slices of prosciutto, halved lengthwise
- Toothpicks
Cooking Instructions:
- Prepare the Dates: Begin by preheating your oven to 375°F (190°C). Carefully make a slit down the length of each date and remove the pit. Be sure not to cut all the way through the date, as you want to create a pocket for the filling.
- Mix the Filling: In a medium-sized bowl, combine the softened cream cheese, chopped chives, garlic powder, and black pepper. Mix thoroughly until all ingredients are well incorporated and the mixture is smooth.
- Stuff the Dates: Using a small spoon or a piping bag, fill each date with about a teaspoon of the cream cheese mixture. Confirm that the dates are nicely filled but not overflowing.
- Wrap with Prosciutto: Take a half slice of prosciutto and wrap it around the stuffed date, securing it with a toothpick. Repeat this process for all the dates, confirming each one is tightly wrapped.
- Bake the Dates: Place the prosciutto-wrapped dates on a baking sheet lined with parchment paper. Bake in the preheated oven for about 10-12 minutes, or until the prosciutto is crispy and the cheese is warm.
- Serve: Allow the dates to cool slightly before serving. They can be enjoyed warm or at room temperature.
Extra Tips:
To make these appetizers even more flavorful, consider adding a few chopped nuts, such as almonds or walnuts, to the cream cheese filling for an extra crunch. If you prefer a touch of sweetness, drizzle a little honey or balsamic glaze over the dates just before serving.
Additionally, you can prepare these dates a day in advance and store them in the refrigerator; just bake them fresh before your guests arrive to confirm they’re crispy and delicious.
Festive Cream Cheese and Pesto Christmas Tree
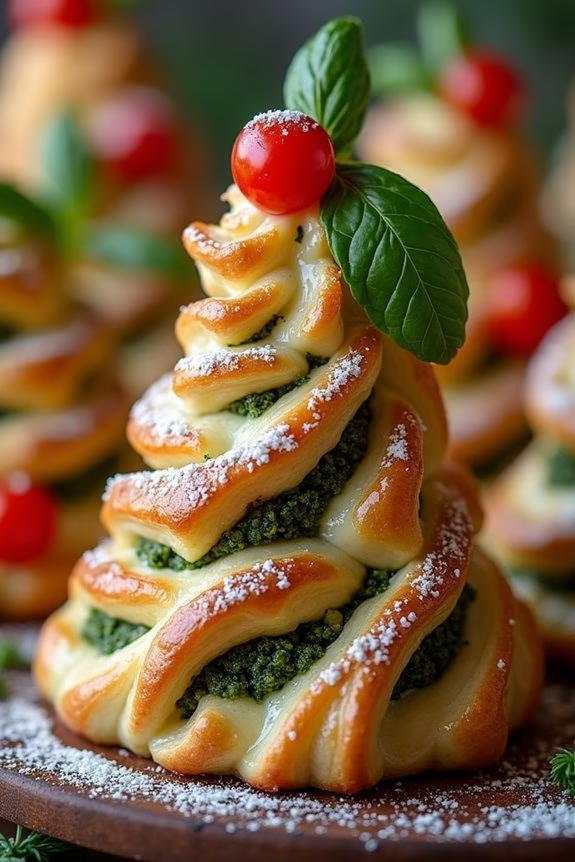
Get ready to impress your holiday guests with a Festive Cream Cheese and Pesto Christmas Tree appetizer. This delightful dish not only looks stunning on your holiday table but also combines the creamy goodness of cheese with the aromatic flavors of basil pesto.
Perfect for a serving size of 4-6 people, this appetizer is easy to prepare and doesn’t require any cooking skills. Whether you’re hosting a holiday party or a cozy family gathering, this Christmas tree-shaped appetizer will surely be a hit.
The Festive Cream Cheese and Pesto Christmas Tree is versatile and can be customized according to your taste preferences. You can add additional toppings like cherry tomatoes, olives, or roasted red peppers for a pop of color and flavor.
This appetizer can be prepared in advance, which makes it an excellent choice for busy hosts. Simply assemble, refrigerate, and serve when your guests arrive. Follow the simple steps below to create this festive and delicious appetizer.
Ingredients (Serves 4-6):
- 1 package (8 oz) cream cheese, softened
- 1/4 cup basil pesto
- 1 sheet puff pastry, thawed
- 1 egg, beaten
- 1/4 cup grated Parmesan cheese
- Fresh basil leaves for garnish
- Cherry tomatoes for garnish
- Salt and pepper to taste
Instructions:
- Prepare the Puff Pastry: Preheat your oven to 400°F (200°C). Roll out the puff pastry sheet on a lightly floured surface into a rectangle. Use a knife or pizza cutter to cut out a large triangle shape to form the tree. Save any extra pastry for decoration.
- Mix the Cream Cheese and Pesto: In a bowl, combine the softened cream cheese with the basil pesto. Mix until smooth and well combined. Season with salt and pepper if desired.
- Assemble the Tree: Place the puff pastry triangle on a baking sheet lined with parchment paper. Spread the cream cheese and pesto mixture evenly over the triangle, leaving a small border around the edges.
- Create the Tree Branches: Use a knife to make horizontal cuts along the sides of the triangle, about 1 inch apart, stopping just before the center so the branches are attached to the tree trunk.
- Twist the Branches: Gently twist each strip to reveal the pesto mixture, creating a spiral effect. This will give the appearance of tree branches.
- Add Decorations and Bake: Brush the entire tree, including the branches, with the beaten egg. Sprinkle grated Parmesan cheese over the top. Use the saved pastry scraps to create a star or other decorations for the top of the tree. Bake in the preheated oven for 15-20 minutes or until golden brown and puffed up.
- Garnish and Serve: Once baked, let the tree cool slightly. Decorate with fresh basil leaves and cherry tomatoes to resemble ornaments. Serve warm or at room temperature.
Extra Tips:
- For added flavor, consider incorporating sun-dried tomatoes or roasted red peppers into the cream cheese mixture.
- If you’re preparing this appetizer ahead of time, assemble the tree and refrigerate until ready to bake. This will allow you to serve it fresh from the oven.
- Confirm that the puff pastry is well-thawed to make rolling and cutting easier. If it becomes too warm, pop it back in the fridge for a few minutes to firm up.
Mini Cream Cheese and Chive Quiches

Mini Cream Cheese and Chive Quiches are a delightful addition to any Christmas appetizer spread. These bite-sized quiches aren’t only visually appealing but also packed with flavor, making them perfect for holiday gatherings. The creamy filling, infused with fresh chives, is encased in a flaky pastry shell, offering a perfect balance of textures.
Whether you’re hosting a large party or a small family gathering, these mini quiches are bound to impress your guests with their elegant presentation and delectable taste.
These quiches are incredibly versatile, allowing you to prepare them ahead of time and reheat them just before serving, freeing up your holiday schedule. The combination of cream cheese and chives adds a savory richness that pairs well with a variety of other holiday flavors. Plus, their small size makes them easy to serve and enjoy without the need for utensils, making them an ideal choice for a cocktail party or buffet-style meal.
Follow the recipe below to create these delicious mini quiches for 4-6 people.
Ingredients:
- 1 sheet of puff pastry, thawed
- 4 oz cream cheese, softened
- 1/4 cup milk
- 2 large eggs
- 1/4 cup grated Parmesan cheese
- 1/4 cup chopped chives
- Salt and pepper to taste
- Non-stick cooking spray
Cooking Instructions:
- Preheat the Oven: Begin by preheating your oven to 375°F (190°C). This guarantees that the oven is at the right temperature for even cooking.
- Prepare the Puff Pastry: Roll out the thawed puff pastry sheet on a lightly floured surface until it’s about 1/8 inch thick. Use a round cutter, approximately 2.5 inches in diameter, to cut out circles. Gently press each circle into the cups of a mini muffin tin that has been lightly sprayed with non-stick cooking spray.
- Make the Filling: In a mixing bowl, combine the softened cream cheese and milk, whisking until smooth. Add the eggs, one at a time, whisking thoroughly after each addition. Stir in the grated Parmesan, chopped chives, and season with salt and pepper to taste.
- Fill the Quiches: Spoon the cream cheese mixture evenly into each pastry cup, filling them about 2/3 full to allow room for the filling to puff up as it bakes.
- Bake: Place the muffin tin in the preheated oven and bake for 15-20 minutes, or until the filling is set and the tops are golden brown. Remove from the oven and let cool in the pan for a few minutes before transferring to a wire rack.
- Serve: Serve the mini quiches warm or at room temperature, allowing the flavors to fully develop. They can be garnished with additional chopped chives if desired.
Extra Tips:
For an even flakier crust, place the cut puff pastry circles in the fridge for about 15 minutes before filling and baking. This helps the butter in the pastry firm up, preventing shrinkage during baking.
If you want to prepare the quiches ahead of time, they can be stored in an airtight container in the refrigerator for up to two days. Reheat them in a 350°F (175°C) oven for about 5 minutes to crisp up the pastry again before serving.
Additionally, feel free to customize the filling with other herbs or small diced vegetables to suit your taste preferences.
Roasted Red Pepper and Cream Cheese Bruschetta

Roasted Red Pepper and Cream Cheese Bruschetta is a delightful appetizer that’s perfect for any festive gathering, especially during the Christmas season. This dish combines the smoky sweetness of roasted red peppers with the creamy richness of cream cheese, all served atop crispy slices of baguette. The vibrant colors and flavors of this bruschetta make it an appealing and delicious start to any holiday meal.
Whether you’re hosting a large family dinner or a cozy get-together with friends, this recipe is bound to impress your guests. The key to making this bruschetta truly stand out is using fresh ingredients and taking the time to properly roast the red peppers, which enhances their natural sweetness and adds a subtle smokiness that pairs beautifully with the cream cheese.
This appetizer is easy to prepare, and its combination of textures and flavors will leave your guests enthusiastic about the main course. Plus, it’s a versatile dish that can be prepared in advance, giving you more time to enjoy your holiday festivities.
Ingredients (Serves 4-6 people):
- 2 large red bell peppers
- 1 French baguette
- 8 oz cream cheese, softened
- 2 tablespoons olive oil
- 1 tablespoon balsamic vinegar
- 2 cloves garlic, minced
- 1 teaspoon dried oregano
- Salt and pepper to taste
- Fresh basil leaves for garnish
Instructions:
- Roast the Red Peppers: Preheat your oven to 450°F (230°C). Place the whole red peppers on a baking sheet lined with foil. Roast in the oven for about 25-30 minutes, turning occasionally, until the skins are charred and blistered.
- Prepare the Peppers: Remove the roasted peppers from the oven and place them in a bowl. Cover the bowl with plastic wrap and let them steam for about 10 minutes, which will make peeling easier. Once cooled, peel off the skins, remove the seeds, and slice the peppers into thin strips.
- Preheat the Oven: Lower the oven temperature to 400°F (200°C).
- Prepare the Bread: Slice the baguette into 1/2-inch thick slices. Arrange the slices on a baking sheet and brush both sides lightly with olive oil. Toast in the oven for about 5-7 minutes, or until golden brown.
- Make the Cream Cheese Spread: In a small bowl, combine the softened cream cheese, minced garlic, oregano, and a pinch of salt and pepper. Mix well until smooth and creamy.
- Assemble the Bruschetta: Spread a generous layer of the cream cheese mixture onto each toasted baguette slice. Top with a few strips of roasted red pepper. Drizzle a small amount of balsamic vinegar over each bruschetta.
- Garnish and Serve: Garnish each bruschetta with fresh basil leaves and serve immediately.
Extra Tips: For an extra burst of flavor, consider adding a sprinkle of crumbled feta cheese or a few capers on top of each bruschetta. If you’re looking to save time, you can roast the peppers a day in advance and store them in the refrigerator.
When assembling the bruschetta, make sure that the baguette slices are still warm from toasting, as this enhances the overall flavor and texture of the dish. Finally, experiment with different types of fresh herbs for garnish, such as parsley or thyme, to suit your personal taste preferences.
Cream Cheese and Spinach Stuffed Pastry Twists

Cream Cheese and Spinach Stuffed Pastry Twists are an elegant yet simple appetizer perfect for Christmas gatherings. These delightful pastries combine the creamy richness of cream cheese with the earthy flavor of spinach, all wrapped in a flaky puff pastry. They aren’t only visually appealing but also incredibly delicious, making them a hit at any festive occasion.
The twists can be prepared ahead of time and baked just before serving, guaranteeing they’re warm and fresh for your guests. This recipe yields enough to serve 4-6 people, making it ideal for smaller gatherings or as part of a larger spread. The combination of ingredients creates a balanced flavor profile that’s both savory and satisfying.
Whether you’re hosting a Christmas party or simply looking for a unique appetizer to add to your holiday menu, these Cream Cheese and Spinach Stuffed Pastry Twists are sure to impress.
Ingredients (Serves 4-6):
- 1 sheet of puff pastry, thawed
- 1 cup fresh spinach, chopped
- 4 oz cream cheese, softened
- 1/2 cup grated Parmesan cheese
- 1 egg, beaten
- 1 tablespoon olive oil
- 1 teaspoon garlic powder
- Salt and pepper to taste
- Flour for dusting
Cooking Instructions:
- Preheat the Oven: Preheat your oven to 400°F (200°C) and line a baking sheet with parchment paper.
- Prepare the Filling: In a medium-sized bowl, combine the chopped spinach, softened cream cheese, grated Parmesan cheese, olive oil, garlic powder, salt, and pepper. Mix until well combined and creamy.
- Roll Out the Puff Pastry: Lightly dust your work surface with flour and roll out the puff pastry to a rectangle of about 12 x 10 inches. Confirm the pastry is even in thickness.
- Spread the Filling: Evenly spread the spinach and cream cheese mixture over half of the puff pastry, leaving a small border around the edges.
- Fold and Seal: Fold the other half of the pastry over the filling to create a sandwich. Press down gently and use a fork to crimp the edges, sealing the filling inside.
- Cut and Twist: Using a sharp knife, cut the pastry into 1-inch wide strips. Twist each strip gently and place them on the prepared baking sheet.
- Brush and Bake: Brush the twists with the beaten egg to give them a golden finish. Bake in the preheated oven for 15-20 minutes or until the pastry is puffed and golden brown.
- Cool and Serve: Allow the twists to cool slightly on a wire rack before serving. Serve warm for the best flavor and texture.
Extra Tips:
When preparing the filling, confirm that the spinach is chopped finely to guarantee even distribution throughout the pastry. If the puff pastry becomes too soft while working with it, place it back in the refrigerator for a few minutes until it firms up. This will make cutting and twisting the strips much easier.
Additionally, you can prepare the twists ahead of time and freeze them unbaked. Simply bake them from frozen, adding a few extra minutes to the baking time. This makes it convenient to serve freshly baked appetizers without the last-minute rush.
Cranberry and Walnut Cream Cheese Ball
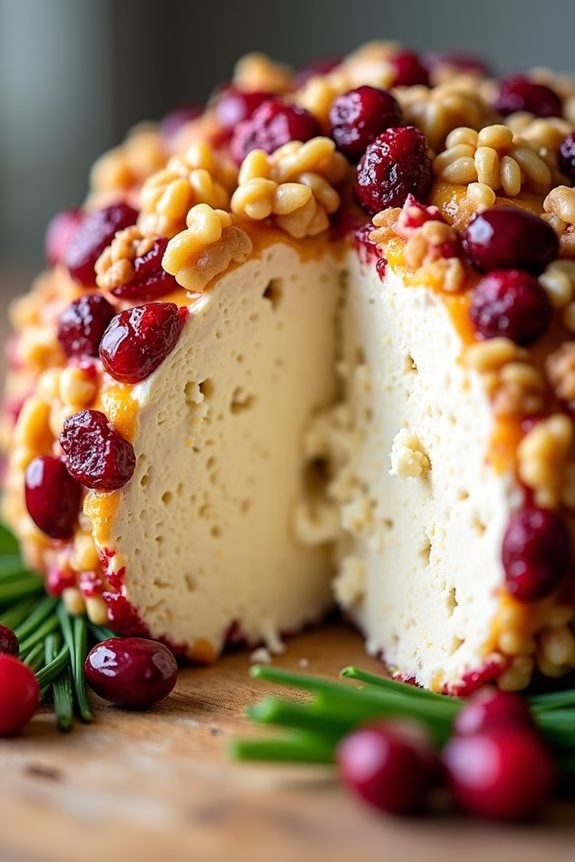
Cranberry and Walnut Cream Cheese Ball is a festive and delicious appetizer perfect for the holiday season. This delightful dish combines the tangy sweetness of dried cranberries with the rich, nutty flavor of walnuts, all enveloped in creamy, smooth cheese. The result is an irresistibly savory treat that will impress your guests and add a touch of elegance to your Christmas gathering.
It’s a versatile appetizer that pairs well with a variety of crackers, breads, or even fresh vegetables. This recipe is designed to serve 4-6 people, making it an ideal choice for a small family gathering or an intimate holiday party. With its vibrant colors and delightful flavors, the Cranberry and Walnut Cream Cheese Ball isn’t only tasty but also visually appealing, making it a perfect centerpiece for your appetizer table.
The preparation is simple, allowing you to focus more on enjoying the festivities rather than spending too much time in the kitchen.
Ingredients for Cranberry and Walnut Cream Cheese Ball (Serves 4-6):
- 8 oz (225g) cream cheese, softened
- 1 cup (100g) shredded sharp cheddar cheese
- 1/2 cup (60g) dried cranberries, chopped
- 1/2 cup (60g) walnuts, chopped
- 1 tablespoon fresh chives, finely chopped
- 1 teaspoon garlic powder
- Salt and pepper to taste
- 1/2 cup (60g) additional chopped walnuts for coating
- 1/4 cup (30g) additional dried cranberries for coating
Cooking Instructions:
- Prepare the Base: In a large mixing bowl, combine the softened cream cheese and shredded cheddar cheese. Use a hand mixer or a wooden spoon to blend the cheeses together until smooth and well combined.
- Add Flavor: Add the chopped dried cranberries, walnuts, chives, garlic powder, salt, and pepper to the cheese mixture. Stir thoroughly to confirm all ingredients are evenly distributed throughout the mixture.
- Shape the Cheese Ball: Once combined, transfer the mixture onto a large piece of plastic wrap. Gather the edges of the plastic wrap and use your hands to shape the mixture into a ball. Make sure it’s compact and holds its shape.
- Coat the Cheese Ball: In a shallow dish or plate, mix the additional chopped walnuts and dried cranberries. Unwrap the cheese ball and roll it gently in the walnut and cranberry mixture, pressing lightly to confirm the coating sticks.
- Chill: Wrap the coated cheese ball in a fresh piece of plastic wrap and refrigerate for at least 1-2 hours. This will help the flavors meld together and allow the cheese ball to firm up.
- Serve: Before serving, remove the cheese ball from the refrigerator and allow it to sit at room temperature for about 15-20 minutes. This will make it easier to spread on crackers or bread.
Extra Tips:
For an extra layer of flavor, consider adding a teaspoon of honey or maple syrup to the cheese mixture for a touch of sweetness. If you prefer a spicier kick, a pinch of cayenne pepper can add some heat.
The cheese ball can be made a day ahead, which allows the flavors to develop even more. Just make sure to keep it well wrapped in the refrigerator. To prevent overmixing, confirm your cream cheese is fully softened before starting the recipe. This will make blending much easier and result in a smoother texture.
Cream Cheese and Bacon Stuffed Cherry Tomatoes
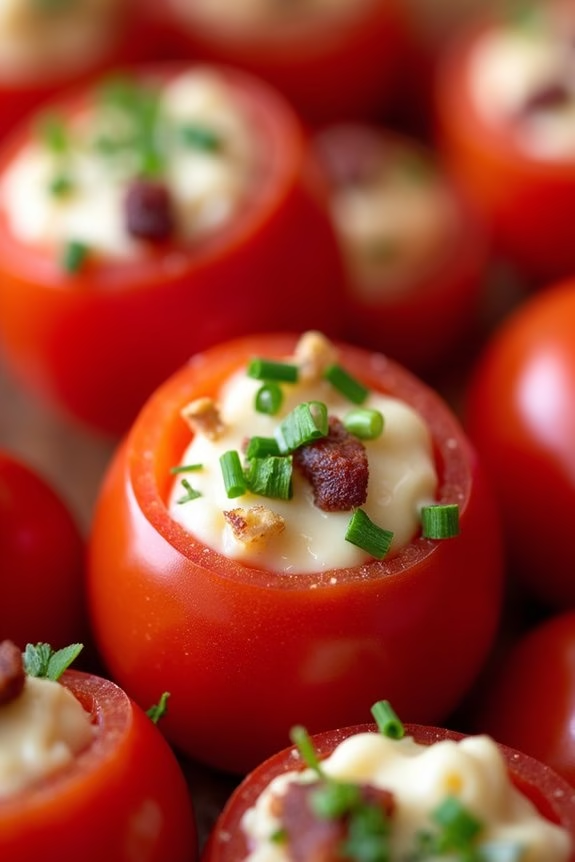
If you’re looking to add a delightful and savory touch to your holiday spread, Cream Cheese and Bacon Stuffed Cherry Tomatoes are the perfect appetizer choice. These bite-sized treats combine the creamy richness of cream cheese with the smoky crunch of bacon, all nestled within sweet and juicy cherry tomatoes.
They’re not only delicious but also visually appealing, adding a pop of color to your Christmas table. Plus, these stuffed tomatoes are easy to make and can be prepared ahead of time, allowing you to enjoy more time with your guests.
This recipe is ideal for serving 4-6 people, making it a great addition to a larger holiday feast or a stand-alone snack at a festive gathering. The balance of flavors and textures will have everyone reaching for more. Whether you’re a seasoned chef or a beginner, these stuffed cherry tomatoes are sure to impress with their elegant presentation and delectable taste.
Ingredients for 4-6 servings:
- 24 cherry tomatoes
- 8 ounces cream cheese, softened
- 6 slices of bacon, cooked and crumbled
- 2 tablespoons fresh chives, finely chopped
- 1 tablespoon fresh parsley, finely chopped
- 1 teaspoon garlic powder
- Salt and pepper to taste
Cooking Instructions:
1. Prepare the Tomatoes: Begin by washing the cherry tomatoes thoroughly. Using a sharp knife, slice off the top of each tomato and use a small spoon or melon baller to gently scoop out the seeds and pulp, creating a hollow center.
Be careful not to puncture the tomato shells. Set the hollowed tomatoes upside down on a paper towel to drain any excess moisture.
2. Cook the Bacon: While the tomatoes are draining, cook the bacon slices in a pan over medium heat until they’re crispy. Once cooked, transfer the bacon to a paper towel-lined plate to cool. Once cooled, crumble the bacon into small pieces.
3. Make the Filling: In a medium-sized mixing bowl, combine the softened cream cheese, crumbled bacon, chopped chives, chopped parsley, and garlic powder. Season the mixture with salt and pepper to taste.
Mix until all ingredients are well incorporated and the filling is smooth and consistent.
4. Stuff the Tomatoes: Using a small spoon or a piping bag, fill each hollowed cherry tomato with the cream cheese and bacon mixture. Make sure not to overfill the tomatoes to prevent the filling from spilling out.
5. Chill and Serve: Arrange the stuffed cherry tomatoes on a serving platter. Cover and refrigerate them for at least 30 minutes before serving. This allows the flavors to meld together and the filling to firm up slightly.
Extra Tips:
To save time, you can prepare the bacon and filling mixture a day in advance and store it in the refrigerator until you’re ready to stuff the tomatoes.
If you’re looking for a slight variation, consider adding a hint of spice by incorporating a dash of cayenne pepper or a sprinkle of paprika into the filling. For a vegetarian version, simply omit the bacon and add a pinch of smoked paprika to retain the smoky flavor.
Sweet and Savory Cream Cheese Puff Pastry Bites

Sweet and Savory Cream Cheese Puff Pastry Bites are the perfect holiday appetizer, blending rich cream cheese with a flaky, buttery puff pastry for a delightful treat.
These bites are quick to prepare and are versatile enough to accommodate both sweet and savory fillings, making them a crowd-pleaser at any Christmas gathering. The contrast of textures and flavors in these bite-sized pastries makes them an irresistible addition to your holiday menu.
Whether you’re hosting a festive soiree or attending a family potluck, these puff pastry bites are sure to impress.
The beauty of this recipe lies in its simplicity and adaptability. You can easily modify the fillings to suit your personal tastes or dietary preferences. For a sweet option, consider using a fruit preserve or a sprinkle of cinnamon sugar, while a savory filling could include herbs, smoked salmon, or sun-dried tomatoes.
These bites can be prepared in advance and baked just before serving, allowing you to enjoy more time with your guests. Perfect for a serving size of 4-6 people, this recipe will yield approximately 24 bites, guaranteeing there’s enough to go around.
Ingredients:
- 1 sheet puff pastry, thawed
- 8 oz cream cheese, softened
- 2 tablespoons honey
- 1 teaspoon vanilla extract
- 1/4 cup finely chopped chives (for savory option)
- 1/4 cup fruit preserve of choice (for sweet option)
- 1 egg, beaten (for egg wash)
- 1 tablespoon sugar (optional for sweet option)
- 1/2 teaspoon salt (optional for savory option)
Cooking Instructions:
- Preheat and Prep: Preheat your oven to 400°F (200°C). Confirm the puff pastry is fully thawed but still cold to the touch. This helps in easy handling and better puffing during baking.
- Prepare Filling: In a medium bowl, mix the softened cream cheese with honey and vanilla extract for the sweet option. If making the savory version, mix the cream cheese with chopped chives and a pinch of salt. Set aside.
- Roll Out Puff Pastry: On a lightly floured surface, unfold the puff pastry sheet and roll it out to approximately a 12×12 inch square. Use a sharp knife or a pizza cutter to divide the pastry into 24 equal squares.
- Fill the Pastry Squares: Place a small dollop of the prepared cream cheese mixture in the center of each square. For sweet bites, add a small spoonful of fruit preserve on top of the cream cheese. For savory bites, you can add a small slice of smoked salmon or sun-dried tomatoes.
- Fold and Seal: Bring each corner of the square to the center over the filling and pinch to seal, forming a small parcel. Place the parcels on a baking sheet lined with parchment paper.
- Apply Egg Wash: Brush the tops of each parcel with the beaten egg. If desired, sprinkle sugar on the sweet ones, or a little sea salt on the savory ones, to enhance flavor and appearance.
- Bake: Bake in the preheated oven for 15-18 minutes or until the pastries are golden brown and puffed. Keep an eye on them to prevent over-browning.
- Cool and Serve: Allow the pastries to cool slightly on a wire rack before serving, letting the flavors meld and the pastry set.
Extra Tips:
For the best results, keep the puff pastry as cold as possible before baking; this guarantees maximum puff and flakiness.
If you’re planning to serve these at a party, you can prepare the bites ahead of time and store them in the refrigerator for up to 24 hours before baking.
Feel free to experiment with different fillings and toppings—some popular choices include caramelized onions for a savory twist or a sprinkle of nuts for added texture in the sweet version.
Finally, consider serving these bites with a dipping sauce, such as a balsamic reduction for the savory bites or a chocolate sauce for the sweet bites, to elevate the experience further.