
Waking up to the scent of freshly baked sweets is one of life’s simple joys. Whether it’s a warm cinnamon roll or a flaky raspberry almond Danish, each bite brings comfort and delight. These breakfast bakes are perfect for satisfying your sweet cravings and adding a touch of nostalgia to your morning. Let’s explore some delicious ways to start your day with these charming recipes.
Classic Cinnamon Rolls: The Ultimate Morning Treat
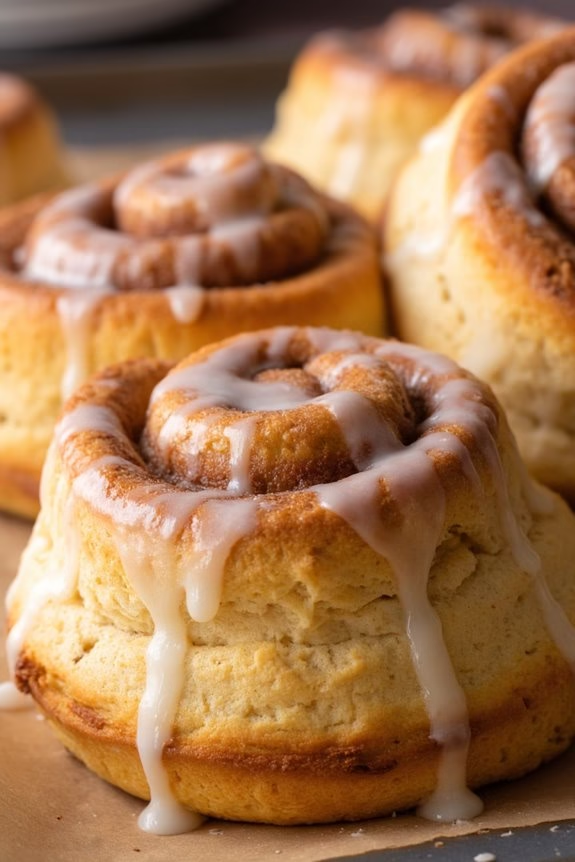
There’s something irresistibly comforting about waking up to the warm, sweet aroma of freshly baked cinnamon rolls wafting through the house. These classic cinnamon rolls are the ultimate morning treat, perfect for a lazy weekend breakfast or a special occasion brunch. Made from scratch, they’re fluffy, gooey, and generously spiced with cinnamon, offering a delightful indulgence that pairs perfectly with a steaming cup of coffee or tea.
Crafting these charming sweet breakfast bakes is a labor of love that rewards you with rich, buttery rolls that melt in your mouth. The process involves preparing a soft, yeasty dough, filling it with a luscious cinnamon-sugar mixture, and baking it to golden perfection. Topped with a creamy glaze, these cinnamon rolls are sure to become a family favorite, adding a touch of sweetness to your morning routine.
Ingredients for 4-6 servings:
- 3 1/2 cups all-purpose flour
- 1/4 cup granulated sugar
- 1 packet (2 1/4 teaspoons) active dry yeast
- 1/2 teaspoon salt
- 1/2 cup whole milk
- 1/4 cup unsalted butter, melted
- 1/4 cup water
- 1 large egg
- 1 teaspoon vanilla extract
- 3/4 cup packed brown sugar
- 2 tablespoons ground cinnamon
- 1/4 cup unsalted butter, softened
- 1/2 cup powdered sugar
- 2 tablespoons cream cheese, softened
- 1 tablespoon milk
- 1/2 teaspoon vanilla extract
Instructions:
- Prepare the Dough: In a large mixing bowl, combine 2 cups of flour, granulated sugar, yeast, and salt. In a small saucepan, heat the milk, melted butter, and water until warm (about 110°F). Stir the wet ingredients into the dry mixture. Add the egg and vanilla extract, mixing until combined. Gradually add the remaining flour, half a cup at a time, until a soft dough forms.
- Knead the Dough: Turn the dough onto a floured surface and knead for about 6-8 minutes, or until it’s smooth and elastic. Place the dough in a lightly greased bowl, cover it with a damp cloth, and let it rise in a warm place until doubled in size, about 1 hour.
- Prepare the Filling: In a small bowl, mix the brown sugar and ground cinnamon. Roll out the dough into a rectangle, approximately 16×12 inches. Spread the softened butter over the dough, leaving a 1-inch border. Sprinkle the cinnamon-sugar mixture evenly over the buttered dough.
- Form the Rolls: Starting from the long edge, tightly roll up the dough into a log. Cut the log into 12 even slices and arrange them in a greased 9×13 inch baking dish. Cover and let them rise until doubled, about 30 minutes.
- Bake the Rolls: Preheat your oven to 350°F (175°C). Bake the cinnamon rolls for 25-30 minutes, or until they’re golden brown. Remove from the oven and let them cool slightly.
- Prepare the Glaze: In a small bowl, mix together the powdered sugar, cream cheese, milk, and vanilla extract until smooth. Drizzle the glaze over the warm rolls before serving.
Extra Tips:
For the best results, make sure that all your ingredients are at room temperature before starting, as this helps the dough rise more effectively. If you prefer a sticky bun effect, you can add a syrupy glaze or caramel sauce at the bottom of the baking dish before placing the rolls in.
To save time in the morning, you can prepare the rolls the night before, let them rise overnight in the refrigerator, and then bake them fresh in the morning. Finally, if you like nuts, consider adding chopped pecans or walnuts to the cinnamon filling for an extra crunch.
Raspberry Almond Danish: Fruity and Nutty Perfection

If you’re looking to elevate your breakfast table with a touch of elegance and a burst of flavor, the Raspberry Almond Danish is the perfect choice. This delightful pastry combines the tangy sweetness of fresh raspberries with the rich, nutty flavor of almonds, all enveloped in a buttery, flaky puff pastry.
Whether you’re planning a cozy family brunch or simply want to treat yourself to something special, this Danish will certainly impress with its beautiful presentation and irresistible taste.
The key to a memorable Raspberry Almond Danish lies in balancing the flavors and textures. The puff pastry provides a light, crispy base, while the almond cream adds a creamy richness that complements the tartness of the raspberries. As the Danish bakes, the almonds toast to perfection, releasing a fragrant aroma that will fill your kitchen.
This recipe is designed to serve 4-6 people, making it ideal for a small gathering or a decadent weekend breakfast.
Ingredients (Serves 4-6):
- 1 sheet puff pastry, thawed
- 1 cup fresh raspberries
- 1/2 cup almond paste
- 1/4 cup granulated sugar
- 1 tablespoon all-purpose flour
- 1/4 cup sliced almonds
- 1 egg (for egg wash)
- 1 tablespoon milk
- Powdered sugar (for dusting)
Cooking Instructions:
- Preheat the Oven: Begin by preheating your oven to 400°F (200°C). This guarantees that your Danish will bake evenly and achieve that perfect golden-brown crust.
- Prepare the Puff Pastry: Roll out the thawed puff pastry on a lightly floured surface to prevent it from sticking. Aim for a rectangle about 12×9 inches in size. Transfer it to a parchment-lined baking sheet.
- Make the Almond Filling: In a medium bowl, combine the almond paste, granulated sugar, and all-purpose flour. Mix until smooth and well combined. Spread this almond mixture evenly onto the center of the puff pastry, leaving a 1-inch border on all sides.
- Add the Raspberries: Scatter the fresh raspberries over the almond filling, pressing them slightly into the mixture to make sure they stay in place during baking.
- Fold the Edges: Carefully fold the edges of the puff pastry over the filling to create a border. This helps to contain the filling and gives the Danish its characteristic shape.
- Apply Egg Wash: In a small bowl, whisk together the egg and milk. Brush this egg wash over the exposed edges of the pastry. This step is vital for achieving that glossy, golden finish.
- Add Almond Slices: Sprinkle the sliced almonds over the top of the Danish, adding a lovely crunch and enhancing the almond flavor as they toast.
- Bake the Danish: Place the prepared Danish in the preheated oven and bake for 20-25 minutes, or until the pastry is puffed and golden brown, and the almonds are toasted.
- Cool and Serve: Once baked, remove the Danish from the oven and allow it to cool slightly on a wire rack. Dust with powdered sugar just before serving to add a touch of sweetness and a beautiful finish.
Extra Tips:
For an extra burst of flavor, consider adding a teaspoon of lemon zest to the almond mixture before spreading it onto the pastry. This adds a bright, citrusy note that complements the raspberries beautifully.
Make sure your puff pastry is cold but pliable; if it’s too warm, it can become difficult to handle and may not puff up as desired during baking. If almond paste is difficult to find, you can substitute it with marzipan for a similar texture and flavor.
Enjoy your Raspberry Almond Danish fresh out of the oven for the best taste and texture.
Cozy Caramel Apple Sticky Buns for Fall Mornings
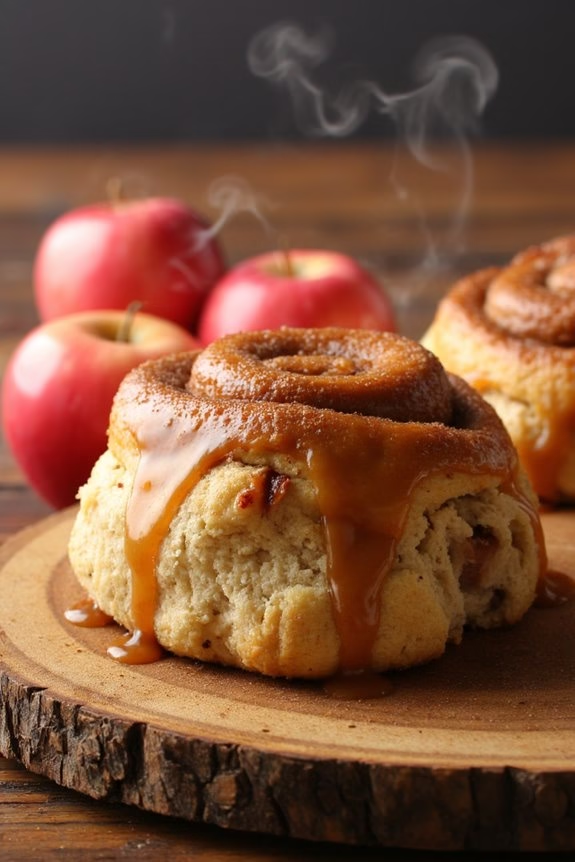
Imagine waking up to the aroma of warm, gooey caramel mingling with the sweet smell of baked apples and cinnamon. These Cozy Caramel Apple Sticky Buns are the perfect breakfast bake for crisp fall mornings. The combination of tender, buttery dough, spiced apples, and rich caramel sauce creates a delightful treat that will make your mornings special.
These buns are a comforting way to start your day and are sure to become a family favorite during the colder months. Perfect for a cozy brunch or a weekend treat, this recipe serves 4-6 people and takes a bit of time, but the results are well worth the effort. The process involves preparing a yeast-based dough, a sweet apple filling, and a luscious caramel topping.
Once baked, the sticky buns are turned upside down to reveal the delicious caramel apple topping. Prepare to indulge in soft, fluffy buns that are both sweet and slightly tart, making them irresistible to anyone who tries them.
Ingredients for 4-6 servings:
- 1 cup whole milk
- 1/4 cup unsalted butter
- 2 1/4 teaspoons active dry yeast
- 1/4 cup granulated sugar
- 1/2 teaspoon salt
- 1 large egg
- 3 1/2 cups all-purpose flour
- 2 medium apples, peeled, cored, and diced
- 1/2 cup packed brown sugar
- 1 tablespoon cinnamon
- 1/4 cup unsalted butter, melted (for filling)
- 1 cup brown sugar (for caramel sauce)
- 1/2 cup unsalted butter (for caramel sauce)
- 1/4 cup heavy cream
- 1/2 teaspoon vanilla extract
Cooking Instructions:
- Prepare the Dough: Warm the milk in a small saucepan over low heat until it’s warm but not hot to the touch. Remove from heat and add 1/4 cup of butter, stirring until melted. Sprinkle the yeast over the warm milk and let it sit for 5-10 minutes until it becomes frothy.
- Mix the Dough: In a large mixing bowl, combine the yeast mixture with the sugar, salt, egg, and 3 cups of flour. Stir until the dough begins to come together, then knead by hand or with a stand mixer until smooth, about 5-7 minutes. If the dough is sticky, add more flour, a tablespoon at a time, until the dough is smooth and elastic.
- Let the Dough Rise: Place the dough in a lightly greased bowl, cover with a clean cloth, and let it rise in a warm place until doubled in size, about 1-1.5 hours.
- Prepare the Filling: In a small bowl, combine the apples, brown sugar, and cinnamon. Set aside.
- Prepare the Caramel Sauce: In a small saucepan over medium heat, melt 1/2 cup of butter. Stir in 1 cup of brown sugar and cook until smooth and bubbling. Remove from heat and stir in the heavy cream and vanilla extract. Pour the caramel sauce into a greased 9×13-inch baking dish.
- Roll Out the Dough: Once the dough has risen, punch it down and roll it out on a floured surface into a 12×18-inch rectangle. Brush the melted butter over the surface of the dough, then evenly spread the apple filling over the top.
- Form the Buns: Starting from the long side, roll the dough tightly into a log. Cut the log into 12 equal slices and place them cut side down into the caramel-lined baking dish.
- Second Rise: Cover the baking dish with a cloth and let the buns rise in a warm place until nearly doubled in size, about 30-45 minutes.
- Bake the Buns: Preheat the oven to 350°F (175°C). Bake the buns for 25-30 minutes, or until golden brown. If they’re browning too quickly, cover them with aluminum foil.
- Invert and Serve: Let the buns cool in the pan for 5 minutes, then carefully invert them onto a serving platter. Allow the caramel to drizzle over the buns. Serve warm.
Extra Tips:
For the best results, use freshly peeled and diced apples for a crisp and fresh flavor. If you prefer a stronger apple flavor, opt for tart apples like Granny Smith to balance the sweetness of the caramel.
To enhance the dough’s flavor, allow it to rise slowly in the refrigerator overnight. This method not only improves flavor but also allows for make-ahead preparation. Finally, if you want to add a nutty crunch, scatter some toasted pecans or walnuts over the caramel sauce before placing the buns in the dish.
Decadent Chocolate Chip Muffins
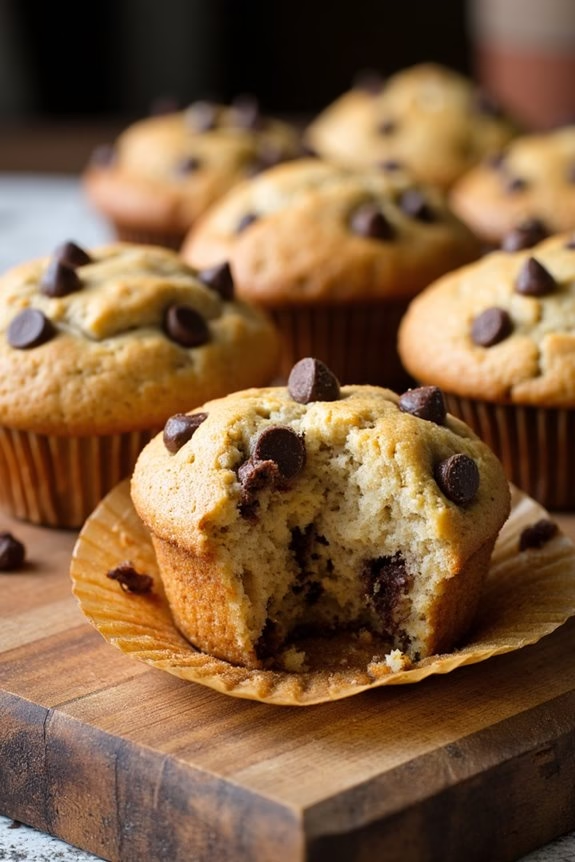
Who can resist the allure of a freshly baked chocolate chip muffin? These delightful treats are perfect for breakfast or any time you crave a sweet indulgence. With a tender crumb and rich, melty chocolate chips in every bite, these muffins are guaranteed to become a favorite. The aroma of vanilla and chocolate wafting from your kitchen as they bake is simply irresistible, making these muffins a delightful way to start your day.
Creating these Decadent Chocolate Chip Muffins is a straightforward process, making it an ideal recipe for both novice and experienced bakers. Whether you’re whipping them up on a lazy Sunday morning or preparing them ahead for busy weekdays, these muffins are quick to make and incredibly satisfying. They pair beautifully with a cup of coffee or a glass of milk, providing a comforting and delicious breakfast experience.
Ingredients (Serves 4-6 people):
- 2 cups all-purpose flour
- 1/2 cup granulated sugar
- 1/4 cup light brown sugar, packed
- 1 tablespoon baking powder
- 1/2 teaspoon salt
- 1/2 cup unsalted butter, melted
- 2 large eggs
- 1 cup whole milk
- 2 teaspoons pure vanilla extract
- 1 1/2 cups semi-sweet chocolate chips
Instructions:
- Preheat the Oven and Prepare the Muffin Tin: Start by preheating your oven to 375°F (190°C). Line a muffin tin with paper liners or lightly grease each cup to prevent sticking.
- Mix Dry Ingredients: In a large mixing bowl, whisk together the all-purpose flour, granulated sugar, brown sugar, baking powder, and salt. Make sure the ingredients are well combined to guarantee even distribution throughout the batter.
- Combine Wet Ingredients: In a separate bowl, whisk together the melted butter, eggs, milk, and vanilla extract until smooth. The mixture should be well-blended to incorporate the flavors evenly.
- Combine Wet and Dry Mixtures: Make a well in the center of the dry ingredients and pour the wet mixture into it. Stir gently with a spatula or wooden spoon until just combined. Be careful not to overmix; the batter should be slightly lumpy.
- Fold in Chocolate Chips: Gently fold in the chocolate chips, ensuring they’re evenly distributed throughout the batter. This will ensure each muffin has plenty of chocolatey goodness.
- Fill the Muffin Cups: Using a spoon or an ice cream scoop, fill each muffin cup about three-quarters full with the batter. This will allow the muffins to rise without overflowing.
- Bake the Muffins: Place the muffin tin in the preheated oven and bake for 18-20 minutes, or until a toothpick inserted into the center of a muffin comes out clean, with a few moist crumbs attached.
- Cool and Serve: Allow the muffins to cool in the tin for about 5 minutes before transferring them to a wire rack to cool completely. Enjoy them warm or at room temperature.
Extra Tips:
For the best results, verify that all your ingredients are at room temperature before starting. This helps the muffin batter to mix more evenly and rise consistently.
If you prefer a slightly more robust flavor, consider adding a teaspoon of espresso powder to the dry ingredients; this will enhance the chocolate flavor without making the muffins taste like coffee.
Additionally, for a fun twist, you can substitute half of the chocolate chips with white chocolate chips or nuts for added texture and flavor.
Zesty Blueberry Lemon Scones
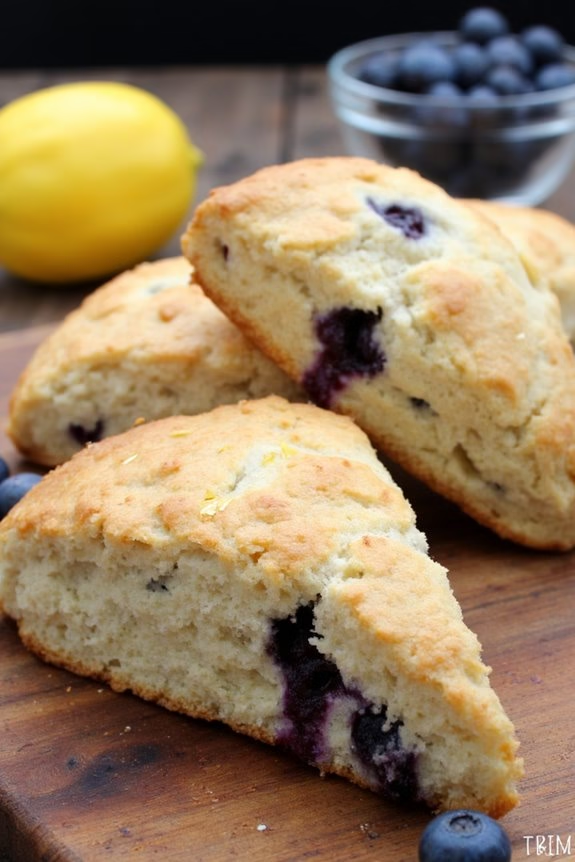
Start your morning with a delightful burst of flavor by baking a batch of zesty blueberry lemon scones. These scones bring together the sweet, juicy goodness of blueberries with the crisp, invigorating zest of lemon, creating a perfect balance for a charming sweet breakfast bake. Their golden-brown exterior and soft, fluffy interior make them a favorite among breakfast enthusiasts, and they’re sure to impress both family and guests alike.
Perfect for breakfast, brunch, or a delightful afternoon snack, these scones will surely become a staple in your home. The combination of blueberries and lemon not only adds an invigorating twist but also packs a punch of antioxidants and vitamin C, making these scones a nutritious choice to start your day.
Whether enjoyed warm from the oven with a dollop of clotted cream or served cold with a side of your favorite jam, these zesty blueberry lemon scones are sure to brighten up any table. The recipe is simple, requiring only a few ingredients and minimal preparation, allowing you to enjoy a homemade pastry without spending hours in the kitchen.
Ingredients for 4-6 servings:
- 2 cups all-purpose flour
- 1/2 cup granulated sugar
- 2 teaspoons baking powder
- 1/2 teaspoon salt
- Zest of 1 large lemon
- 1/2 cup unsalted butter, cold and cubed
- 1 large egg
- 1/2 cup buttermilk
- 1 teaspoon vanilla extract
- 1 cup fresh blueberries
- 1 tablespoon heavy cream or milk (for brushing)
- 2 tablespoons coarse sugar (for topping)
Cooking Instructions:
- Preheat and Prepare: Preheat your oven to 400°F (200°C) and line a baking sheet with parchment paper.
- Mix Dry Ingredients: In a large mixing bowl, whisk together the flour, granulated sugar, baking powder, salt, and lemon zest until well combined.
- Incorporate Butter: Add the cold, cubed butter into the dry ingredients. Use a pastry cutter or your fingers to blend the butter into the flour mixture until it resembles coarse crumbs.
- Combine Wet Ingredients: In a separate bowl, whisk together the egg, buttermilk, and vanilla extract. Pour this mixture into the dry ingredients, stirring gently until just combined.
- Fold in Blueberries: Carefully fold in the fresh blueberries, being cautious not to crush them.
- Shape the Dough: Transfer the dough onto a lightly floured surface. Knead it gently a few times until it comes together, then pat it into a round disk about 1-inch thick.
- Cut and Arrange: Using a sharp knife, cut the disk into 8 wedges, similar to cutting a pizza. Arrange the wedges on the prepared baking sheet, leaving some space between each scone.
- Brush and Sprinkle: Brush the tops of the scones with heavy cream or milk and sprinkle with coarse sugar to add a delightful crunch.
- Bake: Bake in the preheated oven for 18-22 minutes, or until the scones are golden brown and a toothpick inserted into the center comes out clean.
- Cool and Serve: Allow the scones to cool on the baking sheet for a few minutes before transferring them to a wire rack. Serve warm or at room temperature.
Extra Tips:
For the best results, make sure your butter is very cold before incorporating it into the flour mixture; this helps create the flakiness in the scones. If you don’t have buttermilk on hand, you can make a substitute by mixing 1/2 cup of milk with 1/2 tablespoon of lemon juice or vinegar and letting it sit for a few minutes.
Additionally, handle the dough gently and avoid overmixing to keep the scones tender. Finally, if using frozen blueberries, don’t thaw them before adding to the dough to prevent them from bleeding into the mixture. Enjoy your delightful breakfast treat!
Nutty Banana Bread With Walnut Crumble
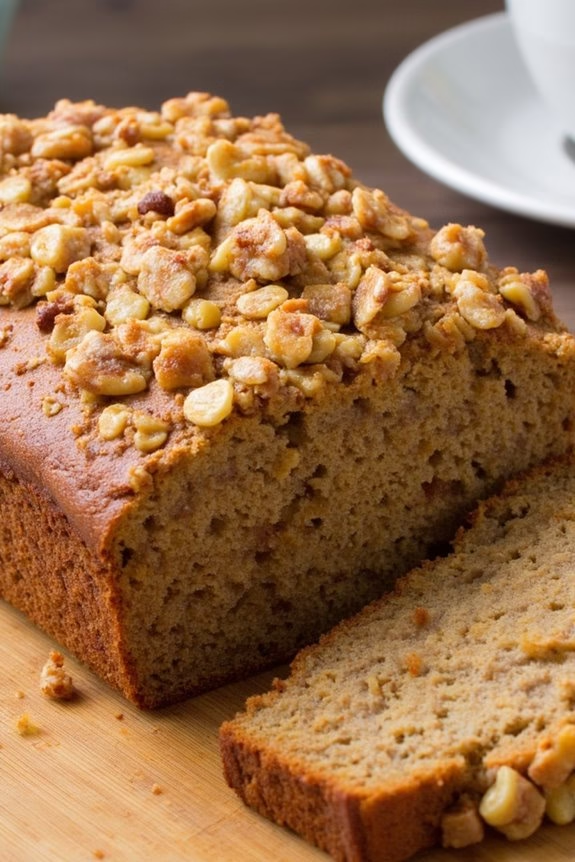
Nutty Banana Bread With Walnut Crumble is a delightful twist on the classic banana bread, perfect for breakfast or a sweet treat any time of the day. This recipe combines the moistness of ripe bananas with the crunch of walnuts, offering a balanced texture that’s both satisfying and comforting. The walnut crumble topping adds an extra layer of flavor, making this banana bread irresistible.
This recipe is designed to serve 4-6 people and is ideal for those who enjoy a nutty, hearty start to their day. It’s easy to make and can be prepared in advance, making it a convenient option for busy mornings. Whether you’re serving it with a cup of coffee or as part of a larger breakfast spread, Nutty Banana Bread With Walnut Crumble is sure to be a hit.
Ingredients:
- 3 ripe bananas, mashed
- 1/3 cup melted butter
- 3/4 cup granulated sugar
- 1 egg, beaten
- 1 teaspoon vanilla extract
- 1 teaspoon baking soda
- Pinch of salt
- 1 1/2 cups all-purpose flour
- 1/2 cup chopped walnuts
Walnut Crumble Topping:
- 1/4 cup all-purpose flour
- 1/4 cup brown sugar
- 1/4 cup chopped walnuts
- 3 tablespoons cold butter, cubed
Instructions:
- Preheat the Oven and Prepare the Pan: Preheat your oven to 350°F (175°C). Grease a 9×5-inch loaf pan with butter or line it with parchment paper to prevent sticking.
- Mix the Wet Ingredients: In a large mixing bowl, combine the mashed bananas with melted butter. Stir in the sugar, beaten egg, and vanilla extract until well blended.
- Combine Dry Ingredients: In a separate bowl, mix together the baking soda, salt, and flour. Gradually add this dry mixture to the wet ingredients, stirring gently until just combined. Be careful not to over-mix.
- Fold in Walnuts: Gently fold in the chopped walnuts, distributing them evenly throughout the batter.
- Prepare the Walnut Crumble Topping: In a small bowl, combine flour, brown sugar, and chopped walnuts. Add the cold butter cubes and use your fingertips to rub the mixture until it resembles coarse crumbs.
- Assemble and Bake: Pour the banana bread batter into the prepared loaf pan. Sprinkle the walnut crumble topping evenly over the top. Bake in the preheated oven for 50-60 minutes, or until a toothpick inserted into the center comes out clean.
- Cool and Serve: Allow the banana bread to cool in the pan for about 10 minutes before transferring it to a wire rack to cool completely. Slice and serve warm or at room temperature.
Extra Tips:
For an extra moist banana bread, use bananas that are overripe, with plenty of dark spots on the peel. If you’re short on time, you can microwave the bananas for about 30 seconds to soften them.
To enhance the flavor even more, consider adding a pinch of cinnamon or nutmeg to the batter. Finally, if you prefer a more pronounced nutty flavor, lightly toast the walnuts before adding them to the batter.
Enjoy your delicious Nutty Banana Bread With Walnut Crumble fresh or store it in an airtight container for up to three days.
Tangy Orange Cranberry Breakfast Loaf
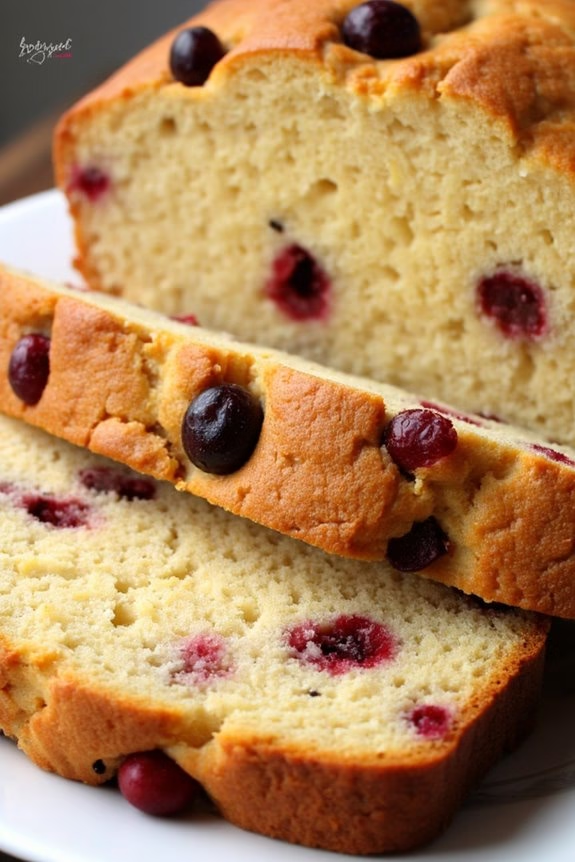
There’s something truly delightful about starting your morning with a freshly baked loaf that combines the tangy zest of oranges with the tartness of cranberries. The Tangy Orange Cranberry Breakfast Loaf isn’t only a treat for your taste buds but also a feast for the senses, with its vibrant colors and intoxicating aroma.
Perfectly moist and gently sweetened, this loaf is a wonderful addition to any breakfast spread or can be enjoyed on its own with a cup of coffee or tea. This recipe makes enough for 4-6 people, guaranteeing there’s plenty to go around, whether you’re serving it at a family breakfast or saving some slices for the next day’s snack.
The balance of citrusy orange and the slight tartness from cranberries makes this loaf a revitalizing change from more traditional breakfast pastries. With simple ingredients and straightforward steps, baking this loaf is as enjoyable as eating it.
Ingredients (serving size: 4-6 people):
- 1 3/4 cups all-purpose flour
- 1 teaspoon baking powder
- 1/2 teaspoon baking soda
- 1/4 teaspoon salt
- 1/2 cup unsalted butter, softened
- 3/4 cup granulated sugar
- 2 large eggs
- 1 tablespoon orange zest
- 1/2 cup freshly squeezed orange juice
- 1 teaspoon vanilla extract
- 1 cup fresh or frozen cranberries
- 1/2 cup chopped walnuts (optional)
Instructions:
- Preheat the Oven: Start by preheating your oven to 350°F (175°C). Grease and flour a standard loaf pan (9×5 inches) to prevent sticking, or line it with parchment paper for easier removal.
- Mix Dry Ingredients: In a medium-sized bowl, whisk together the flour, baking powder, baking soda, and salt. This guarantees that the baking agents are evenly distributed throughout the flour.
- Cream Butter and Sugar: In a large mixing bowl, use an electric mixer to cream the softened butter and granulated sugar together until light and fluffy, about 3-4 minutes. This step is essential for creating a tender crumb in the loaf.
- Add Wet Ingredients: Beat in the eggs one at a time, making sure each is fully incorporated before adding the next. Mix in the orange zest, orange juice, and vanilla extract until well blended.
- Combine Wet and Dry Mixtures: Gradually add the dry ingredients to the wet mixture, mixing just until combined. Be careful not to overmix, as this can make the loaf dense.
- Fold in Cranberries and Walnuts: Gently fold in the cranberries and chopped walnuts (if using) with a spatula, making sure they’re evenly distributed throughout the batter.
- Bake the Loaf: Pour the batter into the prepared loaf pan and smooth the top with a spatula. Bake in the preheated oven for 50-60 minutes, or until a toothpick inserted into the center comes out clean.
- Cool and Serve: Allow the loaf to cool in the pan for about 10 minutes before transferring it to a wire rack to cool completely. Slice and serve warm or at room temperature.
Extra Tips:
For an extra burst of flavor, you can glaze the loaf with a simple orange glaze made from powdered sugar and orange juice. If using frozen cranberries, don’t thaw them before adding to the batter to prevent them from bleeding into the loaf.
Also, to make your loaf even more moist, consider brushing the top with a little orange syrup right after baking. Finally, always verify your ingredients, especially butter and eggs, are at room temperature to achieve the best texture.
Hearty Maple Pecan Oat Bars
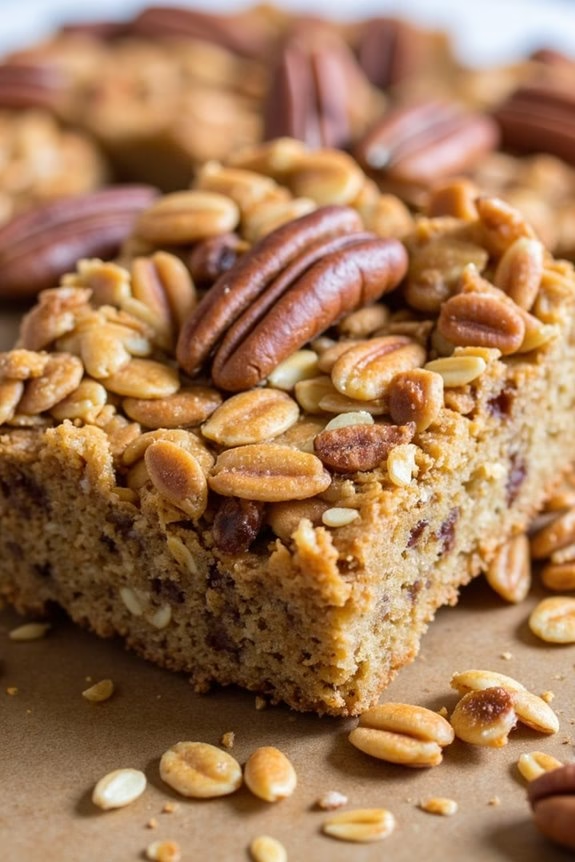
Hearty Maple Pecan Oat Bars are an ideal breakfast treat that brings together the nutty richness of pecans, the wholesome goodness of oats, and the sweet, comforting flavor of maple syrup.
These bars are perfect for those busy mornings when you need a quick, nutritious start to your day or when you want to indulge in a leisurely breakfast with a hot cup of coffee or tea. Not only are they delicious and filling, but they’re also easy to prepare and can be stored for several days, making them a convenient option for meal prep.
The blend of hearty oats, crunchy pecans, and sweet maple syrup makes these bars a delightful combination of flavors and textures. The recipe is designed to serve 4-6 people, making it perfect for a small family breakfast or a weekend brunch with friends.
Whether you enjoy them warm out of the oven or as a cold snack on the go, these bars are sure to become a favorite in your household. The simplicity of the recipe also means that you can easily modify it to suit your taste preferences by adding dried fruits or chocolate chips.
Ingredients (Serves 4-6):
- 2 cups rolled oats
- 1 cup chopped pecans
- 1/2 cup pure maple syrup
- 1/4 cup unsalted butter, melted
- 1/4 cup brown sugar
- 1/2 teaspoon vanilla extract
- 1/2 teaspoon ground cinnamon
- 1/4 teaspoon salt
- 1 large egg
Instructions:
- Preheat the Oven: Start by preheating your oven to 350°F (175°C). This guarantees that the oven is at the ideal temperature when you’re ready to bake your oat bars, allowing them to cook evenly.
- Prepare the Baking Dish: Line an 8×8-inch baking dish with parchment paper, leaving some overhang on the sides. This will make it easier to lift the bars out of the dish once they’re baked and cooled.
- Combine Dry Ingredients: In a large mixing bowl, combine the rolled oats, chopped pecans, ground cinnamon, and salt. Stir these ingredients together until they’re well mixed.
- Mix Wet Ingredients: In a separate bowl, whisk together the melted butter, maple syrup, brown sugar, vanilla extract, and the egg. Ascertain that the egg is well beaten and the mixture is smooth.
- Combine Wet and Dry Ingredients: Pour the wet ingredients into the bowl with the dry ingredients. Stir until all the oats and pecans are well coated with the syrup mixture.
- Transfer to Baking Dish: Pour the oat mixture into the prepared baking dish. Use a spatula or the back of a spoon to press the mixture firmly and evenly into the dish.
- Bake the Bars: Place the dish in the preheated oven and bake for 25-30 minutes, or until the edges are golden brown and the center is set.
- Cool and Slice: Remove the baking dish from the oven and let it cool on a wire rack. Once completely cooled, use the parchment paper to lift the bars out of the dish and onto a cutting board. Slice into bars and serve.
Extra Tips: When preparing Hearty Maple Pecan Oat Bars, make certain that the pecans are evenly chopped to maintain a uniform texture throughout the bars.
If you prefer a chewier texture, consider adding a tablespoon or two of honey along with the maple syrup. For added flavor, you can toast the pecans in a dry skillet over medium heat for a few minutes before adding them to the recipe.
These bars can be stored in an airtight container at room temperature for up to a week, or they can be frozen for longer storage.
Flaky Strawberry Cream Cheese Croissants

Flaky Strawberry Cream Cheese Croissants are a delightful addition to any breakfast table, combining the rich texture of buttery croissants with the sweet and tangy flavors of strawberry and cream cheese. Ideal for a leisurely weekend brunch or a special morning treat, these pastries promise a taste of indulgence with every bite.
The beauty of this dish lies in its simplicity and the joy of homemade freshness, making it a perfect choice for those who love to bake but are short on time.
The process of making Flaky Strawberry Cream Cheese Croissants is both rewarding and straightforward. With the convenience of store-bought puff pastry, you can skip the time-consuming task of making dough from scratch while still achieving a professional-quality pastry.
The filling, made with fresh strawberries and creamy cheese, brings a burst of flavor that complements the flaky, golden layers of the croissant. Whether you’re serving these croissants to family or friends, they’re sure to be a hit and a memorable start to any day.
Ingredients for 4-6 servings:
- 1 package of puff pastry (2 sheets), thawed
- 1 cup fresh strawberries, hulled and diced
- 4 oz cream cheese, softened
- 1/4 cup granulated sugar
- 1 tsp vanilla extract
- 1 egg, beaten (for egg wash)
- Powdered sugar (optional, for dusting)
Instructions:
- Preheat the Oven: Begin by preheating your oven to 400°F (200°C). Line a baking sheet with parchment paper to prevent the croissants from sticking and for easy cleanup.
- Prepare the Filling: In a bowl, combine the softened cream cheese, granulated sugar, and vanilla extract. Mix until smooth and creamy. Gently fold in the diced strawberries, being careful they’re evenly distributed throughout the mixture.
- Roll Out the Pastry: On a lightly floured surface, unfold the puff pastry sheets. Use a rolling pin to gently roll each sheet to smooth out the creases and slightly enlarge the size. Cut each sheet into four equal squares, giving you eight squares in total.
- Fill the Pastry: Place a spoonful of the strawberry cream cheese filling onto the center of each pastry square. Be careful not to overfill, as this can cause the filling to leak during baking.
- Shape the Croissants: To form the croissants, fold each pastry square diagonally to create a triangle. Press the edges together to seal, using a fork to crimp the edges for an extra secure seal.
- Apply Egg Wash: Transfer the croissants to the prepared baking sheet. Brush the tops with the beaten egg to promote a golden, glossy finish as they bake.
- Bake: Place the baking sheet in the preheated oven and bake for 15-20 minutes, or until the croissants are puffed and golden brown.
- Cool and Serve: Let the croissants cool slightly on a wire rack. If desired, dust with powdered sugar before serving.
Extra Tips:
For the best results, make sure your puff pastry is fully thawed but still cold when you start working with it, as this will make it easier to handle and help it puff up during baking.
If you prefer a sweeter filling, consider adding a tablespoon of strawberry jam to the cream cheese mixture. Additionally, verify the oven is fully preheated before baking to achieve the maximum puff and flakiness of the pastry.
Enjoy these croissants fresh from the oven or store them in an airtight container for up to two days.
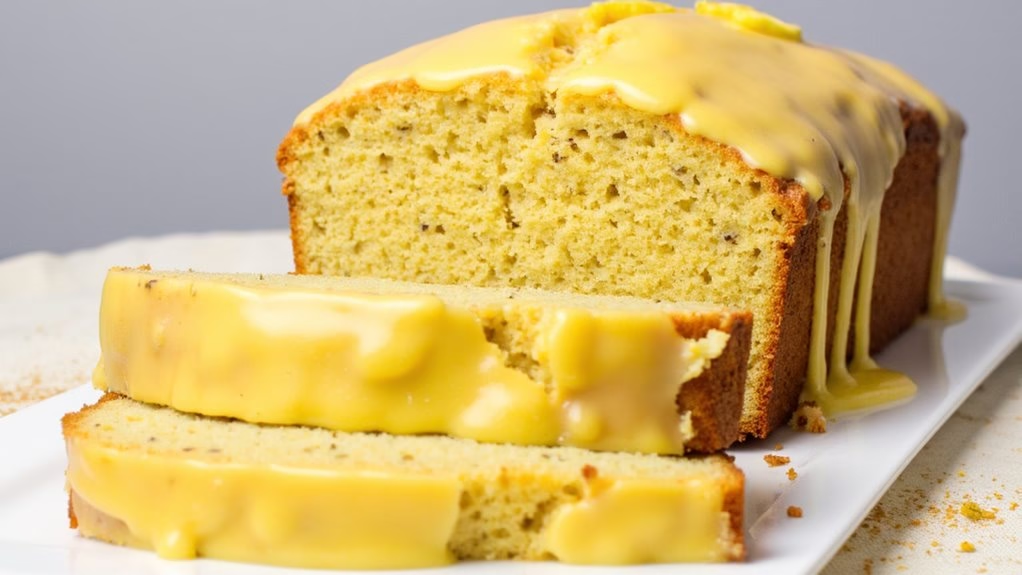
Citrusy Lemon Poppy Seed Pound Cake
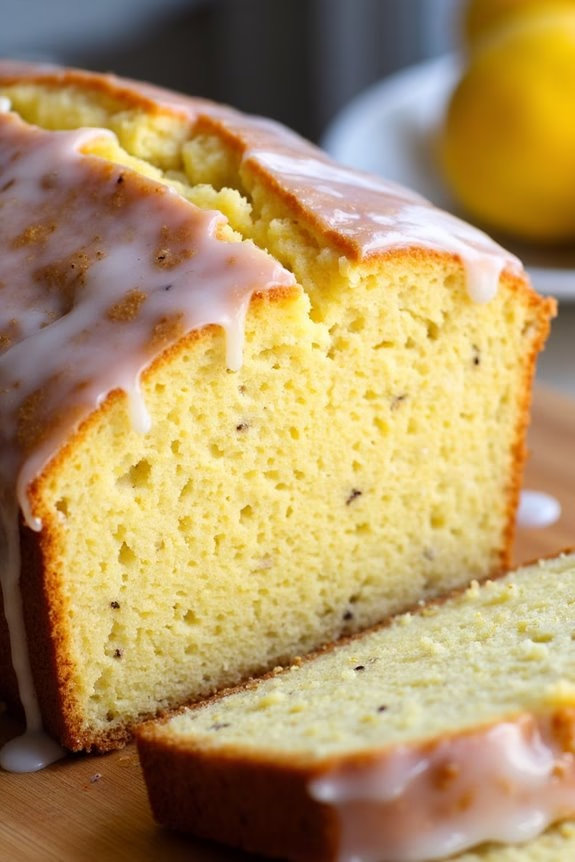
Indulge in the delightful flavors of a Citrus Lemon Poppy Seed Pound Cake, a perfect addition to your breakfast table. This cake combines the bright zest of lemon with the nutty crunch of poppy seeds, creating a moist and tender crumb that’s sure to please your taste buds.
Its subtle sweetness and invigorating citrus aroma make it an ideal morning treat, paired beautifully with a cup of hot coffee or tea. Whether you’re hosting a brunch or simply treating yourself, this pound cake is both an elegant and comforting choice.
This recipe yields a serving size suitable for 4-6 people, making it perfect for a small gathering or family breakfast. The cake is beautifully dense and rich, yet balanced with the lightness of lemon. The glaze, infused with lemon juice, adds a tangy finish to each slice. The following instructions will guide you through making this delectable Citrus Lemon Poppy Seed Pound Cake, ensuring a delightful baking experience.
Ingredients:
- 1 cup unsalted butter, softened
- 1 1/2 cups granulated sugar
- 4 large eggs
- 1/4 cup lemon juice
- 1 tablespoon lemon zest
- 1 teaspoon vanilla extract
- 2 cups all-purpose flour
- 1/2 teaspoon baking powder
- 1/2 teaspoon salt
- 2 tablespoons poppy seeds
- 1/2 cup milk
For the glaze:
- 1 cup powdered sugar
- 2 tablespoons lemon juice
- 1 teaspoon lemon zest
Cooking Instructions:
- Preheat the oven: Set your oven to 350°F (175°C) and grease a 9×5 inch loaf pan with butter or non-stick spray, then line it with parchment paper for easy removal.
- Cream the butter and sugar: In a large mixing bowl, use an electric mixer to beat the softened butter and granulated sugar until light and fluffy, about 3-5 minutes.
- Add the eggs and flavorings: Beat in the eggs one at a time, ensuring each is fully incorporated before adding the next. Mix in the lemon juice, lemon zest, and vanilla extract.
- Combine dry ingredients: In a separate bowl, whisk together the all-purpose flour, baking powder, salt, and poppy seeds.
- Combine wet and dry ingredients: Gradually add the dry ingredients to the butter mixture, alternating with the milk, beginning and ending with the flour mixture. Mix until just combined, being careful not to overmix.
- Bake the cake: Pour the batter into the prepared loaf pan and smooth the top with a spatula. Bake in the preheated oven for 55-65 minutes, or until a toothpick inserted into the center comes out clean.
- Prepare the glaze: While the cake is baking, whisk together the powdered sugar, lemon juice, and lemon zest until smooth.
- Cool and glaze the cake: Allow the cake to cool in the pan for about 10 minutes, then transfer it to a wire rack. Once the cake is completely cooled, drizzle the lemon glaze over the top, allowing it to drip down the sides.
Extra Tips:
For the best results, use fresh lemons for both the juice and zest, as they provide the most vibrant flavor. If the glaze is too thick, you can thin it out with a little more lemon juice or warm water.
Additionally, letting the cake sit overnight allows the flavors to meld together, making it even more delicious the next day. For a decorative touch, sprinkle additional poppy seeds or lemon zest over the glaze before it sets.