
There’s something truly special about starting Christmas morning surrounded by family and the scent of festive treats. Creating a memorable breakfast doesn’t have to break the bank. With a few simple ingredients, you can whip up delightful dishes that everyone will love. From cinnamon roll pancakes to other comforting classics, these recipes are perfect for adding warmth to your holiday. Let’s explore some budget-friendly options that promise to impress.
Classic Cinnamon Roll Pancakes
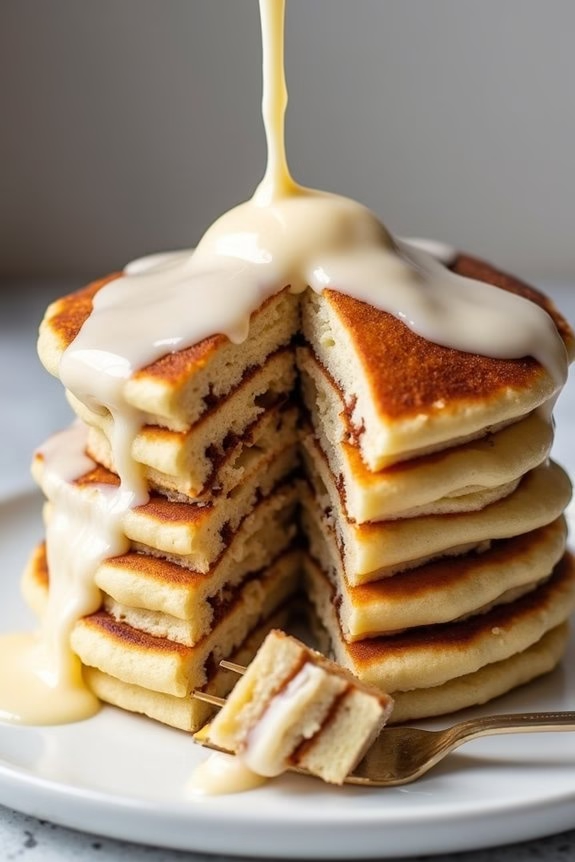
Start your Christmas morning with a delightful twist on a traditional breakfast favorite — Classic Cinnamon Roll Pancakes. These pancakes aren’t just your ordinary flapjacks; they’re filled with a sweet cinnamon swirl that oozes with flavor in every bite. Perfect for the whole family, this recipe combines the comforting taste of cinnamon rolls with the fluffy texture of pancakes, making it a budget-friendly dish that feels indulgent yet is simple to prepare.
Whether you’re serving breakfast in bed or enjoying a cozy meal around the table, these pancakes are certain to become a festive favorite. The preparation of Classic Cinnamon Roll Pancakes is straightforward, allowing you to focus on enjoying your morning rather than spending hours in the kitchen.
The recipe includes a fluffy pancake batter, a sweet cinnamon filling, and a cream cheese glaze that ties everything together beautifully. With a few basic ingredients, you’ll have a delicious breakfast ready in no time, making it ideal not only for Christmas but for any special occasion. Follow the step-by-step guide to whip up these delightful pancakes for a serving size of 4-6 people.
Ingredients:
- 2 cups all-purpose flour
- 2 tablespoons granulated sugar
- 1 tablespoon baking powder
- 1/2 teaspoon baking soda
- 1/2 teaspoon salt
- 2 cups buttermilk
- 2 large eggs
- 1/4 cup melted butter
Cinnamon Filling:
- 1/2 cup unsalted butter, softened
- 3/4 cup packed brown sugar
- 1 tablespoon ground cinnamon
Cream Cheese Glaze:
- 4 ounces cream cheese, softened
- 1 cup powdered sugar
- 1/4 cup milk
- 1/2 teaspoon vanilla extract
Instructions:
- Prepare the Cinnamon Filling: In a medium bowl, mix together the softened butter, brown sugar, and cinnamon until smooth. Transfer the mixture to a small zip-top bag and set aside.
- Make the Pancake Batter: In a large bowl, whisk together the flour, sugar, baking powder, baking soda, and salt. In another bowl, combine the buttermilk, eggs, and melted butter, then add the wet ingredients to the dry ingredients and stir until just combined. Be careful not to overmix; a few lumps are okay.
- Cook the Pancakes: Heat a non-stick skillet or griddle over medium heat. Lightly grease with cooking spray or a small amount of butter. Pour about 1/4 cup of pancake batter onto the skillet for each pancake.
- Add the Cinnamon Swirl: Snip the corner of the zip-top bag containing the cinnamon filling. When the pancakes start to form bubbles, pipe a swirl of the cinnamon mixture onto each pancake.
- Flip the Pancakes: Once the bubbles begin to pop and the edges look set, carefully flip the pancakes and cook for an additional 1-2 minutes, until golden brown.
- Prepare the Cream Cheese Glaze: In a small bowl, whisk together the softened cream cheese, powdered sugar, milk, and vanilla extract until smooth. Adjust the consistency with more milk if needed.
- Serve: Stack the pancakes on a plate, drizzle the cream cheese glaze over the top, and serve immediately.
Extra Tips:
For the best results, make sure all your ingredients are at room temperature, especially the cream cheese, to create a smooth glaze. If you don’t have buttermilk on hand, you can substitute it by adding 2 tablespoons of lemon juice or white vinegar to 2 cups of milk and letting it sit for 5-10 minutes.
Additionally, for a more pronounced cinnamon flavor, consider adding a pinch of nutmeg to the cinnamon filling. Enjoy these scrumptious pancakes with a side of fresh fruit or a cup of hot cocoa for a complete holiday breakfast experience.
Savory Spinach and Cheese Breakfast Strata
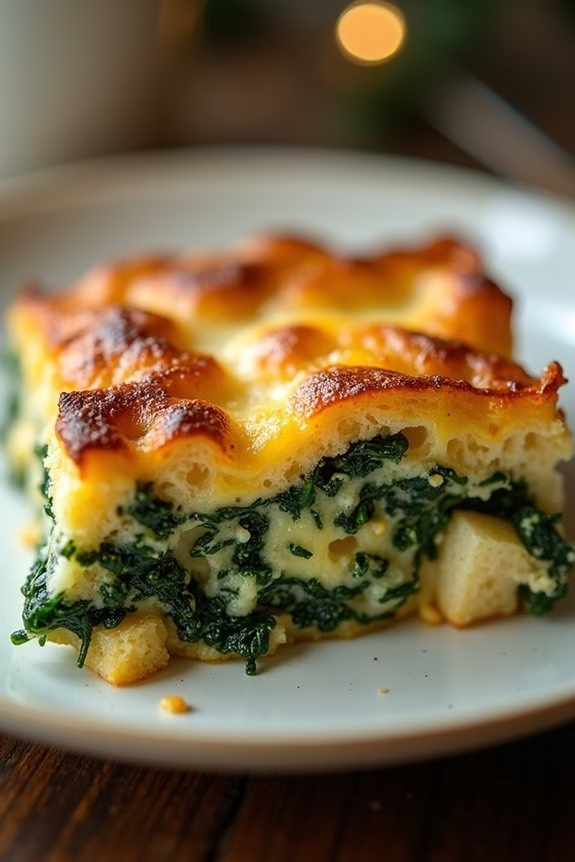
If you’re looking to create a delicious yet budget-friendly Christmas breakfast, this Savory Spinach and Cheese Breakfast Strata is the perfect choice. It’s a versatile, make-ahead dish that’s packed with flavor and easy to prepare. This strata combines day-old bread, fresh spinach, and a mix of cheeses to create a comforting and hearty breakfast casserole.
The beauty of this dish lies in its simplicity; you can prepare it the night before and simply bake it in the morning, leaving you more time to enjoy the holiday festivities with your loved ones.
Not only is this strata a crowd-pleaser, but it’s also an excellent way to use up any leftover bread you might’ve on hand. The combination of savory spinach and gooey melted cheese is sure to satisfy even the pickiest of eaters. Whether you’re hosting a small family gathering or just looking for a special Christmas morning treat, this dish is sure to delight.
Plus, it’s designed to serve 4-6 people, making it ideal for intimate holiday breakfasts.
Ingredients for 4-6 people:
- 6 cups day-old bread, cubed
- 1 tablespoon olive oil
- 1 onion, finely chopped
- 2 cloves garlic, minced
- 5 cups fresh spinach, roughly chopped
- 8 large eggs
- 2 cups milk
- 1 teaspoon salt
- 1/2 teaspoon black pepper
- 1 cup shredded mozzarella cheese
- 1/2 cup grated Parmesan cheese
- 1 teaspoon dried thyme
- Butter for greasing the baking dish
Cooking Instructions:
- Prepare the Bread: Start by cutting the day-old bread into cubes. Verify the cubes are relatively even in size for consistent baking. Set them aside in a large bowl.
- Sauté Vegetables: In a large skillet, heat the olive oil over medium heat. Add the chopped onion and minced garlic, and sauté until the onion becomes translucent, about 5 minutes. Stir in the chopped spinach and cook until wilted, about 2 minutes. Remove from heat and allow the mixture to cool slightly.
- Mix Wet Ingredients: In a separate large bowl, whisk together the eggs, milk, salt, black pepper, and dried thyme until well combined.
- Assemble the Strata: Grease a 9×13-inch baking dish with butter. Spread half of the bread cubes evenly in the bottom of the dish. Layer half of the spinach mixture over the bread, followed by half of the mozzarella and Parmesan cheeses. Repeat the layers with the remaining bread, spinach mixture, and cheeses.
- Pour Egg Mixture: Carefully pour the egg mixture evenly over the assembled layers in the baking dish. Press down gently with a spatula to confirm all the bread cubes are soaked in the egg mixture.
- Refrigerate: Cover the dish with plastic wrap and refrigerate for at least 1 hour or overnight. Allowing the strata to rest helps the bread absorb the egg mixture fully.
- Bake the Strata: Preheat your oven to 350°F (175°C). Remove the plastic wrap and bake the strata in the preheated oven for 45-50 minutes, or until the top is golden brown and the eggs are set.
- Serve: Allow the strata to cool for a few minutes before slicing and serving. Enjoy your savory breakfast delight!
Extra Tips:
For an added flavor boost, consider adding cooked bacon or sausage to the strata layers. You can also substitute or add different cheeses, such as cheddar or feta, to customize the dish to your taste.
If you don’t have day-old bread, you can lightly toast fresh bread cubes in the oven to achieve a similar texture. Remember, the key to a perfect strata is confirming the bread is well-soaked in the egg mixture before baking, so don’t skip the refrigeration step!
Easy Sheet Pan Breakfast Frittata

The holiday season is a time for joy, family gatherings, and delicious food. One way to start Christmas morning on the right note is with a hearty breakfast that doesn’t break the bank. The Easy Sheet Pan Breakfast Frittata is a perfect solution, offering a delightful blend of eggs, vegetables, and cheese in a convenient sheet pan format.
This dish not only saves you time and effort but also guarantees everyone at the table is satisfied. With minimal prep and easy cleanup, you’ll have more time to enjoy the festivities with your loved ones.
A frittata is fundamentally an Italian-style omelet, and by using a sheet pan, you can efficiently make enough to serve a small crowd. This recipe is designed for 4-6 people, making it ideal for a family breakfast or a festive brunch. The best part about this dish is its versatility; you can easily customize it with your favorite ingredients or whatever you have on hand.
Whether you prefer classic flavor combinations or want to try something new, this frittata is sure to please.
Ingredients (Serves 4-6):
- 12 large eggs
- 1/2 cup milk
- 1 cup cherry tomatoes, halved
- 1 cup spinach, chopped
- 1/2 cup bell peppers, diced
- 1/4 cup red onion, finely chopped
- 1 cup shredded cheese (cheddar or your choice)
- 1/2 teaspoon salt
- 1/4 teaspoon black pepper
- 1 tablespoon olive oil
Instructions:
- Preheat the Oven: Preheat your oven to 375°F (190°C) to guarantee it’s hot enough to cook the frittata evenly.
- Prepare the Sheet Pan: Lightly grease a sheet pan with olive oil to prevent sticking. Confirm it’s evenly coated by using a brush or paper towel.
- Whisk the Eggs: In a large mixing bowl, whisk together the eggs and milk until well combined. This mixture will serve as the base of your frittata.
- Add Vegetables and Cheese: Stir the cherry tomatoes, chopped spinach, diced bell peppers, red onion, and shredded cheese into the egg mixture. Season with salt and black pepper.
- Pour and Spread: Pour the egg mixture onto the prepared sheet pan, spreading it out evenly with a spatula to guarantee all ingredients are distributed across the pan.
- Bake: Place the sheet pan in the preheated oven and bake for 20-25 minutes, or until the eggs are set and the top is lightly golden.
- Cool and Cut: Once baked, remove the frittata from the oven and let it cool for a few minutes. Cut into squares or rectangles and serve warm.
Extra Tips:
For a more robust flavor, consider adding cooked bacon or sausage to the frittata. Additionally, feel free to experiment with herbs such as basil or parsley for extra aroma and taste.
If you prefer a spicier kick, a dash of hot sauce or a pinch of red pepper flakes can be added to the egg mixture before baking. Remember, the key to a perfect frittata isn’t to overcook it; keep an eye on the oven towards the end of the baking time to guarantee the eggs remain moist and fluffy.
Chocolate Chip Banana Bread Muffins

Chocolate Chip Banana Bread Muffins are a delightful and easy breakfast option that brings together the comforting flavors of ripe bananas and rich chocolate chips. Perfect for a cozy Christmas morning, these muffins aren’t only delicious but also budget-friendly, guaranteeing you can enjoy a festive meal without breaking the bank.
The moist and tender texture of the muffins, combined with the sweet bursts of chocolate, make them a hit with both kids and adults alike. This recipe is designed to serve 4-6 people, making it ideal for a small family gathering. The ingredients are simple and likely already in your pantry, allowing you to whip up a batch without any hassle.
Whether you’re enjoying them fresh out of the oven or saving them for later, these muffins are sure to bring a smile to everyone’s face.
Ingredients:
- 3 ripe bananas
- 1/3 cup melted butter
- 1 teaspoon baking soda
- Pinch of salt
- 3/4 cup sugar
- 1 egg, beaten
- 1 teaspoon vanilla extract
- 1 1/2 cups all-purpose flour
- 1/2 cup chocolate chips
Instructions:
- Preheat the Oven: Begin by preheating your oven to 350°F (175°C). This guarantees that the muffins bake evenly and develop a nice golden color.
- Prepare the Muffin Tin: Line a muffin tin with paper liners or grease it lightly with cooking spray to prevent the muffins from sticking.
- Mash the Bananas: In a large mixing bowl, mash the bananas with a fork until smooth. They should be ripe with brown spots for the best flavor and sweetness.
- Mix in the Wet Ingredients: Add the melted butter to the mashed bananas and stir until combined. Incorporate the baking soda and salt into the mixture. Then, add sugar, beaten egg, and vanilla extract, mixing well until all ingredients are thoroughly combined.
- Add the Dry Ingredients: Gradually add the all-purpose flour to the banana mixture, stirring gently. Be careful not to overmix, as this can make the muffins dense.
- Fold in the Chocolate Chips: Gently fold the chocolate chips into the batter, guaranteeing they’re evenly distributed. This will ensure that each muffin has a delightful chocolatey surprise.
- Fill the Muffin Tin: Spoon the batter into the prepared muffin tin, filling each cup about three-quarters full. This allows the muffins room to rise without overflowing.
- Bake: Place the muffin tin in the preheated oven and bake for 18-20 minutes, or until a toothpick inserted into the center of a muffin comes out clean.
- Cool and Serve: Remove the muffins from the oven and let them cool in the tin for about 5 minutes. Then transfer them to a wire rack to cool completely. Serve warm or at room temperature.
Extra Tips:
For an extra burst of flavor, consider adding a handful of chopped nuts, such as walnuts or pecans, to the batter. This can add a delightful crunch and complement the sweetness of the bananas and chocolate chips.
Additionally, if you have leftover muffins, store them in an airtight container at room temperature for up to three days, or freeze them for longer storage. To reheat, simply pop them in the microwave for a quick and easy warm-up. Enjoy your Christmas morning with these delicious and comforting muffins!
Gingerbread Overnight Oats
Gingerbread Overnight Oats is a delightful and festive breakfast option that perfectly captures the essence of Christmas. This budget-friendly recipe allows you to prepare a hearty meal the night before, so you can enjoy a stress-free morning with your loved ones. The warm spices of gingerbread combined with the creaminess of oats create a comforting and nutritious start to your day.
Plus, it’s an ideal dish for families or gatherings, as it can easily be scaled to serve a crowd.
The beauty of Gingerbread Overnight Oats lies in its simplicity and versatility. You can customize this recipe to suit your taste preferences or dietary needs by adding different toppings or using alternative milk options. Whether you’re hosting a holiday brunch or simply want to indulge in a festive breakfast, this recipe is sure to become a seasonal favorite.
Prepare it in individual jars or a large bowl to serve 4-6 people, and enjoy the flavors of Christmas morning with ease.
Ingredients (serves 4-6):
- 2 cups rolled oats
- 2 1/2 cups milk (dairy or non-dairy)
- 1/4 cup molasses
- 1/4 cup maple syrup
- 1 teaspoon vanilla extract
- 1 teaspoon ground ginger
- 1 teaspoon ground cinnamon
- 1/4 teaspoon ground nutmeg
- 1/4 teaspoon ground cloves
- Pinch of salt
- 1/2 cup chopped nuts (optional)
- 1/2 cup dried cranberries or raisins (optional)
- Fresh fruit or yogurt for topping (optional)
Cooking Instructions:
- Combine Dry Ingredients: In a large mixing bowl, combine the rolled oats, ground ginger, cinnamon, nutmeg, cloves, and a pinch of salt. Stir the dry ingredients together to guarantee even distribution of the spices.
- Mix Wet Ingredients: In a separate bowl or measuring cup, whisk together the milk, molasses, maple syrup, and vanilla extract until well blended.
- Combine All Ingredients: Pour the wet ingredients into the bowl with the dry ingredients. Stir everything together until the oats are fully coated with the liquid mixture. Ascertain that the molasses is well incorporated.
- Optional Add-ins: If desired, add the chopped nuts and dried cranberries or raisins to the mixture. Stir to distribute them evenly throughout the oats.
- Refrigerate Overnight: Cover the bowl with plastic wrap or divide the mixture into individual jars with lids. Place in the refrigerator and let the oats soak overnight, or for at least 6-8 hours.
- Serve and Enjoy: In the morning, give the oats a good stir. Serve them cold directly from the fridge, or heat them slightly in the microwave if a warm breakfast is preferred. Top with fresh fruit or a dollop of yogurt for added flavor and texture.
Extra Tips:
For those who prefer a thicker consistency, reduce the amount of milk slightly. You can also play with different toppings like sliced bananas, toasted coconut, or a sprinkle of granola for added crunch.
If you’re serving children or those with a sweet tooth, a drizzle of honey or additional maple syrup just before serving can enhance the sweetness. Make sure to use a jar or container with a secure lid if you plan to take your Gingerbread Overnight Oats on the go.
Festive Cranberry Orange Scones
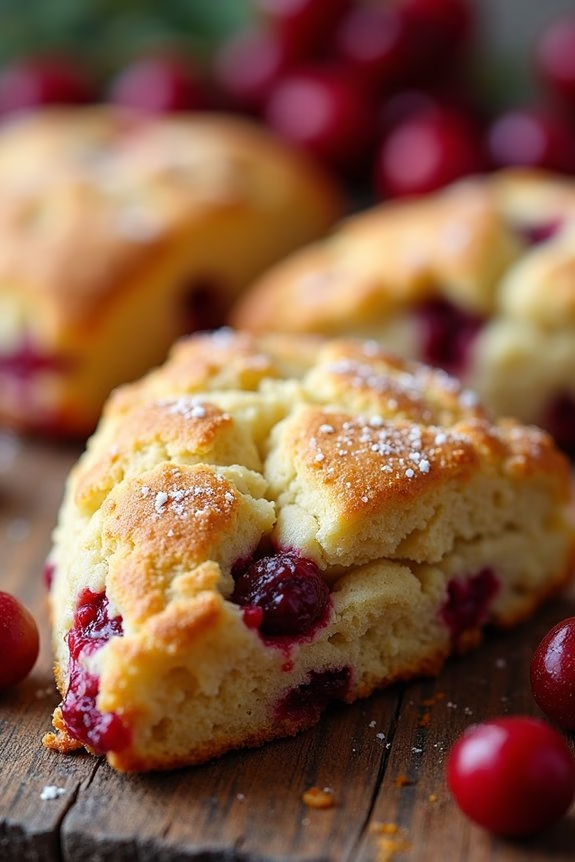
Start your Christmas morning with a delightful and budget-friendly treat—Festive Cranberry Orange Scones. These scones are the perfect combination of tart cranberries and sweet, zesty orange, providing a festive burst of flavor with every bite. Not only are they easy to make, but they’re also gentle on your wallet, making them an excellent choice for a holiday breakfast that doesn’t break the bank.
Whether you’re hosting a small family gathering or simply looking to enjoy a cozy morning at home, these scones are sure to fill your kitchen with the warm, inviting aroma of the holidays. Serve them with a dollop of clotted cream or a touch of butter, and enjoy them with a steaming cup of coffee or tea. This recipe makes enough for 4-6 people, guaranteeing everyone gets a taste of this holiday delight.
Ingredients for 4-6 servings:
- 2 cups all-purpose flour
- 1/4 cup granulated sugar
- 1 tablespoon baking powder
- 1/2 teaspoon salt
- 1/2 cup cold unsalted butter, cubed
- 1/2 cup dried cranberries
- Zest of 1 orange
- 1/2 cup heavy cream
- 1 large egg
- 1 teaspoon vanilla extract
- Additional sugar for sprinkling (optional)
Instructions:
- Preheat and Prepare: Preheat your oven to 400°F (200°C). Line a baking sheet with parchment paper to prevent sticking and guarantee even baking.
- Mix Dry Ingredients: In a large bowl, combine the flour, sugar, baking powder, and salt. Stir well to guarantee the ingredients are evenly distributed.
- Incorporate Butter: Add the cold, cubed butter to the dry ingredients. Using a pastry cutter or your fingertips, work the butter into the mixture until it resembles coarse crumbs.
- Add Cranberries and Zest: Stir in the dried cranberries and orange zest, mixing until they’re evenly distributed throughout the flour mixture.
- Combine Wet Ingredients: In a separate bowl, whisk together the heavy cream, egg, and vanilla extract until smooth.
- Form the Dough: Pour the wet ingredients into the dry mixture. Gently fold the ingredients together with a spatula until a dough forms. Be careful not to overmix; the dough should be slightly sticky but manageable.
- Shape the Scones: Transfer the dough onto a lightly floured surface. Pat it into a circle about 1-inch thick. Using a sharp knife or a dough cutter, divide the dough into 8 wedges.
- Bake: Place the wedges on the prepared baking sheet, spacing them about 2 inches apart. If desired, sprinkle with a little extra sugar for a touch of sweetness and crunch. Bake for 15-20 minutes, or until the scones are golden brown and firm to the touch.
- Cool and Serve: Allow the scones to cool on the baking sheet for a few minutes before transferring them to a wire rack. Serve warm or at room temperature with your choice of accompaniments.
Extra Tips:
For the best results, make sure your butter is very cold before incorporating it into the dry ingredients—this will help create the flaky texture that scones are known for.
If you prefer a more pronounced citrus flavor, you can add a teaspoon of orange juice to the wet ingredients.
Additionally, these scones can be made a day in advance and stored in an airtight container. Simply reheat them in the oven for a few minutes before serving to refresh their texture and warmth.
Ham and Cheese Breakfast Casserole

Looking for a delicious yet budget-friendly option to serve on Christmas morning? This Ham and Cheese Breakfast Casserole is a perfect choice that balances savory flavors with the holiday spirit.
Combining layers of ham, cheese, eggs, and bread, this casserole isn’t only satisfying but also easy to prepare ahead of time, allowing you to spend more time with family and less time in the kitchen. The dish is versatile, allowing you to substitute ingredients based on what you have on hand, and it’s sure to please a crowd with its comforting taste and hearty texture.
This casserole serves 4-6 people and is ideal for a festive breakfast or brunch. It can be assembled the night before and baked fresh in the morning, making it a stress-free addition to your Christmas celebration.
With simple ingredients that are often in your pantry or fridge, the preparation isn’t only budget-friendly but also straightforward, without compromising on flavor or quality. The combination of ham and cheese brings a delightful richness, while the eggs and bread provide substance and warmth, perfect for a chilly winter morning.
Ingredients:
- 6 large eggs
- 1 1/2 cups milk
- 1/2 teaspoon salt
- 1/4 teaspoon black pepper
- 6 slices of bread, cubed
- 1 1/2 cups cooked ham, diced
- 1 1/2 cups shredded cheddar cheese
- 1/4 cup chopped green onions
Instructions:
- Preheat and Prepare Baking Dish: Preheat your oven to 350°F (175°C). Grease a 9×13 inch baking dish with butter or cooking spray to prevent sticking.
- Mix Egg Mixture: In a large bowl, whisk together the eggs, milk, salt, and black pepper until well combined. This will serve as the custard base for your casserole, giving it a creamy texture.
- Layer Ingredients: Spread the cubed bread evenly across the greased baking dish. Sprinkle the diced ham, shredded cheddar cheese, and chopped green onions over the bread cubes. Confirm even distribution for consistent flavor in every bite.
- Pour Egg Mixture: Carefully pour the egg mixture over the layered ingredients in the baking dish. Press down gently with a spatula to confirm the bread absorbs the custard.
- Bake the Casserole: Place the baking dish in the preheated oven. Bake for 35-40 minutes, or until the casserole is set and the top is golden brown. A knife inserted into the center should come out clean when it’s done.
- Rest and Serve: Allow the casserole to cool for about 5 minutes before serving. This resting period helps the casserole firm up, making it easier to cut into portions.
Extra Tips:
For added flavor, consider mixing in a teaspoon of Dijon mustard into the egg mixture, which complements the ham and cheese beautifully.
If you prefer a richer casserole, substitute half of the milk with half-and-half or cream. Additionally, you can customize the casserole with any leftover vegetables like bell peppers or mushrooms that you might have, making it a great way to reduce waste and add nutrients.
Preparing the casserole the night before and refrigerating it overnight will enhance the flavors and make your morning preparation even more effortless.
Sweet Potato and Sausage Hash

Sweet Potato and Sausage Hash is a delightful and hearty breakfast dish that brings together the natural sweetness of sweet potatoes with the savory depth of sausage. This budget-friendly recipe is perfect for Christmas morning when you want to serve something special yet simple. The combination of flavors and textures in this hash will warm your heart and satisfy your taste buds, making it an excellent addition to your holiday breakfast table.
The best part about this Sweet Potato and Sausage Hash is its versatility and ease of preparation. With just a few ingredients, most of which you likely already have on hand, you can whip up this delicious dish in no time. The recipe serves 4-6 people, making it ideal for a family gathering or a festive breakfast with friends. Plus, you can easily customize it by adding your favorite vegetables or herbs to suit your taste preferences.
Ingredients (Serves 4-6):
- 4 medium sweet potatoes, peeled and diced
- 1 pound breakfast sausage (pork or turkey)
- 1 medium onion, diced
- 1 red bell pepper, diced
- 2 tablespoons olive oil
- 1 teaspoon garlic powder
- 1 teaspoon smoked paprika
- Salt and pepper to taste
- 2 tablespoons fresh parsley, chopped (optional, for garnish)
Cooking Instructions:
- Prepare the Ingredients: Begin by peeling and dicing the sweet potatoes into bite-sized cubes. Dice the onion and red bell pepper as well. Set these aside for easy access while cooking.
- Cook the Sausage: In a large skillet over medium heat, add the breakfast sausage. Break it up with a spatula and cook until it’s browned and fully cooked, about 6-8 minutes. Once cooked, remove the sausage from the skillet and set it aside, leaving the drippings in the pan.
- Sauté the Vegetables: Add olive oil to the same skillet if needed, then add the diced onion and red bell pepper. Sauté for 3-4 minutes, or until the onions are translucent and the peppers are slightly softened.
- Cook the Sweet Potatoes: Add the diced sweet potatoes to the skillet with the onions and peppers. Stir to combine, then season with garlic powder, smoked paprika, salt, and pepper. Cover the skillet with a lid, reduce heat to medium-low, and cook for 10-12 minutes, stirring occasionally, until the sweet potatoes are tender.
- Combine Everything: Once the sweet potatoes are cooked, add the browned sausage back to the skillet. Stir everything together and let it cook for another 2-3 minutes to allow the flavors to meld.
- Serve: Transfer the hash to a serving platter or individual plates. Garnish with fresh parsley if desired, and serve immediately.
Extra Tips:
When making Sweet Potato and Sausage Hash, feel free to get creative with additional ingredients. You can add other vegetables like spinach, kale, or mushrooms for more variety.
If you prefer a bit of heat, consider adding a pinch of cayenne pepper or red pepper flakes. To guarantee the sweet potatoes cook evenly, make sure the pieces are uniformly diced.
This dish pairs well with a side of eggs or toast, making it a complete and satisfying breakfast option for the holiday season.
Fluffy Buttermilk Waffles

There’s nothing quite like waking up on Christmas morning to the aroma of homemade waffles wafting through the house. Fluffy Buttermilk Waffles are an ideal breakfast treat that brings warmth and joy to your holiday morning. These waffles are light, airy, and have a subtle tanginess from the buttermilk, making them the perfect base for your favorite toppings like fresh berries, whipped cream, or a drizzle of maple syrup.
Best of all, with a few pantry staples and some simple steps, you can whip up a batch of these delightful waffles that everyone will love, without breaking the bank.
Whether you’re looking to start a new holiday tradition or simply want to serve something special for breakfast, this recipe for Fluffy Buttermilk Waffles is a must-try. The ingredients are budget-friendly, and the process is straightforward, making it a stress-free addition to your Christmas morning.
Gather your loved ones around, pour some hot cocoa or coffee, and enjoy a festive breakfast that sets the tone for the rest of the joyous day ahead.
Ingredients (Serves 4-6):
- 2 cups all-purpose flour
- 2 tablespoons granulated sugar
- 1 teaspoon baking powder
- 1 teaspoon baking soda
- 1/2 teaspoon salt
- 2 large eggs
- 2 cups buttermilk
- 1/3 cup unsalted butter, melted and cooled
- 1 teaspoon vanilla extract
Cooking Instructions:
- Preheat the Waffle Iron: Begin by preheating your waffle iron according to the manufacturer’s instructions. This guarantees that it’s ready to cook the batter as soon as you finish mixing it.
- Mix Dry Ingredients: In a large mixing bowl, whisk together the flour, sugar, baking powder, baking soda, and salt until well-blended. This dry mixture forms the base of your batter and guarantees that the waffles are fluffy and light.
- Prepare the Wet Ingredients: In another bowl, beat the eggs until they’re light and frothy. Add the buttermilk, melted butter, and vanilla extract, stirring until all the wet ingredients are combined.
- Combine Wet and Dry Ingredients: Pour the wet ingredients into the dry ingredients. Stir until just combined, being careful not to over-mix. A few lumps are okay—over-mixing can lead to tough waffles.
- Cook the Waffles: Lightly grease the waffle iron with nonstick spray or a small amount of melted butter. Pour an appropriate amount of batter onto the hot waffle iron, close the lid, and cook according to your waffle iron’s instructions, usually about 3-5 minutes, until the waffles are golden brown and crisp.
- Serve and Enjoy: Carefully remove the waffles from the waffle iron and serve immediately. Top with your choice of toppings, such as fresh fruit, syrup, or whipped cream.
Extra Tips:
To achieve the fluffiest waffles, make sure not to over-mix the batter. Over-mixing can lead to a denser texture.
If you prefer crispier waffles, leave them in the waffle iron a little longer until they reach your desired level of crispness.
If you’re making a large batch, keep the cooked waffles warm in a 200°F (93°C) oven until all are ready to serve.
Additionally, if you don’t have buttermilk on hand, you can make a substitute by adding a tablespoon of lemon juice or vinegar to a cup of milk and letting it sit for a few minutes before using. This will provide the necessary acidity and tang to the waffles.
Eggnog French Toast Bake
Eggnog French Toast Bake is a delightful and festive breakfast option that’s perfect for Christmas morning. This budget-friendly dish combines the rich flavors of traditional eggnog with the comforting texture of French toast, all baked to perfection in a casserole dish. Not only is it incredibly delicious, but it’s also easy to prepare the night before, allowing you more time to enjoy with family and friends on this special day.
Whether you’re serving a small family gathering or a larger group, this recipe is sure to be a hit.
The beauty of Eggnog French Toast Bake lies in its simplicity and the use of ingredients that are often already in the pantry during the holiday season. The combination of crusty bread soaked in a spiced eggnog mixture, with a hint of nutmeg and cinnamon, creates a dish that’s both aromatic and satisfying.
Plus, it offers the convenience of preparing in advance and baking it off in the morning, making it a stress-free addition to your holiday menu.
Ingredients (Serves 4-6):
- 1 loaf of crusty bread (such as French, Italian, or brioche), cut into cubes
- 6 large eggs
- 2 cups store-bought or homemade eggnog
- 1/2 cup milk
- 1/4 cup granulated sugar
- 1 teaspoon vanilla extract
- 1 teaspoon ground cinnamon
- 1/2 teaspoon ground nutmeg
- 1/4 teaspoon salt
- 2 tablespoons unsalted butter, melted
- Maple syrup, for serving (optional)
- Powdered sugar, for dusting (optional)
Instructions:
- Prepare the Bread: Start by cutting the loaf of bread into approximately 1-inch cubes. Arrange these cubes evenly in a greased 9×13-inch baking dish.
- Mix the Custard: In a large mixing bowl, whisk together the eggs, eggnog, milk, granulated sugar, vanilla extract, cinnamon, nutmeg, and salt until well combined and smooth.
- Soak the Bread: Pour the eggnog mixture evenly over the bread cubes, pressing down gently with a spatula to make certain all pieces are submerged and coated thoroughly.
- Chill Overnight: Cover the baking dish with plastic wrap or aluminum foil and refrigerate overnight, or for at least 4 hours, to allow the bread to absorb the custard mixture fully.
- Preheat the Oven: When ready to bake, preheat your oven to 350°F (175°C).
- Butter the Top: Remove the baking dish from the refrigerator, take off the cover, and drizzle the melted butter over the top of the soaked bread cubes.
- Bake: Place the dish in the preheated oven and bake for 40-45 minutes, or until the top is golden brown and the custard is set.
- Serve: Let it cool for a few minutes before serving. Optionally, dust with powdered sugar and serve with maple syrup.
Extra Tips:
For best results, use day-old or slightly stale bread as it will absorb the custard mixture more effectively without becoming too mushy. If you’re short on time, you can speed up the staling process by toasting the bread cubes in a 350°F oven for about 10 minutes before assembling the dish.
Additionally, feel free to customize the flavor by adding dried fruits, nuts, or a splash of rum extract for an extra festive touch. This dish pairs wonderfully with fresh fruits or a side of crispy bacon for a complete breakfast experience.
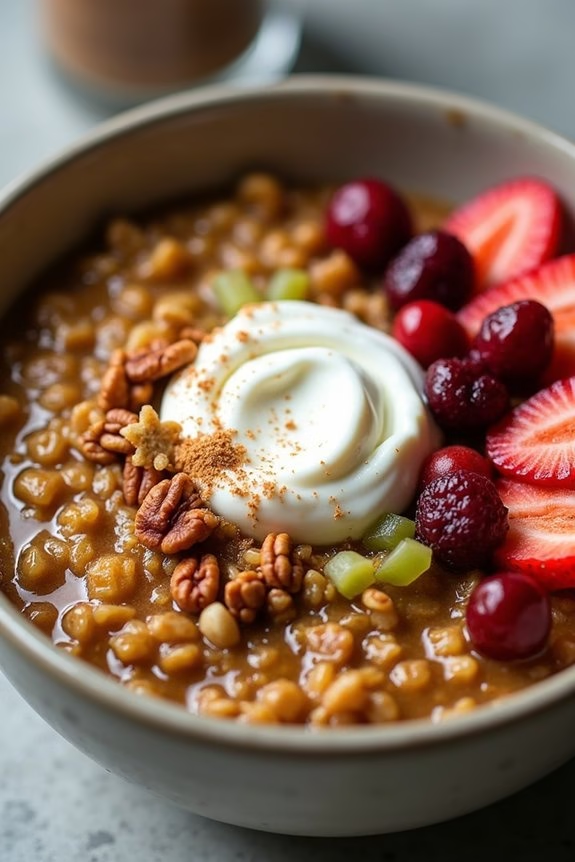
Apple Cinnamon Oatmeal
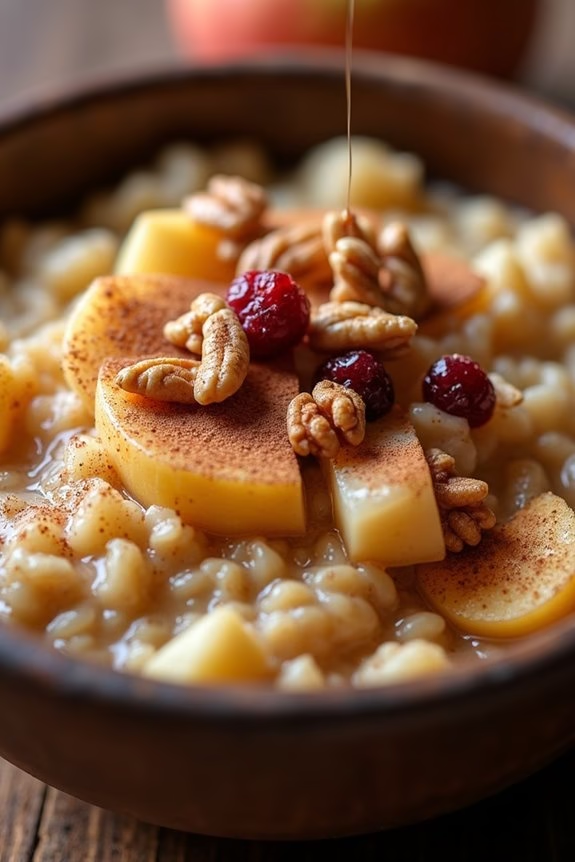
Apple Cinnamon Oatmeal is a warm and comforting dish that perfectly captures the essence of the holiday season. With its fragrant blend of sweet apples and spicy cinnamon, this dish isn’t only delicious but also budget-friendly, making it an ideal breakfast for Christmas morning.
Oatmeal is a great choice for feeding a crowd, as it’s both filling and nutritious, providing a good source of fiber and energy to kickstart your day. This recipe serves 4-6 people and can be prepared in less than 30 minutes.
It’s an easy dish to whip up while you’re busy with other holiday preparations, ensuring that you have a heartwarming breakfast ready without spending too much time in the kitchen. Plus, the aroma will fill your home with a festive scent that everyone will enjoy.
Ingredients:
- 2 cups of rolled oats
- 4 cups of water or milk
- 2 large apples, peeled, cored, and diced
- 1/4 cup of brown sugar
- 1 teaspoon ground cinnamon
- 1/4 teaspoon ground nutmeg
- 1/4 teaspoon salt
- 1 teaspoon vanilla extract
- Optional toppings: chopped nuts, maple syrup, or dried cranberries
Instructions:
- Prepare the Oats: In a large saucepan, bring the water or milk to a boil over medium heat. Once boiling, add the rolled oats and reduce the heat to low. Let it simmer, stirring occasionally, for about 5 minutes or until the oats begin to soften.
- Add Apples and Spices: Stir in the diced apples, brown sugar, ground cinnamon, ground nutmeg, and salt. Continue to cook for another 10-15 minutes, allowing the apples to soften and the flavors to meld into the oats. Stir occasionally to prevent sticking.
- Finish with Vanilla: Once the oatmeal reaches your desired consistency and the apples are tender, remove the saucepan from the heat. Stir in the vanilla extract, mixing well to distribute the flavor evenly throughout the oatmeal.
- Serve Warm: Divide the oatmeal into serving bowls and top with your choice of optional toppings such as chopped nuts, a drizzle of maple syrup, or a sprinkle of dried cranberries for added texture and sweetness.
Extra Tips:
For a creamier consistency, consider using half milk and half water when cooking the oats. If you prefer a thicker oatmeal, reduce the amount of liquid slightly or cook it a bit longer.
Feel free to customize the recipe by adding other spices such as ginger or allspice, or incorporating different types of apples to vary the flavor. For a nut-free version, simply omit any nut toppings.
This dish can also be made ahead and reheated gently on the stove or in the microwave, making your Christmas morning even more relaxed.
Mini Quiche Lorraine

Mini Quiche Lorraine is a delightful and budget-friendly breakfast option that’s perfect for a festive Christmas morning. This classic French dish is known for its rich, savory flavors, combining eggs, cheese, and bacon in a delicate pastry crust.
By making these quiches in a mini version, they’re not only cute and appealing but also the perfect size for a hearty yet manageable breakfast portion. Plus, they’re easy to prepare ahead of time, which means you can focus on enjoying the holiday with your loved ones rather than being stuck in the kitchen.
This recipe for Mini Quiche Lorraine serves 4-6 people and is perfect for a cozy Christmas breakfast. It requires simple ingredients that you may already have in your pantry or can easily find at your local grocery store. With a flaky crust, creamy filling, and a hint of smokiness from the bacon, these mini quiches are sure to be a hit with everyone at the table.
Ingredients (Serves 4-6):
- 1 sheet of store-bought puff pastry, thawed
- 4 large eggs
- 1 cup heavy cream
- 1 cup grated Gruyère cheese
- 6 strips of bacon, cooked and crumbled
- 1/4 cup finely chopped onion
- Salt and pepper to taste
- 1 tablespoon chopped fresh chives (optional)
Cooking Instructions:
- Preheat the Oven: Begin by preheating your oven to 375°F (190°C). This guarantees that the oven is at the right temperature when your quiche is ready to bake.
- Prepare the Pastry: Roll out the thawed puff pastry on a lightly floured surface. Cut the pastry into circles slightly larger than the muffin tin cups you’re using. Gently press the pastry circles into the muffin tin, ensuring they cover the bottom and sides.
- Cook the Bacon: In a skillet over medium heat, cook the bacon until crispy. Remove from the skillet and place on paper towels to drain excess grease. Once cooled, crumble the bacon into small pieces.
- Sauté the Onions: In the same skillet with the bacon drippings, add the chopped onions and sauté until translucent and fragrant, about 3-4 minutes.
- Prepare the Filling: In a mixing bowl, whisk together the eggs and heavy cream until well combined. Stir in the grated Gruyère cheese, crumbled bacon, sautéed onions, salt, and pepper.
- Assemble the Quiches: Pour the egg mixture into the prepared pastry shells in the muffin tin, filling each about three-quarters full. Sprinkle a few chopped chives on top for added flavor and color.
- Bake the Quiches: Place the muffin tin in the preheated oven and bake for 20-25 minutes or until the quiches are puffed and golden brown on top. A toothpick inserted into the center should come out clean.
- Cool and Serve: Allow the quiches to cool in the tin for a few minutes before carefully removing them. Serve warm or at room temperature as part of your Christmas breakfast spread.
Extra Tips:
For a vegetarian version, you can skip the bacon and add sautéed mushrooms or spinach for extra flavor and texture.
The key to a flaky pastry crust isn’t overworking the dough, so handle it gently and minimally. If you’re short on time, you can prepare the filling and pastry the night before, then assemble and bake the mini quiches in the morning for a fresh, hot breakfast.
Additionally, using silicone muffin molds can make it easier to remove the quiches once baked. Enjoy your festive breakfast!
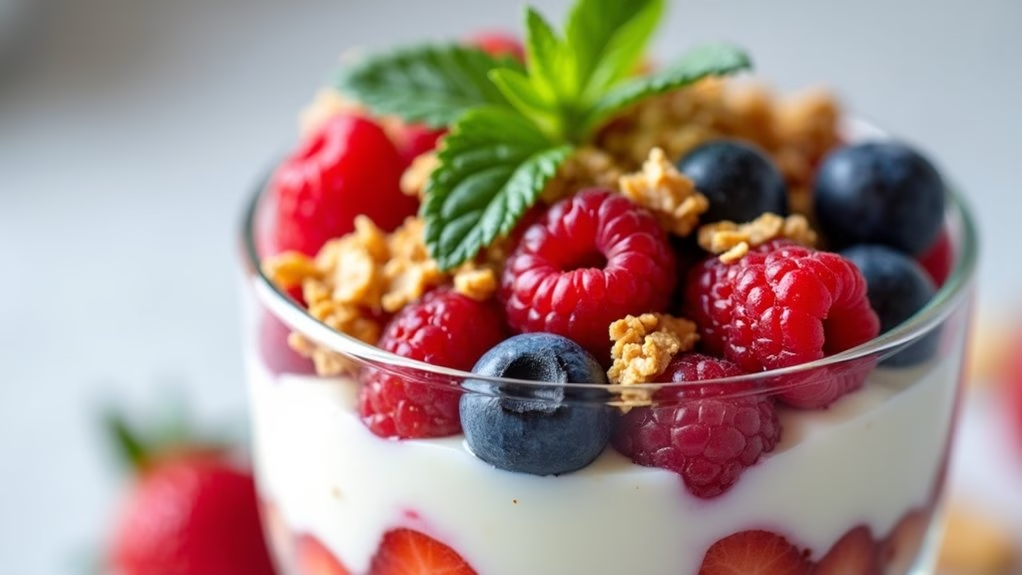
Holiday Berry Yogurt Parfaits
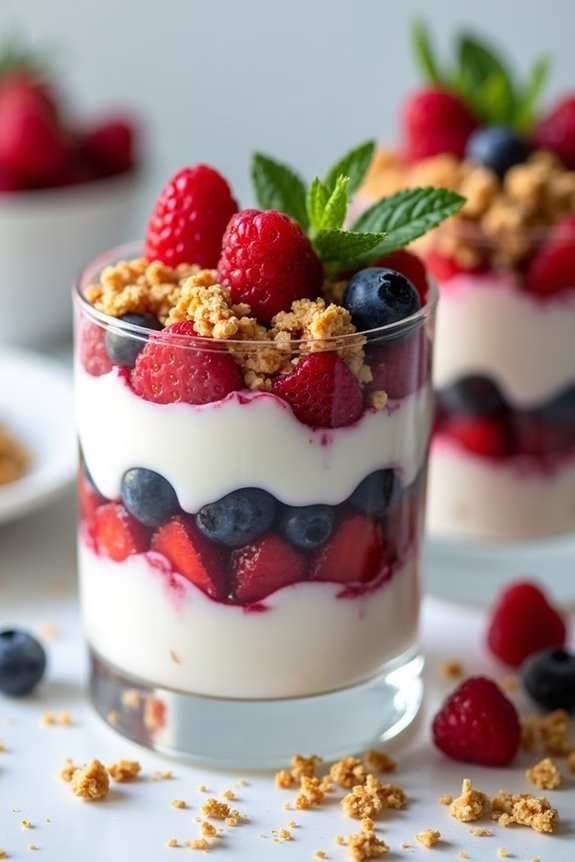
Holiday Berry Yogurt Parfaits are a delightful and budget-friendly breakfast option for Christmas morning. This invigorating dish combines creamy yogurt with vibrant, fresh berries and a crunchy granola topping, creating a delicious symphony of flavors and textures. It’s a perfect way to start the festive day, offering a nutritious yet indulgent treat that both adults and children will enjoy.
What makes this recipe especially appealing is its simplicity and versatility, allowing you to adjust the ingredients based on what you have on hand. The vibrant colors of the berries provide a festive look, making these parfaits not only a treat for the taste buds but also a feast for the eyes.
Preparing these parfaits requires minimal effort and time, which is perfect for busy holiday mornings. Plus, they can be prepped ahead of time, allowing you to spend more quality moments with your family instead of being stuck in the kitchen. Here’s how to make Holiday Berry Yogurt Parfaits for a serving size of 4-6 people.
Ingredients:
- 3 cups plain or vanilla yogurt
- 2 cups mixed fresh berries (strawberries, blueberries, raspberries)
- 1 cup granola
- 2 tablespoons honey or maple syrup
- 1 teaspoon vanilla extract (optional)
- Fresh mint leaves for garnish (optional)
Instructions:
1. Prepare the Yogurt Base:
In a medium bowl, mix the yogurt with honey or maple syrup and vanilla extract if using. Stir until well combined. This will enhance the sweetness and add a subtle vanilla flavor to the yogurt.
2. Wash and Prepare Berries:
Rinse the berries thoroughly under cold water. Pat them dry with a paper towel. If using strawberries, hull and slice them into bite-sized pieces.
3. Assemble the Parfaits:
In each serving glass or bowl, add a spoonful of the yogurt mixture as the first layer. Follow with a layer of mixed berries. Repeat the layers until the glass is almost full, ending with a layer of yogurt on top.
4. Top with Granola:
Sprinkle a generous amount of granola over the top layer of yogurt for a crunchy finish. The granola adds texture and a nutty flavor that complements the creamy yogurt and juicy berries.
5. Garnish and Serve:
Optionally, garnish with fresh mint leaves for a pop of color and extra freshness. Serve immediately for the best texture, or refrigerate for up to an hour before serving to allow flavors to meld.
Extra Tips:
For a more personalized touch, feel free to experiment with different types of yogurt such as Greek yogurt for a thicker consistency or flavored yogurts for a different taste profile. You can also switch up the fruit based on what’s in season or your personal preference.
For a gluten-free option, verify the granola used is certified gluten-free. These parfaits are best consumed fresh to enjoy the crispness of the granola, but if you need to prepare them ahead of time, keep the granola separate and add it right before serving to maintain its crunch.