
Breakfast can be a delightful start to your day, especially when there’s a sweet treat involved. Imagine waking up to Nutella-stuffed French toast, each bite revealing a deliciously gooey center. Or perhaps savoring a berry-loaded yogurt parfait that mirrors the colors of a summer morning. These sweet breakfast ideas are sure to make your mornings something to look forward to. Ready to explore more delicious creations?
Indulge in Nutella-Stuffed French Toast
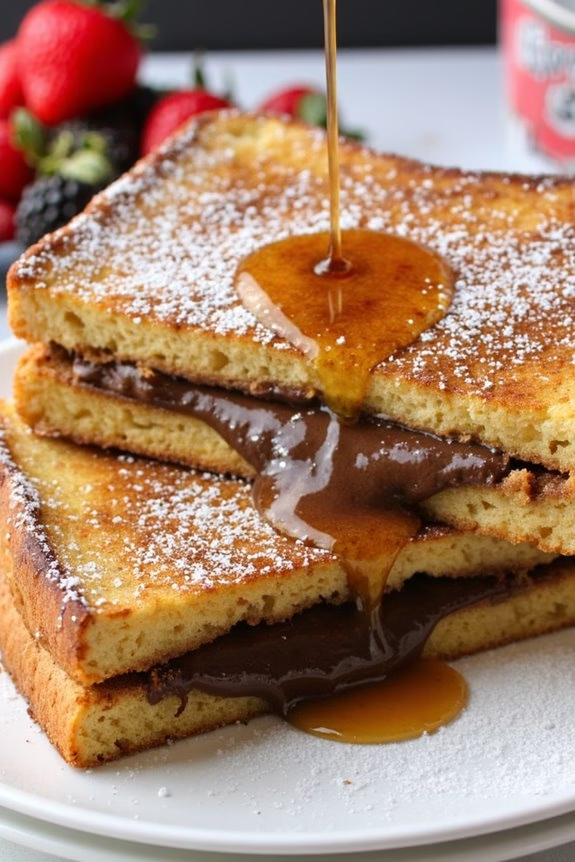
There’s nothing quite like starting your day with a sweet indulgence, and Nutella-Stuffed French Toast is the perfect way to do just that. This delightful breakfast treat combines the classic flavors of French toast with the rich, creamy goodness of Nutella, creating a dish that’s certain to please both kids and adults alike.
Whether you’re planning a special weekend brunch or just want to treat yourself to something extraordinary, this recipe will make your morning truly special.
The key to making Nutella-Stuffed French Toast is choosing the right bread and guaranteeing it’s perfectly cooked. Thick slices of brioche or challah are ideal for this recipe, as they can hold up to the filling and soak up the egg mixture without becoming too soggy.
When paired with the luscious Nutella filling, the result is a decadent breakfast dish that’s crispy on the outside and creamy on the inside. Serving size: 4-6 people.
Ingredients:
- 12 slices of brioche or challah bread
- 1 cup Nutella
- 4 large eggs
- 1 cup whole milk
- 1 teaspoon vanilla extract
- 1 teaspoon ground cinnamon
- 1 tablespoon granulated sugar
- Butter, for frying
- Powdered sugar, for dusting
- Fresh berries (optional), for serving
- Maple syrup (optional), for serving
Instructions:
- Prepare the Bread: Lay out the slices of brioche or challah bread and spread a generous layer of Nutella on half of the slices. Top each Nutella-covered slice with a plain slice to form a sandwich.
- Make the Egg Mixture: In a large mixing bowl, whisk together the eggs, whole milk, vanilla extract, ground cinnamon, and granulated sugar until well combined and slightly frothy.
- Preheat the Pan: Place a large skillet or griddle over medium heat and add a pat of butter to coat the surface. Allow the butter to melt and lightly sizzle, indicating the pan is hot enough.
- Dip the Sandwiches: Carefully dip each Nutella-stuffed sandwich into the egg mixture, guaranteeing both sides are well coated. Allow any excess mixture to drip off before placing them onto the hot skillet.
- Cook the French Toast: Cook the sandwiches for about 3-4 minutes on each side, or until they’re golden brown and crispy. You may need to adjust the heat to prevent burning.
- Serve: Once cooked, transfer the Nutella-stuffed French toast to a serving plate. Dust with powdered sugar and serve with fresh berries and a drizzle of maple syrup, if desired.
Extra Tips:
To guarantee the best results, use day-old bread if possible, as it will absorb the egg mixture more effectively without falling apart.
If you prefer an extra crispy texture, consider adding a tablespoon of sugar to the butter before frying, which will caramelize slightly during cooking.
Additionally, for a more decadent twist, try adding a splash of your favorite liqueur, such as Frangelico or Baileys, to the egg mixture.
Enjoy your Nutella-Stuffed French Toast with a hot cup of coffee or tea for a truly indulgent breakfast experience.
Stack up With Maple Syrup Pancakes

Maple Syrup Pancakes are a classic breakfast favorite that combines the fluffy texture of pancakes with the rich, sweet flavor of pure maple syrup. This delightful dish is perfect for a weekend brunch or a special breakfast treat. The pancakes themselves are light and airy, made with a simple batter that cooks quickly on a hot griddle. When topped with a generous drizzle of real maple syrup, they become an irresistible start to your day.
Making Maple Syrup Pancakes at home is easy and rewarding. The key is to use fresh, quality ingredients and to remain patient while cooking each pancake to golden perfection. Whether you’re serving them with a side of crispy bacon or fresh fruit, these pancakes are sure to impress family and friends alike. Follow this recipe to create a delicious breakfast for 4-6 people.
Ingredients (Serves 4-6):
- 2 cups all-purpose flour
- 2 tablespoons granulated sugar
- 2 teaspoons baking powder
- 1/2 teaspoon baking soda
- 1/2 teaspoon salt
- 2 large eggs
- 2 cups buttermilk
- 1/4 cup unsalted butter, melted
- 1 teaspoon vanilla extract
- Pure maple syrup, for serving
Instructions:
- Prepare the dry ingredients: In a large mixing bowl, whisk together the flour, sugar, baking powder, baking soda, and salt until well combined. This guarantees even distribution of the leavening agents and prevents lumps in the batter.
- Mix the wet ingredients: In a separate bowl, beat the eggs lightly. Add the buttermilk, melted butter, and vanilla extract, and whisk until the mixture is smooth and homogeneous.
- Combine wet and dry ingredients: Pour the wet ingredients into the dry ingredients. Gently stir with a spatula or wooden spoon until just combined. Be careful not to over-mix; it’s okay if there are a few small lumps in the batter.
- Heat the griddle: Preheat a non-stick griddle or large skillet over medium heat. Lightly grease with a bit of butter or cooking spray to prevent sticking.
- Cook the pancakes: Pour about 1/4 cup of batter onto the hot griddle for each pancake. Cook until bubbles form on the surface and the edges look set, about 2-3 minutes. Flip the pancakes and cook for another 2 minutes, or until golden brown on both sides.
- Serve: Stack the pancakes on a plate and serve immediately with a generous drizzle of pure maple syrup. Enjoy!
Extra Tips:
For the fluffiest pancakes, make sure not to over-mix the batter as this can lead to tough pancakes. Allow the batter to rest for a few minutes before cooking to let the gluten relax, resulting in a softer texture.
If you have leftover pancakes, they can be stored in the refrigerator for a few days and reheated in a toaster or microwave for a quick breakfast. For added flavor, consider adding a pinch of cinnamon or nutmeg to the batter.
Build a Berry-Loaded Yogurt Parfait
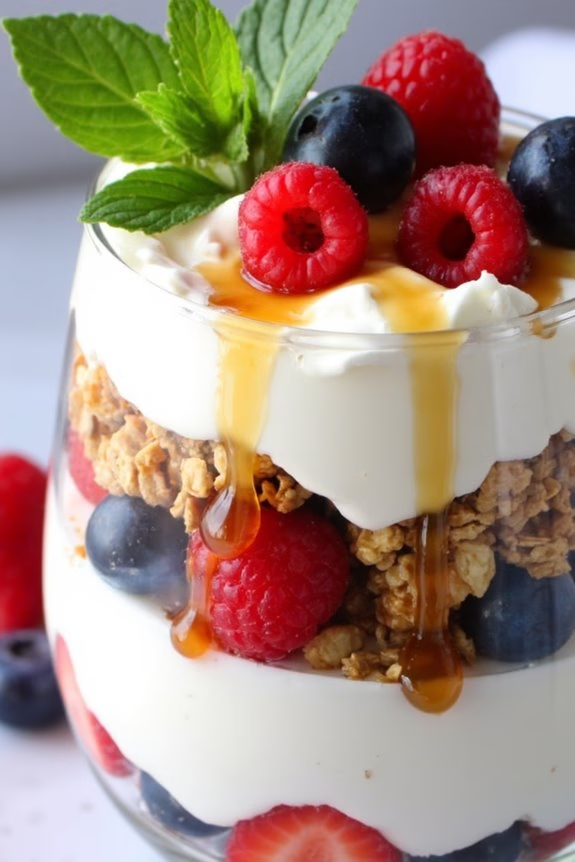
Indulge in a delightful breakfast treat with a Berry-Loaded Yogurt Parfait, perfect for a revitalizing start to your day. This parfait layers creamy Greek yogurt with vibrant, juicy berries and crunchy granola, creating a symphony of flavors and textures. Not only is it visually appealing, but it’s also packed with nutrients to keep you energized throughout the morning.
Whether you’re hosting a brunch or simply want to treat your family to a special breakfast, this recipe is sure to impress with its simplicity and deliciousness.
The Berry-Loaded Yogurt Parfait is versatile and can be tailored to your taste preferences. You can experiment with different types of berries or even add other fruits like bananas or peaches for a unique twist. It’s also a fantastic way to incorporate more fruits into your diet while enjoying a sweet treat.
This recipe serves 4-6 people, making it an ideal choice for gatherings or family breakfasts. Let’s plunge into the ingredients and steps to create this delightful dish.
Ingredients for 4-6 servings:
- 4 cups Greek yogurt
- 2 cups mixed berries (such as strawberries, blueberries, raspberries)
- 1 cup granola
- 4 tablespoons honey
- 1 teaspoon vanilla extract
- Fresh mint leaves for garnish (optional)
Instructions:
- Prepare the Yogurt Mixture:
- In a medium bowl, mix the Greek yogurt with the vanilla extract until well combined. This adds a subtle sweetness and aroma to the yogurt base.
- Layer the Parfait:
- Take four to six serving glasses or bowls. Begin by adding a generous spoonful of the yogurt mixture to the bottom of each glass.
- Add Berries:
- Evenly distribute a layer of mixed berries over the yogurt in each glass. Verify the berries are washed and dried to prevent excess moisture.
- Add Granola:
- Sprinkle a layer of granola over the berries. This will add a delightful crunch to your parfait.
- Repeat Layers:
- Continue layering with another spoonful of yogurt, followed by more berries and granola, until the glasses are nearly full.
- Finish with Honey:
- Drizzle honey over the top of each parfait for a touch of sweetness.
- Garnish and Serve:
- If desired, garnish with fresh mint leaves. Serve immediately to enjoy the freshness and texture of the parfait.
Extra Tips:
For the best results, use fresh, ripe berries for maximum flavor. If fresh berries aren’t available, frozen berries can be a good alternative; just make sure to thaw and drain them before use.
To prevent the granola from becoming soggy, assemble the parfaits just before serving, or keep the components separate until ready to eat. You can also customize the parfait by adding nuts, seeds, or even a sprinkle of cinnamon for added flavor.
Enjoy your Berry-Loaded Yogurt Parfait as a delightful start to any morning!
Enjoy Cinnamon Roll Overnight Oats
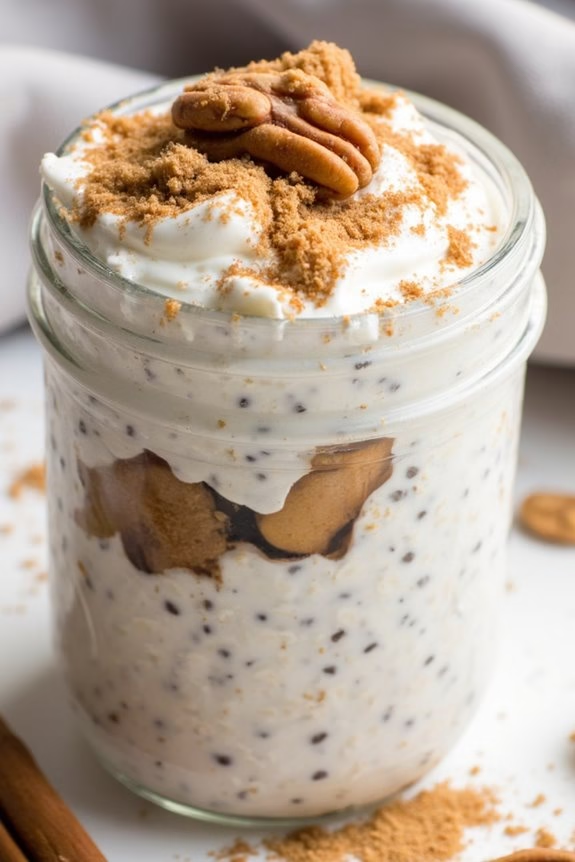
Cinnamon Roll Overnight Oats are a delightful twist on the classic breakfast oatmeal, infusing the comforting flavors of cinnamon rolls into a nutritious start to your day. This no-cook recipe is perfect for those busy mornings when you want something delicious and satisfying but don’t have the time to make a complicated breakfast.
By preparing the oats the night before, you allow the flavors to meld together, creating a creamy and irresistible dish that can be enjoyed cold straight from the fridge.
The beauty of this recipe is in its simplicity and versatility. With just a handful of ingredients, you can whip up a batch that serves 4-6 people, making it perfect for family breakfasts or meal prepping for the week.
The combination of rolled oats, milk, Greek yogurt, and cinnamon creates a rich and creamy base, while the addition of a brown sugar and cinnamon topping mimics the gooey sweetness of a cinnamon roll. This dish is sure to become a favorite in your breakfast rotation.
Ingredients (Serves 4-6):
- 2 cups rolled oats
- 2 cups milk (dairy or non-dairy)
- 1 cup Greek yogurt
- 2 tablespoons chia seeds
- 2 teaspoons ground cinnamon
- 1/4 cup brown sugar
- 1 teaspoon vanilla extract
- 1/4 cup chopped pecans or walnuts (optional)
- Pinch of salt
Instructions:
- Prepare the Oats Base: In a large mixing bowl, combine the rolled oats, milk, Greek yogurt, chia seeds, 1 teaspoon of ground cinnamon, vanilla extract, and a pinch of salt. Stir until all ingredients are well combined.
- Mix the Sweet Topping: In a small bowl, mix together the brown sugar and the remaining 1 teaspoon of ground cinnamon. This will serve as your topping to mimic the cinnamon roll flavor.
- Layer the Ingredients: Divide the oats mixture evenly into individual jars or containers. Sprinkle the cinnamon and brown sugar mix on top of each serving. If using, add chopped pecans or walnuts as a final topping.
- Chill Overnight: Seal the jars or containers and place them in the refrigerator. Allow the oats to soak and the flavors to meld for at least 6 hours, or overnight for the best results.
- Serve and Enjoy: In the morning, give each jar a good stir to combine all the ingredients. You can enjoy the oats cold, or heat them in the microwave for about 1 minute if you prefer a warm breakfast.
Extra Tips:
For additional flavor, consider adding a splash of maple syrup or a dollop of cream cheese when serving, which will enhance the cinnamon roll experience even more.
You can also customize your oats with different toppings like fresh fruits, such as sliced bananas or berries, for added freshness and nutritional value.
If you prefer a nuttier texture, feel free to toast the pecans or walnuts before adding them to your oats.
Finally, storing these oats in mason jars not only makes them portable but also helps with portion control.
Bake Chocolate Chip Banana Bread Breakfast Treat
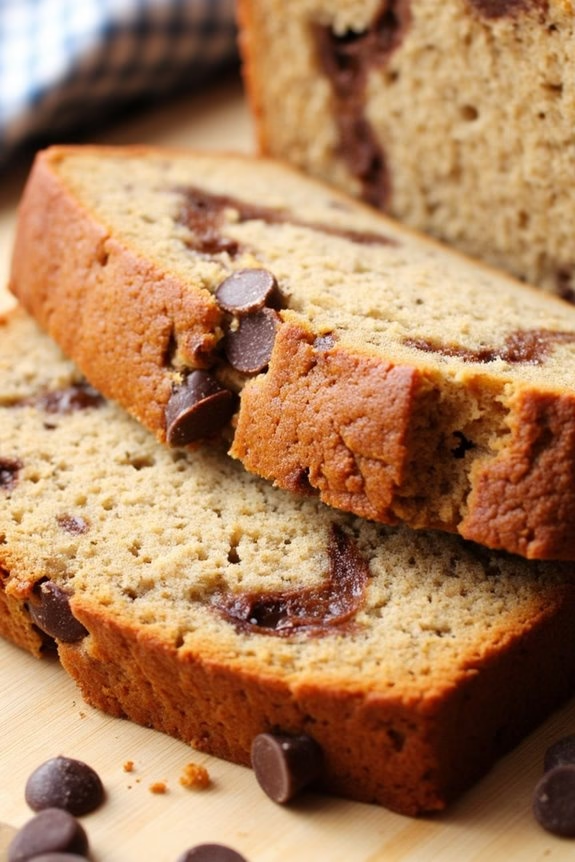
Indulge in a delightful morning experience with this Chocolate Chip Banana Bread Breakfast Treat. This recipe combines the natural sweetness and moist texture of ripe bananas with rich, gooey chocolate chips to create a breakfast that’s both comforting and satisfying.
Perfect for a family breakfast or a special brunch, this treat will fill your kitchen with an irresistible aroma and bring smiles to everyone at the table.
Our recipe is tailored to serve 4-6 people, making it ideal for a small gathering or for having leftovers to enjoy throughout the week. It’s simple to prepare and requires just a few staple ingredients that you likely already have in your pantry.
Follow our step-by-step instructions to bake this delightful bread and enjoy a sweet start to your day.
Ingredients (Serves 4-6):
- 1 1/2 cups all-purpose flour
- 1 teaspoon baking soda
- 1/2 teaspoon salt
- 3/4 cup sugar
- 1/2 cup unsalted butter, melted
- 2 large eggs
- 4 ripe bananas, mashed
- 1 teaspoon vanilla extract
- 1 cup semi-sweet chocolate chips
Cooking Instructions:
- Preheat the Oven: Start by preheating your oven to 350°F (175°C). This guarantees that the oven is at the right temperature when you’re ready to bake.
- Prepare the Pan: Grease a 9×5 inch loaf pan with butter or non-stick spray. This will help prevent the bread from sticking once baked.
- Combine Dry Ingredients: In a medium-sized bowl, whisk together the flour, baking soda, and salt. This guarantees that the baking soda and salt are evenly distributed throughout the flour.
- Mix Wet Ingredients: In a large mixing bowl, combine the melted butter and sugar. Add the eggs one at a time, mixing well after each addition. Stir in the mashed bananas and vanilla extract until everything is well combined.
- Blend Dry and Wet Mixtures: Gradually add the dry ingredient mixture to the wet ingredients, stirring gently until just combined. Be careful not to over-mix, as this can make the bread dense.
- Add Chocolate Chips: Fold in the chocolate chips evenly throughout the batter, reserving a few to sprinkle on top for an extra chocolatey finish.
- Pour and Bake: Pour the batter into the prepared loaf pan, smoothing out the top with a spatula. Sprinkle the reserved chocolate chips on top. Bake in the preheated oven for 60-70 minutes, or until a toothpick inserted into the center comes out clean.
- Cool and Serve: Allow the bread to cool in the pan for about 10 minutes before transferring it to a wire rack to cool completely. Slice and serve warm or at room temperature.
Extra Tips:
For best results, use bananas that are very ripe, as they’re sweeter and provide more moisture. If you prefer a nuttier flavor, consider adding a half cup of chopped walnuts or pecans to the batter.
To guarantee your Chocolate Chip Banana Bread stays fresh, store it in an airtight container at room temperature for up to three days, or refrigerate for up to a week. If you want to enjoy it warm, a quick reheat in the microwave will do the trick.
Savor Caramelized Apple Crepes
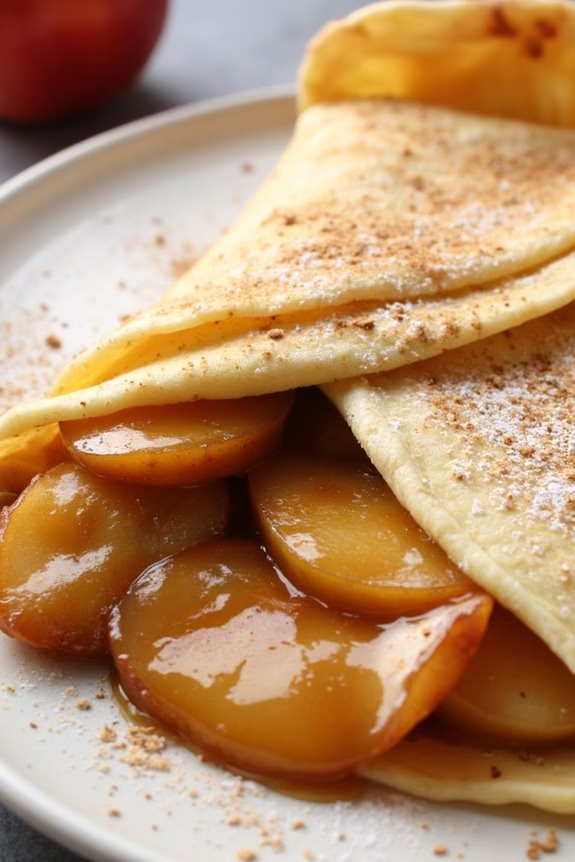
Indulge in the delightful experience of Savor Caramelized Apple Crepes, a perfect breakfast treat that combines the sweetness of caramelized apples with the delicate texture of homemade crepes. This dish is an ideal way to start your day, offering a balance of flavors and a touch of elegance. The golden-brown apples, infused with cinnamon and sugar, nestle perfectly into soft crepes, creating a harmony that’s bound to please your taste buds.
Preparing Savor Caramelized Apple Crepes for 4-6 people is a rewarding venture that brings the cozy warmth of a home-cooked breakfast to your table. The combination of tender apples, rich caramel, and buttery crepes creates a symphony of textures and flavors that’s both comforting and indulgent. Whether you’re serving this dish for a special occasion or simply to treat yourself and your loved ones, these crepes are bound to become a breakfast favorite.
Ingredients for 4-6 servings:
- 1 cup all-purpose flour
- 2 large eggs
- 1 cup milk
- 1/2 cup water
- 2 tablespoons butter, melted
- 1/4 teaspoon salt
- 2 tablespoons butter (for cooking crepes)
- 4 large apples, peeled, cored, and sliced
- 1/2 cup granulated sugar
- 1 teaspoon ground cinnamon
- 1 tablespoon lemon juice
- 1/4 cup water
- 2 tablespoons butter (for caramelizing apples)
- Whipped cream (optional, for serving)
Cooking Instructions:
- Prepare the Crepe Batter:
- In a large mixing bowl, whisk together the flour and salt. In another bowl, beat the eggs and gradually add them to the flour mixture. Slowly incorporate the milk and water, whisking continuously to avoid lumps. Finally, stir in the melted butter. Let the batter rest for at least 30 minutes to achieve a smooth texture.
- Cook the Crepes:
- Heat a non-stick skillet or crepe pan over medium heat and lightly coat it with butter. Pour about 1/4 cup of the crepe batter onto the center of the pan. Quickly tilt the pan in a circular motion so that the batter evenly coats the surface. Cook for about 2 minutes until the edges start to lift and the bottom is lightly browned. Flip the crepe and cook the other side for another minute. Repeat with the remaining batter, stacking the cooked crepes on a plate.
- Caramelize the Apples:
- In a large skillet, melt 2 tablespoons of butter over medium heat. Add the sliced apples, sugar, cinnamon, lemon juice, and water. Stir to coat the apples evenly. Cook for 10-12 minutes, stirring occasionally, until the apples are tender and the sugar has caramelized into a rich sauce.
- Assemble the Crepes:
- Place a cooked crepe on a serving plate. Spoon a generous amount of caramelized apples onto one half of the crepe and fold the other half over. Repeat with the remaining crepes and apple mixture. Serve warm, optionally topped with a dollop of whipped cream.
Extra Tips:
For the best results, verify your crepe batter is lump-free by using a blender if necessary. Allowing the batter to rest is essential as it helps the flour to fully absorb the liquid, resulting in tender crepes.
When caramelizing the apples, monitor them closely to prevent burning, and adjust the sugar based on the sweetness of your apples. If you prefer, you can add a splash of vanilla extract to the apples for an additional layer of flavor.
Enjoy your Savor Caramelized Apple Crepes with a cup of coffee or tea for a truly delightful breakfast experience.
Bite Into Lemon Poppy Seed Muffins
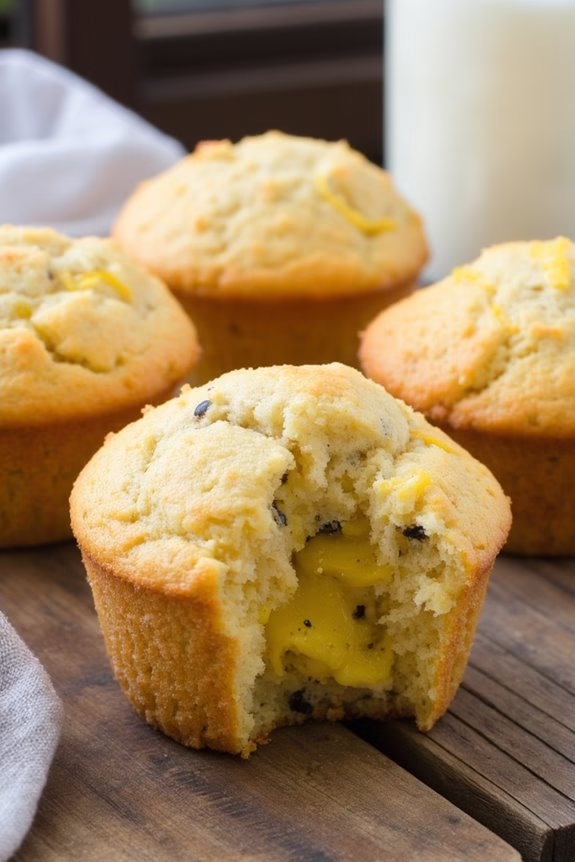
Indulge in the invigorating taste of Lemon Poppy Seed Muffins, a delightful breakfast treat that perfectly balances the tangy zing of lemon with the subtle crunch of poppy seeds.
These muffins are a morning delight, offering a burst of citrus flavor that pairs beautifully with a warm cup of coffee or tea. Their light, fluffy texture makes them a favorite for early risers and brunch enthusiasts alike. Whether you’re hosting a morning gathering or simply want to start your day on a sweet note, these muffins are sure to impress.
Baking Lemon Poppy Seed Muffins isn’t only rewarding but also simple, making them a go-to recipe for both novice and experienced bakers. With just a few basic ingredients, you can create a batch of muffins that taste like they came from a gourmet bakery.
Perfect for serving 4-6 people, this recipe guarantees that everyone at your breakfast table will enjoy a flavorful and satisfying start to their day. Let’s plunge into the ingredients and steps you’ll need to follow to whip up these delightful muffins.
Ingredients (for 4-6 people):
- 2 cups all-purpose flour
- 1 tablespoon poppy seeds
- 1 teaspoon baking powder
- 1/2 teaspoon baking soda
- 1/4 teaspoon salt
- 1/2 cup unsalted butter, melted
- 1 cup granulated sugar
- 2 large eggs
- 1 teaspoon vanilla extract
- 3/4 cup buttermilk
- Zest of 2 lemons
- 1/4 cup freshly squeezed lemon juice
Cooking Instructions:
- Preheat the oven: Start by preheating your oven to 350°F (175°C). Line a muffin tin with paper liners or lightly grease with non-stick spray for easy release.
- Combine dry ingredients: In a large mixing bowl, whisk together the all-purpose flour, poppy seeds, baking powder, baking soda, and salt. Set aside.
- Mix wet ingredients: In another bowl, cream the melted butter and granulated sugar until well combined. Add the eggs, one at a time, beating well after each addition. Stir in the vanilla extract.
- Incorporate liquids: Gradually mix in the buttermilk, lemon zest, and lemon juice with the wet ingredients. Stir until the mixture is smooth and all ingredients are well integrated.
- Combine wet and dry mixtures: Slowly add the dry ingredients to the wet mixture, folding gently with a spatula or wooden spoon. Be careful not to overmix; stop as soon as the batter is just combined.
- Fill the muffin tin: Evenly distribute the batter into the prepared muffin tin, filling each cup about 3/4 full to allow room for rising.
- Bake the muffins: Place the muffin tin in the preheated oven and bake for 18-22 minutes, or until a toothpick inserted into the center of a muffin comes out clean. The tops should be golden brown.
- Cool and serve: Allow the muffins to cool in the pan for about 5 minutes before transferring them to a wire rack to cool completely. Serve warm or at room temperature.
Extra Tips:
For an extra burst of lemon flavor, consider adding a simple lemon glaze on top of the muffins. To make the glaze, mix powdered sugar with a little bit of lemon juice until it reaches a pourable consistency, then drizzle over the cooled muffins.
If you want your muffins to be extra moist, be sure not to overbake them; keeping a close eye on the baking time is vital. Additionally, you can store any leftover muffins in an airtight container for up to three days or freeze them for up to a month. Just reheat before serving to bring back that freshly baked taste.
Relish Almond Croissants

Almond croissants are a delightful pastry that combines the flaky, buttery goodness of a classic croissant with the nutty, sweet flavor of almonds. Perfect for a sweet breakfast treat, these pastries are often enjoyed with a cup of coffee or tea.
Making them at home can be a rewarding experience, as you get to enjoy them fresh out of the oven, filling your kitchen with a warm, inviting aroma.
Creating these delectable croissants involves a few steps, but the end result is well worth the effort. The key is to start with high-quality croissant dough and a rich almond filling. The croissants are then baked to a golden brown, with a crispy exterior and a soft, flavorful interior.
Whether you’re serving these for a special breakfast or a leisurely weekend brunch, these relish almond croissants are sure to impress your family and guests.
Ingredients (Serves 4-6 people):
- 6 large croissants, preferably a day old
- 1 cup almond flour
- 1/2 cup unsalted butter, softened
- 1 cup powdered sugar
- 2 large eggs
- 1 teaspoon almond extract
- 1/2 teaspoon vanilla extract
- 1/4 cup sliced almonds
- 2 tablespoons all-purpose flour
- 2 tablespoons milk
- Powdered sugar for dusting
Cooking Instructions:
1. Prepare the Almond Filling: In a large mixing bowl, combine the almond flour, softened unsalted butter, and powdered sugar. Mix until the ingredients are well incorporated and smooth.
Add in one egg, almond extract, and vanilla extract, then continue mixing until you achieve a creamy consistency.
2. Prepare the Croissants: Slice the croissants in half horizontally. Place the bottom halves on a baking sheet lined with parchment paper.
3. Fill the Croissants: Spread a generous amount of almond filling over each bottom half of the croissants. Place the top halves back on, pressing lightly to guarantee the filling is evenly distributed.
4. Top the Croissants: In a small bowl, beat the second egg with the milk to make an egg wash. Brush the tops of the croissants with this mixture. Sprinkle sliced almonds on top.
5. Bake the Croissants: Preheat your oven to 350°F (175°C). Bake the croissants for 15-20 minutes or until they’re golden brown and the almond filling is set.
6. Finish and Serve: Remove the croissants from the oven and let them cool slightly. Dust with powdered sugar before serving.
Extra Tips: For a richer almond flavor, consider toasting the almond flour lightly before mixing it into the filling.
If your croissants are fresh, you might want to briefly dry them in the oven before assembling, as day-old croissants absorb the almond filling better. Additionally, if you prefer a less sweet pastry, you can adjust the amount of powdered sugar in the filling to your liking.
Enjoy your almond croissants warm for the best taste experience!
Whip Up Peanut Butter and Jelly Waffles

Wake up to the delightful aroma of warm, homemade waffles with a classic twist that combines the beloved flavors of peanut butter and jelly. These Peanut Butter and Jelly Waffles aren’t just a treat for the taste buds but also evoke a sense of nostalgia that takes you back to simpler times. Perfect for a weekend brunch or a special breakfast, this recipe is bound to be a hit with both kids and adults alike.
The fluffy waffles are infused with creamy peanut butter, while a dollop of your favorite jelly or jam adds a sweet, fruity burst with every bite. This recipe is designed to serve 4-6 people, making it ideal for family gatherings or when you have guests over. In just a few simple steps, you can create a breakfast spread that’s as visually appealing as it’s delicious.
With the right balance of ingredients, these waffles come out perfectly every time, with a crispy exterior and a soft, tender interior. Whether you prefer classic grape jelly or want to experiment with strawberry or raspberry, this versatile recipe allows you to customize the flavors to suit your preferences.
Ingredients:
- 2 cups all-purpose flour
- 2 tablespoons granulated sugar
- 1 tablespoon baking powder
- ½ teaspoon salt
- 2 large eggs
- 1¾ cups milk
- ½ cup creamy peanut butter
- 4 tablespoons unsalted butter, melted
- 1 teaspoon vanilla extract
- ½ cup jelly or jam of your choice (grape, strawberry, raspberry)
- Optional: fresh fruit and powdered sugar for topping
Instructions:
1. Prepare the Batter: In a large mixing bowl, combine the flour, sugar, baking powder, and salt. Whisk these dry ingredients together to guarantee they’re evenly distributed.
In a separate bowl, beat the eggs and then add the milk, peanut butter, melted butter, and vanilla extract. Mix until the wet ingredients are well combined and the peanut butter is fully incorporated.
2. Combine Ingredients: Gradually pour the wet mixture into the dry ingredients, stirring gently with a spatula until just combined. Be careful not to overmix, as this can result in tough waffles. The batter should be slightly lumpy.
3. Preheat the Waffle Iron: Turn on your waffle iron according to the manufacturer’s instructions and lightly grease it with non-stick cooking spray or a small amount of melted butter.
4. Cook the Waffles: Pour the batter onto the preheated waffle iron, using about ½ to ¾ cup of batter per waffle, depending on the size of your iron. Close the lid and cook until the waffles are golden brown and crispy, typically about 5-7 minutes. Adjust the cooking time based on your waffle iron’s settings.
5. Add the Jelly: Once the waffles are cooked, remove them from the iron and place them on a serving plate. Spread a generous spoonful of your chosen jelly or jam over the top of each waffle. The warmth of the waffles will slightly melt the jelly, making it spreadable and glossy.
6. Serve and Garnish: Serve the waffles warm, optionally garnished with fresh fruit and a dusting of powdered sugar for an extra touch of sweetness and presentation.
Extra Tips:
For the best results, make sure all your ingredients are at room temperature before starting. This helps the batter combine more smoothly and results in fluffier waffles.
If you want to add a little texture, consider mixing in some chopped peanuts into the batter. If you’re making these waffles for a crowd, keep the cooked waffles warm in an oven preheated to 200°F (93°C) until you’re ready to serve.
Finally, don’t hesitate to experiment with different types of nut butters or jams to create unique flavor combinations.
Delight in Mango Coconut Chia Pudding
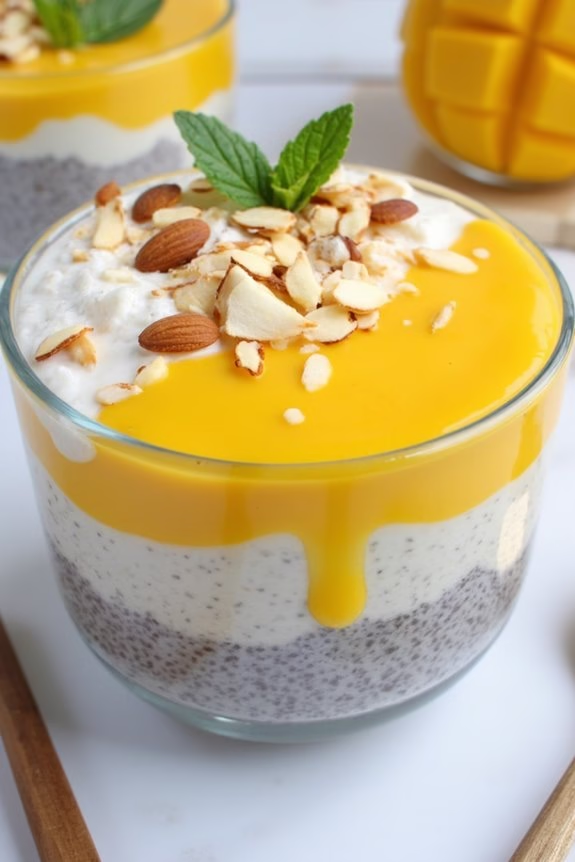
Indulge in a tropical twist for your breakfast with Mango Coconut Chia Pudding. This delightful treat combines the creamy texture of coconut milk with the fresh, vibrant flavor of ripe mangoes, all blended together with the nutritious and satisfying chia seeds.
Perfect for those who love a sweet start to their day, this pudding isn’t only delicious but also packed with fiber and healthy fats, making it a wholesome choice to energize your morning. Whether you’re hosting a brunch or simply treating yourself to something special, this recipe is sure to impress.
Mango Coconut Chia Pudding is a versatile dish that can be prepared in advance, making it an ideal option for busy mornings. The beauty of this recipe lies in its simplicity and the way it allows the natural sweetness of the mango to shine through, complemented by the richness of the coconut milk.
Serve it chilled for a revitalizing breakfast or snack, and feel free to garnish with your favorite toppings such as fresh fruits, nuts, or a drizzle of honey for added indulgence.
Ingredients (Serving Size: 4-6 people):
- 1 cup chia seeds
- 3 cups coconut milk
- 2 ripe mangoes, peeled and diced
- 1/4 cup honey or maple syrup
- 1 teaspoon vanilla extract
- Pinch of salt
- Optional toppings: sliced almonds, coconut flakes, fresh mint leaves
Cooking Instructions:
- Prepare the Chia Pudding Base:
- In a large mixing bowl, combine the chia seeds, coconut milk, honey (or maple syrup), vanilla extract, and a pinch of salt. Stir well until all ingredients are thoroughly mixed. Let the mixture sit for about 5 minutes, then stir again to break up any clumps of chia seeds.
- Refrigerate the Pudding:
- Cover the bowl with plastic wrap or a tight-fitting lid and refrigerate for at least 3 hours, or overnight for best results. This allows the chia seeds to absorb the liquid and swell, creating a pudding-like consistency.
- Prepare the Mango Puree:
- While the chia pudding is setting, place the diced mangoes in a blender or food processor. Blend until smooth to create a mango puree. You might need to add a splash of water if the mangoes aren’t juicy enough to blend smoothly.
- Assemble the Pudding:
- Once the chia pudding has set, remove it from the refrigerator. Stir it well once more to guarantee an even consistency. In serving glasses or bowls, layer the chia pudding with the mango puree. You can create layers or simply top the pudding with the puree, depending on your preference.
- Add Optional Toppings:
- Garnish with your choice of toppings such as sliced almonds, coconut flakes, or fresh mint leaves for added texture and flavor.
- Serve:
- Serve immediately if you like it chilled or store in the refrigerator until you’re ready to enjoy.
Extra Tips:
For a creamier pudding, consider using full-fat coconut milk. You can adjust the sweetness by adding more or less honey/maple syrup according to your taste preference.
If you prepare the pudding overnight, the flavors will meld together beautifully, enhancing the overall taste. Feel free to experiment with different fruit purees like passion fruit or berries for a variation in flavor.
When selecting mangoes, choose ones that are ripe and fragrant for the best flavor.
Explore Raspberry Danish Delights

Indulge in the perfect blend of flaky pastry, creamy cheese filling, and tart raspberries with these Raspberry Danish Delights. Ideal for a sweet breakfast treat, these pastries are both visually appealing and deliciously satisfying.
Whether you’re hosting a brunch or simply treating yourself, these danishes will elevate your morning with their delightful taste and elegant presentation.
These Raspberry Danish Delights aren’t only easy to make but also provide a beautiful balance of flavors and textures. The rich cream cheese filling complements the sweet and tangy raspberry topping, all encased in a buttery, flaky puff pastry.
This recipe serves 4-6 people, making it perfect for family gatherings or a cozy morning at home.
Ingredients (Serves 4-6):
- 1 sheet of puff pastry, thawed
- 1/2 cup cream cheese, softened
- 1/4 cup granulated sugar
- 1 teaspoon vanilla extract
- 1 cup fresh raspberries
- 1 tablespoon raspberry jam
- 1 egg, beaten (for egg wash)
- Powdered sugar, for dusting (optional)
Cooking Instructions:
- Preheat the Oven: Preheat your oven to 400°F (200°C) to guarantee it reaches the right temperature while you prepare the danishes.
- Prepare the Filling: In a mixing bowl, combine the softened cream cheese, granulated sugar, and vanilla extract. Mix until smooth and creamy.
- Roll Out the Pastry: On a lightly floured surface, roll out the puff pastry sheet to smooth out the folds. Cut the pastry into 6 equal squares.
- Assemble the Danishes: Place a spoonful of the cream cheese mixture in the center of each pastry square. Top with a few fresh raspberries and a small dollop of raspberry jam.
- Shape the Pastry: Fold the corners of each pastry square towards the center, pinching them together gently to secure. Brush the edges with the beaten egg to guarantee a golden finish.
- Bake: Arrange the pastries on a parchment-lined baking sheet, leaving enough space between them for expansion. Bake in the preheated oven for 15-20 minutes, or until the pastry is golden brown and puffed.
- Cool and Serve: Allow the danishes to cool slightly on a wire rack. Dust with powdered sugar before serving, if desired.
Extra Tips:
- Make sure the puff pastry is properly thawed but still cold to handle easily and prevent sticking.
- For an extra glossy finish, you can brush the danishes with a simple syrup after baking.
- If fresh raspberries are unavailable, frozen raspberries can be used, though they may produce more liquid during baking.
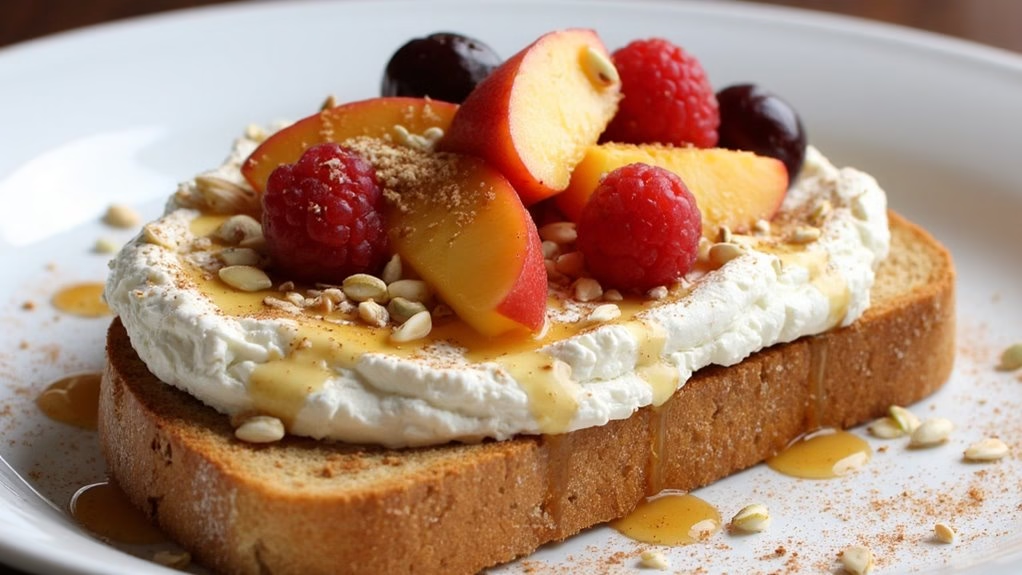
Sweeten With Honey Drizzled Ricotta Toast
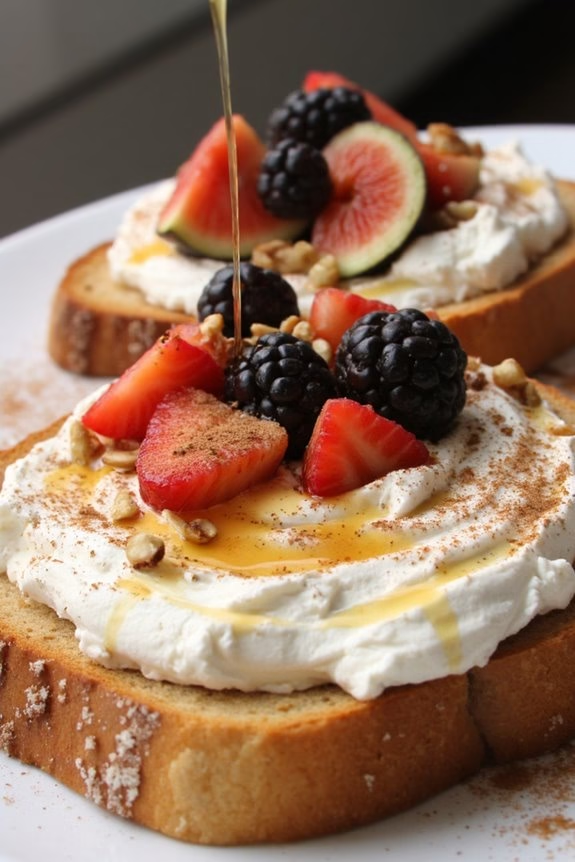
Start your morning with an indulgent yet wholesome treat by making Honey Drizzled Ricotta Toast. This delightful dish combines the creamy texture of ricotta cheese with the sweet, floral notes of honey, all atop a perfectly toasted slice of your favorite bread.
It’s a simple yet sophisticated breakfast that caters to your sweet tooth while providing a good dose of protein and energy to kickstart your day. Whether you’re enjoying a leisurely weekend brunch or need a quick, nutritious breakfast before heading out the door, this recipe will become a staple in your morning routine.
This dish is incredibly versatile, allowing you to customize it with your preferred toppings, such as fresh fruits, nuts, or a sprinkle of cinnamon. The key is in the balance between the creamy ricotta and the natural sweetness of honey, creating a harmonious flavor profile that satisfies without being overly rich.
Perfect for serving 4-6 people, this recipe is ideal for a family breakfast or a small gathering with friends. Let’s explore what you’ll need to create this heavenly breakfast treat.
Ingredients for 4-6 servings:
- 8 slices of your favorite bread (e.g., sourdough, whole grain)
- 1 1/2 cups ricotta cheese
- 1/4 cup honey
- 1 teaspoon vanilla extract
- Fresh fruits (such as berries, figs, or sliced peaches)
- 1/4 cup chopped nuts (such as almonds, walnuts, or pistachios)
- Pinch of sea salt
- Optional: ground cinnamon for sprinkling
Cooking Instructions:
- Prepare the Ricotta Mixture:
- In a medium-sized bowl, combine the ricotta cheese, vanilla extract, and a pinch of sea salt. Stir until the mixture is smooth and creamy. Set aside.
- Toast the Bread:
- Preheat your oven to 350°F (175°C) or use a toaster. If using the oven, place the slices of bread on a baking sheet and toast for about 8-10 minutes, flipping halfway through, until golden brown and crispy. If using a toaster, toast the bread until it reaches your desired level of crispiness.
- Assemble the Toast:
- Once the bread is toasted, spread a generous amount of the ricotta mixture onto each slice. Use the back of a spoon to create a slight swirl on the surface for a decorative touch.
- Add Toppings:
- Drizzle a tablespoon of honey over the ricotta-covered toasts. Then, top with your choice of fresh fruits and a sprinkle of chopped nuts. For an extra hint of warmth, dust the toasts lightly with ground cinnamon if desired.
- Serve:
- Arrange the Honey Drizzled Ricotta Toasts on a serving platter. Serve immediately while the toast is still warm, allowing the honey to meld with the creamy ricotta.
Extra Tips:
For an extra layer of flavor, consider using flavored ricotta, such as lemon or herb-infused varieties. If you’re feeling adventurous, try substituting the honey with maple syrup or agave nectar for a different twist.
Make sure to use high-quality honey and fresh, ripe fruits to enhance the overall taste. Finally, feel free to experiment with different types of bread; a hearty sourdough or a nutty whole grain can add an additional dimension to your dish.
Enjoy this delightful breakfast treat with a cup of your favorite coffee or tea for a perfect start to your day.