
As someone who cherishes a sweet breakfast, I can’t resist the allure of morning treats that bring joy to the start of the day. There’s nothing quite like the satisfaction of fluffy pancakes with a drizzle of maple syrup or the warm hug of cinnamon sugar French toast. The first time I experienced homemade chocolate croissants, it felt like a little piece of heaven. If you’re also a fan of sweet beginnings, you’re going to love these delightful recipes. Have you ever tried Nutella crepes?
Fluffy Maple Syrup Pancakes
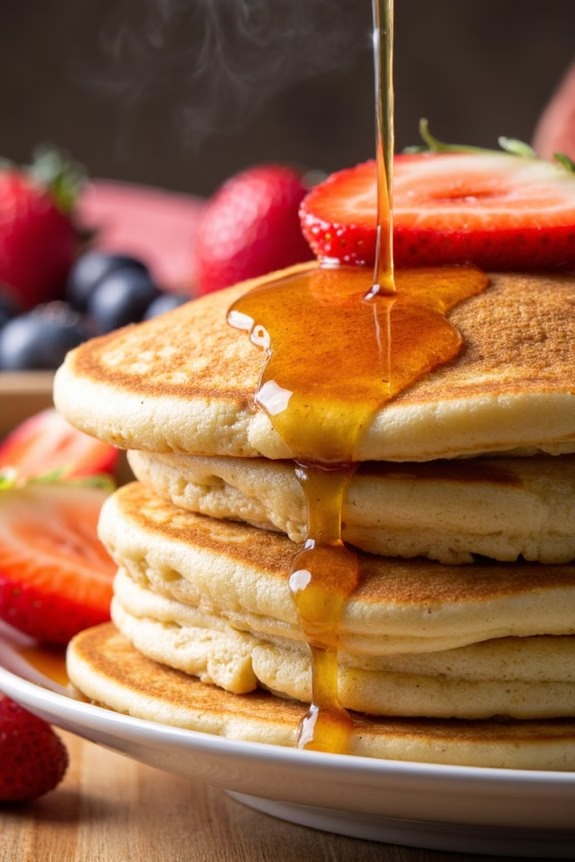
Start your day with a delicious breakfast that combines the lightness of fluffy pancakes with the rich sweetness of maple syrup. These pancakes aren’t only a treat for the taste buds but also a feast for the eyes, with their golden-brown surface and warm, inviting aroma. Perfect for a family breakfast or brunch, these maple syrup pancakes are sure to become a favorite in your household.
The key to achieving the perfect fluffiness lies in the careful combination of ingredients and gentle handling of the batter. Whether you’re planning a lazy weekend morning or a special breakfast occasion, these fluffy maple syrup pancakes provide the perfect start.
The recipe is straightforward, requiring basic ingredients and minimal preparation time, yet delivering a taste that’s anything but ordinary. Pair these pancakes with fresh fruit, a dollop of whipped cream, or additional maple syrup to enhance the indulgence. Now, let’s explore the list of ingredients and step-by-step instructions to create these delightful pancakes.
Ingredients (Serves 4-6):
- 2 cups all-purpose flour
- 2 tablespoons granulated sugar
- 1 tablespoon baking powder
- 1/2 teaspoon baking soda
- 1/2 teaspoon salt
- 2 large eggs
- 2 cups buttermilk
- 1/4 cup unsalted butter, melted
- 1 teaspoon vanilla extract
- 1/2 cup pure maple syrup, plus extra for serving
- Cooking spray or additional butter for greasing the pan
Cooking Instructions:
1. Prepare the Batter: In a large mixing bowl, whisk together the flour, granulated sugar, baking powder, baking soda, and salt until well combined. In another bowl, beat the eggs and then add the buttermilk, melted butter, and vanilla extract.
Stir the wet ingredients into the dry ingredients, mixing just until combined. Be careful not to over-mix; some lumps are okay.
2. Preheat the Griddle or Pan: Heat a non-stick griddle or large skillet over medium heat. Lightly grease it with cooking spray or a small amount of butter.
3. Cook the Pancakes: Pour about 1/4 cup of batter onto the griddle for each pancake. Cook until bubbles form on the surface and the edges look set, about 2-3 minutes.
Flip the pancakes and cook for another 2 minutes, or until the other side is golden brown. Adjust the heat as necessary to guarantee even cooking without burning.
4. Serve with Maple Syrup: Once all the pancakes are cooked, stack them on plates and drizzle generously with pure maple syrup. Serve immediately while they’re warm and fluffy.
Extra Tips:
To promote extra fluffy pancakes, make sure your baking powder and baking soda are fresh. If you have the time, let the batter rest for about 5-10 minutes before cooking; this allows the baking powder to activate fully, giving the pancakes more lift.
For added flavor, consider folding in a handful of blueberries or chocolate chips into the batter before cooking. Finally, always keep an eye on the heat level—too high, and the pancakes will brown too quickly on the outside while remaining undercooked inside.
Enjoy the process, and serve up a breakfast that will surely delight!
Cinnamon Sugar French Toast
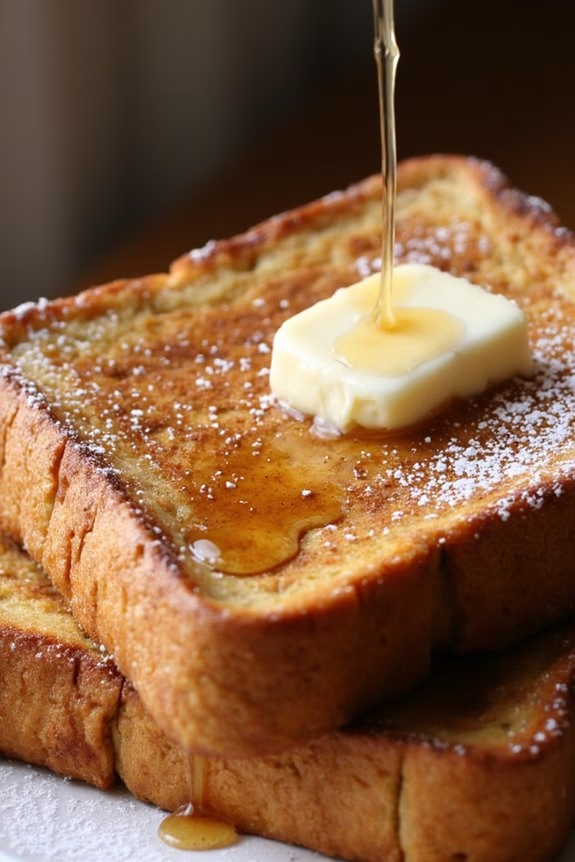
Cinnamon Sugar French Toast is a delightful twist on the classic breakfast favorite, offering a perfect balance of sweetness and spice. This dish captures the warm, comforting flavor of cinnamon combined with the rich, buttery taste of French toast.
Ideal for weekend brunches or special occasions, it’s sure to be a hit with both kids and adults alike. The crispy exterior and soft, fluffy interior make each bite a heavenly experience. Paired with a drizzle of syrup or a dusting of powdered sugar, this Cinnamon Sugar French Toast is destined to become a staple in your breakfast repertoire.
This recipe is designed to serve 4-6 people, making it perfect for a family gathering or a cozy morning with friends. With simple ingredients you likely already have in your pantry, this dish is both convenient and easy to prepare.
The key to achieving that perfect texture and flavor lies in the egg mixture and the proper cooking technique. Follow these steps to create a breakfast treat that everyone will be raving about.
Ingredients:
- 6 large eggs
- 1 cup whole milk
- 2 teaspoons vanilla extract
- 1 tablespoon ground cinnamon
- 1/4 cup granulated sugar
- 1/4 teaspoon salt
- 12 slices of thick-cut bread (such as brioche or challah)
- 4 tablespoons unsalted butter
- Maple syrup, for serving
- Powdered sugar, for dusting (optional)
Instructions:
- Prepare the Egg Mixture: In a large mixing bowl, whisk together the eggs, milk, vanilla extract, cinnamon, sugar, and salt until well combined. Confirm that the cinnamon is evenly distributed throughout the mixture to avoid clumps.
- Soak the Bread: Dip each slice of bread into the egg mixture, allowing it to soak for about 30 seconds on each side. Be sure that the bread is fully saturated but not overly soggy, as this will help it cook evenly and develop a nice crust.
- Preheat the Pan: Heat a large non-stick skillet or griddle over medium heat and add 1 tablespoon of butter. Allow the butter to melt and coat the pan evenly.
- Cook the French Toast: Place 3-4 slices of soaked bread onto the hot skillet. Cook each side for 3-4 minutes, or until golden brown and crispy. Adjust the heat as necessary to prevent burning. Repeat the process, adding more butter to the pan as needed, until all the slices are cooked.
- Serve and Enjoy: Transfer the cooked French toast to a serving platter. Serve immediately with a generous drizzle of maple syrup and a dusting of powdered sugar, if desired.
Extra Tips: For an extra crispy texture, consider using day-old bread, as it holds up better to the soaking process. Be sure to use a heavy-bottomed skillet to confirm even cooking and prevent scorching.
If you’re serving a larger crowd, keep the cooked French toast warm in a low oven (around 200°F) until ready to serve. For a fun variation, try adding a pinch of nutmeg or swapping the vanilla extract for almond extract to give your Cinnamon Sugar French Toast a unique twist.
Homemade Chocolate Croissants

Indulge in the delightful experience of making homemade chocolate croissants. This classic French pastry, known for its buttery, flaky layers and rich chocolate filling, is surprisingly achievable at home. While it might seem intimidating at first, the process of creating these pastries is both rewarding and delicious. Perfect for a sweet breakfast treat, these croissants are sure to impress your family or guests, making your morning extraordinary.
The key to a successful homemade chocolate croissant is patience and attention to detail. The dough must be layered with butter and rolled out several times to create the signature flaky texture. Once assembled and baked to golden perfection, the irresistible aroma will fill your kitchen, drawing everyone to the table. Serve them warm for the ultimate indulgence, and enjoy the satisfaction of a pastry well made.
Ingredients (serves 4-6 people):
- 2 cups all-purpose flour
- 1/4 cup granulated sugar
- 1 teaspoon salt
- 1 packet (2 1/4 teaspoons) active dry yeast
- 3/4 cup warm milk
- 1 cup unsalted butter, chilled
- 1 large egg
- 6 ounces dark chocolate, chopped (or chocolate chips)
- 1 tablespoon water
Cooking Instructions:
- Prepare the Dough:
- In a mixing bowl, combine the flour, sugar, and salt. In a separate small bowl, dissolve the yeast in warm milk and let it sit for about 5 minutes, until it’s foamy.
- Pour the yeast mixture into the dry ingredients and mix until a dough begins to form. Knead the dough on a lightly floured surface for about 5 minutes until smooth and elastic. Shape it into a ball, cover it with a damp cloth, and let it rise in a warm place for about 1 hour, or until it doubles in size.
- Prepare the Butter Block:
- Place the chilled butter between two sheets of parchment paper. Use a rolling pin to beat and roll the butter into an 8-inch square. Once done, wrap it in parchment paper and chill it in the refrigerator until firm.
- Laminate the Dough:
- On a floured surface, roll the dough into a 12-inch square. Place the butter block in the center of the dough, rotating it so it looks like a diamond on the square. Fold each corner of the dough over the butter block, enclosing it completely.
- Roll the dough into a rectangle about 8×24 inches. Fold it into thirds like a letter, wrap it in plastic wrap, and refrigerate for 30 minutes. Repeat this rolling and folding process two more times, chilling after each fold.
- Shape the Croissants:
- Roll the laminated dough into a large rectangle about 1/4 inch thick. Cut the dough into triangles, about 4 inches wide at the base. Place a few pieces of chocolate near the base of each triangle.
- Starting from the base, roll each triangle up towards the tip, tucking the point underneath to secure the croissant shape. Place each croissant on a baking sheet lined with parchment paper.
- Proof the Croissants:
- Cover the croissants lightly with a damp cloth and let them rise in a warm area for about 1 to 2 hours, or until they double in size.
- Bake the Croissants:
- Preheat your oven to 400°F (200°C). Beat the egg with a tablespoon of water to create an egg wash. Brush each croissant with the egg wash.
- Bake the croissants in the preheated oven for 15-20 minutes, or until they’re golden brown. Allow them to cool slightly before serving.
Extra Tips:
When making homemade chocolate croissants, make sure that your butter and dough are both chilled during the laminating process to achieve the best flaky texture.
Be patient with the rising times, as this will help develop the perfect puffiness. Experiment with different types of chocolate to find your preferred flavor, and be sure to enjoy these croissants while they’re fresh and warm.
If you have leftovers, store them in an airtight container and reheat in the oven to regain their crispiness.
Berry Breakfast Parfaits

Berry Breakfast Parfaits are a delightful way to start your day with a burst of fresh flavors and a touch of sweetness. This layered breakfast dish combines creamy yogurt, crunchy granola, and a colorful assortment of berries, creating a perfect harmony of textures and tastes. Not only do these parfaits look stunning, but they’re also packed with nutrients, making them a healthy yet indulgent breakfast option.
Whether you’re hosting a brunch or simply treating yourself to a luxurious breakfast, Berry Breakfast Parfaits are easy to assemble and can be customized to suit your preferences. You can use a variety of berries depending on what’s in season or your personal favorites. These parfaits are versatile, allowing you to experiment with different types of yogurt and granola for added flavor and texture variations.
Ingredients (Serves 4-6):
- 2 cups of Greek yogurt
- 1 cup of strawberries, hulled and sliced
- 1 cup of blueberries
- 1 cup of raspberries
- 1 cup of granola
- 2 tablespoons of honey
- 1 teaspoon of vanilla extract
- Fresh mint leaves for garnish (optional)
Cooking Instructions:
- Prepare the Yogurt Base: In a mixing bowl, combine the Greek yogurt, honey, and vanilla extract. Stir until the mixture is smooth and the ingredients are well incorporated. This will serve as the creamy base for your parfaits.
- Assemble the Parfaits: Begin layering the parfaits in your chosen serving glasses or bowls. Start with a spoonful of the yogurt mixture at the bottom of each glass.
- Add the Granola: Sprinkle a layer of granola over the yogurt. This will add a satisfying crunch to your parfaits.
- Layer with Berries: Add a layer of mixed berries over the granola. You can mix the berries together or layer them separately for a more structured look.
- Repeat the Layers: Continue layering with yogurt, granola, and berries until you reach the top of the glass or bowl. Aim for at least two layers of each component for a visually appealing presentation.
- Finish with Garnish: Top the final layer of berries with a small dollop of yogurt and a drizzle of honey. Garnish with fresh mint leaves for an added touch of freshness and color.
Extra Tips:
For an extra burst of flavor, consider adding a sprinkle of cinnamon or nutmeg to the yogurt mixture. If you’re looking for a dairy-free alternative, coconut or almond yogurt can be substituted for Greek yogurt.
When it comes to granola, choose one with additional nuts or dried fruits for a more complex texture. Finally, if you’re preparing these parfaits in advance, assemble them up to the granola layer and add the final layers of berries just before serving to maintain their freshness and prevent the granola from becoming soggy.
Nutella Crepe Delights
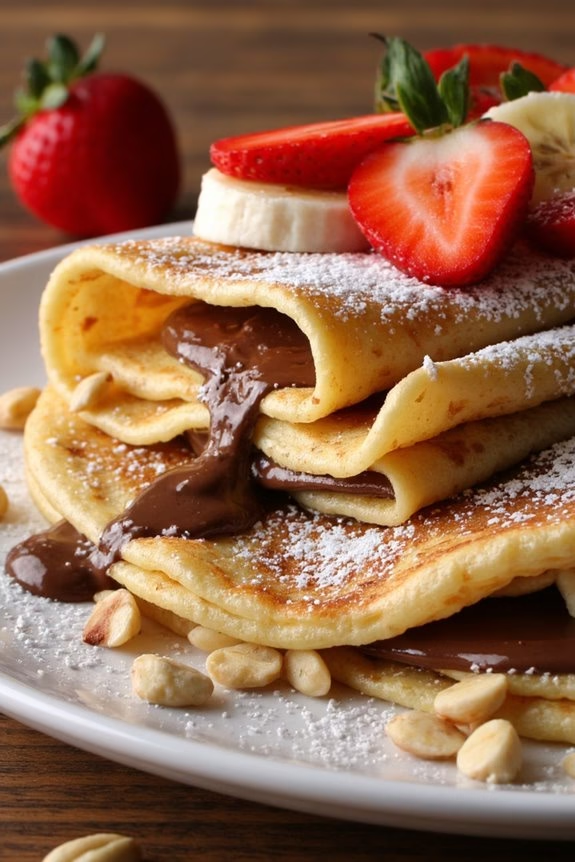
Preparing Nutella Crepe Delights is a straightforward process that yields impressive results. The key to making the best crepes lies in achieving the perfect batter consistency and mastering the art of swirling the pan to create thin, even layers.
Once you’ve prepared the crepes, the fun begins as you spread on that luscious Nutella and experiment with various toppings to enhance the flavors. Whether you prefer the simplicity of just Nutella or the addition of fresh fruits and nuts, this dish will certainly become a favorite in your breakfast repertoire.
Ingredients (serving size: 4-6 people):
- 2 cups all-purpose flour
- 2 tablespoons sugar
- 1/2 teaspoon salt
- 2 1/2 cups milk
- 4 large eggs
- 4 tablespoons unsalted butter, melted
- 1 teaspoon vanilla extract
- 1 cup Nutella
- Optional: sliced strawberries, bananas, or chopped nuts
- Optional: powdered sugar for dusting
Instructions:
1. Prepare the Crepe Batter: In a large mixing bowl, whisk together the flour, sugar, and salt until well combined. In a separate bowl, whisk the milk, eggs, melted butter, and vanilla extract until smooth.
Gradually add the wet ingredients to the dry ingredients, whisking continuously until the batter is smooth and free of lumps. Allow the batter to rest for at least 30 minutes, or up to an hour, to promote a more tender crepe.
2. Cook the Crepes: Heat a non-stick skillet or crepe pan over medium heat and lightly grease it with a small amount of butter. Pour about 1/4 cup of batter into the center of the pan, and immediately tilt and swirl the pan to spread the batter evenly into a thin layer.
Cook the crepe for about 1-2 minutes, or until the edges start to lift and the underside is lightly golden. Flip the crepe and cook the other side for an additional minute. Transfer the cooked crepe to a plate and repeat with the remaining batter, stacking the crepes as you go.
3. Assemble the Crepes: Once all the crepes are cooked, spread a generous layer of Nutella over one side of each crepe. Fold the crepe into quarters or roll it up gently.
Arrange the Nutella-filled crepes on a serving platter.
4. Add Toppings (Optional): Top the crepes with sliced strawberries, bananas, or a sprinkle of chopped nuts for added texture and flavor. Dust with powdered sugar for a touch of elegance if desired.
Extra Tips: To guarantee your Nutella Crepe Delights are perfect every time, make sure the batter is smooth and lump-free before cooking. Resting the batter allows the flour to fully absorb the liquid, resulting in tender crepes.
If the batter thickens too much while resting, simply whisk in a little more milk to reach the desired consistency. Keep the heat at medium to avoid burning the crepes, and adjust as necessary.
Finally, if you’re preparing the crepes in advance, keep them warm by covering with a clean towel or placing them in a low oven until ready to serve. Enjoy experimenting with different fillings and toppings to create a variety of delicious breakfast treats!
Ricotta Honey Waffles
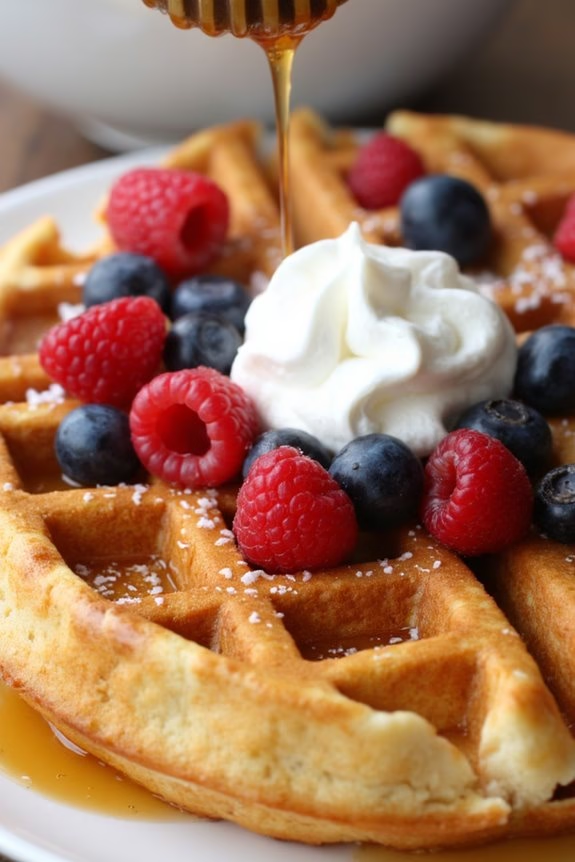
Indulge in the delightful combination of creamy ricotta cheese and sweet honey with these Ricotta Honey Waffles, a perfect treat to start your day. These waffles are light, fluffy, and infused with a rich, slightly tangy flavor from the ricotta, balanced beautifully by the sweetness of honey.
Whether you’re planning a cozy weekend breakfast or a special brunch, these waffles will surely impress your family and friends with their gourmet taste and simple preparation.
The Ricotta Honey Waffles aren’t only delicious but also versatile, allowing you to get creative with toppings like fresh berries, nuts, or a drizzle of extra honey. The batter comes together quickly and requires just a few ingredients, making it an ideal choice for a quick yet satisfying morning meal.
Serve these waffles with a side of fresh fruit and a cup of coffee or tea for a complete breakfast experience.
Ingredients (Serves 4-6):
- 2 cups all-purpose flour
- 1 tablespoon baking powder
- 1/2 teaspoon salt
- 2 tablespoons granulated sugar
- 1 1/2 cups whole milk
- 3/4 cup ricotta cheese
- 3 large eggs
- 1/4 cup unsalted butter, melted
- 1 teaspoon vanilla extract
- 1/4 cup honey
Cooking Instructions:
- Preheat your waffle iron according to the manufacturer’s instructions. This guarantees that your waffles will cook evenly and develop a nice, crispy exterior.
- Mix the dry ingredients: In a large mixing bowl, whisk together the all-purpose flour, baking powder, salt, and granulated sugar until well combined. This helps distribute the baking powder evenly, which is essential for the waffles to rise properly.
- Combine the wet ingredients: In a separate bowl, blend the whole milk, ricotta cheese, eggs, melted butter, vanilla extract, and honey. Whisk until the mixture is smooth and the ricotta is thoroughly incorporated, ensuring a uniform texture in the batter.
- Combine wet and dry mixtures: Pour the wet ingredients into the dry ingredients, stirring gently with a spatula until just combined. Be careful not to overmix; a few lumps are fine, as overmixing can lead to tough waffles.
- Cook the waffles: Lightly grease the preheated waffle iron with cooking spray or melted butter. Pour the batter onto the center of the hot waffle iron, spreading it slightly with a spatula if needed. Close the lid and cook according to your waffle maker’s instructions until the waffles are golden brown and crispy.
- Serve and enjoy: Carefully remove the waffles and serve them warm. Top with your favorite accompaniments such as extra honey, fresh berries, or a dollop of whipped cream for an extra special touch.
Extra Tips:
For the best results, make sure your ingredients are at room temperature before mixing, as this helps them combine more smoothly and guarantees even cooking.
If you want to experiment with flavors, consider adding a pinch of cinnamon or a zest of lemon to the batter for added depth of flavor.
For an extra crispy texture, you can keep the cooked waffles warm in a low oven directly on the rack while you cook the remaining batter.
Enjoy these Ricotta Honey Waffles as a delightful and sweet start to your day!
Cinnamon Roll Muffins
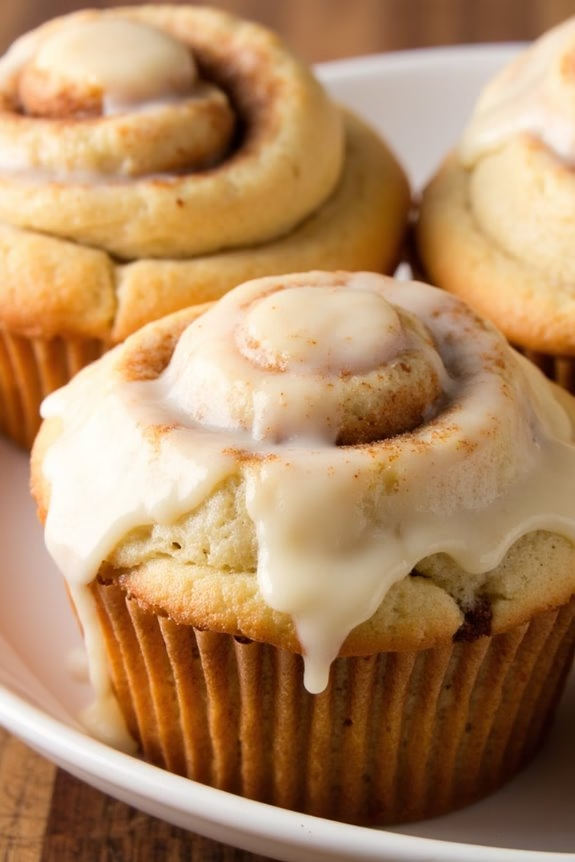
Indulge in the heavenly combination of cinnamon rolls and muffins with this delightful Cinnamon Roll Muffins recipe. Perfect for a sweet breakfast treat, these muffins offer all the comforting flavors of classic cinnamon rolls but with a quicker and more convenient preparation.
Soft, buttery, and swirled with cinnamon and sugar, they’re topped with a luscious cream cheese glaze that melts into every bite, making them an irresistible morning delight.
These muffins are perfect for a weekend breakfast or brunch, and they’re sure to impress your family and friends. The recipe is simple to follow and uses common pantry ingredients, making it an easy yet delectable dish to whip up in no time.
Grab your muffin tins and get ready to enjoy the smell of cinnamon wafting through your kitchen as you bake these scrumptious treats.
Ingredients (Serves 4-6):
- 2 cups all-purpose flour
- 1/2 cup granulated sugar
- 1 tablespoon baking powder
- 1/2 teaspoon salt
- 1/2 cup unsalted butter, melted
- 1 cup milk
- 2 large eggs
- 1 teaspoon vanilla extract
- 1 cup brown sugar
- 1 tablespoon ground cinnamon
For the Cream Cheese Glaze:
- 4 ounces cream cheese, softened
- 1/4 cup unsalted butter, softened
- 1 cup powdered sugar
- 1 teaspoon vanilla extract
- 2 tablespoons milk
Instructions:
1. Preheat the Oven and Prepare the Muffin Tin:
Preheat your oven to 375°F (190°C). Line a muffin tin with paper liners or lightly grease it with cooking spray to prevent sticking.
2. Mix the Dry Ingredients:
In a large mixing bowl, whisk together the all-purpose flour, granulated sugar, baking powder, and salt until well combined. Set aside.
3. Combine Wet Ingredients:
In another bowl, whisk together the melted butter, milk, eggs, and vanilla extract until everything is well incorporated.
4. Make the Cinnamon Sugar Mixture:
In a small bowl, mix the brown sugar and ground cinnamon together until evenly distributed.
5. Combine Wet and Dry Ingredients:
Pour the wet ingredients into the dry ingredients. Stir gently with a spatula until just combined. Don’t overmix; a few lumps are okay.
6. Layer the Batter and Cinnamon Mixture:
Spoon about 1 tablespoon of muffin batter into each muffin cup. Then, sprinkle a teaspoon of the cinnamon sugar mixture over the batter.
Repeat with another layer of batter and cinnamon sugar until the cups are about 2/3 full.
7. Bake the Muffins:
Place the muffin tin in the preheated oven and bake for 15-18 minutes, or until a toothpick inserted into the center of a muffin comes out clean.
8. Prepare the Cream Cheese Glaze:
While the muffins are baking, make the glaze by beating together the softened cream cheese and butter until creamy. Gradually add in the powdered sugar and vanilla extract, mixing until smooth.
Stir in the milk until the glaze reaches the desired consistency.
9. Glaze the Muffins:
Once the muffins have cooled slightly, drizzle the cream cheese glaze over the top of each muffin. Serve warm and enjoy!
Extra Tips:
For an extra burst of flavor, you can add chopped nuts like walnuts or pecans to the cinnamon sugar mixture.
If you prefer a more intense cinnamon flavor, increase the amount of ground cinnamon to your liking.
Make sure not to overbake the muffins as they can become dry; keep an eye on them during the last few minutes of baking. Enjoy these muffins fresh out of the oven for the best texture and taste.
Fruit and Yogurt Smoothie Bowls
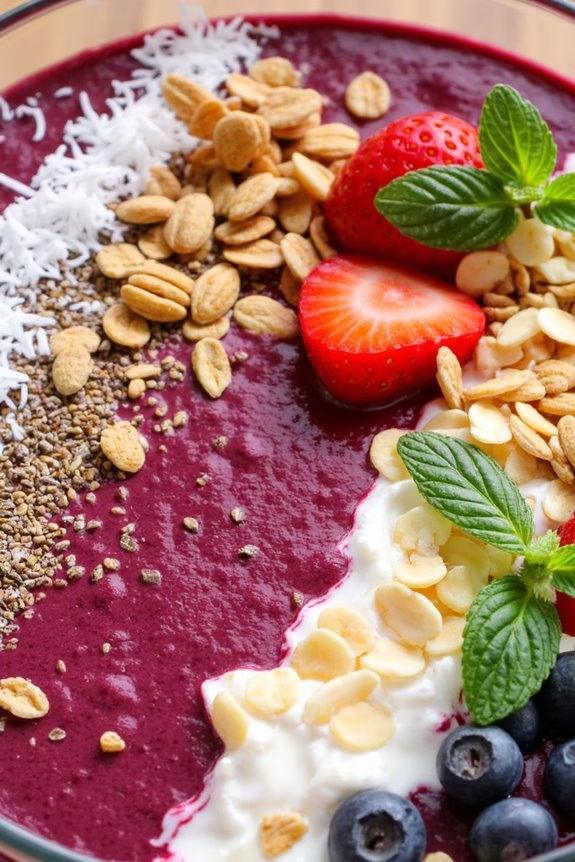
Fruit and yogurt smoothie bowls are a delightful way to start your day with a burst of flavor and nutrition. These vibrant bowls combine creamy yogurt, fresh fruits, and a variety of toppings, making them not only visually appealing but also incredibly satisfying.
They’re perfect for a sweet breakfast that’s both invigorating and energizing. Smoothie bowls are versatile, allowing you to mix and match fruits and toppings based on your preferences or what’s in season.
The base of the smoothie bowl is made by blending together yogurt and fruits to create a thick, creamy consistency. Once the base is ready, you can get creative with the toppings. Popular choices include fresh berries, sliced bananas, granola, seeds, and nuts. This recipe is designed to serve 4-6 people, making it perfect for a family breakfast or a brunch gathering with friends.
Ingredients (Serves 4-6):
- 2 cups plain Greek yogurt
- 2 cups frozen mixed berries
- 2 bananas, sliced
- 1/2 cup almond milk (or any milk of choice)
- 1 tablespoon honey or maple syrup
- 1 teaspoon vanilla extract
- 1 cup granola
- 1/2 cup sliced almonds
- 1/2 cup fresh strawberries, sliced
- 1/4 cup chia seeds
- 1/4 cup shredded coconut
- Fresh mint leaves for garnish
Instructions:
- Prepare the Smoothie Base: In a blender, combine the Greek yogurt, frozen mixed berries, one sliced banana, almond milk, honey (or maple syrup), and vanilla extract. Blend on high speed until smooth and creamy. The consistency should be thick enough to hold toppings on the surface.
- Adjust Consistency: If the smoothie base is too thick, add a little more almond milk and blend again until the desired consistency is reached. If it’s too thin, you can add a few more frozen berries to thicken it.
- Pour into Bowls: Divide the smoothie base evenly among 4-6 bowls, depending on your serving size.
- Add Toppings: Top each bowl with the remaining sliced banana, fresh strawberries, granola, sliced almonds, chia seeds, and shredded coconut. Feel free to adjust the amount of each topping based on personal preference.
- Garnish: Finish with a few fresh mint leaves for a touch of color and added zest.
Extra Tips:
For an even more nutritious boost, consider adding a scoop of protein powder or a spoonful of nut butter to the smoothie base before blending.
You can also swap out the fruits and toppings based on what’s in season or what you have on hand. For a dairy-free version, substitute the Greek yogurt with a plant-based yogurt.
Remember to serve the smoothie bowls immediately after preparation to enjoy the freshest flavors and the best texture.
Caramel Banana Oatmeal
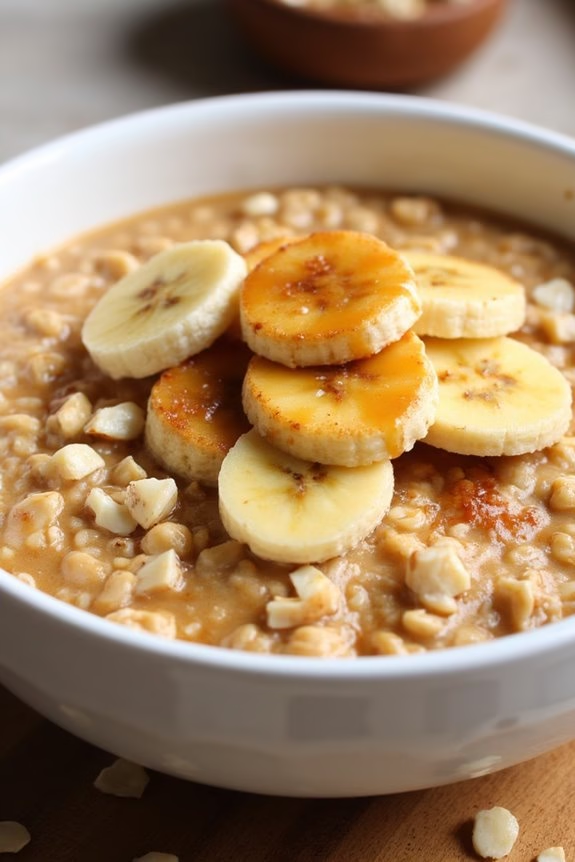
Caramel Banana Oatmeal is the perfect way to elevate your breakfast game with its warm, comforting flavors and satisfying textures. This hearty dish combines the earthy goodness of oats with the sweet, decadent flavor of caramelized bananas, offering a delightful twist to your usual breakfast routine.
It’s an ideal choice for those who crave something sweet in the morning but still want to stay on the healthier side. The natural sweetness of bananas, enhanced by a touch of caramel, pairs beautifully with the creamy oatmeal, creating a dish that’s not only delicious but also packed with nutrients and energy to keep you going throughout the day.
This recipe is perfect for serving a family or a group of friends, as it makes enough to satisfy 4-6 people. The preparation is straightforward and requires minimal ingredients, making it an accessible choice even for those new to cooking. Whether you’re serving it up as a weekend treat or a special weekday breakfast, Caramel Banana Oatmeal is sure to delight everyone at the table.
Ingredients (Serves 4-6):
- 2 cups rolled oats
- 4 cups milk (or any milk alternative)
- 4 ripe bananas
- 4 tablespoons brown sugar
- 2 tablespoons butter
- 1 teaspoon vanilla extract
- 1/2 teaspoon cinnamon
- Pinch of salt
- Optional toppings: chopped nuts, additional banana slices, or a drizzle of caramel sauce
Cooking Instructions:
- Prepare the Oats: In a large saucepan, combine the rolled oats and milk. Place the saucepan over medium heat and bring to a gentle simmer, stirring occasionally to prevent the oats from sticking to the bottom of the pan.
- Cook the Oats: Once the mixture is simmering, reduce the heat to low and continue to cook for about 10 minutes, or until the oats are tender and have absorbed most of the liquid. Stir occasionally to ascertain even cooking.
- Caramelize the Bananas: While the oats are cooking, slice the bananas into thick coins. In a separate skillet, melt the butter over medium heat. Add the brown sugar and stir until it’s dissolved. Place the banana slices in the skillet and cook for about 2-3 minutes on each side, until they’re golden brown and caramelized. Remove from heat and set aside.
- Combine Flavors: Once the oats are cooked, stir in the vanilla extract, cinnamon, and a pinch of salt. Mix well to incorporate the flavors throughout the oatmeal.
- Assemble the Dish: Divide the cooked oatmeal among bowls. Top each serving with an equal portion of caramelized bananas. Add any optional toppings like chopped nuts or additional banana slices for texture and flavor.
Extra Tips:
To guarantee the perfect texture for your Caramel Banana Oatmeal, adjust the amount of milk to your preference – more milk results in creamier oatmeal, while less gives a thicker consistency.
If you prefer a stronger caramel flavor, you can add a drizzle of caramel sauce on top. For those who enjoy a bit of crunch, topping the oatmeal with toasted nuts like almonds or walnuts can add a delightful contrast.
Finally, if you’re preparing this dish in advance, store the caramelized bananas separately and add them when serving to maintain their texture and flavor.
Apple-Cinnamon Strudels

Apple-Cinnamon Strudels are the perfect sweet breakfast treat that combines warm, spiced apples with flaky pastry. Known for their delightful balance of sweetness and spice, these strudels are easy to prepare and certain to impress your family or guests.
The combination of juicy apples and cinnamon wrapped in golden, buttery puff pastry makes this dish an irresistible choice for any breakfast table, elevating your morning with a touch of indulgence.
This recipe serves 4-6 people, making it ideal for a family breakfast or a brunch gathering. The preparation is straightforward, involving simple ingredients that come together to create a deliciously satisfying meal.
Whether you’re a seasoned baker or a novice in the kitchen, this recipe guarantees you’ll have a batch of scrumptious apple-cinnamon strudels ready to enjoy in no time.
Ingredients:
- 2 large apples, peeled and thinly sliced
- 1/4 cup granulated sugar
- 1 tablespoon ground cinnamon
- 1 tablespoon lemon juice
- 1 tablespoon all-purpose flour
- 1/4 cup raisins (optional)
- 1 package (about 17.3 oz) frozen puff pastry, thawed
- 1 egg, beaten (for egg wash)
- 1 tablespoon butter, melted
- Powdered sugar for dusting (optional)
Instructions:
- Preheat Oven: Preheat your oven to 375°F (190°C) and line a baking sheet with parchment paper.
- Prepare Apple Filling: In a mixing bowl, combine the sliced apples, granulated sugar, ground cinnamon, lemon juice, all-purpose flour, and raisins (if using). Toss the mixture well to confirm that the apples are evenly coated with the sugar and cinnamon.
- Roll Out Pastry: On a lightly floured surface, roll out the thawed puff pastry sheets to about 1/8-inch thickness. If necessary, use a rolling pin to smooth out any creases.
- Assemble Strudels: Cut the rolled pastry into rectangles, approximately 5×8 inches. Spoon a generous amount of the apple mixture onto one half of each rectangle, leaving a small border around the edges.
- Seal and Brush: Fold the other half of the pastry over the filling to enclose it, pressing down the edges to seal. Use a fork to crimp the edges for a decorative touch. Brush the tops of the strudels with the beaten egg to promote a golden finish.
- Bake: Transfer the strudels to the prepared baking sheet and bake in the preheated oven for 20-25 minutes, or until the pastry is puffed and golden brown.
- Cool and Serve: Remove from the oven and let them cool slightly on a wire rack. Before serving, you can dust the strudels with powdered sugar for extra sweetness and a beautiful presentation.
Extra Tips:
To enhance the flavor, consider adding a pinch of nutmeg or a dash of vanilla extract to the apple filling.
When selecting apples, opt for varieties like Granny Smith or Honeycrisp, which hold their shape well when baked and offer a nice balance of tartness and sweetness.
If you’re short on time, store-bought apple pie filling can be a quick alternative.
Finally, these strudels are best enjoyed warm, perhaps paired with a scoop of vanilla ice cream or a dollop of whipped cream for an extra-special breakfast treat.
Peach Overnight Oats
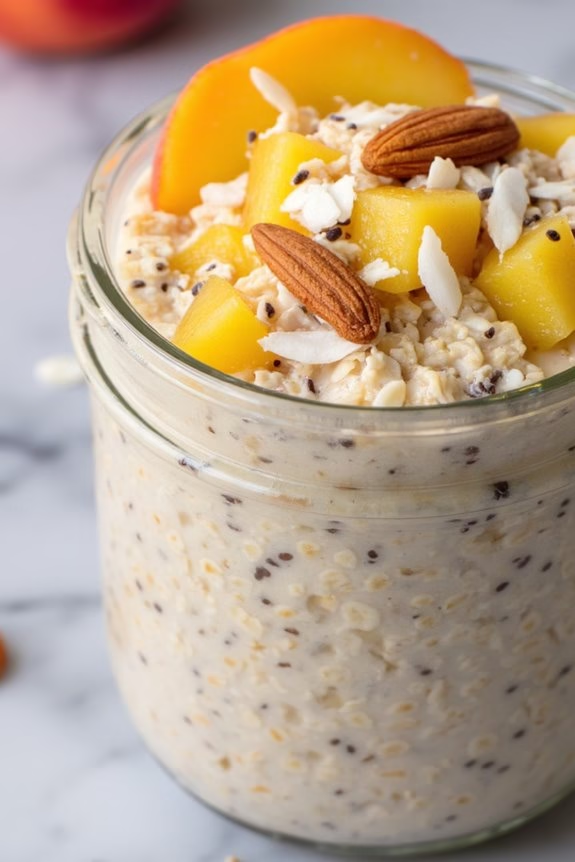
Peach Overnight Oats is a delightful and nutritious breakfast option that combines the creamy texture of oats with the sweet, juicy flavor of peaches. Perfect for those busy mornings when you’re on the go, this dish takes just a few minutes to prepare the night before, allowing the oats to soak up all the flavors and become deliciously soft by the morning.
With a hint of vanilla and a dash of cinnamon, these overnight oats aren’t only a treat for your taste buds but also packed with fiber, vitamins, and minerals to start your day off right.
This recipe is great for serving a family of 4 to 6 people, and each jar of overnight oats can be customized with additional toppings such as nuts, seeds, or even a dollop of yogurt. It’s a versatile breakfast that can easily be made vegan or gluten-free, depending on your dietary preferences.
Whether you’re enjoying these oats at home or taking them with you on the road, they’re sure to become a breakfast favorite.
Ingredients (Serves 4-6):
- 2 cups rolled oats
- 2 cups milk (or any plant-based milk of choice)
- 1 cup Greek yogurt (or coconut yogurt for a vegan option)
- 2 tablespoons chia seeds
- 2 tablespoons honey or maple syrup
- 1 teaspoon vanilla extract
- 1 teaspoon ground cinnamon
- 3 ripe peaches, diced
- A pinch of salt
- Optional toppings: sliced almonds, coconut flakes, extra peach slices
Cooking Instructions:
- Combine Dry Ingredients: In a large mixing bowl, combine 2 cups of rolled oats, 2 tablespoons of chia seeds, 1 teaspoon of ground cinnamon, and a pinch of salt. Mix well to guarantee the chia seeds and spices are evenly distributed.
- Add Wet Ingredients: Pour in 2 cups of milk and 1 cup of Greek yogurt into the bowl with the dry ingredients. Add 2 tablespoons of honey (or maple syrup) and 1 teaspoon of vanilla extract. Stir everything together until well combined.
- Prepare the Peaches: Dice 3 ripe peaches into small chunks and gently fold them into the oat mixture, guaranteeing the peaches are evenly distributed throughout.
- Refrigerate Overnight: Transfer the mixture into individual jars or a large airtight container. Cover and refrigerate overnight, or for at least 6 hours, to allow the oats to absorb the liquid and thicken.
- Serve and Enjoy: In the morning, give the oats a good stir and serve them cold. Add optional toppings such as sliced almonds, coconut flakes, or extra peach slices for added texture and flavor.
Extra Tips:
For a creamier texture, you can use full-fat Greek yogurt or add a bit more yogurt to each serving. If you prefer a sweeter breakfast, feel free to add an extra tablespoon of honey or maple syrup to the mixture.
To keep the peaches from browning, you can toss them with a little lemon juice before adding them to the oats. Overnight oats can be stored in the refrigerator for up to 3 days, making them a great option for meal prep.
If you enjoy your oats warm, you can microwave them for a minute or two before adding your favorite toppings.
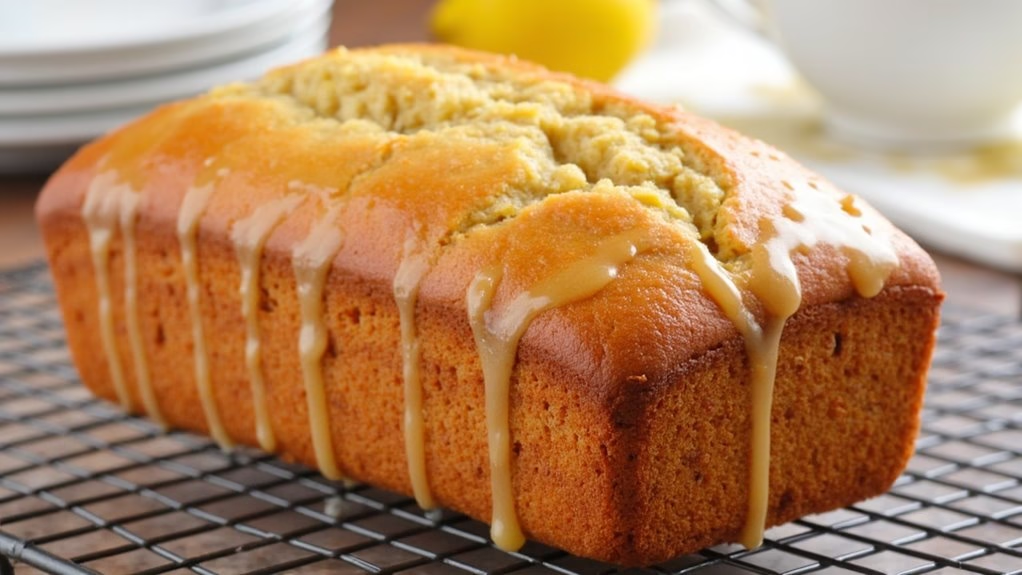
Lemon Breakfast Loaf
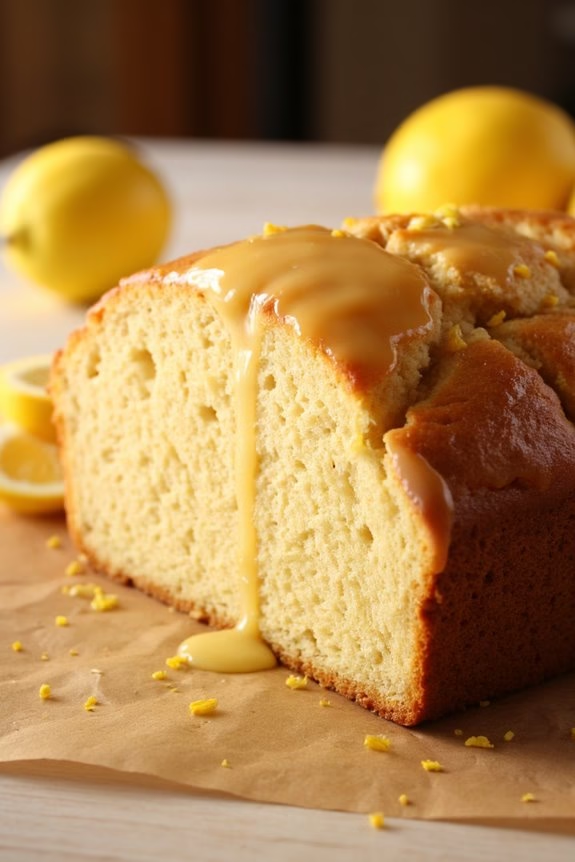
Start your day on a bright and zesty note with a Lemon Breakfast Loaf, a deliciously moist and flavorful treat that’s perfect for breakfast or brunch. This loaf is infused with the vibrant taste of fresh lemons, offering a revitalizing kick with every bite. It pairs beautifully with a warm cup of tea or coffee, making it an ideal centerpiece for any morning gathering.
The soft, tender crumb and the sweet-tart glaze create a delightful balance that will leave you reaching for another slice. A Lemon Breakfast Loaf isn’t only easy to make but also a crowd-pleaser, sure to impress family and friends alike. With simple ingredients and straightforward instructions, this loaf comes together quickly, filling your kitchen with the comforting aroma of citrus and baked goods.
Whether you’re hosting a brunch or simply looking to treat yourself to something special, this recipe will add a touch of sunshine to your morning routine.
Ingredients (serving size 4-6 people):
- 1 1/2 cups all-purpose flour
- 1 teaspoon baking powder
- 1/2 teaspoon salt
- 1 cup granulated sugar
- 2 tablespoons lemon zest (from 2 lemons)
- 3/4 cup unsalted butter, softened
- 3 large eggs
- 1/2 cup whole milk
- 1/4 cup fresh lemon juice
- 1 teaspoon vanilla extract
- 1/2 cup powdered sugar (for glaze)
- 2 tablespoons fresh lemon juice (for glaze)
Cooking Instructions:
- Preheat the Oven: Begin by preheating your oven to 350°F (175°C). Grease and flour a 9×5-inch loaf pan to guarantee easy removal of the loaf once baked.
- Prepare Dry Ingredients: In a medium bowl, whisk together the all-purpose flour, baking powder, and salt. This will guarantee even distribution of the leavening agents and salt throughout the batter.
- Mix Sugar and Lemon Zest: In a large mixing bowl, combine the granulated sugar and lemon zest. Use your fingers to rub the zest into the sugar until the mixture is fragrant and resembles wet sand. This step releases the oils from the zest, enhancing the lemon flavor.
- Cream Butter and Sugar: Add the softened butter to the lemon-sugar mixture. Using a hand mixer or stand mixer, beat on medium speed until light and fluffy, about 3-4 minutes.
- Add Eggs: Beat in the eggs, one at a time, ensuring each egg is fully incorporated before adding the next. Scrape down the sides of the bowl as needed.
- Combine Wet Ingredients: In a small bowl, mix together the whole milk, fresh lemon juice, and vanilla extract. Set aside.
- Incorporate Dry and Wet Ingredients: With the mixer on low speed, add the dry ingredients to the butter mixture in three parts, alternating with the milk mixture, starting and ending with the dry ingredients. Mix until just combined, being careful not to overmix.
- Bake the Loaf: Pour the batter into the prepared loaf pan and smooth the top with a spatula. Bake in the preheated oven for 50-60 minutes, or until a toothpick inserted into the center comes out clean.
- Prepare the Glaze: While the loaf is baking, make the glaze by whisking together the powdered sugar and fresh lemon juice in a small bowl until smooth.
- Glaze the Loaf: Once the loaf is baked, allow it to cool in the pan for 10 minutes. Then, transfer it to a wire rack placed over a baking sheet. Drizzle the lemon glaze over the warm loaf, allowing it to soak in slightly.
- Cool and Serve: Let the loaf cool completely before slicing. Serve as is, or with a dollop of whipped cream or a scoop of vanilla yogurt for an extra indulgent treat.
Extra Tips:
To enhance the lemon flavor, consider adding a teaspoon of lemon extract to the batter. If you prefer a more robust glaze, increase the powdered sugar and lemon juice quantities proportionally.
For a decorative touch, garnish the loaf with thin slices of lemon or a sprinkle of lemon zest after glazing. If you don’t have a loaf pan, you can also bake the batter in muffin tins for individual servings, adjusting the baking time to about 20-25 minutes.
Enjoy your Lemon Breakfast Loaf fresh, or store leftovers in an airtight container at room temperature for up to three days.