
The holiday season is the perfect time to gather around the table with loved ones and enjoy delicious food. I’m always on the lookout for Christmas potluck recipes that are both delightful and easy to make. From honey-glazed ham to creamy mashed potatoes, these dishes are sure to impress your guests. If you’re looking to create memorable moments through food, you’re in the right spot. Let’s explore some crowd-pleasing recipes that will shine at your next celebration.
Classic Honey Glazed Ham
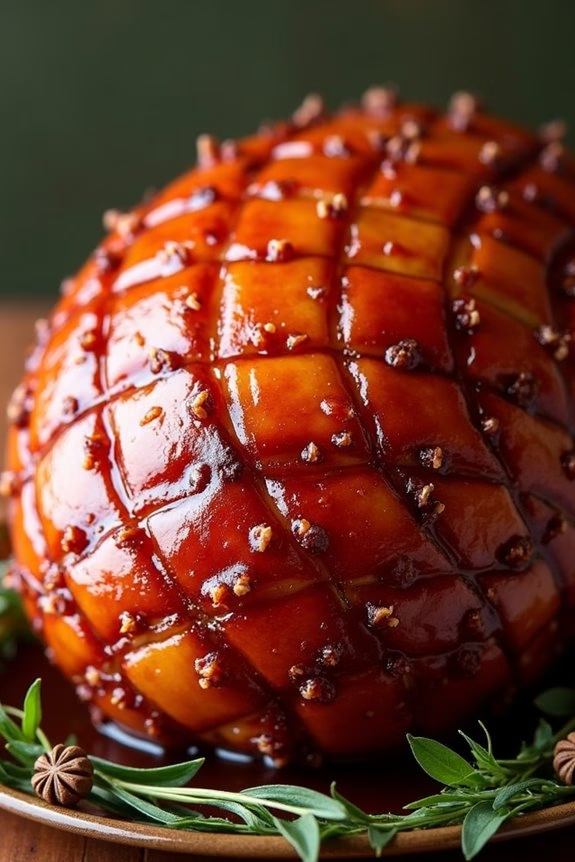
The Classic Honey Glazed Ham is a quintessential dish that graces many holiday tables, offering both tradition and a touch of sweetness. This dish combines the savory richness of ham with a luscious honey glaze that caramelizes during cooking, creating a beautifully golden and flavor-packed outer layer. The combination of brown sugar, honey, and spices infuses the ham with warmth and depth, making it an irresistible centerpiece for your Christmas potluck.
Perfect for serving a gathering of 4-6 people, this recipe guarantees that everyone gets to enjoy a generous slice of ham paired with the sticky sweetness of the glaze. Whether served hot or at room temperature, this dish retains its charm and deliciousness, making it a favorite throughout the holiday season. Follow this recipe to bring a bit of timeless elegance and taste to your festive celebration.
Ingredients (Serves 4-6):
- 1 fully cooked bone-in ham (approximately 4-5 pounds)
- 1 cup honey
- 1/2 cup brown sugar
- 1/4 cup Dijon mustard
- 1/4 cup apple cider vinegar
- 1/2 teaspoon ground cinnamon
- 1/2 teaspoon ground cloves
- 1/4 teaspoon ground nutmeg
- Whole cloves (optional, for studding)
- 1/4 cup water
Cooking Instructions:
- Preheat the Oven: Begin by preheating your oven to 325°F (165°C). This will guarantee the ham cooks evenly and maintains its moisture.
- Prepare the Ham: Remove any packaging from the ham and place it in a roasting pan. If desired, score the surface of the ham with a sharp knife in a crisscross pattern about 1/4-inch deep. This helps the glaze penetrate the meat. Optionally, stud the intersections of the scores with whole cloves for added aroma.
- Make the Glaze: In a saucepan over medium heat, combine the honey, brown sugar, Dijon mustard, apple cider vinegar, ground cinnamon, ground cloves, and ground nutmeg. Stir the mixture until the sugar is dissolved and the ingredients are well combined. Bring the glaze to a gentle simmer, then remove from heat.
- Apply the Glaze: Pour about half of the glaze over the scored ham, making sure it gets into the cuts and coats the surface evenly. Reserve the remaining glaze for basting.
- Roast the Ham: Place the ham in the preheated oven. Roast it for about 1 1/2 to 2 hours, basting every 20-30 minutes with the reserved glaze. During the final 30 minutes of roasting, add 1/4 cup of water to the bottom of the roasting pan to keep the ham moist.
- Check for Doneness: The ham is done when it reaches an internal temperature of 140°F (60°C). Use a meat thermometer to check the temperature at the thickest part of the ham, avoiding bone.
- Rest and Serve: Remove the ham from the oven and let it rest for 10-15 minutes before slicing. This allows the juices to redistribute throughout the meat, guaranteeing each slice is juicy and flavorful.
Extra Tips: For the best flavor, try to baste the ham frequently during roasting—this builds layers of flavor and creates a beautiful caramelized crust. If you prefer a bolder spice profile, adjust the spices in the glaze to your taste. Additionally, if you want a thicker glaze, let it simmer a bit longer before applying.
Finally, when serving, consider pairing the ham with complementary sides like roasted vegetables, mashed potatoes, or a fresh salad to balance the sweetness of the glaze.
Creamy Garlic Mashed Potatoes
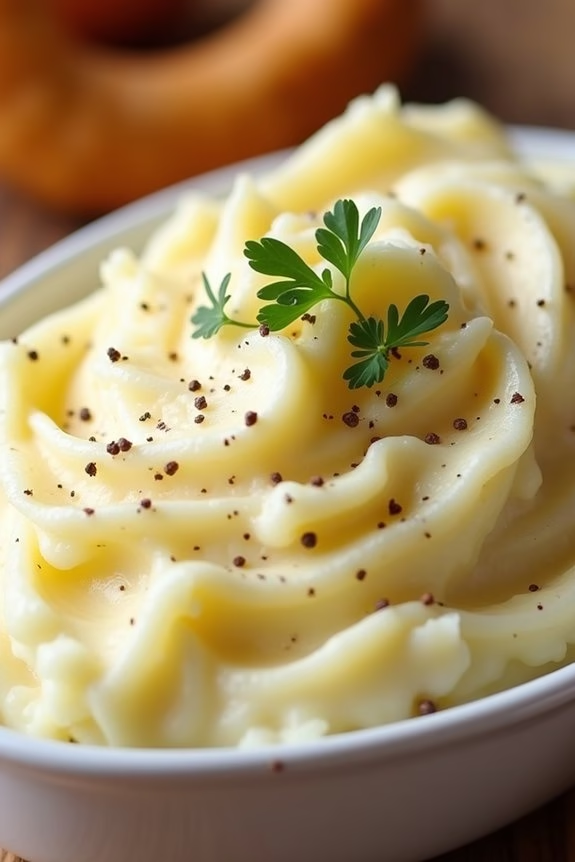
Ideal for a gathering of 4-6 people, this recipe for creamy garlic mashed potatoes will be a hit at your Christmas potluck.
Whether you’re pairing it with roasted turkey, glazed ham, or a vegetarian main, these mashed potatoes will shine on your table. The balance of creamy, buttery flavors with a hint of garlic creates a dish that’s both classic and memorable.
Let’s explore the ingredients you’ll need to recreate this delicious side dish.
Ingredients (serving size of 4-6 people):
- 3 pounds russet potatoes, peeled and cubed
- 4 cloves garlic, minced
- 1 cup heavy cream
- 1/2 cup unsalted butter
- Salt to taste
- Freshly ground black pepper to taste
- 2 tablespoons chopped fresh parsley (optional, for garnish)
Cooking Instructions:
- Prepare the Potatoes: Start by peeling and cubing the potatoes into even-sized chunks. This guarantees they cook evenly. Place them in a large pot and cover with cold water. Add a pinch of salt to the water.
- Boil the Potatoes: Bring the pot to a boil over medium-high heat. Once boiling, reduce the heat to medium and let the potatoes cook for about 15-20 minutes, or until they’re tender and easily pierced with a fork.
- Infuse the Cream and Butter: While the potatoes are boiling, in a small saucepan over low heat, combine the heavy cream, butter, and minced garlic. Allow the mixture to warm and the garlic to infuse without letting it boil. Stir occasionally to prevent the garlic from burning.
- Drain and Mash: Once the potatoes are tender, drain them well and return them to the pot. Use a potato masher or a ricer to mash the potatoes to your desired consistency.
- Combine and Season: Gradually add the warm cream and butter mixture to the mashed potatoes, stirring gently to combine. Season with salt and freshly ground black pepper to taste. Continue to stir until the potatoes are smooth and creamy.
- Serve: Transfer the mashed potatoes to a serving dish and garnish with chopped fresh parsley if desired. Serve warm and enjoy!
Extra Tips: For the best results, make sure your butter and cream are at room temperature before combining them with the potatoes – this prevents shocking the potatoes and helps them absorb the mixture more easily.
If you prefer a more pronounced garlic flavor, consider roasting the garlic before adding it to the cream and butter. Additionally, using a potato ricer rather than a masher can help achieve an ultra-smooth consistency.
To keep the mashed potatoes warm until serving, place them in a heatproof dish and cover them with foil in a warm oven set to a low temperature.
Cranberry Pecan Cheese Ball
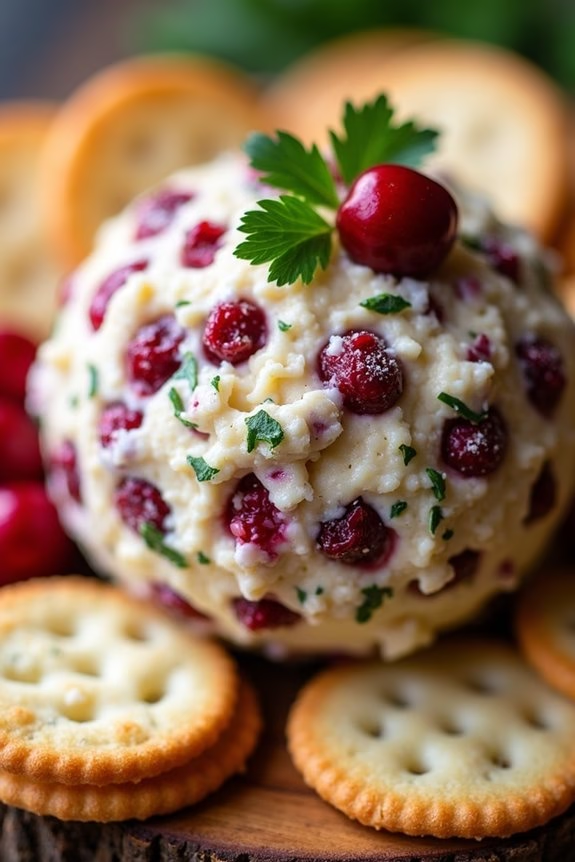
The Cranberry Pecan Cheese Ball is a festive and flavorful appetizer that’s perfect for holiday gatherings such as Christmas potlucks. This delightful dish combines the creamy texture of cheese with the sweet and tart bursts of cranberries, the nutty crunch of pecans, and a hint of savory spices.
It’s an easy-to-make recipe that not only looks appealing with its colorful presentation but also tantalizes the taste buds with its perfect blend of flavors. Whether served with crackers, fresh vegetables, or slices of crusty bread, this cheese ball is sure to be a hit at any holiday party.
The beauty of the Cranberry Pecan Cheese Ball is its versatility and simplicity. You can prepare it ahead of time and let it chill in the refrigerator, making it a convenient and stress-free option for busy holiday preparations.
This recipe serves 4-6 people, making it an ideal choice for intimate gatherings or as part of a larger spread of appetizers. The combination of ingredients creates a festive and delicious centerpiece that can be quickly assembled and enjoyed by all your guests.
Ingredients (Serving Size: 4-6 people):
- 1 cup cream cheese, softened
- 1 cup sharp cheddar cheese, shredded
- 1 teaspoon garlic powder
- 1/2 teaspoon onion powder
- 1/4 teaspoon salt
- 1/4 teaspoon black pepper
- 1/2 cup dried cranberries, chopped
- 1/2 cup pecans, finely chopped
- 1/4 cup fresh parsley, chopped
- Crackers or bread slices for serving
Cooking Instructions:
- Prepare the Cheese Mixture: In a large mixing bowl, combine the softened cream cheese and shredded cheddar cheese. Use a spatula or an electric mixer to blend them together until smooth and well combined.
- Season the Cheese: Add the garlic powder, onion powder, salt, and black pepper to the cheese mixture. Mix thoroughly to guarantee the spices are evenly distributed throughout the cheese.
- Incorporate Cranberries: Add the chopped dried cranberries to the cheese mixture. Fold them in gently using a spatula, ensuring they’re evenly dispersed throughout the cheese.
- Form the Cheese Ball: Line a small bowl with plastic wrap. Transfer the cheese mixture into the bowl, pressing it down to form a compact ball shape. Wrap the plastic wrap tightly around the cheese and refrigerate for at least 1 hour to allow it to firm up.
- Prepare the Coating: On a plate, mix the chopped pecans and fresh parsley together. Once the cheese ball is firm, remove it from the refrigerator and unwrap it. Roll the cheese ball in the pecan and parsley mixture, pressing gently to guarantee the coating sticks evenly.
- Serve: Place the coated cheese ball on a serving platter. Accompany it with an assortment of crackers or bread slices for your guests to enjoy.
Extra Tips:
For best results, confirm the cream cheese is at room temperature before mixing to achieve a smooth texture. Feel free to customize the recipe by adding other ingredients such as chopped chives or a dash of hot sauce for an extra kick.
If you’re preparing this dish in advance, keep it wrapped in the refrigerator and add the pecan and parsley coating just before serving to maintain its fresh appearance. Enjoy your Cranberry Pecan Cheese Ball chilled for the best flavor and texture.
Savory Sausage Stuffing
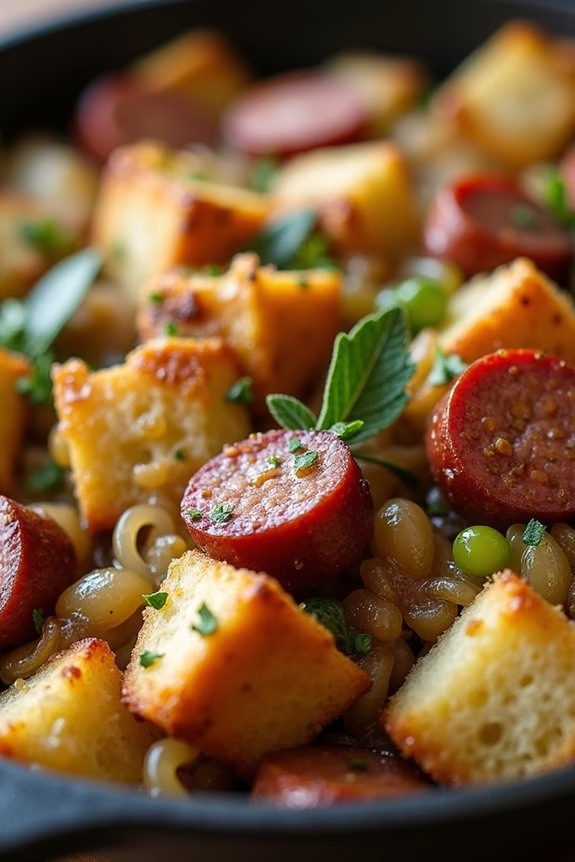
If you’re looking to add a deliciously hearty and savory dish to your Christmas potluck, search no further than this Savory Sausage Stuffing. This classic dish is a crowd-pleaser, combining the rich flavors of seasoned sausage, aromatic herbs, and hearty bread.
It’s the perfect accompaniment to your holiday feast, providing a comforting and satisfying side that pairs well with turkey, ham, or even as a stand-alone dish. This stuffing is moist yet slightly crunchy on the top, creating a wonderful texture that everyone will enjoy.
The key to a great sausage stuffing lies in balancing the flavors and textures. Combining fresh herbs like sage and thyme with the robust flavor of sausage gives the dish its signature taste.
The bread cubes are toasted to provide a sturdy base that can absorb the flavorful broth, ensuring every bite is bursting with savory goodness. It’s easy to prepare and can be made ahead of time, making your holiday cooking a breeze.
This recipe will serve 4-6 people, making it ideal for a small gathering or as part of a larger meal spread.
Ingredients:
- 1 pound of ground sausage
- 1 loaf of day-old bread, cut into 1-inch cubes
- 1 cup of chicken or turkey broth
- 1 large onion, diced
- 2 stalks of celery, chopped
- 2 tablespoons of unsalted butter
- 1 tablespoon of olive oil
- 2 teaspoons of fresh sage, chopped
- 1 teaspoon of fresh thyme, chopped
- Salt and pepper to taste
Cooking Instructions:
- Prepare the Bread Cubes: Preheat your oven to 350°F (175°C). Spread the bread cubes in a single layer on a baking sheet. Toast them in the oven for about 10-15 minutes until they’re dry and slightly golden. Remove and set aside to cool.
- Cook the Sausage: In a large skillet over medium heat, add the olive oil and cook the sausage, breaking it up with a spoon, until it’s fully browned and cooked through. This should take about 8-10 minutes. Remove the sausage from the skillet and drain any excess fat.
- Sauté the Vegetables: In the same skillet, add the butter. Once melted, add the diced onion and chopped celery. Sauté them for about 5 minutes until they’re soft and translucent.
- Combine Ingredients: In a large mixing bowl, combine the toasted bread cubes, cooked sausage, and sautéed vegetables. Add the chopped sage and thyme, and season with salt and pepper to taste.
- Add the Broth: Gradually pour the chicken or turkey broth over the bread mixture, stirring gently until the bread is moistened but not soggy. You may not need all the broth, so add it slowly to control the texture.
- Bake the Stuffing: Transfer the mixture to a greased baking dish. Cover with aluminum foil and bake in the preheated oven for 30 minutes. Remove the foil and bake for an additional 10-15 minutes until the top is golden and crispy.
Extra Tips:
For an extra flavor boost, consider adding a handful of dried cranberries or chopped walnuts to the stuffing mixture before baking. This will add a delightful sweetness and crunch.
If you want to prepare the stuffing ahead of time, you can assemble it completely and store it in the refrigerator for up to a day. Just make sure to let it come to room temperature before baking.
Also, feel free to adjust the herbs and seasoning to match your family’s taste preferences. Enjoy your holiday feast!
Holiday Deviled Eggs
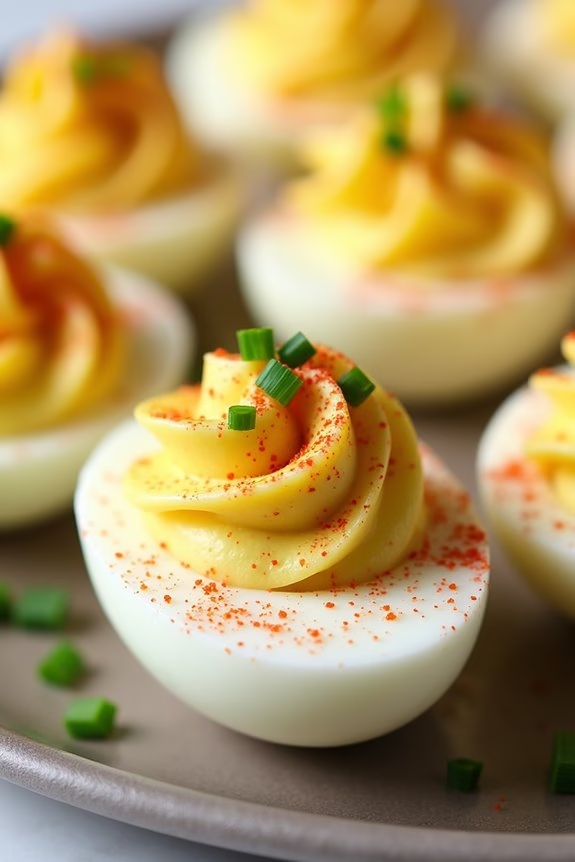
Holiday Deviled Eggs are a delightful and festive twist on the classic appetizer, perfect for your Christmas potluck gatherings. These creamy, tangy eggs not only add a pop of color to your holiday spread but also offer a burst of flavor with each bite. The combination of traditional mayonnaise and mustard with a hint of paprika and chives gives them a balanced taste that’s both rich and invigorating.
Whether you’re hosting a large gathering or an intimate family dinner, these deviled eggs are sure to be a crowd-pleaser. In this recipe, we’ll guide you through creating these delectable Holiday Deviled Eggs for a serving size of 4-6 people. With the right ingredients and a few simple steps, you’ll have a festive appetizer that’s both easy to prepare and delicious to enjoy.
So, gather your ingredients, roll up your sleeves, and let’s get started on making these irresistible deviled eggs for your Christmas celebration!
Ingredients (serving size: 4-6 people):
- 6 large eggs
- 1/4 cup mayonnaise
- 1 teaspoon Dijon mustard
- 1 teaspoon apple cider vinegar
- Salt to taste
- Black pepper to taste
- Paprika for garnish
- Fresh chives for garnish
Instructions:
- Boil the Eggs: Place the eggs in a single layer in a saucepan and cover them with water. Bring the water to a rolling boil over medium-high heat. Once the water is boiling, cover the saucepan, turn off the heat, and let the eggs sit for 10-12 minutes.
- Cool and Peel: After the eggs are cooked, transfer them to a bowl of ice water to stop the cooking process and cool them down. Let them sit for about 5 minutes. Once cooled, gently peel the eggs under running water to remove the shells.
- Prepare the Filling: Slice the peeled eggs in half lengthwise and carefully remove the yolks. Place the yolks in a mixing bowl and mash them with a fork until smooth. Add mayonnaise, Dijon mustard, apple cider vinegar, salt, and black pepper to the mashed yolks. Mix until the filling is creamy and well combined.
- Fill the Egg Whites: Spoon or pipe the yolk mixture back into the hollowed egg whites. Be generous with the filling to make sure each egg half is nicely topped.
- Garnish and Serve: Sprinkle the filled eggs with paprika and finely chopped fresh chives for a burst of color and flavor. Arrange the eggs on a serving platter and refrigerate if not serving immediately.
Extra Tips:
For perfectly hard-boiled eggs, start with cold water and gradually bring it to a boil. This helps prevent the eggs from cracking during cooking. To make peeling easier, consider using eggs that are at least a week old, as they tend to peel more easily than fresh eggs.
If you want to add a bit more zest to your deviled eggs, try incorporating a dash of hot sauce or a pinch of cayenne pepper into the yolk mixture. Finally, using a piping bag or a zip-top bag with a corner snipped off can help you fill the egg whites neatly and with precision.
Enjoy your Holiday Deviled Eggs as a delightful addition to your Christmas potluck!
Maple Roasted Brussels Sprouts
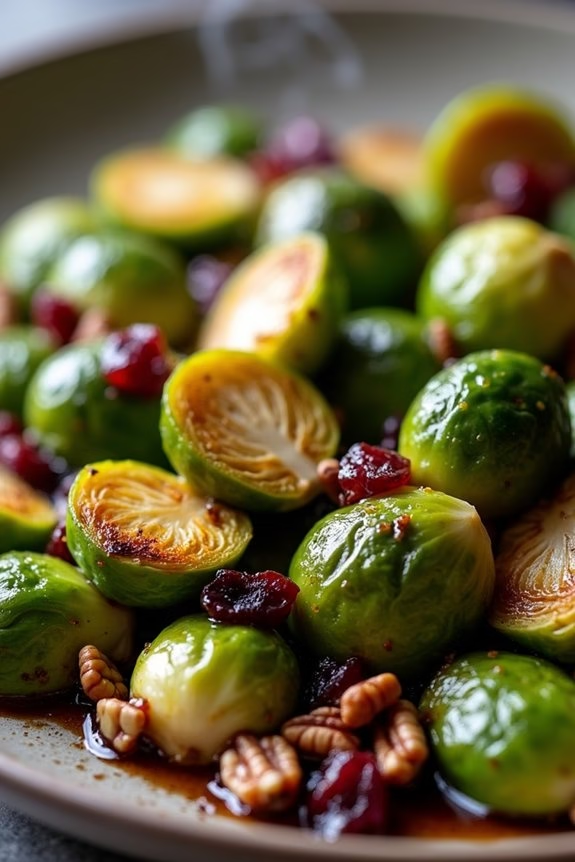
Maple Roasted Brussels Sprouts are a delightful addition to any Christmas potluck, adding both flavor and a pop of color to your holiday spread. The natural sweetness of maple syrup complements the earthy bitterness of the Brussels sprouts, creating a perfectly balanced dish.
Roasting the sprouts at a high temperature caramelizes the outer leaves, giving them a crispy texture and a deep, nutty flavor. This recipe isn’t only delicious but also simple to prepare, making it an ideal choice for both novice and experienced cooks looking to impress their guests.
The combination of maple syrup, olive oil, and balsamic vinegar in this dish creates a rich glaze that enhances the Brussels sprouts’ taste while guaranteeing they stay moist and tender inside. This recipe serves 4-6 people, making it a great option for small gatherings or as a side dish at a larger feast.
With just a few ingredients and minimal preparation, you’ll have a crowd-pleasing side that pairs well with a variety of main courses. Let’s explore the ingredients and steps to create this festive dish.
Ingredients:
- 1 ½ pounds Brussels sprouts, trimmed and halved
- 3 tablespoons olive oil
- 2 tablespoons pure maple syrup
- 1 tablespoon balsamic vinegar
- Salt and pepper to taste
- ½ cup chopped pecans (optional)
- ¼ cup dried cranberries (optional)
Instructions:
- Preheat the Oven: Start by preheating your oven to 400°F (200°C). A properly heated oven is essential for roasting the Brussels sprouts evenly.
- Prepare the Brussels Sprouts: Wash the Brussels sprouts thoroughly, then trim the ends and cut each sprout in half. This ensures they cook evenly and allows the flavors to penetrate better.
- Mix the Dressing: In a large mixing bowl, combine the olive oil, maple syrup, balsamic vinegar, salt, and pepper. Whisk them together until well combined.
- Coat the Brussels Sprouts: Add the halved Brussels sprouts to the bowl and toss them in the maple syrup mixture, making sure each piece is well coated. This step is key for achieving that delicious glaze.
- Arrange on Baking Sheet: Spread the Brussels sprouts out in a single layer on a baking sheet. Make sure they aren’t overcrowded to allow for even roasting.
- Roast: Place the baking sheet in the preheated oven and roast for 20-25 minutes, stirring halfway through. Roast until the Brussels sprouts are tender and the edges are caramelized.
- Add Pecans and Cranberries: If using, sprinkle chopped pecans and dried cranberries over the sprouts during the final 5 minutes of roasting. This step adds a delightful crunch and a hint of tartness.
- Serve: Once roasted to perfection, remove from the oven and transfer to a serving dish. Serve warm and enjoy the festive flavors.
Extra Tips:
For best results, select fresh, firm Brussels sprouts, as they’ll roast more evenly and taste better. If you prefer extra crispy sprouts, turn on the broiler for the last few minutes of roasting, but keep a close eye on them to prevent burning.
Feel free to experiment with additional flavors, such as a sprinkle of garlic powder or a dash of chili flakes, for a more complex taste. Finally, if you’re preparing this dish for a larger crowd, simply double the ingredients, but remember to use two baking sheets to avoid overcrowding.
Sweet Potato Casserole With Marshmallow Topping
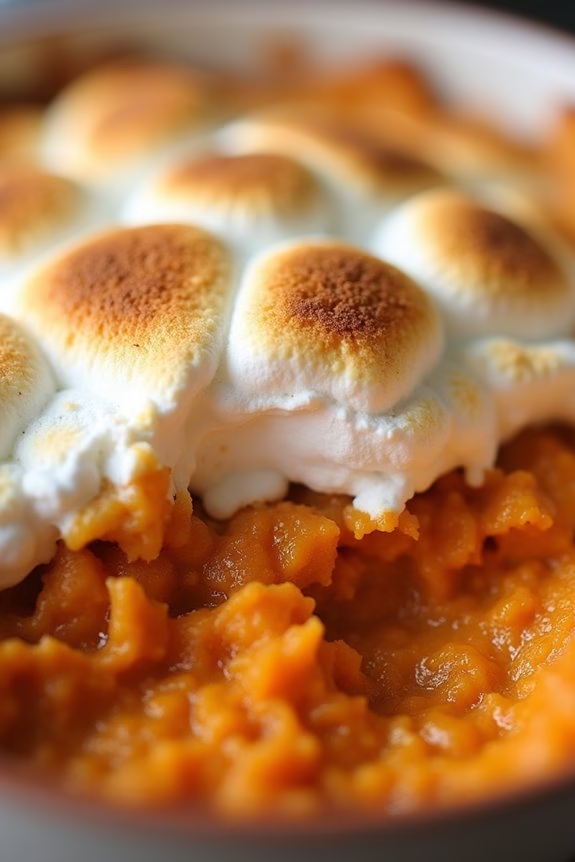
Sweet Potato Casserole With Marshmallow Topping is a classic holiday dish that combines the natural sweetness of sweet potatoes with a gooey, toasted marshmallow topping. This dish is a perfect blend of comfort and nostalgia, often serving as a delightful side dish or even a dessert.
Its rich, creamy texture paired with the soft, fluffy marshmallows makes it a must-have at any Christmas potluck or festive gathering. It’s a crowd-pleaser that brings warmth and joy to the table, and its simple yet flavorful profile is sure to win over both kids and adults.
This dish isn’t only delicious but also incredibly easy to prepare. With just a handful of ingredients, you can create a dish that’s both visually appealing and scrumptiously satisfying. The sweet potatoes are mashed to a smooth consistency and combined with just the right amount of sweetness and spice, then topped with a layer of marshmallows that caramelize to perfection in the oven.
This recipe serves 4-6 people, making it ideal for small gatherings or as a side dish in a larger festive spread.
Ingredients:
- 4 large sweet potatoes
- 1/4 cup unsalted butter, melted
- 1/3 cup brown sugar
- 1/2 teaspoon ground cinnamon
- 1/4 teaspoon ground nutmeg
- 1/4 cup heavy cream
- 1 teaspoon vanilla extract
- 2 cups mini marshmallows
- Salt to taste
Cooking Instructions:
- Preheat the Oven: Start by preheating your oven to 350°F (175°C). This guarantees that the oven is at the right temperature once the casserole is ready to be baked.
- Prepare the Sweet Potatoes: Peel and cube the sweet potatoes. Place them in a large pot, cover with water, and add a pinch of salt. Bring to a boil, then reduce the heat and simmer for 15-20 minutes, or until the sweet potatoes are tender when pierced with a fork.
- Mash the Sweet Potatoes: Drain the cooked sweet potatoes and transfer them to a large mixing bowl. Use a potato masher or electric mixer to mash them until smooth.
- Mix the Ingredients: Add the melted butter, brown sugar, cinnamon, nutmeg, heavy cream, vanilla extract, and a pinch of salt to the mashed sweet potatoes. Mix thoroughly until all ingredients are well combined and the mixture is smooth and creamy.
- Assemble the Casserole: Transfer the sweet potato mixture into a greased baking dish, spreading it evenly. Top with an even layer of mini marshmallows.
- Bake the Casserole: Place the baking dish in the preheated oven and bake for 20-25 minutes, or until the marshmallows are golden brown and slightly crispy on top.
- Serve: Remove from the oven and let it cool for a few minutes before serving. Enjoy your Sweet Potato Casserole With Marshmallow Topping warm.
Extra Tips:
For an added crunch, consider sprinkling chopped pecans or walnuts over the marshmallows before baking. If you prefer a less sweet version, reduce the amount of brown sugar or skip the marshmallows altogether and opt for a pecan streusel topping instead.
For a more robust flavor, you can add a pinch of ground ginger or allspice to the sweet potato mixture. Be sure to keep an eye on the marshmallows during the baking process to prevent them from burning, as they can brown quickly.
Festive Caprese Wreath
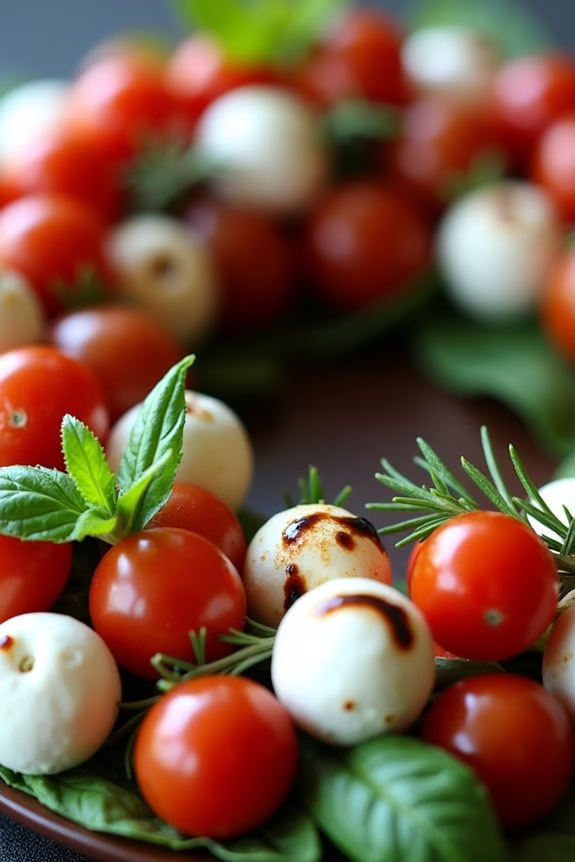
The Festive Caprese Wreath is an elegant and delightful appetizer that perfectly embodies the spirit of the holiday season. This dish is a creative twist on the classic Caprese salad, arranged in a beautiful wreath shape that will surely impress your guests. The vibrant colors of the fresh basil leaves, juicy cherry tomatoes, and creamy mozzarella balls create a visually stunning presentation reminiscent of a holiday wreath. The drizzle of balsamic glaze not only enhances the flavors but also adds a touch of festive elegance to the dish.
This recipe serves 4-6 people and is ideal for those looking for a quick yet sophisticated dish that can be prepared in advance. It requires minimal cooking and allows the fresh ingredients to shine, making it a healthy and invigorating addition to any holiday potluck. Whether you’re throwing a large Christmas party or having a cozy family gathering, the Festive Caprese Wreath will be a delightful and memorable part of your celebration.
Ingredients:
- 20-24 cherry tomatoes
- 20-24 mini mozzarella balls
- Fresh basil leaves (around 20 large leaves)
- Balsamic glaze
- Salt and pepper to taste
- Extra virgin olive oil
- Fresh rosemary sprigs (for garnish)
- Optional: Toothpicks
Instructions:
- Prepare the Ingredients: Rinse the cherry tomatoes and pat them dry. Drain the mini mozzarella balls and pat them dry as well. Wash the basil leaves thoroughly and dry them with a paper towel. Having dry ingredients will guarantee the dressing adheres well.
- Arrange the Wreath: On a large round platter, start by placing the basil leaves in a circular pattern to form the base of the wreath. This will create a beautiful green backdrop for the tomatoes and mozzarella balls.
- Add the Tomatoes and Mozzarella: Alternate placing cherry tomatoes and mozzarella balls on top of the basil leaves, maintaining the circular pattern. Confirm they’re evenly spaced to create a balanced look. If desired, you can use toothpicks to hold them in place.
- Season the Wreath: Drizzle the extra virgin olive oil over the entire wreath. Sprinkle a pinch of salt and pepper over the tomatoes and mozzarella to enhance their flavors.
- Drizzle the Balsamic Glaze: Carefully drizzle the balsamic glaze over the wreath. You can make it as light or as heavy as you prefer. The glaze won’t only add a lovely sweetness but also give the wreath a festive sheen.
- Garnish with Rosemary: Place a few sprigs of fresh rosemary around the wreath for an added touch of greenery and aroma. The rosemary will also impart a subtle earthy flavor to the dish.
- Chill Before Serving: If time allows, cover the wreath with plastic wrap and refrigerate for about 30 minutes before serving. This will allow the flavors to meld together beautifully.
Extra Tips:
When selecting ingredients, opt for the freshest basil and the sweetest cherry tomatoes you can find to guarantee the best flavor. If you want to add a little more variety, consider using a mix of yellow and red cherry tomatoes for a more colorful presentation.
The balsamic glaze can be store-bought or homemade, depending on your preference. Confirm that the wreath is arranged just before serving to keep the basil fresh and prevent it from wilting. This dish is best enjoyed fresh, so prepare it as close to serving time as possible for maximum taste and appearance.
Slow Cooker Mulled Wine

Slow Cooker Mulled Wine is the perfect holiday beverage to warm up your Christmas potluck. This fragrant and spiced drink isn’t only easy to make but also fills your home with the comforting aromas of cinnamon, cloves, and citrus. By using a slow cooker, you can keep the mulled wine at the right temperature throughout your gathering, allowing guests to help themselves to a cozy cup whenever they please.
This recipe offers a delightful balance of sweet and tangy flavors, making it a crowd-pleaser for any festive occasion. The beauty of Slow Cooker Mulled Wine is in its simplicity and versatility. You can prepare it ahead of time, and it can simmer gently without requiring much attention, freeing you up to enjoy your party.
The combination of red wine, spices, and fruit creates a rich and complex flavor profile that complements a variety of holiday dishes. Whether you’re hosting a large gathering or a small family get-together, this mulled wine recipe is sure to add warmth and cheer to your celebration.
Ingredients for 4-6 servings:
- 1 (750ml) bottle of red wine (such as Merlot or Cabernet Sauvignon)
- 1/4 cup brandy
- 1/4 cup honey or sugar
- 1 orange, sliced
- 1 lemon, sliced
- 3 cinnamon sticks
- 6 whole cloves
- 3 star anise
- 1 teaspoon vanilla extract
- 1/2 cup water
- Additional orange slices and cinnamon sticks for garnish (optional)
Cooking Instructions:
- Prepare the Slow Cooker: Set your slow cooker to low heat. Pour the bottle of red wine into the slow cooker, ensuring it’s set to a low temperature to prevent boiling.
- Add the Alcohol and Sweetener: Stir in the brandy and honey (or sugar) until well combined. The sweetness can be adjusted to your preference.
- Incorporate the Fruits and Spices: Add the sliced orange and lemon, cinnamon sticks, cloves, and star anise to the slow cooker. These ingredients will infuse the wine with festive flavors and aromas.
- Add Vanilla and Water: Pour in the vanilla extract and water, stirring gently to mix all the ingredients. The water helps to mellow the wine and spices.
- Simmer the Mulled Wine: Cover the slow cooker and let the mixture simmer on low for about 1-2 hours. This allows the flavors to meld together beautifully.
- Serve and Garnish: Once the mulled wine is warmed through and fragrant, it’s ready to serve. Use a ladle to pour the wine into mugs or heatproof glasses. Garnish with additional orange slices and cinnamon sticks if desired.
Extra Tips:
For the best flavor, choose a wine that you enjoy drinking on its own, as the base wine greatly influences the final taste of the mulled wine. If you prefer a non-alcoholic version, substitute the red wine with a mix of grape juice and cranberry juice, and omit the brandy.
Mulled wine is best enjoyed warm, but avoid letting it boil, as this can cause the alcohol to evaporate and the flavors to become harsh. Adjust the sweetness and spice levels to suit your taste, and feel free to experiment with additional spices like nutmeg or cardamom for a personalized touch.
Peppermint Chocolate Bark

Peppermint Chocolate Bark is a delightful treat that’s perfect for a Christmas potluck. Combining the rich flavors of dark and white chocolate with the invigorating taste of peppermint, this dessert isn’t only easy to make but also a crowd-pleaser.
With its festive appearance and delicious taste, Peppermint Chocolate Bark can add a touch of holiday cheer to any dessert table.
The beauty of this recipe lies in its simplicity. You don’t need any special equipment or advanced cooking skills to prepare this sweet delight. With just a few ingredients and some patience, you can create a batch of Peppermint Chocolate Bark that everyone will love.
Plus, it’s a versatile recipe, so feel free to customize it to suit your taste preferences.
Ingredients (Serving Size: 4-6 people):
- 12 oz dark chocolate chips
- 12 oz white chocolate chips
- 1 teaspoon peppermint extract
- 6 candy canes, crushed
- 1 tablespoon coconut oil (optional)
Cooking Instructions:
- Prepare the Baking Sheet: Line a baking sheet with parchment paper. This will prevent the chocolate from sticking and make it easy to remove the bark once it has set.
- Melt the Dark Chocolate: In a microwave-safe bowl, combine the dark chocolate chips and half of the coconut oil (if using). Microwave in 30-second intervals, stirring in between, until the chocolate is fully melted and smooth. Stir in 1/2 teaspoon of the peppermint extract.
- Spread the Dark Chocolate: Pour the melted dark chocolate onto the prepared baking sheet and spread it evenly with a spatula to about 1/4-inch thickness. Place the baking sheet in the refrigerator to allow the chocolate to set slightly, about 10-15 minutes.
- Melt the White Chocolate: In a separate microwave-safe bowl, combine the white chocolate chips and the remaining coconut oil (if using). Microwave in 30-second intervals, stirring in between, until the white chocolate is fully melted and smooth. Stir in the remaining 1/2 teaspoon of peppermint extract.
- Layer the White Chocolate: Once the dark chocolate layer has set, pour the white chocolate over it, spreading evenly with a spatula.
- Add Crushed Candy Canes: Immediately sprinkle the crushed candy canes over the white chocolate layer while it’s still wet. Press gently to confirm they stick.
- Allow to Set: Place the baking sheet back in the refrigerator for about 30 minutes, or until the chocolate is completely set and firm.
- Break into Pieces: Once set, remove the bark from the refrigerator and break it into small, irregular pieces using your hands or a sharp knife.
Extra Tips: When melting the chocolate, be sure to do it slowly and in intervals to avoid overheating and seizing. If you don’t have a microwave, you can also use a double boiler for a more controlled melting process.
For a more festive look, consider adding a sprinkle of edible glitter or colored sugar along with the candy canes. Additionally, storing the Peppermint Chocolate Bark in an airtight container at room temperature will keep it fresh and crunchy for up to two weeks.
Enjoy sharing this sweet treat with friends and family during the holiday season!
Gingerbread Trifle
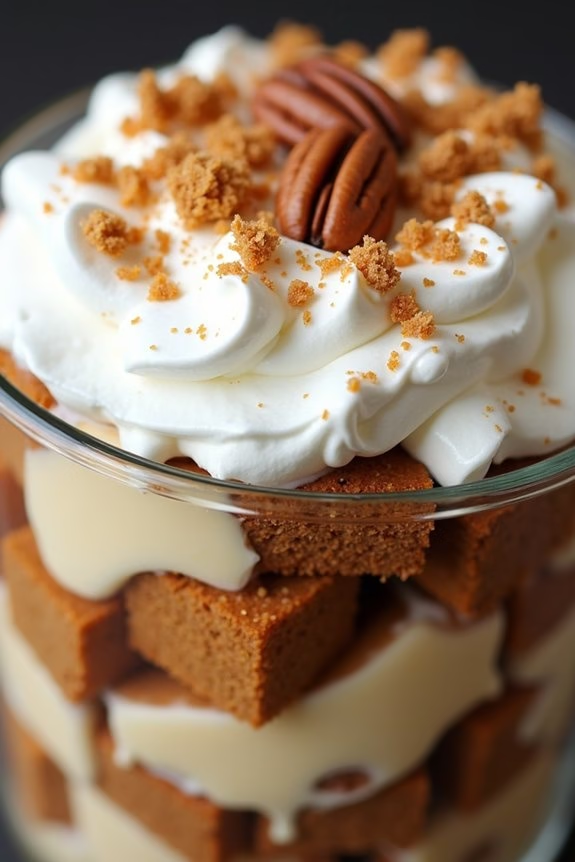
Gingerbread Trifle is a delightful dessert that combines layers of flavorful gingerbread cake, rich vanilla pudding, and whipped cream, all beautifully displayed in a glass trifle dish. This festive treat is perfect for holiday gatherings and will surely impress your guests with its stunning presentation and irresistible taste.
The spiced notes of the gingerbread paired with the creamy textures of the pudding and whipped cream make for a harmonious blend that captures the essence of the holiday season.
As you create this Gingerbread Trifle, you can enjoy the process of assembling a visually appealing and delicious dessert that serves 4-6 people. The layers of this trifle aren’t just a treat for the taste buds but also a feast for the eyes, making it an ideal centerpiece for your Christmas potluck.
With its balance of sweetness and spice, this trifle offers a comforting and nostalgic flavor profile that’s sure to become a holiday favorite.
Ingredients:
- 1 prepared gingerbread cake (9×9 inch)
- 2 cups vanilla pudding
- 1 1/2 cups heavy cream
- 2 tablespoons powdered sugar
- 1 teaspoon vanilla extract
- 1/4 cup chopped crystallized ginger
- 1/4 cup crushed gingersnap cookies
- 1/4 cup pecans (optional)
Instructions:
- Prepare the Whipped Cream: Start by chilling a mixing bowl and beaters in the refrigerator for about 15 minutes. Once chilled, add the heavy cream, powdered sugar, and vanilla extract to the bowl. Beat on medium-high speed until soft peaks form. Set aside in the refrigerator.
- Assemble the Gingerbread Cake: Cut the prepared gingerbread cake into 1-inch cubes. You can use a serrated knife to make clean cuts. This will make it easier to layer the cake in the trifle dish.
- Begin Layering the Trifle: In a glass trifle dish, start by placing a layer of gingerbread cake cubes at the bottom. Confirm they’re evenly spread to form a solid base.
- Add Vanilla Pudding: Spoon a layer of vanilla pudding over the gingerbread cake. Use a spatula or the back of a spoon to spread it evenly across the cake layer.
- Layer with Whipped Cream: Gently spread a layer of the prepared whipped cream over the vanilla pudding. This will create a creamy contrast to the dense cake and pudding layers.
- Repeat Layers: Continue layering with more gingerbread cake, followed by vanilla pudding, and then whipped cream until the trifle dish is full. The final layer should be whipped cream.
- Garnish the Trifle: Sprinkle the top layer of whipped cream with chopped crystallized ginger, crushed gingersnap cookies, and pecans if using. This will add a nice crunch and extra flavor to the trifle.
- Chill the Trifle: Cover the trifle dish with plastic wrap and refrigerate for at least two hours. This allows the flavors to meld together and the trifle to set properly.
Extra Tips:
To enhance the flavors of your Gingerbread Trifle, consider making your gingerbread cake from scratch using your favorite recipe. This will allow you to control the spice levels to your liking.
Additionally, if you prefer a more boozy dessert, you can lightly drizzle the gingerbread cake layers with a little dark rum or brandy before adding the pudding.
Finally, for a more aesthetically pleasing presentation, use a clear trifle dish or large glass bowl to showcase the beautiful layers of your dessert. Enjoy your festive creation and savor the holiday spirit with every bite!
Spiced Apple Cider Punch

Spiced Apple Cider Punch is a warm and inviting beverage perfect for any Christmas potluck. This festive drink combines the sweetness of apple cider with a medley of aromatic spices, creating a cozy and comforting flavor that’s sure to impress your guests.
Whether you’re hosting a gathering or attending one, this punch will quickly become a holiday favorite. The combination of cinnamon, cloves, and star anise imparts a warming spice, while fresh orange slices add a citrusy brightness.
This recipe serves 4-6 people and can easily be doubled or tripled for larger parties. It’s simple to prepare and can be made ahead of time, allowing you to enjoy the festivities without being tied to the kitchen.
The punch can be kept warm in a slow cooker, letting your guests help themselves throughout the event. Whether enjoyed as a non-alcoholic treat or spiked with a splash of rum or bourbon, Spiced Apple Cider Punch is sure to be a hit this holiday season.
Ingredients:
- 8 cups apple cider
- 1 orange, sliced
- 2 cinnamon sticks
- 4 whole cloves
- 2 star anise pods
- 1/4 cup brown sugar
- 1/2 teaspoon ground nutmeg
- Optional: 1 cup dark rum or bourbon
Cooking Instructions:
- Prepare the Ingredients: Begin by gathering all your ingredients. Slice the orange into thin rounds and set aside. This won’t only add flavor but also a visual appeal to the punch.
- Combine in a Pot: In a large pot, combine the apple cider, orange slices, cinnamon sticks, whole cloves, and star anise pods. Stir in the brown sugar and ground nutmeg. This mixture is the base of your punch, with each ingredient contributing to the overall flavor profile.
- Simmer the Mixture: Place the pot over medium heat and bring the mixture to a simmer. Once simmering, reduce the heat to low and let it cook gently for at least 30 minutes. This allows the spices to infuse fully into the cider, enhancing its taste.
- Optional Alcohol Addition: If desired, add the dark rum or bourbon to the pot. Stir well to combine, and let it heat through for another 5 minutes. This step is optional and can be omitted for a non-alcoholic version.
- Strain and Serve: After simmering, strain the mixture through a fine-mesh sieve to remove the spices and orange slices. Pour the spiced apple cider punch into mugs or a punch bowl for serving.
- Keep Warm: If serving at a party, consider transferring the punch to a slow cooker set on the warm setting. This will keep the beverage at the perfect temperature for guests to enjoy throughout the event.
Extra Tips:
For an added touch of festive cheer, garnish each mug with a cinnamon stick or a slice of orange. If you’re preparing the punch ahead of time, simply refrigerate it after simmering and then reheat it gently before serving.
This punch is versatile and can be customized to your liking; consider adding a splash of cranberry juice for a tart twist or a few apple slices for an extra fruity note. If you’re using alcohol, remember to adjust the amount based on your guests’ preferences.
Enjoy your Spiced Apple Cider Punch and have a merry holiday celebration!
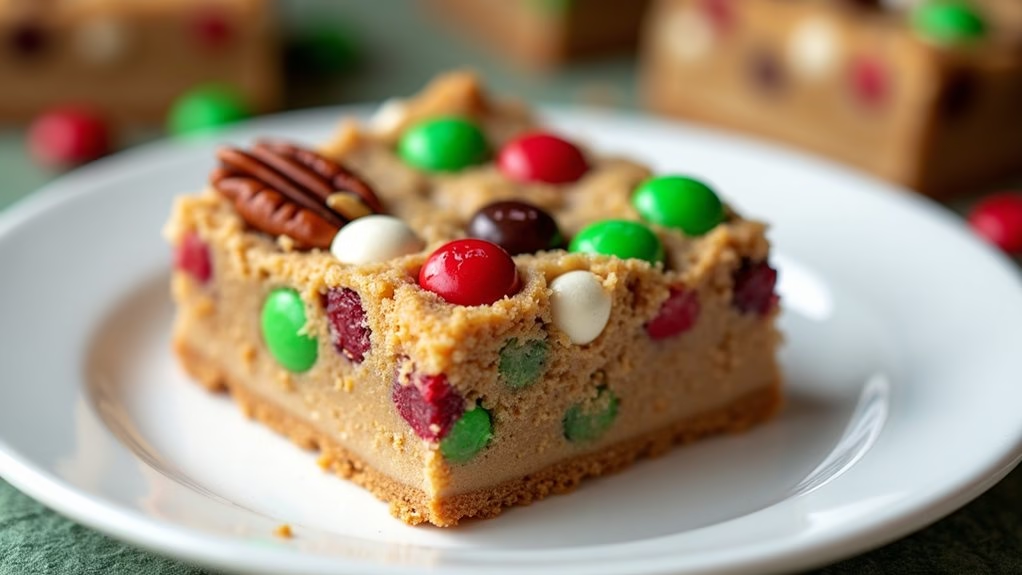
No-Bake Christmas Cookie Bars
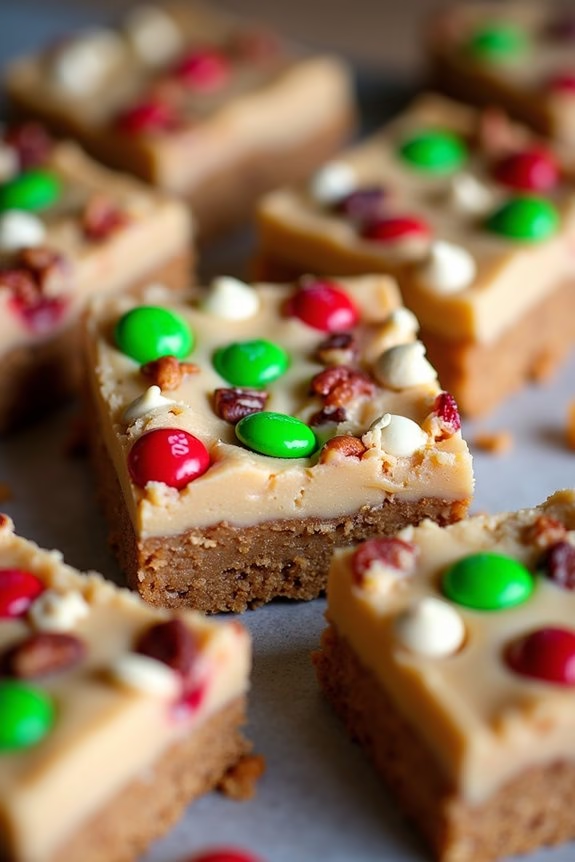
The holiday season is a time for delicious treats and festive gatherings, and nothing says Christmas quite like a batch of No-Bake Christmas Cookie Bars. These delightful bars bring together the festive flavors of the season without the fuss of using an oven. Perfect for a potluck or a last-minute dessert, these cookie bars are easy to prepare and can be customized with your favorite holiday toppings.
The combination of creamy, sweet, and crunchy textures will have your guests reaching for more. The beauty of these no-bake bars lies in their simplicity and versatility. Whether you’re a seasoned baker or someone who prefers less time in the kitchen, these bars can be whipped up in a matter of minutes.
Plus, they’re a great way to get kids involved in holiday baking without the worry of hot ovens. Just mix, layer, chill, and enjoy! With their festive colors and scrumptious taste, these No-Bake Christmas Cookie Bars are sure to become a holiday favorite.
Ingredients (serves 4-6 people):
- 1 cup graham cracker crumbs
- 1/2 cup unsalted butter, melted
- 1/4 cup granulated sugar
- 1 cup sweetened condensed milk
- 1 cup white chocolate chips
- 1/2 cup dried cranberries
- 1/2 cup chopped pecans
- 1/2 cup red and green M&M’s
- 1/4 teaspoon salt
- 1 teaspoon vanilla extract
Cooking Instructions:
1. Prepare the Base:
In a medium-sized mixing bowl, combine the graham cracker crumbs, melted butter, and granulated sugar. Stir until the mixture resembles wet sand.
2. Form the Crust:
Press the graham cracker mixture firmly into the bottom of an 8×8-inch square baking dish lined with parchment paper, creating an even and compact layer.
3. Layer the Toppings:
Pour the sweetened condensed milk evenly over the graham cracker crust. Sprinkle the white chocolate chips, dried cranberries, chopped pecans, and M&M’s over the condensed milk layer, ensuring they’re evenly distributed.
4. Add Flavor:
Sprinkle the salt over the top and drizzle with the vanilla extract for added depth of flavor.
5. Chill:
Place the baking dish in the refrigerator and chill for at least 2 hours, or until the bars are firm and set.
6. Cut and Serve:
Once the bars are firm, use the parchment paper to lift them out of the dish. Cut into squares and serve chilled or at room temperature.
Extra Tips:
For added flair, consider drizzling melted dark chocolate over the top of the bars before chilling for a richer taste. You can also substitute any of the toppings with your favorites, such as chopped almonds or coconut flakes, to suit your personal preference or dietary needs.
These bars can be made a day in advance and stored in the refrigerator, making them an excellent option for stress-free holiday entertaining. Remember to use high-quality ingredients for the best flavor, especially when it comes to the chocolate and nuts.