
As the holiday season approaches, I can’t help but think of the Christmas dinners that have filled my home with warmth and joy over the years.
There’s a comforting charm in a classic roast turkey with herb butter or a honey-glazed ham with a mustard crust.
Each dish has its own story, creating moments that stay with us long after the celebrations.
I’m thrilled to share these treasured recipes with you.
Get ready for a feast that will linger in your memories.
Classic Roast Turkey With Herb Butter

Nothing says Christmas dinner quite like a beautifully roasted turkey, golden brown and infused with the flavors of fresh herbs and butter. This Classic Roast Turkey With Herb Butter is perfect for a festive gathering, offering a succulent and flavorful centerpiece to your holiday table.
The key to a perfectly roasted turkey lies in the preparation and the infusion of flavors, guaranteeing that each bite is rich and savory, with a crispy, golden skin that everyone will love.
The secret to this recipe is the herb-infused butter that’s carefully spread under the skin of the turkey, allowing the meat to absorb the vibrant flavors of fresh herbs like thyme, rosemary, and sage. This method not only adds flavor but also keeps the turkey moist and tender throughout the roasting process.
Paired with a simple seasoning of salt and pepper, this classic roast turkey is bound to be a hit at your Christmas dinner.
Ingredients (Serves 4-6):
- 1 whole turkey (10-12 pounds)
- 1 cup unsalted butter, softened
- 2 tablespoons fresh thyme, chopped
- 2 tablespoons fresh rosemary, chopped
- 2 tablespoons fresh sage, chopped
- Salt and pepper to taste
- 1 large onion, quartered
- 2 carrots, chopped
- 2 celery stalks, chopped
- 4 cups chicken or turkey stock
Cooking Instructions:
- Preparation: Preheat your oven to 325°F (165°C). Remove the turkey from the refrigerator and let it sit at room temperature for about 30 minutes. This helps the turkey cook more evenly.
- Herb Butter: In a bowl, combine the softened butter, thyme, rosemary, and sage. Mix well until the herbs are evenly distributed throughout the butter.
- Prepare the Turkey: Pat the turkey dry with paper towels. Carefully lift the skin over the breast area and spread about half of the herb butter under the skin, covering the breast meat. Rub the remaining herb butter all over the outside of the turkey. Season generously with salt and pepper.
- Stuff and Truss: Place the onion, carrots, and celery inside the turkey cavity. Truss the legs with kitchen twine to guarantee the turkey cooks evenly.
- Roasting: Place the turkey on a rack in a roasting pan. Pour 2 cups of stock into the bottom of the pan. Roast the turkey in the preheated oven, basting every 45 minutes with the pan juices. If the pan becomes dry, add more stock as needed.
- Cooking Time: Roast the turkey for about 3 to 3 1/2 hours, or until the internal temperature reaches 165°F (74°C) in the thickest part of the thigh. If the skin browns too quickly, cover the turkey loosely with aluminum foil.
- Resting: Remove the turkey from the oven and let it rest for 20-30 minutes before carving. This allows the juices to redistribute, guaranteeing moist and tender meat.
Extra Tips: When spreading the herb butter under the skin, be gentle to avoid tearing the skin. You can also prepare the herb butter a day in advance to save time on the day of cooking.
If you prefer a darker skin, increase the oven temperature to 375°F (190°C) for the last 30 minutes of roasting. Remember to use a meat thermometer to check the internal temperature for perfect doneness.
Honey-Glazed Ham With a Mustard Crust
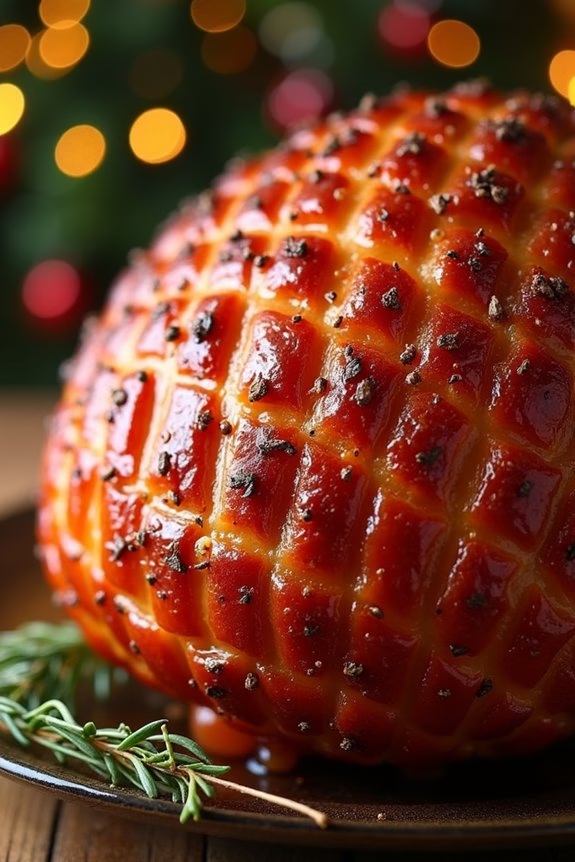
Transform your Christmas dinner into an unforgettable feast with this delicious Honey-Glazed Ham With a Mustard Crust. This dish boasts a perfect balance of sweet and savory flavors, with the honey glaze caramelizing beautifully on the exterior, while the mustard crust adds depth and a slight tang.
The preparation is straightforward, yet the result is a show-stopping centerpiece that will have your guests coming back for seconds. Suitable for serving 4-6 people, this recipe is perfect for an intimate family gathering or a small holiday party.
The ham is first slathered with a mixture of honey, mustard, and spices, then baked to perfection. The aroma of this dish will fill your home with the warm and inviting scents of the holiday season, making it an instant favorite for all.
Ingredients:
- 1 boneless ham, about 3-4 pounds
- 1/2 cup honey
- 1/4 cup Dijon mustard
- 1/4 cup whole grain mustard
- 1/4 cup brown sugar
- 1 teaspoon ground cinnamon
- 1/2 teaspoon ground cloves
- 1/2 teaspoon ground nutmeg
- 1/2 teaspoon black pepper
- 1/4 teaspoon cayenne pepper (optional)
- 1 tablespoon olive oil
- 1/4 cup water
Instructions:
- Preheat the Oven: Begin by preheating your oven to 325°F (165°C). This guarantees that the ham cooks evenly and the glaze caramelizes perfectly.
- Prepare the Ham: Place the ham on a roasting rack inside a roasting pan. Score the surface of the ham in a diamond pattern using a sharp knife. This will allow the glaze to penetrate better and enhance the flavor.
- Make the Glaze: In a medium-sized bowl, combine the honey, Dijon mustard, whole grain mustard, brown sugar, cinnamon, cloves, nutmeg, black pepper, and cayenne pepper. Mix until smooth and well-blended.
- Apply the Glaze: Using a brush or a spoon, generously coat the entire surface of the ham with the glaze, making certain it gets into the scored cuts.
- Bake the Ham: Pour the water into the bottom of the roasting pan to prevent the glaze from burning. Cover the ham loosely with aluminum foil and bake in the preheated oven for about 1.5 hours, or until an internal temperature of 140°F (60°C) is reached.
- Glaze Again: Every 30 minutes, baste the ham with the juices from the pan and reapply more glaze. This will build a nice, thick crust.
- Final Glaze & Rest: About 15 minutes before the ham is done, remove the foil to allow the glaze to caramelize and form a crust. Once done, remove the ham from the oven and let it rest for 10-15 minutes before slicing.
Extra Tips: For a more pronounced mustard flavor, you can adjust the ratio of Dijon to whole grain mustard according to your preference.
If you prefer a less spicy glaze, omit the cayenne pepper. Make certain to use a meat thermometer to check the internal temperature of the ham for perfect doneness.
Additionally, the leftover ham can be used in sandwiches or salads, making it a versatile holiday treat!
Prime Rib Roast With Garlic and Rosemary
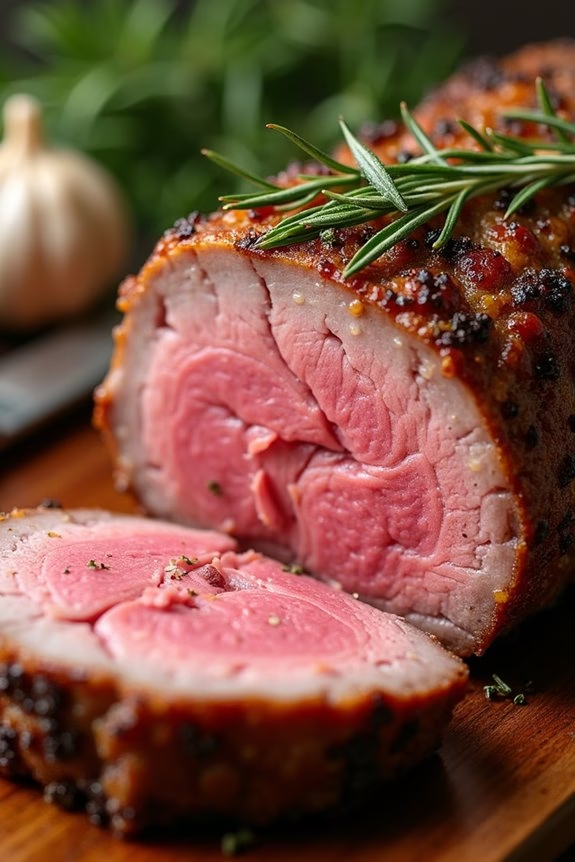
Prime Rib Roast With Garlic and Rosemary is a classic choice for a luxurious Christmas dinner. This dish captures the essence of holiday indulgence with its rich flavors and succulent texture. The prime rib roast is seasoned with a delightful blend of garlic and rosemary, which infuses the meat with aromatic flavors as it cooks. This recipe will guide you through the process of preparing a perfectly roasted prime rib that’s sure to impress your family and guests.
The key to a successful prime rib roast lies in selecting a high-quality cut of meat and seasoning it well. The marriage of garlic and rosemary not only enhances the natural flavors of the beef but also creates a mouthwatering aroma that fills your kitchen as it roasts. This recipe is designed for a serving size of 4-6 people, making it an ideal choice for a festive gathering. With just a few simple steps, you can create a show-stopping centerpiece for your holiday meal.
Ingredients (serving size: 4-6 people):
- 1 prime rib roast (about 4-5 pounds)
- 6 cloves of garlic, minced
- 3 tablespoons fresh rosemary, finely chopped
- 2 tablespoons olive oil
- 1 tablespoon kosher salt
- 1 teaspoon freshly ground black pepper
Cooking Instructions:
- Preheat the Oven: Begin by preheating your oven to 450°F (232°C). This initial high temperature will help sear the outside of the roast, locking in juices and flavors.
- Prepare the Seasoning: In a small bowl, combine the minced garlic, chopped rosemary, olive oil, kosher salt, and black pepper. Mix well to form a paste.
- Season the Roast: Pat the prime rib roast dry with paper towels to remove any excess moisture. Rub the garlic and rosemary paste evenly over the entire surface of the roast, ensuring it’s well-coated.
- Roasting: Place the seasoned roast on a rack in a roasting pan, fat side up. Insert a meat thermometer into the thickest part of the roast, avoiding bone. Place the pan in the preheated oven and roast for 20 minutes.
- Adjust Temperature: After 20 minutes, reduce the oven temperature to 325°F (163°C). Continue roasting until the internal temperature reaches 130°F (54°C) for medium-rare, or adjust according to your preferred level of doneness.
- Rest the Meat: Once the desired temperature is reached, remove the roast from the oven and tent it loosely with aluminum foil. Let it rest for at least 20 minutes before carving. This allows the juices to redistribute throughout the meat.
- Carve and Serve: Carve the roast into thick slices and serve with your favorite sides. Enjoy the tender, flavorful meat that’s the centerpiece of your holiday feast.
Extra Tips:
For the best results, bring the prime rib to room temperature before roasting, which helps it cook more evenly. Use a meat thermometer for precise temperature control to avoid overcooking. If you prefer a deeper crust, finish the roast with a few minutes under the broiler at the end of cooking.
Additionally, consider serving with a red wine reduction or horseradish sauce for complementary flavors that enhance the richness of the meat.
Stuffed Pork Loin With Cranberry and Apple
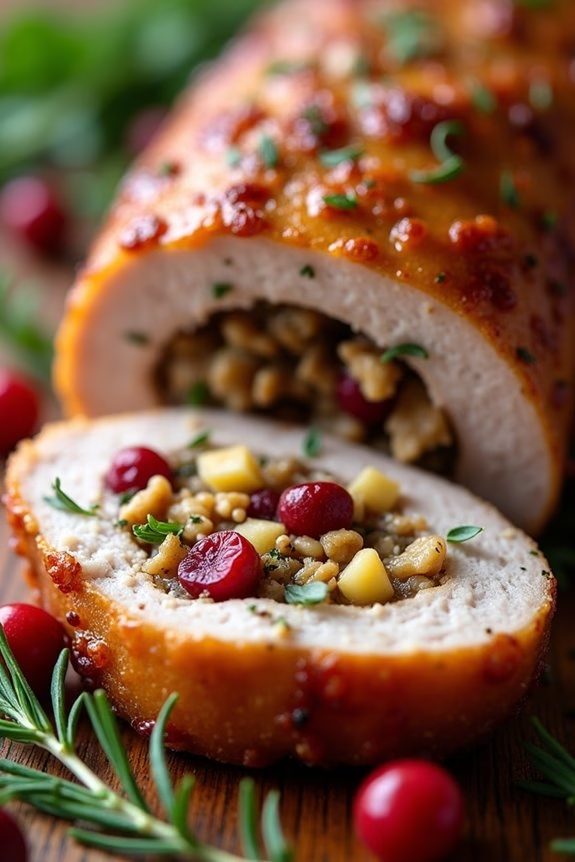
This festive Stuffed Pork Loin with Cranberry and Apple is the perfect centerpiece for your Christmas dinner. The succulent pork loin is filled with a savory and slightly sweet stuffing, combining the tartness of cranberries with the sweetness of apples. The flavors meld together beautifully, creating a dish that’s both impressive and delicious.
The stuffing also includes aromatic herbs, which add depth and complexity to the dish. This recipe serves 4-6 people, making it ideal for a small gathering or family dinner. The combination of pork, fruit, and herbs not only enhances the flavor but also adds a beautiful presentation to your Christmas table.
With a few simple steps, you can create this gourmet dish that will leave your guests raving.
Ingredients:
- 1 (3-4 pound) pork loin
- 1 cup fresh cranberries
- 1 large apple, peeled, cored, and diced
- 1/2 cup chopped walnuts
- 1/2 cup bread crumbs
- 1/4 cup chopped fresh parsley
- 1 teaspoon dried thyme
- 1 teaspoon dried sage
- 2 tablespoons olive oil
- Salt and pepper to taste
- Butcher’s twine
Instructions:
- Prepare the Pork Loin: Preheat your oven to 375°F (190°C). Carefully butterfly the pork loin by slicing it horizontally, being careful not to cut all the way through. Open the loin like a book and pound it gently with a meat mallet to an even thickness.
- Make the Stuffing: In a large bowl, combine the cranberries, diced apple, walnuts, bread crumbs, parsley, thyme, sage, olive oil, salt, and pepper. Mix until all ingredients are well incorporated.
- Stuff the Pork Loin: Spread the stuffing mixture evenly over the inside of the pork loin. Roll the pork tightly, starting from one end, and tie it securely with butcher’s twine at 1 to 2-inch intervals.
- Season the Pork Loin: Rub the outside of the stuffed loin with olive oil and season generously with salt and pepper.
- Roast the Pork Loin: Place the stuffed pork loin seam-side down in a roasting pan. Roast in the preheated oven for 1 to 1.5 hours, or until the internal temperature reaches 145°F (63°C).
- Rest and Serve: Remove the pork loin from the oven and let it rest for 10-15 minutes before slicing. This allows the juices to redistribute, making the meat more tender and flavorful. Slice and serve warm.
Extra Tips:
For a more pronounced flavor, you can prepare the stuffing a day in advance and let it chill in the refrigerator, allowing the flavors to meld together.
Make sure to tightly secure the pork with twine to guarantee even cooking and to prevent the stuffing from falling out. Additionally, if you want a crispier exterior, you can sear the stuffed pork loin in a hot skillet with some olive oil before placing it in the oven. This adds a nice texture and enhances the overall presentation of the dish.
Vegan Wellington With Mushroom and Lentil Filling
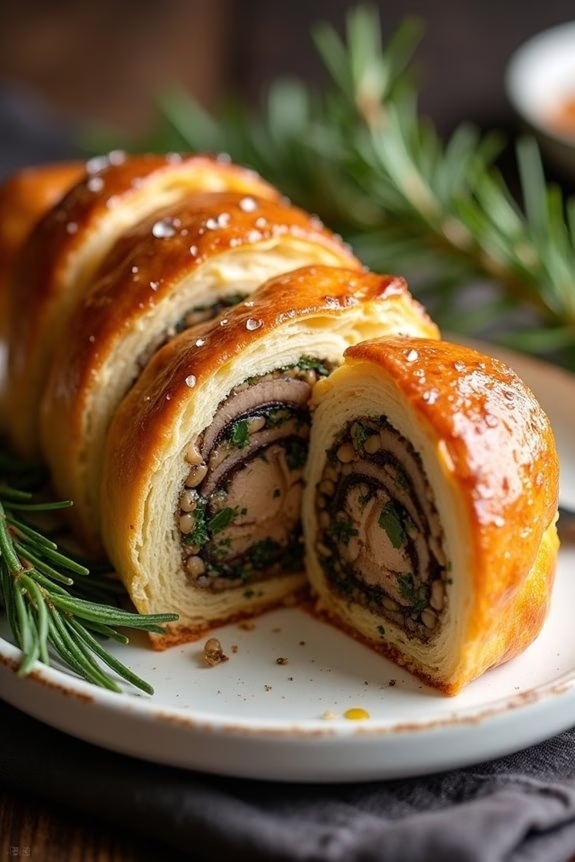
Vegan Wellington with Mushroom and Lentil Filling is a delightful and hearty dish perfect for a Christmas feast. This plant-based version of the classic Wellington combines rich, savory flavors and textures to create a truly satisfying centerpiece for your holiday table. The flaky puff pastry encases a filling made from earthy mushrooms, protein-packed lentils, aromatic herbs, and spices, offering a delicious alternative to traditional meat dishes.
Whether you’re catering to vegan guests or simply wish to take a break from meat, this dish is sure to impress all diners with its depth of flavor and elegant presentation.
The preparation of Vegan Wellington might seem complex at first glance, but breaking it down into manageable steps makes it quite approachable. You’ll start by sautéing a medley of finely chopped vegetables, including mushrooms, onions, and garlic, to build a robust and savory base.
The addition of lentils adds heartiness and absorbs the flavors beautifully, while fresh herbs like thyme and rosemary infuse the filling with festive aromas. Once the filling is perfectly seasoned and cooled, it’s wrapped in a layer of golden puff pastry, baked to perfection, and served with your choice of sides. This recipe serves 4-6 people, making it ideal for a cozy family gathering or an intimate holiday dinner.
Ingredients:
- 1 tablespoon olive oil
- 1 medium onion, finely chopped
- 3 cloves garlic, minced
- 2 cups mushrooms, finely chopped
- 1 cup cooked lentils
- 1 tablespoon soy sauce
- 1 teaspoon balsamic vinegar
- 1 teaspoon fresh thyme, chopped
- 1 teaspoon fresh rosemary, chopped
- Salt and pepper to taste
- 1 sheet vegan puff pastry, thawed
- 1 tablespoon almond milk (for brushing)
- Optional: sesame seeds for garnish
Cooking Instructions:
- Preheat the Oven: Start by preheating your oven to 400°F (200°C) to guarantee it reaches the right temperature for baking the Wellington.
- Prepare the Filling: Heat the olive oil in a large skillet over medium heat. Add the chopped onion and garlic, sautéing until the onion becomes translucent.
- Cook the Vegetables: Add the chopped mushrooms to the skillet. Cook for about 5-7 minutes, stirring occasionally, until the mushrooms release their moisture and begin to brown.
- Add Lentils and Seasonings: Stir in the cooked lentils, soy sauce, balsamic vinegar, thyme, and rosemary. Season with salt and pepper to taste. Cook for another 3-4 minutes, allowing the flavors to meld together.
- Cool the Filling: Remove the skillet from heat and let the filling cool completely. This step is essential to prevent the puff pastry from becoming soggy.
- Prepare the Pastry: Roll out the puff pastry on a lightly floured surface. Spoon the cooled filling onto the center of the pastry, shaping it into a log.
- Wrap the Filling: Fold the pastry over the filling, sealing the edges by pressing them together. Trim any excess pastry if needed. Place the Wellington seam-side down on a baking sheet lined with parchment paper.
- Brush and Bake: Brush the top of the Wellington with almond milk and sprinkle with sesame seeds if desired. Bake in the preheated oven for 25-30 minutes, or until the pastry is golden brown and crisp.
- Serve: Allow the Wellington to cool slightly before slicing and serving. Pair with your favorite holiday sides for a complete meal.
Extra Tips:
For best results, make sure the filling is completely cooled before wrapping it in puff pastry, as any warmth can cause the pastry to become soggy.
You can prepare the filling in advance and store it in the refrigerator until you’re ready to assemble the Wellington. When slicing the baked Wellington, use a sharp knife to maintain the integrity of the pastry.
If you prefer a richer glaze, you can mix a touch of soy sauce with the almond milk before brushing it over the pastry for added color and flavor.
Baked Brie With Cranberry and Pistachio Topping
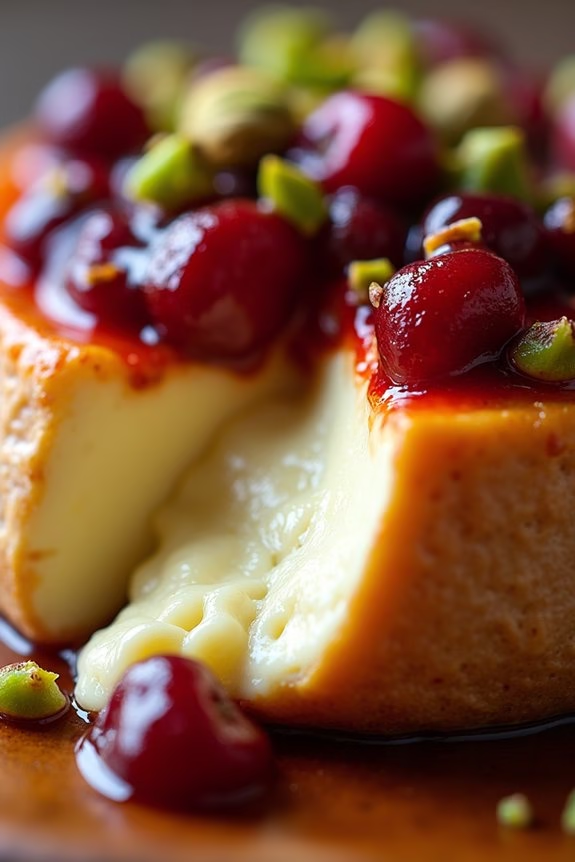
Baked Brie with Cranberry and Pistachio Topping is a delightful holiday appetizer that combines the rich creaminess of brie cheese with a sweet and nutty topping. This dish is perfect for Christmas dinner, offering a beautiful blend of flavors and textures that are guaranteed to impress your guests.
The warm, gooey cheese pairs perfectly with the tartness of cranberries and the crunch of pistachios, creating a harmonious balance that’s both festive and delicious.
This recipe is simple to prepare, making it an ideal choice for holiday gatherings when you want to spend more time with family and friends and less time in the kitchen. Serve it with slices of a fresh baguette or an assortment of crackers, and you’ll have a dish that looks as beautiful as it tastes.
This recipe serves 4-6 people, making it perfect for a small gathering or as part of a larger spread.
Ingredients:
- 1 wheel of brie cheese (approximately 8 oz)
- 1/2 cup fresh cranberries
- 1/4 cup pistachios, shelled and roughly chopped
- 1/4 cup brown sugar
- 1 tablespoon honey
- 1 tablespoon orange juice
- 1 tablespoon orange zest
- Crackers or sliced baguette, for serving
Cooking Instructions:
- Preheat the Oven: Start by preheating your oven to 350°F (175°C). This will guarantee that the brie bakes evenly and achieves the desired gooey texture.
- Prepare the Cranberry Topping: In a small saucepan over medium heat, combine the cranberries, brown sugar, honey, orange juice, and orange zest. Stir occasionally and cook until the cranberries begin to pop and the mixture thickens slightly, about 5-7 minutes.
- Prepare the Brie: While the cranberry mixture is cooking, place the brie wheel on a parchment-lined baking sheet. If desired, use a sharp knife to score the top of the brie in a crosshatch pattern. This will allow the topping to seep into the cheese slightly as it bakes.
- Add Topping to Brie: Once the cranberry mixture is ready, remove it from the heat and carefully spoon it over the top of the brie. Sprinkle the chopped pistachios evenly over the cranberry topping.
- Bake the Brie: Place the baking sheet in the preheated oven and bake for 10-12 minutes, or until the brie is soft and the topping is heated through. Keep a close eye to avoid overcooking, as this can cause the brie to lose its shape entirely.
- Serve: Carefully transfer the baked brie to a serving platter. Serve immediately with crackers or slices of baguette. Encourage your guests to scoop up some of the topping with each piece of brie for the best flavor experience.
Extra Tips:
For best results, use a good-quality brie cheese, as the flavor of the cheese is central to this dish. If fresh cranberries aren’t available, you can use dried cranberries, but be sure to reduce the sugar slightly to account for their sweetness.
The pistachios can be substituted with other nuts like walnuts or pecans if desired. Be sure to let the brie cool for a minute or two before serving to avoid burns, as the cheese can be very hot when it first comes out of the oven.
Garlic Mashed Potatoes With Chives

Garlic Mashed Potatoes With Chives is a classic and comforting side dish that’s perfect for your Christmas dinner table. The smooth, creamy texture of the mashed potatoes combined with the rich, aromatic flavor of roasted garlic creates a delightful contrast that’s sure to please your guests.
Chives add a touch of freshness and color, making this dish not only delicious but also visually appealing. Whether you’re hosting a large family gathering or a more intimate holiday meal, these mashed potatoes will be a hit.
This recipe serves 4-6 people and is easy to prepare, making it ideal for those who want to spend less time in the kitchen and more time enjoying their holiday celebration. The key to perfect mashed potatoes is using the right kind of potatoes and ensuring they’re cooked to the right consistency. Yukon Gold potatoes are a great choice for this recipe as they’ve a naturally buttery flavor and smooth texture.
Ingredients:
- 2 pounds Yukon Gold potatoes, peeled and cubed
- 4 cloves garlic, peeled
- 1/2 cup unsalted butter, cut into pieces
- 3/4 cup heavy cream
- Salt to taste
- Freshly ground black pepper to taste
- 1/4 cup chopped fresh chives
Instructions:
- Prepare the Potatoes and Garlic: Place the cubed potatoes and whole garlic cloves into a large pot. Fill the pot with enough cold water to cover the potatoes by about an inch. Add a generous pinch of salt to the water.
- Cook the Potatoes: Bring the water to a boil over medium-high heat. Once boiling, reduce the heat to medium and let the potatoes simmer for about 15-20 minutes, or until they’re fork-tender.
- Drain and Mash: Drain the potatoes and garlic in a colander and return them to the pot. Allow them to sit for a minute to let excess moisture evaporate.
- Add Butter and Cream: Add the butter to the pot with the potatoes and garlic. Use a potato masher to begin mashing the potatoes. Gradually add the heavy cream, mashing until you reach your desired consistency.
- Season the Potatoes: Season the mashed potatoes with salt and freshly ground black pepper to taste. Stir in the chopped chives until evenly distributed.
- Serve: Transfer the mashed potatoes to a serving dish and garnish with additional chives if desired. Serve warm.
Extra Tips:
For the creamiest mashed potatoes, be sure not to over-mash them, as this can lead to a gluey texture. If you prefer a chunkier texture, mash the potatoes less or use a fork instead of a masher.
You can also substitute half-and-half for heavy cream if you want a lighter version of the dish. Roasting the garlic beforehand can add an extra depth of flavor, so consider roasting the garlic cloves in the oven wrapped in foil at 400°F (200°C) for about 20 minutes before adding them to the potatoes.
Maple-Roasted Brussels Sprouts With Bacon

Maple-Roasted Brussels Sprouts With Bacon is a delightful side dish that combines the rich, smoky flavor of bacon with the sweet, caramelized notes of maple syrup. This recipe transforms often-maligned Brussels sprouts into a dish that’s both savory and sweet, making it a perfect addition to your Christmas dinner table.
The dish is roasted to perfection, allowing the outer leaves of the Brussels sprouts to crisp up beautifully while the insides remain tender and flavorful. The addition of bacon adds a savory depth, while the maple syrup introduces a subtle sweetness that balances the flavors beautifully.
This recipe is designed to serve 4-6 people, making it ideal for a family gathering or a festive holiday meal. The preparation is straightforward, yet the result is a dish that feels special and indulgent. Whether you’re a fan of Brussels sprouts or not, this recipe is sure to win you over with its combination of textures and flavors.
Serve alongside your main course, and watch as it becomes a favorite among your guests.
Ingredients:
- 1 1/2 pounds Brussels sprouts, trimmed and halved
- 4 slices bacon, diced
- 3 tablespoons olive oil
- 1/4 cup pure maple syrup
- Salt and freshly ground black pepper, to taste
- 1 tablespoon balsamic vinegar (optional, for added depth of flavor)
Instructions:
- Preheat the Oven: Start by preheating your oven to 400°F (200°C). This guarantees that it’s hot enough to roast the Brussels sprouts evenly and achieve a nice crispy texture.
- Prepare the Brussels Sprouts: Trim the ends of the Brussels sprouts and remove any yellow or damaged outer leaves. Cut them in half lengthwise to guarantee they cook evenly.
- Combine Ingredients: In a large mixing bowl, toss the halved Brussels sprouts with the diced bacon pieces, olive oil, and maple syrup. Season generously with salt and freshly ground black pepper. If you want an extra layer of flavor, add in the balsamic vinegar at this stage.
- Roast the Brussels Sprouts: Spread the Brussels sprouts mixture in an even layer on a large baking sheet. Make sure they aren’t overcrowded to allow them to roast rather than steam. Place the baking sheet in the preheated oven.
- Cook Until Crispy: Roast for 25-30 minutes, or until the Brussels sprouts are tender and the bacon is crispy. Stir halfway through the cooking time to guarantee they brown evenly.
- Serve: Once cooked to your liking, remove the baking sheet from the oven. Transfer the Brussels sprouts to a serving dish and serve immediately while they’re still warm and crispy.
Extra Tips:
When selecting Brussels sprouts, look for ones that are firm and bright green, as they’ll have the best flavor and texture. If you prefer a more pronounced maple flavor, you can drizzle a little extra maple syrup over the dish right before serving.
Additionally, you can add a sprinkle of chopped nuts, such as pecans or walnuts, for a bit of extra crunch and nuttiness. Remember, the key to perfect roasted Brussels sprouts isn’t to overcrowd the pan, as this will guarantee they roast evenly and develop a nice caramelized exterior.
Sweet Potato Casserole With Marshmallow Topping
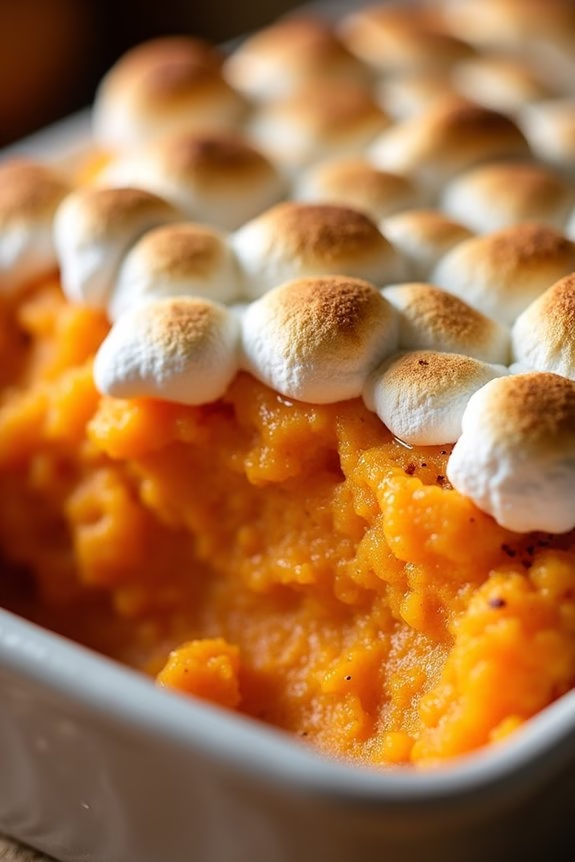
Sweet Potato Casserole with Marshmallow Topping is a classic holiday dish that brings warmth and sweetness to your Christmas dinner table. This delightful side dish combines creamy mashed sweet potatoes with a hint of spice and a generous topping of golden-brown marshmallows, creating a perfect balance of flavors and textures.
Whether you’re hosting a large gathering or enjoying an intimate family dinner, this casserole is guaranteed to be a crowd-pleaser, adding a touch of nostalgia and comfort to your festive meal.
This recipe is designed to serve 4-6 people, making it ideal for a small to medium-sized gathering. The sweetness of the marshmallows complements the natural flavors of the sweet potatoes, while a touch of cinnamon and vanilla elevates this dish to a whole new level of deliciousness.
Easy to prepare and even easier to enjoy, this Sweet Potato Casserole with Marshmallow Topping is a must-have on your Christmas dinner menu.
Ingredients (Serves 4-6):
- 3 large sweet potatoes (about 2 pounds)
- 1/3 cup brown sugar
- 1/4 cup unsalted butter, melted
- 1/2 cup milk
- 1 teaspoon vanilla extract
- 1 teaspoon ground cinnamon
- 1/4 teaspoon salt
- 1/8 teaspoon ground nutmeg
- 2 cups mini marshmallows
Instructions:
- Preheat the Oven: Start by preheating your oven to 350°F (175°C). This guarantees that the oven is hot enough to bake the casserole evenly.
- Prepare the Sweet Potatoes: Peel the sweet potatoes and cut them into large chunks. Place the chunks in a large pot, cover with water, and bring to a boil over medium-high heat. Cook until the sweet potatoes are tender, about 15-20 minutes. Drain the water and return the sweet potatoes to the pot.
- Mash the Sweet Potatoes: Use a potato masher or a hand mixer to mash the cooked sweet potatoes until smooth. Confirm there are no lumps for a creamy texture.
- Mix in Other Ingredients: Add the brown sugar, melted butter, milk, vanilla extract, cinnamon, salt, and nutmeg to the mashed sweet potatoes. Mix well until all ingredients are fully incorporated and the mixture is smooth.
- Assemble the Casserole: Transfer the sweet potato mixture to a greased 9×13 inch baking dish. Spread it out evenly using a spatula.
- Add the Marshmallow Topping: Evenly distribute the mini marshmallows over the top of the sweet potato mixture. This will create a sweet and gooey topping once baked.
- Bake the Casserole: Place the baking dish in the preheated oven and bake for 20-25 minutes, or until the marshmallows are golden brown and the sweet potato mixture is heated through.
- Serve and Enjoy: Remove the casserole from the oven and let it cool slightly before serving. Enjoy this warm, sweet, and creamy dish alongside your Christmas dinner.
Extra Tips:
For an added crunch, consider sprinkling a handful of chopped pecans or walnuts over the marshmallows before baking. This adds a delightful contrast to the soft and sweet topping.
Additionally, if you prefer a less sweet version, you can reduce the amount of brown sugar or use a blend of marshmallows and a crumble topping.
For a smoother preparation, you can prepare the sweet potato mixture a day in advance and refrigerate it, then add the marshmallows and bake on the day of serving.
Traditional Yorkshire Pudding
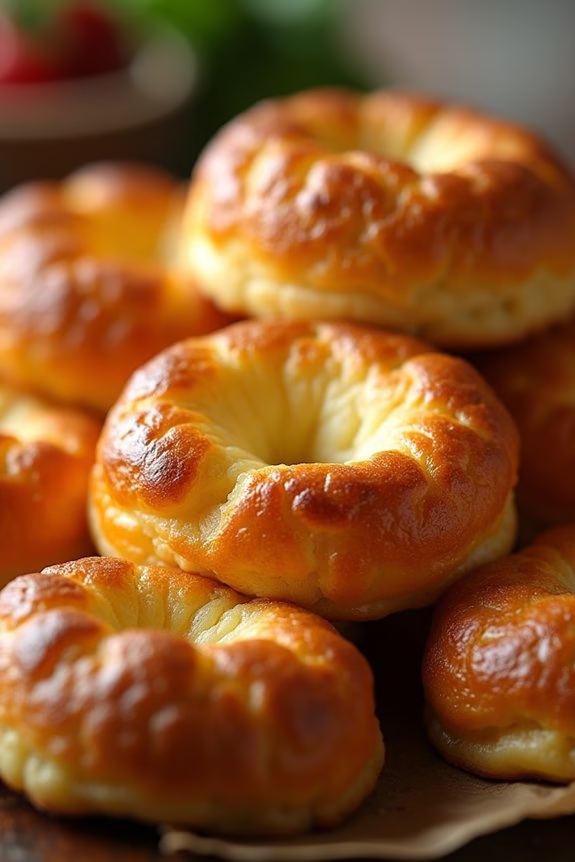
Yorkshire Pudding is a quintessential part of a classic British Christmas dinner, serving as a delightful accompaniment to roasted meats and vegetables. This savory dish, with its crisp exterior and soft, fluffy interior, has roots in the northern regions of England. Traditionally, Yorkshire Pudding was made to stretch a meal and make use of the meat drippings from the roast.
Today, it remains a beloved staple on many holiday tables, offering a comforting and satisfying addition to the festive feast. The beauty of Yorkshire Pudding lies in its simplicity; it’s made from a straightforward batter of eggs, flour, and milk. When baked at a high temperature, the batter puffs up dramatically, creating a light and airy texture.
Perfect for soaking up gravy, Yorkshire Pudding adds both flavor and texture to the meal. While the ingredients are basic, the technique is key to achieving the perfect rise and texture. Follow this traditional recipe to serve 4-6 people, guaranteeing your Christmas dinner is complete with this classic dish.
Ingredients:
- 1 cup all-purpose flour
- 1 cup milk
- 3 large eggs
- 1/2 teaspoon salt
- 1/4 cup beef drippings or vegetable oil
Cooking Instructions:
- Prepare the Oven and Pan: Preheat your oven to 425°F (220°C). Place a 12-cup muffin tin or a pudding tray in the oven to heat up. This guarantees that the batter begins to cook immediately when poured in, aiding in the rise.
- Mix the Batter: In a large mixing bowl, whisk together the flour and salt. Make a well in the center and add the eggs. Gradually mix in the milk, whisking continuously until you have a smooth batter. Let the batter rest for at least 30 minutes to allow the flour to fully absorb the liquid.
- Heat the Fat: Once the oven and tin are hot, carefully remove the tin and add a small amount of beef drippings or vegetable oil to each cup. The fat should sizzle immediately; if not, return the tin to the oven for a few more minutes.
- Pour and Bake: Quickly pour the batter into the hot fat, filling each cup about halfway. The batter should begin to bubble around the edges. Return the tin to the oven and bake for 20-25 minutes, or until the puddings have puffed up and are golden brown.
- Serve Immediately: Once baked, remove the puddings from the oven and serve immediately. Yorkshire Puddings are best enjoyed fresh and hot, straight from the oven.
Extra Tips:
For the best results, guarantee that all ingredients are at room temperature before mixing. Using room temperature ingredients helps the batter rise better. Additionally, resist the temptation to open the oven door during baking, as this can cause the puddings to deflate.
If you need to make them ahead of time, Yorkshire Puddings can be reheated in the oven for a few minutes to regain their crispness. Enjoy these delightful puffs alongside your Christmas roast, and watch them disappear in no time!
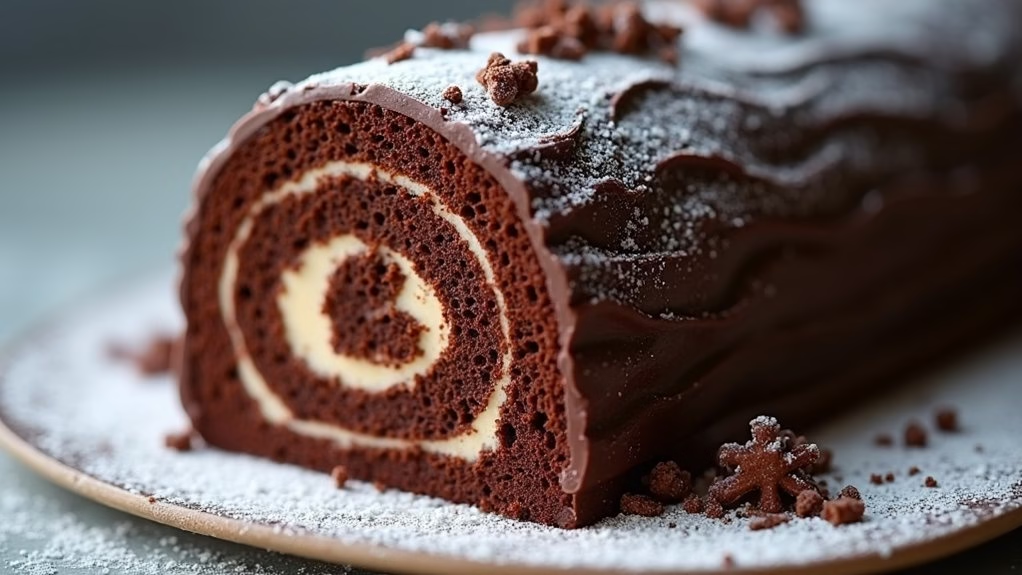
Chocolate Yule Log Cake
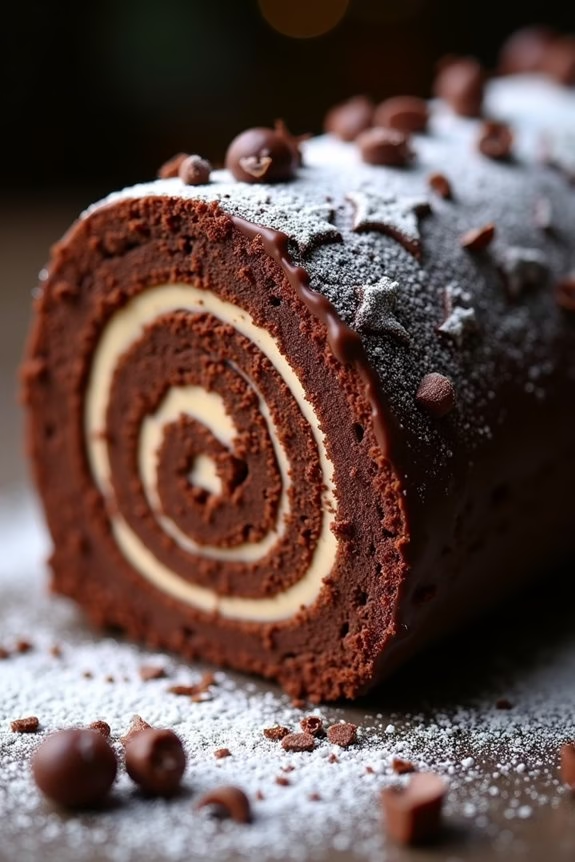
A Chocolate Yule Log Cake is a classic holiday dessert that brings elegance and festive charm to your Christmas dinner table. This delightful cake, also known as Bûche de Noël, mimics the appearance of a wooden log and is traditionally served during the holiday season. Its combination of rich chocolate sponge cake, creamy filling, and decadent frosting not only makes it visually appealing but also irresistibly delicious.
Perfect for serving 4-6 people, this cake is both a decorative centerpiece and a tasty treat that embodies the warmth and joy of Christmas.
The preparation of a Chocolate Yule Log Cake involves baking a light and airy chocolate sponge cake, which is then rolled with a luscious filling and covered with a smooth chocolate ganache or buttercream. While the process may seem intricate, with careful attention to detail and a little patience, you can create a stunning dessert that will impress your family and friends.
Whether you’re an experienced baker or trying this recipe for the first time, the following ingredients and instructions will guide you in crafting a memorable Christmas dessert.
Ingredients (serves 4-6):
- 4 large eggs
- 2/3 cup granulated sugar
- 1 teaspoon vanilla extract
- 1/2 cup all-purpose flour
- 1/3 cup unsweetened cocoa powder
- 1 teaspoon baking powder
- 1/4 teaspoon salt
- 1 cup heavy cream
- 2 tablespoons confectioners’ sugar
- 1 teaspoon instant espresso powder (optional)
- 1 1/2 cups chocolate ganache or buttercream frosting
- Powdered sugar and chocolate shavings for garnish (optional)
Cooking Instructions:
1. Preheat and Prepare**: Preheat your oven to 350°F (175°C). Line a 10×15-inch jelly roll pan** with parchment paper, making sure the paper extends slightly over the edges for easy removal.
2. Mix the Batter: In a large bowl, beat the eggs using an electric mixer on high speed until thick and pale, about 5 minutes. Gradually add the granulated sugar and continue beating until the mixture is light and fluffy. Stir in the vanilla extract.
3. Combine Dry Ingredients: In a separate bowl, whisk together the flour, cocoa powder, baking powder, and salt. Gently fold the dry ingredients into the egg mixture, being careful not to deflate the batter.
4. Bake the Cake: Pour the batter into the prepared pan, spreading it evenly. Bake in the preheated oven for 12-15 minutes, or until the cake springs back when lightly touched.
5. Roll the Cake: While the cake is still warm, carefully lift it from the pan using the parchment paper and transfer it to a flat surface. Dust the top with a light layer of confectioners’ sugar and cover with a clean kitchen towel.
Starting from the short side, gently roll the cake with the towel and parchment paper inside. Let it cool completely in this rolled position.
6. Prepare the Filling: In a chilled bowl, whip the heavy cream with confectioners’ sugar and instant espresso powder (if using) until stiff peaks form.
7. Fill and Roll: Unroll the cooled cake and spread the whipped cream evenly over the surface. Re-roll the cake without the parchment paper, ensuring the seam is on the bottom.
8. Frost the Cake: Spread the chocolate ganache or buttercream frosting over the entire log, using a spatula to create a bark-like texture if desired.
9. Garnish and Serve: Optionally, dust the log with powdered sugar and sprinkle with chocolate shavings for a festive touch. Slice and serve the cake to your delighted guests.
Extra Tips:
When making the Chocolate Yule Log Cake, verify the sponge cake isn’t overbaked as it may crack when rolled. Rolling the cake while still warm helps prevent cracking and makes it easier to handle.
For a more intense chocolate flavor, consider adding a teaspoon of espresso powder to the cocoa mixture. If you’re short on time, store-bought chocolate frosting can substitute homemade ganache, though making it from scratch gives the cake a richer taste.
Remember to refrigerate the cake until serving time, especially if using whipped cream filling, to maintain its shape and freshness.