
Last Christmas, I stumbled upon a delightful collection of 14 appetizer recipes that perfectly set the festive scene. Each dish, from the creamy baked brie with cranberry-pecan topping to the savory spinach and artichoke stuffed mushrooms, brought a touch of elegance to our table. I’m so excited to share every detail with you. Trust me, the prosciutto-wrapped asparagus is just the start of this tasty journey. Let’s make this holiday season even more special with these delicious appetizers.
Baked Brie With Cranberry-Pecan Topping
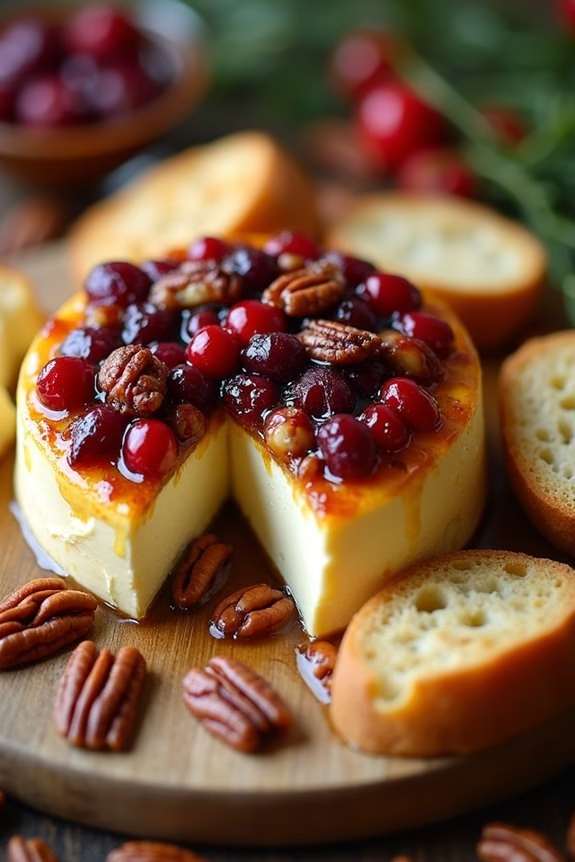
Baked Brie With Cranberry-Pecan Topping is an elegant and delicious appetizer that’s perfect for any holiday gathering. This dish combines the creamy richness of Brie cheese with the sweet and tangy flavors of cranberries and the nutty crunch of pecans. It’s a crowd-pleaser that’s both visually appealing and incredibly easy to prepare, making it a favorite among both novice and experienced cooks.
The warm, melty cheese paired with the flavorful topping creates a delightful contrast, making each bite irresistible. This appetizer isn’t only delicious but also versatile. It can be served with a variety of accompaniments such as sliced baguette, crackers, or fresh fruit. The combination of textures and flavors will have your guests coming back for more.
Whether you’re hosting a small family gathering or a large holiday party, Baked Brie With Cranberry-Pecan Topping is certain to impress and satisfy everyone’s taste buds.
Ingredients (serves 4-6):
- 1 wheel of Brie cheese (about 8 ounces)
- 1/2 cup dried cranberries
- 1/2 cup chopped pecans
- 1/4 cup brown sugar
- 1/4 cup honey
- 1 tablespoon unsalted butter
- 1/2 teaspoon ground cinnamon
- Crackers or sliced baguette, for serving
Cooking Instructions:
- Preheat the Oven: Start by preheating your oven to 350°F (175°C). This guarantees that the Brie will cook evenly and the topping will caramelize perfectly.
- Prepare the Topping: In a small saucepan over medium heat, combine the butter, honey, and brown sugar. Stir until the butter is melted and the mixture is smooth. Add the dried cranberries, chopped pecans, and ground cinnamon. Continue to cook for 2-3 minutes, stirring constantly, until everything is well coated and slightly thickened.
- Assemble the Brie: Place the wheel of Brie on a baking sheet lined with parchment paper. Pour the cranberry-pecan mixture over the top of the Brie, spreading it evenly to cover the entire surface.
- Bake the Brie: Transfer the baking sheet to the preheated oven and bake for about 12-15 minutes, or until the Brie is soft to the touch and the topping is bubbling and golden brown.
- Serve Immediately: Carefully transfer the baked Brie to a serving platter. Serve warm with crackers or sliced baguette on the side. Encourage guests to scoop up the cheese and topping together for the best flavor experience.
Extra Tips:
When making Baked Brie With Cranberry-Pecan Topping, be sure to use a wheel of Brie that’s at room temperature before baking. This helps the cheese to melt evenly and prevents it from cracking.
You can also prepare the cranberry-pecan topping ahead of time and store it in the refrigerator until you’re ready to bake. Just reheat it slightly before pouring it over the Brie. Additionally, feel free to experiment with different nuts or dried fruits to customize the topping to your liking.
Prosciutto-Wrapped Asparagus Spears
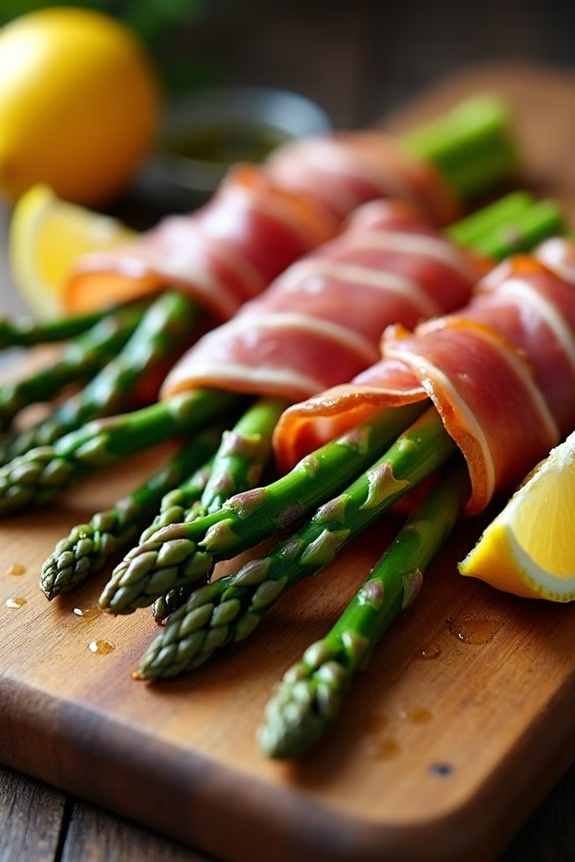
Prosciutto-Wrapped Asparagus Spears is a delightful appetizer perfect for Christmas gatherings. This dish combines the earthy flavor of asparagus with the salty, savory taste of prosciutto to create a sophisticated yet simple appetizer.
The spears are roasted to perfection, creating a crisp yet tender bite that pairs beautifully with the rich, delicate slices of prosciutto. This dish not only adds elegance to your holiday spread but is also incredibly easy to prepare, allowing you to spend more time with your guests and less time in the kitchen.
The dish is versatile and can be served warm or at room temperature, making it an ideal choice for busy holiday entertaining. Prosciutto-Wrapped Asparagus Spears can be prepared in advance, giving you the freedom to enjoy the festivities without stress.
Whether you’re planning a casual get-together or a formal dinner, these elegant spears are sure to impress your guests with their flavor and presentation.
Ingredients for 4-6 people:
- 1 pound (about 20-24) fresh asparagus spears, trimmed
- 12 slices of prosciutto, halved lengthwise
- 2 tablespoons olive oil
- Salt and freshly ground black pepper, to taste
- 1 lemon, cut into wedges for serving (optional)
Cooking Instructions:
- Preheat the Oven: Preheat your oven to 400°F (200°C). Line a baking sheet with parchment paper or lightly grease it with olive oil to prevent sticking.
- Prepare the Asparagus: Wash the asparagus spears thoroughly and trim the tough ends. You can do this by gently bending each spear until it naturally snaps at the point where the tender part meets the woody end.
- Wrap the Asparagus: Take a half slice of prosciutto and wrap it around each asparagus spear, starting just below the tip and spiraling downwards. Continue wrapping until you reach the bottom of the spear. Place the wrapped spears on the prepared baking sheet.
- Season and Drizzle: Once all the spears are wrapped, drizzle them with olive oil and sprinkle a pinch of salt and freshly ground black pepper over the top. Be cautious with the salt, as prosciutto is naturally salty.
- Roast in the Oven: Place the baking sheet in the preheated oven and roast the asparagus spears for 15-20 minutes, or until the prosciutto is crispy and the asparagus is tender when pierced with a fork.
- Serve: Remove the spears from the oven and let them cool slightly before transferring them to a serving platter. Garnish with lemon wedges if desired, allowing guests to squeeze fresh lemon juice over their serving for added flavor.
Extra Tips:
For an extra layer of flavor, consider sprinkling freshly grated Parmesan cheese over the spears just before serving.
If you prefer a smokier taste, you can grill the prosciutto-wrapped asparagus on an outdoor grill instead of roasting them in the oven. Be sure to monitor them closely to avoid burning the delicate prosciutto.
Also, feel free to experiment with other cured meats like pancetta if prosciutto is unavailable.
Spinach and Artichoke Stuffed Mushrooms
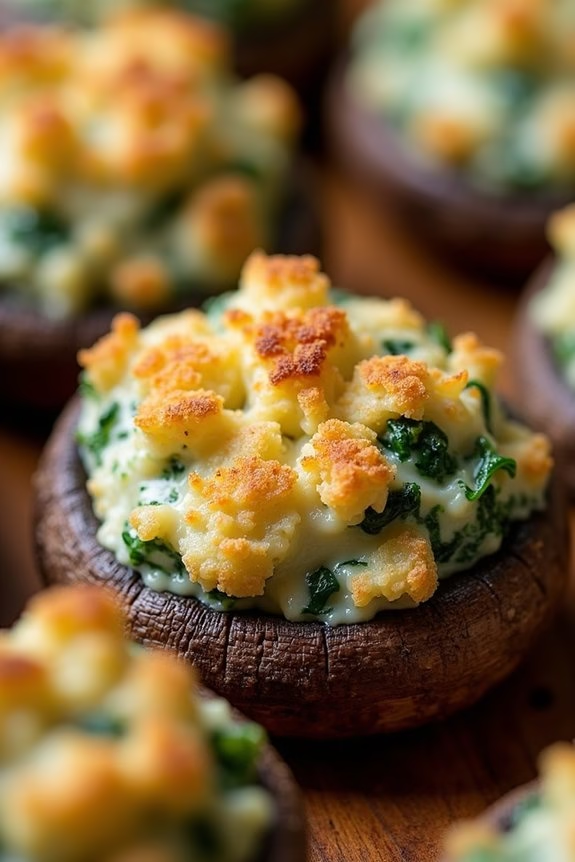
Spinach and Artichoke Stuffed Mushrooms are a delightful appetizer that combines the earthy flavor of mushrooms with the creamy, savory goodness of spinach and artichoke dip. This dish is perfect for holiday gatherings or any special occasion where you want to impress your guests with a delicious yet easy-to-make starter.
The stuffing, made from a blend of cheeses, spinach, and artichokes, is rich and flavorful, providing a perfect contrast to the tender, juicy mushroom caps. The beauty of this recipe lies in its simplicity and the way it elevates common ingredients into a gourmet experience.
With just a little preparation, you can create a dish that’s both visually appealing and incredibly tasty. These Spinach and Artichoke Stuffed Mushrooms are sure to be a hit at your next Christmas party, leaving your guests craving more.
Ingredients (Serving size: 4-6 people):
- 24 large fresh mushrooms
- 1 tablespoon olive oil
- 1 cup frozen chopped spinach, thawed and drained
- 1 can (14 oz) artichoke hearts, drained and chopped
- 4 oz cream cheese, softened
- 1/2 cup grated Parmesan cheese
- 1/2 cup shredded mozzarella cheese
- 2 cloves garlic, minced
- 1/4 teaspoon salt
- 1/4 teaspoon black pepper
- 1/4 teaspoon red pepper flakes (optional)
- 2 tablespoons breadcrumbs
Instructions:
- Preheat the Oven: Preheat your oven to 375°F (190°C). This guarantees that the mushrooms cook evenly and the stuffing becomes nicely golden and bubbly.
- Prepare the Mushrooms: Clean the mushrooms by gently wiping them with a damp cloth. Remove the stems and set aside. You can chop the stems finely to add to the stuffing if desired.
- Cook the Spinach: In a skillet over medium heat, add the olive oil and garlic. Sauté until the garlic is fragrant, about 1 minute. Add the chopped spinach and artichoke hearts, and cook for another 3 minutes until heated through.
- Make the Stuffing: In a large mixing bowl, combine the cooked spinach and artichokes with cream cheese, Parmesan cheese, mozzarella cheese, salt, black pepper, and red pepper flakes. Mix until all ingredients are well combined and creamy.
- Stuff the Mushrooms: Using a spoon, fill each mushroom cap with the spinach and artichoke mixture, packing it tightly and slightly mounding it on top.
- Top with Breadcrumbs: Sprinkle breadcrumbs over the stuffed mushrooms for added texture and a golden brown finish.
- Bake the Mushrooms: Place the stuffed mushrooms on a baking sheet and bake in the preheated oven for 20-25 minutes, or until the mushrooms are tender and the stuffing is bubbly and golden.
- Serve: Allow the mushrooms to cool slightly before serving. Enjoy them warm for the best flavor experience.
Extra Tips:
When selecting mushrooms, choose ones that are firm and have no signs of bruising or dark spots, as these are indications of freshness.
To save time, you can prepare the stuffing a day in advance and store it in the refrigerator until you’re ready to assemble and bake the mushrooms.
If you prefer a bit of crunch, consider adding chopped walnuts or pine nuts to the stuffing mixture. Finally, these stuffed mushrooms can be served with a side of marinara sauce for dipping, adding a deliciously tangy contrast to the creamy filling.
Smoked Salmon and Dill Canapés
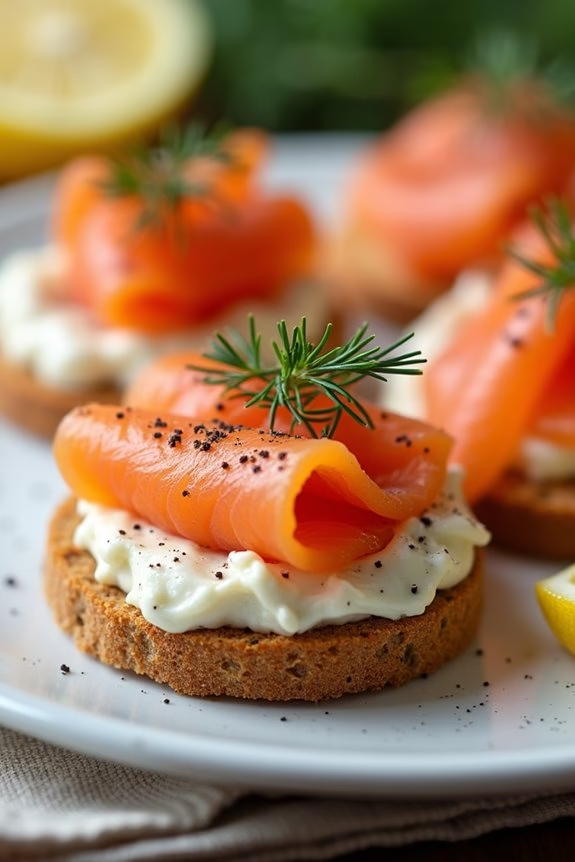
Smoked Salmon and Dill Canapés are a classic, elegant appetizer perfect for Christmas gatherings. These bite-sized treats combine the rich, savory flavors of smoked salmon with the fresh, aromatic notes of dill, all atop a crunchy base. The combination of textures and flavors makes these canapés a favorite among guests, offering a luxurious start to any holiday meal.
Whether you’re hosting a large party or an intimate family dinner, these canapés are bound to impress with their sophisticated taste and beautiful presentation. Not only are Smoked Salmon and Dill Canapés delicious, but they’re also incredibly easy to prepare, making them an ideal choice for holiday hosts looking to streamline their menu.
With just a few simple ingredients, you can create a dish that looks and tastes like it took hours to prepare. This recipe yields enough canapés for 4-6 people, making it perfect for small gatherings or as part of a larger appetizer spread.
Ingredients:
- 12 slices of cocktail rye bread or blinis
- 8 oz. smoked salmon
- 4 oz. cream cheese, softened
- 1 tablespoon lemon juice
- 1 tablespoon fresh dill, finely chopped
- 1 teaspoon capers, rinsed and chopped
- Fresh dill sprigs for garnish
- Black pepper to taste
- Lemon wedges for serving
Instructions:
- Prepare the Cream Cheese Mixture: In a small bowl, combine the softened cream cheese with lemon juice, chopped dill, and capers. Mix well until all ingredients are thoroughly combined, creating a smooth and flavorful spread.
- Prepare the Bread Base: Lay out the slices of cocktail rye bread or blinis on a serving platter. If using rye bread, you may want to lightly toast them in the oven for a few minutes to add an extra crunch to your canapés.
- Assemble the Canapés: Spread about a teaspoon of the cream cheese mixture onto each slice of bread or blini. Make sure the spread is evenly distributed to guarantee each bite is flavorful.
- Add the Smoked Salmon: Cut the smoked salmon into small pieces that will fit neatly on top of the bread or blinis. Place a piece of smoked salmon on each canapé, gently pressing it into the cream cheese spread to hold it in place.
- Garnish and Season: Top each canapé with a small sprig of fresh dill and a light sprinkle of black pepper. This adds a pop of color and enhances the overall flavor of the appetizer.
- Serve: Arrange the canapés on a platter with lemon wedges on the side. Encourage your guests to squeeze a little lemon juice over the top for an added burst of freshness before enjoying.
Extra Tips:
For the best flavor, try to use high-quality smoked salmon, as it’s the star ingredient in this dish. If you prefer a slightly spicy kick, consider adding a pinch of cayenne pepper to the cream cheese mixture.
These canapés can be prepared a few hours in advance and stored in the refrigerator; just add the fresh dill and black pepper right before serving to maintain their vibrant appearance. If cocktail rye bread isn’t available, you can substitute with any small, sturdy bread or cracker that will hold up well with the toppings.
Fig and Goat Cheese Crostini
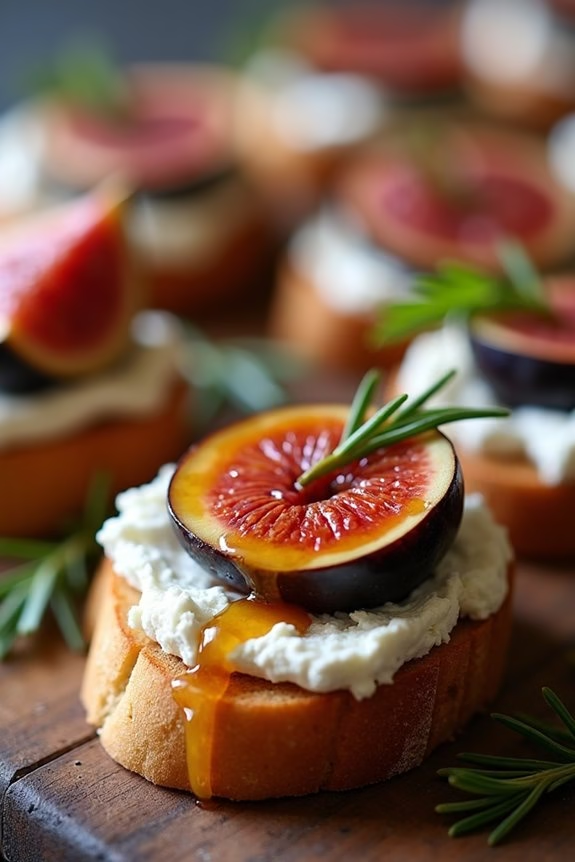
Fig and Goat Cheese Crostini is an elegant and delicious appetizer that perfectly complements any holiday gathering, especially Christmas. This dish combines the creamy texture of goat cheese with the sweet and complex flavors of figs, all served atop crunchy crostini. The contrast of textures and flavors makes it a sophisticated addition to your appetizer spread, bound to impress your guests.
Plus, it’s quick to prepare, allowing you more time to enjoy the festivities. Ideal for a serving size of 4-6 people, this appetizer is perfect for intimate gatherings or as a starter for a larger meal. The combination of fresh ingredients not only offers a burst of flavor but also provides nutritional benefits; figs are rich in fiber and antioxidants, while goat cheese is a good source of protein and calcium.
This recipe isn’t only delicious but also brings a touch of healthfulness to your holiday table.
Ingredients:
- 1 baguette, sliced into 1/2-inch thick pieces
- 1 cup fresh figs, quartered
- 6 ounces goat cheese, softened
- 2 tablespoons honey
- 2 tablespoons olive oil
- Salt to taste
- Freshly ground black pepper to taste
- Fresh rosemary or thyme for garnish (optional)
Instructions:
- Preheat the Oven: Begin by preheating your oven to 350°F (175°C). This guarantees that the baguette slices toast evenly, becoming crisp and golden brown.
- Prepare the Baguette: Arrange the sliced baguette on a baking sheet. Brush each slice lightly with olive oil to help them crisp up and add a hint of flavor. Sprinkle with a pinch of salt and freshly ground black pepper.
- Toast the Baguette: Place the baking sheet in the preheated oven and bake for about 10-12 minutes or until the baguette slices are golden and crispy. Keep an eye on them to prevent burning.
- Prepare the Figs: While the bread is toasting, wash and quarter the figs. Set them aside for assembly.
- Assemble the Crostini: Once the baguette slices are toasted, remove them from the oven and allow them to cool slightly. Spread a generous amount of softened goat cheese on each slice.
- Add the Figs: Top the goat cheese with the quartered figs, pressing them gently into the cheese to ascertain they stay in place.
- Drizzle with Honey: Drizzle each crostini with honey, adding a touch of sweetness that complements the figs and cheese.
- Garnish and Serve: For an optional finish, garnish with a sprig of fresh rosemary or thyme. Serve the crostini immediately while the bread is still warm.
Extra Tips: For a creamier texture, you can whip the goat cheese with a tablespoon of cream or milk before spreading it on the crostini. If fresh figs are unavailable, you can use dried figs that have been rehydrated in warm water for about 10 minutes.
Additionally, feel free to experiment with different herbs or a balsamic glaze instead of honey for a unique twist. This dish is versatile, so have fun tailoring it to your taste preferences or what you have on hand.
Caprese Skewers With Balsamic Glaze
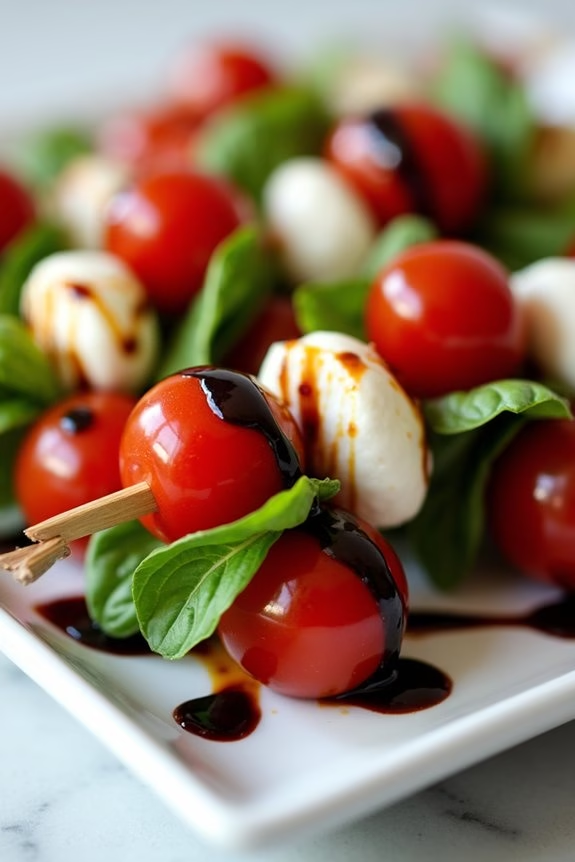
Caprese Skewers With Balsamic Glaze are a delightful and invigorating appetizer perfect for any holiday gathering. These skewers combine the classic flavors of tomatoes, fresh mozzarella, and basil, all drizzled with a rich balsamic glaze. Not only are they visually appealing, but the combination of juicy tomatoes, creamy mozzarella, and aromatic basil creates a festive explosion of flavors that will surely please your guests.
These skewers are quick to assemble, making them an excellent choice for a stress-free Christmas appetizer. This recipe serves 4-6 people and is perfect for those who want to enjoy a light, yet flavorful appetizer. The key to this dish is using fresh ingredients, especially the mozzarella and basil, to enhance the natural flavors of each component.
The balsamic glaze adds a touch of sweetness and acidity, balancing the rich and creamy texture of the mozzarella. By preparing these skewers, you’ll have an appetizer that not only tastes delicious but also looks elegant on the table.
Ingredients:
- 20 cherry tomatoes
- 20 small fresh mozzarella balls (bocconcini)
- 20 fresh basil leaves
- 1 cup balsamic vinegar
- 1 tablespoon honey
- Salt and pepper to taste
- 20 wooden skewers
Instructions:
- Prepare the Balsamic Glaze: In a small saucepan, combine the balsamic vinegar and honey. Bring to a simmer over medium heat. Lower the heat and let it gently simmer for about 10-15 minutes, or until the mixture has reduced by half and is thick enough to coat the back of a spoon. Remove from heat and let it cool.
- Assemble the Skewers: On each wooden skewer, thread one cherry tomato, followed by a basil leaf, a mozzarella ball, another basil leaf, and finish with another cherry tomato. Repeat this process for all skewers.
- Season the Skewers: Lightly sprinkle salt and pepper over the assembled skewers to enhance the flavors of the fresh ingredients.
- Drizzle with Balsamic Glaze: Using a spoon, drizzle the balsamic glaze over the skewers just before serving. Make sure each skewer gets a good amount of the glaze for added flavor.
- Serve Immediately: Arrange the skewers on a serving platter, either standing up in a decorative arrangement or laid flat. Serve them immediately for the best texture and flavor.
Extra Tips:
For the best results, use high-quality balsamic vinegar, as it will impact the flavor of the glaze considerably. If possible, prepare the glaze in advance and store it in the refrigerator until needed; simply reheat gently before use.
To prevent the wooden skewers from burning or splintering, consider soaking them in water for 15-20 minutes prior to assembly. Finally, these skewers can be made a few hours in advance and stored in the refrigerator, but wait to add the balsamic glaze until just before serving to keep the mozzarella fresh and the tomatoes crisp.
Maple-Glazed Bacon-Wrapped Dates
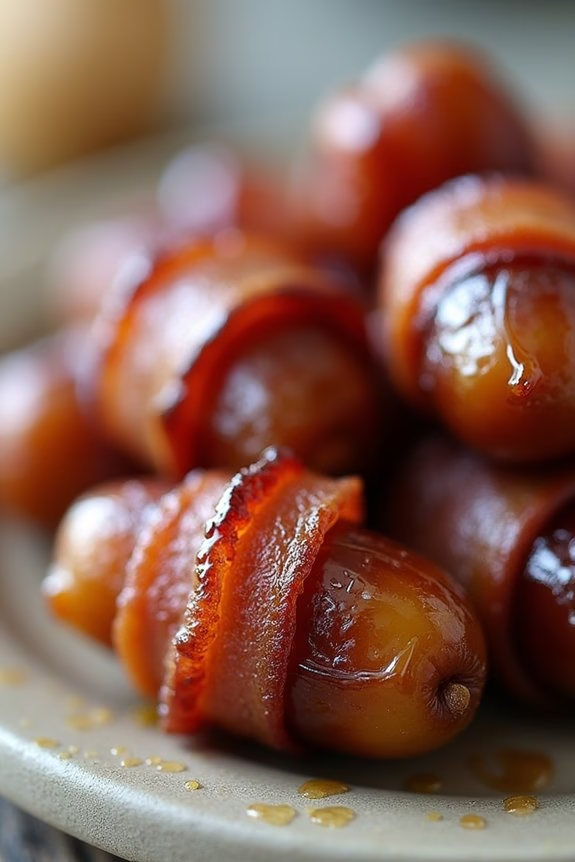
Maple-Glazed Bacon-Wrapped Dates are a delightful appetizer that marries sweet and savory flavors in a bite-sized treat. These little morsels are perfect for holiday gatherings, offering a sophisticated touch to your Christmas appetizer spread. The natural sweetness of Medjool dates is complemented by the smoky, salty bacon, and then elevated further with a luscious maple glaze. The combination creates an irresistible snack that will have your guests coming back for more.
This recipe isn’t only delicious but also incredibly simple to prepare, making it an excellent choice for both novice and experienced home cooks. The key to success lies in choosing high-quality ingredients, such as fresh dates and thick-cut bacon, which guarantee the best flavor and texture. With just a few steps, you’ll have a tray of savory-sweet bites ready to impress. The following recipe yields enough to serve 4-6 people, a perfect amount for a small gathering or as part of a larger appetizer selection.
Ingredients (Serves 4-6)
- 24 Medjool dates, pitted
- 12 slices of thick-cut bacon, halved
- 1/4 cup pure maple syrup
- 1/2 tablespoon Dijon mustard
- Toothpicks
Cooking Instructions
- Preheat the Oven: Preheat your oven to 375°F (190°C). Line a baking sheet with parchment paper to prevent sticking and for easy cleanup.
- Prepare the Glaze: In a small bowl, mix together the maple syrup and Dijon mustard. This will create a sweet and slightly tangy glaze that will coat the bacon-wrapped dates.
- Wrap the Dates: Take each pitted date and wrap it with a half slice of bacon. Secure the bacon with a toothpick, making sure it pierces through both ends of the bacon to hold it snugly around the date.
- Place on Baking Sheet: Arrange the bacon-wrapped dates on the prepared baking sheet, leaving a little space between each one to guarantee even cooking.
- Apply the Glaze: Using a brush, generously coat each bacon-wrapped date with the maple-Dijon glaze. Make sure all sides are well covered for maximum flavor.
- Bake: Place the baking sheet in the preheated oven and bake for 15-20 minutes, or until the bacon is crispy and the dates are warmed through. If necessary, turn the dates halfway through baking to guarantee even browning.
- Serve: Once cooked, remove from the oven and let cool slightly. Serve warm on a platter, allowing the glaze to set and the flavors to meld.
Extra Tips
For an added layer of flavor, consider stuffing the dates with a small piece of cheese or an almond before wrapping them in bacon. Blue cheese or goat cheese add a creamy contrast, while an almond adds a nice crunch.
If you prefer a crispier bacon wrap, pre-cook the bacon for a few minutes before wrapping the dates, but be cautious not to overcook it before baking. Adjust the baking time accordingly to prevent burning.
Mini Crab Cakes With Lemon Aioli
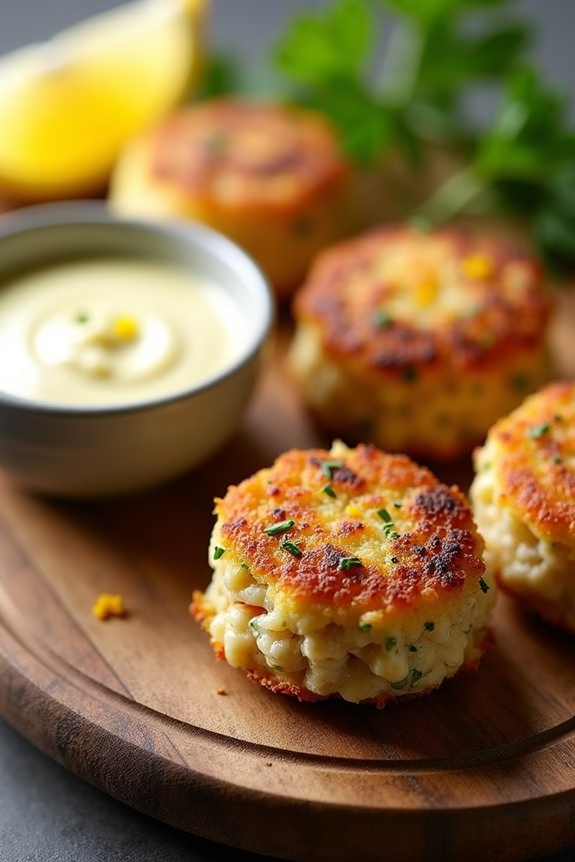
Mini Crab Cakes With Lemon Aioli are a delightful and elegant appetizer perfect for your Christmas gatherings. These bite-sized treats are packed with fresh crab meat, a blend of seasonings, and a touch of lemon zest, making them a crowd-pleaser at any holiday party. Pairing them with a tangy lemon aioli adds a revitalizing contrast to the rich, savory flavors of the crab cakes, creating a harmonious balance that your guests will love.
These crab cakes aren’t only flavorful but also easy to prepare, allowing you to enjoy more time with your guests rather than being stuck in the kitchen. The simplicity of the recipe allows the natural sweetness of the crab to shine through, while the lemon aioli provides a creamy, citrusy finish. Perfect for serving 4-6 people, this dish is sure to add a touch of sophistication to your festive spread.
Ingredients for Crab Cakes (serving size: 4-6 people):
- 1 pound fresh crab meat, picked over for shells
- 1/4 cup mayonnaise
- 1 large egg, beaten
- 1 tablespoon Dijon mustard
- 1 tablespoon Worcestershire sauce
- 1 teaspoon Old Bay seasoning
- 1/2 cup panko breadcrumbs
- 2 tablespoons chopped fresh parsley
- 1 teaspoon lemon zest
- Salt and pepper to taste
- 2 tablespoons vegetable oil (for frying)
Ingredients for Lemon Aioli:
- 1/2 cup mayonnaise
- 1 tablespoon lemon juice
- 1 teaspoon lemon zest
- 1 garlic clove, minced
- Salt and pepper to taste
Cooking Instructions:
- Prepare the Crab Mixture: In a large mixing bowl, combine the crab meat, mayonnaise, beaten egg, Dijon mustard, Worcestershire sauce, Old Bay seasoning, panko breadcrumbs, chopped parsley, and lemon zest. Season with salt and pepper to taste. Gently fold the ingredients together, being careful not to break up the crab meat too much.
- Shape the Crab Cakes: Divide the crab mixture into small portions, about 2 tablespoons each, and gently form them into small patties. Place the formed crab cakes on a baking sheet lined with parchment paper. Refrigerate the patties for at least 30 minutes to help them hold their shape during cooking.
- Cook the Crab Cakes: Heat the vegetable oil in a large skillet over medium heat. Once the oil is hot, carefully add the crab cakes to the skillet, cooking in batches if necessary to avoid overcrowding. Fry the crab cakes for about 3-4 minutes on each side, or until they’re golden brown and crispy. Transfer the cooked crab cakes to a paper towel-lined plate to drain any excess oil.
- Prepare the Lemon Aioli: In a small bowl, whisk together the mayonnaise, lemon juice, lemon zest, minced garlic, and a pinch of salt and pepper. Adjust the seasoning to taste, if needed. Serve the aioli alongside the warm crab cakes as a dipping sauce.
Extra Tips:
To guarantee your crab cakes have the perfect texture, be gentle when mixing and forming the patties to avoid breaking down the crab meat chunks. Chilling the formed patties before cooking helps them stay together during frying, so don’t skip this step.
If you prefer a spicier kick, consider adding a pinch of cayenne pepper to the crab mixture. For a healthier option, you can bake the crab cakes at 400°F (200°C) for 12-15 minutes, flipping halfway through, until they’re golden and cooked through. Enjoy these mini crab cakes hot for the best flavor experience.
Roasted Red Pepper Hummus With Pita Chips
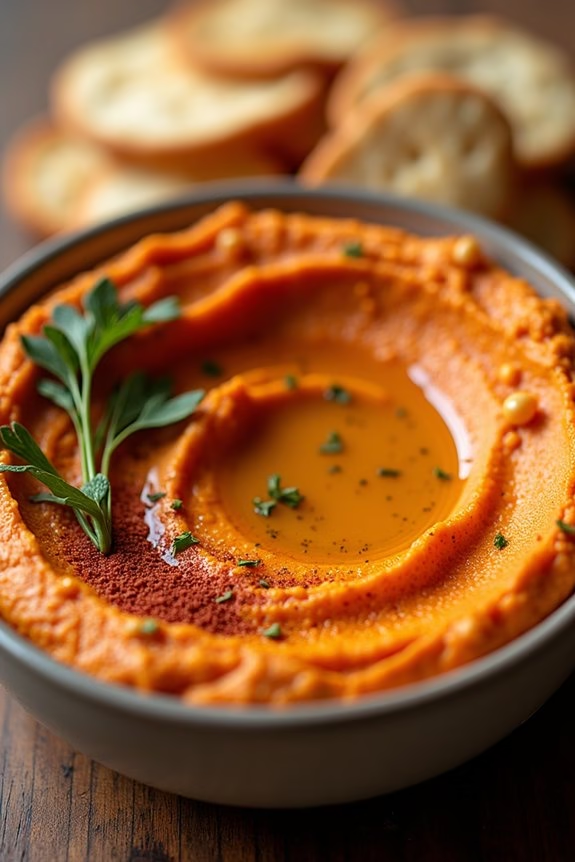
Roasted Red Pepper Hummus With Pita Chips is a delicious and vibrant appetizer perfect for any Christmas gathering. The creamy texture of the hummus, combined with the smoky sweetness of roasted red peppers, creates a mouthwatering dip that pairs beautifully with crispy pita chips. This dish isn’t only visually appealing with its rich red and golden hues but also packed with flavor and nutrients, making it a healthy choice for entertaining guests.
This appetizer is easy to prepare and can be made ahead of time, allowing you to focus on other holiday preparations. The hummus can be served chilled or at room temperature, and the pita chips add a delightful crunch that complements the smooth texture of the dip. Whether you’re hosting a large party or a small family get-together, Roasted Red Pepper Hummus With Pita Chips is sure to be a hit with everyone.
Ingredients (Serves 4-6):
- 2 large red bell peppers
- 1 can (15 oz) chickpeas, drained and rinsed
- 1/4 cup tahini
- 1/4 cup fresh lemon juice
- 2 tablespoons olive oil
- 2 cloves garlic, minced
- 1 teaspoon ground cumin
- 1/2 teaspoon smoked paprika
- Salt to taste
- Ground black pepper to taste
- 3 large pita breads
- 2 tablespoons olive oil (for pita chips)
- Sea salt to taste
Cooking Instructions:
- Roast the Red Peppers: Preheat your oven to 450°F (232°C). Place the red bell peppers on a baking sheet lined with parchment paper. Roast for 25-30 minutes, turning occasionally, until the skins are charred and blistered. Remove from the oven and place in a bowl, covering with plastic wrap to steam for 10 minutes. Peel off the skins, remove seeds, and chop roughly.
- Prepare the Hummus: In a food processor, combine the chickpeas, tahini, lemon juice, olive oil, garlic, cumin, smoked paprika, and a pinch of salt and pepper. Add the roasted red peppers. Blend until smooth, scraping down the sides as needed. Adjust seasoning to taste.
- Make the Pita Chips: Preheat the oven to 375°F (190°C). Cut the pita breads into triangles and arrange on a baking sheet. Drizzle with olive oil and sprinkle with sea salt. Bake for 10-12 minutes, or until golden brown and crispy. Let cool before serving.
- Serve: Transfer the hummus to a serving bowl. Create a small well in the center and drizzle with a little olive oil. Sprinkle additional smoked paprika or chopped fresh herbs for garnish, if desired. Serve with the pita chips on the side.
Extra Tips: For an extra smoky flavor, you can grill the red peppers instead of roasting them in the oven. If you prefer a spicier hummus, add a pinch of cayenne pepper during blending. The hummus can be stored in an airtight container in the refrigerator for up to 3 days. For a gluten-free option, serve the hummus with fresh vegetable sticks such as carrots, cucumbers, and bell peppers instead of pita chips.
Cheesy Garlic Bread Pull-Apart
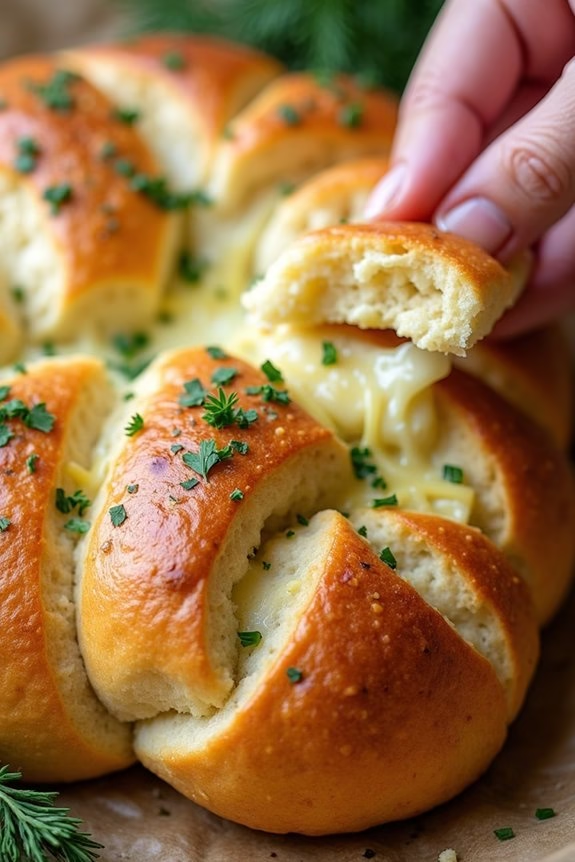
Cheesy Garlic Bread Pull-Apart is a delightful appetizer perfect for any holiday gathering, especially during Christmas. This dish combines the irresistible flavors of melted cheese and aromatic garlic, all baked into a warm, crusty loaf of bread that pulls apart effortlessly into individual pieces.
It’s a crowd-pleaser that’s sure to disappear quickly once it’s on the table. Not only is it delicious, but it’s also easy to prepare, making it an excellent choice for hosts looking to impress guests without spending too much time in the kitchen.
To create this mouth-watering appetizer, you’ll need a loaf of rustic bread like sourdough or Italian, which will serve as the base for the cheesy garlic goodness. The bread is scored in a crisscross pattern, allowing the garlic butter and cheese mixture to seep into every nook and cranny, guaranteeing each piece is flavorful.
Baking transforms the loaf into a golden, bubbly masterpiece with cheese oozing from every cut. The pull-apart nature of this dish makes it interactive and fun, perfect for sharing with family and friends during the festive season.
Ingredients (Serving Size: 4-6 people):
- 1 large loaf of sourdough or Italian bread
- 1/2 cup unsalted butter, melted
- 3 cloves garlic, minced
- 1 tablespoon fresh parsley, chopped
- 1 teaspoon dried oregano
- 1 1/2 cups mozzarella cheese, shredded
- 1/2 cup Parmesan cheese, grated
- Salt and pepper to taste
Cooking Instructions:
- Preheat the Oven: Set your oven to 375°F (190°C) to make sure it’s hot and ready for baking.
- Prepare the Bread: Place the bread on a cutting board. Using a sharp serrated knife, make diagonal cuts across the loaf about 1 inch apart, being careful not to slice all the way through. Rotate the bread and make similar cuts in the opposite direction, forming a diamond pattern.
- Make the Garlic Butter: In a small bowl, combine the melted butter, minced garlic, chopped parsley, and dried oregano. Mix well to integrate all ingredients.
- Infuse the Bread: Gently pull apart the bread sections and use a pastry brush or spoon to drizzle the garlic butter mixture into the cuts. Make sure the mixture is evenly distributed throughout the loaf.
- Add the Cheese: Stuff the shredded mozzarella and grated Parmesan into the cuts of the bread. Be generous to make sure every piece is cheesy.
- Bake: Wrap the loaf in aluminum foil, leaving a small opening at the top to allow steam to escape. Place it on a baking sheet and bake in the preheated oven for 15-20 minutes.
- Final Touch: After the initial baking time, open the foil completely and bake for an additional 5-10 minutes until the cheese is bubbly and the top is golden brown.
- Serve: Remove from the oven and let it cool slightly before serving. Enjoy by pulling apart pieces of the cheesy garlic bread.
Extra Tips:
For an added flavor boost, consider adding a sprinkle of red pepper flakes to the garlic butter mixture for a bit of heat. If you prefer a crispier texture, bake the bread directly on the oven rack for the final 5-10 minutes instead of keeping it on the baking sheet.
To make this dish ahead of time, prepare the bread and garlic butter mixture and store them separately. Assemble and bake just before serving for maximum freshness.
Deviled Eggs With Truffle Oil
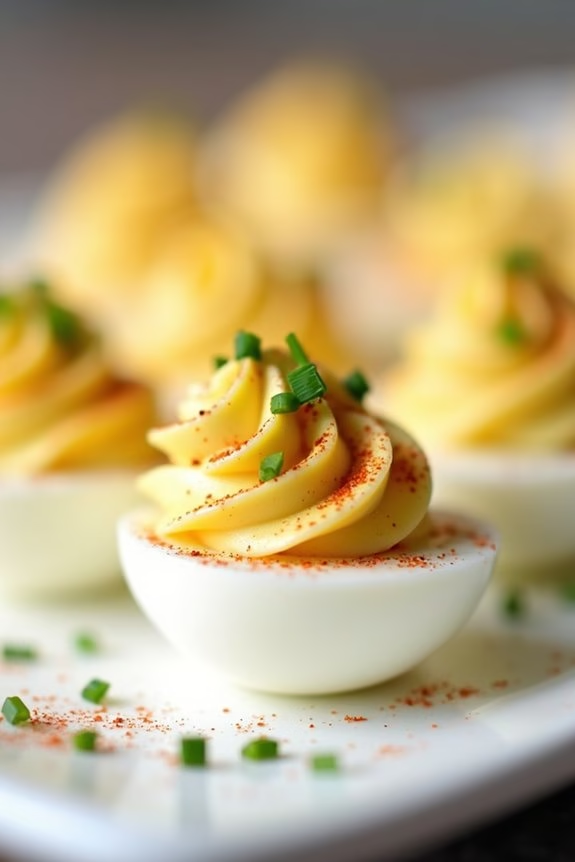
Deviled eggs are a classic appetizer that can elevate any Christmas gathering with their creamy texture and bold flavors. This version infuses the traditional deviled egg with the luxurious and earthy flavor of truffle oil, adding a gourmet twist that will impress your guests. The rich aroma of truffle oil complements the tangy and spicy filling, making these deviled eggs a must-have on your holiday table.
Perfect for serving 4-6 people, these deviled eggs with truffle oil are simple to prepare yet sophisticated in taste. Whether you’re hosting a large gathering or an intimate dinner, these delectable bites will surely be a hit. The combination of mayonnaise, Dijon mustard, and a hint of truffle oil creates a smooth, flavorful filling that pairs wonderfully with the soft, delicate egg whites.
Ingredients:
- 6 large eggs
- 3 tablespoons mayonnaise
- 1 teaspoon Dijon mustard
- 1 teaspoon truffle oil
- 1/4 teaspoon salt
- 1/4 teaspoon freshly ground black pepper
- 1 teaspoon white wine vinegar
- 1 teaspoon chopped fresh chives (plus extra for garnish)
- Paprika, for garnish
Cooking Instructions:
- Boil the Eggs: Place the eggs in a medium saucepan and cover them with cold water. Bring the water to a boil over medium-high heat. Once boiling, remove the saucepan from the heat, cover it with a lid, and let the eggs sit for 10-12 minutes.
- Cool and Peel the Eggs: After the eggs have cooked, transfer them into a bowl of ice water to cool for about 5 minutes. Once cooled, gently tap each egg on the counter to crack the shell and peel them carefully.
- Prepare the Filling: Cut each egg in half lengthwise and carefully scoop out the yolks into a mixing bowl. Set the egg whites aside on a serving platter.
- Mix the Ingredients: To the bowl with the yolks, add mayonnaise, Dijon mustard, truffle oil, salt, black pepper, white wine vinegar, and chopped chives. Use a fork or an electric mixer to blend the ingredients until smooth and creamy.
- Fill the Egg Whites: Using a spoon or a piping bag with a star tip, fill each egg white half with the yolk mixture. Make sure each egg is generously filled for the best presentation.
- Garnish and Serve: Lightly sprinkle paprika over the filled eggs for a touch of color. Garnish with extra chopped chives, if desired. Serve immediately or refrigerate until ready to serve.
Extra Tips:
When making deviled eggs, verify that the eggs aren’t overcooked to prevent a greenish ring around the yolk, which can affect both appearance and taste.
If truffle oil isn’t readily available, you can substitute with a truffle mustard for a similar flavor profile.
To achieve a visually appealing presentation, consider using a piping bag for the filling. This not only enhances the look of the deviled eggs but also guarantees an even distribution of the filling.
Pear and Blue Cheese Tartlets
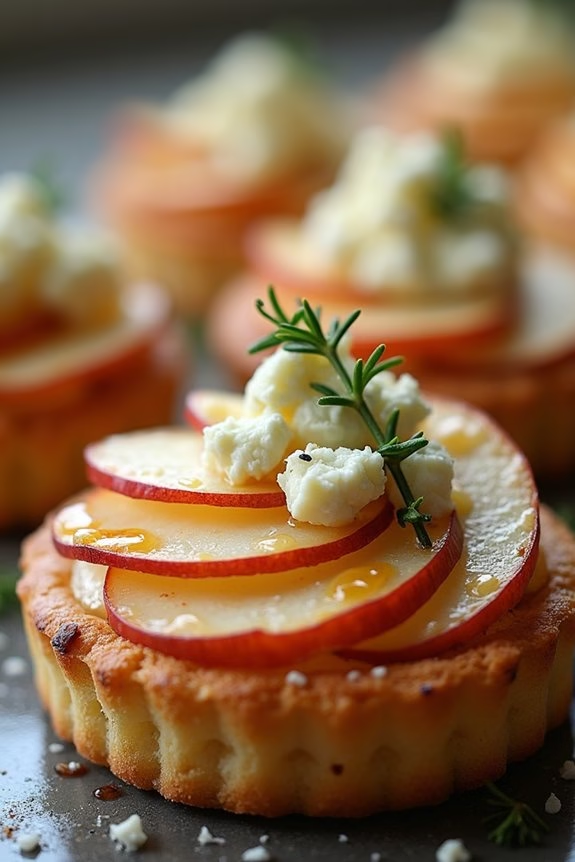
Pear and Blue Cheese Tartlets are a delightful addition to any holiday spread, combining the sweetness of ripe pears with the tangy, creamy flavor of blue cheese. These tartlets offer a sophisticated balance of flavors and textures, making them an irresistible appetizer for your Christmas gathering.
With a flaky pastry base, they’re both visually appealing and incredibly tasty, ensuring that they’ll be a hit with guests. This recipe is designed to serve 4-6 people, making it perfect for a cozy get-together. The tartlets are easy to prepare and can be made ahead of time, allowing you to enjoy the festivities without being tied to the kitchen.
The combination of ingredients is simple yet elegant, showcasing the rich flavors of the season in every bite.
Ingredients:
- 1 sheet of puff pastry
- 2 ripe pears, cored and thinly sliced
- 100g blue cheese, crumbled
- 1 tablespoon honey
- 1 tablespoon fresh thyme leaves
- 1 egg, beaten (for egg wash)
- Salt and pepper to taste
Cooking Instructions:
- Preheat and Prepare: Preheat your oven to 200°C (400°F). Line a baking sheet with parchment paper to prevent sticking.
- Prepare the Puff Pastry: Roll out the puff pastry sheet on a lightly floured surface to smooth out any creases. Using a sharp knife or a pastry cutter, cut the pastry into small squares, roughly 5×5 cm each, to form the base of your tartlets. Place these squares onto the prepared baking sheet.
- Assemble the Tartlets: Arrange a few slices of pear on each pastry square, leaving a small border around the edges. Sprinkle a few crumbles of blue cheese over the pears. Drizzle a small amount of honey over each tartlet and sprinkle with fresh thyme leaves.
- Add Seasoning: Lightly season each tartlet with salt and pepper to enhance the flavors of the ingredients.
- Egg Wash: Brush the exposed edges of the puff pastry with the beaten egg. This will give the pastry a golden, glossy finish once baked.
- Bake: Place the tartlets in the preheated oven and bake for about 15-20 minutes, or until the pastry is golden brown and puffed, and the cheese is bubbly and slightly caramelized.
- Cool and Serve: Remove the tartlets from the oven and allow them to cool slightly on a wire rack. Serve warm or at room temperature for the best flavor.
Extra Tips:
When selecting pears for this recipe, opt for those that are firm yet ripe, as they’ll hold their shape better during baking.
Feel free to experiment with different varieties of blue cheese to suit your taste preference, such as Roquefort or Gorgonzola. If you’re preparing these tartlets ahead of time, you can reheat them in a low oven for a few minutes before serving to refresh their crispness.
Enjoy these tartlets with a glass of chilled white wine or your favorite holiday cocktail for a truly festive experience.
Sweet and Spicy Meatballs

Sweet and Spicy Meatballs are a delightful addition to your Christmas appetizer spread, offering a perfect balance of flavors that are sure to impress your guests. These meatballs are tender and juicy, cloaked in a tantalizing sauce that combines the sweetness of brown sugar and honey with the heat of sriracha and crushed red pepper flakes. This dish isn’t only pleasing to the palate but also visually appealing, making it a festive treat for the holiday season.
Ideal for serving 4-6 people, Sweet and Spicy Meatballs are great for sharing at a holiday gathering or family dinner. They can be prepared in advance, allowing you more time to enjoy the festivities. The combination of ingredients creates a harmonious blend of flavors that will have your guests reaching for more. Serve them as an appetizer or as part of a larger meal – either way, they’re sure to be a hit!
Ingredients:
- 1 pound ground beef
- 1/2 cup breadcrumbs
- 1/4 cup milk
- 1 large egg
- 2 cloves garlic, minced
- 1 tablespoon soy sauce
- 1/2 teaspoon salt
- 1/4 teaspoon black pepper
- 1 tablespoon olive oil
- 1/2 cup brown sugar
- 1/3 cup honey
- 1/4 cup soy sauce
- 2 tablespoons sriracha sauce
- 1 teaspoon crushed red pepper flakes
- 1 tablespoon cornstarch
- 2 tablespoons water
- 2 tablespoons chopped fresh parsley (for garnish)
Cooking Instructions:
- Prepare the Meatball Mixture: In a large bowl, combine the ground beef, breadcrumbs, milk, egg, minced garlic, soy sauce, salt, and black pepper. Mix until all the ingredients are well incorporated.
- Shape the Meatballs: Using your hands, form the mixture into small meatballs, about 1 inch in diameter. Place them on a baking sheet lined with parchment paper.
- Cook the Meatballs: Heat the olive oil in a large skillet over medium heat. Add the meatballs in batches, cooking until they’re browned on all sides and cooked through, about 8-10 minutes. Remove the meatballs from the skillet and set aside.
- Make the Sauce: In the same skillet, add the brown sugar, honey, soy sauce, sriracha, and crushed red pepper flakes. Stir over medium heat until the sugar dissolves and the mixture begins to simmer.
- Thicken the Sauce: In a small bowl, mix the cornstarch with water to create a slurry. Gradually add the slurry to the sauce, stirring constantly until the sauce thickens, about 2-3 minutes.
- Combine Meatballs and Sauce: Return the meatballs to the skillet, coating them evenly with the sauce. Allow them to simmer in the sauce for an additional 5 minutes to absorb the flavors.
- Garnish and Serve: Transfer the meatballs to a serving dish, and garnish with chopped fresh parsley before serving.
For extra tips, when forming the meatballs, wet your hands slightly to prevent the mixture from sticking. If you prefer a milder heat, adjust the amount of sriracha and red pepper flakes to taste.
These meatballs can also be made ahead and reheated in the sauce, making them convenient for entertaining. Serve them with cocktail picks for easy grabbing and consider pairing them with a cool dipping sauce like ranch or blue cheese for added flavor contrast.
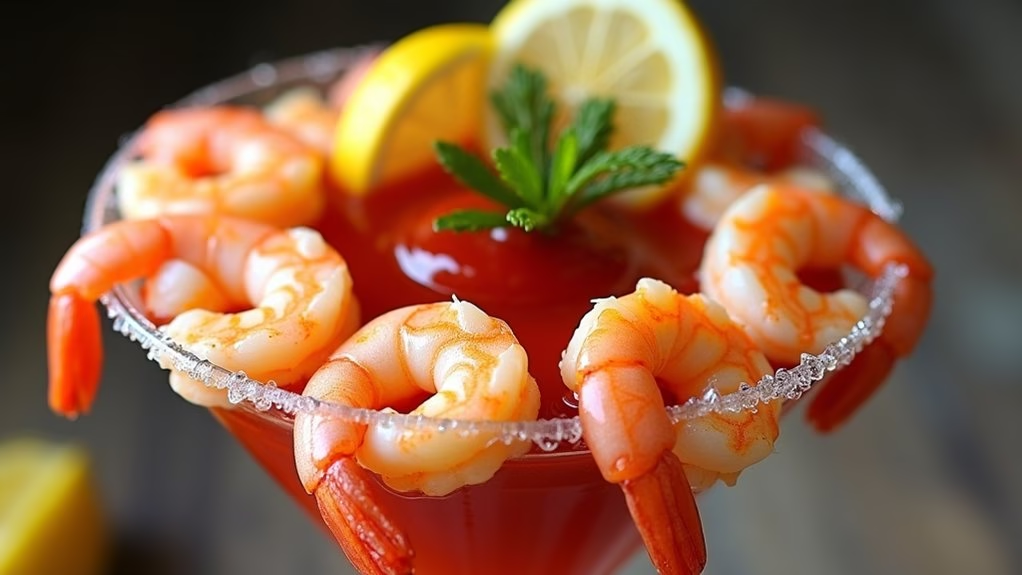
Shrimp Cocktail With Zesty Cocktail Sauce
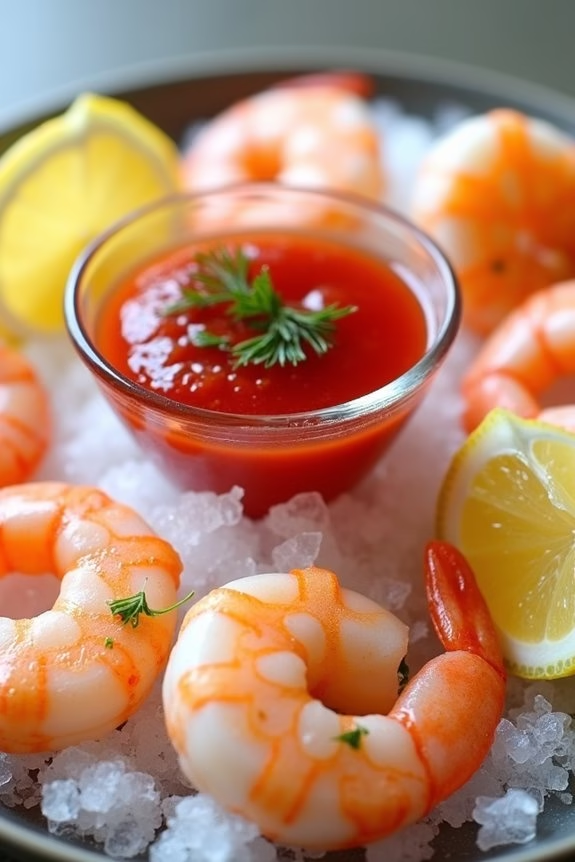
A classic Shrimp Cocktail with Zesty Cocktail Sauce is a perfect way to kick off your holiday festivities. This timeless appetizer isn’t only simple to prepare but also a crowd-pleaser with its succulent shrimp and flavorful sauce. The key to this dish is in the freshness of the shrimp, coupled with a tangy cocktail sauce that packs a punch, making certain your guests are delighted from the very first bite.
When preparing this dish, it’s crucial to focus on quality ingredients. Fresh shrimp, properly cooked and chilled, are the star of the show while the cocktail sauce complements them with its spicy and tangy notes. This appetizer is versatile and can be prepared in advance, allowing you more time to enjoy the holiday celebrations with your guests.
Serve it in a stylish way, perhaps over a bed of ice or in individual cocktail glasses, to add a touch of elegance to your Christmas gathering.
Ingredients (serves 4-6):
- 1 1/2 pounds large shrimp, peeled and deveined
- 1 cup ketchup
- 2 tablespoons prepared horseradish
- 1 tablespoon lemon juice
- 1 teaspoon Worcestershire sauce
- 1/2 teaspoon hot sauce (optional)
- Salt, to taste
- Lemon wedges, for serving
- Fresh dill or parsley, for garnish
Instructions:
1. Prepare the Shrimp: Begin by bringing a large pot of salted water to a boil. Add the shrimp and cook for about 2-3 minutes, or until they’re pink and opaque. Be careful not to overcook them as they’ll become rubbery.
Once cooked, remove the shrimp from the pot and immediately transfer them to a bowl of ice water to stop the cooking process. Allow them to chill for at least 10 minutes.
2. Make the Cocktail Sauce: In a medium-sized bowl, combine the ketchup, prepared horseradish, lemon juice, Worcestershire sauce, and hot sauce. Stir well until all the ingredients are thoroughly mixed.
Taste the sauce and add salt to your preference. Adjust the level of spiciness by adding more or less horseradish and hot sauce according to your taste.
3. Serve: Once the shrimp are chilled, drain and pat them dry with a paper towel. Arrange them on a serving platter or individual cocktail glasses.
Serve with the zesty cocktail sauce in a small bowl in the center of the platter or alongside the glasses. Garnish with lemon wedges and a sprinkle of fresh dill or parsley for added flavor and presentation.
Extra Tips:
For the best results, use fresh shrimp from a reliable source and make sure they’re properly cleaned and deveined. If fresh shrimp aren’t available, frozen shrimp can be used, but make sure to thaw them completely before cooking.
To enhance the flavor of the shrimp, consider adding aromatics like bay leaves or peppercorns to the boiling water. The cocktail sauce can be made a day in advance and stored in the refrigerator, which helps to meld the flavors together beautifully.
Finally, when serving, keep the shrimp chilled by placing them on a bed of crushed ice.