
Are you ready to elevate your chicken dinner to a whole new level?
I’ve curated a list of 12 light appetizers that will have your guests raving!
From vibrant Caprese skewers to refreshing shrimp ceviche, there’s something for everyone.
And who can resist the flaky goodness of spinach and feta puffs or a unique twist on classic bruschetta?
Let’s explore these delicious bites that will set the stage for an unforgettable meal!
Fresh Caprese Skewers
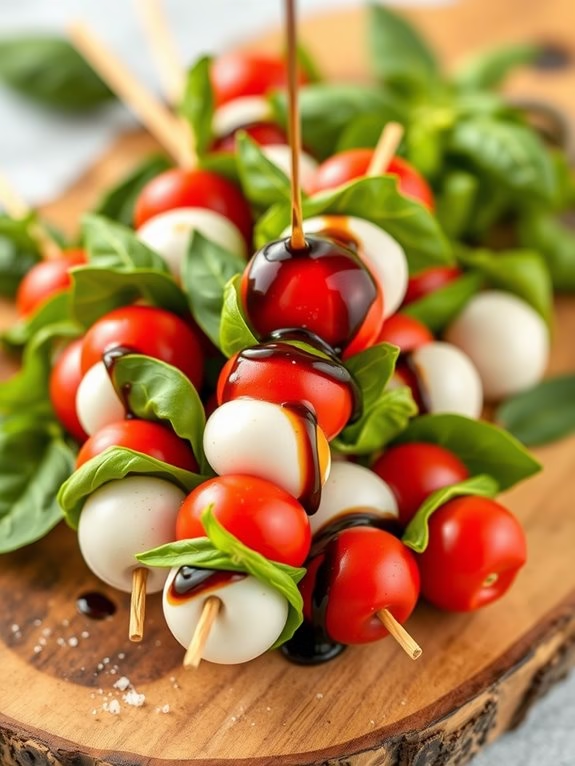
Caprese skewers are the perfect appetizer for any dinner party, offering a fresh and light start to a meal. This dish is a miniaturized version of the classic Italian Caprese salad, skewered for easy serving and eating. They’re simple to prepare, yet their vibrant colors and flavors pack a punch, impressing your guests right from the start. The combination of ripe cherry tomatoes, creamy mozzarella cheese, and fresh basil leaves, drizzled with a sweet balsamic glaze, makes for a delightful burst of flavors in every bite.
The best part about this recipe is its versatility. It’s perfect for a formal dinner party, a casual barbecue, a potluck, or even a picnic. The skewers are easy to make, easy to serve, and easy to eat, making them a crowd favorite. The ingredients are simple and fresh, and the recipe can be easily adjusted to cater to different dietary preferences or restrictions.
Ingredients:
- 24 cherry tomatoes
- 24 mini mozzarella cheese balls
- 24 fresh basil leaves
- 1 cup of balsamic vinegar
- 2 tablespoons of honey
- Salt to taste
- Ground black pepper to taste
- 24 toothpicks or small skewers
Instructions:
- Start by preparing the balsamic glaze. In a small saucepan, combine the balsamic vinegar and honey. Bring the mixture to a boil over medium heat, then reduce the heat to low and let it simmer for about 15 minutes, or until it has reduced by half and has a syrup-like consistency. Set it aside to cool.
- While the glaze is cooling, prepare the skewers. On each toothpick or skewer, thread a cherry tomato, a basil leaf (folded in half if it’s large), and a mini mozzarella ball.
- Once all the skewers are prepared, arrange them on a platter. Drizzle the cooled balsamic glaze over the skewers, making sure every skewer gets a good coating.
- Finally, season the skewers with a pinch of salt and black pepper to taste.
Extra Tips:
When preparing the Caprese skewers, choose ripe yet firm cherry tomatoes for the best flavor and texture. The mini mozzarella balls should be fresh and kept in its brine until you’re ready to use them. For the basil leaves, opt for fresh over dried for an authentic Italian flavor.
If you’re preparing these skewers in advance, keep them refrigerated until you’re ready to serve, but remember to bring them to room temperature and drizzle the balsamic glaze just before serving for the best taste.
Zesty Lemon Shrimp Ceviche
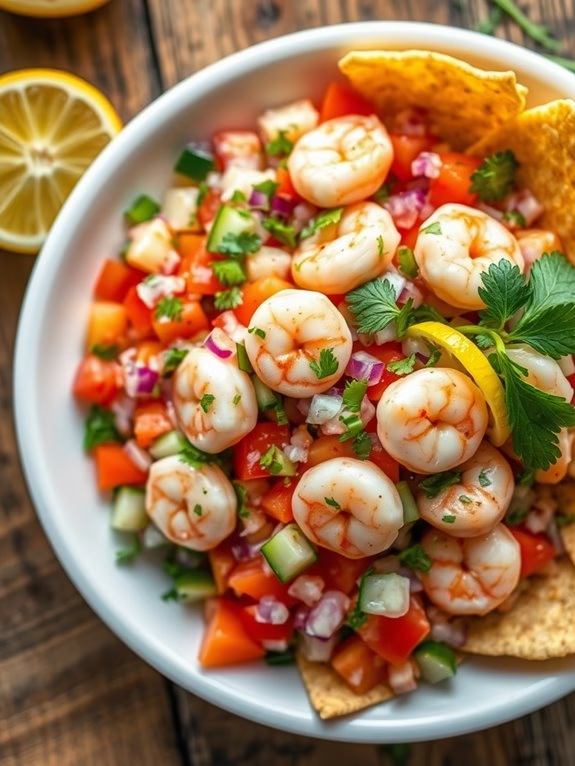
Zesty Lemon Shrimp Ceviche, a light appetizer originating from Peru, is a delightful and invigorating start to any meal. Ceviche is a dish where the main ingredient, usually seafood, is “cooked” in citrus juices. Its light, tangy, and slightly spicy flavors whet the appetite, preparing your taste buds for the main course. This dish is an excellent choice for those looking for a low carb and high protein appetizer.
The key to a great shrimp ceviche is using fresh ingredients. Fresh shrimp, lemon, cilantro, and other ingredients combined together create a symphony of flavors that’s truly irresistible. It’s also important to note that the shrimp will be cooked by the acidity of the lemon juice, so no actual heat is required. This makes it a perfect appetizer for the summer months when you want to keep the kitchen cool.
Ingredients:
- 1 lb fresh shrimp, peeled and deveined
- 1 cup fresh lemon juice
- 1 medium red onion, finely chopped
- 1-2 serrano or jalapeño peppers, finely chopped
- 1 large ripe tomato, finely chopped
- 1/2 cup fresh cilantro, chopped
- 1 cucumber, peeled and diced
- 1 teaspoon salt
- 1/2 teaspoon black pepper
- Tortilla chips, for serving
Cooking Instructions:
- Start by chopping the fresh shrimp into bite-sized pieces. This will allow the lemon juice to penetrate the shrimp, effectively cooking it.
- In a large bowl, combine the chopped shrimp and lemon juice. Make sure the shrimp is fully submerged in the juice. Cover and refrigerate for about one hour. The shrimp should turn pink and opaque when it’s ready.
- While the shrimp is marinating, prepare your other ingredients. Finely chop the red onion, serrano or jalapeño peppers, tomato, and cilantro. Dice the cucumber into small pieces.
- After the shrimp is ready, drain off the excess lemon juice. You want to leave a little juice for flavor, but too much can overpower the other ingredients.
- Add the chopped onion, peppers, tomato, cilantro, cucumber, salt, and pepper to the shrimp. Stir well to combine.
- Let the ceviche sit in the fridge for another half an hour to let the flavors meld together.
- Serve the ceviche chilled with tortilla chips on the side for dipping.
Tips:
When making Zesty Lemon Shrimp Ceviche, make sure to use fresh lemon juice, not bottled. Bottled juice is often too sour and lacks the fresh citrus flavor that this dish needs.
Also, adjust the heat to your liking by adding more or less serrano or jalapeño peppers. Remember, this dish is best served fresh, so plan to eat it the same day you prepare it. Enjoy this light, zesty, and flavorful appetizer before your main dinner.
Savory Spinach and Feta Puffs

Savory Spinach and Feta Puffs are the perfect light appetizer to serve before a big meal. These delightful bites, filled with a flavorful mix of spinach and feta cheese, are irresistibly delicious and surprisingly easy to make. The flaky puff pastry, combined with the slightly salty feta and the healthy green spinach, creates a balanced and appetizing dish that will surely impress your guests.
This recipe isn’t only delicious but also very flexible. You can add more vegetables, switch up the cheese, or even make them larger or smaller according to your preference. It’s the perfect way to kick off your dinner, as they’re light, savory, and won’t fill your guests up too much before the main course.
Ingredients:
- 2 sheets of puff pastry
- 1 egg (for egg wash)
- 2 cups of fresh spinach
- 1 cup of feta cheese, crumbled
- 1/2 cup of white onion, finely chopped
- 2 cloves of garlic, minced
- 1 tablespoon of olive oil
- Salt and pepper to taste
Instructions:
- Preheat the oven to 400 degrees F (200 degrees C) and line a baking sheet with parchment paper.
- In a frying pan, heat the olive oil over medium heat. Add the onions and garlic, cooking until the onions become translucent.
- Add the spinach to the pan, stirring until it wilts. Season with salt and pepper.
- Remove the pan from the heat and stir in the crumbled feta cheese until it’s evenly distributed throughout the spinach mixture.
- Roll out the puff pastry sheets and cut into squares approximately 3×3 inches. Place a spoonful of the spinach and feta mixture in the center of each square.
- Brush the edges of the pastry squares with the beaten egg, then fold the corners towards the center, sealing the puff. Repeat the process with all the squares.
- Place the puffs on the prepared baking sheet and brush the tops with the remaining egg wash.
- Bake in the preheated oven for 15-20 minutes, or until the pastry is golden brown. Allow to cool slightly before serving.
Extra Tips:
It’s essential not to overfill the puff pastry squares, as this will make sealing them more difficult and could lead to leakage during baking.
Also, remember to give them space on the baking sheet, as the pastry will puff up and expand. If you’d like a bit of extra flavor, consider adding some herbs like dill or basil to the spinach and feta mixture. Enjoy these savory puffs warm for the best flavor and texture.
Classic Bruschetta With a Twist
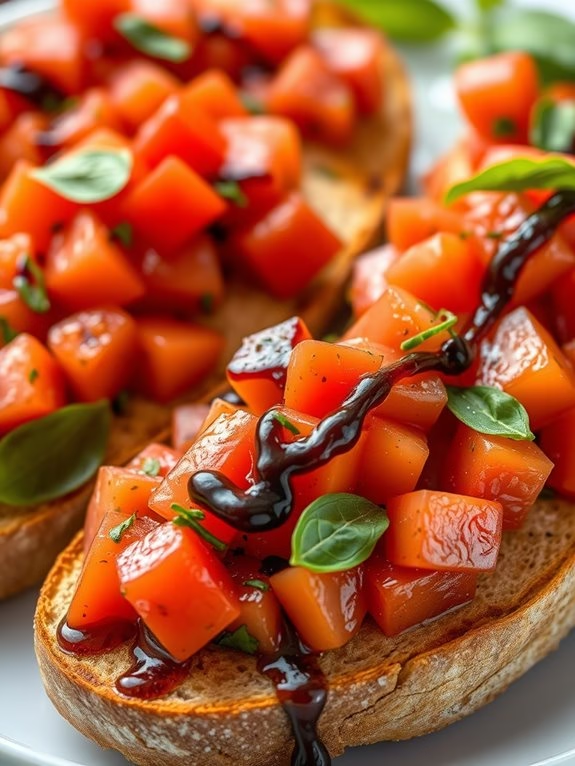
Bruschetta is an Italian classic that has found its way into the hearts and kitchens of food lovers worldwide. The traditional version of this appetizer includes fresh tomatoes, basil, garlic, and olive oil served on grilled bread. However, in our recipe for Classic Bruschetta With a Twist, we introduce a dash of balsamic glaze that adds a tangy sweetness to this beloved dish. This quick and easy recipe makes for a light and invigorating appetizer, perfect for serving before a hearty dinner.
When it comes to preparing Classic Bruschetta With a Twist, the focus is on using high-quality and fresh ingredients. The juiciness of the tomatoes, the crunchiness of the bread, the aromatic basil, and, of course, the special twist – the balsamic glaze, all come together to make a delightful starter that’s sure to impress your guests.
Here’s how you can prepare Classic Bruschetta With a Twist for 4-6 people.
Ingredients:
- 1 loaf of Italian bread or French baguette
- 4 ripe tomatoes
- 2 cloves of garlic
- 1 bunch of fresh basil
- 3 tablespoons of extra virgin olive oil
- Salt and pepper to taste
- Balsamic glaze for drizzling
Cooking Instructions:
- Start by preheating your oven to 350 degrees Fahrenheit. This will be used to toast the bread.
- While the oven heats up, cut the bread into 1-inch thick slices and arrange them on a baking sheet.
- Brush each slice of bread with a bit of olive oil and place the baking sheet in the oven. Allow the bread to toast for about 10-15 minutes or until it becomes golden brown.
- While the bread is toasting, prepare the tomato topping. Dice the tomatoes and mince the garlic. Combine the tomatoes, garlic, and remaining olive oil in a bowl.
- Chop the basil leaves and add them to the bowl. Season the mixture with salt and pepper to taste and stir well.
- Once the bread is toasted, remove it from the oven and let it cool slightly. Then, top each slice with a generous helping of the tomato mixture.
- To finish, drizzle each bruschetta with the balsamic glaze. The bruschetta is now ready to be served.
Extra Tips:
When preparing Classic Bruschetta With a Twist, it’s important to use ripe, flavorful tomatoes since they’re the star of the dish.
Also, the bread should be toasted just right – not too soft and not too hard. If you wish, you can rub a garlic clove on the toasted bread before topping it with the tomato mixture for an extra hint of flavor.
Lightly Grilled Asparagus Spears
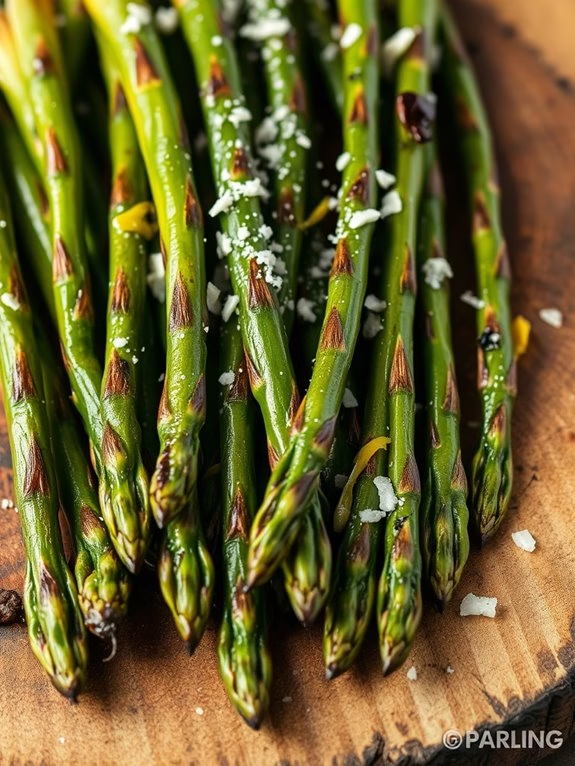
Lightly Grilled Asparagus Spears are the ideal light appetizer to get your dinner party started. They aren’t only healthy and delicious but also easy to prepare. Asparagus has a distinct, mildly bitter taste that pairs wonderfully with the smoky flavor from the grill. Adding a squeeze of fresh lemon juice and a sprinkle of grated Parmesan cheese enhances its flavor and makes it truly irresistible.
This appetizer is a great way to impress your guests without spending a lot of time in the kitchen. The dish is also versatile as it can easily be modified to suit vegan or dairy-free diets. Now, let’s get started on preparing this dish for a serving size of 4-6 people.
Ingredients:
- 2 bundles of fresh asparagus, about 40 spears
- 2 tablespoons of extra-virgin olive oil
- Salt and freshly ground black pepper to taste
- 2 lemons, halved
- 1/2 cup of grated Parmesan cheese
Cooking Instructions:
- First, preheat your grill to medium-high heat. While the grill is heating, prepare the asparagus by washing them thoroughly under cold water to remove any dirt or grit.
- Cut or snap off the tough, woody ends of the asparagus spears. This part is usually about 1-2 inches from the bottom.
- In a large bowl, toss the asparagus spears with extra-virgin olive oil, salt, and freshly ground black pepper. Confirm that all spears are evenly coated.
- Once the grill is ready, arrange the asparagus spears directly on the grill grates. Grill the asparagus for about 3-4 minutes on each side, or until they’re tender and slightly charred.
- While the asparagus is grilling, squeeze fresh lemon juice over the spears. This will add a zesty flavor that complements the smoky, grilled taste.
- Finally, remove the asparagus spears from the grill and immediately sprinkle them with the grated Parmesan cheese. The heat from the asparagus will melt the cheese slightly, giving them a delicious, creamy texture.
Some extra tips to remember while cooking this dish include choosing asparagus that are firm and have a bright green color. These are indicators of freshness.
Also, try to use asparagus spears that are similar in thickness to confirm even cooking. If you prefer your asparagus to be more tender, simply grill them for a longer period of time. However, be careful not to overcook them as they can become mushy.
Enjoy your Lightly Grilled Asparagus Spears as a perfect start to your dinner!
Prosciutto Wrapped Melon Bites

Prosciutto Wrapped Melon Bites are a classic Italian appetizer that are perfect for a light start before a heavy dinner. These bites offer a perfect balance of sweet, salty, and invigorating flavors. The sweetness of the melon pairs beautifully with the salty prosciutto, while the mint adds a refreshing touch.
These bites aren’t only delicious but also very easy to make, requiring only three main ingredients and taking less than 20 minutes to prepare. This recipe is also quite versatile and can be served at any time of the year, making it an excellent choice for both casual and formal gatherings.
The serving size for this recipe is ideal for 4-6 people, making it perfect for small dinner parties or family get-togethers. Now, let’s get started on how to prepare these delightful bites.
Ingredients:
- 1 ripe cantaloupe
- 12 slices of prosciutto
- 24 fresh mint leaves
- Toothpicks
Instructions:
- Begin by cutting the cantaloupe in half and scooping out the seeds using a spoon.
- After the seeds are removed, slice the cantaloupe into wedges. The size of the wedges should be bite-sized, as they’ll be wrapped in prosciutto and eaten in one bite.
- Next, take a slice of prosciutto and cut it in half lengthwise. You should now have two long, thin strips of prosciutto.
- Wrap each cantaloupe wedge with a strip of prosciutto. Try to wrap it so that the melon is fully covered, but a small part of the melon is still visible.
- Once the melon is wrapped, take a mint leaf and place it on top of the prosciutto.
- Secure the prosciutto and mint leaf to the melon by inserting a toothpick through them, making sure it goes into the melon to hold everything together.
- Repeat these steps until all the cantaloupe wedges are wrapped in prosciutto, topped with mint, and secured with a toothpick.
- Once all the bites are prepared, place them in the refrigerator for about an hour before serving. This will help the flavors to meld together and the bites to become more invigorating.
A tip to remember when preparing these bites is to choose a ripe but firm cantaloupe. A cantaloupe that’s too ripe will be too soft to hold the prosciutto and mint, while a cantaloupe that isn’t ripe enough won’t have the sweet flavor that contrasts so well with the salty prosciutto.
Additionally, for the best flavor, try to use high-quality prosciutto. If you can’t find prosciutto, you can substitute it with other types of cured ham. Enjoy these delicious and invigorating bites!
Refreshing Cucumber Dill Canapés

Light appetizers are a fantastic way to kick off a dinner party, keeping your guests satisfied while they anticipate the main course. One such delightfully light and invigorating appetizer is the cucumber dill canapé. This appetizer isn’t just aesthetically pleasing with its vibrant green from the cucumber and the dill, but also a delight to the palate with its fresh and tangy flavors.
Cucumber dill canapés are the embodiment of simplicity, yet their taste is anything but plain. The invigorating crunch of the cucumber paired with the tangy cream cheese and aromatic dill is a combination that never fails to impress. This is a quick and easy recipe, ideal for those who want to spend less time in the kitchen and more time with their guests.
Ingredients for 4-6 people:
- 2 English cucumbers
- 1 (8 ounce) package cream cheese, softened
- 2 tablespoons fresh dill, finely chopped
- 1/2 teaspoon garlic powder
- 1/4 teaspoon salt
- 1/4 teaspoon pepper
- 1 loaf of rye bread
- Fresh dill sprigs for garnish
Cooking Instructions:
- Start by slicing the cucumbers into thin rounds, about 1/4 inch thick. Set aside.
- In a bowl, combine the softened cream cheese, finely chopped dill, garlic powder, salt, and pepper. Mix them well until they form a smooth and creamy spread.
- Cut the rye bread into small, bite-sized pieces, roughly the same size as your cucumber slices.
- Spread a generous portion of the cream cheese mixture onto each piece of bread.
- Place a cucumber slice on top of the cream cheese spread on each piece of bread.
- Garnish each canapé with a sprig of fresh dill.
- Arrange the canapés on a serving platter and chill in the refrigerator for at least 30 minutes before serving. This allows the flavors to meld together.
A useful tip when preparing cucumber dill canapés is to confirm the cucumbers are crisp and fresh. Using English cucumbers is preferable as they’ve fewer seeds and a thinner skin, which makes them perfect for this recipe.
Also remember, the canapés are best served chilled, so make sure to keep them in the refrigerator until you’re ready to serve. These light and invigorating bites are sure to be a hit at your next dinner party.
Tangy Greek Salad Cups
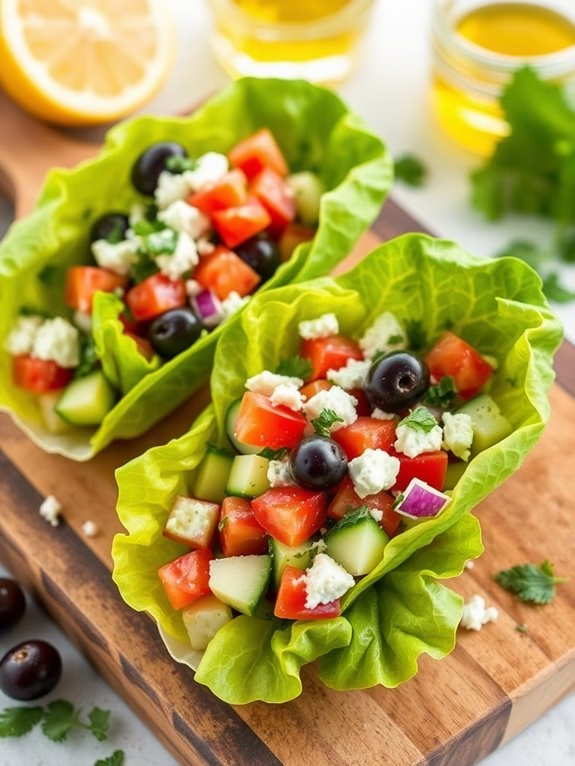
Whet your appetite with the light and invigorating Tangy Greek Salad Cups. These delightful appetizers are a wholesome combination of fresh, zesty flavors encased in crisp lettuce cups. The vibrant colors and lively taste of this dish not only make it a feast for the eyes but also a nutritious start to any meal. Perfect for dinner parties or family gatherings, these Greek Salad Cups are sure to be a hit with your guests!
The secret to their amazing taste lies in the blend of ripe tomatoes, crisp cucumbers, tangy feta cheese, and aromatic herbs tossed in a zesty lemon-olive oil dressing. Each lettuce cup is generously filled with this salad mix, making every bite a delicious balance of textures and flavors.
In addition, this dish is incredibly easy to whip up and can be prepared ahead of time, saving you from last-minute cooking stress.
Ingredients:
- 2 heads of Romaine lettuce
- 2 medium-sized cucumbers, peeled and diced
- 4 ripe tomatoes, diced
- 1 red onion, thinly sliced
- 1 cup of Kalamata olives, pitted and halved
- 1 cup of feta cheese, crumbled
- 1/2 cup of fresh mint leaves, chopped
- 1/2 cup of fresh parsley, chopped
- Juice of 2 lemons
- 1/2 cup of extra virgin olive oil
- Salt and pepper to taste
Cooking Instructions:
- Begin by preparing the lettuce cups. Detach the leaves from the Romaine lettuce heads and rinse them thoroughly under cold water. Pat them dry and set them aside.
- In a large bowl, combine the diced cucumbers, tomatoes, sliced red onion, halved Kalamata olives, and crumbled feta cheese.
- Add the chopped mint and parsley to the bowl. These herbs will provide an invigorating aroma and a burst of flavor to the salad.
- To prepare the dressing, squeeze the juice of two lemons into a small bowl. Gradually whisk in the olive oil until the mixture emulsifies. Season with salt and pepper according to your taste.
- Pour the dressing over the salad mixture and toss gently until all the ingredients are well-coated.
- Spoon the salad mixture into the prepared lettuce cups. Serve immediately or chill in the refrigerator before serving.
When preparing the Tangy Greek Salad Cups, keep in mind that freshness is key. Use only ripe and firm tomatoes and cucumbers for the best taste and texture.
If you want to prepare this dish ahead of time, you can prepare the salad and dressing separately and assemble them just before serving. This will keep the lettuce cups crisp and the salad fresh. Enjoy this light and flavorful appetizer before your main course!
Miniature Vegetable Spring Rolls

Miniature Vegetable Spring Rolls are a perfect light appetizer to prepare before a hearty dinner. These bite-sized delicacies aren’t only visually appealing but also packed with flavor that will leave your guests craving more. With a crispy outer skin and a juicy vegetable filling, this oriental dish brings a unique twist to your regular appetizer lineup.
They’re easy to prepare and can be made in large batches ahead of time, making them a go-to choice for parties and gatherings. The secret to a delicious Miniature Vegetable Spring Roll lies in its filling. The combination of fresh, crunchy vegetables and aromatic spices creates a medley of flavors that bursts in your mouth with each bite.
The rolls are then fried to golden perfection, guaranteeing a beautiful contrast of textures. Served with a sweet and spicy dipping sauce, these Miniature Vegetable Spring Rolls are sure to be a hit among your guests.
Ingredients:
- 20 spring roll wrappers
- 2 cups shredded cabbage
- 1 cup shredded carrots
- 1 bell pepper, finely chopped
- 1/2 cup bean sprouts
- 2 green onions, finely chopped
- 2 cloves garlic, minced
- 1 tablespoon soy sauce
- 1 tablespoon sesame oil
- 1 teaspoon freshly grated ginger
- Salt and pepper to taste
- Vegetable oil for deep frying
- Sweet and spicy dipping sauce for serving
Instructions:
- Begin by preparing your vegetables. Shred the cabbage and carrots, finely chop the bell pepper and green onions, and mince the garlic. Set these aside.
- In a large skillet, heat the sesame oil over medium heat. Add the garlic and ginger and sauté until fragrant, about a minute.
- Add the shredded cabbage, carrots, bell pepper, bean sprouts, and green onions to the skillet. Stir well to combine the ingredients and cook until the vegetables are tender, about 5-7 minutes.
- Season the vegetable mixture with soy sauce, salt, and pepper. Stir well to evenly distribute the seasoning. Remove from heat and let it cool.
- Lay a spring roll wrapper on a clean surface. Place about two tablespoons of the cooked vegetable mixture on the lower third of the wrapper.
- Roll the wrapper tightly around the filling, folding in the sides as you go. Wet the edges of the wrapper with a bit of water to seal it tightly.
- Repeat this process with the remaining wrappers and filling.
- Heat the vegetable oil in a deep frying pan over medium-high heat. Once the oil is hot, add the spring rolls, a few at a time, and fry until golden brown and crispy, about 2-3 minutes per side.
- Remove the spring rolls from the oil using a slotted spoon and drain on paper towels to remove excess oil.
- Serve the Miniature Vegetable Spring Rolls hot with sweet and spicy dipping sauce.
Extra Tips:
When cooking Miniature Vegetable Spring Rolls, verify that your filling isn’t too wet. Excess moisture can make the spring roll wrapper soggy and cause it to break during frying.
Also, be careful not to overfill the wrappers, as this can also cause them to break. If you’re preparing these ahead of time, keep them covered with a damp cloth to prevent the wrappers from drying out. Finally, remember to serve them hot for the perfect crispy texture.
Spicy Tuna Tartare Cones

Spicy Tuna Tartare Cones are a delightful fusion of delicate seafood with a kick of spice. They’re a light and flavorful appetizer that can be prepared in no time. These mini cones, filled with fresh tuna, avocado, and a spicy sauce, are sure to impress your guests with their impressive presentation and intense flavors.
They’re perfect for any dinner party or gathering and are sure to set the tone for a fantastic meal to come.
Making Spicy Tuna Tartare Cones is a straightforward process. The key is to use fresh, high-quality tuna and ripe, creamy avocados. The spicy sauce adds a fiery kick, which complements the rich flavors of the tuna and avocado. With a few simple ingredients and easy-to-follow steps, you can create this stunning appetizer in your own kitchen.
Ingredients:
- 500g of fresh sushi-grade tuna
- 2 ripe avocados
- 1/2 cup of mayonnaise
- 2 tablespoons of Sriracha sauce
- 1 tablespoon of soy sauce
- 1 teaspoon of sesame oil
- 1/2 cup of finely chopped green onions
- 1/2 cup of finely chopped fresh cilantro
- 1/4 cup of sesame seeds
- 12 mini ice cream cones
- Salt and pepper to taste
Instructions:
- Start by finely chopping the tuna into small cubes and place them in a large bowl.
- Cut the avocados into small cubes and add them to the bowl with the tuna.
- In another bowl, combine the mayonnaise, Sriracha sauce, soy sauce, and sesame oil. Mix well to create a spicy sauce.
- Pour the sauce over the tuna and avocado. Mix gently to combine, ensuring that the tuna and avocado are well coated.
- Add the chopped green onions and cilantro to the mixture. Stir well to incorporate.
- Season the mixture with salt and pepper to taste.
- Toast the sesame seeds in a dry skillet over medium heat until they’re golden brown. Let them cool.
- Fill each mini ice cream cone with the tuna tartare mixture.
- Sprinkle the toasted sesame seeds over the top of each cone.
When preparing the Spicy Tuna Tartare Cones, it’s essential to handle the tuna gently to preserve its texture.
Also, be sure to taste the spicy sauce before adding it to the tuna and adjust the heat according to your preference. Remember, the cones should be filled just before serving to prevent them from becoming soggy.
Enjoy this light and spicy appetizer that’s sure to be a hit with your guests.
Baked Sweet Potato Crisps

Baked Sweet Potato Crisps are a delicious and healthy alternative to traditional potato chips. They’re an excellent appetizer to serve before dinner, as they’re light yet flavorful, and won’t fill up guests before the main course.
They’re also easy to make and can be prepared ahead of time, freeing you up to focus on the more demanding dishes.
The sweet potatoes are thinly sliced, then baked until they’re perfectly crispy. They’re lightly seasoned with sea salt, making them the perfect combination of sweet and salty. The result is a snack that’s not only delicious but also packed with vitamins and fiber. Perfect for guests who want something tasty but not too heavy.
Ingredients:
- 3 large sweet potatoes
- 2 tablespoons of olive oil
- 1 teaspoon of sea salt
- 1/2 teaspoon of black pepper
Instructions:
- Preheat the oven to 400 degrees Fahrenheit and line two baking sheets with parchment paper. This will prevent the sweet potato crisps from sticking to the pan.
- Wash the sweet potatoes thoroughly under cold running water. Use a vegetable brush if necessary to remove any dirt. Dry them with a clean kitchen towel.
- Slice the sweet potatoes into thin rounds using a mandolin or sharp knife. Aim for a thickness of about 1/8 inch.
- Place the sliced sweet potatoes in a large bowl. Drizzle them with the olive oil, then sprinkle with sea salt and black pepper. Toss everything together until the slices are evenly coated.
- Arrange the sweet potato slices in a single layer on the prepared baking sheets. Make sure not to overlap them; otherwise, they won’t crisp up properly.
- Bake in the preheated oven for 20-25 minutes, or until the edges of the sweet potato slices start to curl up and turn crispy. Halfway through the baking time, flip the slices over to guarantee they cook evenly.
- Remove the sweet potato crisps from the oven and let them cool on the baking sheets for 5-10 minutes. They’ll continue to harden as they cool.
- Serve the sweet potato crisps in a large bowl or distribute among individual serving dishes. They can be enjoyed as is or with your favorite dip.
Creamy Avocado Deviled Eggs

Creamy Avocado Deviled Eggs are the perfect light appetizer to enjoy before dinner. This recipe is a fresh twist on classic deviled eggs, adding creamy avocado and a hint of lime for a revitalizing burst of flavor.
It’s not only delicious but also packed with healthy fats and proteins, making it a nutritious choice. The rich, creamy filling contrasts beautifully with the firm egg white, while the lime zest adds a touch of brightness.
This dish is perfect for parties, picnics, or even a simple family dinner. It’s easy to make and can be prepared ahead of time, making it a convenient option for busy hosts. The green color of the avocado gives these deviled eggs a unique, eye-catching appearance that’s sure to impress your guests.
Let’s get started on this recipe that serves 4-6 people.
Ingredients:
- 12 large eggs
- 2 ripe avocados
- 1 tablespoon of lime juice
- 2 tablespoons of mayonnaise
- Salt and pepper to taste
- Paprika for garnish
- Fresh parsley for garnish
Cooking Instructions:
- Place the eggs in a large pot and cover with cold water. Bring the water to a boil, then reduce the heat to low and let the eggs simmer for about 15 minutes.
- While the eggs are cooking, halve the avocados and remove the pits. Scoop out the flesh and place it in a mixing bowl.
- Once the eggs are done, drain the hot water and rinse the eggs under cold water. Peel the eggs and cut them in half lengthwise. Carefully remove the yolks and add them to the bowl with the avocado.
- To the bowl, add the lime juice, mayonnaise, salt, and pepper. Mash everything together until the mixture is smooth and creamy.
- Using a spoon or a piping bag, fill each egg white half with the avocado mixture. Garnish each deviled egg with a sprinkle of paprika and a sprig of fresh parsley.
Here’s an extra tip: To make the eggs easier to peel, add a teaspoon of baking soda to the boiling water. This will raise the pH of the water and make the shells come off more easily.
Also, using ripe avocados will give a much creamier texture to the filling. Enjoy these delicious and healthy Creamy Avocado Deviled Eggs as a light appetizer before your main course.