
Ever found yourself in a crunch when unexpected guests arrive and all you have is a raw chicken in your fridge?
Trust me, I’ve been there, and it can be quite the dilemma.
But don’t worry, because I’ve got you covered with 15 fabulous chicken appetizers that are not only quick to make but also guaranteed to wow your guests.
From zesty mini chicken tacos to creamy buffalo chicken dip bites, each one is a delicious treat.
Let’s get cooking and turn that chicken into something spectacular!
Buffalo Chicken Dip Bites

Buffalo Chicken Dip Bites are the perfect appetizer for your next gathering. These bite-sized treats pack all the flavor of buffalo chicken dip into a neat and tidy package. The spicy kick of buffalo sauce, creamy richness of cream cheese, sharp cheddar, and tender chicken all come together in a delightful crunch of a phyllo pastry shell. It’s a guaranteed crowd-pleaser and can be prepared and cooked in under an hour.
This dish is ideal for those who love to entertain but want to minimize time spent in the kitchen. The recipe is straightforward and requires minimal prep work. The best part is that, despite their gourmet appearance, Buffalo Chicken Dip Bites are incredibly easy to make. This recipe is designed to serve 4-6 people, perfect for a small gathering or as part of a larger spread.
Ingredients:
- 1 cup cooked chicken, shredded
- 1/2 cup buffalo sauce
- 1/2 cup cream cheese, softened
- 1/2 cup sharp cheddar cheese, shredded
- 1 package mini phyllo pastry shells (about 15 shells)
- 2 green onions, chopped
- Salt and pepper to taste
Cooking Instructions:
- Preheat your oven to 350 degrees Fahrenheit.
- In a medium-sized mixing bowl, combine the shredded chicken and buffalo sauce. Mix until the chicken is thoroughly coated.
- Add the softened cream cheese to the chicken mixture. Stir until the ingredients are well combined.
- Mix in the shredded sharp cheddar cheese. Add salt and pepper to taste.
- Arrange the mini phyllo pastry shells on a baking sheet. Using a teaspoon, fill each shell with the buffalo chicken mixture.
- Place the baking sheet in the preheated oven. Bake the Buffalo Chicken Dip Bites for 15-20 minutes, or until the cheese is melted and bubbly.
- Remove the bites from the oven and sprinkle chopped green onions on top for garnish.
- Let the bites cool for a few minutes before serving.
When making Buffalo Chicken Dip Bites, be sure not to overfill the phyllo pastry shells. Excess filling can cause the bites to become messy and difficult to eat.
Also, remember that buffalo sauce can be quite spicy. If you’re serving these to guests with varying spice tolerances, consider providing a mild dipping sauce on the side, like ranch or blue cheese dressing.
Finally, these bites are best served warm, so plan your cooking time accordingly to guarantee they’re fresh out of the oven when your guests arrive. Enjoy your cooking!
Mini Chicken Tacos
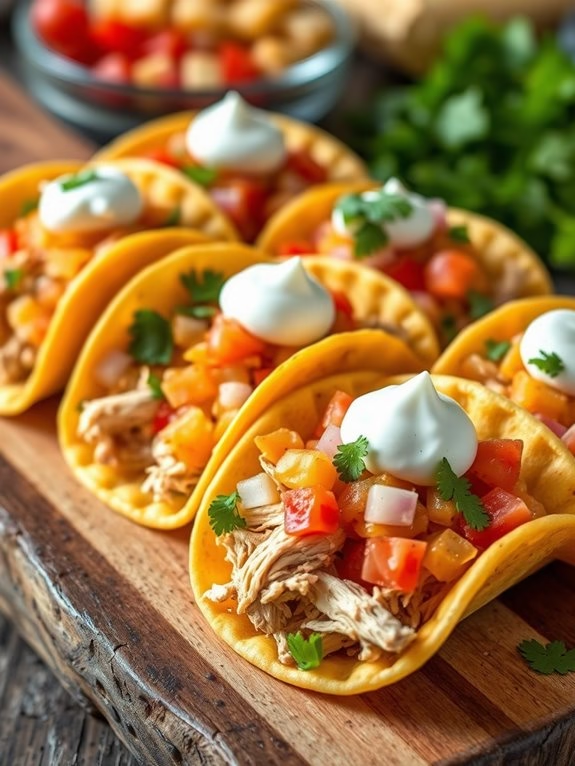
Mini Chicken Tacos are an ideal quick appetizer for any occasion, be it a casual get-together or a formal party. They’re bite-sized, packed with flavor and offer an appealing combination of textures. The succulent chicken, tangy salsa, creamy cheese, and crunchy taco shells make for a party in your mouth.
Besides, the mini size makes them perfect for snacking and keeps the portion size in check. The best part about these Mini Chicken Tacos is that they’re super easy to make. With some simple ingredients and a bit of time, you can whip up these delicious tacos in no time.
They can be customized according to one’s preference, and you can get creative with the toppings. The following recipe is for 4-6 servings.
Ingredients:
- 1 lb boneless chicken breasts
- 1 packet taco seasoning
- 1 cup diced tomatoes
- 1/2 cup diced onions
- 1/2 cup shredded cheddar cheese
- 1/4 cup chopped fresh cilantro
- 24 mini taco shells
- 1/2 cup sour cream
- 2 tablespoons cooking oil
- Salt to taste
Cooking Instructions:
- Start by seasoning the chicken breasts with the taco seasoning and a bit of salt. Make sure the chicken is well coated with the seasoning.
- Heat the cooking oil in a pan over medium heat. Add the seasoned chicken to the pan and cook until it’s browned and cooked through.
- Once the chicken is cooked, let it cool for a bit and then shred it using two forks.
- In a bowl, mix the shredded chicken, diced tomatoes, and diced onions.
- Preheat your oven to 350°F (175°C). Arrange the mini taco shells on a baking sheet.
- Spoon the chicken mixture into each taco shell. Top each taco with a bit of shredded cheddar cheese.
- Bake the mini tacos in the preheated oven for about 10 minutes, or until the cheese is melted and bubbly.
- Remove the mini tacos from the oven and top each one with a dollop of sour cream and a sprinkle of chopped cilantro.
Extra Tips:
While cooking the chicken, make sure not to overcook it as it could get tough and chewy.
Also, you can add more toppings to your mini tacos like guacamole, salsa, or pico de gallo. Remember, the key to great mini tacos is a good balance of flavors and textures. So, feel free to get creative and make these tasty appetizers your own.
Spicy Chicken Lettuce Wraps
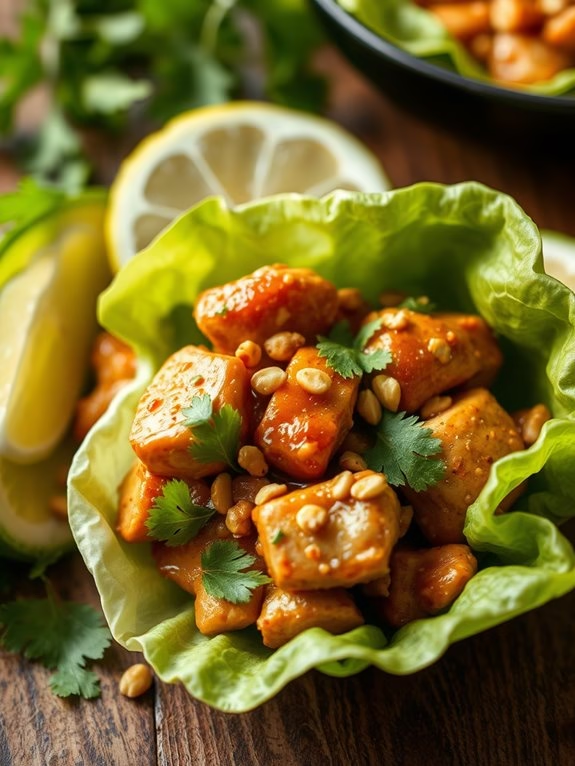
Spicy Chicken Lettuce Wraps are the perfect quick chicken appetizers that pack a punch of flavor and spice. This Asian-inspired dish features tender chicken cooked in a savory sauce, topped with crunchy peanuts, and wrapped in crisp lettuce leaves. The contrasting textures make this appetizer exciting to the palate, while the heat from the sauce makes it a surefire crowd-pleaser.
With its blend of fresh, spicy, and savory elements, it creates a balance of tastes that will keep your guests coming back for more. This recipe isn’t only delicious but also easy to prepare. It’s an ideal choice when you need to whip up something fast and impressive for your guests.
The ingredients are easy to find, and the cooking process is straightforward, perfect for both beginner and experienced cooks. Ready in under 30 minutes, Spicy Chicken Lettuce Wraps are a joy to make and a delight to eat.
Ingredients:
- 1 lb chicken breasts, finely diced
- 1 tablespoon vegetable oil
- 2 cloves garlic, minced
- 1 small red onion, finely chopped
- 2 tablespoons soy sauce
- 1 tablespoon fish sauce
- 1 tablespoon sriracha sauce
- 1 teaspoon sugar
- 1/2 cup chopped roasted peanuts
- 1 head of lettuce, separated into leaves
- Fresh cilantro leaves for garnish
- Lime wedges for serving
Cooking Instructions:
- Heat the vegetable oil in a large pan over medium heat.
- Add the minced garlic and chopped onion to the pan. Sauté until the onion becomes translucent, about 5 minutes.
- Next, add the finely diced chicken to the pan. Cook until the chicken is no longer pink, approximately 7 to 10 minutes.
- Stir in the soy sauce, fish sauce, sriracha sauce, and sugar. Mix thoroughly until the chicken is well coated with the sauces.
- Reduce the heat to low and let the mixture simmer for another 5 minutes to allow the flavors to meld together.
- Remove the pan from the heat and stir in the chopped roasted peanuts.
- To serve, spoon a generous amount of the spicy chicken mixture onto a lettuce leaf. Garnish with fresh cilantro leaves. Repeat this process with the remaining lettuce leaves and chicken mixture.
- Serve the Spicy Chicken Lettuce Wraps with lime wedges on the side. The lime juice can be squeezed over the wraps for an extra zing of freshness.
Cooking the Spicy Chicken Lettuce Wraps should be an enjoyable experience. Remember to prepare all your ingredients before starting to cook. This practice, known as “mise en place,” guarantees a smooth cooking process.
Also, feel free to adjust the level of spiciness according to your preference. If you’re not a fan of heat, you can reduce the amount of sriracha sauce. Conversely, if you love fiery dishes, add more sriracha or even some red pepper flakes. Enjoy creating and eating this delightful appetizer!
BBQ Chicken Sliders
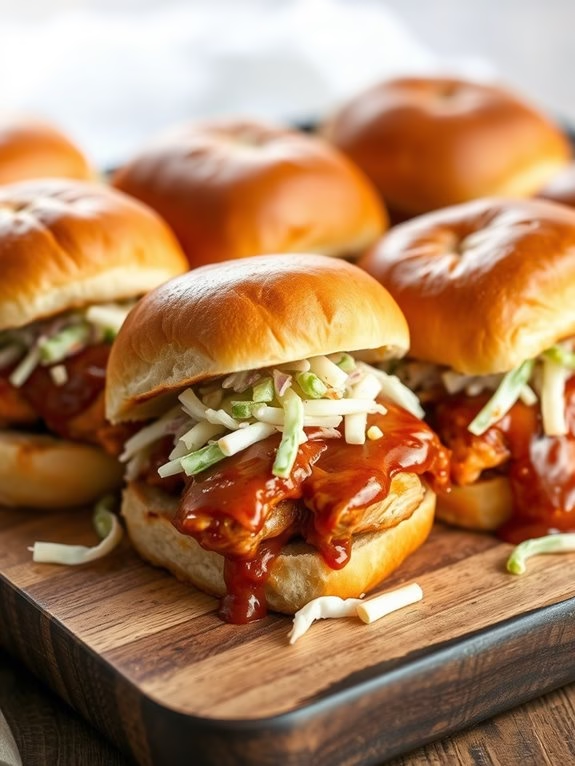
BBQ Chicken Sliders are a delightful treat that can be served as a quick appetizer or a meal in itself. This recipe is ideal for parties, game day, or just a casual family dinner.
These sliders are packed with tender, juicy chicken tossed in a tangy BBQ sauce, topped with a creamy coleslaw, and sandwiched between soft, toasted buns. BBQ Chicken Sliders are a crowd-pleaser that’s simple to make and can be prepared ahead of time, making it a winning dish for any occasion.
Guests will love the balance of flavors and textures in these sliders. The BBQ sauce brings a tangy sweetness that pairs perfectly with the savory chicken, while the coleslaw adds a revitalizing crunch. The buns, lightly toasted, provide just the right amount of bite.
Every component comes together to deliver a burst of flavor in each mouthful. Let’s get started on this recipe that will serve 4-6 people.
Ingredients:
- 2 boneless, skinless chicken breasts
- 1 cup of your favorite BBQ sauce
- 1 cup of coleslaw mix
- 1/2 cup of mayonnaise
- 1 tablespoon of apple cider vinegar
- Salt and pepper to taste
- 8-12 small slider buns
- 2 tablespoons of butter, melted
Cooking Instructions:
- Start by preheating your oven to 375 degrees Fahrenheit.
- While the oven is preheating, season the chicken breasts with salt and pepper on both sides.
- Place the chicken breasts in a baking dish and cover them with the BBQ sauce. Make sure each piece is completely coated.
- Bake the chicken in the preheated oven for 25-30 minutes, or until the internal temperature of the chicken reaches 165 degrees Fahrenheit.
- While the chicken is baking, prepare the coleslaw. In a bowl, combine the coleslaw mix, mayonnaise, and apple cider vinegar. Season with salt and pepper, then mix well until all the ingredients are fully incorporated.
- Once the chicken is done, remove it from the oven and let it rest for a few minutes. Then, using two forks, shred the chicken in the baking dish, mixing it with the BBQ sauce.
- Cut the slider buns in half and brush the inside of each half with the melted butter. Toast them in the oven for a few minutes until they’re lightly browned.
- To assemble the sliders, place a generous amount of the shredded BBQ chicken on the bottom half of each bun. Top it with a spoonful of coleslaw, then cover with the top half of the bun.
Extra Tips:
When cooking the chicken, make sure not to overcook it as it can make the meat dry. Keep an eye on the temperature to verify it’s perfectly cooked.
For the coleslaw, feel free to add other ingredients like shredded carrots or red cabbage for added color and crunch. Finally, you can use different types of buns according to your preference. Brioche buns or Hawaiian rolls can add a sweet contrast to the tangy BBQ chicken.
Chicken Quesadilla Pinwheels
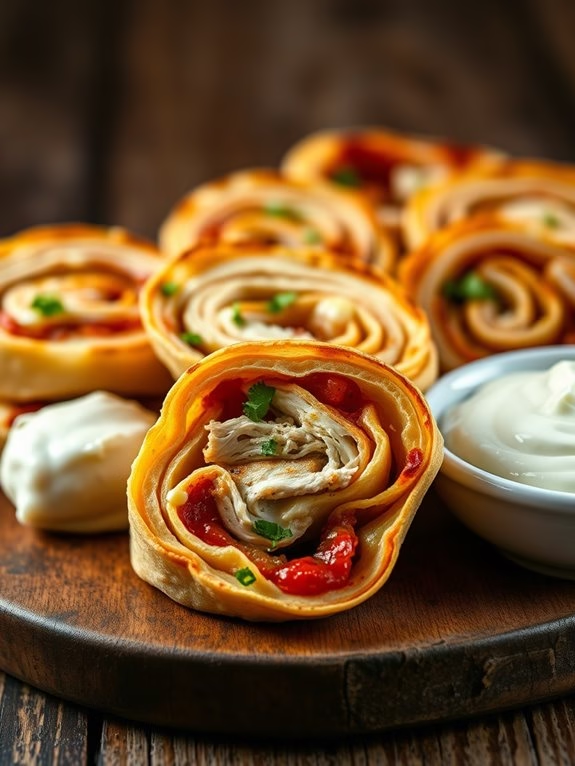
Chicken Quesadilla Pinwheels are a perfect pick for a quick and easy chicken appetizer. These bite-sized delights are packed with flavour, from the tangy salsa to the melted cheese, all wrapped up in a crispy tortilla shell.
Whether you’re hosting a party or simply want a tasty snack, these pinwheels are sure to please. They’re also great for getting kids involved in the kitchen, as they can help assemble and roll up the tortillas.
The ingredients for this recipe can be easily found in your local grocery store. Feel free to get creative with your fillings — you can add some jalapenos for a spicy kick, or some sweet corn for a burst of sweetness. The best part about this recipe is its flexibility; you can easily modify it to suit your taste and dietary preferences.
Ingredients for 4-6 servings:
- 4 large flour tortillas
- 2 cups of cooked, shredded chicken
- 2 cups of shredded Mexican cheese blend
- 1 cup of salsa
- 1/4 cup of chopped fresh cilantro
- 1/2 teaspoon of ground cumin
- 1/2 teaspoon of chili powder
- Salt to taste
- 1/2 cup of sour cream for dipping
Cooking Instructions:
- Preheat your oven to 375°F (190°C) and line a baking sheet with parchment paper.
- Spread each tortilla with a thin layer of salsa.
- In a bowl, mix together the shredded chicken, cheese, cilantro, cumin, chili powder, and salt. Divide this mixture evenly among the tortillas, spreading it over the salsa layer.
- Starting at one edge, roll each tortilla tightly into a log. Use a sharp knife to slice each log into 1-inch pinwheels.
- Arrange the pinwheels on the prepared baking sheet, making sure they don’t touch each other.
- Bake for 15-20 minutes, or until the pinwheels are golden brown and the cheese is melted. Remove from the oven and let them cool slightly before serving with sour cream for dipping.
When making these Chicken Quesadilla Pinwheels, it’s essential that you roll the tortillas tightly to guarantee they hold their shape while baking.
If you’re preparing this dish ahead of time, you can store the unbaked pinwheels in the fridge and simply pop them in the oven when you’re ready to serve.
Chicken Satay Skewers
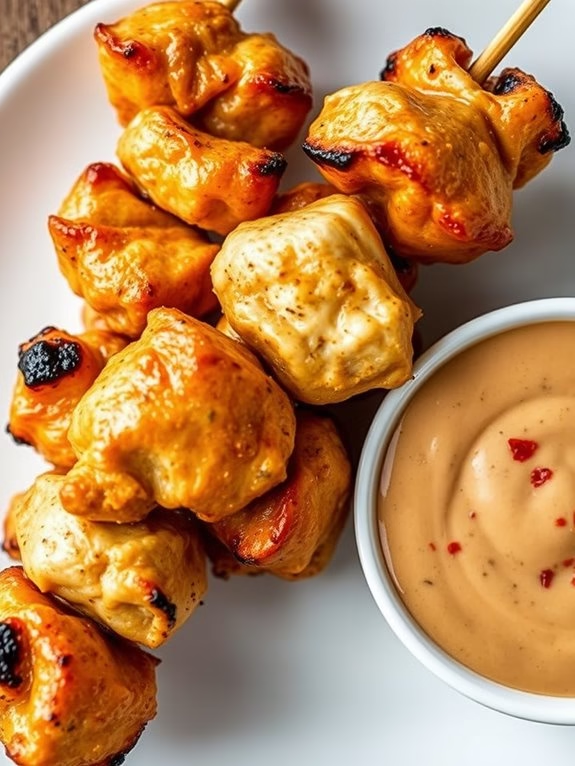
Chicken Satay Skewers are a popular Asian appetizer that features skewered chicken pieces marinated in an aromatic blend and cooked to perfection. The skewers are traditionally grilled, but they can also be baked or pan-fried. The combination of savory chicken, tangy marinade, and creamy dipping sauce makes for a mouthwatering appetizer that’s certain to impress your guests. This quick and easy recipe is perfect for any get-together, potluck, or game day celebration.
For this recipe, we’ll be using boneless, skinless chicken breasts, cut into thin strips and threaded onto skewers. The marinade is a flavorful blend of soy sauce, brown sugar, garlic, and spices. The chicken is then grilled until it’s juicy and slightly charred. The skewers are typically served with a peanut sauce for dipping, but you can also serve them with a spicy chili sauce if you prefer.
Ingredients for Chicken Satay Skewers (serves 4-6):
- 1.5 pounds boneless, skinless chicken breasts
- 1/2 cup soy sauce
- 1/4 cup brown sugar
- 3 cloves garlic, minced
- 1 teaspoon ground coriander
- 1 teaspoon turmeric
- 1 teaspoon ground cumin
- 1/2 teaspoon crushed red pepper flakes
- Bamboo skewers (soaked in water for 30 minutes)
For the peanut sauce:
- 1/2 cup smooth peanut butter
- 2 tablespoons lime juice
- 1 tablespoon soy sauce
- 1 tablespoon brown sugar
- 1 clove garlic, minced
- 1/2 teaspoon ground ginger
- 1/4 teaspoon crushed red pepper flakes
Instructions:
- Start by cutting the chicken into thin strips. The strips should be approximately the same size to guarantee even cooking.
- In a bowl, combine the soy sauce, brown sugar, minced garlic, coriander, turmeric, cumin, and crushed red pepper flakes. Stir until the sugar is fully dissolved.
- Add the chicken strips to the marinade. Make sure all the pieces are coated well. Cover the bowl and marinate in the refrigerator for at least 2 hours, or overnight for best results.
- While the chicken is marinating, prepare the peanut sauce. In a bowl, combine the peanut butter, lime juice, soy sauce, brown sugar, minced garlic, ground ginger and crushed red pepper flakes. Stir until well combined.
- After the chicken is done marinating, thread the strips onto the soaked skewers.
- Grill the skewers over medium heat for about 3-4 minutes per side, or until the chicken is cooked through and slightly charred. Alternatively, you can bake or pan-fry the skewers.
- Serve the chicken skewers with the peanut sauce on the side for dipping.
When making Chicken Satay Skewers, remember to soak the bamboo skewers in water for at least 30 minutes before using. This will prevent them from burning during cooking.
Also, marinating the chicken for a longer time will yield more flavorful results. If you prefer a spicier kick, feel free to add more crushed red pepper flakes to the marinade or the peanut sauce. Enjoy this delicious appetizer at your next gathering!
Baked Chicken Parmesan Bites
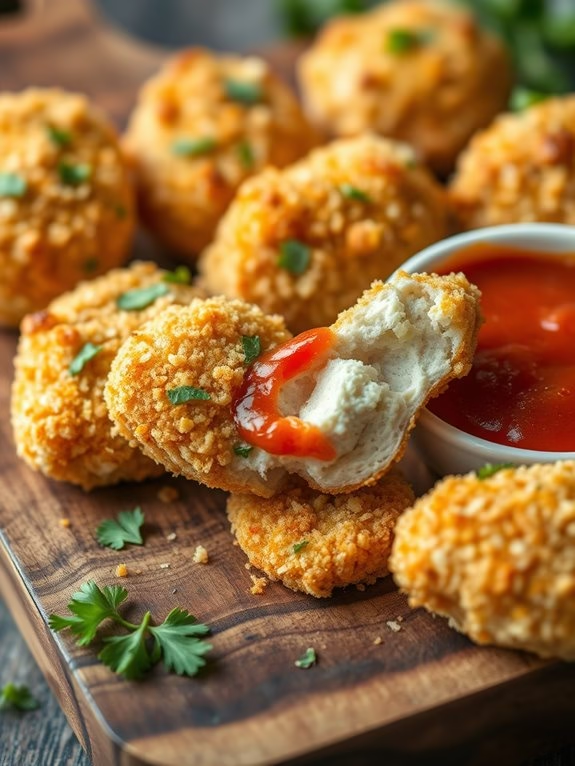
Baked Chicken Parmesan Bites are the perfect quick appetizers that will add flavor and excitement to your dining table. These bite-sized delights are a healthier, yet equally delicious alternative to the traditional version. Baked instead of fried, they’re coated in a scrumptious parmesan and breadcrumb mixture, then cooked until golden and crispy. The end result is a mouth-watering appetizer that’s low in fat, high in protein, and utterly satisfying.
This recipe is ideal for feeding a small group of people, as it can easily be adjusted to suit a larger crowd if needed. Whether you’re hosting a dinner party or just want something simple and tasty to serve before a meal, these Parmesan bites are the way to go. They’re easy to prepare, require minimal ingredients, and can be ready to serve in under 30 minutes.
Ingredients:
- 2 Boneless, skinless chicken breasts
- 1 cup Parmesan cheese, grated
- 1 cup Italian breadcrumbs
- 1/2 cup Flour
- 2 large Eggs
- 1/2 teaspoon Garlic powder
- 1/2 teaspoon Salt
- 1/2 teaspoon Pepper
- 1/2 cup Marinara sauce, for dipping
- Fresh parsley, chopped (for garnish)
Cooking Instructions:
- Preheat your oven to 400°F (200°C) and line a baking sheet with parchment paper to prevent the bites from sticking.
- Cut the chicken breasts into bite-sized pieces, roughly 1-inch in size.
- In a shallow dish, mix together the Parmesan cheese, breadcrumbs, garlic powder, salt, and pepper. This will be your coating mixture.
- In a separate dish, beat the eggs. Dip each piece of chicken into the flour, then the beaten eggs, and finally coat them in the Parmesan mixture, making certain each piece is fully covered.
- Place the coated chicken bites on the prepared baking sheet and bake for 15-20 minutes, or until they’re golden brown and cooked through.
- Allow the bites to cool for a few minutes before serving. Serve with marinara sauce for dipping and garnish with fresh parsley.
Extra Tips:
While this recipe is relatively straightforward, there are a few tips to make certain your Baked Chicken Parmesan Bites turn out perfectly.
First, make sure your chicken pieces are cut evenly to promote even cooking.
Second, when coating your chicken, press the breadcrumb and Parmesan mixture onto the chicken to help it adhere better.
Finally, keep a close eye on the bites in the final minutes of baking to prevent over-browning.
With these simple tips, you’re sure to have a delicious and satisfying appetizer that your guests will love.
Cheesy Chicken Nachos
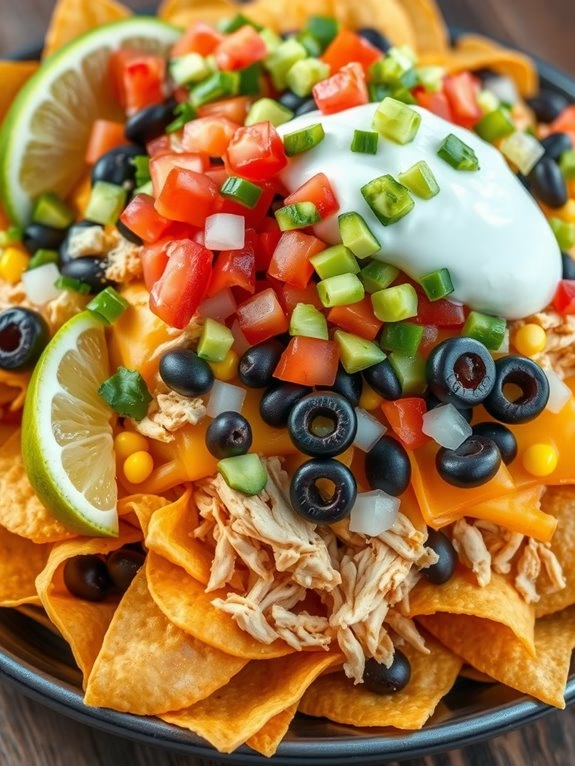
Cheesy Chicken Nachos are a quick and easy appetizer that are perfect for casual get-togethers or game nights. The combination of crispy tortilla chips, juicy chicken, melted cheese, and flavorful toppings create a mouthwatering dish that will leave everyone reaching for more.
This recipe isn’t only delicious but also customizable, allowing you to add your favorite toppings and adjust the heat level to your liking.
The key to making perfect chicken nachos is layering. By spreading the ingredients in layers, you guarantee that every chip gets an even coating of toppings. This way, you won’t end up with any plain, topping-less nachos at the bottom of the pile.
Let’s get started on making these irresistible Cheesy Chicken Nachos.
Ingredients for serving 4-6 people:
- 1 bag of tortilla chips
- 2 cups of shredded chicken
- 2 cups of shredded cheddar cheese
- 1 cup of black beans
- 1 cup of corn kernels
- 1/2 cup of diced red onion
- 1/2 cup of sliced black olives
- 1 jalapeno, sliced
- 1/2 cup of diced tomatoes
- 1/4 cup of chopped cilantro
- 1/2 cup of sour cream
- 1 avocado, diced
- Lime wedges, for serving
Instructions:
- Preheat your oven to 400 degrees Fahrenheit. While the oven is preheating, spread half of the tortilla chips on a large baking sheet.
- Distribute half of the shredded chicken, cheese, black beans, corn, red onion, black olives, and jalapeno evenly over the chips.
- Add another layer of the remaining chips on top of the first layer. Repeat the process of distributing the remaining chicken, cheese, beans, corn, onion, olives, and jalapeno.
- Place the baking sheet in the preheated oven and bake for about 10-15 minutes, or until the cheese is melted and bubbly.
- Remove the nachos from the oven and sprinkle the diced tomatoes, chopped cilantro, and diced avocado on top. Drizzle with sour cream and serve with lime wedges on the side.
When making these Cheesy Chicken Nachos, remember to keep an eye on them while they’re in the oven. The chips can go from perfectly cooked to burnt in a matter of minutes.
Also, feel free to experiment with the toppings. You can add salsa, guacamole, or even a sprinkle of crumbled queso fresco. The possibilities are endless. Enjoy your cooking!
Lemon Pepper Chicken Wings
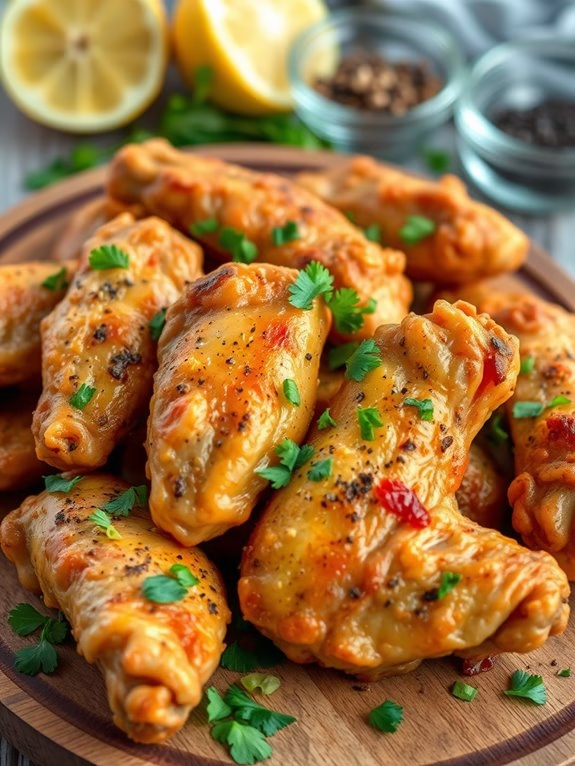
When it comes to quick and delicious chicken appetizers, Lemon Pepper Chicken Wings take the crown. These wings deliver a punch of flavors, harmoniously blending the invigorating tang of lemon, the sharp bite of pepper, and the satisfying savory taste of chicken.
Whether it’s a game night, a family gathering, or just a tranquil evening by yourself, this finger-licking recipe will surely elevate your culinary experience.
The recipe is straightforward and requires minimal prep work. The secret to achieving the perfect Lemon Pepper Chicken Wings lies in marinating the chicken and getting the balance between the lemon and pepper right. This dish serves 4-6 people, making it perfect for small gatherings or a family meal.
Ingredients:
- 2 lbs chicken wings
- 2 lemons
- 4 cloves of garlic
- 4 tablespoons olive oil
- 4 tablespoons black pepper
- Salt to taste
- Fresh parsley for garnish
Cooking Instructions:
- Start by washing the chicken wings thoroughly. Pat them dry using a kitchen towel. This step is essential as it helps the marinade stick better to the chicken, ultimately resulting in more flavorful wings.
- Grate the zest from the lemons and squeeze out the juice. Be careful not to get any seeds.
- In a large bowl, combine the lemon zest, lemon juice, minced garlic, olive oil, black pepper, and salt. Stir until all the ingredients are well incorporated.
- Add the chicken wings to the marinade, ensuring that each wing is well coated. Cover the bowl and let the chicken marinate for at least 2 hours, or overnight if time allows. The longer the marination, the more flavorful your wings will be.
- Preheat your oven to 400 degrees F (200 degrees C). Line a baking sheet with aluminum foil and place a wire rack on top.
- Arrange the marinated chicken wings on the wire rack, ensuring that there’s space between each wing for even cooking.
- Cook the wings in the preheated oven for about 40-45 minutes, or until they’re golden brown and crispy.
- Once the wings are cooked, remove from the oven and let them cool slightly. Garnish with fresh parsley before serving for an added pop of color and freshness.
Extra Tips:
When cooking Lemon Pepper Chicken Wings, make sure to not overcrowd the wings on the baking sheet. This could result in the wings steaming rather than roasting, leaving you with soggy wings instead of the desired crispy ones.
Also, don’t skip the marination process. The longer the chicken marinates, the more intense the flavors will be. Finally, feel free to adjust the amount of lemon and pepper based on your preference. Enjoy your delicious Lemon Pepper Chicken Wings!
Chicken and Waffle Sliders
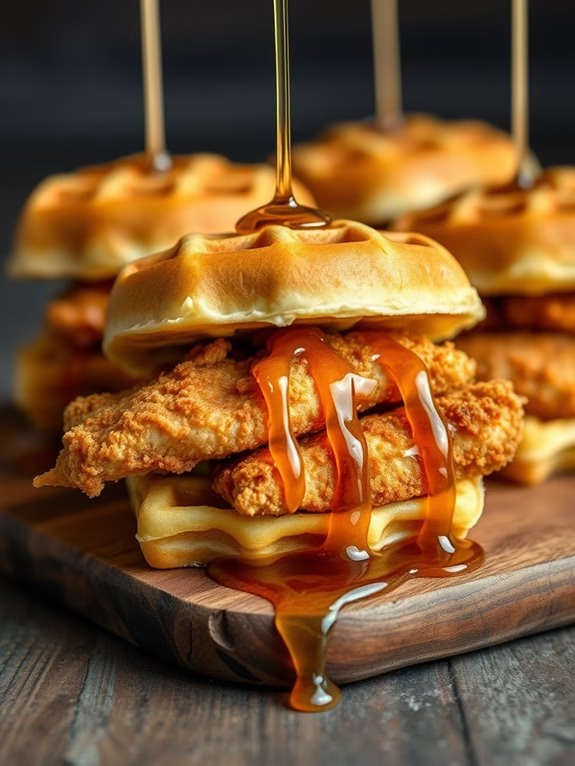
Quick, easy, and delicious, Chicken and Waffle Sliders are a delightful appetizer that will surely please your guests. This fun twist on the Southern favorite combines sweet and savory flavors in an irresistible, bite-sized package. The tender chicken is seasoned to perfection, fried until golden, and nestled between two mini waffles. Dressed with a drizzle of maple syrup, it’s a perfect blend of textures and flavors that’s sure to be a hit at any gathering.
As a plus, these sliders are an excellent choice for those who are short on time but don’t want to skimp on flavor. The chicken can be prepared in advance, and the waffles take just minutes to make. This quick and easy recipe will yield 12 sliders, enough to serve 4-6 people.
Ingredients:
- 12 mini waffles
- 2 boneless, skinless chicken breasts
- 1 cup buttermilk
- 1 cup all-purpose flour
- 1 teaspoon salt
- 1/2 teaspoon black pepper
- 1/2 teaspoon paprika
- 1/2 teaspoon garlic powder
- Vegetable oil, for frying
- Maple syrup, for serving
Instructions:
- Begin by slicing the chicken breasts into 12 equal-sized pieces. This will guarantee that each slider has a uniform amount of chicken.
- Next, marinate the chicken pieces in the buttermilk for at least an hour. This won’t only tenderize the chicken but will also give it a tangy flavor that complements the sweetness of the waffles.
- While the chicken is marinating, combine the flour, salt, pepper, paprika, and garlic powder in a bowl. This will be your breading mixture.
- After the chicken has marinated, remove each piece and dredge it in the breading mixture, making sure to coat it thoroughly.
- In a large skillet, heat about an inch of vegetable oil over medium heat. Once the oil is hot, add the breaded chicken pieces and fry them until they’re golden brown and cooked through. This should take about 3-4 minutes per side.
- While the chicken is frying, toast the mini waffles until they’re crispy and golden.
- Once the chicken is done, assemble your sliders. Place a piece of chicken between two mini waffles and drizzle with maple syrup.
- Serve immediately while the chicken is still warm and the waffles are still crispy.
When making these Chicken and Waffle Sliders, it’s crucial to keep the waffles warm and crispy until serving time. If the waffles become soggy, they won’t provide the desired contrast with the tender, juicy chicken.
Also, don’t skimp on the maple syrup. It’s the sweet touch that brings the whole dish together. Enjoy this quick and easy appetizer at your next gathering!
Sticky Honey Garlic Chicken Bites
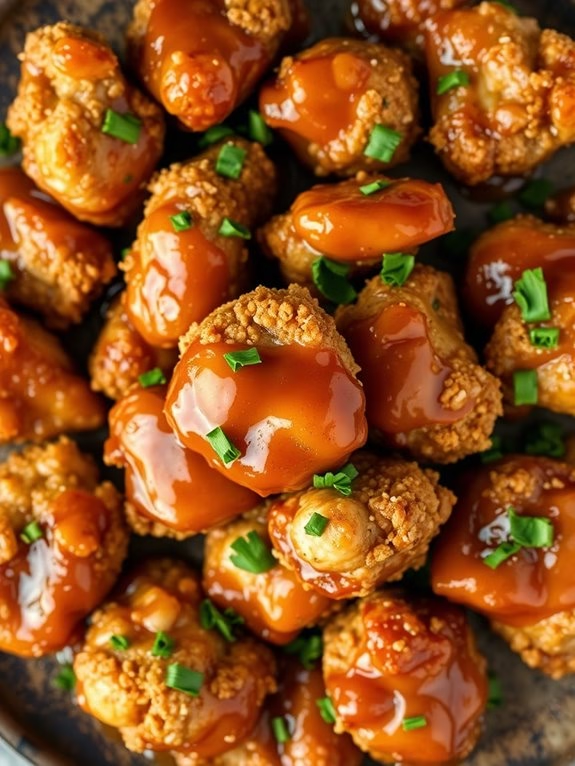
When you’re looking for a quick and delicious appetizer, nothing beats Sticky Honey Garlic Chicken Bites. These succulent chicken appetizers are the perfect blend of sweetness and tanginess, making them an instant hit at any gathering. Not only are they incredibly tasty, but they’re also easy to whip up in no time. This recipe is perfect for those who love to entertain but despise the hours of preparation that some dishes demand.
The secret to the irresistible flavor of these chicken bites lies in the honey garlic glaze. The honey adds a delicious sweetness that beautifully contrasts the robust flavors of the garlic. The result is an appetizer that’s so mouth-wateringly good, it will have your guests coming back for more.
Ingredients:
- 2 lbs of boneless chicken breasts, cut into bite-sized pieces
- 1 cup of all-purpose flour
- 2 large eggs, beaten
- 2 cups of panko breadcrumbs
- 1 cup of honey
- 4 cloves of garlic, minced
- 2 tablespoons of soy sauce
- 1 tablespoon of cornstarch
- Salt and pepper to taste
- Vegetable oil for frying
- Freshly chopped parsley for garnish
Cooking Instructions:
- Start by seasoning the chicken pieces with salt and pepper. Then, dredge each piece in flour, dip into the beaten eggs, and coat with panko breadcrumbs.
- In a large skillet, heat the vegetable oil over medium heat. Once the oil is hot, add the chicken pieces and fry until they’re golden brown and crispy. This should take about 3-4 minutes per side. Once done, remove the chicken from the skillet and set aside.
- In the same skillet, add the minced garlic and sauté until it becomes fragrant. This should take about 1 minute.
- In a small bowl, mix together the honey, soy sauce, and cornstarch. Pour this mixture into the skillet with the garlic and stir continuously until it thickens into a glaze.
- Return the fried chicken pieces to the skillet and toss them in the honey garlic glaze until they’re fully coated. Let them cook in the glaze for an additional 2-3 minutes.
- Once done, remove the chicken bites from the skillet and place them on a serving platter. Garnish with freshly chopped parsley and serve immediately.
Extra Tips:
When frying the chicken bites, it’s important not to overcrowd the skillet. If too many pieces are added at once, the temperature of the oil will drop and the chicken won’t become crispy.
Also, be sure to use a high-quality honey for this recipe. The flavor of the honey greatly affects the overall taste of the dish.
Finally, don’t skip the garnish! The fresh parsley adds a nice touch of color and freshness to the dish.
Chicken and Avocado Spring Rolls
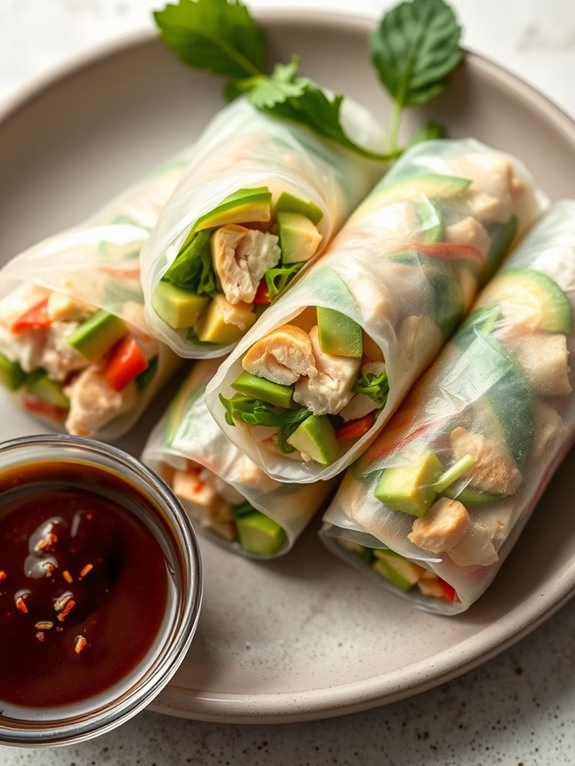
Searching for a unique, gourmet appetizer that won’t take all day to prepare? Seek no further than these Chicken and Avocado Spring Rolls. They’re a perfect blend of succulent chicken, creamy avocado, and crisp vegetables, all enveloped in a delicate spring roll wrapper. Not only are they delicious, but they’re also quick and easy to prepare, making them a fantastic choice for entertaining guests or for a light and revitalizing dinner.
The beauty of these Chicken and Avocado Spring Rolls lies in their balance of flavors and textures. The chicken provides a hearty, protein-packed base, while the avocado adds a smooth, buttery texture that contrasts beautifully with the crunch of the fresh vegetables. The spring roll wrappers, thin and light, hold everything together without overpowering the filling. Topped off with a tangy dipping sauce, these spring rolls are sure to impress.
Ingredients:
- 2 boneless, skinless chicken breasts
- 2 ripe avocados, peeled and diced
- 1 large carrot, julienned
- 1 cucumber, julienned
- 1/2 red bell pepper, julienned
- 4-6 spring roll wrappers
- 1 tablespoon sesame oil
- Salt and pepper to taste
- 1/2 cup soy sauce
- 1 tablespoon rice vinegar
- 1 tablespoon honey
- 1/2 teaspoon crushed red pepper flakes
Cooking Instructions:
- Begin by cooking the chicken breasts. Heat a pan over medium heat and add the sesame oil. Season the chicken with salt and pepper, then cook in the heated pan until thoroughly cooked and lightly browned on both sides. Once done, set aside to cool, then dice into bite-sized pieces.
- While the chicken is cooling, prepare the dipping sauce. In a small bowl, combine the soy sauce, rice vinegar, honey, and crushed red pepper flakes. Stir until well combined and set aside.
- Prepare the spring roll wrappers according to the package instructions. Typically, this involves soaking them in warm water until they become pliable.
- Once your ingredients are ready, it’s time to assemble the spring rolls. Lay out one spring roll wrapper and place a handful of the diced chicken near the bottom. Top with a few pieces of avocado, carrot, cucumber, and red bell pepper.
- Fold the bottom of the wrapper up over the filling, then fold in the sides and roll tightly. Repeat with the remaining wrappers and filling.
- Serve the spring rolls with the dipping sauce on the side. They’re best enjoyed fresh, but can also be stored in the refrigerator for a quick and easy snack later on.
Extra Tips:
When assembling the spring rolls, be sure not to overfill them as this can cause the wrappers to tear. Also, remember to roll them as tightly as possible to prevent the filling from falling out when eating. If you wish to prepare these ahead of time, simply cover them with a damp paper towel and store in the refrigerator to keep them fresh. Enjoy this quick chicken appetizer that’s sure to impress your guests!
Chicken Teriyaki Meatballs
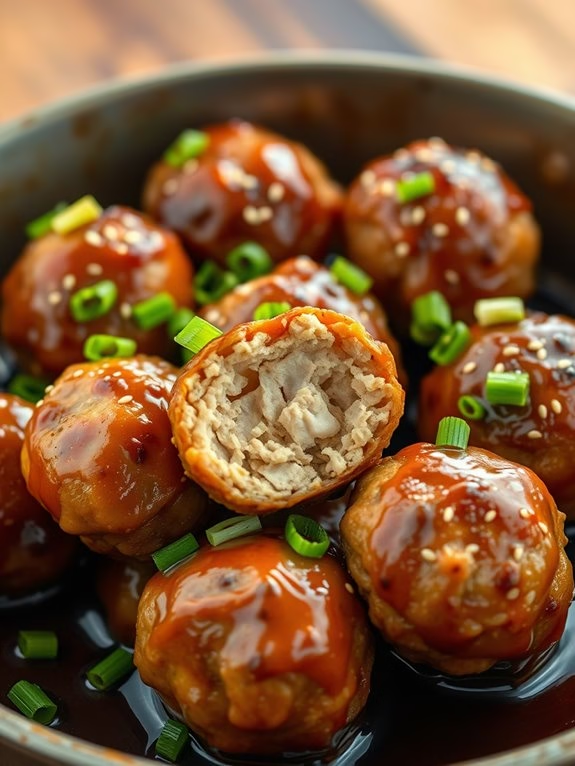
Chicken Teriyaki Meatballs are the perfect appetizer for any gathering. These bite-sized balls of delight are packed with the rich, sweet, and tangy flavors of traditional Japanese Teriyaki sauce, adding a touch of sophistication to your party spread.
The moist chicken meatballs, glazed with the irresistible teriyaki sauce, aren’t just appetizing but also incredibly easy to make. They’re certain to impress your guests and have them reaching for seconds!
This recipe is designed to serve 4-6 people, making it perfect for small get-togethers or family dinners. It’s a quick and simple dish that doesn’t compromise on taste. So, roll up your sleeves and let’s get started on these mouthwatering Chicken Teriyaki Meatballs.
Ingredients:
- 1 lb ground chicken
- 1/2 cup breadcrumbs
- 1/2 cup grated onion
- 2 cloves of garlic, minced
- 1 egg
- 1 tablespoon soy sauce
- Salt and pepper to taste
- 1/2 cup Teriyaki sauce
- 2 tablespoons vegetable oil
- 2 green onions, thinly sliced for garnish
- Sesame seeds for garnish
Instructions:
- In a large bowl, combine the ground chicken, breadcrumbs, grated onion, minced garlic, egg, and soy sauce. Season with salt and pepper. Mix all the ingredients well until they’re fully combined.
- Form the mixture into small, bite-sized meatballs. This recipe should yield around 20 meatballs.
- Heat the vegetable oil in a skillet over medium heat. Once the oil is hot, carefully place the meatballs in the skillet.
- Cook the meatballs for about 10-12 minutes, or until they’re fully cooked and golden brown on all sides. Make sure to turn them occasionally for even cooking.
- In the same skillet, pour the teriyaki sauce over the cooked meatballs. Let it simmer for about 2-3 minutes until the meatballs are well coated with the sauce.
- Remove the skillet from heat. Garnish the Chicken Teriyaki Meatballs with thinly sliced green onions and sesame seeds before serving.
Extra Tips:
While making these Chicken Teriyaki Meatballs, it’s important to remember not to overwork the mixture while combining the ingredients. This will guarantee that your meatballs remain tender and juicy.
Also, be careful while turning the meatballs in the skillet to avoid breaking them. If you prefer a stronger flavor, you can marinate the meatballs in the teriyaki sauce for a few hours before cooking.
Additionally, these meatballs can be made ahead of time and simply reheated before serving, making them an excellent choice for meal prep or party planning.
Crispy Chicken Taquitos
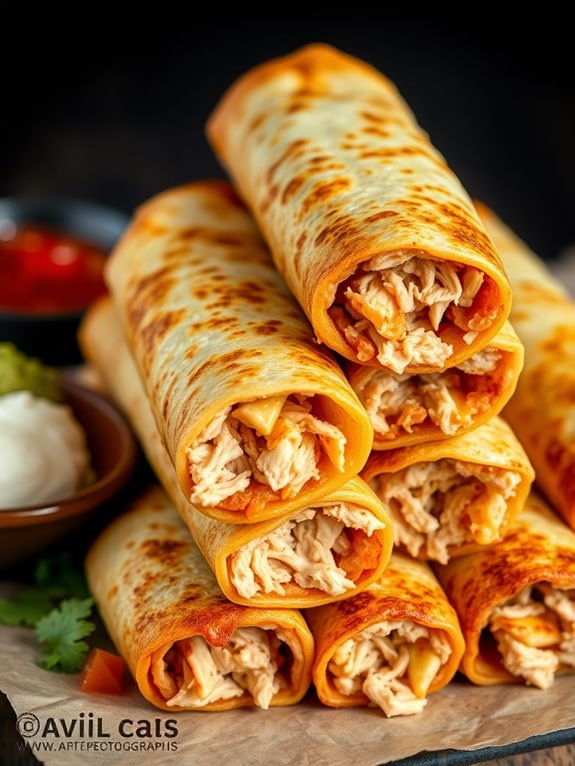
Crispy Chicken Taquitos are the perfect quick appetizer for any gathering. They’re delightfully crisp, loaded with shredded chicken, and have a perfect blend of spices that will leave everyone asking for more. Not only are they easy to make, but they’re also incredibly versatile.
These can be served with a variety of dips such as salsa, guacamole, or sour cream, and they’re also a great addition to any party spread.
The best part about these taquitos is that they’re baked, not fried, which makes them a healthier option for those who are watching their diets. The chicken filling is also versatile, and you can add in any of your favorite ingredients like cheese, beans, or even corn.
Once you master the basic recipe, feel free to experiment with different fillings and seasonings to make this recipe your own.
Ingredients:
- 2 boneless skinless chicken breasts
- 1 teaspoon of salt
- 1/2 teaspoon of black pepper
- 1 teaspoon of chili powder
- 1/2 teaspoon of cumin
- 1/2 cup of shredded cheese
- 12-15 small flour tortillas
- 1/2 cup of vegetable oil
- Salsa, guacamole, or sour cream for serving
Cooking Instructions:
- Preheat your oven to 425 degrees Fahrenheit and line a baking sheet with parchment paper.
- Season the chicken breasts with salt, pepper, chili powder, and cumin.
- Cook the chicken in a skillet over medium heat until it’s no longer pink and can be easily shredded with a fork. This should take approximately 15 to 20 minutes.
- Once the chicken is cooked, transfer it to a bowl and shred it using two forks.
- Add the shredded cheese to the bowl and mix it well with the chicken.
- Lay out your tortillas and spoon about two tablespoons of the chicken mixture onto each one. Roll the tortilla tightly around the filling and place it seam-side down on the baking sheet.
- Brush each taquito with a bit of vegetable oil to help them brown in the oven.
- Bake the taquitos for 15-20 minutes, or until they’re golden brown and crispy.
- Allow them to cool slightly before serving with your choice of salsa, guacamole, or sour cream.
Extra Tips:
When rolling your taquitos, make sure to roll them as tightly as possible to prevent the filling from spilling out during baking. Confirm the seam side is placed down on the baking sheet to keep them sealed.
If you prefer an extra spicy taquito, feel free to add in a bit of jalapeno or hot sauce to the chicken mixture. Also, remember that the taquitos will be very hot straight out of the oven, so allow them to cool slightly before serving to avoid burning your mouth.
Enjoy these delicious, crispy chicken taquitos at your next gathering!
Chicken Caesar Salad Cups
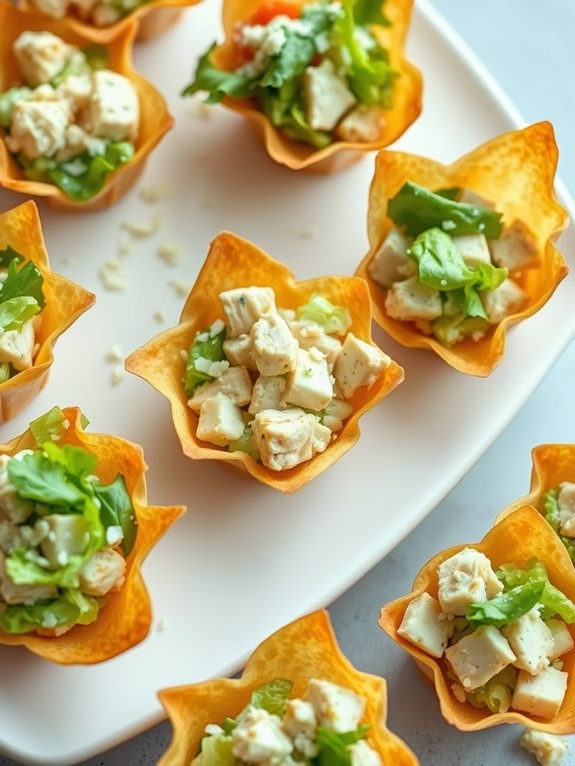
Chicken Caesar Salad Cups are the perfect appetizer for any gathering. They’re a simple yet elegant way to serve a classic salad in a bite-sized form. The crisp lettuce, juicy chicken, and homemade Caesar dressing nestled in a crunchy wonton cup will surely impress your guests.
Plus, they’re easy to make, so you can whip up a batch in no time and have more time to enjoy the party. Moreover, these salad cups are a healthier alternative to typical party foods. The wonton cups provide just enough crunch to satisfy your cravings without being overly heavy. The homemade Caesar dressing allows you to control the ingredients, making it much healthier than store-bought versions.
Ingredients:
- 24 wonton wrappers
- 2 boneless, skinless chicken breasts
- Salt and pepper to taste
- 1 tablespoon olive oil
- 1 head of romaine lettuce, chopped
- 1/2 cup shredded Parmesan cheese
- 1 cup Caesar salad dressing (homemade or store-bought)
Cooking Instructions:
- Preheat your oven to 375 degrees Fahrenheit.
- In each section of a muffin tin, press a wonton wrapper to form a cup. Bake in the oven for 10-12 minutes, or until the wonton cups are crispy and lightly browned. Remove from the oven and allow to cool.
- While the wonton cups are cooling, season the chicken breasts with salt and pepper. Heat the olive oil in a skillet over medium-high heat. Cook the chicken until it’s no longer pink in the middle, about 7 minutes per side. Remove the chicken from the skillet and allow it to cool.
- Once the chicken has cooled, dice it into small bite-sized pieces.
- In a large bowl, toss together the chopped lettuce, diced chicken, shredded Parmesan cheese, and Caesar dressing.
- Spoon the salad mixture into each cooled wonton cup. Serve immediately.
When making these Chicken Caesar Salad Cups, it’s important to keep in mind the size of your wonton cups. They should be large enough to hold a good amount of salad, but not so large that they’re difficult to eat in one or two bites.
If you want to prepare this dish in advance, you can bake the wonton cups and cook the chicken a day ahead. However, don’t assemble the salad cups until right before serving to prevent the wonton cups from becoming soggy.