
Who doesn’t love the challenge of creating a meal that kids will actually eat?
I’m here to help you with that!
Let’s get ready to whip up 10 delicious chicken appetizers that are not only kid-approved but also packed with protein.
From crispy homemade nuggets to zesty BBQ skewers, there’s something here to please every little palate.
These fun and flavorful ideas will make mealtime exciting for your little ones!
Crispy Chicken Nuggets Recipe
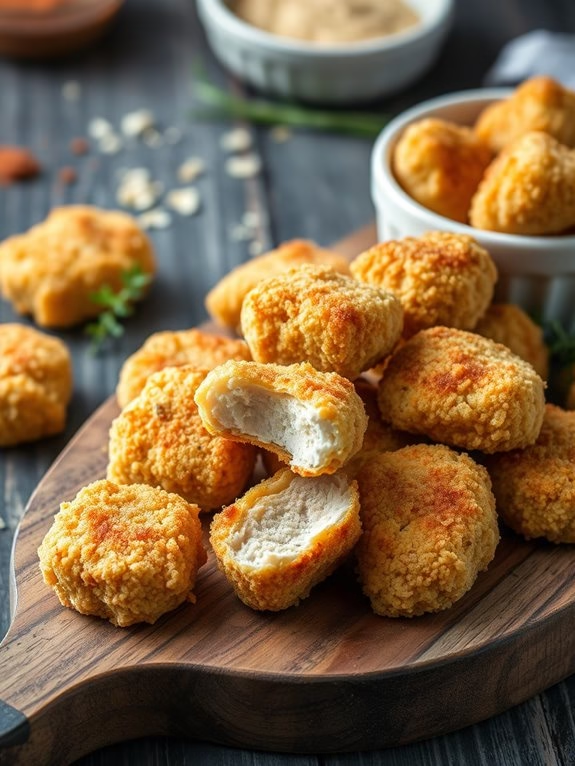
Introducing crispy chicken nuggets – a favorite amongst kids and adults alike. These golden, crunchy morsels are the perfect appetizer for any occasion, be it a picnic, a party, or a simple family dinner. The best part? They’re easy to make, healthy (as they’re baked, not fried), and absolutely delicious. This recipe will guide you through the process of making crispy chicken nuggets that are guaranteed to leave everyone asking for more.
What sets this recipe apart is the use of panko breadcrumbs, which make the nuggets extra crispy. The chicken is marinated in a flavorful mix of spices and herbs, then coated in the breadcrumbs and baked to perfection. The result is a batch of nuggets that are crispy on the outside and tender and juicy on the inside. Now, let’s get started.
Ingredients:
- 2 boneless, skinless chicken breasts
- 2 cups panko breadcrumbs
- 1 cup all-purpose flour
- 2 large eggs
- 1 teaspoon salt
- 1/2 teaspoon black pepper
- 1/2 teaspoon garlic powder
- 1/2 teaspoon onion powder
- 1/2 teaspoon paprika
- Cooking oil spray
Cooking Instructions:
- Preheat your oven to 400°F (200°C). While the oven is heating, prepare a baking tray by lining it with foil and lightly greasing it with cooking oil spray.
- Cut the chicken breasts into small, bite-sized pieces. Try to keep them roughly the same size for even cooking.
- In a bowl, combine the salt, black pepper, garlic powder, onion powder, and paprika.
- Add the chicken pieces to the bowl and mix well until each piece is evenly coated in the spice mix.
- Set up a breading station: one bowl with the flour, one with beaten eggs, and one with panko breadcrumbs.
- Roll each piece of chicken first in the flour, then dip it in the egg, and finally coat it in the breadcrumbs. Make sure each piece is fully coated at each step.
- Place the coated chicken pieces on the prepared baking tray, guaranteeing they aren’t touching each other.
- Spray the top of the chicken nuggets with a bit of cooking oil spray. This will help them brown and become crispy.
- Bake in the preheated oven for 15-20 minutes, or until the chicken is cooked through and the coating is golden and crispy.
- Let the nuggets cool for a few minutes before serving.
Extra Tips:
While this recipe is quite straightforward, here are a few tips to guarantee your chicken nuggets turn out perfectly every time.
First, make sure to cut the chicken into even pieces so they all cook at the same rate.
Second, don’t skip the step of spraying the nuggets with oil before baking – this is what gives them their irresistible golden color and crunch.
Finally, these nuggets are best served hot, so plan your meal accordingly. Enjoy your homemade crispy chicken nuggets!
Baked Chicken Fingers Adventure
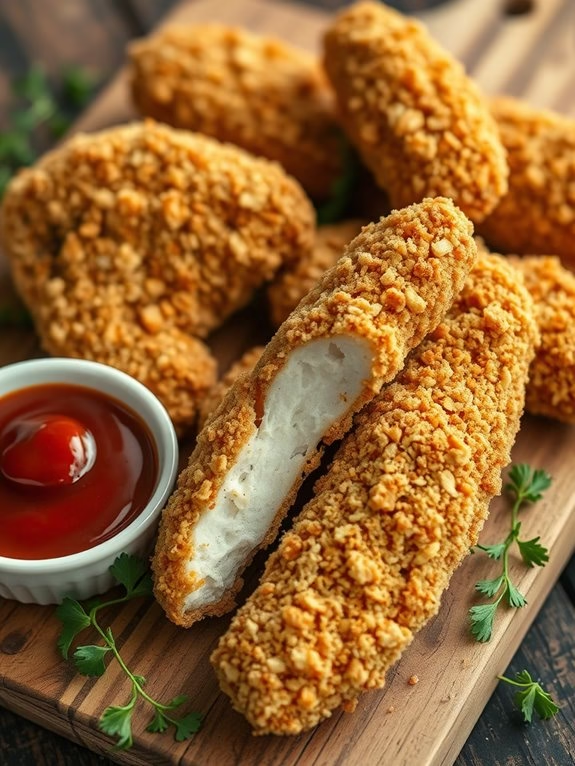
When it comes to feeding kids, it can sometimes be quite challenging to come up with recipes that are both nutritious and appealing. Baked Chicken Fingers Adventure is one such recipe that’s sure to win over the little ones. This appetizer isn’t only protein-packed but also delightfully crunchy and flavorful, making it a perfect choice for a children’s party or a family dinner.
The recipe is relatively simple to prepare, requiring everyday ingredients that can be easily found in your pantry. Additionally, baking the chicken fingers instead of frying them makes this dish a healthier alternative to the traditional fried chicken fingers.
Now let’s plunge into the recipe for Baked Chicken Fingers Adventure that can serve 4-6 people.
Ingredients:
- 1.5 lbs of boneless, skinless chicken breasts
- 1 cup of all-purpose flour
- 2 large eggs
- 2 cups of panko breadcrumbs
- 1 teaspoon of garlic powder
- 1 teaspoon of onion powder
- 1 teaspoon of paprika
- Salt and black pepper to taste
- Cooking spray
- Ketchup or BBQ sauce for dipping
Instructions:
- Preheat your oven to 400 degrees F (200 degrees C) and line a baking sheet with parchment paper.
- Cut the chicken breasts into thin strips, about 1 inch wide.
- In a shallow dish, combine the flour, garlic powder, onion powder, paprika, salt, and pepper.
- In another dish, beat the eggs.
- In a third dish, spread out the panko breadcrumbs.
- Coat each chicken strip in the flour mixture, then dip it into the beaten eggs, and finally coat it with the breadcrumbs. Verify each strip is fully coated at each stage.
- Arrange the coated chicken strips on the prepared baking sheet and spray lightly with cooking spray.
- Bake for 20-25 minutes, or until the chicken is cooked through and the coating is golden and crispy.
- Serve warm with ketchup or BBQ sauce for dipping.
Additional Tips:
Remember to check the chicken’s doneness by cutting into one of the fingers; it should be white and juicy, not pink. You can also use a cooking thermometer to confirm the chicken has reached an internal temperature of 165 degrees F (74 degrees C).
For an extra flavor boost, consider adding some grated Parmesan cheese to the breadcrumb mixture. Finally, always let the chicken rest for a few minutes before serving to allow the juices to redistribute, guaranteeing a moist and tender bite.
BBQ Chicken Skewers Delight
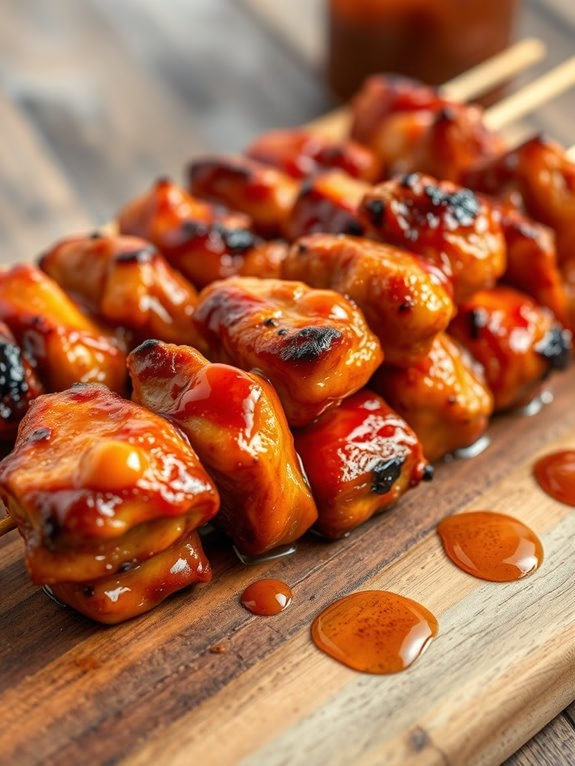
BBQ Chicken Skewers Delight is a fun and tasty appetizer that kids will love. Easy to make, these skewers are packed with flavors that will make your little ones’ taste buds dance with delight. Made with tender chicken pieces marinated in a sweet and tangy barbecue sauce, these skewers are bound to be a hit at any party or family gathering.
Not only are they delicious, but they’re also a healthy choice, providing a good source of protein. What’s more, kids will enjoy helping out in the kitchen, threading the chicken onto the skewers. This is a wonderful way to introduce them to cooking and to encourage them to try new foods. BBQ Chicken Skewers Delight is a recipe that’s bound to become a family favorite.
Ingredients for BBQ Chicken Skewers Delight (Serves 4-6):
- 1.5 lbs of boneless, skinless chicken breasts
- 1 cup of barbecue sauce
- 1/4 cup of honey
- 2 tablespoons of olive oil
- 1/2 teaspoon of salt
- 1/2 teaspoon of pepper
- 1 teaspoon of garlic powder
- 1/2 teaspoon of onion powder
- Wooden or metal skewers
Cooking Instructions:
- Start by cutting the chicken breasts into bite-sized pieces. Make sure they’re all roughly the same size so they cook evenly.
- In a large bowl, combine the barbecue sauce, honey, olive oil, salt, pepper, garlic powder, and onion powder. Stir until everything is well combined.
- Add the chicken pieces to the bowl and stir until they’re fully coated in the marinade. Cover the bowl and place it in the fridge for at least 2 hours, or overnight if possible.
- If you’re using wooden skewers, soak them in water for 30 minutes before using to prevent them from burning.
- Preheat your grill or barbecue to medium heat.
- Thread the chicken pieces onto the skewers, leaving a small gap between each piece.
- Cook the skewers on the preheated grill for 10-15 minutes, turning them occasionally, until the chicken is fully cooked and slightly charred.
- Serve the BBQ Chicken Skewers Delight immediately, while they’re still hot.
Extra Cooking Tips:
When preparing BBQ Chicken Skewers Delight, it’s important to remember not to rush the marinating process. Allowing the chicken to marinate for at least 2 hours will guarantee that the flavors fully penetrate the meat, resulting in a more flavorful dish.
If you’re preparing this dish for a party, you can even marinate the chicken and thread them onto the skewers the night before, saving you time on the day of the event. Just be sure to keep them refrigerated until you’re ready to grill.
Mini Chicken Tacos Fiesta

The Mini Chicken Tacos Fiesta is an excellent appetizer that you can prepare for your kids. This dish isn’t only tasty but also packed with nutrition. It’s a fun and easy dish to make and the kids will definitely love the mini size.
With a blend of chicken, beans, cheese, and vegetables, it’s a wholesome dish that your kids will keep asking for more. This recipe is an excellent way to sneak in some vegetables into your kids’ diet. It’s a perfect appetizer for parties, picnics, or even a casual family dinner.
The mini size makes it easy for the little hands to hold and eat. Let’s get started on preparing this delicious Mini Chicken Tacos Fiesta.
Ingredients:
- 2 boneless, skinless chicken breasts
- 1 cup of canned black beans, rinsed and drained
- 1 cup of frozen corn, thawed
- 1 small red onion, finely chopped
- 1 red bell pepper, diced
- 1 cup of shredded cheddar cheese
- 1 tablespoon of olive oil
- 1 teaspoon of chili powder
- 1 teaspoon of ground cumin
- 1 package of mini taco shells
- Salt to taste
Instructions:
- Preheat your oven to 350°F (180°C).
- Heat the olive oil in a pan over medium heat. Add the finely chopped red onion and diced bell pepper into the pan and sauté until they become soft.
- Cut the chicken breasts into small pieces. Add these pieces to the pan and cook until they’re no longer pink inside.
- Add chili powder, ground cumin, and salt. Stir well to guarantee all the chicken pieces are coated with the spices.
- Add the rinsed black beans and thawed corn to the pan. Stir everything together and let it cook for 2-3 minutes.
- Take the mini taco shells and fill them with the cooked chicken and vegetable mixture. Top each taco with some shredded cheddar cheese.
- Arrange the filled tacos on a baking sheet and put them in the preheated oven. Bake for 5-7 minutes or until the cheese is melted and slightly browned.
- Remove from the oven and let them cool slightly before serving.
Extra Tips:
When cooking the Mini Chicken Tacos Fiesta, feel free to adjust the spices according to your kids’ tastes. If your kids don’t like spicy food, you can reduce or skip the chili powder.
You can also add other vegetables like zucchini or carrots to the mix. If your kids aren’t fond of black beans, you can replace them with kidney beans or chickpeas. Remember, the key is to make it flavorful and fun for the kids. Enjoy cooking!
Healthy Chicken Lettuce Wraps
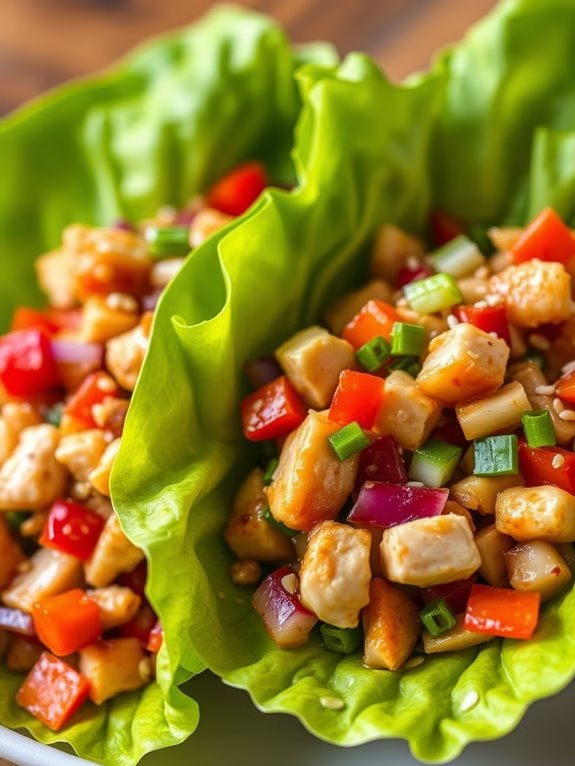
Healthy Chicken Lettuce Wraps are a fun and nutritious appetizer that kids will enjoy. These wraps are packed with tender chicken, crunchy vegetables, and a sweet-savory sauce, all nestled inside fresh, crisp lettuce leaves. The wraps are easy to pick up and eat, and children can even help prepare them.
They’re not only delicious but also packed with protein, vitamins, and fiber, making them a great choice for a wholesome snack or meal starter.
These wraps are very versatile. Feel free to add other veggies your kids love, or spice them up with some chili flakes if your little ones are adventurous eaters. Now, let’s get into the recipe. This recipe yields 4-6 servings.
Ingredients:
- 1 lb boneless, skinless chicken breasts
- 1 tablespoon olive oil
- 1 medium onion, finely diced
- 2 cloves garlic, minced
- 1 red bell pepper, diced
- 1 medium carrot, shredded
- 1/4 cup hoisin sauce
- 2 tablespoons soy sauce
- 1 teaspoon sesame oil
- 1/2 teaspoon ground ginger
- Salt and pepper to taste
- 1 head of iceberg or butter lettuce
- Optional toppings: chopped green onions, sesame seeds, or crispy noodles
Cooking Instructions:
- Cut the chicken into small, bite-sized pieces. Heat the olive oil in a large skillet over medium heat. Add the chicken pieces and cook until they’re no longer pink in the center. Remove the chicken from the skillet and set aside.
- In the same skillet, add the diced onion and minced garlic. Cook until the onion becomes translucent.
- Add the diced bell pepper and shredded carrot to the skillet. Stir everything together and cook for another 2-3 minutes until the vegetables are tender.
- Return the chicken to the skillet. Add the hoisin sauce, soy sauce, sesame oil, and ground ginger. Stir well to combine and coat the chicken and vegetables in the sauce. Season with salt and pepper to taste.
- Cook for another 2-3 minutes until everything is heated through. Remove from heat.
- To assemble the wraps, separate the lettuce leaves. Spoon some of the chicken filling onto the center of each lettuce leaf. Top with your choice of optional toppings.
Extra Tips:
- To make this recipe even healthier, you can use low-sodium soy sauce and hoisin sauce.
- If your kids aren’t big fans of spicy food, you can omit the ground ginger.
- You can also substitute the chicken with tofu or ground turkey for a different flavor.
- Make sure to wash the lettuce thoroughly and pat dry before using. The crispness of the lettuce adds a delightful contrast to the savory chicken filling.
Tasty Chicken Quesadilla Triangles
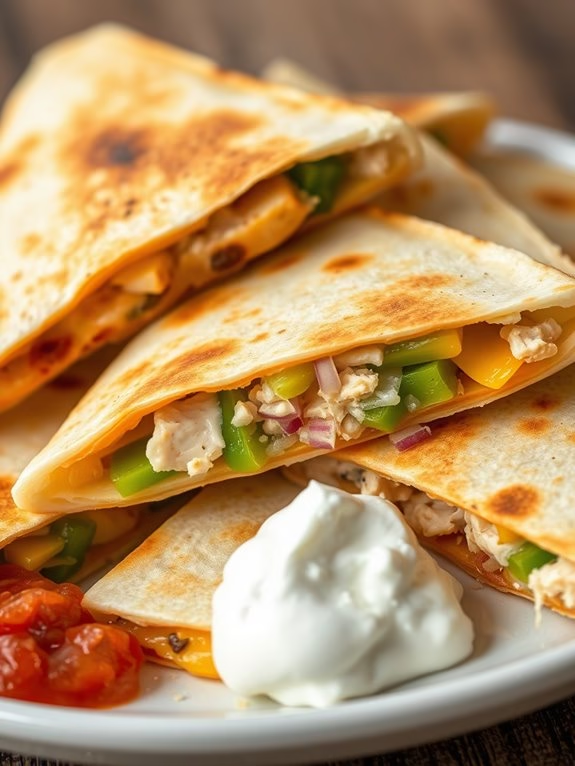
When it comes to appeasing the picky eaters in your household, the task may seem intimidating. However, the Tasty Chicken Quesadilla Triangles are an appetizer that’s sure to be a hit with your kids. This dish combines the comforting flavors of chicken and cheese with a crispy quesadilla shell, resulting in a finger food that’s both delicious and easy to handle for little hands.
The beauty of this recipe lies in its simplicity. It requires just a few basic ingredients—most of which you probably already have in your pantry—and takes less than 30 minutes to prepare and cook. The cooking process is also quite straightforward, making it a great recipe for novice cooks or busy parents.
Ingredients:
- 2 boneless, skinless chicken breasts
- 1 teaspoon of salt
- 1/2 teaspoon of black pepper
- 2 tablespoons of olive oil
- 4 large flour tortillas
- 2 cups of shredded cheddar cheese
- 1/2 cup of finely chopped green bell pepper
- 1/2 cup of finely chopped red onion
- Sour cream and salsa for serving (optional)
Cooking Instructions:
- Start by seasoning the chicken breasts with salt and pepper. Make sure that both sides of the chicken are evenly coated.
- Heat the olive oil in a large skillet over medium heat. Once the oil is hot, add the chicken breasts to the skillet.
- Cook the chicken for about 5-7 minutes on each side, or until it’s no longer pink in the middle. Remove the chicken from the skillet and set it aside to cool.
- Once the chicken has cooled, shred it into small, bite-sized pieces using a fork.
- Lay out the tortillas on a flat surface. Spread an even layer of shredded cheese on one half of each tortilla. Top the cheese with the shredded chicken, chopped bell pepper, and red onion.
- Fold the tortillas in half, pressing down gently to secure the fillings.
- Heat a clean skillet over medium heat and cook each quesadilla for about 3 minutes on each side, or until the tortilla is golden brown and the cheese has melted.
- Remove the quesadillas from the skillet and cut each one into triangles using a pizza cutter or sharp knife.
- Serve warm with sour cream and salsa on the side, if desired.
When making the Tasty Chicken Quesadilla Triangles, it’s essential to cook the quesadillas on medium heat. This allows the cheese to melt completely without burning the tortilla.
Also, feel free to customize this recipe according to your kids’ preferences. You can substitute the chicken with turkey or even add some sweet corn or black beans for extra flavor and nutrition.
Flavorful Chicken Meatballs

Chicken meatballs are a versatile and delicious appetizer that kids will absolutely love. They’re easy to make, packed full of flavor, and can be served with a variety of sauces or dips.
These chicken meatballs aren’t only fun to eat but also provide a healthy dose of protein. Whether you’re hosting a birthday party or just need a quick snack before dinner, these chicken meatballs are sure to be a hit.
This recipe will guide you on how to make flavorful chicken meatballs for 4-6 servings. It’s simple, straightforward, and doesn’t require any fancy kitchen gadgets or ingredients. You can even make these meatballs ahead of time and freeze them for later use.
Ingredients:
- 1 pound of ground chicken
- 1/2 cup of bread crumbs
- 1/4 cup of grated Parmesan cheese
- 2 cloves of garlic, minced
- 1 small onion, finely chopped
- 1 egg
- 1 tablespoon of fresh parsley, finely chopped
- Salt and pepper to taste
- 1 tablespoon of olive oil
- 1 cup of your favorite marinara sauce
Cooking Instructions:
- In a large bowl, combine the ground chicken, bread crumbs, Parmesan cheese, garlic, onion, egg, parsley, salt, and pepper. Mix the ingredients together until they’re well combined.
- Once the ingredients are mixed, shape the mixture into small meatballs about the size of a golf ball. Place the meatballs on a tray lined with parchment paper.
- Heat the olive oil in a large skillet over medium heat. Once the oil is hot, add the meatballs to the skillet. Make sure not to overcrowd the skillet. You may need to cook the meatballs in batches.
- Cook the meatballs for about 5 minutes on each side, or until they’re golden brown and cooked through.
- Once the meatballs are cooked, remove them from the skillet and place them on a plate lined with paper towels to drain any excess oil.
- In the same skillet, add the marinara sauce and heat it over low heat. Once the sauce is hot, add the meatballs back into the skillet and stir them around to coat them in the sauce.
- Cook the meatballs in the sauce for about 10 minutes, or until they’re heated through.
When cooking these meatballs, it’s important not to overcook them as this can make them dry. They should be juicy and moist on the inside.
You can also experiment with different types of sauces or dips to serve with these meatballs. A simple marinara sauce works well, but you can also try a creamy Alfredo sauce or a tangy barbecue sauce. The possibilities are endless!
Sweet and Sour Chicken Pops
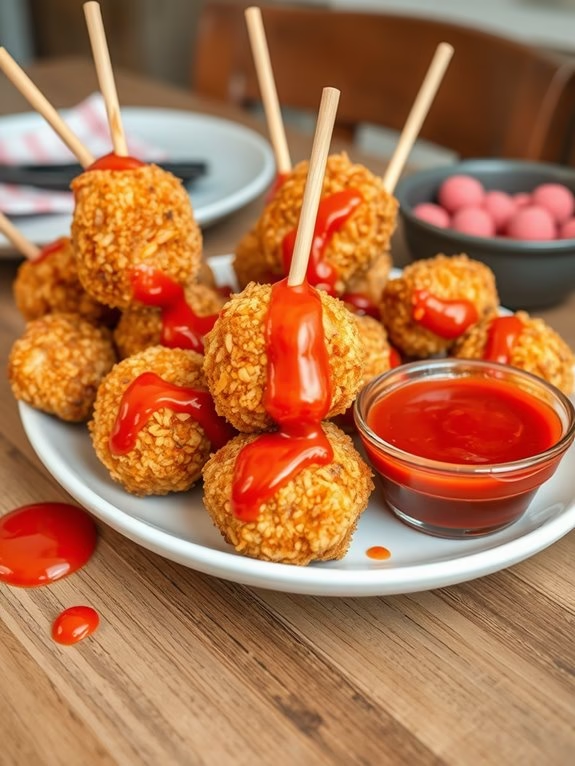
Introducing a kid-friendly, fun and easy-to-eat chicken dish – Sweet and Sour Chicken Pops. This dish is an excellent choice for kids’ parties, picnics, or even as an exciting dinner entree.
Combining the succulence of chicken with the tangy sweetness of a homemade sweet and sour sauce, these chicken pops are sure to be a hit with the little ones. Not to mention, the joy of eating food off a stick makes the experience even more delightful for kids.
The Sweet and Sour Chicken Pops recipe is simple and quick, taking less than an hour to prepare. The chicken is first marinated in a blend of spices, then coated with a crispy breaded layer, and finally baked to perfection. The pops are then generously drizzled with a homemade sweet and sour sauce, which adds a burst of flavor in every bite.
Here are your ingredients for serving 4-6 people:
- 2 pounds of boneless, skinless chicken breasts
- 2 cups of panko breadcrumbs
- 2 eggs
- 1 cup of flour
- Salt and pepper to taste
- 1/2 cup of ketchup
- 1/4 cup of soy sauce
- 1/4 cup of sugar
- 1/4 cup of vinegar
- 1 tablespoon of cornstarch
- Wooden skewers
Cooking instructions:
- Begin by preheating your oven to 400°F (200°C) and lining a baking sheet with parchment paper.
- Cut the chicken into bite-sized pieces and season them with salt and pepper.
- Beat the eggs in a separate bowl. In another bowl, add the flour and in a third bowl, add the panko breadcrumbs.
- Dip each chicken piece first in the flour, then the eggs, and finally coat them in the breadcrumbs. Place the breaded chicken pieces on the prepared baking sheet.
- Bake the chicken for about 15-20 minutes or until it’s golden brown and crispy.
- While the chicken is baking, prepare the sweet and sour sauce. Combine the ketchup, soy sauce, sugar, vinegar, and cornstarch in a saucepan over medium heat. Stir continuously until the sauce thickens.
- Once the chicken is ready, let it cool for a few minutes. Then, skewer each piece onto a wooden stick.
- Drizzle the sweet and sour sauce over the chicken pops or serve it on the side for dipping.
Extra tips: If you want the chicken pops to be extra crispy, you can double-dip them in the egg and breadcrumb mixture before baking.
Also, make sure to stir the sauce continuously while it’s cooking to prevent it from burning. If the sauce is too thick, you can add a bit of water to thin it out.
Make sure to let the chicken pops cool slightly before skewering them to prevent burns.
Enjoy these Sweet and Sour Chicken Pops as a fun and flavorful appetizer that kids will love!
Spicy Chicken Wings for Kids
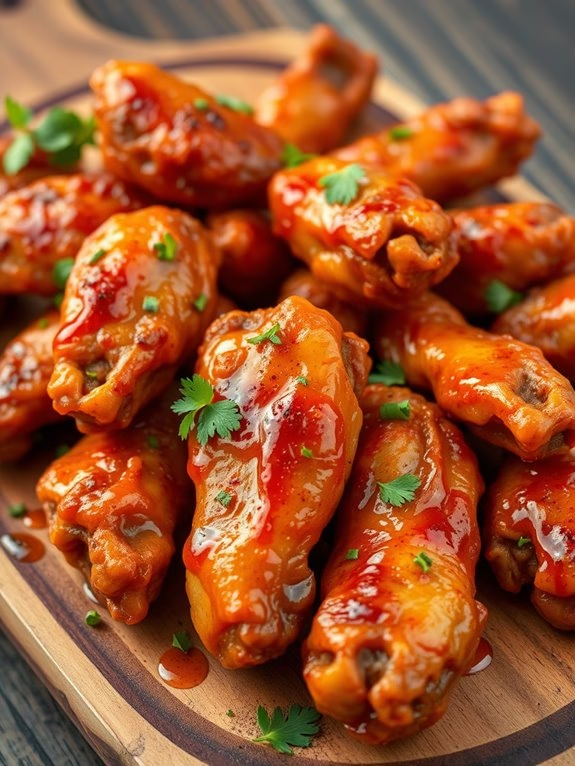
Spicy chicken wings are an all-time favorite appetizer for both kids and adults. However, when preparing them for kids, it’s important to strike a balance between the spice level and the flavors that children love. This recipe achieves that perfect balance, creating a dish that’s not too spicy, but still packed with flavor.
These chicken wings are crispy on the outside, juicy on the inside, and coated with a tangy and slightly spicy sauce that will have the kids asking for more. Not only are these spicy chicken wings delicious, but they’re also easy to make.
Whether you’re hosting a party or simply looking for a tasty snack for the kids, these chicken wings are sure to be a hit. This recipe serves 4-6 people, making it ideal for family gatherings or small parties. So, let’s get started and create some delicious spicy chicken wings for kids.
Ingredients:
- 2 lbs of chicken wings
- 1 teaspoon of salt
- 1 teaspoon of black pepper
- 1 cup of all-purpose flour
- 1/2 cup of butter, melted
- 1/2 cup of hot sauce (preferably a mild one)
- 2 tablespoons of honey
- 2 teaspoons of garlic powder
- 1/2 teaspoon of onion powder
- 1/2 teaspoon of paprika
Cooking Instructions:
- Preheat your oven to 400 degrees Fahrenheit and line a baking sheet with parchment paper.
- Rinely season the chicken wings with salt and pepper. Then, dredge the wings in the flour, making certain they’re evenly coated. Shake off any excess flour.
- Arrange the wings on the prepared baking sheet and bake for 40-45 minutes, or until they’re crispy and golden brown. Make sure to flip the wings halfway through the baking time for even cooking.
- While the wings are baking, prepare the sauce. In a bowl, combine the melted butter, hot sauce, honey, garlic powder, onion powder, and paprika. Stir until all the ingredients are well combined.
- Once the wings are baked, remove them from the oven and let them cool for a few minutes. Then, toss the wings in the sauce until they’re fully coated.
- Return the wings to the baking sheet and bake for another 5-10 minutes, or until the sauce is sticky and slightly caramelized.
- Let the wings cool for a few minutes before serving.
Extra Tips:
When baking the chicken wings, it’s essential to flip them halfway through to guarantee they cook evenly. Also, when choosing hot sauce, opt for a milder one to keep the spice level appropriate for kids.
If you want to add an extra kick for the adults, you can serve extra hot sauce on the side. Finally, remember that the wings will be hot when they come out of the oven, so allow them to cool for a few minutes before serving to avoid burns. Enjoy this kid-friendly take on a classic appetizer.
Cheesy Chicken Pizza Bites

Cheesy Chicken Pizza Bites are the perfect appetizer for any party or get-together. They’re bite-sized pieces of heaven, filled with juicy chicken, melted cheese, and flavorful pizza sauce. These tasty morsels are a sure hit amongst kids due to their fun size and delicious taste. They’re also easy and quick to prepare, making them an ideal choice for busy parents.
The combination of the chicken’s rich flavor with the tangy pizza sauce and the creaminess of the cheese makes these bites irresistible. The dough is soft and fluffy, perfect for holding the delicious filling. In addition, you can customize these bites according to your child’s preferences by adding in other ingredients like bell peppers or mushrooms.
Let’s get started on how to make these Cheesy Chicken Pizza Bites.
Ingredients:
- 2 cups of diced cooked chicken
- 1 cup of shredded mozzarella cheese
- 1 cup of pizza sauce
- 2 cans of refrigerated biscuit dough (16 oz each)
- 1/2 cup of grated Parmesan cheese
- 1 tablespoon of olive oil
- 1 teaspoon of garlic powder
- 1 teaspoon of dried oregano
- Salt and pepper to taste
Cooking Instructions:
- Preheat your oven to 375 degrees Fahrenheit and lightly grease a baking sheet.
- Take the biscuit dough and flatten each biscuit into a round disc using a rolling pin.
- In the center of each biscuit disc, place a spoonful of pizza sauce, a portion of the diced chicken, and a sprinkle of mozzarella cheese.
- Bundle up the edges of the biscuit disc to create a ball, making sure the filling is completely enclosed. Place the ball seam-side down on the prepared baking sheet.
- Repeat the process until all the biscuit dough and filling are used up.
- In a small bowl, mix together the olive oil, garlic powder, and dried oregano.
- Brush this mixture over the top of each pizza bite, making sure it’s evenly coated.
- Sprinkle the grated Parmesan cheese over the top of the pizza bites.
- Bake in the preheated oven for about 15-20 minutes, or until the pizza bites are golden brown and the cheese is melted.
- Allow the bites to cool for a few minutes before serving.
Extra Cooking Tips:
When making these Cheesy Chicken Pizza Bites, it’s crucial to not overfill the biscuit dough, as it might cause it to burst during baking.
Also, you can substitute the chicken with other proteins like ham or pepperoni. For a vegetarian version, replace the chicken with vegetables of your choice.
Finally, remember to serve these bites warm to guarantee the cheese is gooey and the flavors are at their peak. Enjoy this fun and flavorful appetizer with your kids at your next family gathering.