
When hosting a gathering, chicken appetizers are always my go-to.
They’re not only versatile but also incredibly easy to whip up.
From crispy chicken wings smothered in spicy sauce to savory buffalo chicken meatballs that vanish in no time, there’s something for everyone.
I can’t resist mini chicken quesadillas and those irresistible chicken satay skewers either!
Let’s explore some delicious options that’ll make your next event unforgettable!
Chicken Wings With Spicy Sauce

Chicken wings are a classic appetizer that never fails to impress at any gathering. Whether you’re hosting a game day party, a backyard barbecue, or a casual get-together, these Chicken Wings With Spicy Sauce are sure to be a hit. The combination of crispy skin and a fiery sauce creates a mouthwatering experience that will have your guests reaching for more.
Plus, they’re surprisingly easy to make, allowing you to focus on enjoying your time with family and friends. To achieve the perfect balance of heat and flavor, it’s important to use quality ingredients and marinate the wings properly. The spicy sauce is customizable, so feel free to adjust the heat level according to your preference.
Whether you like it mild or fiery hot, these chicken wings will be the star of the show. Serve them with your favorite dipping sauces and some crunchy veggies on the side for a complete appetizer platter!
Ingredients (Serving Size: 4-6 people)
- 2 pounds chicken wings
- 1 tablespoon olive oil
- 1 teaspoon garlic powder
- 1 teaspoon onion powder
- 1 teaspoon smoked paprika
- Salt and pepper to taste
- 1 cup hot sauce (like Frank’s RedHot)
- 1/2 cup unsalted butter
- 1 tablespoon honey (optional, for sweetness)
- Chopped green onions and celery sticks for serving (optional)
Cooking Instructions
1. Prepare the Chicken Wings: Start by rinsing the chicken wings under cold water and patting them dry with paper towels. Ensuring the wings are dry will help achieve a crispy skin when cooked.
In a large bowl, toss the wings with olive oil, garlic powder, onion powder, smoked paprika, salt, and pepper until they’re evenly coated.
2. Marinate the Wings: For the best flavor, let the seasoned wings marinate in the refrigerator for at least 30 minutes or up to overnight. This step enhances the taste of the chicken and allows the spices to penetrate the meat.
3. Preheat the Oven: Preheat your oven to 400°F (200°C). A hot oven is vital for getting that crispy texture on the wings. If you prefer, you can also cook the wings on a grill for a smoky flavor.
4. Bake the Wings: Arrange the marinated chicken wings in a single layer on a baking sheet lined with parchment paper. Bake in the preheated oven for 40-45 minutes, flipping the wings halfway through cooking.
This allows them to cook evenly and helps achieve a golden-brown color.
5. Prepare the Spicy Sauce: While the wings are baking, prepare the spicy sauce. In a small saucepan over medium heat, melt the butter and add the hot sauce. Stir to combine.
If you like a hint of sweetness, add honey to the mixture and stir until well combined. Allow the sauce to simmer for a few minutes to meld the flavors.
6. Coat the Wings: Once the wings are cooked and crispy, remove them from the oven and place them in a large bowl. Pour the spicy sauce over the wings and toss to coat them evenly.
Make sure every wing is well covered with the sauce for maximum flavor.
7. Serve: Transfer the wings to a serving platter and garnish with chopped green onions and celery sticks if desired. Serve immediately while they’re hot and crispy.
Extra Tips
For an even crispier wing, consider using a wire rack on top of your baking sheet to allow air circulation around the wings as they cook. This will help render out excess fat and result in a crunchier texture.
Additionally, feel free to experiment with different sauces, such as barbecue or teriyaki, to suit your taste. Always have plenty of napkins on hand—these tasty wings can get messy, but that’s part of the fun! Enjoy your delicious Chicken Wings With Spicy Sauce!
Mini Chicken Quesadillas

Mini Chicken Quesadillas are a perfect appetizer that combines the delicious flavors of seasoned chicken, melted cheese, and fresh vegetables, all tucked between crispy tortillas.
They’re easy to prepare and can be customized to suit various tastes, making them an excellent choice for parties, game days, or family gatherings.
These bite-sized delights aren’t only scrumptious but also offer a fun and interactive way for guests to enjoy their food, as they can be dipped in salsa, guacamole, or sour cream.
With their golden, crispy exterior and gooey cheese filling, Mini Chicken Quesadillas are sure to impress your guests and leave them wanting more.
They can be prepared in advance and cooked just before serving, making them a practical option for busy hosts.
Whether you’re a seasoned chef or a cooking novice, this recipe is straightforward and guarantees a delicious result.
Let’s jump into how to make these tasty appetizers!
Ingredients (Serves 4-6):
- 2 cups cooked, shredded chicken
- 1 cup shredded cheese (cheddar, Monterey Jack, or a blend)
- 1/2 cup diced bell peppers (any color)
- 1/4 cup diced onions
- 1 teaspoon taco seasoning (optional)
- 8 small flour tortillas
- Cooking spray or oil for frying
- Salsa, guacamole, or sour cream (for serving)
Cooking Instructions:
1. Prepare the Filling: In a mixing bowl, combine the shredded chicken, shredded cheese, diced bell peppers, diced onions, and taco seasoning (if using).
Stir well until all ingredients are evenly mixed. This will be the flavorful filling for your quesadillas.
2. Assemble the Quesadillas: Lay out four tortillas on a clean surface.
Divide the chicken filling evenly among the tortillas, placing it on one half of each tortilla.
Fold the tortillas over to cover the filling, creating a half-moon shape. Press down gently to seal.
3. Cook the Quesadillas: Heat a large skillet over medium heat and add a small amount of cooking spray or oil.
Once hot, place two or three quesadillas in the skillet (depending on size) and cook for about 3-4 minutes on each side, or until golden brown and crispy.
Repeat with the remaining quesadillas.
4. Slice and Serve: Once cooked, remove the quesadillas from the skillet and place them on a cutting board.
Allow them to cool for a minute before slicing each quesadilla into wedges.
Serve warm with your choice of salsa, guacamole, or sour cream for dipping.
Extra Tips:
To enhance the flavor of your Mini Chicken Quesadillas, consider marinating the shredded chicken in a mixture of lime juice, garlic, and cumin before cooking.
This will infuse the chicken with additional zest.
For an extra kick, you can also add jalapeños or your favorite hot sauce to the filling.
If you want to make these quesadillas even more nutritious, feel free to add cooked spinach or black beans to the filling mix.
Enjoy your cooking!
Chicken Satay Skewers

Chicken Satay Skewers are a delightful and easy-to-make appetizer that brings the flavors of Southeast Asia right to your kitchen. These skewers are marinated in a savory and aromatic peanut sauce, then grilled to perfection, creating a dish that’s both flavorful and visually appealing.
Perfect for gatherings, game days, or even a casual dinner, chicken satay is sure to impress your family and friends with its tender, juicy chicken and rich, nutty sauce.
Preparing Chicken Satay Skewers is simple, and the marinade can be made ahead of time for added convenience. The key to achieving that authentic taste lies in the marinade, which infuses the chicken with a delightful blend of spices.
Once marinated, the chicken is threaded onto skewers and cooked until beautifully charred. Serve with a side of extra peanut sauce for dipping, and enjoy this delicious appetizer that’s sure to be a crowd-pleaser!
Ingredients (Serves 4-6 people):
- 1 pound boneless, skinless chicken breast, cut into bite-sized pieces
- 1/4 cup coconut milk
- 2 tablespoons soy sauce
- 2 tablespoons peanut butter
- 1 tablespoon brown sugar
- 1 tablespoon lime juice
- 2 cloves garlic, minced
- 1 teaspoon ground cumin
- 1 teaspoon ground coriander
- 1/2 teaspoon turmeric
- Salt and pepper, to taste
- Bamboo skewers (soaked in water for 30 minutes)
Cooking Instructions:
- Prepare the Marinade: In a medium bowl, combine the coconut milk, soy sauce, peanut butter, brown sugar, lime juice, minced garlic, cumin, coriander, turmeric, salt, and pepper. Whisk the ingredients together until they’re well blended and form a smooth marinade.
- Marinate the Chicken: Add the chicken pieces to the marinade, guaranteeing they’re evenly coated. Cover the bowl with plastic wrap and refrigerate for at least 1 hour, or preferably overnight to allow the flavors to penetrate the chicken.
- Preheat the Grill: While the chicken is marinating, preheat your grill or grill pan to medium-high heat. If using an oven, preheat to 400°F (200°C).
- Assemble the Skewers: Once the chicken is marinated, thread the chicken pieces onto the soaked bamboo skewers. Leave a little space between each piece to guarantee even cooking.
- Grill the Skewers: Place the skewers on the grill and cook for about 4-5 minutes on each side, or until the chicken is cooked through and has nice grill marks. Make sure to check that the internal temperature reaches 165°F (75°C).
- Serve: Remove the skewers from the grill and let them rest for a couple of minutes. Serve with additional peanut sauce for dipping and garnish with fresh cilantro or lime wedges if desired.
Extra Tips:
For a variation in flavor, consider adding vegetables such as bell peppers, onions, or zucchini to the skewers. These can be grilled alongside the chicken for a colorful presentation and added nutrition.
Additionally, if you prefer a spicier kick, feel free to add some chili paste or sriracha to the marinade. Always remember to soak your bamboo skewers beforehand to prevent burning on the grill. Enjoy your Chicken Satay Skewers!
Cheesy Chicken Stuffed Peppers
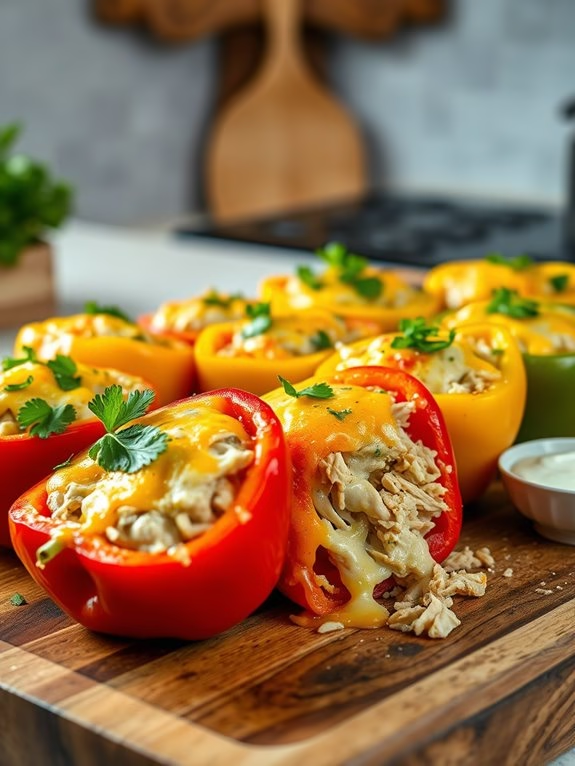
Cheesy Chicken Stuffed Peppers are a delightful and easy appetizer that combines fresh bell peppers with a savory, cheesy chicken filling. This dish is perfect for parties, gatherings, or simply as a delicious snack at home. The vibrant colors of the peppers not only make it visually appealing but also provide a sweet crunch that complements the creamy filling. With just the right amount of cheese and seasoned chicken, these stuffed peppers will surely impress your guests.
Preparing Cheesy Chicken Stuffed Peppers is a straightforward process that allows you to customize the filling to your taste. Whether you’re using rotisserie chicken for convenience or cooking your own, the stuffing can be adjusted with various spices, herbs, and even vegetables. This recipe is for a serving size of 4-6 people, making it ideal for sharing or enjoying leftovers!
Ingredients:
- 4 large bell peppers (any color)
- 2 cups cooked chicken, shredded or diced
- 1 cup cream cheese, softened
- 1 cup shredded cheddar cheese
- 1/2 cup sour cream
- 1/2 teaspoon garlic powder
- 1/2 teaspoon onion powder
- 1 teaspoon Italian seasoning
- Salt and pepper to taste
- 1/2 cup diced tomatoes (optional)
- Fresh parsley or cilantro for garnish (optional)
Cooking Instructions:
- Preheat the Oven: Begin by preheating your oven to 375°F (190°C). This guarantees that your Cheesy Chicken Stuffed Peppers will cook evenly and thoroughly.
- Prepare the Bell Peppers: While the oven is preheating, wash the bell peppers and slice the tops off. Remove the seeds and membranes inside, creating hollow shells for the stuffing. Set aside the tops if you wish to chop them and include them in the filling.
- Make the Filling: In a large mixing bowl, combine the cooked chicken, cream cheese, shredded cheddar cheese, sour cream, garlic powder, onion powder, Italian seasoning, salt, and pepper. If you’re using diced tomatoes, add them to the mixture as well. Mix everything together until well combined and creamy.
- Stuff the Peppers: Carefully fill each bell pepper with the cheesy chicken mixture, packing it in gently. Leave a little space at the top as the filling may expand slightly while cooking.
- Bake the Peppers: Place the stuffed peppers upright in a baking dish. You may add a splash of water to the bottom of the dish to help steam the peppers while they bake. Cover the dish with aluminum foil and bake in the preheated oven for 25 minutes.
- Add Toppings and Finish Cooking: After 25 minutes, remove the foil and sprinkle some extra shredded cheese on top of each stuffed pepper if desired. Return them to the oven and bake for an additional 10-15 minutes, or until the cheese is melted and bubbly and the peppers are tender.
- Garnish and Serve: Once done, remove the dish from the oven and let the peppers cool for a few minutes. Garnish with freshly chopped parsley or cilantro before serving.
Extra Tips:
For an extra layer of flavor, consider adding chopped jalapeños or spices like cayenne pepper to the filling for a spicy kick.
If you want to make the dish healthier, you can substitute the cream cheese with Greek yogurt and use low-fat cheese.
Feel free to experiment with different types of cheese or add in other vegetables such as corn or black beans for additional texture and taste.
These stuffed peppers can also be made ahead of time and stored in the refrigerator before baking, making them a convenient option for busy days!
Buffalo Chicken Meatballs
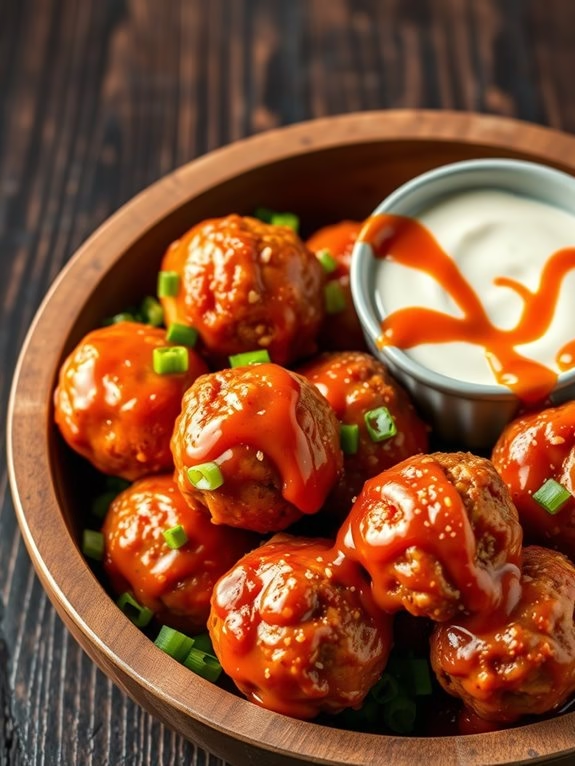
Buffalo Chicken Meatballs are a delicious and spicy twist on traditional chicken appetizers that are perfect for game day, parties, or as a tasty snack. These meatballs are packed with flavor, combining ground chicken with classic buffalo sauce and spices, then baked to perfection. The result is a mouthwatering dish that’s both tender and bursting with that signature buffalo kick.
Serve them with a side of blue cheese or ranch dressing for dipping, and you’ll have a crowd-pleasing appetizer that everyone will love.
This recipe is easy to follow and can be prepared in under an hour, making it a great option for busy cooks. With just a few simple ingredients, you can whip up a batch of Buffalo Chicken Meatballs that are certain to impress your guests. Whether you’re hosting a casual get-together or simply craving a spicy snack, these meatballs are an ideal choice. Let’s get started!
Ingredients (serving size: 4-6 people):
- 1 pound ground chicken
- 1/2 cup breadcrumbs
- 1/4 cup grated Parmesan cheese
- 1/4 cup finely chopped green onions
- 1 large egg
- 1/4 cup buffalo sauce (plus extra for tossing)
- 1 teaspoon garlic powder
- 1 teaspoon onion powder
- 1/2 teaspoon salt
- 1/4 teaspoon black pepper
- Cooking spray or olive oil for greasing the baking sheet
Cooking Instructions:
1. Preheat the Oven: Begin by preheating your oven to 400°F (200°C). Preheating the oven guarantees that your meatballs cook evenly and develop a nice golden color.
2. Prepare the Baking Sheet: Line a baking sheet with parchment paper or lightly grease it with cooking spray or olive oil. This will prevent the meatballs from sticking and make cleanup easier.
3. Mix the Ingredients: In a large mixing bowl, combine the ground chicken, breadcrumbs, grated Parmesan cheese, chopped green onions, egg, buffalo sauce, garlic powder, onion powder, salt, and black pepper.
Use your hands or a spoon to mix everything together until just combined. Be careful not to overmix, as this can make the meatballs tough.
4. Form the Meatballs: With your hands, scoop out about 2 tablespoons of the mixture and roll it into a ball. Place the formed meatballs onto the prepared baking sheet, spacing them about 1 inch apart. You should have around 20-24 meatballs.
5. Bake the Meatballs: Place the baking sheet in the preheated oven and bake for 20-25 minutes, or until the meatballs are cooked through and reach an internal temperature of 165°F (74°C). They should be nicely browned on the outside.
6. Toss in Buffalo Sauce: Once cooked, remove the meatballs from the oven. In a large bowl, toss the meatballs with additional buffalo sauce to coat them evenly. This step adds even more flavor and heat to your dish.
7. Serve: Transfer the buffalo chicken meatballs to a serving platter with your choice of dipping sauce, such as blue cheese or ranch dressing. Enjoy them warm!
Extra Tips: When making Buffalo Chicken Meatballs, feel free to adjust the amount of buffalo sauce to suit your heat preference. For a milder version, you can mix in some plain yogurt or mayonnaise to the buffalo sauce.
Additionally, if you’re looking to make these meatballs ahead of time, you can prepare and form them, then refrigerate or freeze them before baking. Just remember to adjust baking times if cooking from frozen!
Crispy Chicken Sliders
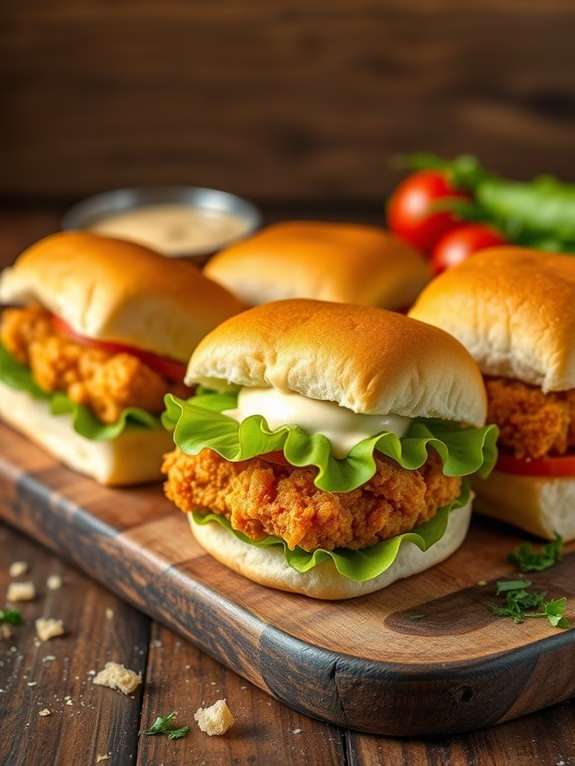
Crispy Chicken Sliders are the perfect easy appetizer for any gathering, party, or game day. These sliders feature tender, juicy chicken breasts that are coated in a seasoned, crispy breading and nestled between soft, buttery slider buns. They aren’t only delightful to eat but also customizable, allowing you to add your favorite toppings and sauces to elevate the flavor.
Whether you’re preparing them for a casual get-together or a celebratory feast, these sliders are sure to be a hit with everyone.
The process of making Crispy Chicken Sliders is straightforward, making it an excellent choice for cooks of all skill levels. With just a few ingredients and simple steps, you can create a delicious snack that’s both satisfying and easy to prepare. Serve them with a side of dipping sauce, and watch as they disappear from the platter in no time!
Ingredients (Serves 4-6 people):
- 1 pound boneless, skinless chicken breasts
- 1 cup all-purpose flour
- 2 large eggs
- 1 cup breadcrumbs (Panko or regular)
- 1 teaspoon garlic powder
- 1 teaspoon onion powder
- 1 teaspoon paprika
- Salt and pepper, to taste
- 6 slider buns
- Lettuce leaves (for garnish)
- Sliced tomatoes (for garnish)
- Mayonnaise or your favorite sauce (for serving)
Cooking Instructions:
- Prepare the Chicken: Start by cutting the chicken breasts into smaller pieces, about the size of the slider buns. This will help them cook evenly and fit perfectly in the buns. Pat the chicken dry with paper towels to guarantee the breading adheres well.
- Set Up the Breading Station: In three separate shallow dishes, set up a breading station. In the first dish, place the all-purpose flour mixed with a pinch of salt and pepper. In the second dish, beat the eggs until fully combined. In the third dish, combine the breadcrumbs, garlic powder, onion powder, paprika, and a little more salt and pepper.
- Bread the Chicken: Take each piece of chicken and first coat it in the flour, shaking off any excess. Then, dip it into the beaten eggs, allowing any excess egg to drip off. Finally, coat the chicken in the breadcrumb mixture, pressing gently to guarantee the breadcrumbs stick well. Repeat this process for all chicken pieces.
- Fry the Chicken: In a large skillet, heat about ½ inch of oil over medium-high heat. Once the oil is hot, carefully add the breaded chicken pieces in batches, making sure not to overcrowd the pan. Fry each side for about 3-4 minutes or until golden brown and cooked through (internal temperature should reach 165°F). Use a slotted spoon to transfer the chicken to a paper towel-lined plate to drain excess oil.
- Assemble the Sliders: Slice the slider buns in half. Place a piece of crispy chicken on the bottom half of each bun. Add lettuce and a slice of tomato, then spread mayonnaise or your favorite sauce on the top half of the bun. Place the top half of the bun on each slider to complete the assembly.
- Serve: Arrange the Crispy Chicken Sliders on a serving platter and enjoy them warm. They pair perfectly with a side of fries or your favorite dipping sauces.
Extra Tips: To add extra flavor to your Crispy Chicken Sliders, consider marinating the chicken in buttermilk for a few hours or overnight before breading. This will make the chicken even more tender and flavorful.
Additionally, feel free to experiment with different spices in the breadcrumb mixture or use different sauces for a unique twist. If you want a healthier option, you can bake the breaded chicken in a preheated oven at 400°F for about 20-25 minutes, flipping halfway through, until golden brown and crispy.
Chicken Nachos Supreme

Chicken Nachos Supreme is a delightful appetizer that brings together crispy tortilla chips, seasoned chicken, and a medley of delicious toppings. Perfect for game nights, parties, or casual family gatherings, this dish is easy to prepare and certain to impress your guests.
The combination of melted cheese, zesty salsa, and creamy guacamole creates an explosion of flavors that will leave everyone wanting more.
To make Chicken Nachos Supreme, you’ll start by preparing the chicken with a blend of spices, guaranteeing every bite is packed with flavor. Layering the ingredients on the tortilla chips not only makes for a visually appealing dish but also allows for a variety of textures and tastes in each serving.
Whether you’re a nacho novice or a seasoned pro, this recipe will guide you through creating a mouthwatering appetizer that everyone will love.
Ingredients (Serves 4-6):
- 1 pound boneless, skinless chicken breasts, cooked and shredded
- 1 tablespoon olive oil
- 1 packet taco seasoning
- 1 bag (12 oz) tortilla chips
- 2 cups shredded cheddar cheese
- 1 cup black beans, drained and rinsed
- 1 cup diced tomatoes
- ½ cup sliced jalapeños (optional)
- ½ cup sour cream
- ½ cup guacamole
- ¼ cup chopped fresh cilantro
- Salsa, for serving
Cooking Instructions:
- Cook the Chicken: In a skillet over medium heat, add the olive oil and shredded chicken. Sprinkle the taco seasoning over the chicken and stir to combine. Cook for about 5-7 minutes, allowing the chicken to heat through and absorb the spices. Remove from heat and set aside.
- Prepare the Tortilla Chips: On a large baking sheet, spread out the tortilla chips in an even layer. This will allow for even heating and guarantee that each chip is loaded with toppings.
- Layer the Ingredients: Evenly distribute the seasoned shredded chicken over the tortilla chips. Follow with the black beans and diced tomatoes. Make sure the toppings cover as much of the chips as possible for maximum flavor in every bite.
- Add the Cheese: Sprinkle the shredded cheddar cheese generously over the top of the nachos. The more cheese, the better!
- Bake the Nachos: Preheat your oven to 350°F (175°C). Place the baking sheet in the oven and bake for about 10-15 minutes or until the cheese is melted and bubbly. Keep an eye on them to prevent burning.
- Garnish and Serve: Once the nachos are out of the oven, top them with sliced jalapeños, sour cream, guacamole, and chopped cilantro. Serve with salsa on the side for dipping.
Extra Tips:
When preparing Chicken Nachos Supreme, feel free to customize the toppings to suit your preferences. You can add ingredients like corn, olives, or avocado for extra flavor.
If you’re looking for a spicier kick, consider using pepper jack cheese or adding hot sauce to the chicken mixture. Always serve immediately for the best texture and flavor, as nachos are best enjoyed while the chips are still crunchy and the cheese is warm and gooey.
Garlic Parmesan Chicken Bites

Garlic Parmesan Chicken Bites are the perfect appetizer for any gathering or family dinner. These flavorful bites are tender, juicy, and coated in a delicious blend of garlic, Parmesan cheese, and herbs, making them incredibly irresistible.
Whether you’re hosting a party, enjoying a cozy movie night, or just looking for a quick snack, these chicken bites are guaranteed to impress your guests and satisfy your cravings.
To prepare these chicken bites, you’ll need boneless, skinless chicken breast cut into bite-sized pieces, which are then marinated in a rich mixture of garlic and Parmesan. Baked to golden perfection, these bites can be served with a dipping sauce or enjoyed on their own. They aren’t only easy to make but also packed with flavor, making them a must-try recipe for any chicken lover.
Ingredients (Serves 4-6):
- 1 pound boneless, skinless chicken breasts, cut into bite-sized pieces
- 1/2 cup grated Parmesan cheese
- 1/2 cup breadcrumbs (preferably Italian-style)
- 4 cloves garlic, minced
- 1 teaspoon dried Italian herbs (oregano, basil, and thyme)
- 1/2 teaspoon salt
- 1/2 teaspoon black pepper
- 1/4 cup olive oil
- Fresh parsley, chopped (for garnish)
Cooking Instructions:
- Preheat the Oven: Start by preheating your oven to 400°F (200°C). This guarantees that the chicken bites cook evenly and become crispy as they bake.
- Prepare the Chicken: In a large bowl, combine the bite-sized chicken pieces with the minced garlic, olive oil, salt, and pepper. Toss everything together until the chicken is well-coated with the mixture. This step infuses the chicken with flavor before it’s breaded.
- Mix the Coating: In a separate bowl, mix together the grated Parmesan cheese, breadcrumbs, and dried Italian herbs. This mixture will create a flavorful crust that adds both texture and taste to the chicken bites.
- Coat the Chicken: Take each piece of marinated chicken and dredge it in the breadcrumb mixture, ensuring it’s fully coated. Place the coated chicken bites on a baking sheet lined with parchment paper. Make sure to leave space between each piece for even cooking.
- Bake: Place the baking sheet in the preheated oven and bake for 15-20 minutes, or until the chicken is golden brown and cooked through. You can check the internal temperature with a meat thermometer; it should read at least 165°F (75°C).
- Garnish and Serve: Once cooked, remove the chicken bites from the oven and let them cool slightly. Garnish with freshly chopped parsley for a pop of color and added flavor. Serve warm with your choice of dipping sauce, if desired.
Extra Tips:
For an extra layer of flavor, consider marinating the chicken in the garlic and olive oil mixture for at least 30 minutes before coating it with the breadcrumb mixture.
Additionally, you can experiment with different types of cheese or add a pinch of red pepper flakes to the breadcrumb mixture for a spicy kick.
These chicken bites are versatile, and you can also try serving them with a variety of dipping sauces like marinara, ranch, or a homemade garlic aioli for an added twist. Enjoy your cooking!
Chicken and Spinach Pinwheels
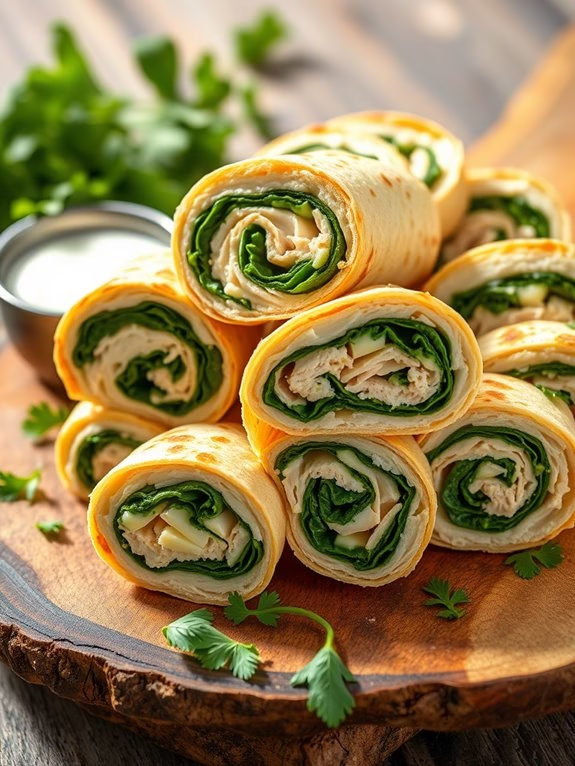
Chicken and Spinach Pinwheels are a delightful and versatile appetizer that can be served at any gathering, from casual get-togethers to elegant parties. The combination of tender chicken, creamy cheese, and nutritious spinach, all rolled up in a tortilla, creates a flavorful bite that’s sure to please a crowd.
Not only are they easy to prepare, but they can also be made ahead of time, making them a perfect choice for busy hosts. These pinwheels aren’t only visually appealing but also offer a satisfying mix of textures and flavors. The creaminess of the cheese complements the savory chicken and fresh spinach, while the tortilla provides a soft, chewy wrapper.
You can serve them cold or heat them up for a warm appetizer, allowing you to customize them to your event. Whether you’re enjoying a game day, a family gathering, or a holiday celebration, Chicken and Spinach Pinwheels will certainly be a hit.
Ingredients (Serves 4-6):
- 2 cups cooked chicken, shredded
- 1 cup fresh spinach, chopped
- 1 cup cream cheese, softened
- ½ cup shredded mozzarella cheese
- 1 teaspoon garlic powder
- 1 teaspoon onion powder
- 4 large flour tortillas
- Salt and pepper, to taste
- Optional: ½ cup diced red bell pepper for added color and crunch
Cooking Instructions:
- Prepare the Filling: In a large mixing bowl, combine the shredded chicken, chopped spinach, softened cream cheese, shredded mozzarella cheese, garlic powder, onion powder, salt, and pepper. If you’re adding diced red bell pepper, include it in this mix. Stir until all ingredients are well combined and evenly distributed.
- Assemble the Pinwheels: Lay one tortilla flat on a clean surface or cutting board. Spoon a generous amount of the chicken and spinach mixture onto the center of the tortilla. Using a spatula or the back of a spoon, spread the filling evenly, leaving a small border around the edges to prevent spilling when rolling.
- Roll the Tortilla: Starting from one edge of the tortilla, carefully roll it tightly away from you, ensuring the filling stays inside. Once fully rolled, gently press the edge to seal it. Repeat this process for the remaining tortillas and filling.
- Slice the Pinwheels: Using a sharp knife, slice each rolled tortilla into bite-sized pinwheels, about 1-2 inches thick. Arrange them on a serving platter, cut side up for presentation.
- Serve: You can serve the pinwheels immediately or chill them in the refrigerator for about 30 minutes to firm up, which can make them easier to cut and handle. If desired, serve with a dipping sauce, such as ranch dressing or a spicy aioli.
Extra Tips:
For a more flavorful twist, consider adding herbs like fresh dill or basil to the filling mixture. You can also experiment with different types of cheese or add other vegetables, such as grated carrots or zucchini, to increase the nutritional value.
If you’re making these pinwheels ahead of time, wrap them tightly in plastic wrap before refrigerating to keep them fresh and prevent them from drying out. Enjoy your delicious Chicken and Spinach Pinwheels!
Teriyaki Chicken Bites
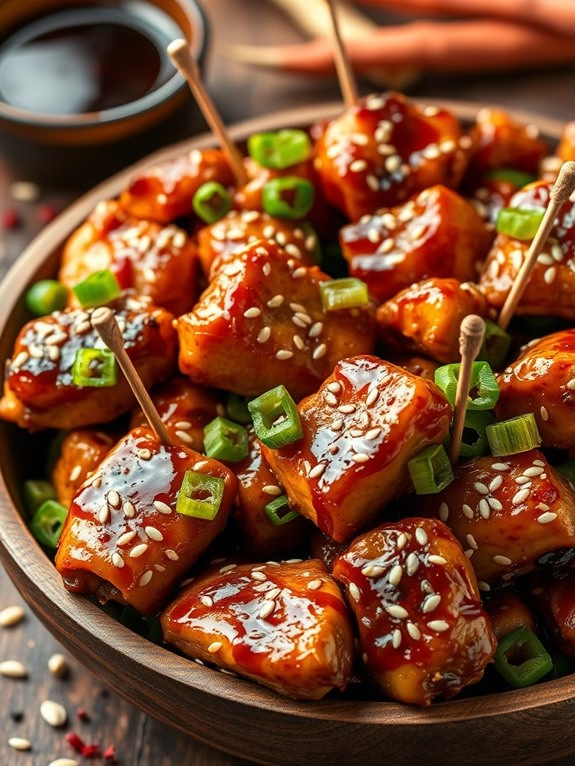
Teriyaki Chicken Bites
If you’re seeking a crowd-pleasing appetizer that’s both delicious and easy to prepare, search no further than Teriyaki Chicken Bites. These flavorful morsels are marinated in a sweet and savory teriyaki sauce, then baked or grilled to perfection. They’re perfect for parties, game days, or just a casual family gathering.
Not only are they simple to make, but they also pack a punch of flavor that will impress your guests. The combination of tender chicken, a rich teriyaki glaze, and a sprinkle of sesame seeds creates a delightful bite-sized treat that will have everyone coming back for more.
Serve them with toothpicks for easy eating and watch as they disappear within minutes. This recipe serves 4-6 people, making it an ideal option for any occasion.
Ingredients
- 1.5 lbs boneless, skinless chicken breasts, cut into bite-sized pieces
- 1/2 cup teriyaki sauce
- 2 tablespoons soy sauce
- 1 tablespoon honey
- 1 tablespoon olive oil
- 1 teaspoon garlic powder
- 1 teaspoon ginger powder
- 1/2 teaspoon black pepper
- 2 tablespoons sesame seeds (for garnish)
- 2 green onions, sliced (for garnish)
Cooking Instructions
1. Prepare the Marinade: In a large bowl, combine the teriyaki sauce, soy sauce, honey, olive oil, garlic powder, ginger powder, and black pepper. Whisk until all ingredients are well mixed. This marinade will infuse the chicken with a delicious flavor.
2. Marinate the Chicken: Add the bite-sized chicken pieces to the marinade and stir to coat all the pieces evenly. Cover the bowl with plastic wrap or transfer the mixture to a resealable bag. Let it marinate in the refrigerator for at least 30 minutes, or up to 2 hours for more intense flavor.
3. Preheat the Oven or Grill: If you’re baking, preheat your oven to 400°F (200°C). If you’re grilling, preheat your grill to medium-high heat. Preparing either method will guarantee that the chicken cooks evenly and develops a nice caramelization.
4. Bake or Grill the Chicken: If baking, spread the marinated chicken pieces on a lined baking sheet in a single layer. Bake for 15-20 minutes, or until the chicken is cooked through and slightly caramelized.
If grilling, thread the marinated chicken onto skewers and grill for about 10-12 minutes, turning occasionally, until the chicken is cooked through and has nice grill marks.
5. Garnish and Serve: Once cooked, remove the chicken from the oven or grill, and let it rest for a few minutes. Sprinkle sesame seeds and sliced green onions on top for a decorative and flavorful touch. Serve warm with extra teriyaki sauce on the side for dipping.
Extra Tips
For an extra layer of flavor, consider adding crushed red pepper flakes to the marinade for a hint of spice. You can also substitute chicken thighs for a juicier option if desired.
If you’re short on time, using store-bought teriyaki sauce can save you a few minutes. Finally, feel free to experiment by adding vegetables like bell peppers and onions to the skewers for a colorful and nutritious twist!
BBQ Chicken Flatbreads
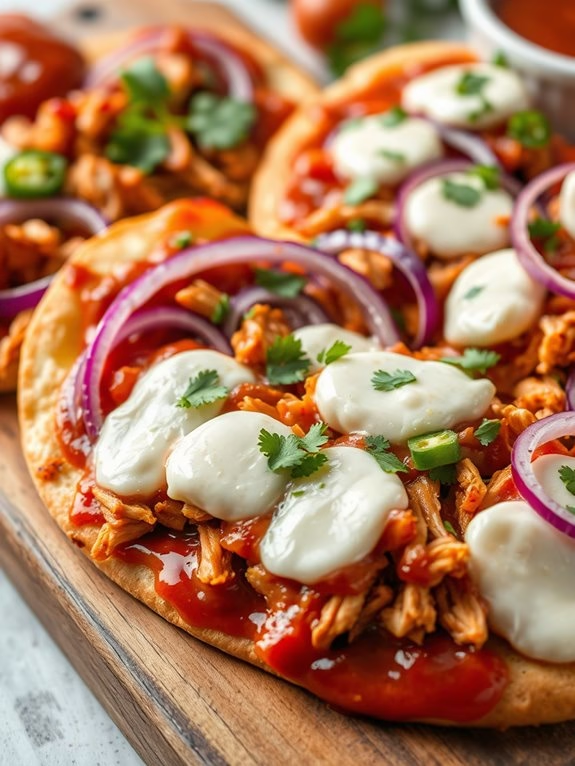
BBQ Chicken Flatbreads are a delightful appetizer that combines the smoky flavors of barbecue sauce and tender chicken with the crispy texture of flatbread. Perfect for gatherings or family dinners, these flatbreads aren’t only easy to prepare but also versatile, allowing you to customize the toppings to your liking.
Whether you’re using leftover chicken or cooking it fresh, this dish can be made in under 30 minutes, making it an ideal choice for those busy weeknights or last-minute entertaining.
The combination of tangy barbecue sauce, melty cheese, and fresh toppings such as cilantro or green onions adds a burst of flavor that will have your guests reaching for seconds. Serve them warm from the oven, and watch as they disappear in no time.
This recipe serves 4-6 people, making it perfect for sharing or enjoying as a meal on its own.
Ingredients:
- 2 cups cooked chicken, shredded (rotisserie chicken works great)
- 1 cup barbecue sauce
- 4 flatbreads or naan
- 1 cup shredded mozzarella cheese
- 1/2 cup red onion, thinly sliced
- 1/4 cup fresh cilantro, chopped (for garnish)
- 1/2 cup sliced jalapeños (optional, for a spicy kick)
- Olive oil (for brushing)
Cooking Instructions:
- Preheat the Oven: Start by preheating your oven to 400°F (200°C). This guarantees that the flatbreads will crisp up nicely when cooked.
- Prepare the Chicken: In a mixing bowl, combine the shredded chicken with the barbecue sauce. Make sure all the chicken is evenly coated in the sauce for maximum flavor.
- Prepare the Flatbreads: Take your flatbreads or naan and place them on a baking sheet. Lightly brush each flatbread with olive oil to enhance the crispiness and flavor during baking.
- Assemble the Flatbreads: Evenly distribute the BBQ chicken mixture over each flatbread, spreading it out to cover the surface. Sprinkle the shredded mozzarella cheese on top of the chicken, followed by the sliced red onions and jalapeños if you’re using them.
- Bake: Place the baking sheet in the preheated oven and bake for about 10-12 minutes or until the cheese is melted and bubbly and the edges of the flatbreads are golden brown.
- Garnish and Serve: Once done, remove the flatbreads from the oven. Let them cool for a minute, then garnish with fresh cilantro before slicing into pieces. Serve warm and enjoy!
Extra Tips:
For an extra layer of flavor, consider adding a drizzle of additional barbecue sauce over the top just before serving.
You can also experiment with different types of cheese, such as cheddar or pepper jack, to suit your taste preferences. If you have time, marinating the chicken in the barbecue sauce for a few hours before shredding can enhance the flavor even more.
Don’t hesitate to customize your toppings—pineapple, bell peppers, or even a sprinkle of feta cheese can offer a unique twist that your guests will love.
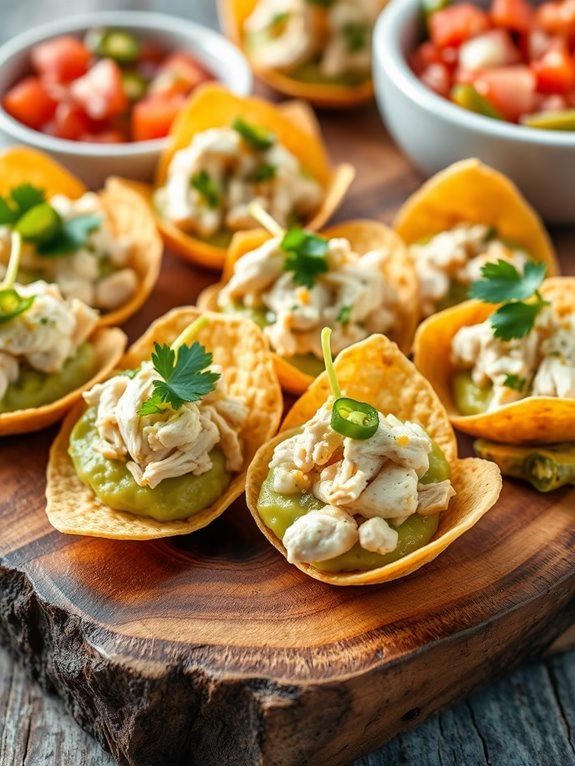
Chicken Avocado Bites

Easy Chicken Appetizers: Chicken Avocado Bites
Chicken Avocado Bites are the perfect finger food for any gathering, combining the rich flavors of chicken and creamy avocado in a bite-sized treat. These appetizers aren’t only delicious but also quick to prepare, making them an ideal choice for parties, game days, or casual get-togethers.
The combination of tender chicken, zesty lime, and smooth avocado creates a delightful flavor profile that will impress your guests. This recipe is also versatile; you can customize it with your favorite spices or add toppings like cilantro or diced tomatoes for an extra burst of flavor.
With minimal cooking time and simple ingredients, Chicken Avocado Bites are sure to become a favorite in your appetizer repertoire.
Ingredients (Serves 4-6 people):
- 2 cups cooked chicken, shredded
- 2 ripe avocados, halved and pitted
- 1 lime, juiced
- 1 teaspoon garlic powder
- 1 teaspoon onion powder
- 1 teaspoon salt
- ½ teaspoon black pepper
- ¼ teaspoon cayenne pepper (optional)
- 1 tablespoon fresh cilantro, chopped (optional)
- Tortilla chips or crackers for serving
Cooking Instructions:
- Prepare the Chicken: If you haven’t already cooked the chicken, you can use rotisserie chicken for convenience. Shred the chicken into small pieces and place it in a mixing bowl. If using raw chicken, boil or bake it until fully cooked, then shred.
- Mash the Avocado: In a separate bowl, scoop out the flesh of the avocados and mash it with a fork until creamy but still slightly chunky. This will provide a nice texture to the bites.
- Combine Ingredients: Add the shredded chicken to the mashed avocado. Then, squeeze the lime juice over the mixture. This not only adds flavor but also helps prevent the avocado from browning. Stir in garlic powder, onion powder, salt, black pepper, and cayenne pepper (if using) until everything is well combined.
- Taste and Adjust: Before serving, taste the mixture and adjust seasoning as needed. You may want to add more lime juice or salt, depending on your preference.
- Serve: Spoon the chicken and avocado mixture onto tortilla chips or crackers. Garnish with fresh cilantro if desired, and serve immediately to enjoy the fresh flavors.
Extra Tips:
For a little extra flair, consider adding diced tomatoes or jalapeños into the chicken and avocado mixture for added flavor and texture.
To make the preparation even easier, you can prepare the chicken and avocado mixture in advance and store it in the refrigerator until you’re ready to serve. Just be sure to cover it tightly to keep the avocado from browning.
Enjoy your Chicken Avocado Bites with a side of salsa or a tangy dipping sauce for an added kick!