
We all know how hectic mornings can be, but breakfast doesn’t have to be a chore. Sweet breakfast bites can be your saving grace on those busy days. Picture starting your day with Nutty Banana Pancake Bites or a Zesty Lemon Poppy Seed Mini Muffin. These treats are quick to prepare and easy to customize for your taste. Ready to explore some deliciously simple breakfast ideas?
Quick and Easy Sweet Breakfast Bites

Start your morning off with a burst of creativity and flavor by preparing Nutty Banana Pancake Bites. These delightful little morsels are perfect for those who crave a sweet start to their day but don’t want to spend hours in the kitchen. Quick, easy, and absolutely delicious, these pancake bites are filled with the comforting flavors of bananas and the rich texture of nuts, making them an immediate hit with both adults and children alike.
Serve them with a drizzle of honey or a dollop of yogurt for an extra touch of indulgence. Perfect for serving 4-6 people, these Nutty Banana Pancake Bites aren’t only easy to make but also versatile enough to suit various dietary needs. Whether you’re hosting a brunch or just looking for a way to make your mornings a bit more special, this recipe is sure to satisfy your cravings.
The combination of ripe bananas and crunchy nuts will have everyone coming back for seconds, while the bite-sized portions make them a delightful and convenient breakfast option.
Ingredients:
- 2 cups all-purpose flour
- 2 tablespoons sugar
- 1 tablespoon baking powder
- 1/2 teaspoon salt
- 2 ripe bananas, mashed
- 1 cup milk
- 2 large eggs
- 1 teaspoon vanilla extract
- 1/4 cup melted butter
- 1/2 cup chopped nuts (such as walnuts or pecans)
- Cooking spray or additional butter for frying
Cooking Instructions:
- Prepare the Batter: In a large mixing bowl, whisk together the all-purpose flour, sugar, baking powder, and salt. In a separate bowl, combine the mashed bananas, milk, eggs, vanilla extract, and melted butter. Gradually pour the wet ingredients into the dry ingredients, stirring gently until just combined. Be careful not to overmix to avoid tough pancake bites.
- Incorporate the Nuts: Gently fold in the chopped nuts until they’re evenly distributed throughout the batter. This will give the pancake bites a delightful crunch and enhance their nutty flavor.
- Heat the Pan: Preheat a non-stick skillet or griddle over medium heat. Lightly coat the surface with cooking spray or a small amount of butter to prevent sticking and to add a golden-brown finish to the bites.
- Cook the Bites: Using a tablespoon or small ice cream scoop, drop spoonfuls of batter onto the hot skillet. Cook for about 2 minutes on one side, or until bubbles form on the surface and the edges look set. Carefully flip each bite and cook for an additional 1-2 minutes, until golden brown and cooked through.
- Keep Warm: Transfer the cooked pancake bites to a plate and cover with a clean towel to keep warm while you cook the remaining batter. Repeat the process until all the batter is used up.
- Serve and Enjoy: Once all the pancake bites are ready, serve them warm with your choice of toppings such as honey, maple syrup, yogurt, or fresh fruit.
Extra Tips:
For an extra burst of flavor, consider adding a pinch of cinnamon or nutmeg to the batter. If you’re making these bites for a crowd, you can keep them warm in a preheated oven at 200°F (93°C) while you cook the rest.
Feel free to experiment with different types of nuts or even add chocolate chips for a sweeter twist. The texture can be adjusted by adding a bit more milk if the batter seems too thick or a bit of flour if it’s too thin. Enjoy experimenting with these versatile and delightful breakfast bites!
Delightful Berry Granola Bars
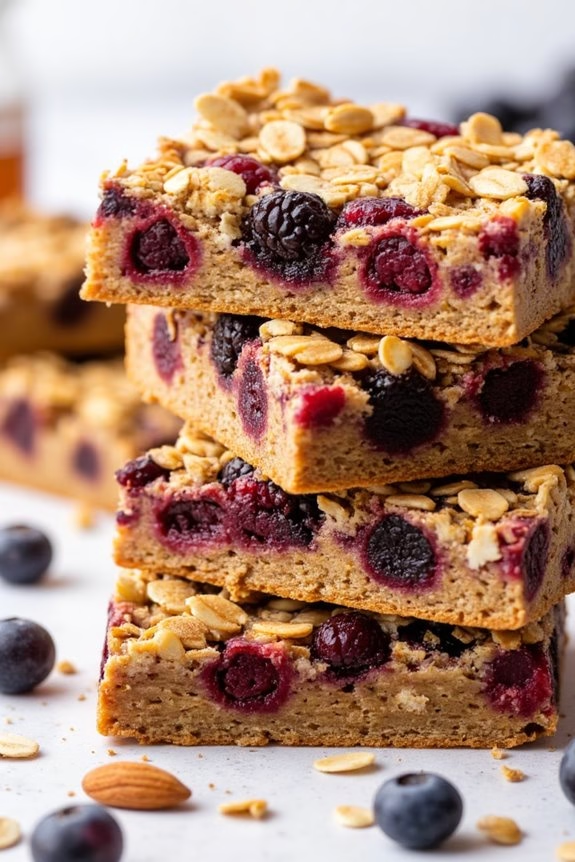
Jumpstart your day with these scrumptious Delightful Berry Granola Bars. Perfect for a quick breakfast on the go or a delightful snack, these bars combine the natural sweetness of berries with the satisfying crunch of granola. Packed with fiber, antioxidants, and a hint of honey, they’re as nutritious as they’re delicious.
These bars are a great way to enjoy the fruity flavors of the season in every bite. Whether you’re packing a lunchbox, preparing for a road trip, or simply craving a sweet breakfast treat, these granola bars are bound to please. Not only are they easy to make, but they also store well, making them a convenient option for busy mornings.
With a blend of oats, nuts, and a variety of berries, they offer a wholesome, energy-boosting start to your day.
Ingredients for 4-6 People:
- 2 cups rolled oats
- 1 cup mixed berries (such as blueberries, raspberries, and chopped strawberries)
- 1/2 cup honey
- 1/4 cup unsalted butter
- 1/4 cup brown sugar
- 1 teaspoon vanilla extract
- 1/2 cup chopped almonds
- 1/2 cup dried cranberries
- 1/4 teaspoon salt
Cooking Instructions:
- Preheat the Oven: Start by preheating your oven to 350°F (175°C). This guarantees the oven is at the right temperature when you’re ready to bake the bars.
- Prepare the Baking Pan: Line an 8×8-inch baking pan with parchment paper, leaving some overhang on the sides. This will make it easier to lift the bars out once they’re baked.
- Melt the Wet Ingredients: In a small saucepan over medium heat, combine the honey, unsalted butter, and brown sugar. Stir continuously until the butter is melted, and the sugar is fully dissolved. Remove from heat and stir in the vanilla extract.
- Mix Dry Ingredients: In a large mixing bowl, combine the rolled oats, chopped almonds, dried cranberries, and salt. Mix well to make sure the ingredients are evenly distributed.
- Combine Everything: Pour the melted honey mixture over the dry ingredients. Stir until the oats and nuts are fully coated. Gently fold in the mixed berries, being careful not to crush them too much.
- Transfer to Baking Pan: Pour the mixture into the prepared baking pan. Use a spatula or the back of a spoon to press the mixture firmly and evenly into the pan.
- Bake: Place the pan in the preheated oven and bake for 25-30 minutes, or until the edges are golden brown.
- Cool and Slice: Once baked, remove the pan from the oven and let it cool completely on a wire rack. Use the parchment paper overhang to lift the bars out of the pan. Place them on a cutting board and slice into bars of your desired size.
Extra Tips:
For a more personalized touch, feel free to swap in your favorite nuts or dried fruits. If you prefer a chewier bar, reduce the baking time slightly, and for a crunchier texture, bake a few minutes longer.
These bars can be stored in an airtight container at room temperature for up to a week or frozen for longer storage. Enjoy them as is, or pair with yogurt for a more substantial breakfast.
Fruity Chia Overnight Oats
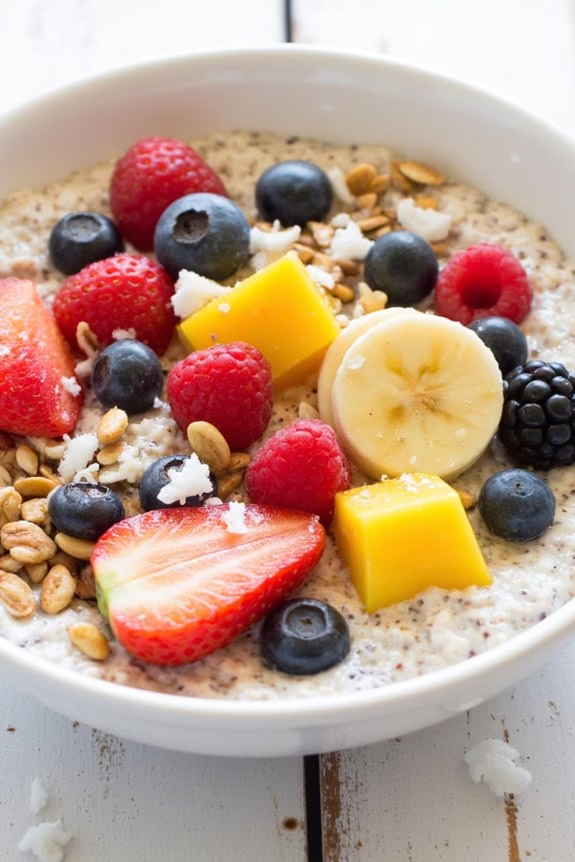
Transform your typical breakfast routine with Fruity Chia Overnight Oats, a delightful and healthy way to start your day. This dish combines creamy oats, nutrient-rich chia seeds, and a medley of fresh fruits, creating a colorful and flavorful breakfast that’s both satisfying and nourishing.
Prepared the night before, this recipe is perfect for busy mornings when you need a quick grab-and-go meal that’s both delicious and nutritious.
Fruity Chia Overnight Oats isn’t only easy to make but also highly customizable, allowing you to tailor it to your personal taste preferences. The chia seeds add a unique pudding-like texture and are packed with omega-3 fatty acids, providing a healthful boost to your morning meal.
The addition of fresh fruits like berries, bananas, or mangoes elevates the dish with natural sweetness and a burst of vitamins. This recipe is designed to serve 4-6 people, making it an ideal choice for family breakfasts or meal prepping for the week ahead.
Ingredients (Serves 4-6):
- 2 cups rolled oats
- 1/4 cup chia seeds
- 4 cups almond milk (or milk of choice)
- 1/2 cup Greek yogurt (optional)
- 2 tablespoons honey or maple syrup
- 1 teaspoon vanilla extract
- 1 cup mixed berries (e.g., strawberries, blueberries, raspberries)
- 1 banana, sliced
- 1 mango, diced
- 1/4 cup chopped nuts (e.g., almonds, walnuts)
- 1/4 cup shredded coconut (optional)
Cooking Instructions:
1. Mix the Base Ingredients: In a large mixing bowl, combine the rolled oats, chia seeds, almond milk, Greek yogurt (if using), honey or maple syrup, and vanilla extract. Stir well until all ingredients are fully integrated.
The mixture will be quite liquidy, but the oats and chia seeds will absorb much of the liquid overnight.
2. Prepare the Fruit: Rinse the berries under cold water and pat them dry. Slice the banana and dice the mango. Set the prepared fruits aside. You can choose to mix them into the oat mixture now or add them fresh in the morning.
3. Combine and Refrigerate: If you prefer the fruit mixed in, gently fold the berries, banana slices, and mango into the oat mixture. Pour the mixture into a large airtight container or individual serving jars.
If you haven’t added the fruit yet, you can top the oats with them the next morning. Seal the container or jars and refrigerate overnight, or for at least 6 hours.
4. Serve and Garnish: In the morning, give the oats a good stir. Portion into bowls if using a large container. Add additional toppings such as chopped nuts and shredded coconut to enhance the flavor and texture.
Feel free to drizzle extra honey or maple syrup for added sweetness.
Extra Tips:
For the best texture, verify your oats and chia seeds have had enough time to absorb the liquid, turning into a creamy consistency. If you prefer your oats looser, feel free to add a splash more milk before serving.
You can also experiment with different fruit combinations, such as peaches and nectarines or apples and cinnamon, to keep the breakfast exciting day after day. These oats can be stored in the refrigerator for up to four days, making them an excellent option for meal prep.
Decadent Chocolate Chip Muffin Bites
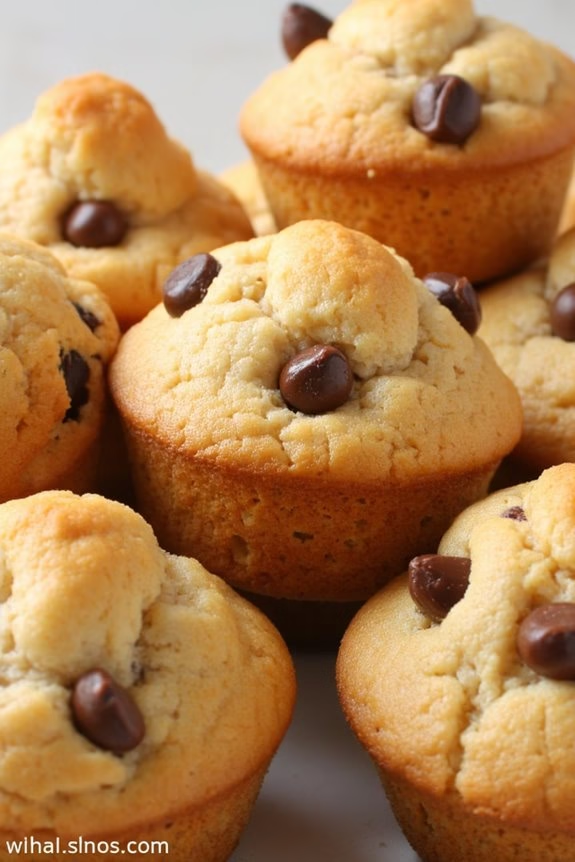
Decadent Chocolate Chip Muffin Bites are a delightful way to start your morning with a touch of sweetness. These mini muffins are packed with rich chocolate chips and have a tender, fluffy texture that’s sure to please any breakfast lover. Perfect for a breakfast gathering or just a quick morning treat, these bites offer the comforting taste of a classic muffin, but in a fun, bite-sized form.
They’re easy to prepare and bake, making them a practical choice for busy mornings when you want something homemade but don’t have much time to spare.
The beauty of these muffin bites lies in their versatility. You can enjoy them warm, right out of the oven, or save them for later as a delicious snack. They pair wonderfully with a warm cup of coffee or a glass of milk, and they can even be customized with your favorite add-ins, like nuts or dried fruit, to make them even more special.
Whether you’re serving them to friends and family or savoring them all by yourself, these Decadent Chocolate Chip Muffin Bites are bound to become a beloved breakfast staple.
Ingredients (Serves 4-6)
- 1 3/4 cups all-purpose flour
- 1/2 cup granulated sugar
- 2 teaspoons baking powder
- 1/2 teaspoon salt
- 1/2 cup unsalted butter, melted and slightly cooled
- 1/2 cup milk
- 1 teaspoon vanilla extract
- 2 large eggs
- 1 cup semisweet chocolate chips
Cooking Instructions
- Preheat the Oven: Begin by preheating your oven to 375°F (190°C). This guarantees that your oven is at the right temperature when you’re ready to bake the muffin bites.
- Prepare the Muffin Tin: Lightly grease a mini muffin tin with butter or non-stick spray, or line it with mini muffin paper liners. This will prevent the muffin bites from sticking and make clean-up easier.
- Mix Dry Ingredients: In a large mixing bowl, whisk together the flour, sugar, baking powder, and salt. This step is essential for evenly distributing the leavening agent and guaranteeing a consistent texture.
- Combine Wet Ingredients: In another bowl, whisk together the melted butter, milk, vanilla extract, and eggs until they’re well combined. Make sure the butter isn’t too hot to avoid cooking the eggs.
- Create the Batter: Pour the wet ingredients into the bowl with the dry ingredients. Stir gently with a spatula or wooden spoon until just combined. It’s important not to overmix, as this can result in tough muffins.
- Fold in Chocolate Chips: Gently fold in the chocolate chips, ensuring they’re evenly distributed throughout the batter.
- Fill the Muffin Tin: Spoon the batter into the prepared mini muffin tin, filling each cup about 3/4 full. This allows room for the muffins to rise without overflowing.
- Bake: Place the muffin tin in the preheated oven and bake for 10-12 minutes, or until a toothpick inserted into the center comes out clean or with a few moist crumbs.
- Cool and Serve: Allow the muffin bites to cool in the tin for about 5 minutes before transferring them to a wire rack. Serve warm or at room temperature.
Extra Tips
For an extra burst of flavor, consider adding a teaspoon of cinnamon or a tablespoon of orange zest to the batter. If you’re looking to make these muffins even more indulgent, try adding a sprinkle of coarse sugar on top before baking for a sweet crunch.
Additionally, these muffin bites can be frozen and reheated in the microwave for a quick breakfast on the go. Simply allow them to cool completely, place them in a freezer-safe bag, and store for up to three months. When ready to enjoy, thaw at room temperature or gently warm them in the microwave.
Energizing Nut Butter and Banana Wraps
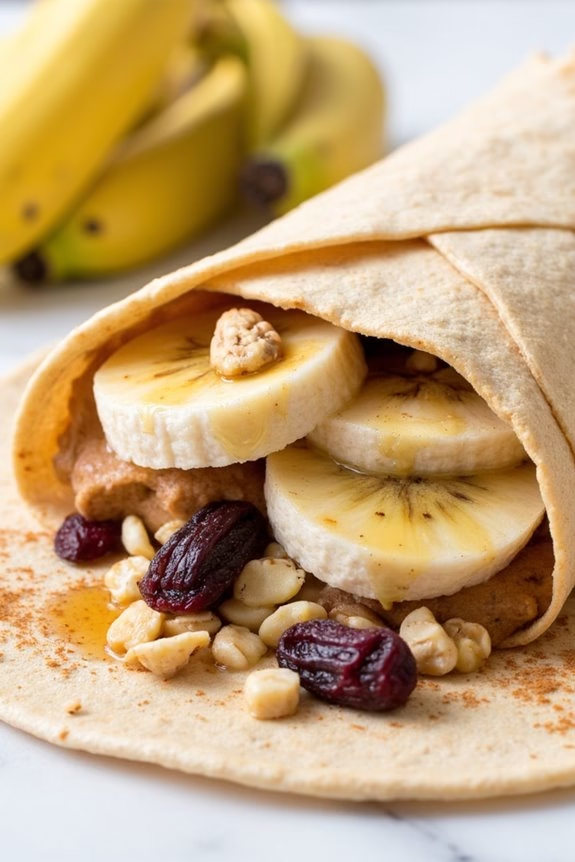
Start your day with a burst of energy and flavor with these delightful Energizing Nut Butter and Banana Wraps. This simple yet satisfying breakfast recipe combines the creamy richness of nut butter with the natural sweetness of bananas, all wrapped up in a soft tortilla.
Perfect for busy mornings, these wraps aren’t only quick to prepare but also packed with nutrients that will keep you fueled throughout the day. Whether you’re looking for a nutritious breakfast option or a delicious snack, these wraps are sure to become a favorite in your household.
Designed to serve 4-6 people, this recipe is versatile enough to accommodate individual preferences. You can use your favorite type of nut butter, whether it’s classic peanut butter, almond butter, or even a combination of several.
The bananas provide a natural sweetness that pairs beautifully with the nutty flavors, while the tortillas offer a soft and foldable base to encase all the goodness. With minimal ingredients and effortless preparation, these wraps are a go-to option for anyone looking to enjoy a wholesome meal without spending too much time in the kitchen.
Ingredients (Serves 4-6):
- 4 large tortillas
- 1 cup of nut butter (peanut, almond, or your choice)
- 4 medium-sized ripe bananas
- 2 tablespoons honey (optional)
- 1 teaspoon ground cinnamon
- 1/4 cup chopped nuts (almonds, walnuts, or pecans)
- 1/4 cup dried cranberries or raisins
Instructions:
- Prepare the Ingredients: Begin by laying out all the ingredients on your countertop. This will make the assembly process smoother and faster. Peel the bananas and slice them thinly.
- Spread the Nut Butter: Place one tortilla on a flat surface. Use a knife or spatula to spread a generous layer of your chosen nut butter over the entire surface of the tortilla. Verify the nut butter is evenly distributed to each edge.
- Add the Bananas: Arrange the banana slices evenly over the nut butter layer. Try to cover as much surface area as possible to verify each bite includes banana.
- Drizzle with Honey and Cinnamon: If desired, drizzle a small amount of honey over the bananas for added sweetness. Sprinkle a pinch of ground cinnamon over the top to enhance the flavor profile.
- Sprinkle Nuts and Dried Fruits: Evenly distribute the chopped nuts and dried cranberries or raisins over the bananas. These add a delightful crunch and burst of flavor.
- Roll the Wraps: Starting from one end, carefully roll the tortilla tightly to encase all the filling. Verify the wrap is firm but not overly tight to avoid squishing the bananas out.
- Slice and Serve: Once rolled, use a sharp knife to slice the wrap into smaller segments, about 2-3 inches each, for easy serving. Arrange the slices on a plate and serve immediately.
Extra Tips:
For a gluten-free option, substitute regular tortillas with gluten-free ones. If you prefer a lower-calorie version, opt for low-calorie wraps or whole grain tortillas.
You can also experiment with additional toppings like chia seeds or shredded coconut for extra texture and flavor. If you’re prepping these wraps in advance, store them in an airtight container in the refrigerator to maintain their crispness.
Enjoy these wraps cold or at room temperature for a revitalizing breakfast or snack.
No-Bake Almond Joy Energy Balls
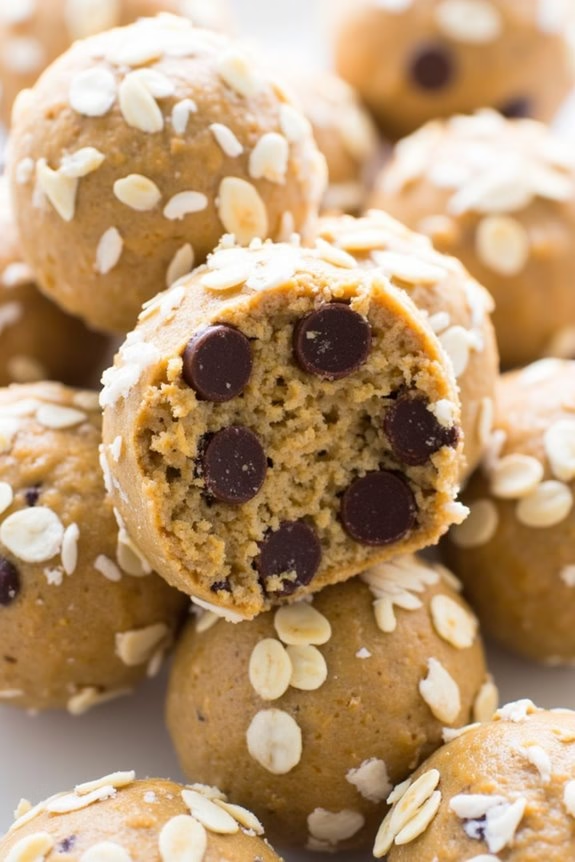
No-Bake Almond Joy Energy Balls are the perfect sweet breakfast bites for those looking to start their day with a burst of energy and flavor. These delightful morsels are inspired by the classic Almond Joy candy bar, offering a delicious combination of almond, coconut, and chocolate flavors without any baking required.
They’re easy to make, require minimal ingredients, and are perfect for a quick breakfast on the go or a mid-morning snack that will keep you satisfied and energized.
These energy balls aren’t only tasty but also packed with nutrients, making them a healthy choice to fuel your morning. With a base of rolled oats and almond butter, they provide a good source of fiber and healthy fats. The addition of shredded coconut, dark chocolate chips, and almonds adds texture and flavor, while honey provides natural sweetness.
Best of all, these No-Bake Almond Joy Energy Balls can be prepared in just a few minutes and stored in the refrigerator for up to a week, making them a convenient option for busy mornings.
Ingredients (serving size: 4-6 people):
- 1 cup rolled oats
- 1/2 cup almond butter
- 1/3 cup honey
- 1/2 cup shredded coconut
- 1/4 cup dark chocolate chips
- 1/4 cup chopped almonds
- 1 teaspoon vanilla extract
- 1/4 teaspoon salt
Cooking Instructions:
- Prepare the Mixture: In a large mixing bowl, combine the rolled oats, almond butter, honey, shredded coconut, dark chocolate chips, chopped almonds, vanilla extract, and salt. Mix well until all the ingredients are thoroughly combined and a sticky dough forms.
- Shape the Balls: Using your hands, take about a tablespoon of the mixture and roll it into a small ball. Repeat this process until all the mixture has been used. You should end up with approximately 20-24 energy balls, depending on the size you make them.
- Chill the Balls: Place the energy balls on a baking sheet lined with parchment paper. Refrigerate them for at least 30 minutes to allow them to firm up and hold their shape.
- Store and Serve: Once the energy balls have chilled, transfer them to an airtight container. Store them in the refrigerator for up to a week. Serve chilled or at room temperature for a convenient and delicious breakfast bite.
Extra Tips:
For an added flavor boost, try toasting the shredded coconut before mixing it into the dough. This will enhance the coconut’s natural flavor and add a slight crunch to the energy balls.
If you prefer a sweeter taste, you can increase the amount of honey or substitute it with maple syrup for a different flavor profile. Additionally, feel free to customize these energy balls by adding other ingredients like chia seeds, flaxseeds, or dried fruits to suit your taste preferences.
Breakfast Quesadillas With a Sweet Twist
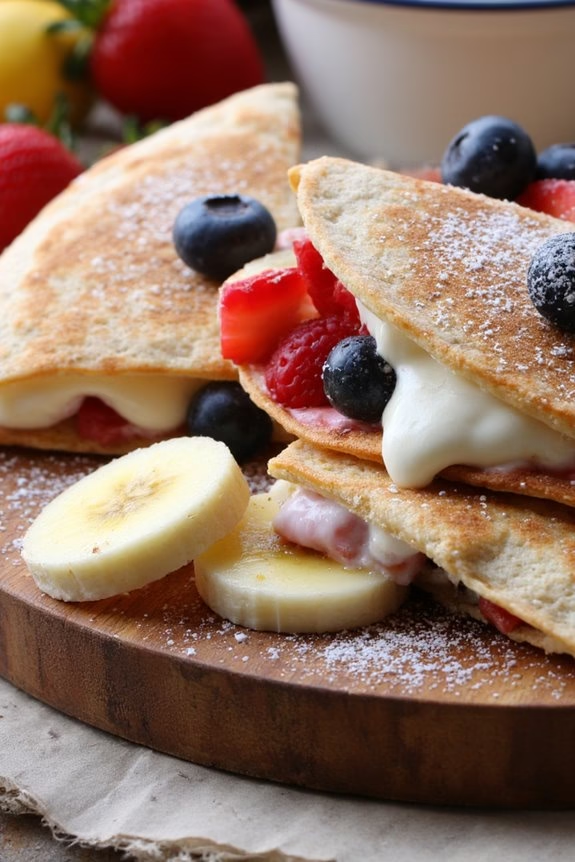
Start your morning with a delightful surprise by preparing Breakfast Quesadillas with a Sweet Twist. Combining the classic idea of a quesadilla with the indulgence of sweet ingredients, these breakfast bites are sure to make your morning brighter. Perfect for families or anyone looking to shake up their breakfast routine, these quesadillas are easy to prepare and offer a deliciously unexpected combination of flavors.
They’re perfect for a brunch gathering or a cozy breakfast at home, providing a quick and satisfying meal that everyone can enjoy.
These sweet breakfast quesadillas are a blend of creamy ricotta cheese, fresh fruit, and a hint of cinnamon, all enveloped in a crisp tortilla shell. The balance between the rich, creamy filling and the lightly toasted tortilla creates a harmony of textures that will leave you craving more.
Whether you’re a fan of traditional breakfast foods or seeking something new, this recipe offers an exciting twist that will delight both kids and adults alike.
Ingredients (Serves 4-6):
- 6 large flour tortillas
- 1 cup ricotta cheese
- 3 tablespoons honey
- 1 teaspoon cinnamon
- 2 cups mixed berries (such as strawberries, blueberries, and raspberries)
- 1 banana, sliced
- Butter, for cooking
- Optional: powdered sugar, for dusting
Cooking Instructions:
- Prepare the Ricotta Mixture: In a medium-sized bowl, combine the ricotta cheese, honey, and cinnamon. Mix well until the ingredients are fully incorporated and the mixture is smooth.
- Assemble the Quesadillas: Lay out the tortillas on a clean surface. Spread about 2 tablespoons of the ricotta mixture evenly over one half of each tortilla. Divide the mixed berries and banana slices evenly among the tortillas, placing them on top of the ricotta spread.
- Fold the Tortillas: Carefully fold each tortilla in half, pressing gently to confirm they hold together.
- Cook the Quesadillas: Heat a nonstick skillet or griddle over medium heat. Add a small amount of butter to the pan, allowing it to melt and coat the surface. Place the folded quesadillas in the skillet, cooking them in batches if necessary. Cook for 2-3 minutes on each side, or until the tortillas are golden brown and crispy.
- Serve: Remove the quesadillas from the skillet and let them cool slightly. If desired, dust with powdered sugar before serving. Cut each quesadilla into wedges and serve immediately.
Extra Tips:
For an extra indulgent touch, consider adding a drizzle of melted chocolate or a sprinkle of your favorite nuts for added crunch. If you prefer a different type of cheese, mascarpone or cream cheese can be used as alternatives to ricotta.
Feel free to experiment with different fruits depending on what’s in season or your personal preferences—peaches, kiwi, or mango would all make delicious substitutions. Finally, to save time in the morning, you can prepare the ricotta mixture and chop the fruits the night before, keeping them in the refrigerator until you’re ready to assemble the quesadillas.
Greek Yogurt Parfaits With Honey Drizzle
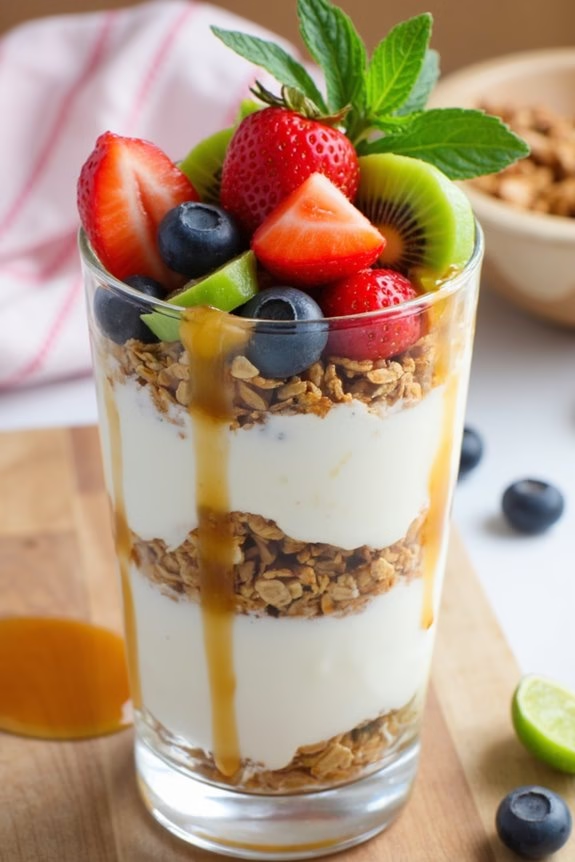
Start your morning with a delightful and healthy treat by preparing Greek Yogurt Parfaits With Honey Drizzle. These parfaits are layered with creamy Greek yogurt, crunchy granola, and vibrant fresh fruits, all topped off with a sweet honey drizzle that ties the flavors together.
Not only are these parfaits visually appealing, but they’re also packed with protein and nutrients, making them an ideal breakfast choice to fuel your day. Perfect for a brunch gathering or a quick family breakfast, these parfaits can be prepared in advance and assembled just before serving.
Customize them with your favorite seasonal fruits and granola flavors for a personalized touch. This recipe serves 4-6 people, providing a delightful balance of sweet and tangy flavors that will leave everyone satisfied.
Ingredients for 4-6 servings:
- 3 cups Greek yogurt
- 2 cups granola
- 2 cups mixed fresh fruits (e.g., berries, sliced bananas, or kiwi)
- 1/4 cup honey
- 1 teaspoon vanilla extract
- Optional: mint leaves for garnish
Cooking Instructions:
- Prepare the Yogurt Mixture: In a mixing bowl, combine the Greek yogurt with the vanilla extract. Stir well until the vanilla is evenly integrated into the yogurt for a subtle aromatic flavor.
- Layer the Parfaits: Start by placing a spoonful of the yogurt mixture at the bottom of each serving glass or bowl. Add a layer of granola on top of the yogurt, followed by a layer of mixed fresh fruits. Repeat the layers until the glasses or bowls are filled, finishing with a layer of fruits on top.
- Drizzle with Honey: Just before serving, drizzle honey generously over the top layer of fruits. The honey will add a natural sweetness and a lovely sheen to the parfaits.
- Garnish and Serve: If desired, garnish each parfait with a sprig of fresh mint for an added touch of freshness and color. Serve immediately to enjoy the perfect combination of creamy, crunchy, and fruity textures.
Extra Tips:
For an enhanced flavor profile, consider toasting the granola in the oven for a few minutes until golden brown. This not only adds a deeper nutty flavor but also makes the granola extra crunchy.
Be creative with the fruits you choose; seasonal and ripe fruits will offer the best taste and nutritional value. If preparing ahead of time, assemble the parfaits without the granola and honey, and add them right before serving to maintain the granola’s crunchiness.
Crispy Cinnamon Apple Toast
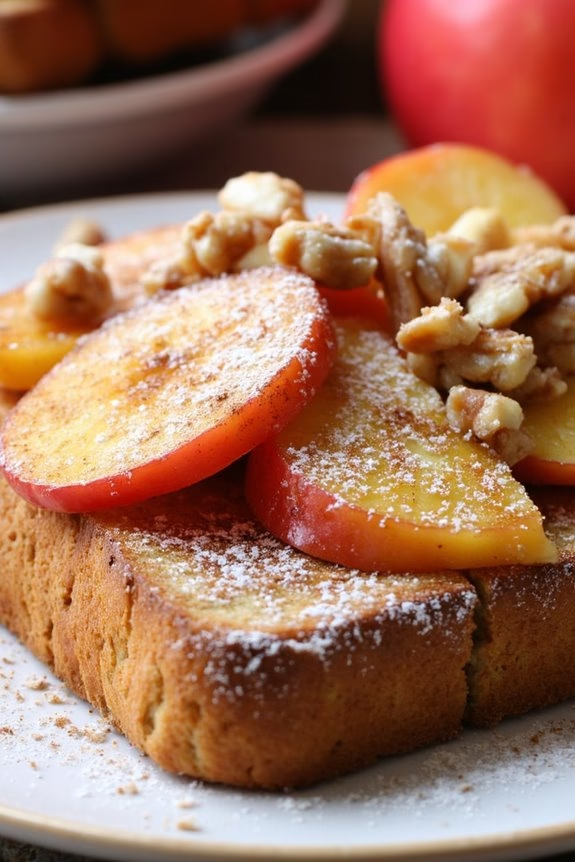
Start your day with a delightful twist on traditional toast by making Crispy Cinnamon Apple Toast. This dish combines the comforting flavors of cinnamon and apple with the satisfying crunch of toasted bread, creating a breakfast treat that’s both sweet and savory.
Perfect for a weekend brunch or a cozy morning at home, this recipe is easy to prepare and will fill your kitchen with the warm, inviting aroma of cinnamon and baked apples.
The recipe serves 4-6 people, making it an ideal choice for a family breakfast or a gathering with friends. With a few simple ingredients, you can transform ordinary bread into a gourmet delight that’s bound to impress and satisfy everyone at the table. The combination of textures and flavors makes this dish a standout choice for any breakfast menu.
Ingredients (Serves 4-6):
- 6 slices of thick bread (such as brioche or sourdough)
- 3 large apples (such as Granny Smith or Honeycrisp)
- 3 tablespoons unsalted butter
- 3 tablespoons granulated sugar
- 2 teaspoons ground cinnamon
- 1 teaspoon vanilla extract
- 1/2 cup chopped walnuts (optional)
- Powdered sugar for dusting (optional)
Cooking Instructions:
- Prepare the Apples: Begin by washing, peeling, and thinly slicing the apples. Aim for uniform slices to guarantee even cooking.
- Make the Apple Topping: In a large skillet over medium heat, melt the butter. Add the apple slices, sugar, and cinnamon, stirring to coat the apples evenly. Cook for about 8-10 minutes, or until the apples are tender and caramelized. Add the vanilla extract and stir well. Remove from heat and set aside.
- Toast the Bread: While the apples are cooking, preheat your oven to 350°F (175°C). Place the bread slices on a baking sheet and toast them in the oven for about 5 minutes on each side, or until they’re golden brown and crispy.
- Assemble the Toast: Once the bread is toasted and the apples are ready, spoon the apple mixture over each slice of toast. Make sure to distribute the apples evenly among the slices.
- Add Toppings: If desired, sprinkle chopped walnuts over the apples for added crunch and flavor.
- Serve and Enjoy: Dust the top of each toast with powdered sugar for a touch of sweetness and serve immediately while still warm.
Extra Tips:
For a richer flavor, consider using a flavored bread such as cinnamon raisin or adding a drizzle of honey over the finished toast.
If you’re looking for a dairy-free option, substitute the butter with coconut oil. This dish can also be customized with different types of nuts or even a dollop of whipped cream for an indulgent touch.
Storing leftovers is easy; just keep the apple mixture and toast separate in airtight containers and reheat them before serving for a fresh taste.
Maple Oatmeal Squares
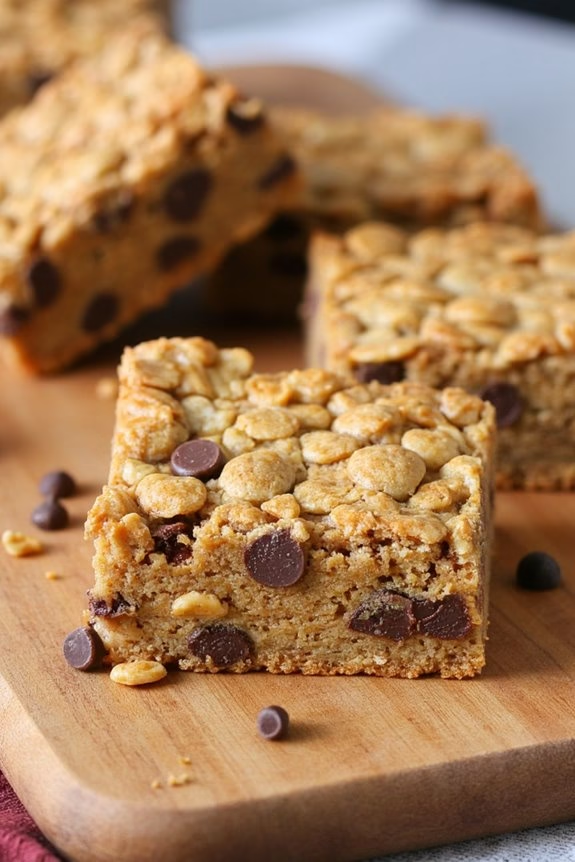
Start your day on a sweet note with these delightful Maple Oatmeal Squares. Perfectly blending the rich flavors of maple syrup with wholesome oats, these squares aren’t only delicious but also nutritious. Ideal for a family breakfast or a weekend brunch, these squares will quickly become a favorite in your household. Each bite offers a comforting taste that’s certain to energize you for the day ahead.
The recipe is designed to serve 4-6 people, guaranteeing everyone gets their fair share of this delightful breakfast treat. The ingredients are simple and easy to find, making it a convenient option for a quick breakfast solution. Whether you enjoy them as they’re or dress them up with some fresh fruit or a dollop of yogurt, these Maple Oatmeal Squares are sure to impress.
Ingredients (Serves 4-6):
- 2 cups rolled oats
- 1/2 cup all-purpose flour
- 1/2 teaspoon baking soda
- 1/4 teaspoon salt
- 1/2 cup pure maple syrup
- 1/4 cup unsalted butter, melted
- 1 large egg
- 1 teaspoon vanilla extract
- 1/2 cup chopped nuts (optional)
- 1/2 cup dried fruit or chocolate chips (optional)
Cooking Instructions:
- Preheat the Oven: Start by preheating your oven to 350°F (175°C). This guarantees that the oven is hot enough to bake your oatmeal squares evenly.
- Prepare the Baking Dish: Grease an 8×8 inch baking dish with butter or non-stick spray. This will prevent the squares from sticking and make it easier to remove them once baked.
- Mix Dry Ingredients: In a large mixing bowl, combine the rolled oats, all-purpose flour, baking soda, and salt. Stir until all dry ingredients are well mixed.
- Blend Wet Ingredients: In a separate bowl, whisk together the pure maple syrup, melted butter, large egg, and vanilla extract. Make sure the mixture is smooth and well-combined.
- Combine Wet and Dry Ingredients: Pour the wet mixture into the bowl of dry ingredients. Stir gently until everything is just combined. If using, fold in the chopped nuts and dried fruit or chocolate chips.
- Transfer to Baking Dish: Pour the mixture into the prepared baking dish, spreading it evenly with a spatula. Guarantee the mixture is level for even baking.
- Bake: Place the baking dish in the preheated oven and bake for 25-30 minutes, or until the edges are golden brown and a toothpick inserted in the center comes out clean.
- Cool and Serve: Allow the squares to cool in the pan for at least 10 minutes before slicing into squares. Serve warm or at room temperature.
Extra Tips:
For a gluten-free version, substitute the all-purpose flour with almond flour or a gluten-free flour blend. If you prefer a lower sugar option, reduce the amount of maple syrup to 1/3 cup and increase the vanilla extract for added flavor.
Feel free to customize the squares with your favorite mix-ins, such as raisins, cranberries, or dark chocolate chips. These squares can be stored in an airtight container for up to 5 days, making them a great make-ahead option for a busy week.
Zesty Lemon Poppy Seed Mini Muffins
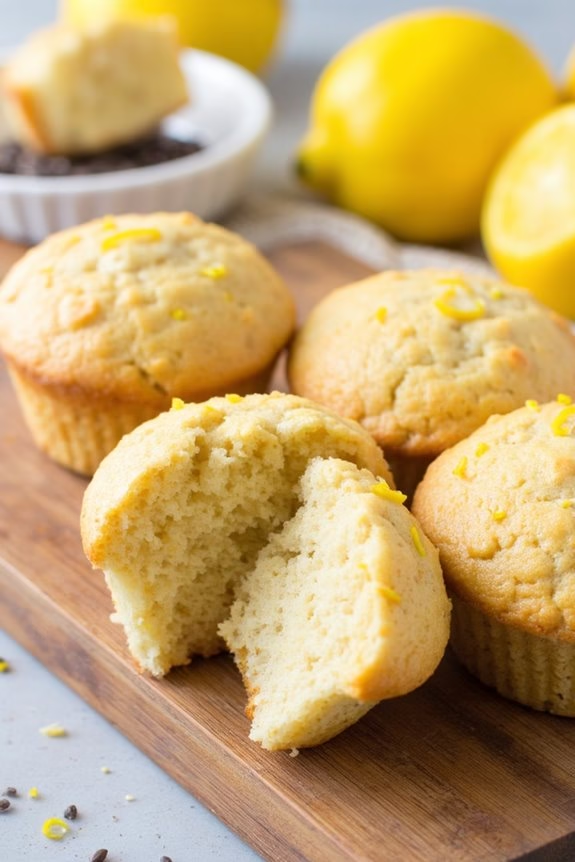
Indulge in the delightful tang of Zesty Lemon Poppy Seed Mini Muffins for a revitalizing start to your day. These bite-sized treats pack a punch of flavor, combining the citrusy brightness of lemon with the subtle crunch of poppy seeds. Perfect for breakfast or a quick snack, these mini muffins aren’t only easy to make but also satisfyingly light and fluffy.
Whether you’re entertaining guests or simply preparing a sweet breakfast for your family, these muffins are sure to be a hit. The secret to their irresistible taste lies in the balance of ingredients, giving each muffin a moist texture and a delightful zest. The combination of fresh lemon juice and zest guarantees a vibrant citrus flavor, while the poppy seeds add a unique texture and visual appeal.
These muffins aren’t only delicious but also aesthetically pleasing, making them perfect for any breakfast table setting. Let’s plunge into the recipe and learn how to whip up these delectable mini muffins for a serving size of 4-6 people.
Ingredients for 4-6 Servings:
- 1 1/2 cups all-purpose flour
- 1/2 cup granulated sugar
- 1 tablespoon poppy seeds
- 1 teaspoon baking powder
- 1/2 teaspoon baking soda
- 1/4 teaspoon salt
- 1/2 cup unsalted butter, melted
- 2 large eggs
- 1/2 cup plain yogurt
- 1/4 cup freshly squeezed lemon juice
- 1 tablespoon lemon zest
- 1 teaspoon vanilla extract
Cooking Instructions:
- Preheat the Oven: Begin by preheating your oven to 350°F (175°C). This makes sure that the oven reaches the right temperature by the time your muffin batter is ready.
- Prepare the Muffin Pan: Lightly grease a mini muffin pan with butter or non-stick spray, or line the cups with mini muffin liners to prevent sticking.
- Mix Dry Ingredients: In a large mixing bowl, combine the all-purpose flour, granulated sugar, poppy seeds, baking powder, baking soda, and salt. Stir with a whisk to make certain the ingredients are evenly distributed.
- Combine Wet Ingredients: In a separate bowl, whisk together the melted butter, eggs, yogurt, lemon juice, lemon zest, and vanilla extract until smooth and well combined.
- Create the Muffin Batter: Gradually add the wet ingredients into the dry ingredients, using a spatula to fold them together gently. Mix until just combined to avoid overworking the batter, which can make the muffins tough.
- Fill the Muffin Cups: Using a spoon or small ice cream scoop, fill each mini muffin cup about 3/4 full with the batter.
- Bake: Place the muffin pan in the preheated oven and bake for 12-15 minutes or until the muffins are golden brown and a toothpick inserted into the center comes out clean.
- Cool: Remove the muffins from the oven and let them cool in the pan for about 5 minutes. Then transfer them to a wire rack to cool completely.
Extra Tips:
For an extra burst of lemon flavor, consider drizzling a simple lemon glaze over the cooled muffins. Mix powdered sugar with a bit of lemon juice until you reach your desired consistency and drizzle lightly over the tops.
If you prefer a sweeter muffin, you can increase the sugar by a couple of tablespoons. Remember, these mini muffins freeze well, so you can make a batch ahead of time and have a quick breakfast solution ready in the freezer. Enjoy these Zesty Lemon Poppy Seed Mini Muffins with a cup of tea or coffee for a delightful morning treat.
Tropical Coconut and Pineapple Smoothie Bowls
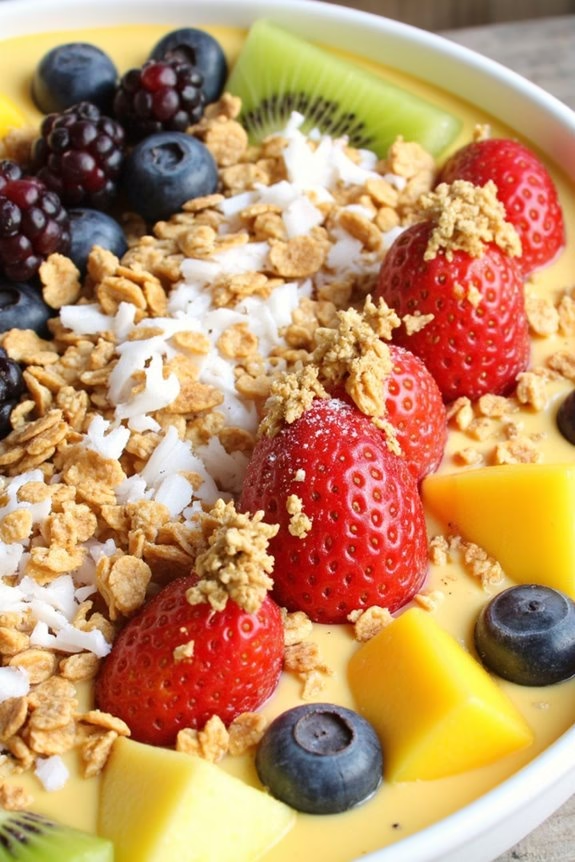
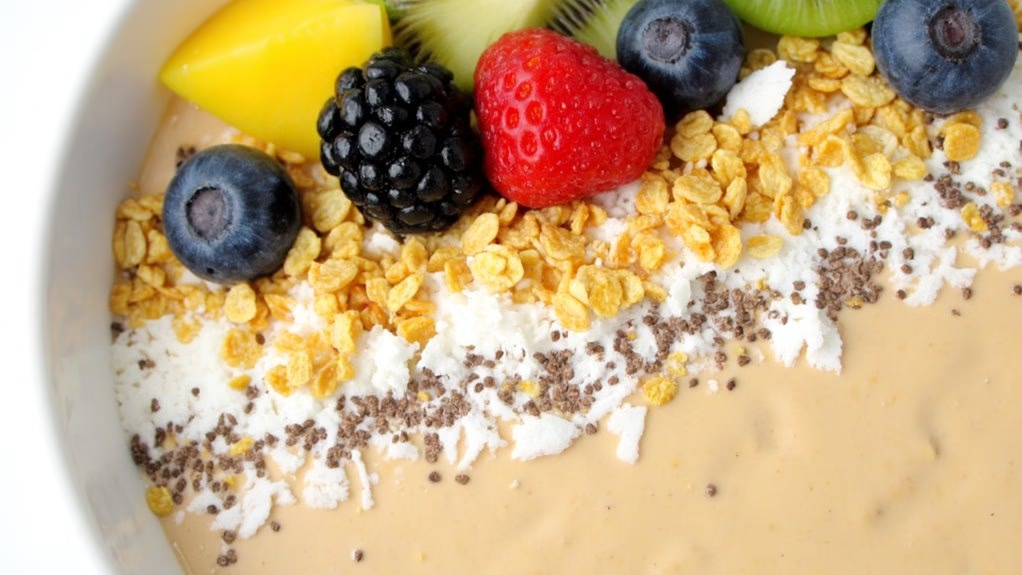
Start your morning with a burst of tropical flavors by indulging in these delightful Tropical Coconut and Pineapple Smoothie Bowls. This breakfast dish isn’t only visually appealing but also packed with invigorating flavors that transport you straight to a sunny beach.
The creamy texture of coconut milk combined with the sweet, tangy taste of fresh pineapple creates a perfect harmony. Topped with a variety of fruits and granola, these smoothie bowls provide a wholesome and satisfying breakfast that’s both nutritious and delicious.
This recipe is designed to serve 4-6 people, making it ideal for a family breakfast or a gathering with friends. These smoothie bowls aren’t only easy to prepare, but they also offer plenty of room for customization, allowing you to add your favorite toppings and make each serving unique.
Whether you’re looking to start your day on a healthy note or just want to treat yourself to something special, these Tropical Coconut and Pineapple Smoothie Bowls are sure to impress.
Ingredients (serves 4-6):
- 2 cups of fresh pineapple chunks
- 2 bananas, sliced
- 1 cup of coconut milk
- 1/2 cup of Greek yogurt
- 2 tablespoons of honey
- 1 teaspoon of vanilla extract
- 1/4 cup of shredded coconut
- 1/4 cup of chia seeds
- 1 cup of granola
- 1/2 cup of assorted berries (e.g., blueberries, strawberries)
- Optional: sliced kiwi, mango chunks, or any other tropical fruit for topping
Instructions:
- Prepare the Base: In a blender, combine the fresh pineapple chunks, sliced bananas, coconut milk, Greek yogurt, honey, and vanilla extract. Blend until the mixture is smooth and creamy.
- Adjust Consistency: Check the consistency of the smoothie. If it’s too thick, add a little more coconut milk to reach your desired thickness. Blend again to incorporate any additional liquid.
- Chill the Mixture: Pour the smoothie into a large bowl and refrigerate for about 10 minutes to allow it to thicken slightly. This will make it easier to add toppings without them sinking.
- Prepare the Toppings: While the smoothie chills, prepare your toppings. Slice any additional fruits, such as kiwi or mango, and have your granola, berries, shredded coconut, and chia seeds ready.
- Assemble the Bowls: Divide the chilled smoothie mixture evenly into individual serving bowls. Top each bowl with a generous sprinkle of granola, a handful of assorted berries, a sprinkle of shredded coconut, and a spoonful of chia seeds. Add any other fruits or toppings you desire.
- Serve and Enjoy: Serve immediately for the best texture and flavor. Encourage your guests to mix the toppings into the smoothie for an even distribution of flavors and textures.
Extra Tips:
For an even creamier texture, consider freezing the bananas and pineapple chunks before blending. This not only adds an invigorating chill but also enhances the creaminess of the smoothie.
If you prefer a sweeter bowl, adjust the amount of honey to taste. You can also add a scoop of protein powder or a handful of spinach for an extra nutritional boost.
Feel free to experiment with different fruit combinations and toppings to make these smoothie bowls your own signature breakfast dish.