

Brunch is such a wonderful meal to host, especially when the dishes are both gorgeous and easy to prepare. Let’s talk about avocado toast topped with a perfectly poached egg. It’s simple and oh-so-satisfying. Or how about a smoked salmon bagel platter that’s as vibrant as it is inviting? Each dish is like a little masterpiece, and I’ve found some delightful options that are sure to impress. Curious about elevating your brunch game?
Avocado Toast With Poached Eggs
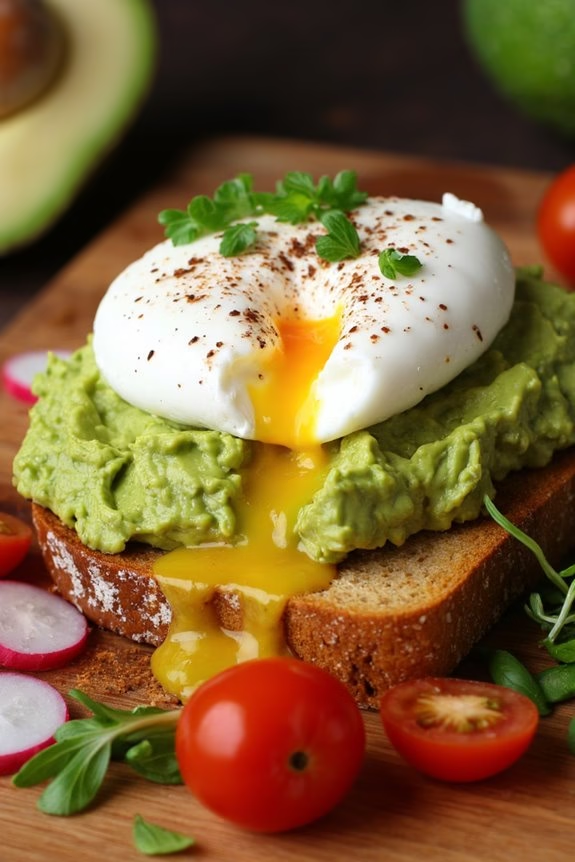
Preparing this dish involves a balance of textures and flavors that can be easily mastered with a few tips and tricks. The rich and buttery avocado pairs seamlessly with the runny yolk of the poached eggs, while the bread provides the much-needed crunch. Fresh lime juice and a sprinkle of salt and pepper enhance the natural flavors, making each bite a delight. This recipe is designed to serve 4-6 people, making it perfect for sharing the joy of brunch with loved ones.
Ingredients for 4-6 servings:
- 4-6 slices of sourdough or multigrain bread
- 3 ripe avocados
- Juice of 1 lime
- Salt and pepper to taste
- 8-12 large eggs
- 1 tablespoon white vinegar
- Optional toppings: cherry tomatoes, radish slices, microgreens, red pepper flakes
Cooking Instructions:
- Prepare the Avocado Mixture: Cut the avocados in half, remove the pits, and scoop the flesh into a bowl. Add the lime juice, a pinch of salt, and pepper. Mash the mixture with a fork until smooth with a few chunks remaining for texture.
- Toast the Bread: While you prepare the avocado, toast the slices of bread in a toaster or under a broiler until they’re golden brown and crispy. This will guarantee that the bread can hold up to the toppings without becoming soggy.
- Poach the Eggs: Fill a deep skillet or saucepan with about 3 inches of water and bring it to a gentle simmer. Add the white vinegar to the water. Crack each egg into a small bowl or ramekin. Carefully slide each egg into the simmering water, and let them cook for about 3-4 minutes until the whites are set but the yolks remain runny. Remove the eggs with a slotted spoon and drain on a paper towel.
- Assemble the Toasts: Spread a generous layer of the avocado mixture on each slice of toasted bread. Top each with one or two poached eggs. Season the eggs with a little more salt and pepper.
- Add Optional Toppings: Garnish the avocado toast with your choice of optional toppings such as cherry tomatoes, radish slices, microgreens, or a sprinkle of red pepper flakes for added flavor and visual appeal.
Extra Tips: To guarantee perfectly poached eggs, make sure the water is simmering gently rather than boiling vigorously, as this can cause the eggs to break apart. If you’re new to poaching, consider using a poaching pod or similar tool for easier handling.
When selecting avocados, look for ones that yield slightly to pressure but aren’t overly soft. This dish can be customized with additional proteins such as smoked salmon or bacon for a heartier meal. Enjoy this brunch classic with a side of fresh fruit or a light salad for a complete meal.
Smoked Salmon Bagel Platter
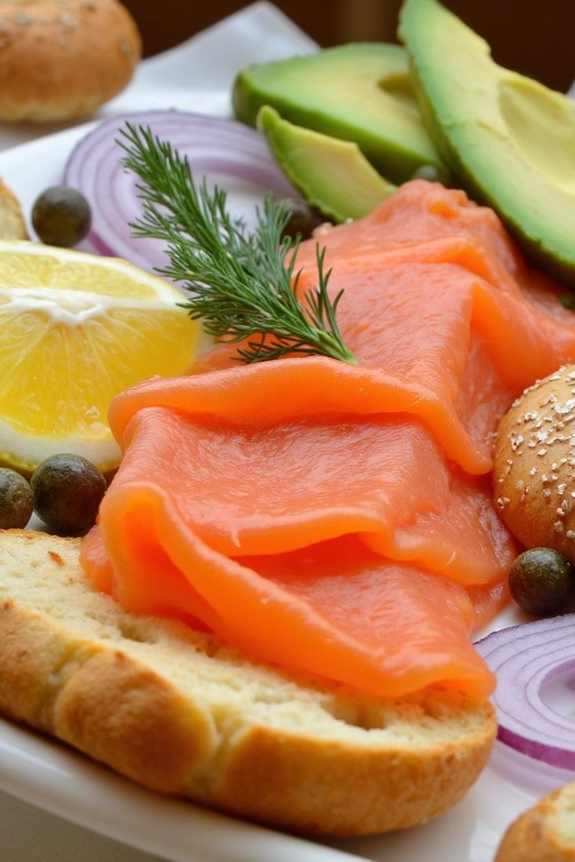
A Smoked Salmon Bagel Platter is a delightful and versatile brunch option that’s both elegant and satisfying. This dish combines the rich, smoky flavor of salmon with the creaminess of cream cheese, all on a crispy, toasted bagel. It’s perfect for a leisurely morning gathering with friends or family, offering a variety of textures and flavors in each bite.
The beauty of this dish lies in its simplicity and the ability to customize each bagel to individual tastes. This recipe is designed to serve 4-6 people, making it a great option for a small brunch party or a cozy family meal. The key is to use high-quality ingredients, as the freshness of the salmon and the softness of the bagels will make all the difference.
Paired with traditional accompaniments like capers, red onions, and dill, this Smoked Salmon Bagel Platter is sure to impress and satisfy everyone at the table.
Ingredients:
- 6 plain or sesame seed bagels
- 12 ounces of smoked salmon
- 8 ounces of cream cheese
- 1 small red onion, thinly sliced
- 1 lemon, cut into wedges
- 1/2 cup of capers
- Fresh dill sprigs
- 1 cucumber, thinly sliced
- Salt and pepper to taste
- Optional: 1 avocado, sliced
Instructions:
- Prepare the Bagels: Begin by slicing the bagels in half horizontally. Toast them until they’re golden and crispy, either in a toaster or under a broiler. This will give them a nice crunch and enhance the overall texture of the dish.
- Arrange the Platter: On a large serving platter, arrange the toasted bagel halves around the edges. In the center, place the smoked salmon slices, fanning them out for an appealing presentation.
- Prepare the Cream Cheese: Soften the cream cheese by letting it sit at room temperature for about 10 minutes. This makes it easier to spread. Optionally, mix in some freshly chopped dill for added flavor.
- Add the Accompaniments: Neatly place the red onion slices, lemon wedges, capers, and cucumber slices around the salmon on the platter. If using avocado, arrange the slices alongside the other accompaniments.
- Final Touches: Garnish the platter with fresh dill sprigs for a pop of color and an aromatic touch. Sprinkle a pinch of salt and pepper over the salmon and vegetables according to taste.
- Serve: Encourage your guests to assemble their own bagels by spreading cream cheese on the toasted bagel halves and layering them with smoked salmon and their choice of accompaniments. Squeeze a bit of lemon juice over the top for a revitalizing zing.
Extra Tips:
For the best results, try to source high-quality smoked salmon from a reputable deli or fish market. The richer the flavor, the better your platter will taste.
If you prefer, you can use flavored cream cheese, such as herb or chive, for an extra twist. Additionally, consider offering a variety of bagels like everything or poppy seed to cater to different preferences.
Finally, if you have any dietary restrictions, gluten-free bagels or lactose-free cream cheese can easily be substituted without compromising the flavor.
Spinach and Feta Omelette

A Spinach and Feta Omelette is a delightful brunch option that combines the fresh, earthy flavors of spinach with the tangy, creamy notes of feta cheese. This omelette isn’t only delicious but also packed with nutrients, making it a wholesome choice for a leisurely weekend breakfast or brunch.
The combination of eggs, spinach, and feta creates a perfect balance of protein, vitamins, and minerals, providing a satisfying meal that will keep you energized throughout the day.
This dish is versatile and can be customized to suit your personal preferences by adding other ingredients like tomatoes, onions, or herbs. However, the classic combination of spinach and feta is timeless and sure to be a hit with your family and friends.
The following recipe is designed to serve 4-6 people, making it ideal for a small gathering or a hearty family meal.
Ingredients for 4-6 servings:
- 12 large eggs
- 1 cup fresh spinach, chopped
- 1 cup feta cheese, crumbled
- 1/4 cup milk
- 2 tablespoons olive oil
- Salt and pepper to taste
- Optional: 1/2 cup cherry tomatoes, halved
- Optional: 1/4 cup chopped fresh herbs (such as parsley or dill)
Cooking Instructions:
- Prepare the Ingredients: Begin by washing the spinach thoroughly and chopping it into smaller pieces. If you’re using cherry tomatoes and herbs, wash and prepare these as well.
- Beat the Eggs: In a large mixing bowl, crack the eggs and add the milk, salt, and pepper. Whisk the mixture until the eggs are fully beaten and the ingredients are well combined.
- Heat the Pan: Place a non-stick skillet over medium heat and add the olive oil. Allow the oil to heat for about a minute.
- Cook the Spinach: Add the chopped spinach to the skillet and sauté for 2-3 minutes until it wilts. If you’re using tomatoes, add them at this stage and cook for an additional 2 minutes.
- Pour the Egg Mixture: Pour the egg mixture over the spinach (and tomatoes, if using) in the skillet, making sure it spreads evenly.
- Add the Feta: Sprinkle the crumbled feta cheese evenly over the egg mixture. If you’re using herbs, add them now as well.
- Cook the Omelette: Allow the omelette to cook for 5-7 minutes, or until the edges start to set. Reduce the heat to low and cover the skillet with a lid to help the top set without flipping. This should take another 3-4 minutes.
- Check for Doneness: The omelette is done when the top is firm and no longer runny. If you prefer a slightly browned top, you can briefly place the skillet under a broiler for a minute or two.
- Serve: Carefully slide the omelette out of the skillet onto a serving plate. Cut into wedges and serve immediately.
Extra Tips:
To guarantee your Spinach and Feta Omelette is light and fluffy, avoid overcooking the eggs. Keep the heat moderate and cover the skillet to trap steam, which helps cook the omelette evenly.
If you find the omelette difficult to slide out of the pan, use a spatula to gently lift and loosen the edges before transferring. Additionally, feel free to experiment with different cheese types or herbs to tailor the flavors to your liking.
Enjoy your delicious brunch creation!
Classic French Toast
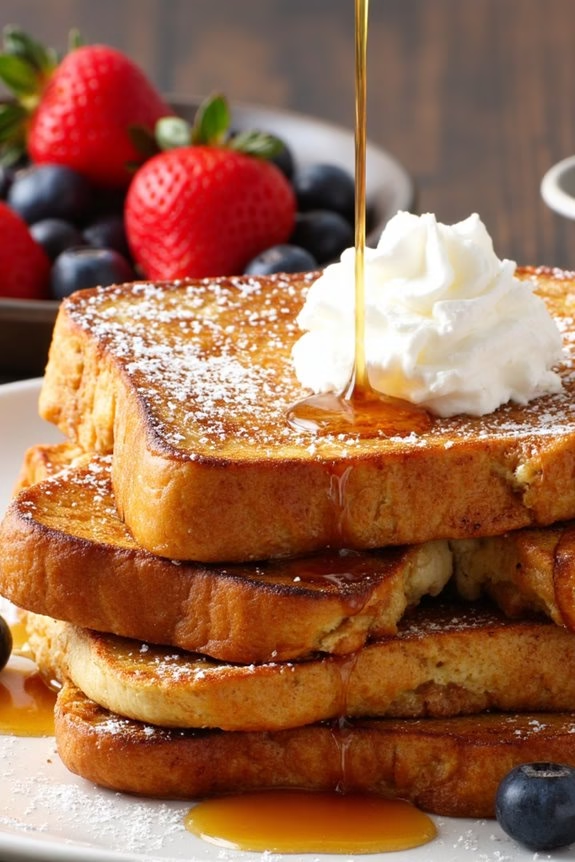
Classic French Toast is a beloved brunch staple that combines the perfect balance of softness and crispiness with a hint of sweetness and warmth. This dish is a delightful way to start your day or to serve as a special weekend treat. Its simple preparation and versatility make it a favorite among both novice and experienced cooks. By using a few key ingredients and following precise methods, you can create a batch of French toast that will impress family and friends alike.
The secret to attaining the ideal Classic French Toast lies in the choice of bread and the preparation of the custard mixture. Opting for slightly stale, thick-sliced bread allows it to soak up the perfect amount of custard without becoming too soggy. The custard itself, a blend of eggs, milk, and spices, infuses the bread with a rich flavor that’s further enhanced by the cooking process.
Once cooked to a golden brown, the French toast becomes a canvas for a variety of toppings, from traditional maple syrup to fresh berries and whipped cream.
Ingredients (Serves 4-6):
- 1 loaf of day-old brioche or challah bread, sliced into 1-inch thick slices
- 4 large eggs
- 1 cup whole milk
- 1/4 cup heavy cream
- 2 tablespoons granulated sugar
- 1 teaspoon vanilla extract
- 1 teaspoon ground cinnamon
- 1/4 teaspoon salt
- 2 tablespoons unsalted butter
- Maple syrup, for serving
- Powdered sugar, for dusting (optional)
Cooking Instructions:
- Prepare the Bread: Begin by slicing the loaf of bread into 1-inch thick slices. If the bread isn’t already stale, let the slices sit out for a few hours to dry slightly. This will help them absorb the custard without becoming too soggy.
- Make the Custard: In a large mixing bowl, whisk together the eggs, milk, heavy cream, sugar, vanilla extract, cinnamon, and salt. Confirm all ingredients are well combined to form a smooth custard mixture.
- Soak the Bread: Place the bread slices in a single layer in a shallow dish. Pour the custard mixture over the bread and let it soak for about 5 minutes. Turn the slices halfway through to confirm both sides are evenly soaked.
- Preheat and Cook: Heat a large skillet or griddle over medium heat. Add 1 tablespoon of butter and allow it to melt, coating the pan. Working in batches, place the soaked bread slices onto the skillet. Cook for 3-4 minutes on each side, or until they’re golden brown and cooked through.
- Keep Warm: If cooking in batches, keep the cooked French toast warm in an oven set to low heat (around 200°F) until all slices are ready to serve.
- Serve: Transfer the French toast to serving plates. Drizzle with maple syrup, and if desired, dust with powdered sugar. Serve warm with your choice of toppings.
Extra Tips:
To elevate your Classic French Toast, experiment with different types of bread such as sourdough or baguette for unique textures and flavors. If you prefer a more decadent flavor, substitute part of the milk with half-and-half or a flavored creamer.
Additionally, consider adding a pinch of nutmeg or a splash of your favorite liqueur to the custard mixture for an extra depth of flavor. When cooking, confirm that the skillet is at the right temperature: too hot, and the bread will burn; too cool, and it won’t develop the desired crispy exterior.
Caprese Salad With Balsamic Glaze
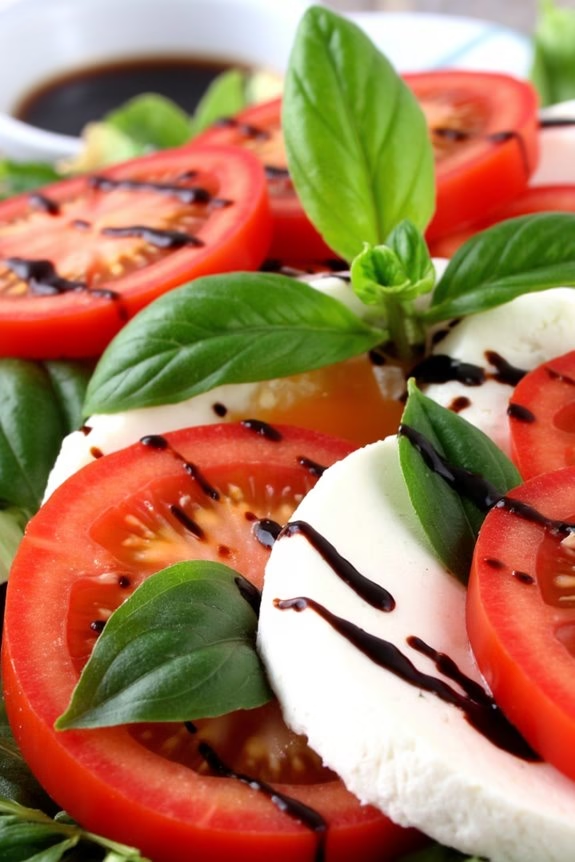
Caprese Salad With Balsamic Glaze is a delightful and invigorating dish that embodies the flavors of summer. This classic Italian salad is known for its simplicity and the quality of its ingredients, making it a perfect centerpiece for any brunch gathering. The vibrant combination of ripe tomatoes, fresh mozzarella, and aromatic basil leaves is elevated by a drizzle of balsamic glaze, creating a harmonious balance of taste and texture.
Whether served as an appetizer or a side, Caprese Salad With Balsamic Glaze is sure to impress your guests with its visual appeal and exquisite flavor profile.
Preparing this dish is both easy and quick, making it an ideal choice for any brunch menu. By selecting fresh, high-quality ingredients, you guarantee that each element of the salad shines. The key to a perfect Caprese is to use ripe, juicy tomatoes and creamy mozzarella that contrast beautifully with the sweet and tangy balsamic glaze.
This recipe is designed to serve 4-6 people, making it suitable for a small gathering or a larger family meal. With just a few simple steps, you can create a dish that’s as pleasing to the eye as it’s to the palate.
Ingredients (Serves 4-6):
- 4 large ripe tomatoes
- 16 ounces fresh mozzarella cheese
- 1 cup fresh basil leaves
- 1/2 cup balsamic vinegar
- 2 tablespoons honey (optional)
- 1/4 cup extra-virgin olive oil
- Salt and freshly ground black pepper to taste
Instructions:
- Prepare the Balsamic Glaze:
- In a small saucepan, combine the balsamic vinegar and honey (if using). Bring to a simmer over medium heat, then reduce the heat to low. Allow it to simmer gently until the mixture reduces by half, forming a thick glaze. This should take about 10-15 minutes. Remove from heat and let it cool.
- Slice the Ingredients:
- While the glaze is cooling, slice the tomatoes and mozzarella into thick, even slices, approximately 1/4 inch thick. This guarantees that each bite is balanced with both tomato and cheese.
- Assemble the Salad:
- On a large serving platter, alternate slices of tomato and mozzarella, slightly overlapping them in a circular pattern. Tuck fresh basil leaves between the slices. This layering creates a visually appealing presentation.
- Dress the Salad:
- Drizzle the assembled salad with extra-virgin olive oil. Follow this with the cooled balsamic glaze, guaranteeing even distribution over the tomatoes and mozzarella. Season with salt and freshly ground black pepper to taste.
- Serve:
- Serve immediately to enjoy the freshness of the ingredients. This salad is best enjoyed at room temperature.
Extra Tips:
When selecting ingredients, opt for heirloom or vine-ripened tomatoes for the best flavor. Fresh mozzarella is key; avoid pre-sliced or low-moisture varieties for the best taste and texture.
If you prefer a sweeter glaze, adding honey to the balsamic vinegar can enhance the flavor, but it’s optional. Finally, be mindful of the balsamic glaze consistency; it should be syrupy but not overly thick, as it will continue to thicken as it cools.
Enjoy your Caprese Salad With Balsamic Glaze as a standalone dish or alongside crusty bread for a more substantial brunch offering.
Quiche Lorraine

Quiche Lorraine is a classic French dish that’s perfect for brunch, combining a rich, creamy custard with a savory filling of bacon, cheese, and onions, all encased in a buttery, flaky pastry. This dish is renowned for its delicate balance of flavors and textures, with the smoky bacon complementing the creamy custard and the crisp pastry adding a delightful crunch. Ideal for a weekend gathering or a special occasion, Quiche Lorraine is both sophisticated and satisfying, making it an excellent choice for a mid-morning meal or a light lunch.
The origins of Quiche Lorraine lie in the Lorraine region of France, where it was traditionally made with lardons, or small strips of pork fat. Over time, the recipe has evolved to include bacon and sometimes cheese for added richness. The key to a perfect Quiche Lorraine is in the quality of the ingredients and the precision of the cooking process. It’s crucial to use fresh eggs, high-quality cream, and a good quality cheese to achieve the best flavor and texture. Below is a recipe for serving 4-6 people to enjoy this delightful dish.
Ingredients (serving size: 4-6 people):
- 1 pre-made 9-inch pie crust
- 6 slices of bacon
- 1 cup of shredded Gruyère cheese
- 1 small onion, finely chopped
- 4 large eggs
- 1 1/2 cups of heavy cream
- 1/4 teaspoon of ground nutmeg
- Salt and pepper to taste
Cooking Instructions:
- Preheat the Oven: Begin by preheating your oven to 375°F (190°C). A properly heated oven guarantees even cooking and a nicely browned crust.
- Prepare the Pie Crust: Roll out the pre-made pie crust into a 9-inch pie dish. Press it gently into the bottom and sides of the dish, trimming any excess dough. Prick the base with a fork to prevent bubbling.
- Blind Bake the Crust: Line the crust with parchment paper and fill it with pie weights or dried beans. Bake in the preheated oven for 10 minutes to prevent a soggy bottom. Remove the weights and bake for an additional 5 minutes until lightly golden.
- Cook the Bacon: While the crust is baking, cook the bacon in a skillet over medium heat until crispy. Remove and drain on paper towels, then crumble into small pieces.
- Sauté the Onions: In the same skillet, add the chopped onions. Sauté until they’re soft and translucent, about 5 minutes. Remove from heat.
- Prepare the Custard Filling: In a mixing bowl, whisk together the eggs, heavy cream, nutmeg, salt, and pepper until well combined.
- Assemble the Quiche: Spread the cooked bacon and sautéed onions evenly over the baked pie crust. Sprinkle the shredded Gruyère cheese on top. Pour the custard mixture over the fillings, making sure it covers evenly.
- Bake the Quiche: Place the assembled quiche in the oven and bake for 30-35 minutes, or until the custard is set and the top is golden brown. A knife inserted into the center should come out clean.
- Cool and Serve: Allow the quiche to cool slightly before slicing. This helps the custard to set further and makes serving easier.
Extra Tips:
For the best results, verify your ingredients are at room temperature before beginning. This helps with even cooking and prevents the quiche from cracking.
If you prefer a more robust flavor, consider adding a pinch of cayenne pepper or a teaspoon of Dijon mustard to the custard mixture.
To save time, the crust can be prepared a day in advance and stored in the refrigerator until ready to use. Enjoy your Quiche Lorraine warm or at room temperature for the best taste.
Pancakes With Fresh Berries

Pancakes with fresh berries are a delightful brunch dish that combines the fluffy texture of homemade pancakes with the sweet and tangy burst of fresh seasonal berries. Perfect for a weekend brunch or special occasion breakfast, this dish is loved by both kids and adults alike.
The key to achieving perfect pancakes lies in the batter and the cooking technique, guaranteeing a light and airy texture paired with the natural sweetness of the berries. The combination of pancakes and berries not only provides a visual appeal with vibrant colors but also offers a nutritious start to your day.
Berries are packed with antioxidants and vitamins, making this dish both a treat and a healthful option. The following recipe serves 4-6 people, making it ideal for a family gathering or a small brunch party.
Ingredients:
- 2 cups all-purpose flour
- 2 tablespoons sugar
- 2 teaspoons baking powder
- 1 teaspoon baking soda
- 1/2 teaspoon salt
- 2 large eggs
- 2 cups buttermilk
- 1/4 cup unsalted butter, melted
- 1 teaspoon vanilla extract
- 1 cup fresh mixed berries (such as strawberries, blueberries, and raspberries)
- Maple syrup, for serving
- Additional butter for cooking
Cooking Instructions:
- Prepare the Dry Ingredients: In a large mixing bowl, combine the flour, sugar, baking powder, baking soda, and salt. Whisk them together until evenly mixed, confirming there are no clumps.
- Mix the Wet Ingredients: In a separate bowl, beat the eggs until they’re slightly frothy. Add buttermilk, melted butter, and vanilla extract to the eggs. Stir the mixture until all the wet ingredients are well incorporated.
- Combine Wet and Dry Ingredients: Create a well in the center of the dry ingredients. Pour the wet mixture into the well and gently fold everything together using a spatula. Be careful not to overmix the batter; a few lumps are fine as they’ll dissolve while cooking.
- Heat the Pan: Place a non-stick skillet or griddle over medium heat. Add a small amount of butter to the pan and allow it to melt and coat the surface evenly.
- Cook the Pancakes: Pour about 1/4 cup of batter onto the skillet for each pancake. Sprinkle a few berries on top of the batter. Cook until bubbles form on the surface and the edges appear dry, about 2-3 minutes. Flip the pancakes and cook for an additional 1-2 minutes, until golden brown.
- Serve: Stack the pancakes on a plate and top with additional fresh berries. Drizzle with maple syrup and serve immediately for the best flavor.
Extra Tips:
For the fluffiest pancakes, confirm your baking powder and baking soda are fresh, as these are key to creating lift in the batter. Let the batter rest for about 5 minutes before cooking to allow the ingredients to fully hydrate, which can also help with texture.
If you’re using frozen berries, make sure they’re thawed and well-drained before adding them to the pancakes to prevent excess moisture from affecting the cooking process. Adjust the heat as needed while cooking the pancakes to prevent them from burning. Enjoy your delicious pancakes with fresh berries!
Greek Yogurt Parfait With Granola
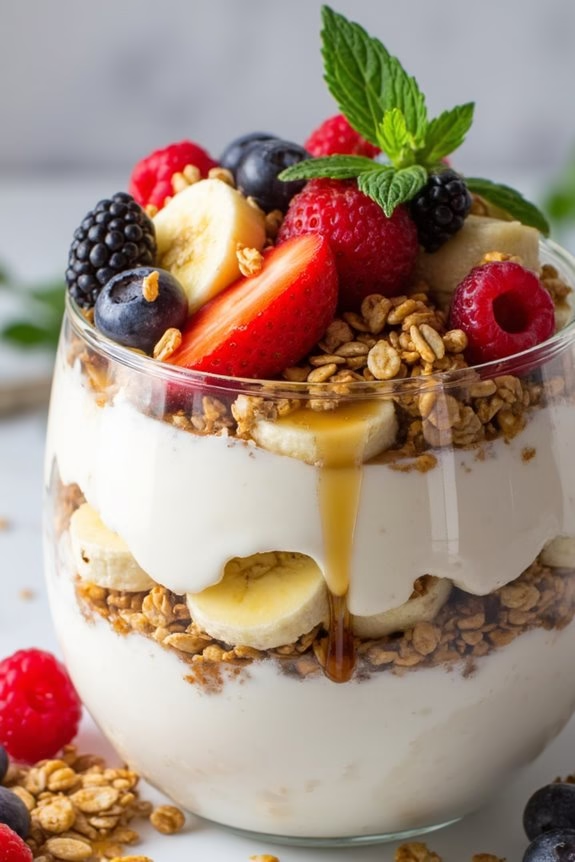
Greek Yogurt Parfait with Granola is a delightful brunch dish that combines the creaminess of Greek yogurt with the crunch of granola and the natural sweetness of fresh fruit.
It’s a versatile dish that not only looks appealing but is also packed with nutrients. Perfect for a leisurely weekend brunch, this parfait is easy to assemble and can be customized with your favorite fruits and toppings.
Whether you’re hosting a brunch or just looking to treat yourself, this dish provides a rejuvenating start to your day.
Ideal for serving 4-6 people, this recipe requires minimal effort yet delivers maximum flavor. The combination of smooth Greek yogurt, crunchy granola, and juicy fruits creates a harmony of textures and tastes.
You can prepare the components ahead of time, making it a convenient option for entertaining guests. Additionally, this dish allows for creative variations; feel free to experiment with different types of granola and seasonal fruits to make it your own.
Ingredients for 4-6 people:
- 4 cups Greek yogurt
- 2 cups granola
- 1 cup fresh berries (such as strawberries, blueberries, or raspberries)
- 1 cup sliced bananas
- 1/2 cup honey
- 1 teaspoon vanilla extract
- Mint leaves for garnish (optional)
Cooking Instructions:
- Prepare the Yogurt Base: In a mixing bowl, combine the Greek yogurt with the vanilla extract. Stir until the vanilla is thoroughly mixed into the yogurt, enhancing its flavor.
- Layer the Parfait: Begin by placing a generous spoonful of the yogurt mixture at the bottom of each serving glass or bowl.
- Add Granola: Sprinkle a layer of granola over the yogurt. Aim for about a quarter cup per layer, ensuring it covers the yogurt evenly.
- Layer the Fruits: Add a layer of sliced bananas and fresh berries on top of the granola. Alternate between the different fruits to create a colorful and appealing appearance.
- Repeat the Layers: Continue layering yogurt, granola, and fruits until the glasses or bowls are filled. Aim for two or three layers, depending on the size of your serving dish.
- Top with Honey and Garnish: Drizzle honey over the top layer of the parfait. This will add a touch of sweetness and a glossy finish. Finally, garnish each parfait with a few mint leaves for added freshness and color.
Extra Tips:
For a thicker parfait, consider using full-fat Greek yogurt, which also adds a richer taste. If you prefer a lower-sugar option, reduce the amount of honey or use a sugar-free alternative.
To keep the granola crunchy, add it just before serving, especially if preparing the parfaits in advance. You can also toast nuts or coconut flakes to use as an additional topping for extra texture and flavor.
Shakshuka With Crusty Bread

Shakshuka is a vibrant, flavorful dish with origins in North African and Middle Eastern cuisines. It features poached eggs nestled in a spicy, tomato-based sauce, infused with aromatic spices and herbs. This dish has gained popularity as a brunch staple due to its rich flavors, simplicity, and versatility. It’s perfect for serving at a leisurely weekend brunch with friends or family.
Shakshuka is traditionally eaten with crusty bread, which is perfect for scooping up the delicious sauce and runny yolks. Creating a perfect Shakshuka requires fresh ingredients and a bit of patience to allow the flavors to meld together. The sauce is made by simmering tomatoes with onions, bell peppers, and spices until thick and aromatic.
Once the sauce is ready, eggs are gently poached in the mixture, and the entire skillet is brought to the table for a communal feast. Paired with warm, crusty bread, this dish isn’t only hearty and satisfying but also visually appealing with its vibrant colors and rustic presentation.
Ingredients (serves 4-6):
- 2 tablespoons olive oil
- 1 large onion, finely chopped
- 1 red bell pepper, chopped
- 4 cloves garlic, minced
- 1 teaspoon ground cumin
- 1 teaspoon paprika
- 1/2 teaspoon cayenne pepper (optional for extra heat)
- 1 can (28 ounces) crushed tomatoes
- Salt and pepper to taste
- 6 large eggs
- 1/4 cup fresh parsley, chopped
- 1/4 cup fresh cilantro, chopped
- Crusty bread, for serving
Instructions:
- Prepare the base: Heat the olive oil in a large skillet over medium heat. Add the chopped onion and red bell pepper. Sauté for about 5-7 minutes, or until the onions are translucent and the peppers are tender.
- Add garlic and spices: Stir in the minced garlic and cook for about 1 minute until fragrant. Then add the ground cumin, paprika, and cayenne pepper (if using). Stir well to coat the vegetables with the spices.
- Simmer the sauce: Pour in the crushed tomatoes, season with salt and pepper, and stir to combine. Reduce the heat to low, and let the sauce simmer for about 10-15 minutes, stirring occasionally, until it thickens slightly.
- Poach the eggs: Make small wells in the sauce using the back of a spoon and crack an egg into each well. Cover the skillet with a lid and let the eggs cook for about 5-6 minutes, or until the whites are set but the yolks remain runny.
- Garnish and serve: Remove from heat and sprinkle with fresh parsley and cilantro. Serve immediately with warm, crusty bread on the side for dipping.
Extra Tips:
For a richer flavor, you can add crumbled feta cheese on top of the Shakshuka before serving. If you prefer your eggs more cooked, simply extend the poaching time by a couple of minutes.
For a smokier flavor, try using smoked paprika instead of regular paprika. Remember to taste and adjust the seasoning of the sauce before adding the eggs, as the flavors can vary depending on the brand of tomatoes used. Enjoy your Shakshuka with a side of olives or a simple green salad for a complete meal.
Croissant Sandwiches With Ham and Cheese

Croissant sandwiches with ham and cheese are a delightful brunch option that combines the rich, buttery flavor of croissants with the savory taste of ham and the creamy texture of melted cheese. This dish is perfect for a leisurely weekend brunch or a special occasion breakfast.
The preparation is simple, yet the result is both elegant and satisfying, making it a popular choice for gatherings or family meals. With minimal effort, you can create a delicious spread that will impress your guests and leave them craving more.
The key to a perfect croissant sandwich is in the quality of the ingredients. Opt for fresh, flaky croissants and high-quality ham and cheese to guarantee that each bite is packed with flavor. You can choose from a variety of cheeses, such as Swiss, cheddar, or Gruyère, to suit your taste preferences.
These sandwiches can be made ahead of time and warmed just before serving, making them a convenient option for entertaining.
Ingredients (serves 4-6 people):
- 6 large croissants
- 12 slices of deli ham
- 12 slices of cheese (Swiss, cheddar, or Gruyère)
- 2 tablespoons Dijon mustard
- 2 tablespoons mayonnaise
- 2 tablespoons unsalted butter, melted
- Salt and pepper to taste
Cooking Instructions:
- Preheat the Oven: Begin by preheating your oven to 350°F (175°C). This will guarantee that your sandwiches are evenly heated and the cheese is perfectly melted.
- Prepare the Croissants: Slice each croissant horizontally, creating a top and bottom half. Arrange them on a baking sheet lined with parchment paper for easy cleanup.
- Mix the Sauce: In a small bowl, combine the Dijon mustard and mayonnaise. Mix well until smooth. This sauce will add a tangy flavor to your sandwiches.
- Assemble the Sandwiches: Spread a thin layer of the mustard-mayo mixture on the bottom half of each croissant. Layer two slices of ham and two slices of cheese on top of the sauce. Season with a pinch of salt and pepper. Place the top half of the croissant over the fillings.
- Brush with Butter: Using a pastry brush, gently brush the tops of the assembled croissants with melted butter. This will give them a beautiful golden-brown finish once baked.
- Bake the Sandwiches: Place the baking sheet in the preheated oven and bake for 10-12 minutes, or until the cheese is melted and the croissants are lightly toasted. Keep an eye on them to prevent over-browning.
- Serve and Enjoy: Once baked, remove the sandwiches from the oven and let them cool for a minute or two. Serve warm and enjoy!
Extra Tips:
For an extra layer of flavor, consider adding a few slices of ripe tomato or a handful of fresh arugula before closing the sandwiches. If you have extra time, lightly toast the croissants before assembling the sandwiches for additional texture.
You can also experiment with different types of ham, such as honey-baked or smoked, to add variety to the dish. Finally, if preparing in advance, assemble the sandwiches without baking, cover them with plastic wrap, and refrigerate. When ready to serve, simply bake as directed.
Waffles With Maple Syrup and Whipped Cream

Waffles With Maple Syrup and Whipped Cream is a delightful brunch dish that brings together the perfect balance of crispy waffles, sweet maple syrup, and creamy whipped cream. This combination creates an irresistible treat that’s bound to please both adults and children alike.
Whether you’re hosting a brunch gathering or simply indulging in a leisurely morning meal, these waffles will elevate your dining experience with their light and fluffy texture paired with rich, decadent toppings.
To make the perfect Waffles With Maple Syrup and Whipped Cream, you’ll need to start with a good waffle batter that cooks to a golden brown crisp on the outside while remaining soft and airy on the inside. The addition of pure maple syrup and freshly whipped cream enhances the waffles’ flavor, making each bite a heavenly experience.
This recipe serves 4-6 people, making it ideal for a small brunch party or a special family breakfast.
Ingredients:
- 2 cups all-purpose flour
- 2 tablespoons granulated sugar
- 1 tablespoon baking powder
- 1/2 teaspoon salt
- 2 large eggs
- 1 3/4 cups milk
- 1/2 cup unsalted butter, melted
- 1 teaspoon vanilla extract
- Pure maple syrup, for serving
- 1 cup heavy cream
- 2 tablespoons powdered sugar
- 1 teaspoon vanilla extract (for whipped cream)
Instructions:
- Prepare the Waffle Batter: In a large mixing bowl, whisk together the flour, sugar, baking powder, and salt. In another bowl, beat the eggs and then add the milk, melted butter, and vanilla extract. Mix the wet ingredients until well combined.
- Combine Ingredients: Pour the wet ingredients into the dry ingredients and stir until just combined. Be careful not to overmix; a few lumps are okay. Let the batter rest for about 5 minutes while you preheat your waffle iron according to the manufacturer’s instructions.
- Cook the Waffles: Lightly grease the waffle iron with cooking spray or a brush of melted butter. Pour the batter onto the center of the waffle iron and spread it out evenly. Close the lid and cook until the waffles are golden brown and crisp. This usually takes about 4-5 minutes, depending on your waffle iron. Repeat until all the batter is used.
- Make the Whipped Cream: While the waffles are cooking, prepare the whipped cream. In a chilled bowl, combine the heavy cream, powdered sugar, and vanilla extract. Use an electric mixer on medium-high speed to whip the cream until soft peaks form.
- Assemble and Serve: Place the cooked waffles on a serving platter. Drizzle with pure maple syrup, then top generously with the freshly whipped cream. Serve immediately for the best taste and texture.
When making Waffles With Maple Syrup and Whipped Cream, verify that your waffle iron is properly preheated to achieve the crispiest results. If you prefer your waffles extra crispy, you can leave them in the waffle iron a little longer.
Additionally, using pure maple syrup enhances the flavor greatly compared to artificial syrups, so it’s worth the investment. For an added touch, you can garnish your waffles with fresh berries or toasted nuts. Remember to serve the waffles hot for the ultimate brunch experience.
Smashed Avocado and Tomato Bruschetta

Smashed Avocado and Tomato Bruschetta is a delightful brunch dish that combines the creamy goodness of ripe avocados with the fresh, juicy taste of tomatoes, all served atop a crunchy slice of rustic bread.
This dish isn’t only visually appealing with its vibrant colors, but it also offers a symphony of textures and flavors in every bite. Perfect for a weekend brunch with family or friends, this bruschetta is easy to prepare, yet sophisticated enough to impress your guests.
The key to a perfect Smashed Avocado and Tomato Bruschetta lies in using fresh, high-quality ingredients. The ripe avocados should be perfectly soft, the tomatoes juicy and flavorful, and the bread should be crusty to hold up the toppings without getting soggy.
This recipe is designed to serve 4-6 people, making it an ideal choice for a small gathering or a hearty brunch meal. With just a few simple steps and minimal cooking time, you can create a delicious and satisfying dish that everyone will love.
Ingredients (Serves 4-6):
- 4 ripe avocados
- 6 medium ripe tomatoes
- 1 loaf of rustic bread (like a baguette or ciabatta)
- 2 cloves of garlic
- 2 tablespoons olive oil
- 1 tablespoon lemon juice
- Salt and pepper to taste
- Fresh basil leaves for garnish
Cooking Instructions:
- Prepare the Bread: Preheat your oven to 400°F (200°C). Slice the rustic bread into 1/2-inch thick slices. Place them on a baking sheet, drizzle with olive oil, and toast in the oven for about 5-7 minutes or until golden and crispy.
- Make the Smashed Avocado: While the bread is toasting, halve the avocados, remove the pits, and scoop the flesh into a bowl. Add the lemon juice, a pinch of salt, and pepper. Use a fork to smash the avocado until it reaches your desired consistency, either smooth or slightly chunky.
- Prepare the Tomato Topping: Dice the tomatoes into small cubes and place them in a separate bowl. Mince the garlic cloves and add them to the tomatoes. Drizzle with a tablespoon of olive oil, season with salt and pepper, and mix well.
- Assemble the Bruschetta: Once the bread is toasted, remove it from the oven. Let it cool slightly, then rub each slice lightly with the remaining garlic clove for extra flavor. Spread a generous amount of smashed avocado on each slice, followed by a spoonful of the tomato mixture.
- Garnish and Serve: Top each bruschetta with fresh basil leaves for an added burst of flavor and color. Serve immediately while the bread is still warm and crispy.
Extra Tips:
For the best results, use avocados that yield slightly to gentle pressure without feeling mushy. You can also experiment with different types of tomatoes, such as cherry tomatoes for a sweeter taste.
To give your bruschetta an additional flavor dimension, consider adding a drizzle of balsamic glaze over the top before serving. If you prefer a bit of heat, a sprinkle of red pepper flakes can add a subtle kick.
Enjoy your brunch with a revitalizing beverage like a mimosa or a freshly brewed coffee for the perfect pairing.
Banana Bread With Walnuts
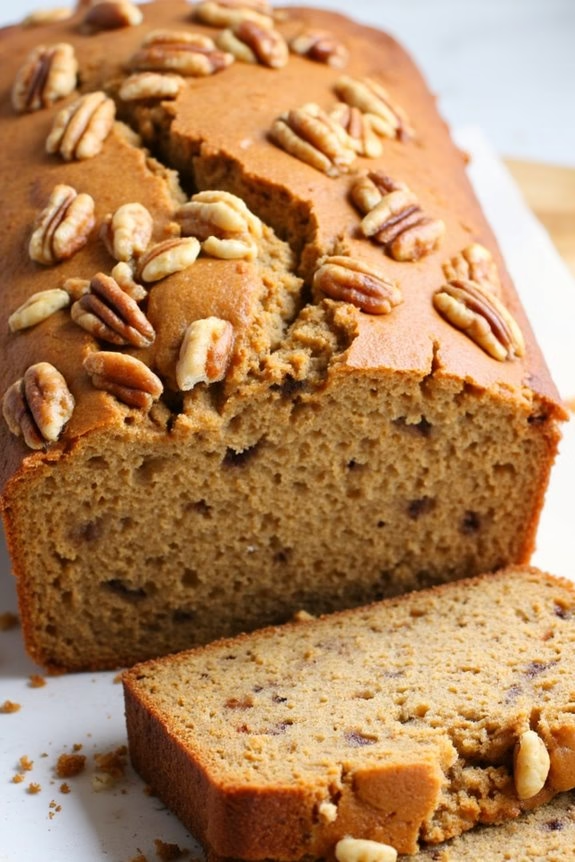
Banana Bread With Walnuts is a classic brunch dish that combines the natural sweetness of ripe bananas with the crunchy texture of walnuts, making it a crowd-pleaser. This recipe is perfect for a lazy weekend brunch or as a delightful treat to enjoy with your morning coffee. The moist, flavorful bread is easy to prepare, and it fills your kitchen with a warm, inviting aroma that everyone will love.
When making this Banana Bread With Walnuts, it’s important to use overripe bananas for the best flavor and texture. The walnuts add a nutty depth to the bread, complementing the sweetness of the bananas. This recipe yields a loaf that serves 4-6 people, making it perfect for family gatherings or a small brunch party. Follow the simple steps below to create this delicious dish.
Ingredients (serving size: 4-6 people):
- 3 ripe bananas
- 1/3 cup melted butter
- 3/4 cup sugar
- 1 egg, beaten
- 1 teaspoon vanilla extract
- 1 teaspoon baking soda
- Pinch of salt
- 1 1/2 cups all-purpose flour
- 1/2 cup chopped walnuts
Cooking Instructions:
- Preheat the Oven: Start by preheating your oven to 350°F (175°C). This guarantees that your banana bread will bake evenly.
- Prepare the Loaf Pan: Grease a 9×5-inch loaf pan with butter or non-stick cooking spray to prevent the bread from sticking.
- Mash the Bananas: In a large mixing bowl, mash the ripe bananas with a fork until smooth. It’s okay if there are a few small lumps.
- Mix in Other Ingredients: Add the melted butter to the mashed bananas, stirring until well combined. Then, mix in the sugar, beaten egg, and vanilla extract.
- Add Dry Ingredients: Sprinkle the baking soda and salt over the banana mixture, mixing well. Gradually fold in the flour until just combined. Avoid over-mixing to prevent the bread from becoming dense.
- Incorporate Walnuts: Gently fold in the chopped walnuts, ensuring they’re evenly distributed throughout the batter.
- Pour into Pan: Pour the batter into the prepared loaf pan, spreading it evenly with a spatula.
- Bake the Bread: Place the loaf pan in the preheated oven and bake for 60-65 minutes, or until a toothpick inserted into the center comes out clean.
- Cool and Serve: Allow the banana bread to cool in the pan for about 10 minutes, then transfer it to a wire rack to cool completely before slicing and serving.
Extra Tips: For an even more flavorful banana bread, consider adding a teaspoon of cinnamon or nutmeg to the batter. If your bananas aren’t quite ripe, you can speed up the ripening process by placing them in a paper bag for a day or two. Additionally, if you prefer a sweeter bread, you can increase the sugar to 1 cup.
When storing the bread, wrap it tightly in plastic wrap or foil to keep it moist and fresh. Enjoy your Banana Bread With Walnuts warm or at room temperature for the best taste.
Mushroom and Cheese Frittata

Mushroom and Cheese Frittata is a delightful brunch dish that combines the earthy flavors of mushrooms with the creamy richness of cheese, all nestled within a fluffy egg base. This versatile dish can be enjoyed as a filling breakfast, a light lunch, or even a savory dinner option. Perfect for gatherings or a cozy family meal, this frittata is both delicious and easy to prepare.
The beauty of a frittata lies in its simplicity and adaptability. By using fresh ingredients and a handful of pantry staples, you can create a dish that’s both satisfying and nourishing. The Mushroom and Cheese Frittata is cooked entirely on the stovetop, making it a quick and fuss-free option for any meal. Its golden-brown crust and soft, cheesy center make it a crowd-pleaser, and it can easily be adapted to include your favorite vegetables or herbs.
Ingredients (Serves 4-6)
- 8 large eggs
- 1/4 cup whole milk
- 1 cup grated cheddar cheese
- 1 cup sliced mushrooms
- 1 small onion, finely chopped
- 2 cloves garlic, minced
- 2 tablespoons olive oil
- Salt and pepper to taste
- Fresh parsley for garnish
Cooking Instructions
- Prepare the Ingredients: Begin by cracking the eggs into a mixing bowl. Add the milk, salt, and pepper, and whisk together until the mixture is well combined and slightly frothy. Set aside.
- Cook the Vegetables: Heat the olive oil in a large non-stick skillet over medium heat. Add the chopped onion and sauté for 2-3 minutes until it becomes translucent. Add the minced garlic and sliced mushrooms, cooking until the mushrooms are browned and any liquid has evaporated, about 5-6 minutes.
- Combine and Cook: Pour the egg mixture over the cooked vegetables in the skillet. Stir gently to distribute the vegetables evenly. Reduce the heat to low and allow the frittata to cook undisturbed for about 5 minutes, or until the edges start to set.
- Add Cheese and Finish Cooking: Sprinkle the grated cheddar cheese evenly over the top of the frittata. Cover the skillet with a lid and continue cooking for another 5-7 minutes, or until the eggs are fully set and the cheese is melted.
- Garnish and Serve: Remove the skillet from the heat. Allow the frittata to cool slightly before garnishing with fresh parsley. Slice into wedges and serve warm.
Extra Tips
For the best results, make sure the skillet you use is non-stick and has a lid that fits snugly. This will help the frittata cook evenly and prevent sticking.
Feel free to experiment with different types of cheese or add extra vegetables such as spinach or bell peppers. If you prefer a more browned top, you can finish the frittata under a broiler for a minute or two, keeping a close eye to prevent burning.
Enjoy your Mushroom and Cheese Frittata with a side salad or crusty bread for a complete meal.
Ricotta and Lemon Zest Pancakes

Ricotta and Lemon Zest Pancakes are a delightful way to elevate your brunch experience. These pancakes are light, fluffy, and bursting with fresh flavors that will awaken your senses. The creamy ricotta cheese adds a rich texture, while the lemon zest provides a revitalizing citrus note, making these pancakes a perfect combination of indulgence and brightness.
Whether you’re hosting a brunch for friends or simply treating yourself to a leisurely morning at home, this recipe is sure to impress.
The beauty of these pancakes lies in their simplicity and the harmony of flavors. The ricotta adds moisture and a subtle creaminess, while the lemon zest cuts through the richness with its vibrant aroma.
Paired with a drizzle of maple syrup or a sprinkle of powdered sugar, these pancakes are a sure way to make any morning feel special. With just a few ingredients and a bit of time, you can create a dish that tastes as good as it looks, offering a perfect start to your day.
Ingredients (Serves 4-6):
- 1 cup ricotta cheese
- 1 cup all-purpose flour
- 1 tablespoon baking powder
- 1/4 cup granulated sugar
- 2 large eggs
- 3/4 cup milk
- Zest of 2 lemons
- 1 teaspoon vanilla extract
- A pinch of salt
- Butter or oil for cooking
- Optional: Maple syrup or powdered sugar for serving
Instructions:
- Prepare the Batter: In a large mixing bowl, combine the ricotta cheese, milk, eggs, and vanilla extract. Whisk together until the mixture is smooth and well blended.
- Mix Dry Ingredients: In another bowl, sift together the flour, baking powder, sugar, and salt. Once mixed, gradually fold the dry ingredients into the wet ingredients, making sure there are no lumps.
- Add Lemon Zest: Gently fold in the lemon zest, making sure it’s evenly distributed throughout the batter. This will infuse the pancakes with a bright and zesty flavor.
- Heat the Griddle: Preheat a non-stick skillet or griddle over medium heat. Add a small amount of butter or oil to coat the surface, preventing the pancakes from sticking.
- Cook the Pancakes: Pour about 1/4 cup of batter onto the skillet for each pancake. Cook until bubbles start to form on the surface and the edges look set, approximately 2-3 minutes. Flip the pancakes and cook for another 1-2 minutes, until golden brown.
- Serve: Remove the pancakes from the skillet and serve warm. Optionally, top with maple syrup or a dusting of powdered sugar for added sweetness.
Extra Tips:
For the fluffiest pancakes, avoid overmixing the batter once the dry and wet ingredients are combined. Overmixing can lead to tougher pancakes.
Also, make sure your skillet or griddle is hot before adding the batter; this helps in achieving a nice golden-brown exterior. If you’re preparing these pancakes in advance, they can be kept warm in a preheated oven at 200°F (93°C) until ready to serve.
Enjoy these pancakes with a side of fresh berries or a dollop of whipped cream for an extra touch of luxury.