

Breakfast can often feel like a whirlwind, especially when you’re juggling a busy schedule. That’s why I’ve compiled 15 amazing make-ahead breakfast bar recipes that are simple to whip up and filled with goodness. With these nutritious bars ready to go, you’ll have one less thing to worry about in the morning. Want to see how these tasty options can enhance your routine? Let’s discover how they can simplify your mornings.
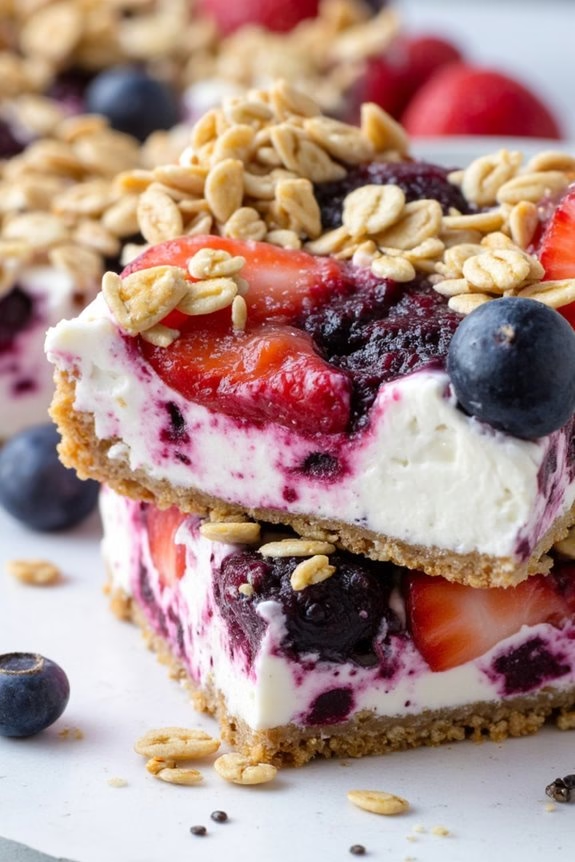
Classic Oatmeal Berry Bars
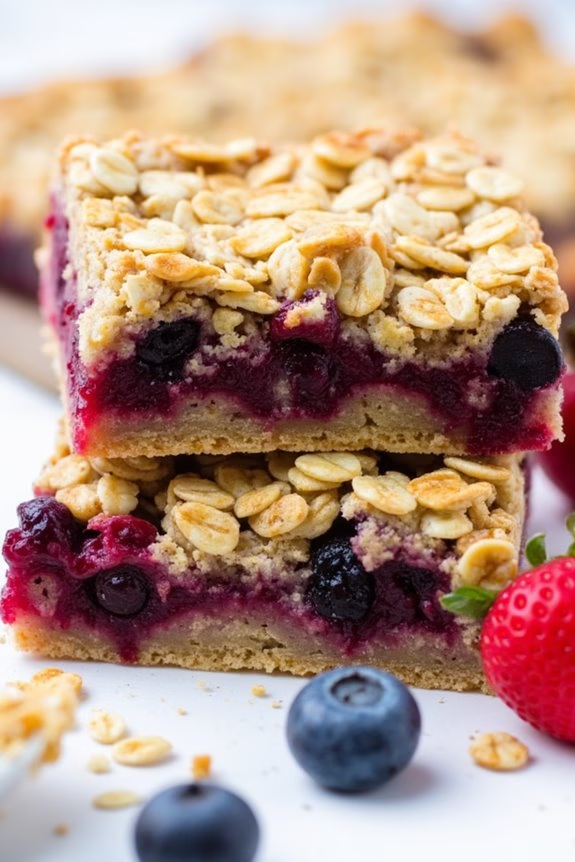
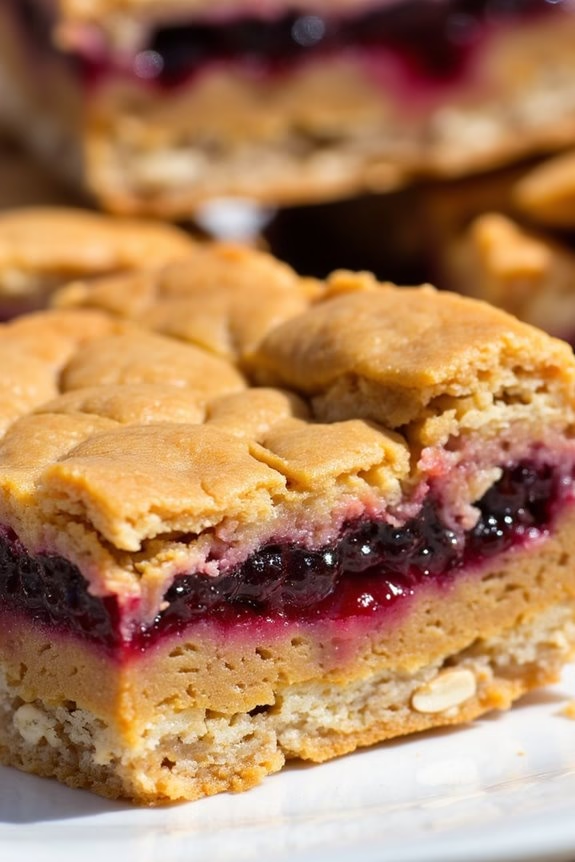
Classic Oatmeal Berry Bars are a delightful and nutritious breakfast option that combines the wholesome goodness of oats with the juicy sweetness of mixed berries. These bars are perfect for on-the-go mornings or as a convenient snack throughout the day. Not only are they easy to make, but they also offer a great way to incorporate essential nutrients into your diet.
By preparing these bars at home, you can control the ingredients, guaranteeing a healthier choice by avoiding unnecessary preservatives and sugars often found in store-bought versions.
The combination of hearty oats and vibrant berries offers a perfect balance of texture and flavor. The oats provide a chewy base, while the berries add a burst of freshness and natural sweetness. These bars can be made ahead of time and stored, making them ideal for meal prepping.
In addition, they’re versatile; you can customize them with your favorite nuts or seeds for added crunch or even a touch of honey or maple syrup for extra sweetness. Here’s how you can make Classic Oatmeal Berry Bars for a serving size of 4-6 people:
Ingredients:
- 2 cups rolled oats
- 1 cup all-purpose flour
- 1/2 cup brown sugar
- 1/2 teaspoon baking soda
- 1/4 teaspoon salt
- 1/2 cup unsalted butter, melted
- 1 teaspoon vanilla extract
- 2 cups mixed berries (e.g., blueberries, raspberries, strawberries)
- 2 tablespoons granulated sugar
- 1 tablespoon cornstarch
- 1 tablespoon lemon juice
Cooking Instructions:
- Preheat and Prepare: Preheat your oven to 350°F (175°C). Line a 9×13-inch baking dish with parchment paper, allowing some overhang on the sides to easily lift the bars out later.
- Mix Dry Ingredients: In a large bowl, combine the rolled oats, all-purpose flour, brown sugar, baking soda, and salt. Stir well to verify all the dry ingredients are evenly mixed.
- Combine with Wet Ingredients: Pour in the melted butter and vanilla extract into the dry mixture. Mix until the ingredients are fully incorporated, creating a crumbly texture that will form the base and topping of the bars.
- Prepare Berry Filling: In a separate bowl, combine the mixed berries with granulated sugar, cornstarch, and lemon juice. Gently toss the berries until they’re evenly coated with the mixture. The cornstarch will help thicken the berry filling as it bakes.
- Assemble the Layers: Press half of the oat mixture into the prepared baking dish to form an even base layer. Spread the berry mixture over the base, and then sprinkle the remaining oat mixture on top, pressing gently.
- Bake: Place the baking dish in the preheated oven and bake for 30-35 minutes, or until the top is golden brown and the berry filling is bubbly.
- Cool and Serve: Allow the bars to cool completely in the pan on a wire rack. Once cooled, use the parchment paper overhang to lift the bars out of the pan. Cut into squares and serve.
Extra Tips:
To make these bars even more nutritious, consider adding a handful of chopped nuts or seeds to the oat mixture before baking. If you prefer a sweeter bar, you can drizzle a bit of honey or maple syrup over the top before baking.
For a gluten-free version, substitute the all-purpose flour with almond flour or a gluten-free flour blend. Remember to store any leftover bars in an airtight container in the refrigerator, where they’ll keep for up to a week. Enjoy your homemade Classic Oatmeal Berry Bars as a quick breakfast or a healthy snack option throughout the day!
Chocolate Peanut Butter Delight Bars
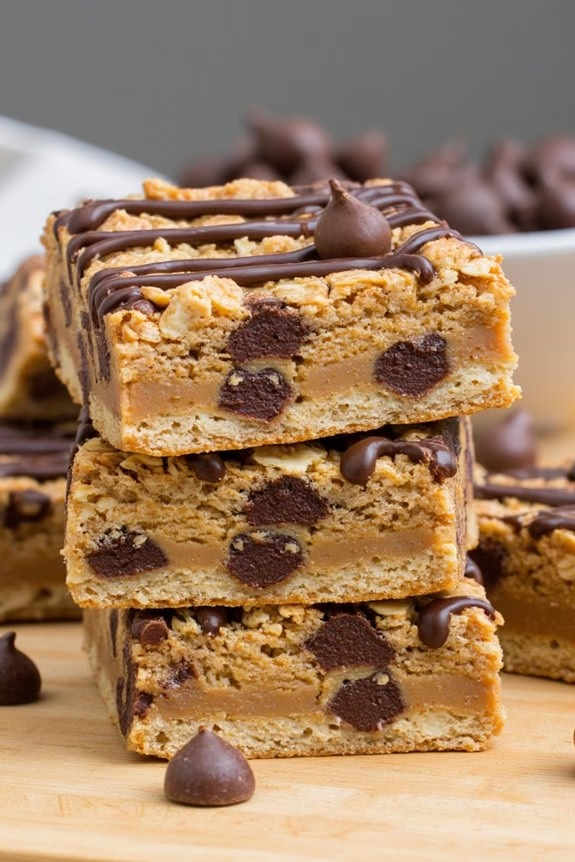
Chocolate Peanut Butter Delight Bars are the ultimate indulgence for anyone with a sweet tooth. These bars combine the rich flavors of chocolate and peanut butter, creating a mouthwatering treat that’s perfect for breakfast or as a snack any time of the day. The smooth texture of peanut butter complements the rich chocolate, creating a harmony of flavors that you won’t be able to resist.
Plus, these bars are packed with nutrients, providing a satisfying start to your day or a delicious energy boost in the afternoon.
These delightful bars aren’t only scrumptious, but they’re also incredibly easy to make. With minimal ingredients and straightforward steps, you’ll have a batch ready in no time. Perfectly portioned for sharing, this recipe yields enough to serve 4-6 people.
Whether you’re preparing them for your family, friends, or just for yourself, these Chocolate Peanut Butter Delight Bars are sure to become a staple in your recipe collection.
Ingredients for 4-6 servings:
- 1 cup rolled oats
- 1/2 cup honey
- 1/2 cup creamy peanut butter
- 1/4 cup unsweetened cocoa powder
- 1 teaspoon vanilla extract
- 1/2 cup chopped peanuts
- 1/2 cup semi-sweet chocolate chips
- 1/4 teaspoon salt
Cooking Instructions:
- Prepare the Baking Dish: Line an 8×8 inch baking dish with parchment paper, leaving an overhang on the sides. This will make it easier to lift the bars out once they’re set.
- Mix Dry Ingredients: In a large mixing bowl, combine the rolled oats, cocoa powder, chopped peanuts, and salt. Stir until all the dry ingredients are evenly distributed.
- Combine Wet Ingredients: In a separate microwave-safe bowl, combine the honey and peanut butter. Microwave on medium power for about 30 seconds, or until the mixture is slightly warmed and can be easily stirred. Add the vanilla extract and stir until smooth.
- Combine Mixtures: Pour the wet ingredients into the bowl with the dry ingredients. Mix thoroughly with a spatula until everything is well combined and the oats are completely coated.
- Add Chocolate Chips: Fold in the chocolate chips, making sure they’re evenly distributed throughout the mixture.
- Press into Baking Dish: Transfer the mixture into the prepared baking dish. Use the back of a spoon or your hands to press the mixture firmly and evenly into the dish.
- Chill: Place the baking dish in the refrigerator and let the bars chill for at least 2 hours. This will allow them to set and become firm.
- Cut and Serve: Once set, use the parchment paper overhang to lift the bars out of the dish. Cut into squares or bars of your desired size and serve.
Extra Tips:
For an extra layer of flavor, consider drizzling some melted chocolate over the top of the bars before placing them in the refrigerator to set.
If you prefer a crunchier texture, toast the rolled oats and peanuts lightly in the oven before mixing them with the other ingredients.
These bars can be stored in an airtight container in the fridge for up to a week, making them a convenient grab-and-go option.
Remember to always use creamy peanut butter for the best consistency, as crunchy varieties can alter the texture of the bars.
Tropical Coconut Mango Bars
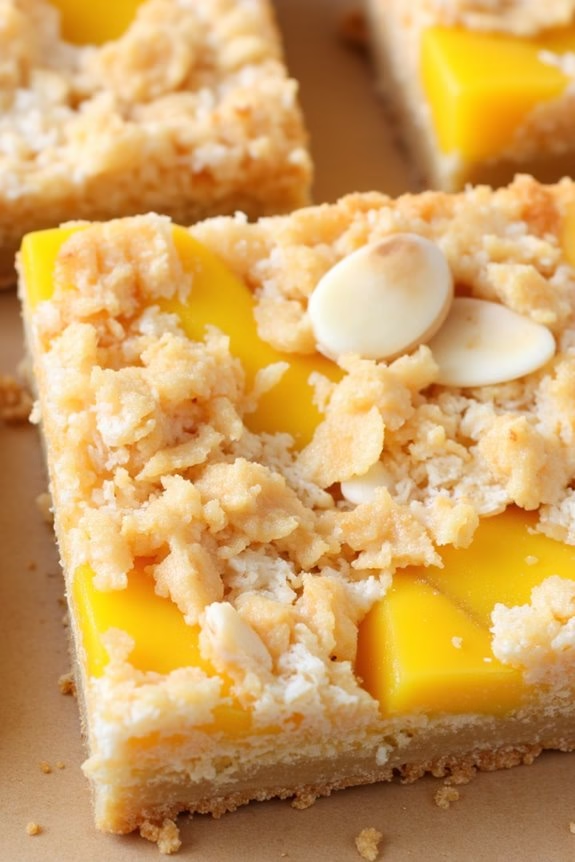
Tropical Coconut Mango Bars are a delightful treat that brings the taste of a tropical paradise to your breakfast table. These bars are perfect for those who crave a sweet, fruity start to their day.
Combining the vibrant flavors of ripe mango and the rich, nutty taste of coconut, these bars aren’t only delicious but also packed with nutrients. They’re a wonderful way to enjoy a healthy breakfast on the go or a delightful snack at any time.
Infused with the natural sweetness of mango and the crunchy texture of coconut, these bars are bound to become a favorite. The recipe is simple to follow and requires minimal baking time, making it perfect for busy mornings.
Whether you’re looking to impress your family with a homemade breakfast treat or prepare a batch for a brunch gathering, these Tropical Coconut Mango Bars won’t disappoint. Here’s how to make them for 4-6 servings.
Ingredients:
- 1 ½ cups rolled oats
- 1 cup shredded coconut
- ½ cup almond flour
- ½ teaspoon baking powder
- ¼ teaspoon salt
- ½ cup honey or maple syrup
- ¼ cup coconut oil, melted
- 1 teaspoon vanilla extract
- 1 ½ cups diced ripe mango
- ¼ cup chopped macadamia nuts (optional)
Instructions:
- Preheat and Prepare: Preheat your oven to 350°F (175°C). Line an 8×8 inch baking pan with parchment paper, leaving some overhang on the sides for easy removal later.
- Mix Dry Ingredients: In a large mixing bowl, combine the rolled oats, shredded coconut, almond flour, baking powder, and salt. Stir well to guarantee everything is evenly distributed.
- Combine Wet Ingredients: In a separate bowl, whisk together the honey or maple syrup, melted coconut oil, and vanilla extract until smooth.
- Combine Mixtures: Pour the wet ingredients into the dry ingredients and mix until fully incorporated. The mixture should be sticky and hold together when pressed.
- Add Mango and Nuts: Gently fold in the diced mango and macadamia nuts (if using) until evenly distributed throughout the mixture.
- Press and Bake: Transfer the mixture to the prepared baking pan. Use a spatula to press it firmly and evenly into the pan. Bake in the preheated oven for 25-30 minutes, or until the edges are golden brown.
- Cool and Cut: Allow the bars to cool completely in the pan on a wire rack. Once cooled, use the parchment paper overhang to lift the bars out of the pan. Cut into squares or bars as desired.
Extra Tips:
For an added tropical flair, consider toasting the shredded coconut before mixing it with the other ingredients. This will enhance the coconut flavor and add a hint of crunch to the bars.
If fresh mango isn’t available, you can use frozen mango chunks, but be sure to thaw and drain them well before adding to the mix to avoid excess moisture.
Store any leftover bars in an airtight container at room temperature for up to three days, or refrigerate them for up to a week. Enjoy your Tropical Coconut Mango Bars with a cup of coffee or tea for a truly delightful breakfast experience.
Almond Joy Breakfast Bars
Almond Joy Breakfast Bars are the perfect combination of sweet and nutty flavors that will transport you to a tropical paradise with every bite. These bars are inspired by the classic candy but are made with wholesome ingredients, making them a nutritious and satisfying breakfast option. Packed with almonds, chocolate, and coconut, they provide a delightful crunch and a burst of flavor to kickstart your day with energy and joy.
This recipe is designed to serve 4-6 people, making it an ideal choice for a family breakfast or a quick grab-and-go option for busy mornings. The bars are easy to prepare and can be made ahead of time, so you can enjoy a delicious breakfast without the morning rush.
Let’s explore the ingredients and instructions to make these irresistible Almond Joy Breakfast Bars.
Ingredients for 4-6 servings:
- 1 ½ cups rolled oats
- 1 cup almond butter
- ½ cup honey or maple syrup
- 1 teaspoon vanilla extract
- ½ cup unsweetened shredded coconut
- ½ cup chopped almonds
- ½ cup dark chocolate chips
- ¼ teaspoon salt
Cooking Instructions:
- Prepare the Baking Dish: Line an 8×8-inch baking dish with parchment paper, leaving some overhang on the sides. This will make it easier to remove the bars once they’re set.
- Mix the Wet Ingredients: In a medium saucepan over low heat, combine the almond butter and honey (or maple syrup). Stir constantly until the mixture is smooth and well-blended. Remove from heat and stir in the vanilla extract.
- Combine Dry Ingredients: In a large mixing bowl, combine the rolled oats, shredded coconut, chopped almonds, chocolate chips, and salt. Stir well to guarantee all ingredients are evenly distributed.
- Combine Wet and Dry Ingredients: Pour the almond butter mixture over the dry ingredients. Use a spatula to mix everything together until all the dry ingredients are well coated with the wet mixture.
- Press into the Baking Dish: Transfer the mixture into the prepared baking dish. Use the back of a spoon or a spatula to press down firmly, ensuring the mixture is evenly spread and compact.
- Chill the Bars: Place the baking dish in the refrigerator for at least 2 hours, or until the mixture is firm and set.
- Cut and Serve: Once set, lift the parchment paper to remove the bars from the dish. Place on a cutting board and cut into bars of your desired size. Serve immediately or store for later.
Extra Tips:
For a more decadent treat, consider drizzling melted dark chocolate over the top of the bars before chilling them.
If you prefer a chewier texture, you can toast the oats and coconut lightly in a pan before mixing.
These bars store well in an airtight container in the refrigerator for up to a week, or they can be frozen for up to a month.
Feel free to experiment with different types of nuts or add-ins, like dried fruits, to customize the flavor to your liking.
Banana Nut Crunch Bars
Banana Nut Crunch Bars are a delightful and wholesome breakfast option that combines the natural sweetness of bananas with the satisfying crunch of nuts. Perfect for busy mornings, these bars are packed with nutrients and flavors that can keep you energized throughout the day. By using ripe bananas, you can naturally sweeten the bars, making them a healthier alternative to store-bought options.
The combination of rolled oats, nuts, and a hint of cinnamon creates a warm and comforting taste that will make these bars a family favorite. These bars aren’t only delicious but also quite easy to make. All it takes is a little preparation, and you’ll have a batch ready in no time. They can be stored for several days, making them a convenient breakfast or snack option.
Whether you’re on the go or enjoying a leisurely morning at home, Banana Nut Crunch Bars can be a tasty and nutritious addition to your breakfast routine.
Ingredients (Serves 4-6):
- 3 ripe bananas
- 2 cups rolled oats
- 1/2 cup chopped walnuts
- 1/4 cup honey
- 1 teaspoon vanilla extract
- 1 teaspoon ground cinnamon
- 1/4 teaspoon salt
- 1/4 cup melted coconut oil
- 1/4 cup almond butter
Instructions:
- Preheat the Oven: Begin by preheating your oven to 350°F (175°C). This guarantees that the oven is ready for baking the bars once you have prepared the mixture.
- Prepare the Baking Dish: Line an 8×8-inch baking dish with parchment paper. This will make it easy to remove the bars once they’re baked and cooled.
- Mash the Bananas: In a large mixing bowl, mash the ripe bananas using a fork until they reach a smooth consistency. The mashed bananas will act as a natural sweetener and binder for the bars.
- Combine Ingredients: Add the rolled oats, chopped walnuts, honey, vanilla extract, ground cinnamon, and salt to the mashed bananas. Stir until all the ingredients are well combined.
- Add Wet Ingredients: Pour in the melted coconut oil and almond butter, then mix thoroughly to guarantee all the ingredients are evenly distributed.
- Transfer to Baking Dish: Pour the mixture into the prepared baking dish, spreading it evenly with a spatula to ensure uniform thickness.
- Bake: Place the baking dish in the preheated oven and bake for 25-30 minutes or until the edges turn golden brown and the center is set.
- Cool and Cut: Allow the bars to cool in the baking dish for about 15 minutes before lifting them out using the parchment paper. Once cooled completely, cut into bars of your desired size.
Extra Tips:
For an added touch of flavor, consider sprinkling some additional chopped nuts or seeds on top of the mixture before baking. If you prefer a sweeter bar, you can increase the amount of honey or add a handful of chocolate chips.
These bars can be stored in an airtight container at room temperature for up to 3 days or in the refrigerator for up to a week. For a nut-free version, substitute the walnuts with pumpkin seeds and the almond butter with sunflower seed butter.
Apple Cinnamon Streusel Bars

Apple Cinnamon Streusel Bars are a delightful breakfast option that combines the comforting flavors of apple pie with the convenience of a grab-and-go bar. These bars are perfect for those mornings when you’re short on time but still want a hearty and satisfying breakfast.
With a delicious combination of tender apples, warm cinnamon, and a crumbly streusel topping, these bars are guaranteed to become a family favorite. Imagine starting your day with a bar that encapsulates the essence of autumn in every bite.
These Apple Cinnamon Streusel Bars aren’t only easy to make but also filled with nutritious ingredients that provide a good balance of carbohydrates and fiber. Whether you’re enjoying them fresh out of the oven at home or packing them up for a quick breakfast at work or school, these bars will keep you energized and satisfied.
Ingredients (serving size: 4-6 people):
- 2 cups all-purpose flour
- 1 cup rolled oats
- 1 cup brown sugar, packed
- 1 teaspoon baking powder
- 1/2 teaspoon salt
- 1 teaspoon ground cinnamon
- 1/2 teaspoon ground nutmeg
- 1 cup unsalted butter, melted
- 3 medium apples, peeled, cored, and diced
- 2 tablespoons granulated sugar
- 1 tablespoon lemon juice
- 1 teaspoon vanilla extract
Cooking Instructions:
- Preheat the Oven: Begin by preheating your oven to 350°F (175°C). This guarantees that it’s at the right temperature when you’re ready to bake the bars.
- Prepare the Baking Dish: Grease a 9×13 inch baking dish lightly with butter or non-stick spray to prevent the bars from sticking.
- Make the Streusel Base: In a large mixing bowl, combine the flour, oats, brown sugar, baking powder, salt, cinnamon, and nutmeg. Mix well until all ingredients are evenly distributed.
- Add the Butter: Pour the melted butter over the dry ingredients. Stir until the mixture becomes crumbly and evenly moist. Reserve about 1 cup of this mixture for the topping.
- Form the Base Layer: Press the remaining crumb mixture firmly into the bottom of the prepared baking dish to create an even base layer.
- Prepare the Apple Filling: In a separate bowl, toss the diced apples with granulated sugar, lemon juice, and vanilla extract. Confirm all the apple pieces are well-coated.
- Assemble the Bars: Spread the apple mixture evenly over the crumb base in the baking dish. Sprinkle the reserved crumb mixture on top of the apples to form a streusel topping.
- Bake: Place the baking dish in the preheated oven and bake for 35-40 minutes, or until the top is golden brown and the apples are tender.
- Cool and Serve: Allow the bars to cool in the baking dish for about 15 minutes before cutting them into squares. Serve warm or at room temperature for the best flavor.
Extra Tips:
When selecting apples for this recipe, choose a variety that holds up well during baking, such as Granny Smith or Honeycrisp. If you prefer a sweeter bar, consider adding a bit more sugar to the apple filling.
For an added twist, you can incorporate nuts like walnuts or pecans into the streusel topping for extra crunch. These bars can be stored in an airtight container for up to 3 days, making them a convenient make-ahead breakfast option.
Cranberry Orange Bliss Bars
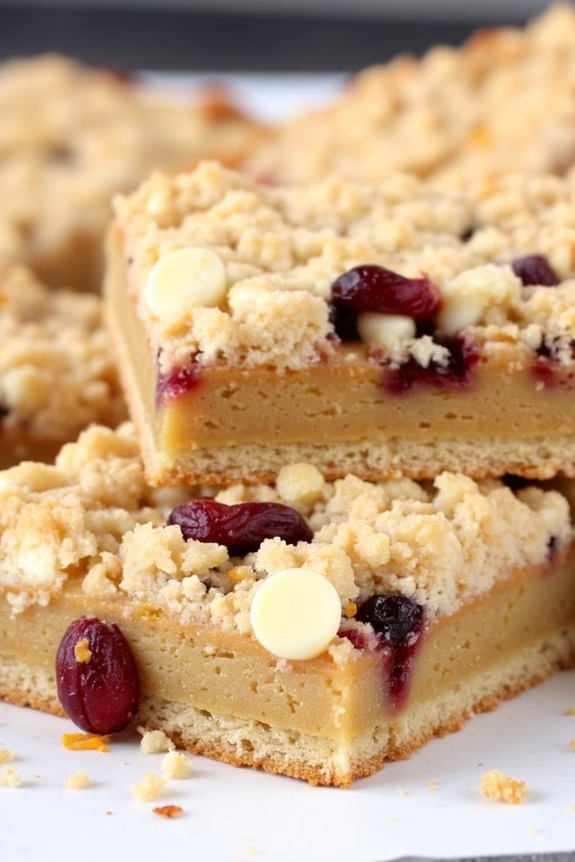
Cranberry Orange Bliss Bars are a delightful and flavorful treat that combines the tartness of cranberries with the invigorating zest of oranges. These bars are perfect for breakfast or as a snack, offering a balance of sweetness and tanginess that’s sure to please any palate.
The combination of dried cranberries and orange zest provides a burst of flavor in every bite, making these bars a crowd favorite. They’re easy to make and can be prepared in advance, making them a convenient option for busy mornings or brunch gatherings.
Whether you’re preparing them for a family breakfast or a friendly get-together, these Cranberry Orange Bliss Bars are sure to be a hit. The bars are moist and slightly chewy, with a crumbly topping that adds a lovely texture. Rich in flavor and filled with wholesome ingredients, this recipe will yield bars that are both satisfying and nutritious.
This recipe serves 4-6 people, making it perfect for sharing or saving some for later.
Ingredients:
- 1 1/2 cups all-purpose flour
- 1/2 cup rolled oats
- 1/2 cup granulated sugar
- 1/2 cup brown sugar
- 1 teaspoon baking powder
- 1/2 teaspoon salt
- 1/2 cup unsalted butter, melted
- 1 large egg
- 1 teaspoon vanilla extract
- Zest of 1 orange
- 1/2 cup dried cranberries
- 1/4 cup orange juice
- 1/2 cup white chocolate chips
Cooking Instructions:
- Preheat and Prepare: Preheat your oven to 350°F (175°C). Line an 8×8 inch baking pan with parchment paper, allowing some overhang on the sides for easy removal of the bars later.
- Mix Dry Ingredients: In a large mixing bowl, combine the all-purpose flour, rolled oats, granulated sugar, brown sugar, baking powder, and salt. Stir until all ingredients are well combined.
- Combine Wet Ingredients: In a separate bowl, whisk together the melted butter, egg, vanilla extract, and orange zest until smooth. Pour this mixture into the bowl with the dry ingredients.
- Incorporate the Add-ins: Gently fold in the dried cranberries, orange juice, and white chocolate chips until evenly distributed throughout the dough.
- Transfer to Baking Pan: Pour the mixture into the prepared baking pan, spreading it evenly with a spatula to guarantee the bars cook uniformly.
- Bake: Place the pan in the preheated oven and bake for 25-30 minutes, or until the edges are golden brown and a toothpick inserted into the center comes out clean.
- Cool Completely: Once baked, remove the pan from the oven and allow the bars to cool completely in the pan on a wire rack. This will make them easier to cut and serve.
- Slice and Serve: Use the parchment paper overhang to lift the bars out of the pan. Cut into squares or rectangles, depending on your preference. Serve and enjoy!
Extra Tips:
To enhance the flavor of your Cranberry Orange Bliss Bars, consider toasting the rolled oats lightly before adding them to the mixture; this will give the bars a nuttier flavor.
You can also substitute the white chocolate chips with dark chocolate chips for a richer taste. If you prefer a more intense orange flavor, add a bit more orange zest or a splash of orange extract.
Remember to store the bars in an airtight container at room temperature, where they can remain fresh for up to a week.
Pumpkin Spice Granola Bars
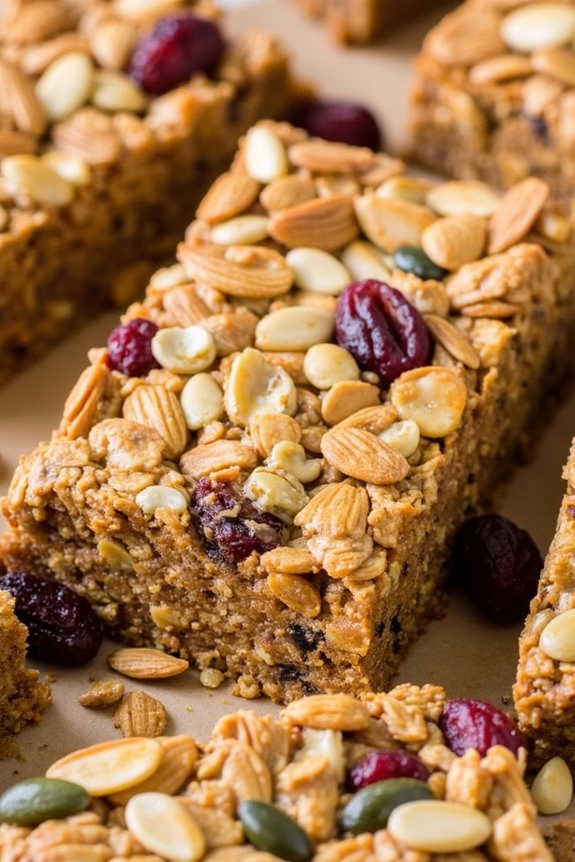
Pumpkin Spice Granola Bars are a delightful and nutritious option for breakfast or a quick snack. These bars combine the warm, comforting flavors of pumpkin spice with the hearty texture of oats and nuts, making them perfect for the fall season or anytime you crave a taste of autumn.
Packed with the goodness of pumpkin puree, these granola bars aren’t only flavorful but also offer a good dose of fiber and nutrients to start your day on the right note.
Whether you’re looking for a make-ahead breakfast option or a portable snack for busy days, Pumpkin Spice Granola Bars are an excellent choice. They can be easily customized with your favorite nuts, seeds, and dried fruits, allowing you to tailor them to your taste preferences.
With just a few simple ingredients and some time in the kitchen, you’ll have a batch of these delicious bars ready to enjoy.
Ingredients (Serves 4-6)
- 2 cups rolled oats
- 1 cup canned pumpkin puree
- 1/2 cup honey or maple syrup
- 1/2 cup almond butter
- 1/4 cup chopped almonds
- 1/4 cup pumpkin seeds
- 1/4 cup dried cranberries
- 2 teaspoons pumpkin spice mix
- 1 teaspoon vanilla extract
- 1/2 teaspoon salt
Cooking Instructions
- Preheat Oven: Start by preheating your oven to 350°F (175°C). This will guarantee that the granola bars bake evenly.
- Mix Dry Ingredients: In a large mixing bowl, combine the rolled oats, chopped almonds, pumpkin seeds, dried cranberries, pumpkin spice mix, and salt. Stir until all the dry ingredients are evenly mixed.
- Combine Wet Ingredients: In a separate bowl, mix together the pumpkin puree, honey (or maple syrup), almond butter, and vanilla extract. Stir until smooth and well combined.
- Combine Wet and Dry Mixtures: Pour the wet ingredients into the bowl with the dry ingredients. Stir until everything is fully combined and the oats are well coated with the pumpkin mixture.
- Prepare Baking Dish: Line an 8×8 inch baking dish with parchment paper, leaving some overhang on the sides. This will make it easier to remove the bars once they’re baked.
- Transfer and Flatten: Transfer the granola mixture into the prepared baking dish. Use a spatula or the back of a spoon to press down firmly, making sure the mixture is evenly spread and compacted.
- Bake: Place the baking dish in the preheated oven and bake for 25-30 minutes, or until the edges are golden brown and the mixture is set.
- Cool and Slice: Remove the baking dish from the oven and allow the granola bars to cool completely in the dish. Once cooled, use the parchment paper to lift the bars out of the dish. Place on a cutting board and slice into bars.
Extra Tips
For the best texture, make sure to firmly press the granola mixture into the baking dish before baking. This helps the bars hold together better once they’re cooled and sliced.
If you prefer a nuttier flavor, lightly toast the almonds and pumpkin seeds before mixing them into the granola.
These bars can be stored in an airtight container at room temperature for up to a week or in the refrigerator for a longer shelf life. Feel free to experiment with different add-ins like chocolate chips or different nuts to customize the bars to your liking.
Lemon Poppy Seed Bars
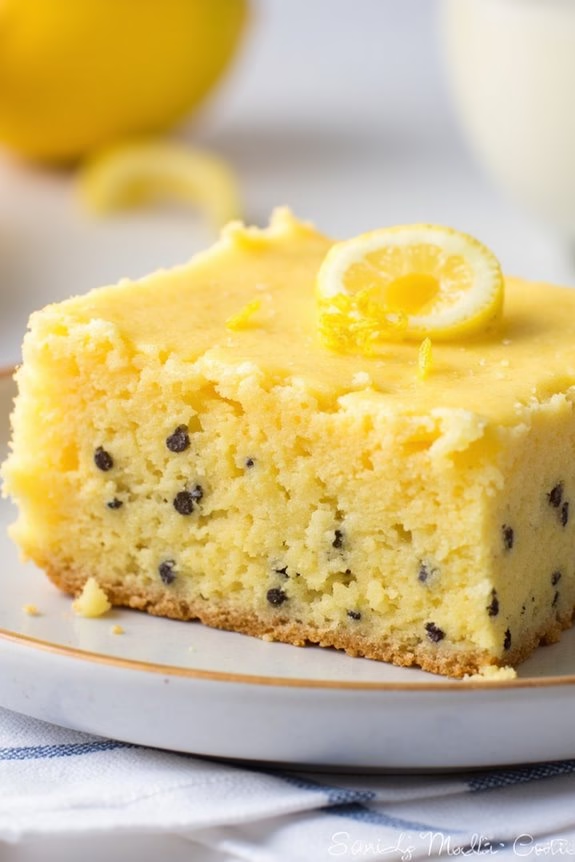
To create a delightful and zesty treat, Lemon Poppy Seed Bars can be the perfect addition to your breakfast or snack menu. These bars are a beautiful balance of tangy lemon and crunchy poppy seeds, offering a rejuvenating taste in every bite.
Whether you’re serving them at a brunch or enjoying them as a midday snack, they’re sure to brighten your day with their vibrant flavor and soft, chewy texture.
These bars are straightforward to make and packed with a burst of citrusy goodness. With just a few ingredients, you can whip up a batch that serves 4-6 people, making them ideal for sharing with family or friends.
The combination of fresh lemon zest and juice guarantees each bite is flavorful, while the poppy seeds add a delightful crunch, making these bars hard to resist.
Ingredients (serves 4-6):
- 1 cup all-purpose flour
- 1/2 teaspoon baking powder
- 1/4 teaspoon salt
- 1/2 cup unsalted butter, softened
- 3/4 cup granulated sugar
- 2 large eggs
- 1 tablespoon lemon zest
- 1/4 cup fresh lemon juice
- 1 teaspoon vanilla extract
- 2 tablespoons poppy seeds
Cooking Instructions:
- Preheat the Oven: Start by preheating your oven to 350°F (175°C). Line an 8×8 inch baking pan with parchment paper, leaving a bit of overhang on the sides for easy removal later.
- Mix Dry Ingredients: In a medium-sized bowl, whisk together the flour, baking powder, and salt. Set this mixture aside for later use.
- Cream Butter and Sugar: In a large mixing bowl, cream together the softened butter and granulated sugar using an electric mixer on medium speed until the mixture is light and fluffy, about 2-3 minutes.
- Add Wet Ingredients: Beat in the eggs one at a time, making sure each is fully incorporated before adding the next. Add the lemon zest, lemon juice, and vanilla extract, mixing until well combined.
- Combine Ingredients: Gradually add the dry ingredients to the wet mixture, mixing on low speed until just combined. Be careful not to overmix. Fold in the poppy seeds until evenly distributed throughout the batter.
- Bake the Bars: Pour the batter into the prepared baking pan, smoothing the top with a spatula. Bake in the preheated oven for 20-25 minutes or until a toothpick inserted into the center comes out clean.
- Cool and Serve: Allow the bars to cool in the pan for about 10 minutes, then use the parchment paper overhang to lift them out onto a wire rack to cool completely. Cut into bars and serve.
Extra Tips:
For an additional burst of flavor, consider drizzling the cooled bars with a simple glaze made from powdered sugar and lemon juice. This won’t only add sweetness but also enhance the citrus flavor.
Also, keep an eye on the baking time; overbaking can cause the bars to become dry. If you notice the edges browning too quickly, cover them with a piece of foil partway through baking.
These bars are best enjoyed fresh but can be stored in an airtight container at room temperature for up to three days.
Peanut Butter Jelly Bars
There’s something incredibly comforting about the combination of peanut butter and jelly, especially when transformed into a delicious breakfast bar. These Peanut Butter Jelly Bars are the perfect marriage of creamy, nutty peanut butter and sweet, fruity jelly, all nestled within a soft, chewy bar.
Ideal for a quick breakfast on the go or a satisfying snack, these bars will bring a smile to anyone’s face, reminiscent of the classic PB&J sandwich. The recipe yields bars with a rich, moist texture and a delightful balance of flavors. The oats add a hearty element, ensuring the bars are both filling and nutritious.
Whether you’re serving them for breakfast or packing them for a mid-afternoon treat, these bars are sure to become a family favorite. Let’s plunge into making this delicious treat for 4-6 people.
Ingredients:
- 1 cup creamy peanut butter
- 1/2 cup unsalted butter, softened
- 1/2 cup granulated sugar
- 1/2 cup brown sugar, packed
- 1 teaspoon vanilla extract
- 2 large eggs
- 1 1/2 cups all-purpose flour
- 1 teaspoon baking powder
- 1/4 teaspoon salt
- 1 1/2 cups old-fashioned oats
- 3/4 cup fruit jelly or jam of your choice
Instructions:
- Preheat the Oven: Start by preheating your oven to 350°F (175°C). Grease a 9×13 inch baking dish or line it with parchment paper to prevent the bars from sticking.
- Mix the Wet Ingredients: In a large mixing bowl, combine the creamy peanut butter, softened butter, granulated sugar, brown sugar, and vanilla extract. Beat these ingredients together with an electric mixer on medium speed until the mixture is smooth and creamy.
- Add the Eggs: Add the eggs to the wet mixture one at a time, beating well after each addition. This will help achieve a uniform batter.
- Combine Dry Ingredients: In a separate bowl, whisk together the all-purpose flour, baking powder, and salt. Gradually add this dry mixture to the wet ingredients, mixing until just combined.
- Incorporate the Oats: Stir in the old-fashioned oats until they’re evenly distributed throughout the batter. The oats will add a delightful texture to your bars.
- Layer the Mixture: Spread half of the peanut butter mixture into the prepared baking dish, pressing it down to form an even layer.
- Add the Jelly Layer: Spread the fruit jelly or jam over the peanut butter layer. Be careful to spread it evenly without mixing it into the base layer.
- Top with Remaining Mixture: Drop spoonfuls of the remaining peanut butter mixture over the jelly layer. Use a spatula or your fingers to gently spread it, covering the jelly as much as possible.
- Bake the Bars: Place the baking dish in the preheated oven and bake for 30-35 minutes, or until the bars are golden brown on top. A toothpick inserted into the center should come out mostly clean.
- Cool and Serve: Allow the bars to cool completely in the pan on a wire rack. Once cooled, slice them into bars and serve.
Extra Tips:
When spreading the top layer of peanut butter mixture, it may be a bit sticky. Dipping your spatula or fingers in a little water can help smooth it out more easily.
Additionally, feel free to experiment with different types of jelly or jam to find your favorite flavor combination. For a more decadent touch, consider drizzling melted chocolate over the top once the bars have cooled. This won’t only enhance the flavor but also add a touch of elegance to the presentation.
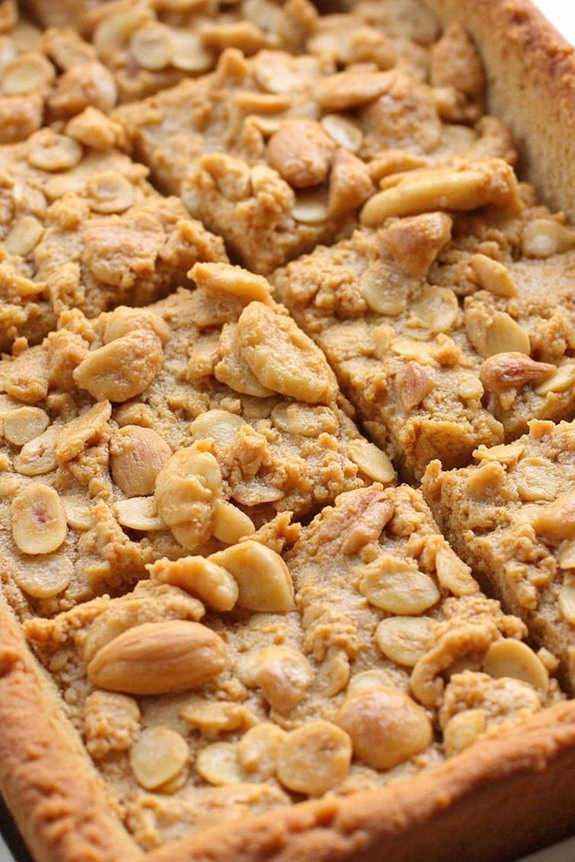
Blueberry Almond Bars
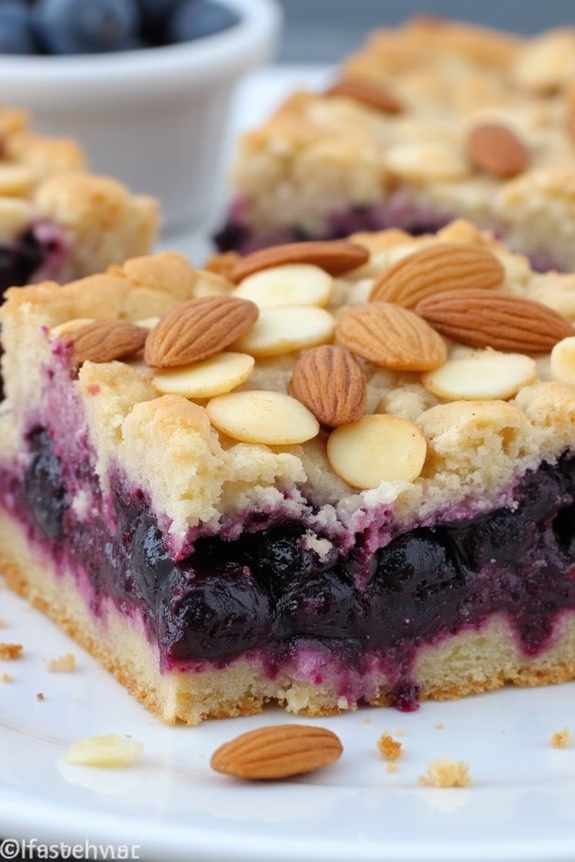
Blueberry Almond Bars are a delightful treat that combines the natural sweetness of blueberries with the nutty flavor of almonds. These bars are perfect for breakfast, a snack, or even a light dessert. With a crumbly almond crust and a juicy blueberry filling, they’re sure to satisfy your sweet tooth while providing a good dose of nutrients.
The combination of textures and flavors make these bars irresistible and a favorite among both kids and adults alike. These bars aren’t only delicious but also easy to make. They’re perfect for preparing ahead of time and enjoying throughout the week.
Whether you’re serving them at a brunch or packing them for a school lunch, Blueberry Almond Bars are a versatile and healthy choice. The recipe below yields 12-16 bars, making it ideal for serving 4-6 people.
Ingredients:
- 2 cups all-purpose flour
- 1 cup rolled oats
- 1 cup brown sugar
- 1 teaspoon baking powder
- 1/2 teaspoon salt
- 1 cup unsalted butter, melted
- 2 cups fresh or frozen blueberries
- 1/4 cup granulated sugar
- 1 tablespoon cornstarch
- 1 teaspoon vanilla extract
- 1/2 cup sliced almonds
Instructions:
- Preheat and Prepare the Pan: Preheat your oven to 350°F (175°C). Line a 9×13-inch baking pan with parchment paper, leaving some overhang on the sides for easy removal of the bars later.
- Make the Crust and Topping: In a large bowl, combine the flour, oats, brown sugar, baking powder, and salt. Stir in the melted butter until the mixture resembles coarse crumbs. Reserve about 1 cup of this mixture for the topping and press the rest firmly into the bottom of the prepared pan to form the crust.
- Prepare the Blueberry Filling: In a medium bowl, combine the blueberries, granulated sugar, cornstarch, and vanilla extract. Mix until the blueberries are well-coated with the sugar and cornstarch.
- Assemble the Bars: Spread the blueberry mixture evenly over the crust in the pan. Sprinkle the reserved crumb mixture over the top, followed by the sliced almonds.
- Bake the Bars: Place the pan in the preheated oven and bake for 40-45 minutes, or until the top is golden brown and the blueberries are bubbling.
- Cool and Slice: Allow the bars to cool completely in the pan on a wire rack. Once cool, use the parchment paper overhang to lift the bars out of the pan and onto a cutting board. Slice into 12-16 bars.
Extra Tips:
For the best results, make sure to use fresh, ripe blueberries when they’re in season. If using frozen blueberries, don’t thaw them before adding to the mixture, as this can make the filling too watery.
For a gluten-free version, substitute the all-purpose flour with a gluten-free flour blend. To enhance the almond flavor, you can add a few drops of almond extract to the crust mixture.
These bars can be stored in an airtight container at room temperature for up to 3 days or in the refrigerator for up to a week.
Date and Walnut Energy Bars
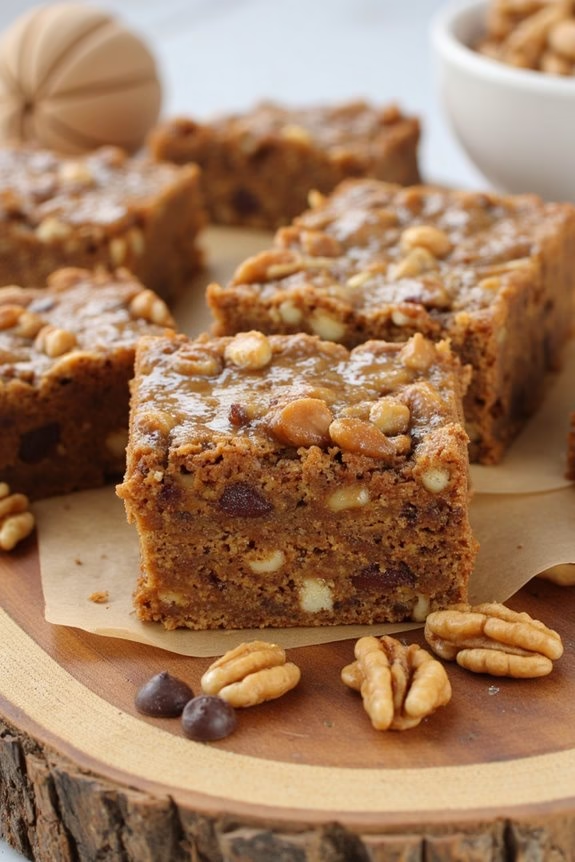
Date and Walnut Energy Bars are a delicious and nutritious option for a quick breakfast or a mid-day snack. Packed with natural sugars from dates and protein from walnuts, these bars provide a perfect energy boost to start your day or keep you going through a busy afternoon.
They’re easy to make, require no baking, and can be stored for several days, making them a convenient choice for meal prep.
These energy bars aren’t only tasty but also versatile, allowing you to add in other ingredients like seeds, dried fruits, or even a touch of chocolate for variety. The combination of dates and walnuts creates a chewy texture with a nutty flavor that’s both satisfying and wholesome.
Preparing Date and Walnut Energy Bars at home guarantees that you know exactly what goes into them, making them a healthier option compared to store-bought alternatives.
Ingredients (Serves 4-6)
- 1 cup pitted dates
- 1 cup walnuts
- 1/4 cup almond butter
- 1/4 cup honey or maple syrup
- 1/2 teaspoon vanilla extract
- 1/4 teaspoon salt
- 1/4 cup chia seeds (optional)
- 1/4 cup mini chocolate chips (optional)
Cooking Instructions
- Prepare the Dates: Place the pitted dates in a bowl and cover them with warm water. Let them soak for about 10 minutes to soften. After soaking, drain the water and pat the dates dry with a paper towel.
- Process the Mixture: In a food processor, combine the soaked dates and walnuts. Pulse until the mixture is well combined and starts to come together. The mixture should be sticky and have a uniform consistency.
- Incorporate Additional Ingredients: Add the almond butter, honey or maple syrup, vanilla extract, and salt to the food processor. If using chia seeds or chocolate chips, add them as well. Pulse the mixture again until all ingredients are fully incorporated.
- Form the Bars: Line an 8×8 inch baking pan with parchment paper. Transfer the mixture to the prepared pan and press it down firmly with a spatula to create an even layer. Make sure to pack it tightly to confirm the bars hold together.
- Chill and Set: Place the pan in the refrigerator for at least 2 hours, or until the mixture is firm enough to cut. Once set, remove from the fridge and lift the parchment paper out of the pan. Cut the mixture into bars or squares of your desired size.
- Store: Store the bars in an airtight container in the refrigerator for up to a week, or freeze them for up to 3 months. Enjoy them as a quick breakfast or a handy snack on the go.
Extra Tips
For a different flavor profile, try adding a teaspoon of cinnamon or a pinch of nutmeg to the mixture. You can also experiment with different types of nuts, such as almonds or pecans, for a unique twist.
If you prefer a sweeter bar, increase the amount of honey or maple syrup, but be cautious as it may affect the firmness of the bars.
Finally, to make cutting easier, use a sharp knife and clean it between cuts to achieve neat and even pieces.
Maple Pecan Breakfast Bars
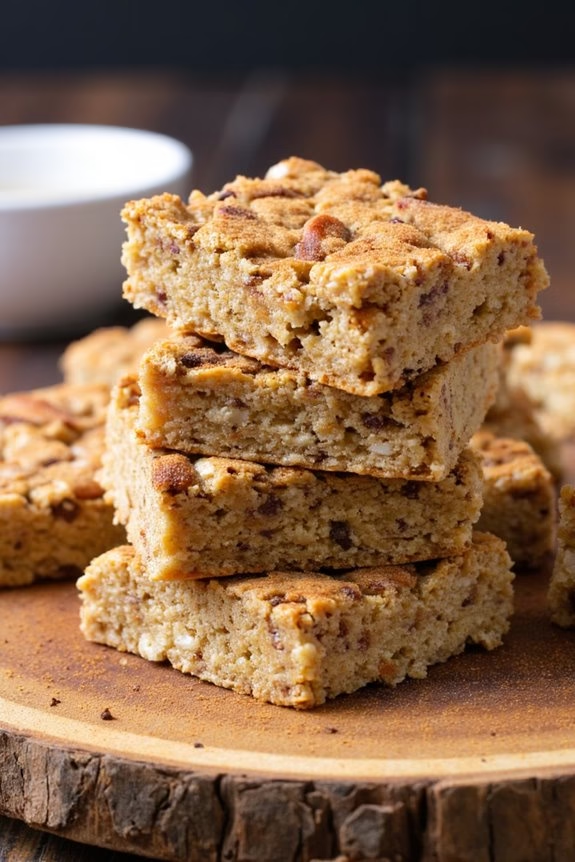
Maple Pecan Breakfast Bars are a delightful and wholesome way to start your day. These bars combine the comforting flavors of maple syrup and toasted pecans, creating a sweet yet nutty treat that’s both satisfying and nutritious. Perfect for busy mornings, they can be made ahead of time and stored for a quick grab-and-go breakfast or a midday snack.
Whether you’re rushing out the door or enjoying a leisurely morning at home, these bars are a versatile option that caters to various dietary preferences. Incorporating oats, almond flour, and a blend of seeds, these bars not only offer a great taste but also provide a boost of energy to keep you going throughout the day.
The natural sweetness of maple syrup complements the richness of pecans, while a hint of cinnamon adds warmth to the mix. These Maple Pecan Breakfast Bars are perfect for serving 4-6 people and can be enjoyed by everyone in the family. With simple, wholesome ingredients, they’re a great alternative to store-bought options, guaranteeing you know exactly what goes into your breakfast.
Ingredients (serves 4-6):
- 2 cups rolled oats
- 1 cup almond flour
- 1 cup pecans, chopped
- 1/2 cup maple syrup
- 1/4 cup coconut oil, melted
- 1/4 cup chia seeds
- 1/4 cup flaxseeds
- 1 tsp vanilla extract
- 1 tsp ground cinnamon
- 1/2 tsp salt
Cooking Instructions:
- Preheat the Oven: Begin by preheating your oven to 350°F (175°C). This will guarantee that your bars cook evenly throughout.
- Mix the Dry Ingredients: In a large mixing bowl, combine the rolled oats, almond flour, chopped pecans, chia seeds, flaxseeds, ground cinnamon, and salt. Stir until all the dry ingredients are well mixed.
- Combine Wet Ingredients: In a separate bowl, whisk together the melted coconut oil, maple syrup, and vanilla extract. Make sure the coconut oil is fully melted to facilitate easy mixing.
- Combine Wet and Dry Mixtures: Pour the wet ingredients into the bowl with the dry ingredients. Mix thoroughly until the entire mixture is well-coated and forms a sticky consistency.
- Prepare the Baking Dish: Line an 8×8 inch baking dish with parchment paper, leaving some overhang on the sides to help lift the bars out later. This will prevent the bars from sticking to the dish.
- Transfer and Flatten the Mixture: Pour the mixture into the prepared baking dish. Use the back of a spoon or a spatula to press the mixture down evenly, ensuring it’s compact and level.
- Bake: Place the baking dish in the preheated oven and bake for 25-30 minutes, or until the edges are golden brown and the center is set.
- Cool and Cut: Remove the bars from the oven and let them cool in the dish for about 10 minutes. Then, use the parchment paper overhang to lift the bars out and transfer them to a wire rack to cool completely. Once cooled, cut them into bars of your desired size.
Extra Tips: For a more robust flavor, try toasting the pecans before adding them to the mixture. Simply heat them in a dry skillet over medium heat for about 5 minutes, stirring frequently until they’re fragrant.
Additionally, feel free to customize your bars by adding dried fruits, such as cranberries or raisins, for extra sweetness. Store the bars in an airtight container at room temperature for up to a week, or freeze them for longer storage. Enjoy these Maple Pecan Breakfast Bars as part of a balanced breakfast or as a nourishing snack throughout the day.
Mixed Berry Yogurt Bars
Mixed Berry Yogurt Bars are a delicious and nutritious way to start your day. These bars combine the tangy taste of mixed berries with the creamy texture of yogurt to create a delightful breakfast option. Perfect for those on the go, these bars can be prepared ahead of time and stored in the refrigerator for a quick grab-and-go breakfast or snack.
They’re not only packed with flavor but also with essential nutrients, making them a great choice for a healthy morning routine.
These breakfast bars are particularly versatile as they can be adapted to suit your taste or dietary needs. You can use any combination of your favorite berries like strawberries, blueberries, raspberries, or blackberries. The addition of granola or oats provides a satisfying crunch and keeps you full longer. This recipe serves 4-6 people, making it ideal for a family breakfast or a brunch gathering with friends.
Ingredients (Serves 4-6):
- 2 cups Greek yogurt
- 1/4 cup honey or maple syrup
- 1 teaspoon vanilla extract
- 1 cup mixed berries (strawberries, blueberries, raspberries, blackberries)
- 1/2 cup granola or rolled oats
- 1/4 cup chopped nuts (optional)
- 1 tablespoon chia seeds (optional)
Cooking Instructions:
- Prepare the Yogurt Mixture: In a medium bowl, combine the Greek yogurt, honey or maple syrup, and vanilla extract. Mix well until the ingredients are fully incorporated and the mixture is smooth.
- Prepare the Berries: Wash and pat dry the mixed berries. If using strawberries, hull and slice them into smaller pieces. Verify all berries are roughly the same size for even distribution.
- Layer the Ingredients: Line an 8×8 inch baking dish with parchment paper for easy removal. Spread half of the yogurt mixture evenly over the bottom of the dish.
- Add the Berries: Evenly distribute the mixed berries over the yogurt layer. Sprinkle the granola or oats on top of the berries, followed by the optional chopped nuts and chia seeds, if using.
- Top with Remaining Yogurt: Pour the remaining yogurt mixture over the top of the berries and granola. Use a spatula to spread it evenly, making sure all ingredients are covered.
- Freeze the Bars: Place the dish in the freezer for at least 4 hours, or until the yogurt is firm and set.
- Slice and Serve: Once set, remove the dish from the freezer and let it sit at room temperature for about 5 minutes to soften slightly. Lift the mixture out using the parchment paper and place it on a cutting board. Cut into bars of your desired size and serve immediately or store in the freezer.
Extra Tips:
For a smoother cutting process, use a sharp knife and run it under warm water before slicing the bars. If you prefer softer bars, allow them to sit at room temperature for a few more minutes before serving.
You can customize these bars by adding other ingredients like coconut flakes or dried fruits. Store any leftovers in an airtight container in the freezer to keep them fresh for up to two weeks. Enjoy your Mixed Berry Yogurt Bars as a nutritious breakfast or a delightful snack whenever you need a quick boost of energy.
Choco Hazelnut Dream Bars
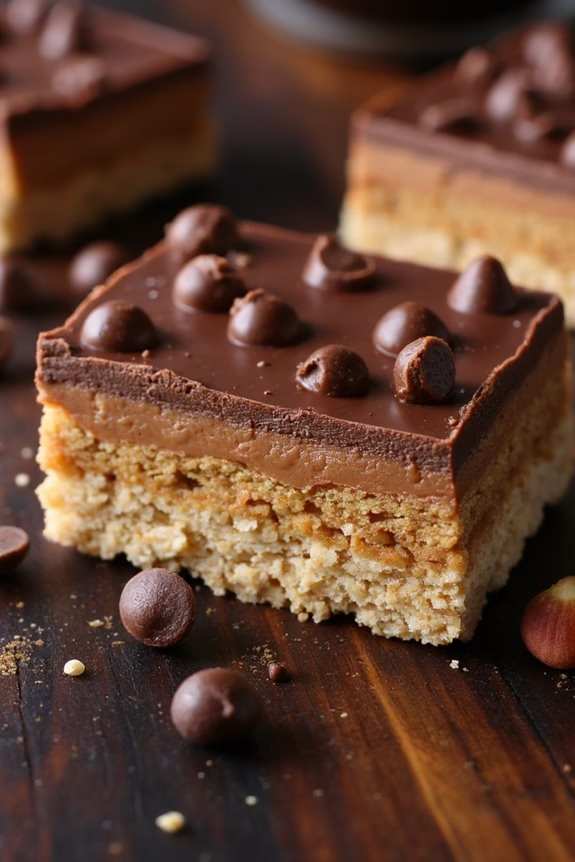
Choco Hazelnut Dream Bars are a delightful fusion of rich chocolate and crunchy hazelnuts, perfect for a quick breakfast or an indulgent snack. These bars aren’t only delicious but also a great source of energy, making them ideal for busy mornings or a mid-afternoon pick-me-up.
With a smooth chocolate layer topping a chewy, nutty base, these bars will satisfy your sweet tooth while keeping you fueled throughout the day.
This recipe is designed to serve 4-6 people, making it perfect for sharing with friends or family. The preparation process involves simple steps and the use of readily available ingredients, guaranteeing that you can whip up these delectable bars without much hassle.
Whether you’re a seasoned baker or a novice in the kitchen, these Choco Hazelnut Dream Bars are sure to impress with their irresistible flavor and texture.
Ingredients:
- 1 cup rolled oats
- 1/2 cup hazelnuts, chopped
- 1/2 cup all-purpose flour
- 1/4 cup brown sugar
- 1/4 cup honey
- 1/4 cup unsalted butter, melted
- 1/4 teaspoon salt
- 1/2 cup chocolate chips
- 1/4 cup hazelnut spread (such as Nutella)
- 1/2 teaspoon vanilla extract
Instructions:
- Preheat the Oven: Begin by preheating your oven to 350°F (175°C). Line an 8×8 inch baking dish with parchment paper, leaving some overhang on the sides for easy removal later.
- Prepare the Base: In a large mixing bowl, combine the rolled oats, chopped hazelnuts, all-purpose flour, brown sugar, and salt. Stir the ingredients until they’re evenly distributed.
- Mix Wet Ingredients: In a separate bowl, whisk together the melted butter, honey, and vanilla extract. Pour this mixture into the dry ingredients and stir until everything is well combined and a thick, sticky dough forms.
- Press the Mixture: Transfer the mixture into the prepared baking dish. Use the back of a spoon or your hands to press it down firmly and evenly across the bottom of the dish.
- Bake the Base: Place the baking dish in the preheated oven and bake for 15-20 minutes, or until the edges turn golden brown. Remove from the oven and allow it to cool slightly.
- Prepare the Topping: While the base cools, melt the chocolate chips either in a microwave-safe bowl in 30-second intervals or using a double boiler method. Stir until smooth and silky.
- Layer the Topping: Once the base has cooled, spread the hazelnut spread evenly over it, followed by the melted chocolate. Use a spatula to guarantee an even layer.
- Chill the Bars: Transfer the baking dish to the refrigerator and allow the bars to set for at least 1 hour, or until the chocolate topping has hardened.
- Slice and Serve: Once set, remove the bars from the dish using the parchment paper overhang. Slice into squares or rectangles and serve your Choco Hazelnut Dream Bars.
Extra Tips:
For an extra crunch, consider toasting the hazelnuts before incorporating them into the mixture. You can do this by spreading them on a baking sheet and roasting at 350°F (175°C) for about 5-7 minutes, or until they’re fragrant.
Be sure to let them cool before chopping. Additionally, if you prefer a less sweet bar, you can reduce the amount of brown sugar or honey to suit your taste.
Finally, store any leftover bars in an airtight container in the refrigerator to keep them fresh for up to a week.