
Mornings can be a whirlwind, but having easy breakfast options on hand can make all the difference.
I’ve gathered 11 simple breakfast-to-go ideas that promise to make your mornings smoother.
Think overnight oats or a breakfast burrito wrap that you can enjoy on the go.
Curious about these delightful, time-saving meals?
Let’s explore how you can start your day with ease.
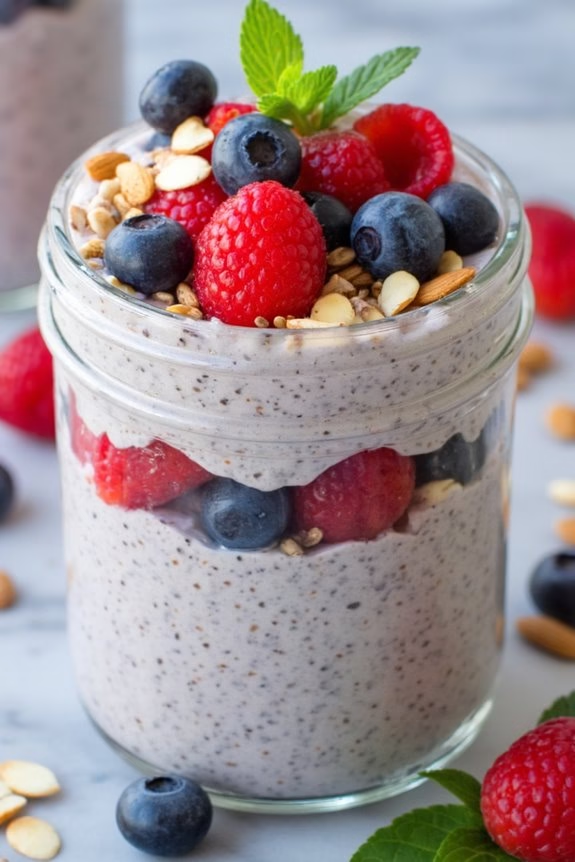
Overnight Oats With Fresh Fruit
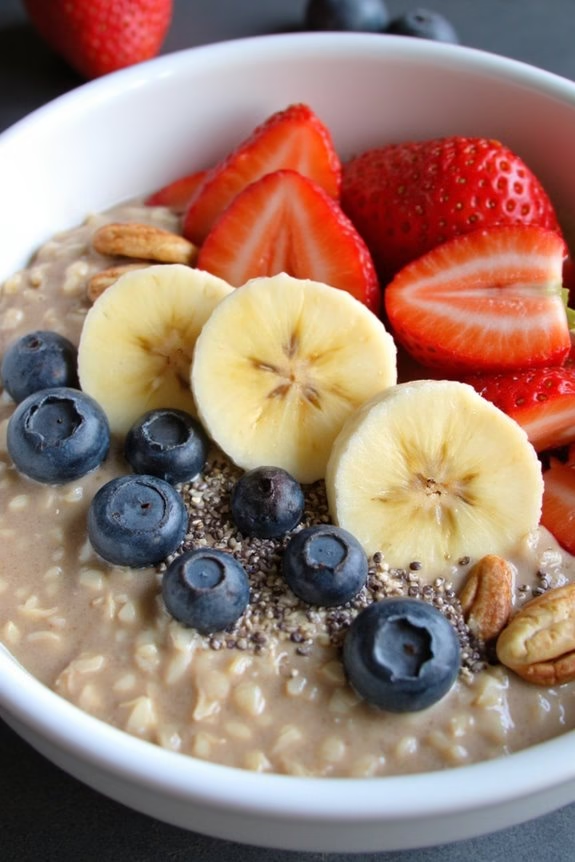
Overnight oats with fresh fruit is a delicious, nutritious breakfast perfect for busy mornings. Prepared the night before, this meal requires minimal effort in the morning, allowing you to grab a wholesome breakfast on the go. The combination of creamy oats and vibrant, juicy fruit offers a delightful contrast in texture and a burst of flavor with every bite.
Plus, it’s a versatile dish that can be customized to your taste preferences and dietary needs. Whether you’re feeding a family or preparing breakfast for the week, this recipe serves 4-6 people, making it perfect for meal prep. The oats soak up the liquid overnight, becoming soft and creamy, while the fruit adds a natural sweetness and a boost of vitamins.
Feel free to adjust the types of fruit and other toppings based on seasonal availability or personal preference to keep this breakfast fresh and exciting.
Ingredients:
- 3 cups rolled oats
- 3 cups milk (dairy or plant-based)
- 6 tablespoons chia seeds
- 3 tablespoons honey or maple syrup
- 1 teaspoon vanilla extract
- 1 teaspoon ground cinnamon
- Pinch of salt
- 2 cups mixed fresh fruit (such as berries, bananas, or apples)
- 1/2 cup nuts or seeds (optional)
- 1/2 cup Greek yogurt (optional)
Instructions:
- Combine Ingredients: In a large mixing bowl, combine the rolled oats, milk, chia seeds, honey or maple syrup, vanilla extract, ground cinnamon, and a pinch of salt. Stir well to confirm all ingredients are evenly distributed.
- Divide and Refrigerate: Divide the mixture evenly among 4-6 mason jars or airtight containers. Make sure each container is sealed tightly to prevent any spoilage. Refrigerate the jars overnight, or for at least 6-8 hours, allowing the oats to absorb the liquid and soften.
- Prepare Fresh Fruit: Just before serving, prepare your fresh fruit by washing and slicing it as needed. Choose a mix of fruits like strawberries, blueberries, bananas, or apples for a variety of flavors and textures.
- Assemble the Oats: Remove the oats from the refrigerator and give them a good stir. Top each jar with a generous portion of the prepared fresh fruit. If desired, add a dollop of Greek yogurt for extra creaminess and some nuts or seeds for added crunch and nutrition.
- Serve and Enjoy: These overnight oats are ready to eat straight from the jar. If you prefer them slightly warmer, you can microwave the oats for about 30 seconds before adding the fruit. Enjoy your nutritious breakfast on the go!
Extra Tips:
To keep your overnight oats fresh, store them in the refrigerator for up to 5 days. This makes them an excellent choice for meal prepping.
Feel free to experiment with different flavors by adding ingredients such as cocoa powder, nut butters, or protein powder to the oat mixture. You can also try different milk alternatives to find the one that best suits your taste and dietary needs.
Remember to adjust the level of sweetness by varying the amount of honey or maple syrup according to your preference.
Breakfast Burrito Wraps

Breakfast burrito wraps are a fantastic way to start your day with a hearty and satisfying meal. These wraps aren’t only delicious but also incredibly versatile, allowing you to customize them with your favorite ingredients.
Ideal for busy mornings, these portable breakfast options can be made ahead of time and quickly reheated, making them perfect for those on the go. Imagine waking up to a warm tortilla filled with scrambled eggs, savory sausage, melted cheese, and fresh veggies, all wrapped up and ready to fuel your day.
Whether you’re feeding a family or meal prepping for yourself, this recipe serves 4-6 people, offering a balanced combination of protein, carbohydrates, and healthy fats. With a few simple ingredients and easy-to-follow steps, you can whip up these breakfast burrito wraps in no time.
They’re perfect for a quick breakfast, a midday snack, or even a light lunch. Let’s explore the ingredients and steps needed to create these delicious wraps.
Ingredients (Serves 4-6):
- 6 large flour tortillas
- 8 large eggs
- 1/4 cup milk
- 1 pound breakfast sausage or bacon
- 1 cup shredded cheddar cheese
- 1 cup diced bell peppers (red, green, or yellow)
- 1/2 cup diced onions
- Salt and pepper to taste
- 1 tablespoon butter or oil
- Salsa or hot sauce (optional)
Cooking Instructions:
- Cook the Meat: In a large skillet, cook the breakfast sausage or bacon over medium heat until fully cooked. If using sausage, break it into small pieces as it cooks. Drain excess fat and set aside.
- Sauté the Vegetables: In the same skillet, add the diced bell peppers and onions. Sauté for about 5 minutes until the vegetables are tender. Remove from the skillet and set aside with the cooked meat.
- Scramble the Eggs: In a mixing bowl, whisk together the eggs, milk, salt, and pepper. Heat butter or oil in the skillet over medium heat. Pour the egg mixture into the skillet and gently stir with a spatula until the eggs are softly scrambled and just set. Turn off the heat.
- Assemble the Burritos: Lay a tortilla flat and place a portion of the scrambled eggs down the center. Top with cooked meat, sautéed vegetables, and a sprinkle of shredded cheese. Repeat for each tortilla.
- Wrap the Burritos: Fold in the sides of the tortilla, then roll it up from the bottom to the top, ensuring all the fillings are securely enclosed.
- Heat and Serve: If desired, place the wrapped burritos in the skillet over low heat for a minute on each side to lightly brown the tortilla and melt the cheese. Serve warm with salsa or hot sauce on the side.
Extra Tips:
To make these breakfast burrito wraps even more convenient, you can prepare them the night before and refrigerate them. In the morning, simply reheat them in the microwave or on a skillet for a quick breakfast.
If you prefer a vegetarian version, skip the meat and add more vegetables or beans. Additionally, you can experiment with different cheeses, such as Monterey Jack or pepper jack, for a unique flavor profile.
Greek Yogurt Parfaits
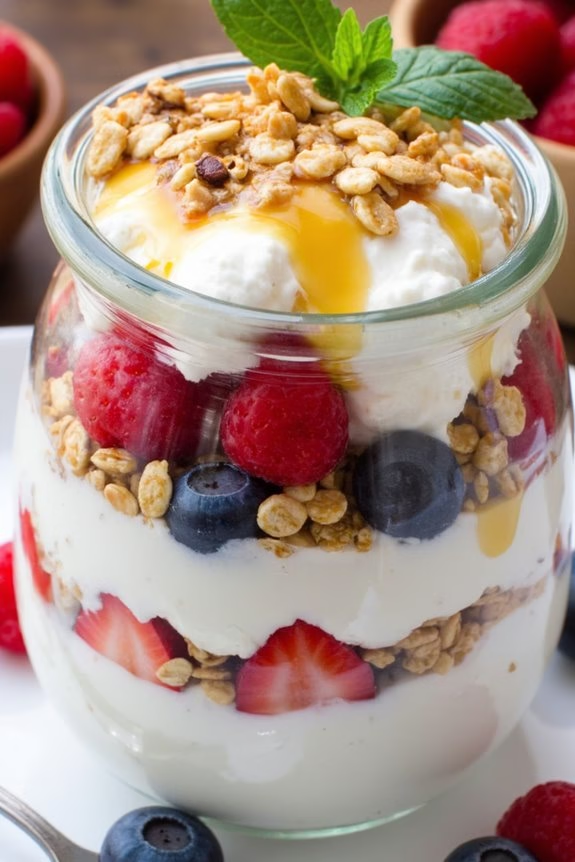
Start your day with a nutritious and delicious breakfast by preparing Greek Yogurt Parfaits. This delightful dish is perfect for those busy mornings when you need a quick yet satisfying meal on the go. Packed with protein-rich Greek yogurt, fresh fruits, crunchy granola, and a drizzle of honey, these parfaits aren’t only tasty but also a great way to kickstart your day with a boost of energy. Ideal for meal prepping, they can be assembled in advance and stored in the refrigerator for a hassle-free breakfast experience.
Greek Yogurt Parfaits are incredibly versatile, allowing you to customize them with your favorite fruits and toppings. Whether you’re a fan of berries, stone fruits, or tropical varieties, you can mix and match ingredients to suit your taste preferences. This recipe serves 4-6 people, making it a perfect choice for family breakfasts or brunch gatherings. Not only is it visually appealing, but it also offers a balanced combination of flavors and textures that will surely delight your taste buds.
Ingredients (Serving Size: 4-6 People):
- 4 cups Greek yogurt
- 2 cups mixed fresh berries (such as strawberries, blueberries, and raspberries)
- 2 cups granola
- 1/4 cup honey
- 1/4 cup chopped nuts (such as almonds or walnuts, optional)
- 1 teaspoon vanilla extract
- Fresh mint leaves for garnish (optional)
Cooking Instructions:
- Prepare the Yogurt Base: In a large mixing bowl, combine the Greek yogurt with the vanilla extract. Stir well to guarantee the vanilla is evenly distributed throughout the yogurt for an enhanced flavor.
- Layer the Parfaits: Using 4-6 glass jars or cups, start by spooning a layer of the yogurt mixture into the bottom of each container. Aim for about 1/3 cup per serving.
- Add the Berries: On top of the yogurt layer, add a layer of mixed fresh berries. Distribute them evenly across the containers, using approximately 1/3 cup of berries per parfait.
- Sprinkle the Granola: Next, add a layer of granola on top of the berries. Use around 1/3 cup of granola per serving, spreading it evenly to create a crunchy contrast.
- Repeat Layers: Continue to layer the yogurt, berries, and granola until the containers are full. Aim for two layers of each component for a balanced parfait.
- Drizzle with Honey: Once the layers are complete, drizzle a bit of honey over the top of each parfait. This will add a touch of natural sweetness and enhance the overall flavor.
- Add Nuts and Garnish: If using, sprinkle a few chopped nuts on top for added texture. Finish with a sprig of fresh mint leaves for a pop of color and a revitalizing scent.
- Chill and Serve: Cover the parfaits with lids or plastic wrap and refrigerate for at least 30 minutes to allow the flavors to meld together. Serve chilled and enjoy your wholesome breakfast!
Extra Tips:
For a more personalized touch, consider using flavored Greek yogurt, such as vanilla or berry, to add an extra layer of taste. If you’re preparing these parfaits in advance, keep the granola in a separate container until just before serving to maintain its crunchiness.
Additionally, feel free to experiment with different types of granola or nuts to find your preferred combination. Greek Yogurt Parfaits are a great way to use seasonal fruits, so don’t hesitate to swap the berries with peaches, mangoes, or even bananas depending on what’s available.
Egg and Veggie Muffins

Egg and Veggie Muffins are a perfect breakfast to go option for those busy mornings when you need something quick, filling, and nutritious. These savory muffins are packed with protein from the eggs and a variety of vitamins and minerals from the vegetables. They’re incredibly versatile and can easily be customized to suit your taste preferences or whatever veggies you have on hand. Not only are these muffins delicious, but they’re also convenient as they can be made ahead of time and stored in the refrigerator or freezer for a quick heat-up in the morning.
Making Egg and Veggie Muffins is simple and requires minimal preparation time. They’re baked in a muffin tin, which makes portioning easy and guarantees even cooking. This recipe yields 12 muffins, making it suitable for serving 4-6 people. Whether you’re hosting a brunch or looking for a meal prep option for the workweek, these muffins are a healthy and satisfying choice.
Ingredients (Serving Size: 4-6 people):
- 10 large eggs
- 1/2 cup milk
- 1 cup spinach, chopped
- 1 bell pepper, diced
- 1/2 cup cherry tomatoes, halved
- 1/4 cup onion, diced
- 1/2 cup shredded cheddar cheese
- Salt and pepper to taste
- Non-stick cooking spray
Cooking Instructions:
- Preheat the Oven: Begin by preheating your oven to 350°F (175°C) to guarantee it reaches the right temperature by the time you’re ready to bake.
- Prepare the Muffin Tin: Lightly spray a 12-cup muffin tin with non-stick cooking spray to prevent the muffins from sticking to the pan.
- Whisk the Eggs and Milk: In a large bowl, whisk together the eggs and milk until well combined. This mixture will form the base of your muffins.
- Add the Vegetables: Stir in the chopped spinach, diced bell pepper, halved cherry tomatoes, and diced onion. Mix until the vegetables are evenly distributed throughout the egg mixture.
- Season the Mixture: Add salt and pepper to taste, remembering that the amount may vary based on personal preference and the saltiness of the cheese.
- Fill the Muffin Cups: Pour the egg and veggie mixture evenly into the prepared muffin cups, filling each about three-quarters full.
- Add Cheese: Sprinkle the shredded cheddar cheese on top of each muffin, allowing it to melt and become golden during baking.
- Bake the Muffins: Place the muffin tin in the preheated oven and bake for 20-25 minutes, or until the muffins are set and the tops are lightly golden.
- Cool and Serve: Once baked, remove the muffins from the oven and let them cool in the tin for a few minutes before transferring them to a wire rack. Serve warm or store for later use.
Extra Tips: When making Egg and Veggie Muffins, feel free to experiment with different vegetable combinations or add cooked bacon or sausage for an extra protein boost. If you prefer a dairy-free version, substitute the milk with a non-dairy alternative and omit the cheese or use a plant-based cheese option.
These muffins can be stored in the refrigerator for up to four days or frozen for up to two months. To reheat, simply microwave for about 30 seconds if refrigerated, or a bit longer if frozen.
Smoothie Packs
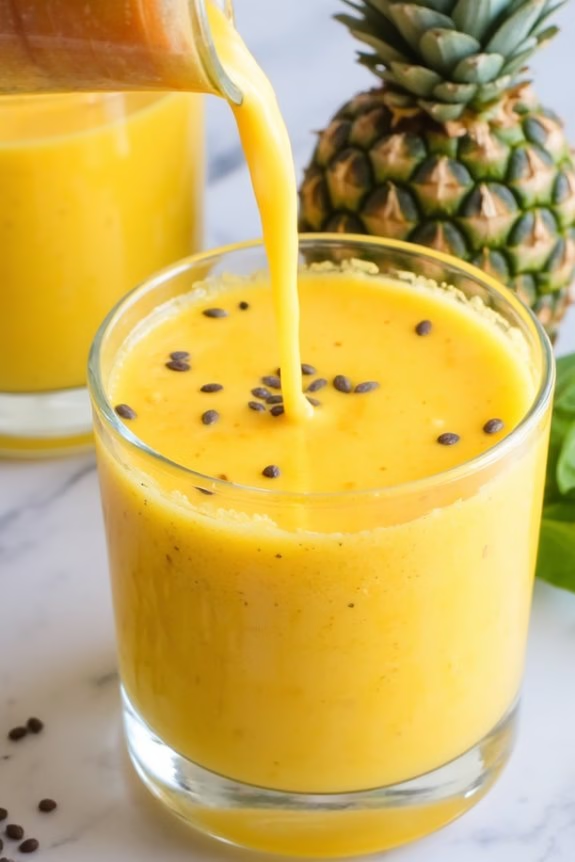
Start your day with a burst of tropical flavors that will keep you energized and satisfied. These Tropical Smoothie Packs are perfect for busy mornings when you need a quick and healthy breakfast option. By prepping these smoothie packs ahead of time, you’ll have a delicious breakfast to go that’s rich in vitamins, antioxidants, and fiber.
Each smoothie pack is filled with a vibrant combination of frozen fruits and a hint of greens, making it not only invigorating but also nutritious. Just blend with your choice of liquid and enjoy a taste of the tropics in minutes. This recipe serves 4-6 people, making it ideal for family breakfasts or for prepping a week’s worth of smoothies in advance.
Ingredients for 4-6 Servings:
- 2 cups frozen mango chunks
- 2 cups frozen pineapple chunks
- 2 bananas, sliced
- 1 cup spinach leaves
- 1 cup Greek yogurt
- 2 tablespoons chia seeds
- 2 tablespoons honey
- 3-4 cups coconut milk or almond milk
Cooking Instructions:
- Prepare the Fruits and Greens: Start by laying out all your ingredients. Peel and slice the bananas, and wash the spinach leaves thoroughly. This will help you assemble the smoothie packs quickly.
- Assemble the Smoothie Packs: In each zip-top freezer bag, add 1/2 cup of frozen mango chunks, 1/2 cup of frozen pineapple chunks, half a sliced banana, and a handful of spinach leaves. Seal the bags and store them in the freezer until you’re ready to use them.
- Blend the Smoothie: When you’re ready to make a smoothie, take one smoothie pack out of the freezer. Pour the contents into a blender and add 1/4 cup Greek yogurt, 1 teaspoon chia seeds, and 1 teaspoon honey.
- Add the Liquid: Pour 1/2 to 3/4 cup of coconut milk or almond milk into the blender, depending on how thick you like your smoothie. You can add more if needed.
- Blend Until Smooth: Blend on high speed until the mixture is smooth and creamy. If the smoothie is too thick, add more liquid a little at a time until you reach the desired consistency.
- Serve and Enjoy: Pour the smoothie into a glass and enjoy it immediately for the best taste and texture.
Extra Tips:
For a creamier texture, you can substitute the Greek yogurt with coconut yogurt, which also complements the tropical flavors. If you prefer a sweeter smoothie, consider adding more honey or a splash of natural fruit juice.
You can also experiment with different greens like kale or swiss chard for variety. To save even more time, prepare multiple smoothie packs at once and label them with the date to guarantee freshness.
Nut Butter and Banana Sandwiches
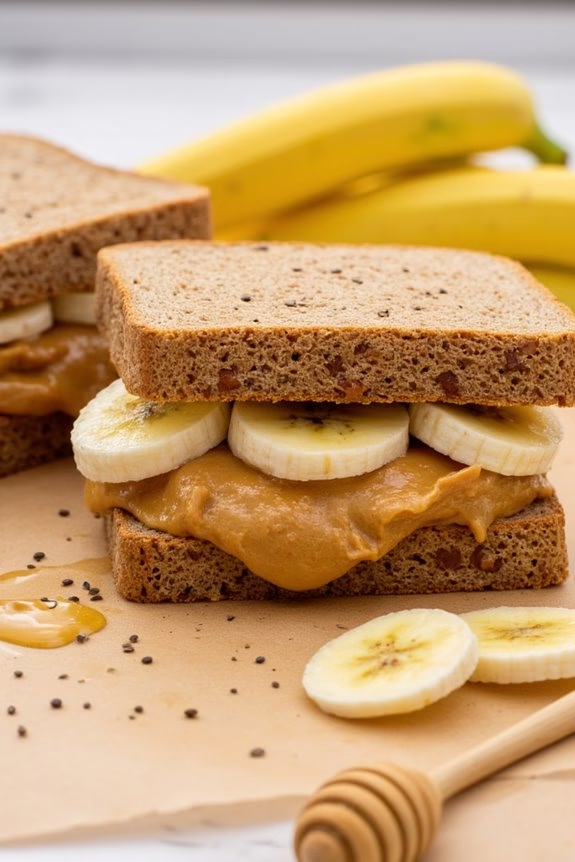
Nut Butter and Banana Sandwiches are a quick and nutritious breakfast option that you can easily take with you on the go. Perfect for busy mornings, these sandwiches combine the creamy richness of nut butter with the natural sweetness of bananas. The whole grain bread adds fiber and substance, making it a well-rounded meal that will keep you satisfied until lunch. Not only are these sandwiches easy to make, but they also provide a good balance of protein, carbohydrates, and healthy fats.
This recipe is ideal for serving 4-6 people, making it a great choice for feeding the whole family or meal prepping for the week. You can customize the sandwiches by using your favorite nut butter, such as almond, peanut, or cashew butter, and by adding additional toppings like chia seeds or honey for extra flavor and nutrition. This simple yet delicious recipe will surely become a staple in your breakfast routine.
Ingredients (serving size: 4-6 people):
- 8-12 slices of whole grain bread
- 1 cup of nut butter (peanut, almond, or cashew)
- 4-6 ripe bananas
- Optional: 2 tablespoons of honey
- Optional: 2 tablespoons of chia seeds
Cooking Instructions:
- Prepare the Ingredients: Start by gathering all the ingredients. Peel the bananas and slice them into thin rounds. If you’re using honey and chia seeds, get them ready for use.
- Spread the Nut Butter: Take the slices of whole grain bread and spread a generous amount of nut butter on one side of each slice. Confirm that the nut butter is spread evenly to cover the entire surface of the bread.
- Add the Bananas: Place the sliced bananas evenly over the nut butter on half of the bread slices. You can slightly overlap the banana slices to guarantee each bite has a bit of banana.
- Add Optional Toppings: If desired, drizzle a small amount of honey over the banana slices for added sweetness. Sprinkle chia seeds over the top for a boost of fiber and omega-3 fatty acids.
- Assemble the Sandwiches: Place the remaining slices of bread, nut butter side down, on top of the banana-covered slices to form sandwiches. Press gently to confirm the sandwiches hold together.
- Slice and Serve: Cut each sandwich in half or into quarters, depending on your preference, and serve immediately. If you’re packing them to go, wrap each sandwich individually in parchment paper or foil for easy transport.
Extra Tips:
For a warm and slightly crispy version, you can toast the bread before assembling the sandwiches. This adds an extra layer of texture and enhances the flavors of the nut butter and bananas.
Additionally, if you’re meal prepping, consider using a little lemon juice on the banana slices to prevent them from browning. For those with nut allergies, you can substitute the nut butter with sunflower seed butter or soy nut butter.
Always opt for ripe bananas as they’re sweeter and easier to mash or slice, enhancing the overall taste of the sandwich.
Chia Seed Pudding
Chia Seed Pudding is an excellent choice for a quick and nutritious breakfast on the go. This delightful dish is made by combining chia seeds with a liquid, typically milk or a milk alternative, to create a creamy and satisfying pudding. Chia seeds aren’t only rich in fiber and omega-3 fatty acids, but they also expand in liquid to form a gel-like consistency, making them a perfect base for a breakfast pudding that can be easily prepared the night before.
With a variety of toppings such as fresh fruit, nuts, and sweeteners like honey or maple syrup, this pudding can be customized to your taste preferences while providing a healthy start to your day.
Preparing Chia Seed Pudding is incredibly simple and requires minimal ingredients, making it an ideal recipe for busy mornings. The pudding can be stored in individual containers or jars, allowing you to grab a wholesome breakfast as you head out the door.
Whether you’re heading to work, school, or simply need a convenient option to eat at home, this creamy and versatile pudding can be adapted to suit any palate and dietary needs. Furthermore, chia seed pudding can be made in larger batches and stored in the refrigerator, guaranteeing you have a ready-to-eat breakfast throughout the week.
Ingredients for 4-6 servings:
- 1 cup chia seeds
- 4 cups milk or milk alternative (such as almond milk, coconut milk, or oat milk)
- 1/4 cup honey or maple syrup
- 1 teaspoon vanilla extract
- Pinch of salt
- Assorted toppings (e.g., fresh fruit, nuts, seeds, granola)
Cooking Instructions:
- Combine Ingredients: In a large mixing bowl, combine the chia seeds, milk, honey or maple syrup, vanilla extract, and salt. Whisk the mixture thoroughly to confirm the chia seeds are evenly distributed and don’t clump together.
- Initial Stirring: After mixing, let the pudding sit for about 10 minutes. Then, give it another thorough stir to break up any clumps that may have formed. This helps the chia seeds absorb the liquid evenly, confirming a smooth pudding consistency.
- Chill and Set: Cover the bowl with plastic wrap or a lid, and place it in the refrigerator for at least 4 hours, or preferably overnight. This allows the chia seeds to fully absorb the liquid and thicken into a pudding.
- Serve and Garnish: Once set, give the pudding a good stir before serving. Divide it into individual bowls or jars and top with your choice of fresh fruit, nuts, seeds, or granola for added flavor and texture.
- Storage: If not serving immediately, cover the containers and store in the refrigerator. The pudding can be kept for up to 5 days, making it a convenient, make-ahead breakfast option.
Extra Tips:
When making Chia Seed Pudding, feel free to experiment with different types of milk and sweeteners to suit your dietary needs or taste preferences. For a thicker pudding, reduce the amount of liquid slightly, or for a thinner consistency, add a bit more milk.
If you prefer a more uniform texture, consider blending the pudding after it has set for a smoother result. Adding a pinch of cinnamon or cacao powder can also introduce new flavors to your pudding.
Finally, always confirm the chia seeds are well mixed initially to prevent clumping, which can affect the final texture of the pudding.
Ham and Cheese Croissants

Start your day with a delicious and satisfying breakfast that’s quick to make and easy to take on the go. Ham and Cheese Croissants are the perfect savory option for those busy mornings when you need something filling yet convenient.
These flaky pastries are packed with flavorful ham and gooey melted cheese, making them an irresistible choice for both adults and kids alike. Not only are these croissants easy to assemble, but they also bake to golden perfection in just a few minutes.
Whether you’re grabbing breakfast on the way to work or packing a lunch for the kids, these Ham and Cheese Croissants are sure to delight everyone. Let’s plunge into this simple recipe that serves 4-6 people, guaranteeing there’s enough to share or save for later.
Ingredients for 4-6 servings:
- 1 package (8-count) refrigerated crescent roll dough
- 8 slices of deli ham
- 8 slices of Swiss cheese
- 1 tablespoon Dijon mustard (optional)
- 1 egg, beaten (for egg wash)
- 1 tablespoon sesame seeds (optional)
Cooking Instructions:
- Preheat the Oven: Begin by preheating your oven to 375°F (190°C). This guarantees that your croissants will bake evenly and achieve that perfect golden-brown color.
- Prepare the Dough: Unroll the crescent roll dough on a clean, flat surface. Separate the triangles along the perforations, so you have 8 individual triangles.
- Add the Filling: If desired, lightly spread a small amount of Dijon mustard on each triangle. Place one slice of ham and one slice of Swiss cheese at the wide end of each triangle.
- Roll the Croissants: Starting at the wide end, gently roll each triangle up towards the point, encasing the ham and cheese. Place the rolled croissants on a baking sheet lined with parchment paper, point side down to prevent unrolling.
- Apply Egg Wash: Brush each croissant with the beaten egg. This will give them a shiny, golden crust. If you like, sprinkle sesame seeds on top for added texture and flavor.
- Bake: Place the baking sheet in the preheated oven and bake for 12-15 minutes or until the croissants are golden brown and the cheese is melted.
- Cool and Serve: Once baked, remove the croissants from the oven and allow them to cool slightly on a wire rack. Serve warm or at room temperature.
Extra Tips:
For even more flavor, try experimenting with different types of cheese such as cheddar or Gruyère, or add a sprinkle of herbs like thyme or rosemary before rolling the croissants.
If preparing these croissants in advance, they can be stored in the refrigerator and reheated in the oven or microwave. Additionally, if you’re aiming for a crispier texture, consider baking them on a wire rack placed over the baking sheet to allow better air circulation around the croissants.
Enjoy your delicious Ham and Cheese Croissants hot or cold, and feel free to customize them to your taste!
Avocado Toast on the Go
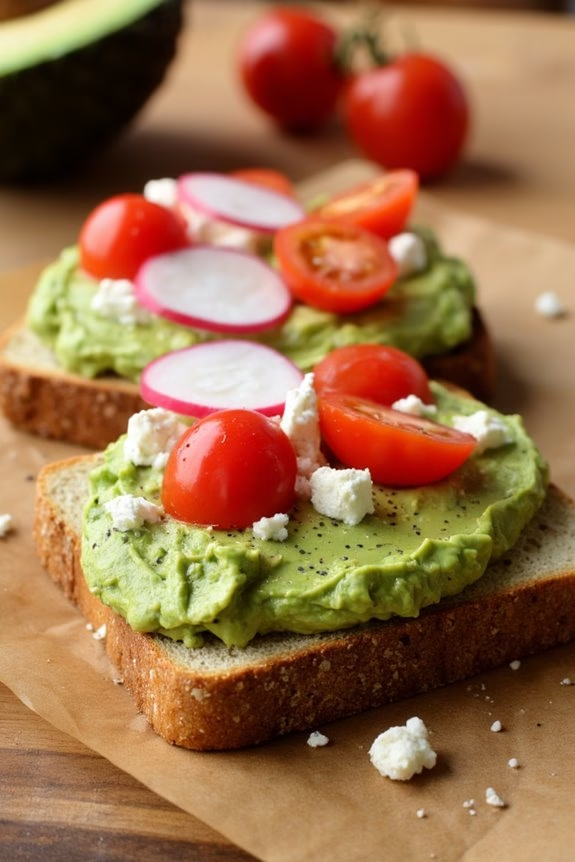
Avocado Toast on the Go is a quick and nutritious breakfast option that combines the creamy goodness of ripe avocados with the satisfying crunch of toasted bread. Perfect for busy mornings, this dish isn’t only easy to prepare but also packed with essential nutrients, making it an ideal choice for a healthy start to your day.
Whether you’re rushing out the door or looking for a portable breakfast option, this recipe guarantees that you won’t have to compromise on taste or nutrition.
The beauty of Avocado Toast on the Go lies in its simplicity and versatility. You can customize it to your taste by adding toppings such as cherry tomatoes, radishes, or even a sprinkle of feta cheese.
For a serving size of 4-6 people, this recipe provides a delightful balance of flavors and textures, making it a crowd-pleaser for family breakfasts or brunch gatherings. Prepare to enjoy a delicious meal that fuels your morning activities and keeps you satisfied until lunchtime.
Ingredients (Serving Size: 4-6 people):
- 6 slices of whole-grain or sourdough bread
- 4 ripe avocados
- 2 tablespoons of lemon juice
- Salt to taste
- Black pepper to taste
- Optional toppings: cherry tomatoes, radishes, feta cheese, red pepper flakes
Cooking Instructions:
- Prepare the Avocados: Begin by cutting each avocado in half and removing the pit. Scoop out the flesh into a bowl and discard the skins. Use a fork to mash the avocado until you achieve your desired consistency—smooth or slightly chunky, depending on your preference.
- Season the Avocado Mixture: Add the lemon juice, salt, and black pepper to the mashed avocado. Mix everything thoroughly to guarantee even distribution of flavors. The lemon juice not only adds a fresh zest but also helps prevent the avocados from browning.
- Toast the Bread: While preparing the avocado mixture, preheat your toaster or oven to medium-high. Toast the slices of bread until golden brown and crispy. This should take about 3-5 minutes depending on your equipment.
- Assemble the Toast: Once the bread is toasted, spread a generous amount of the avocado mixture onto each slice. Use the back of a spoon or a butter knife to create an even layer.
- Add Toppings: If desired, add your choice of toppings. Slice cherry tomatoes or radishes and place them on top of the avocado spread. For an extra kick, you can sprinkle red pepper flakes or crumble feta cheese over the toast.
- Serve and Enjoy: Once topped, serve the Avocado Toast immediately to enjoy the perfect combination of flavors and textures. Pack any leftovers in airtight containers if you need to take them on the go.
Extra Tips:
When selecting avocados, look for ones that yield slightly to gentle pressure, indicating they’re ripe and ready to use. If you have leftover avocado halves, store them in the refrigerator with the pit intact and cover tightly with plastic wrap to slow down oxidation.
For a gluten-free version, substitute the bread with your favorite gluten-free option. Feel free to experiment with different herbs and spices to personalize the toast to your liking.
Mini Quiche Cups

Mini Quiche Cups are a delightful and convenient breakfast option perfect for those busy mornings. These bite-sized treats are packed with flavor and can be made in advance, making them an ideal grab-and-go breakfast or snack.
The beauty of mini quiche cups lies in their versatility; you can customize them with your favorite ingredients such as bacon, spinach, cheese, and more. They’re easy to make and can be enjoyed warm or cold, making them a favorite among adults and children alike.
These mini quiches are baked in a muffin tin, allowing you to make multiple servings at once. The combination of eggs, cream, and various fillings results in a creamy, savory dish that’s both satisfying and nutritious. Whether you’re hosting a brunch or simply need a quick breakfast solution, these mini quiche cups are sure to impress.
Ingredients (for 4-6 people):
- 6 large eggs
- 1 cup heavy cream
- 1 cup shredded cheese (cheddar, Swiss, or your choice)
- 1/2 cup cooked bacon, chopped
- 1/2 cup fresh spinach, chopped
- 1/4 cup diced onion
- Salt and pepper to taste
- Cooking spray or butter for greasing
Instructions:
- Preheat the Oven: Start by preheating your oven to 375°F (190°C). This guarantees the oven is at the right temperature by the time you’re ready to bake the quiche cups.
- Prepare the Muffin Tin: Lightly grease a muffin tin with cooking spray or butter. This will prevent the mini quiches from sticking to the pan, making them easier to remove once baked.
- Beat the Eggs and Cream: In a mixing bowl, whisk together the eggs and heavy cream until well combined. This forms the base of your quiche mixture, providing a rich and creamy texture.
- Add Fillings: Stir in the shredded cheese, chopped bacon, spinach, and diced onion into the egg mixture. Season with salt and pepper according to your taste.
- Fill the Muffin Tin: Pour the egg mixture evenly into the prepared muffin cups, filling each about 3/4 full. This allows space for the quiches to puff up as they bake.
- Bake the Quiches: Place the muffin tin in the preheated oven and bake for 20-25 minutes, or until the tops are golden brown and the quiches are set. You can test this by inserting a toothpick in the center of one—it should come out clean.
- Cool and Serve: Once baked, let the quiches cool in the pan for a few minutes before removing them. Serve warm for the best flavor, or allow them to cool completely and store them in an airtight container for up to 3 days.
Extra Tips:
For a more robust flavor, consider adding a pinch of nutmeg to the egg mixture. If you prefer a vegetarian option, simply omit the bacon and add more vegetables like bell peppers or mushrooms.
Feel free to experiment with different cheeses and herbs to suit your taste. When reheating leftover quiches, use a toaster oven or microwave for a quick warm-up.
If you’re preparing these mini quiches ahead of time, you can freeze them and reheat them when needed, making them even more convenient for those busy mornings.
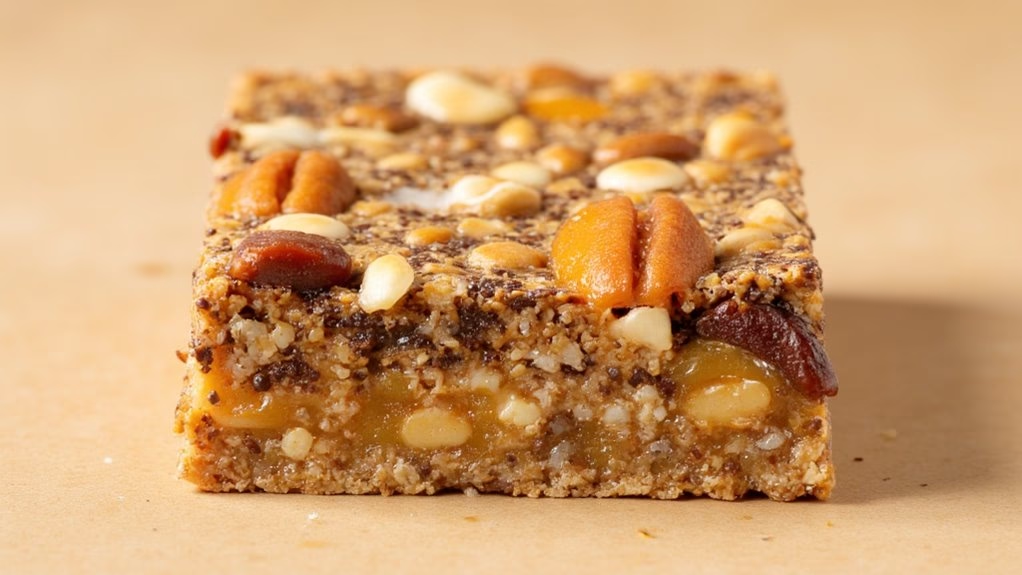
Fruit and Nut Energy Bars
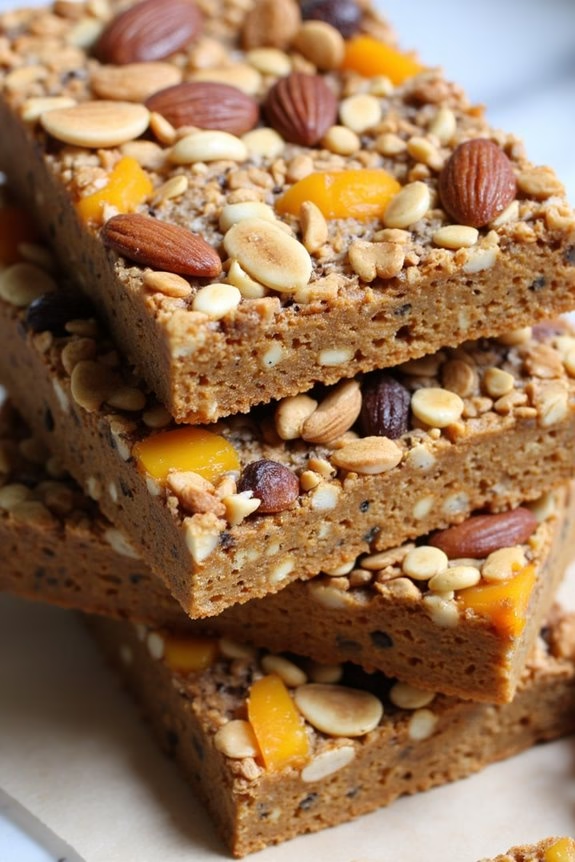
Fruit and nut energy bars are a perfect breakfast to go option, providing a balanced mix of carbohydrates, healthy fats, and protein to kickstart your day. These homemade bars aren’t only delicious but also a healthier alternative to store-bought versions, as they’re free from artificial preservatives and refined sugars. Packed with dried fruits, nuts, and seeds, they offer a burst of energy that can sustain you through a busy morning or serve as a convenient snack throughout the day.
Making your own energy bars at home isn’t only cost-effective but also allows you to customize the ingredients to suit your taste preferences and dietary needs. Whether you prefer almonds, walnuts, or a combination of both, you can adjust the recipe accordingly. Additionally, you can experiment with different types of dried fruits such as apricots, dates, or cranberries to add natural sweetness and a chewy texture.
Here’s how you can make a batch of delicious fruit and nut energy bars for 4-6 people.
Ingredients for 4-6 servings:
- 1 cup of pitted dates
- 1 cup of mixed nuts (such as almonds, walnuts, or cashews)
- 1/2 cup of dried apricots
- 1/4 cup of sunflower seeds
- 1/4 cup of pumpkin seeds
- 1/4 cup of shredded coconut
- 2 tablespoons of chia seeds
- 2 tablespoons of honey or maple syrup
- 1 teaspoon of vanilla extract
- 1/2 teaspoon of cinnamon
- A pinch of salt
Cooking Instructions:
- Prepare the Baking Dish: Line a square baking dish (8×8 inch) with parchment paper, leaving some overhang on the sides for easy removal later.
- Process the Dates and Nuts: In a food processor, add the pitted dates and pulse until they form a sticky paste. Add the mixed nuts and pulse again until the nuts are finely chopped but still have some texture.
- Add Remaining Ingredients: Add the dried apricots, sunflower seeds, pumpkin seeds, shredded coconut, chia seeds, honey or maple syrup, vanilla extract, cinnamon, and a pinch of salt to the food processor. Pulse until the mixture is well combined and sticky.
- Press into the Baking Dish: Transfer the mixture into the prepared baking dish. Use a spatula or your hands to press it down evenly and firmly into the dish.
- Chill the Mixture: Place the baking dish in the refrigerator for at least 2 hours, or until the mixture is firm and set.
- Cut into Bars: Once set, use the parchment paper overhang to lift the mixture out of the baking dish. Place it on a cutting board and cut it into bars or squares of your desired size.
Extra Tips:
For an added layer of flavor, consider toasting the nuts and seeds before processing them. This will enhance their natural oils and give the bars a deeper, nuttier taste.
If you prefer a softer bar, you can soak the dried fruits in warm water for about 10 minutes before using them, then drain and pat them dry.
These bars can be stored in an airtight container in the refrigerator for up to two weeks or frozen for up to three months for longer storage. Feel free to experiment with different combinations of nuts and dried fruits to keep the recipe exciting and tailored to your personal taste.