

Waking up to the delicious aroma of breakfast can transform your morning. With these creative freezer breakfast sandwiches, you can enjoy a gourmet start to your day without the rush. From a classic egg and cheese to a bold smoked salmon bagel, these options are perfect for busy mornings. They’re simple to prep in advance and taste wonderfully fresh. Ready to explore some delightful possibilities?
Classic Egg and Cheese Delight

Start your day off right with a Classic Egg and Cheese Delight, a scrumptious and convenient breakfast option that can be prepared ahead and stored in the freezer for those busy mornings.
These breakfast sandwiches are a combination of fluffy eggs, melted cheese, and your choice of bread, perfect for a quick and satisfying meal. The beauty of this recipe lies in its simplicity and the ease with which it can be customized to suit your taste preferences.
Whether you’re feeding a family of four or a group of six, these Classic Egg and Cheese Delight sandwiches are a fantastic way to guarantee everyone starts their day with a nutritious meal.
The ingredients are affordable and easy to find, making this recipe a staple for anyone who values both time and taste. The versatility of the egg and cheese combination allows you to add additional ingredients or leave it as is for a classic taste that never disappoints.
Ingredients for 4-6 servings:
- 6 large eggs
- 2 tablespoons milk
- Salt and pepper to taste
- 6 slices of cheese (such as cheddar or American)
- 6 English muffins or bagels
- 2 tablespoons butter or cooking spray
- Optional: cooked bacon, sausage, or ham
Cooking Instructions:
1. Preheat and Prepare: Begin by preheating your oven to 350°F (175°C). Lightly grease a baking dish or line it with parchment paper to prevent sticking.
2. Whisk the Eggs: In a medium-sized bowl, crack the eggs and add the milk, salt, and pepper. Whisk the mixture until it’s well combined and slightly frothy.
3. Cook the Eggs: Pour the egg mixture into the prepared baking dish and bake in the preheated oven for 15-20 minutes, or until the eggs are fully set and slightly golden on top.
Once cooked, remove from the oven and let cool slightly.
4. Prepare the Muffins: While the eggs are baking, slice the English muffins or bagels in half and toast them to your desired level of crispiness.
5. Assemble the Sandwiches: Cut the baked eggs into squares or rounds that fit inside your chosen bread. Place a slice of cheese on each egg portion. If using, add cooked bacon, sausage, or ham.
6. Build the Sandwich: Place the egg and cheese (and optional meat) onto the bottom half of each toasted muffin. Top with the other half of the muffin to complete the sandwich.
7. Freeze the Sandwiches: Wrap each sandwich in aluminum foil or plastic wrap and place them in a freezer-safe bag. Store in the freezer for up to 1 month.
8. Reheat When Ready: To enjoy, unwrap a frozen sandwich and reheat in the microwave for 1-2 minutes or until heated through. Alternatively, reheat in an oven at 350°F (175°C) for approximately 10-15 minutes.
Extra Tips: For a fluffier texture, you can add a pinch of baking powder to the egg mixture before baking.
If you prefer a spicier kick, mix in some chopped jalapeños or a splash of hot sauce with the eggs. To guarantee even cooking, make sure the eggs are spread evenly in the baking dish.
When reheating in the microwave, placing a damp paper towel over the sandwich can help retain moisture and prevent the bread from drying out.
Sausage, Egg, and Cheese Biscuit

Freezer Breakfast Sandwiches are the perfect make-ahead meal for busy mornings, combining convenience with a hearty and satisfying start to your day.
These Sausage, Egg, and Cheese Biscuit sandwiches aren’t only easy to prepare but also deliciously filling. By preparing them in advance and storing them in the freezer, you can enjoy a warm and tasty breakfast in just minutes, making them ideal for families or anyone with a tight morning schedule.
This recipe focuses on creating a delicious Sausage, Egg, and Cheese Biscuit sandwich. The savory sausage, creamy scrambled eggs, and gooey melted cheese are layered between fluffy, buttery biscuits, creating a breakfast that will keep you full and energized.
With a serving size of 4-6 people, this recipe is perfect for prepping for the week or sharing with family and friends.
Ingredients (for 4-6 servings):
- 6 large eggs
- 1/2 cup milk
- Salt and pepper to taste
- 6 sausage patties
- 6 slices of cheddar cheese
- 6 biscuits (store-bought or homemade)
- Butter for greasing the pan
Cooking Instructions:
- Preheat the Oven and Prepare the Biscuits: Preheat your oven to 375°F (190°C). If using store-bought biscuits, bake them according to the package instructions. If making homemade biscuits, prepare and bake them as per your recipe. Once baked, allow them to cool completely.
- Cook the Sausage Patties: In a skillet over medium heat, cook the sausage patties until they’re browned and cooked through, about 4-5 minutes per side. Once cooked, remove from the pan and place them on a paper towel-lined plate to drain any excess grease.
- Prepare the Eggs: In a medium bowl, whisk together the eggs, milk, salt, and pepper until well combined. Grease a large non-stick skillet with butter and heat over medium-low heat. Pour in the egg mixture and allow it to cook slowly, gently stirring with a spatula until the eggs are soft and scrambled. Remove from heat.
- Assemble the Sandwiches: Slice each biscuit in half horizontally. On the bottom half of each biscuit, place a sausage patty, followed by a scoop of scrambled eggs, and a slice of cheddar cheese. Top with the other half of the biscuit.
- Wrap and Freeze: Wrap each sandwich individually in aluminum foil or freezer-safe wrap. Place the wrapped sandwiches in a large freezer bag or airtight container. Store in the freezer for up to 2 months.
- Reheat and Serve: To reheat, remove the foil and wrap the sandwich in a paper towel. Microwave on high for 1-2 minutes until heated through. Alternatively, you can reheat them in the oven at 350°F (175°C) for 10-15 minutes. Serve hot.
Extra Tips:
For the best texture and flavor, consider using freshly baked homemade biscuits.
You can also customize these sandwiches by adding vegetables such as spinach or bell peppers to the scrambled eggs, or by using different types of cheese or sausage varieties.
If you prefer, you can substitute sausage with bacon or ham. When reheating, confirm the center of the sandwich reaches the desired temperature for both taste and safety.
Enjoy these sandwiches with your favorite hot beverage for a complete breakfast experience!
Veggie and Avocado Breakfast Sandwich

These Veggie and Avocado Breakfast Sandwiches are a delightful way to start your day with a burst of flavor and nutrition. Perfect for those busy mornings, these sandwiches can be made in advance and stored in the freezer, ensuring you have a delicious breakfast option ready in minutes. Packed with fresh veggies and creamy avocado, these sandwiches aren’t only tasty but also a healthy choice, offering a good mix of carbohydrates, proteins, and healthy fats to keep you fueled throughout the morning.
Whether you’re catering to a family or preparing for a week’s worth of breakfasts, this recipe is designed for a serving size of 4-6 people. It’s a versatile dish, allowing you to customize the ingredients based on personal preferences or dietary restrictions. The combination of whole grain English muffins, eggs, sautéed vegetables, and ripe avocado creates a satisfying meal that can be enjoyed on the go. Follow this simple recipe to make these mouthwatering breakfast sandwiches.
Ingredients (Serves 4-6 people):
- 6 whole grain English muffins
- 6 large eggs
- 1 ripe avocado
- 1 cup spinach leaves
- 1 red bell pepper
- 1 small onion
- 1 tablespoon olive oil
- Salt and pepper to taste
- 6 slices of cheddar cheese (optional)
Cooking Instructions:
- Preparation: Begin by preheating your oven to 350°F (175°C). While the oven is heating, slice the English muffins in half and lay them on a baking sheet.
- Sauté Vegetables: Dice the red bell pepper and onion. Heat the olive oil in a skillet over medium heat. Add the diced bell pepper and onion, sauté until they’re soft, about 5 minutes. Add the spinach and cook for an additional 2 minutes until wilted. Season with salt and pepper to taste. Set aside.
- Cook the Eggs: In a large mixing bowl, whisk the eggs together with a pinch of salt and pepper. Pour the mixture into a greased baking dish and bake for about 12-15 minutes, or until the eggs are fully set. Once cooked, cut the eggs into squares or rounds that fit the size of the English muffins.
- Assemble Sandwiches: Slice the avocado and set aside. To assemble the sandwiches, place a slice of cheese (if using) on the bottom half of each English muffin. Top with a portion of the egg, a slice of avocado, and a spoonful of sautéed vegetables. Place the top half of the muffin to complete the sandwich.
- Freeze or Serve: If you plan to eat the sandwiches immediately, place them in the oven for 5 minutes to melt the cheese. For freezing, let the sandwiches cool completely, then wrap each one individually in aluminum foil or plastic wrap. Store in a freezer-safe bag or container.
Extra Tips:
To reheat the frozen sandwiches, unwrap them and place in the microwave for 1-2 minutes, or until heated through. If you prefer a crispier sandwich, you can reheat them in an oven or toaster oven at 350°F (175°C) for about 10-15 minutes.
Feel free to add extra veggies or swap in your favorite cheese to make these sandwiches your own. If you notice the avocado browning, squeeze some lemon juice on it before assembling to keep it fresh and vibrant.
Ham and Swiss Croissant

Start your day off right with these delicious and convenient Freezer Breakfast Sandwiches featuring ham and Swiss cheese on a buttery croissant.
These sandwiches are perfect for busy mornings when you need a quick yet satisfying meal. By preparing them in advance and storing them in the freezer, you can enjoy a gourmet breakfast in minutes without the morning rush. The combination of savory ham and creamy Swiss cheese, all nestled in a flaky croissant, makes for a delightful breakfast experience.
These sandwiches aren’t only easy to make but also customizable to suit your taste preferences. You can easily swap out the ham for turkey or add a splash of Dijon mustard for extra flavor. This recipe makes 4-6 servings, guaranteeing you have enough to feed your family or meal-prep for the week.
Once you try these Freezer Breakfast Sandwiches, they’ll quickly become a staple in your breakfast routine.
Ingredients (Serves 4-6):
- 4-6 large croissants
- 8-12 slices of deli ham
- 8-12 slices of Swiss cheese
- 4-6 large eggs
- Salt and pepper to taste
- 2 tablespoons of butter
- Optional: Dijon mustard
Cooking Instructions:
- Prepare the Eggs: Start by whisking the eggs in a bowl with a pinch of salt and pepper. Heat a non-stick skillet over medium heat and melt the butter. Pour the beaten eggs into the skillet, stirring gently until they’re scrambled and cooked through. Set aside to cool slightly.
- Assemble the Sandwiches: Slice the croissants in half horizontally. Layer 2 slices of ham and 2 slices of Swiss cheese on the bottom half of each croissant. Add a portion of the scrambled eggs on top of the cheese, and if desired, spread a thin layer of Dijon mustard on the top half of the croissant before placing it over the eggs.
- Wrap and Freeze: Wrap each assembled sandwich tightly in aluminum foil or plastic wrap. Place the wrapped sandwiches in a resealable freezer bag or airtight container. Label with the date and store in the freezer for up to 2 months.
- Reheat and Serve: When ready to eat, remove the sandwich from the freezer, unwrap it and place it on a microwave-safe plate. Microwave on high for 2-3 minutes or until heated through, or reheat in a 350°F (175°C) oven for 10-15 minutes until the croissant is crispy and the cheese is melted.
Extra Tips:
To guarantee the best texture, avoid overcooking the eggs as they’ll be reheated later. If you prefer, you can add vegetables like spinach or bell peppers to the scrambled eggs for added nutrition.
When reheating, check the sandwich halfway through to ensure even heating, and adjust the time accordingly based on your microwave’s power. For a crispier croissant, reheating in the oven is recommended over the microwave. Enjoy these sandwiches hot, fresh, and full of flavor!
Spinach and Feta English Muffin

Spinach and Feta English Muffin Freezer Breakfast Sandwiches are a delightful and nutritious way to start your day. These sandwiches combine the savory flavors of sautéed spinach and creamy feta cheese, all nestled between toasted English muffins. Perfect for busy mornings, they can be prepared in advance and stored in the freezer for a quick and satisfying breakfast.
The combination of protein-packed eggs, healthy greens, and tangy cheese makes these sandwiches a wholesome choice that will keep you energized throughout the morning.
Preparing these sandwiches is simple and efficient, allowing you to make a batch that serves 4-6 people at once. Once assembled, the sandwiches can be individually wrapped and frozen, guaranteeing you have a delicious breakfast ready to go whenever you need it.
This recipe is particularly convenient for those who like to meal prep or have limited time in the mornings. With just a few ingredients and some easy steps, you’ll have a week’s worth of breakfast ready to enjoy.
Ingredients (Serves 4-6):
- 6 whole wheat English muffins, split
- 6 large eggs
- 1 cup fresh spinach, chopped
- 1/2 cup feta cheese, crumbled
- Salt and pepper, to taste
- 2 tablespoons olive oil
- 6 slices of ham or turkey (optional)
- Butter for toasting (optional)
Cooking Instructions:
- Preheat the Oven: Set your oven to 350°F (175°C) to preheat while you prepare the other ingredients.
- Prepare the Eggs: In a large skillet, heat 1 tablespoon of olive oil over medium heat. Crack the eggs into the skillet and scramble them gently. Add salt and pepper to taste. Once cooked, transfer the eggs to a plate and set aside.
- Sauté the Spinach: In the same skillet, add another tablespoon of olive oil if needed. Add the chopped spinach and sauté until wilted, about 2-3 minutes. Remove from heat and mix in the crumbled feta cheese.
- Assemble the Sandwiches: On each English muffin half, layer a portion of scrambled eggs, a slice of ham or turkey (if using), and a generous spoonful of the spinach and feta mixture. Top with the other half of the English muffin.
- Toast the Sandwiches: Optionally, spread a little butter on the outside of the English muffins. Place the sandwiches on a baking sheet and bake in the preheated oven for 8-10 minutes, or until the muffins are golden and the cheese is slightly melted.
- Cool and Wrap: Allow the sandwiches to cool completely, then individually wrap each sandwich in aluminum foil or plastic wrap. Place wrapped sandwiches in a freezer-safe bag and store in the freezer.
- Reheat: To enjoy, unwrap a sandwich and microwave for 1-2 minutes, or until heated through. Alternatively, reheat in a toaster oven for a crispier texture.
Extra Tips:
To guarantee the best flavor and texture, always use fresh spinach and high-quality feta cheese. If you prefer a vegetarian option, simply omit the ham or turkey.
You can also customize these sandwiches by adding other ingredients like sliced tomatoes, roasted red peppers, or avocado. When freezing, label each sandwich with the date to keep track of freshness, and consume them within a month for peak taste.
Bacon, Egg, and Cheddar Bagel

Start your day off right with these delicious Bacon, Egg, and Cheddar Bagel Freezer Breakfast Sandwiches. Perfect for busy mornings, these sandwiches can be made ahead of time and stored in the freezer, ready to be reheated at a moment’s notice. With crispy bacon, fluffy eggs, and melted cheddar cheese all nestled between a soft bagel, breakfast has never been more satisfying or convenient.
This recipe is designed to serve 4-6 people, making it ideal for families or those who like to meal prep. Preparing these sandwiches in advance not only saves time but also guarantees you have a hearty and delicious breakfast option ready to go. Simply follow the steps below to make these tasty breakfast sandwiches a staple in your morning routine.
Ingredients (Serves 4-6):
- 6 bagels, split
- 12 slices of bacon
- 12 large eggs
- 1 cup shredded cheddar cheese
- Salt and pepper, to taste
- Butter or cooking spray
- Wax paper or parchment paper
- Aluminum foil
Cooking Instructions:
- Cook the Bacon: Preheat your oven to 400°F (200°C). Lay the bacon slices in a single layer on a baking sheet lined with foil. Bake for 15-20 minutes, or until crispy. Remove from the oven and place on paper towels to drain excess grease.
- Prepare the Eggs: While the bacon is cooking, beat the eggs in a large bowl and season with salt and pepper. Heat a nonstick skillet over medium heat and lightly coat with butter or cooking spray. Pour in the beaten eggs and cook, stirring occasionally, until the eggs are scrambled and cooked through. Remove from heat.
- Assemble the Sandwiches: Open the bagels and lay them out on a clean surface. On the bottom half of each bagel, layer scrambled eggs, two slices of bacon, and a generous sprinkle of cheddar cheese. Top with the other half of the bagel.
- Wrap and Freeze: Wrap each sandwich tightly in wax or parchment paper, then in aluminum foil. Place the wrapped sandwiches in a large freezer-safe bag or container. Freeze for up to 3 months.
- Reheat and Serve: To reheat, remove the foil and paper wrapping. Place the sandwich on a microwave-safe plate and microwave on high for 1-2 minutes, or until heated through. Alternatively, you can reheat in the oven at 350°F (175°C) for 10-15 minutes. Serve immediately.
Extra Tips:
When preparing these freezer breakfast sandwiches, make sure the eggs are fully cooled before assembling to prevent sogginess in the bagels. If you prefer, you can substitute or add ingredients such as spinach, ham, or different types of cheese to suit your taste.
Also, toasting the bagels slightly before assembly can add an extra layer of texture and flavor. Enjoy your mornings with these quick and delicious breakfast sandwiches!
Spicy Chorizo and Pepper Jack

Freezer Breakfast Sandwiches are a convenient and delicious way to start your day, especially when you’re on the go. The Spicy Chorizo and Pepper Jack variation adds a flavorful kick to your morning routine, combining the zesty heat of chorizo with the creamy, slightly spicy notes of pepper jack cheese.
These sandwiches are perfect for meal prep, offering a hearty and satisfying breakfast option that can be prepared in advance and stored in the freezer for when you need them.
To create these sandwiches, you’ll start by cooking the chorizo and preparing the eggs, then assembling each sandwich with cheese and your choice of bread. Once assembled, they can be wrapped and frozen, ready to be reheated for a quick breakfast that doesn’t compromise on flavor.
This recipe serves 4-6 people, making it ideal for family meal prep or for a week’s worth of breakfast sandwiches for yourself.
Ingredients
- 1 pound chorizo sausage
- 6 large eggs
- 1/4 cup milk
- 1/4 teaspoon salt
- 1/4 teaspoon black pepper
- 6 slices pepper jack cheese
- 6 English muffins or bagels
- Butter or cooking spray for greasing
- Optional: hot sauce for extra spice
Cooking Instructions
- Cook the Chorizo: In a medium skillet over medium heat, cook the chorizo until browned and cooked through, breaking it into small pieces as it cooks. This should take about 8-10 minutes. Once cooked, drain the excess fat and set the chorizo aside.
- Prepare the Eggs: In a bowl, whisk together the eggs, milk, salt, and pepper until well combined. Grease a large non-stick skillet with butter or cooking spray and heat over medium-low. Pour the egg mixture into the skillet and cook, stirring occasionally, until the eggs are softly scrambled. This should take about 5 minutes.
- Assemble the Sandwiches: Split and lightly toast the English muffins or bagels. On the bottom half of each, place a generous scoop of the cooked chorizo, followed by a portion of scrambled eggs and a slice of pepper jack cheese. Top with the other half of the muffin or bagel.
- Wrap and Freeze: Wrap each sandwich tightly in aluminum foil or plastic wrap. Place the wrapped sandwiches in a large resealable freezer bag, and store them in the freezer.
- Reheat and Serve: When ready to eat, unwrap a sandwich and reheat in the microwave for 1-2 minutes, or until heated through. Alternatively, you can reheat the sandwich in a toaster oven at 350°F (175°C) for about 10 minutes. Add hot sauce if desired, and enjoy!
Extra Tips
For an even fluffier egg texture, consider adding a tablespoon of cream to the egg mixture before cooking.
If you’re preparing these sandwiches for a crowd or a larger family, you can easily double the recipe.
When freezing, make sure to remove as much air as possible from the freezer bags to prevent freezer burn. Additionally, labeling the bags with the date of preparation can help you keep track of freshness.
Mushroom and Goat Cheese Wrap
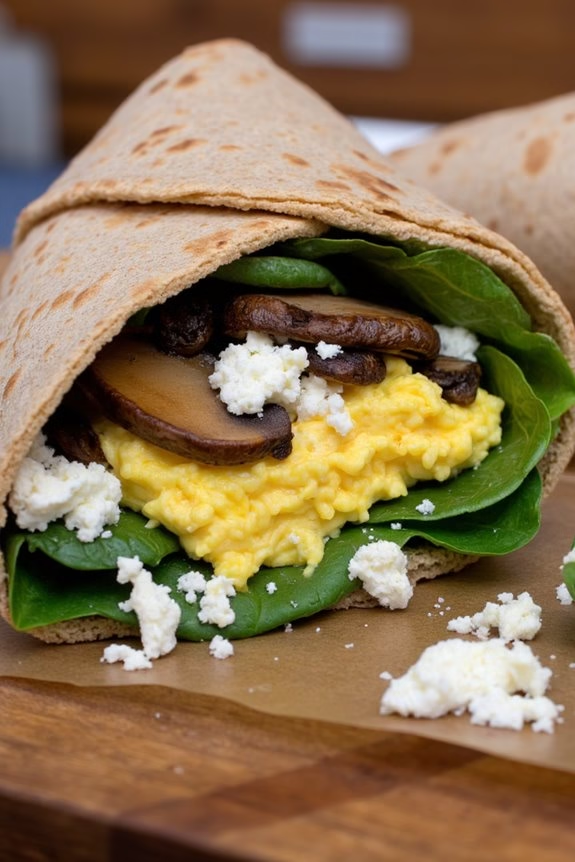
For a quick and delicious breakfast option, consider making Mushroom and Goat Cheese Wraps. These wraps are perfect for busy mornings, as they can be prepared ahead of time and stored in the freezer. With the earthy flavor of mushrooms and the creamy richness of goat cheese, this dish is sure to satisfy your morning cravings.
Whether you’re preparing breakfast for a family or just want to have a convenient meal option on hand, these wraps are a fantastic choice.
With a serving size appropriate for 4-6 people, this recipe guarantees that everyone gets a hearty start to their day. The combination of mushrooms, goat cheese, and other flavorful ingredients makes these wraps both nutritious and delicious. By following this simple recipe, you’ll have a batch of tasty breakfast wraps ready to grab and go, saving you precious time on hectic mornings.
Ingredients (serves 4-6):
- 12 large eggs
- 1 cup milk
- Salt and pepper to taste
- 2 tablespoons olive oil
- 1 pound mushrooms, sliced
- 1 onion, finely chopped
- 4 cloves garlic, minced
- 6 ounces goat cheese, crumbled
- 6 large whole wheat tortillas
- 2 cups fresh spinach
- Cooking spray
Instructions:
1. Prepare the Egg Mixture: In a large bowl, whisk together the eggs, milk, salt, and pepper until well combined. Set aside.
2. Cook the Mushroom Mixture: Heat the olive oil in a large skillet over medium heat. Add the sliced mushrooms and cook for about 5-7 minutes until they release their moisture and start to brown.
Add the chopped onion and garlic, cooking for another 3-4 minutes until the onion is translucent and the garlic is fragrant.
3. Combine with Eggs: Pour the egg mixture into the skillet with the mushrooms and onions. Stir continuously over medium heat until the eggs are fully cooked and scrambled.
4. Assemble the Wraps: Lay out each tortilla and evenly distribute the spinach leaves across them. Spoon the scrambled egg and mushroom mixture onto each tortilla, followed by crumbled goat cheese.
5. Wrap and Freeze: Roll each tortilla tightly into a wrap. Wrap each one individually in aluminum foil or plastic wrap. Place the wrapped tortillas in a freezer-safe bag or container, and store them in the freezer.
6. Reheat and Serve: When ready to eat, remove a wrap from the freezer and unwrap it. Place it on a microwave-safe plate and cover with a paper towel. Microwave on high for about 1-2 minutes or until heated through.
Alternatively, you can reheat in an oven preheated to 350°F (175°C) for about 15 minutes.
Extra Tips:
For best results, make sure the wraps are cooled to room temperature before freezing to prevent sogginess. You can also add other vegetables such as bell peppers or tomatoes for extra flavor and nutrition.
If you prefer a different cheese, feta or cheddar can be great alternatives to goat cheese. When reheating, be cautious not to overheat, as this can cause the eggs to become rubbery. Enjoy your Mushroom and Goat Cheese Wraps as they provide a balanced and satisfying breakfast option!
Turkey and Provolone Panini

Freezer Breakfast Sandwiches are a convenient and delicious way to start your day with minimal morning preparation. Among the many combinations possible, the Turkey and Provolone Panini stands out as a flavorful and satisfying option. Perfect for busy mornings or lazy weekends, these sandwiches offer a balanced mix of protein and carbohydrates, guaranteeing you stay full and energized throughout the morning. By preparing these sandwiches in advance and storing them in the freezer, you can enjoy a gourmet breakfast in just a matter of minutes.
The Turkey and Provolone Panini combines the savory taste of smoked turkey with the creamy, slightly tangy flavor of provolone cheese. The addition of fresh spinach and a touch of Dijon mustard elevates the flavor profile, while a sturdy, crusty bread guarantees the sandwich holds up well during the freezing and reheating process. This recipe yields 4-6 servings, making it ideal for meal prep or feeding a small family.
Ingredients (Serves 4-6):
- 8 slices of crusty bread (such as ciabatta or sourdough)
- 8 slices of smoked turkey breast
- 4 slices of provolone cheese
- 1 cup fresh spinach leaves
- 2 tablespoons Dijon mustard
- Butter or olive oil, for grilling
Cooking Instructions:
- Prepare the Bread: Lay out the slices of crusty bread on a clean surface. Spread a thin layer of Dijon mustard on each slice. This will add a tangy flavor that complements the turkey and provolone.
- Assemble the Sandwiches: On half of the bread slices, layer 2 slices of turkey breast, followed by a slice of provolone cheese and a handful of fresh spinach leaves. Top each with the remaining bread slices, mustard side down, to form a sandwich.
- Prepare for Freezing: If you plan to freeze the sandwiches, wrap each sandwich tightly in aluminum foil or plastic wrap. Label and date each one for easy identification later.
- Grill the Sandwiches: Heat a panini press or a non-stick skillet over medium heat. Lightly brush the outside of each sandwich with butter or olive oil. Grill the sandwiches until the bread is golden brown and the cheese is melted, about 4-5 minutes per side. If using a skillet, press down with a spatula or a heavy skillet to mimic a panini press.
- Cool and Freeze: Allow the sandwiches to cool completely if you plan to freeze them. Once cooled, store the wrapped sandwiches in a freezer-safe bag or container for up to 3 months.
- Reheating: When ready to eat, remove the sandwich from the freezer. Unwrap and reheat in a preheated oven at 350°F (175°C) for 15-20 minutes, or until heated through. Alternatively, use a microwave for a quick reheat, but note the bread may not be as crispy.
Extra Tips:
For best results, choose a dense, crusty bread that can withstand freezing and reheating without becoming soggy. You can customize the sandwiches by adding sliced tomatoes or substituting the greens with arugula for a peppery kick. If you don’t have a panini press, use a heavy skillet to press down on the sandwiches as they grill in a regular skillet.
Finally, make sure the sandwiches are completely cooled before freezing to prevent ice crystals from forming and affecting texture.
Sweet Potato and Black Bean Breakfast Burrito

Sweet Potato and Black Bean Breakfast Burrito is a delightful and nutritious option for those busy mornings when you need a quick but satisfying meal. This dish combines the earthy sweetness of roasted sweet potatoes with the hearty texture of black beans, all wrapped up in a warm tortilla. It’s the perfect make-ahead breakfast that you can store in the freezer and reheat in a flash, guaranteeing you start your day on the right foot.
These breakfast burritos aren’t only delicious but also packed with protein and fiber, making them an excellent choice for sustaining energy throughout the morning. The addition of spices and fresh ingredients elevates the flavors, while the simplicity of the recipe means you can whip up a batch in no time. Whether you’re feeding a family or just preparing meals for yourself, this recipe will yield enough to keep everyone satisfied and ready to tackle the day.
Ingredients for 4-6 servings:
- 2 large sweet potatoes
- 1 tablespoon olive oil
- 1 teaspoon ground cumin
- 1 teaspoon smoked paprika
- Salt and pepper to taste
- 1 can (15 ounces) black beans, drained and rinsed
- 1 cup shredded cheddar cheese
- 6 large eggs
- 1/4 cup milk
- 6 large flour tortillas
- Optional toppings: salsa, avocado, fresh cilantro
Cooking Instructions:
- Preheat the Oven: Preheat your oven to 400°F (200°C). While the oven is heating, peel and dice the sweet potatoes into small cubes.
- Roast the Sweet Potatoes: Place the diced sweet potatoes on a baking sheet. Drizzle with olive oil, and sprinkle with cumin, smoked paprika, salt, and pepper. Toss to coat evenly. Roast in the preheated oven for 20-25 minutes until tender, stirring halfway through.
- Prepare the Eggs: In a medium bowl, whisk together the eggs and milk. Season with a pinch of salt and pepper. Heat a non-stick skillet over medium heat and scramble the eggs until just set. Remove from heat and set aside.
- Heat the Black Beans: In a small saucepan, heat the black beans over medium heat until warmed through. Set aside.
- Assemble the Burritos: Lay out the tortillas on a clean surface. Evenly distribute the roasted sweet potatoes, scrambled eggs, black beans, and shredded cheese among the tortillas. Add any optional toppings if desired.
- Wrap the Burritos: Fold the sides of each tortilla over the filling, then roll up tightly from the bottom to form a burrito.
- Freeze the Burritos: Wrap each burrito tightly in foil or plastic wrap. Place them in a resealable plastic bag or airtight container, and store in the freezer.
- Reheat the Burritos: To reheat, remove the foil or plastic wrap and microwave on high for 2-3 minutes, or until heated through. Alternatively, bake in a preheated oven at 350°F (175°C) for 15-20 minutes.
Extra Tips:
When making these Sweet Potato and Black Bean Breakfast Burritos, feel free to customize the fillings to suit your taste. You can add other vegetables like bell peppers or onions for extra flavor and nutrition.
If you prefer a spicier version, consider adding diced jalapeños or a splash of hot sauce. To guarantee the burritos stay fresh in the freezer, make sure they’re wrapped tightly and labeled with the date. Enjoy your breakfast burrito with a side of fresh fruit or a small salad for a well-rounded meal.
Smoked Salmon and Cream Cheese Bagel

Start your morning with these delightful Smoked Salmon and Cream Cheese Bagel Freezer Breakfast Sandwiches. This dish combines the savory flavors of smoked salmon with the delicate creaminess of cream cheese, all nestled between a perfectly toasted bagel. Not only are these sandwiches delicious, but they’re also incredibly convenient for those hectic mornings when time is of the essence.
Prepare them in advance, freeze them, and simply reheat for a gourmet breakfast that’s ready in minutes. Perfect for serving 4-6 people, these sandwiches are an ideal choice for family breakfasts or brunch gatherings. The rich flavors of smoked salmon and the tanginess of the cream cheese are complemented by the crispness of fresh cucumbers and the zing of red onions, delivering a harmonious balance of taste and texture.
Let’s plunge into the ingredients and steps to create these delectable breakfast sandwiches.
Ingredients (for 4-6 servings):
- 4-6 plain bagels
- 8-12 ounces of smoked salmon
- 8 ounces of cream cheese
- 1 medium red onion, thinly sliced
- 1 cucumber, thinly sliced
- Capers, to taste
- Fresh dill, for garnish
- Salt and pepper, to taste
Cooking Instructions:
- Prepare the Bagels: Begin by slicing the bagels in half. Lightly toast them to your desired level of crispness. This can be done using a toaster or by placing them under a broiler for a minute or two.
- Spread the Cream Cheese: Once the bagels are toasted, generously spread cream cheese on the bottom half of each bagel. Confirm an even layer so each bite is rich and creamy.
- Assemble the Sandwiches: Layer the smoked salmon over the cream cheese. Use approximately 2 ounces of smoked salmon per sandwich for a hearty portion.
- Add Vegetables and Garnish: Place a few slices of red onion and cucumber on top of the salmon. Add a few capers and a sprig of fresh dill for additional flavor. Season with salt and pepper according to your taste.
- Complete the Sandwich: Place the top half of the bagel over the filling. Gently press down to secure the layers together.
- Freeze the Sandwiches: Wrap each assembled sandwich tightly in plastic wrap or aluminum foil. Place them in a freezer-safe bag or container. These sandwiches can be stored in the freezer for up to one month.
- Reheat and Serve: When ready to serve, remove the sandwiches from the freezer. Unwrap them and place them in a preheated oven at 350°F (175°C) for about 15-20 minutes or until heated through. Alternatively, you can use a microwave, but be mindful that this may affect the texture of the bagel.
Extra Tips:
For an extra burst of flavor, consider adding a squeeze of fresh lemon juice over the smoked salmon before assembling the sandwiches. This can enhance the taste and provide a revitalizing contrast.
When freezing, confirm the sandwiches are well-wrapped to prevent freezer burn and maintain their quality. If you prefer a softer bagel after reheating, you can cover the wrapped sandwich with a damp paper towel before microwaving, which helps retain moisture. Always check for doneness, as cooking times may vary depending on your appliance.