
Mornings can feel like a whirlwind, right? Between squeezing in a few extra minutes of sleep and the morning rush, breakfast often gets overlooked. But guess what? There are ways to enjoy a tasty, stress-free breakfast without giving up those precious moments of rest. Let’s explore some simple make-ahead breakfast ideas to make your mornings a little bit easier and a lot more delicious.
Overnight Oats
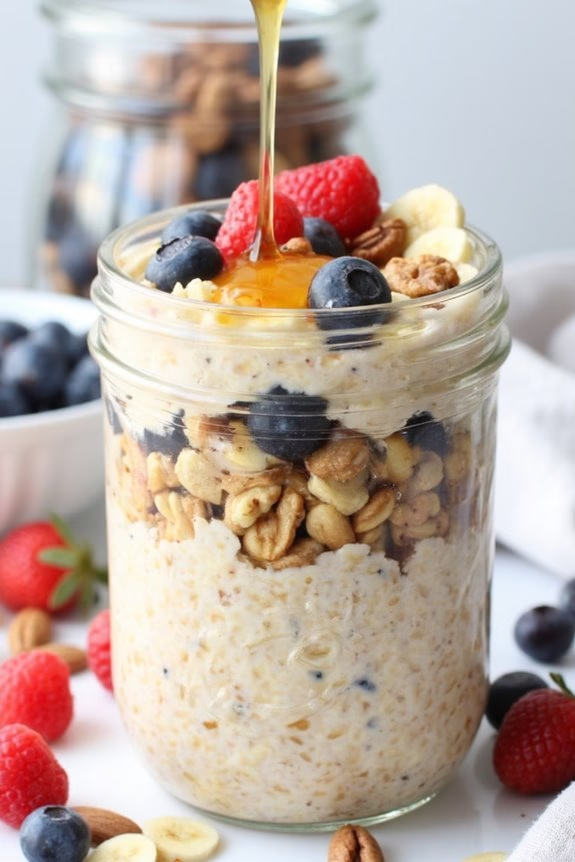
If you’re looking for a quick and nutritious breakfast option that you can prepare in advance, Creamy Banana Nut Overnight Oats are a perfect choice. This make-ahead breakfast isn’t only convenient but also packed with flavors and nutrients to keep you energized throughout the morning. The combination of ripe bananas, crunchy nuts, and creamy oats will surely delight your taste buds.
Plus, it’s a versatile recipe that allows for plenty of customization to suit your dietary preferences.
Overnight oats are incredibly simple to prepare. The basic concept involves soaking oats in milk or a milk alternative overnight, allowing them to soften and absorb the flavors of the other ingredients. In this recipe, the natural sweetness of bananas pairs beautifully with the nuttiness of almonds and walnuts.
Whether you’re feeding a hungry family or preparing meals for the week, this recipe serves 4-6 people and can be easily doubled or halved as needed.
Ingredients for 4-6 servings:
- 3 cups old-fashioned rolled oats
- 3 cups milk or milk alternative (almond, soy, etc.)
- 2 ripe bananas, mashed
- 1/2 cup chopped walnuts
- 1/2 cup sliced almonds
- 1/4 cup honey or maple syrup
- 1 teaspoon vanilla extract
- 1 teaspoon cinnamon
- Pinch of salt
- Optional toppings: fresh berries, sliced bananas, nut butter
Cooking Instructions:
- Prepare the Base: In a large mixing bowl, combine the old-fashioned rolled oats, milk, mashed bananas, honey or maple syrup, vanilla extract, cinnamon, and a pinch of salt. Stir thoroughly until all the ingredients are well integrated.
- Add the Nuts: Fold in the chopped walnuts and sliced almonds, ensuring they’re evenly distributed throughout the mixture. This will add a delightful crunch to your creamy oats.
- Portion Out: Divide the mixture into individual containers or jars. Mason jars work well for this, as they’re both portable and airtight. Make sure to leave some space at the top of each container for any toppings you may wish to add later.
- Refrigerate Overnight: Seal the containers with lids and place them in the refrigerator. Allow the oats to soak for at least 6 hours or overnight. This resting period lets the oats absorb the liquid and flavors, resulting in a creamy texture.
- Serve and Enjoy: In the morning, give each container a good stir before serving. Add your favorite toppings such as fresh berries, additional sliced bananas, or a dollop of nut butter for extra flavor and texture.
Extra Tips:
- For a creamier texture, consider substituting some of the milk with Greek yogurt or adding a scoop of protein powder.
- Customize the sweetness level by adjusting the amount of honey or maple syrup to your taste.
- If you prefer a warm breakfast, transfer the oats to a microwave-safe bowl and heat them for a minute or two before serving.
- These overnight oats can be stored in the fridge for up to five days, making them ideal for meal prepping.
Egg Muffins

Egg muffins are a versatile and convenient option for a make-ahead breakfast. Perfectly portioned and packed with protein, these little delights are ideal for busy mornings or as a grab-and-go snack. With endless customization options, you can tailor them to suit your taste preferences by adding your favorite vegetables, cheeses, and meats.
Whether you’re feeding a family or prepping for the week, egg muffins are a nutritious way to start your day. These savory muffins aren’t only simple to prepare but also easy to store and reheat. By making a batch in advance, you can guarantee you have a healthy breakfast ready in minutes, reducing morning stress and providing more time to enjoy your meal.
Follow this recipe for a basic egg muffin that serves 4-6 people, and feel free to get creative with your own additions.
Ingredients (Serves 4-6):
- 10 large eggs
- 1 cup diced bell peppers (any color)
- 1/2 cup diced onions
- 1 cup chopped spinach
- 1 cup cooked and crumbled sausage or bacon
- 1 cup shredded cheddar cheese
- Salt and pepper to taste
- Non-stick cooking spray
Cooking Instructions:
- Preheat and Prepare: Preheat your oven to 350°F (175°C). Lightly spray a 12-cup muffin tin with non-stick cooking spray to prevent sticking and make cleanup easier.
- Mix the Ingredients: In a large mixing bowl, crack the eggs and whisk them until they’re well beaten. Add the diced bell peppers, onions, spinach, cooked sausage or bacon, and half of the shredded cheese. Season with salt and pepper to taste, and mix until all ingredients are well combined.
- Fill the Muffin Tin: Pour the egg mixture evenly into the prepared muffin tin, filling each cup about three-quarters full. The mixture will expand as it bakes, so leave a little room at the top.
- Top with Cheese: Sprinkle the remaining shredded cheese on top of each muffin cup for an extra cheesy finish.
- Bake: Place the muffin tin in the preheated oven and bake for 20-25 minutes or until the egg muffins are firm and lightly browned on top. To check for doneness, insert a toothpick into the center of a muffin; it should come out clean.
- Cool and Store: Allow the muffins to cool in the tin for a few minutes before removing them. Serve immediately or transfer them to an airtight container and refrigerate for up to 5 days. For longer storage, freeze the muffins and reheat them as needed.
Extra Tips:
To customize your egg muffins, consider adding different ingredients such as diced tomatoes, mushrooms, or jalapeños for a spicy kick. You can also experiment with different cheeses or swap out meat for a vegetarian option.
When reheating, use the microwave or oven, but be cautious not to overheat, as this can make the muffins rubbery. If you plan to freeze them, wrap each muffin individually to prevent freezer burn and preserve freshness.
Chia Seed Pudding
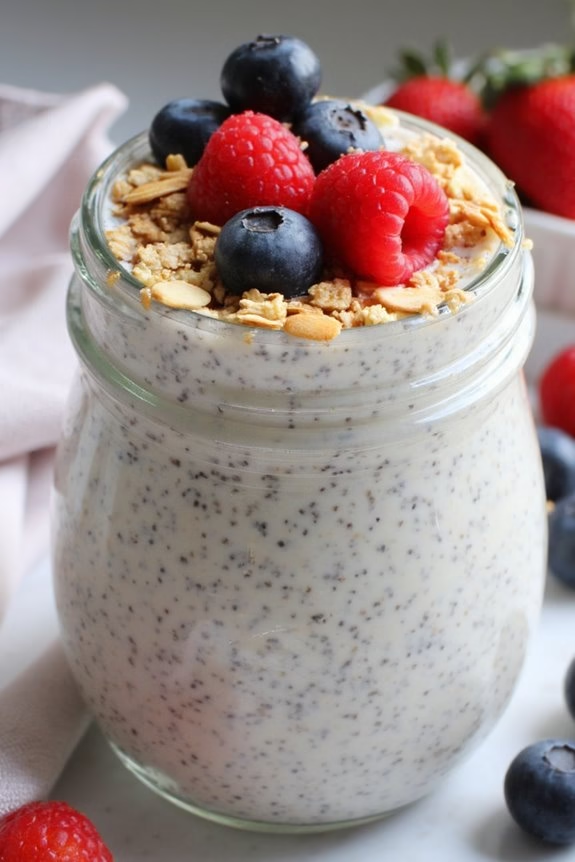
Chia Seed Pudding is a nutritious and versatile make-ahead breakfast option that’s perfect for busy mornings. This creamy delight isn’t only easy to prepare, but it also allows for endless variations with your choice of toppings. Simply mix the ingredients together the night before, and you’ll wake up to a delicious and satisfying breakfast that provides essential nutrients and energy to start your day.
Whether you prefer fresh berries, nuts, or a drizzle of honey, chia seed pudding can be customized to suit your taste. This recipe is designed to serve 4–6 people, making it ideal for families or meal prep enthusiasts. The preparation involves minimal effort, and the pudding can be stored in the refrigerator for several days.
The base consists of chia seeds, which are rich in omega-3 fatty acids, fiber, and protein, combined with your choice of milk for a creamy, delicious texture. Follow the simple steps below to create a wholesome breakfast that everyone will enjoy.
Ingredients for 4–6 Servings:
- 1 cup chia seeds
- 4 cups milk (dairy or plant-based)
- 1/4 cup maple syrup or honey (optional for sweetness)
- 1 teaspoon vanilla extract
- A pinch of salt
- Fresh fruits, nuts, or granola for topping
Cooking Instructions:
- Combine Ingredients: In a large mixing bowl, whisk together the chia seeds, milk, maple syrup (or honey), vanilla extract, and a pinch of salt. Confirm that the chia seeds are evenly distributed and not clumping together.
- Mix Thoroughly: Stir the mixture well to combine all the ingredients. This will help to prevent the chia seeds from settling at the bottom and confirm an even consistency.
- Set Aside to Gel: Cover the bowl with plastic wrap or a lid and place it in the refrigerator. Allow the chia seeds to absorb the liquid and gel for at least 4 hours, or overnight for best results. Stir the mixture once more after the first hour to break up any clumps.
- Serve and Enjoy: Once the pudding has reached a thick, gel-like consistency, it’s ready to be served. Spoon the chia seed pudding into individual bowls or jars. Top with fresh fruits, nuts, granola, or any of your preferred toppings.
- Store Leftovers: If there’s any leftover pudding, cover it and store it in the refrigerator for up to 5 days. The flavors will continue to meld, making it even more delicious over time.
Extra Tips:
For a creamier texture, consider using a combination of coconut milk and almond milk. If you prefer a sweeter pudding, adjust the amount of maple syrup or honey to taste.
You can also experiment with different flavors by adding cocoa powder for a chocolate version or a pinch of cinnamon for a warm, spiced pudding. Remember to stir the mixture thoroughly to prevent clumping and confirm a smooth, even texture throughout.
Breakfast Burritos

Breakfast burritos are a delicious and convenient way to start your day, especially when you’re on the go or have a busy morning ahead. These make-ahead breakfast burritos can be prepared in advance, stored in the refrigerator or freezer, and then quickly reheated for a satisfying and hearty breakfast. Packed with protein, vegetables, and cheese, they provide a balanced meal that will keep you full and energized throughout the morning.
The best part is that they’re highly customizable, so you can tailor them to your family’s tastes by adding your favorite ingredients.
To make breakfast burritos for 4-6 people, you’ll need to gather your ingredients and have a little time set aside for preparation. This recipe captures the essence of a classic breakfast burrito with scrambled eggs, sausage, and cheese, but feel free to get creative by adding other fillings such as beans, potatoes, or salsa.
Once you’ve prepared the burritos, they can be individually wrapped and stored, making breakfast time seamless and stress-free.
Ingredients (Serves 4-6):
- 8 large flour tortillas
- 8 eggs
- 1 cup cooked breakfast sausage, crumbled
- 1 cup shredded cheddar cheese
- 1 red bell pepper, diced
- 1 green bell pepper, diced
- 1 onion, diced
- 1 teaspoon salt
- 1/2 teaspoon black pepper
- 1 tablespoon butter
- Cooking spray or a small amount of oil
Cooking Instructions:
- Prepare the Filling:
- Heat a large pan over medium heat and add the butter. Once melted, add the diced onion, red bell pepper, and green bell pepper. Sauté for about 5-7 minutes until the vegetables are soft.
- Add the crumbled sausage to the pan and cook for an additional 3-5 minutes, stirring occasionally, until heated through.
- Scramble the Eggs:
- In a large bowl, crack the eggs and whisk them together with salt and pepper.
- Spray a non-stick skillet with cooking spray (or add a small amount of oil) and heat over medium-low heat. Pour the eggs into the skillet and gently stir with a spatula until they’re fully cooked but still soft. Remove from heat.
- Assemble the Burritos:
- Lay a tortilla flat on a clean surface. Place a portion of the scrambled eggs in the center, followed by the sautéed vegetables and sausage mixture. Sprinkle with shredded cheddar cheese.
- Fold the sides of the tortilla over the filling, then roll it up tightly from the bottom to the top. Repeat with the remaining tortillas and filling.
- Wrap and Store:
- Wrap each burrito in foil or parchment paper. If storing them in the refrigerator, they’ll keep for up to 3 days. For longer storage, place them in a freezer-safe bag and freeze for up to 1 month.
- Reheat:
- To reheat, remove any foil or parchment paper and microwave for 1-2 minutes until heated through. For a crispier texture, you can also heat them in a skillet or oven.
Extra Tips:
When assembling your breakfast burritos, be mindful not to overfill them as this can make them difficult to roll and cause the ingredients to spill out.
If you prefer a spicier burrito, consider adding diced jalapeños or a dash of hot sauce to the filling. To save time in the morning, consider reheating the burritos in the oven at 350°F (175°C) for about 10-15 minutes, which will give them a nice crispness.
Always label the storage bags with the date to keep track of freshness if you’re freezing them. Enjoy your homemade breakfast burritos!
Smoothie Packs
Smoothie packs are a fantastic make-ahead breakfast option that allows you to enjoy a healthy and delicious smoothie with minimal morning prep. By preparing these packs in advance, all you need to do is blend and enjoy, making your morning routine smoother and more efficient.
Whether you’re rushing to work, getting the kids ready for school, or simply want to start your day with a nutritious meal, smoothie packs are a convenient solution.
The beauty of smoothie packs lies in their versatility and ease of customization. You can tailor each pack to suit your taste preferences and nutritional needs. With a variety of fruits, vegetables, and other add-ins, you can guarantee that you’re getting a balanced meal in just a few sips.
Preparing smoothie packs for the week not only saves time but also helps in reducing food waste, as you can use up fruits and greens before they go bad.
Ingredients for 4-6 Servings:
- 2 ripe bananas, sliced
- 2 cups strawberries, hulled and halved
- 2 cups spinach leaves
- 1 cup blueberries
- 1 cup Greek yogurt
- 1 cup almond milk (or any milk of choice)
- 1/2 cup rolled oats
- 2 tablespoons chia seeds
- 2 tablespoons honey (optional)
Instructions:
- Prepare the Ingredients: Start by washing and drying all the fruits and spinach. Slice the bananas and hull and halve the strawberries. This will make it easier to portion out the ingredients into the smoothie packs.
- Assemble the Packs: Lay out four to six resealable freezer bags or containers. In each bag or container, evenly divide and layer the bananas, strawberries, spinach, blueberries, and Greek yogurt. These will form the base of your smoothie.
- Add Dry Ingredients: Add the rolled oats and chia seeds on top of the layered fruits in each pack. These will add texture and nutritional value to your smoothies.
- Seal and Freeze: Carefully seal each bag or container, making sure there’s as little air as possible. Label each pack with the date and contents before placing them in the freezer. These packs can be stored in the freezer for up to a month.
- Blend When Ready to Serve: When you’re ready to make your smoothie, take a pack out of the freezer. Empty the contents into a blender, add 1/2 cup of almond milk (or your chosen milk), and blend until smooth. Add honey to taste if desired.
Extra Tips:
When preparing smoothie packs, consider varying your ingredients for different nutritional profiles and flavors. You could swap out spinach for kale, or use different fruits like mangoes or peaches.
If your blender struggles with frozen ingredients, let the pack sit at room temperature for a couple of minutes before blending. Finally, remember that the consistency of your smoothie can be adjusted by adding more or less milk. Enjoy experimenting with different combinations to find your perfect morning smoothie!
Baked Oatmeal
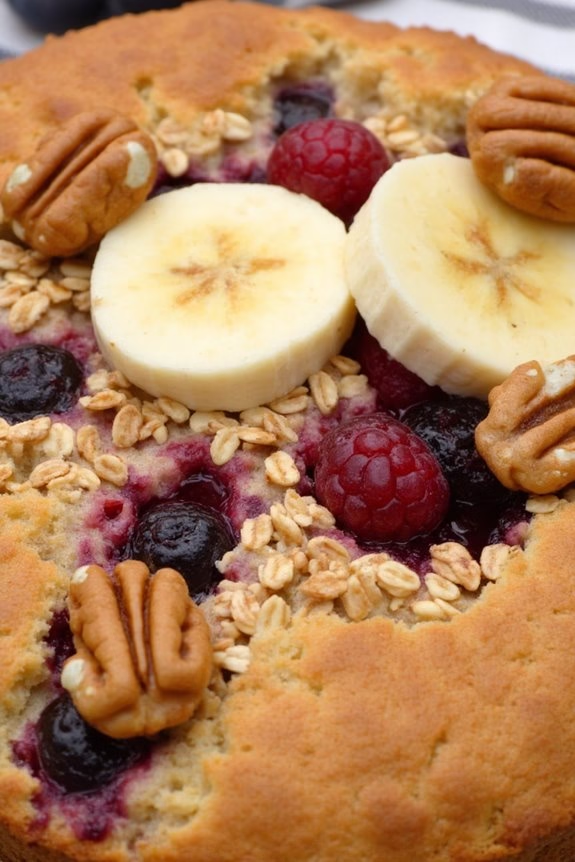
Baked oatmeal is a delightful and nutritious breakfast option that’s perfect for busy mornings. This make-ahead dish combines rolled oats, milk, and a mix of fruits and nuts to create a hearty meal that can be prepared in advance and simply reheated. It offers a warm, comforting start to the day and can be customized with your favorite ingredients to suit your taste preferences.
Ideal for serving a family or for meal prep, baked oatmeal can be stored in the refrigerator and enjoyed throughout the week. This recipe serves 4-6 people, making it an ideal choice for a family breakfast or a week’s worth of individual servings. Whether you’re rushing off to work or looking for a leisurely weekend breakfast, baked oatmeal is a versatile and satisfying option.
Ingredients for 4-6 servings:
- 2 cups rolled oats
- 1/2 cup brown sugar
- 1 teaspoon baking powder
- 1/2 teaspoon salt
- 1 teaspoon ground cinnamon
- 1/2 cup walnuts or pecans, chopped
- 1 cup milk
- 2 eggs
- 1 teaspoon vanilla extract
- 1/4 cup melted butter or coconut oil
- 1 1/2 cups mixed berries (fresh or frozen)
- 1 ripe banana, sliced
Instructions:
- Preheat the Oven: Start by preheating your oven to 350°F (175°C) to guarantee it’s hot enough for baking the oatmeal.
- Mix Dry Ingredients: In a large mixing bowl, combine the rolled oats, brown sugar, baking powder, salt, ground cinnamon, and chopped nuts. Stir until all the dry ingredients are well incorporated.
- Prepare Wet Ingredients: In a separate bowl, whisk together the milk, eggs, vanilla extract, and melted butter or coconut oil. Make sure the butter or oil is cooled slightly before mixing to prevent cooking the eggs.
- Combine Ingredients: Pour the wet ingredients into the bowl of dry ingredients. Mix gently until everything is fully combined, making sure there are no dry clumps.
- Add Fruit: Fold in the mixed berries and sliced banana, distributing them evenly throughout the mixture.
- Transfer to Baking Dish: Pour the oatmeal mixture into a greased 9×13 inch baking dish, spreading it out evenly to guarantee an even bake.
- Bake: Place the dish in the preheated oven and bake for 30-35 minutes, or until the top is golden brown and the oatmeal is set.
- Cool and Serve: Allow the baked oatmeal to cool for a few minutes before slicing and serving. Enjoy it warm, and top with additional milk, yogurt, or syrup if desired.
Extra Tips:
For a more personalized touch, consider adding different types of fruits or nuts based on your preference. Dried fruits such as raisins or apricots can add extra sweetness.
If you prefer a less sweet option, reduce the amount of brown sugar or replace it with maple syrup or honey. Baked oatmeal can also be frozen in individual portions, making it a convenient breakfast option for those especially hectic mornings.
Simply thaw overnight and reheat in the microwave for a quick meal.
Yogurt Parfaits
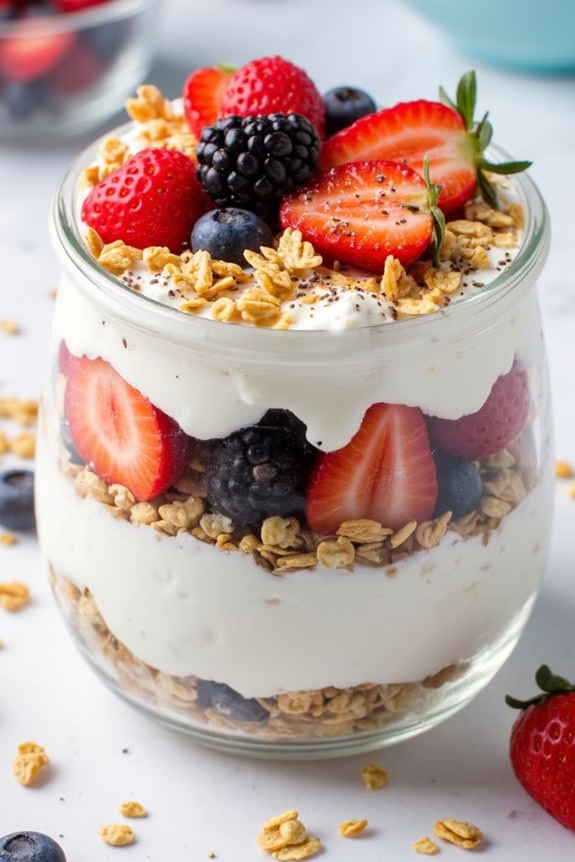
Yogurt parfaits are a delicious and nutritious breakfast option that can be easily prepared ahead of time. Perfect for busy mornings, these parfaits combine layers of creamy yogurt, crunchy granola, and fresh or dried fruits to create a delightful start to the day. Not only are they quick to assemble, but they’re also customizable to suit your taste preferences, making them a versatile addition to your breakfast repertoire.
Crafting these make-ahead yogurt parfaits involves a few simple steps and just a handful of ingredients. By preparing them in advance, you can have a healthy breakfast ready to go, saving precious time during your morning routine. This recipe yields a serving size of 4-6 people, making it ideal for families or meal prepping for the week.
Ingredients:
- 4 cups of Greek yogurt (plain or flavored)
- 2 cups of granola
- 2 cups of mixed berries (e.g., strawberries, blueberries, raspberries)
- 1/2 cup of honey or maple syrup
- 1/4 cup of chia seeds
- 1 teaspoon of vanilla extract
- Optional: nuts, seeds, or dried fruit for topping
Instructions:
- Prepare the Yogurt Mixture:
- In a large mixing bowl, combine the Greek yogurt, honey or maple syrup, and vanilla extract. Stir until the mixture is smooth and the sweetener and vanilla are well incorporated.
- Layer the Parfaits:
- Start by spooning a generous amount of the yogurt mixture into the bottom of each serving glass or jar. Aim for about 1/3 cup, but adjust according to your preference for the number of layers.
- Add the Fruits:
- On top of the yogurt, add a layer of mixed berries. Use a mix of strawberries, blueberries, and raspberries for a balanced flavor and appealing color contrast.
- Sprinkle the Granola:
- Add a layer of granola over the berries. This adds a satisfying crunch to the parfaits. Make sure to spread it out evenly for an even texture.
- Repeat Layers:
- Continue layering with the remaining yogurt, berries, and granola until you reach the top of the glass or jar. The number of layers will depend on the size of your serving containers.
- Top with Extras:
- For added texture and flavor, sprinkle nuts, seeds, or dried fruit on top of the final yogurt layer. Chia seeds are also a great choice for added nutrition.
- Refrigerate:
- Cover each parfait with a lid or plastic wrap and refrigerate for at least an hour, or overnight for best results. This allows the flavors to meld together.
Extra Tips:
When assembling your yogurt parfaits, make sure the granola is added just before serving if you prefer it to stay crunchy. If preparing in advance, consider storing granola separately and adding it right before consumption.
Feel free to experiment with different fruit combinations or yogurt flavors to keep the parfaits exciting and tailored to your personal taste. Additionally, using mason jars with lids can make storage and transportation easier, especially if you’re planning to take your parfaits on the go.
Quiche Cups

Quiche Cups are a delightful and convenient breakfast option that can be prepared in advance, making them perfect for busy mornings. These miniature versions of the classic quiche are packed with flavor and can easily be customized with your favorite ingredients.
Whether you’re a fan of savory meats, fresh vegetables, or gooey cheese, Quiche Cups offer a versatile canvas for your culinary creativity. By preparing them ahead of time, you’ll guarantee a quick, nutritious, and delicious start to your day.
For a serving size of 4-6 people, this recipe will yield approximately 12 Quiche Cups. They’re perfect for meal prep and can be stored in the fridge or freezer, allowing you to enjoy a hearty breakfast with minimal effort during the week.
These Quiche Cups aren’t only convenient but also provide a satisfying meal that will keep you fueled and ready to tackle the day.
Ingredients:
- 6 large eggs
- 1 cup milk
- 1 cup shredded cheese (cheddar, Swiss, or your choice)
- 1/2 cup cooked bacon or ham, diced
- 1/2 cup bell peppers, diced
- 1/2 cup onions, diced
- Salt and pepper to taste
- Cooking spray or oil for greasing the muffin tin
Cooking Instructions:
1. Preheat the Oven:
Preheat your oven to 375°F (190°C). This guarantees that the oven is hot and ready to bake your Quiche Cups evenly.
2. Prepare the Muffin Tin:
Lightly grease a 12-cup muffin tin with cooking spray or oil. This will prevent the quiche from sticking, making it easier to remove them once baked.
3. Mix the Filling:
In a large mixing bowl, whisk together the eggs and milk until fully combined. Add the shredded cheese, diced bacon or ham, bell peppers, and onions.
Season with salt and pepper to taste. Stir the mixture until all ingredients are well incorporated.
4. Fill the Muffin Cups:
Pour the egg mixture into each muffin cup, filling them about 3/4 full. Be sure to distribute the ingredients evenly to guarantee each cup has a good mix of flavors.
5. Bake the Quiche Cups:
Place the muffin tin in the preheated oven and bake for 20-25 minutes, or until the tops are golden brown and a toothpick inserted into the center comes out clean.
6. Cool and Serve:
Allow the Quiche Cups to cool in the muffin tin for about 5 minutes before removing. Serve warm, or let them cool completely before storing them for later use.
Extra Tips:
When making Quiche Cups, feel free to experiment with different ingredients based on your preferences. You can substitute spinach, mushrooms, or tomatoes for the bell peppers, or try different types of cheese for unique flavor variations.
If you prefer a vegetarian option, simply omit the bacon or ham. To store, place cooled Quiche Cups in an airtight container and refrigerate for up to 4 days, or freeze them for up to a month.
Reheat in the microwave or oven for a quick, satisfying breakfast on the go.
Banana Bread
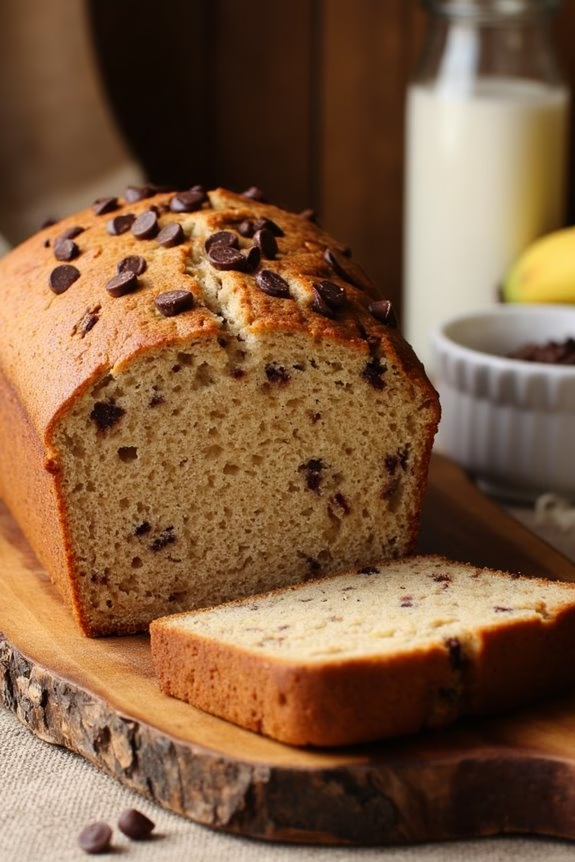
Banana bread is a timeless breakfast favorite that’s both comforting and versatile. Its sweet, moist texture makes it an ideal treat for any time of the day, especially for a make-ahead breakfast option. You can prepare it in advance and enjoy it throughout the week, either warmed up or at room temperature. Not only is it delicious, but it also makes the best use of overripe bananas that might otherwise go to waste.
This classic banana bread recipe is perfect for serving 4-6 people and is a great addition to your breakfast routine. This recipe uses simple ingredients that you likely already have in your pantry. The result is a moist, flavorful loaf that can be customized with nuts, chocolate chips, or even dried fruits if desired.
Banana bread is also perfect for packing in lunches, serving as an afternoon snack, or pairing with a cup of coffee. Let’s get started on making this delightful dish that your family will surely love.
Ingredients (serving size: 4-6 people):
- 3 overripe bananas
- 1/3 cup melted butter
- 3/4 cup sugar
- 1 large egg, beaten
- 1 teaspoon vanilla extract
- 1 teaspoon baking soda
- Pinch of salt
- 1 1/2 cups all-purpose flour
- Optional: 1/2 cup chopped nuts or chocolate chips
Cooking Instructions:
- Preheat and Prepare: Preheat your oven to 350°F (175°C). Grease a 9×5 inch loaf pan with butter or non-stick spray to prevent the banana bread from sticking.
- Mash the Bananas: In a large mixing bowl, peel and mash the overripe bananas with a fork until they’re smooth. This will be the base of your banana bread and provide moisture and sweetness.
- Add Wet Ingredients: Stir the melted butter into the mashed bananas. Mix in the sugar, beaten egg, and vanilla extract. Stir until all the wet ingredients are well combined.
- Incorporate Dry Ingredients: Sprinkle the baking soda and a pinch of salt over the banana mixture. Gently fold in the all-purpose flour using a spatula or wooden spoon until the batter is just combined. Be careful not to overmix to guarantee a tender loaf.
- Optional Add-ins: If using, gently fold in the chopped nuts or chocolate chips, ensuring they’re evenly distributed throughout the batter.
- Bake the Bread: Pour the batter into the prepared loaf pan, spreading it evenly. Place the pan in the preheated oven and bake for 60-65 minutes, or until a toothpick inserted into the center comes out clean.
- Cool and Serve: Once baked, remove the banana bread from the oven and let it cool in the pan for about 10 minutes. Then, transfer it to a wire rack to cool completely before slicing and serving.
Extra Tips:
To guarantee your banana bread turns out perfectly every time, make sure your bananas are overripe, as they provide the best flavor and sweetness. If your bananas aren’t ripe enough, you can speed up the process by placing them in a brown paper bag for a day or two.
Also, feel free to experiment with different mix-ins like dried fruits or spices such as cinnamon or nutmeg for added flavor. Banana bread also freezes well, so consider doubling the recipe and freezing a loaf for later use. Simply wrap it tightly in plastic wrap and foil before placing it in the freezer. When ready to eat, thaw at room temperature or gently warm in the oven.
Breakfast Sandwiches

Breakfast sandwiches are a delightful and convenient option for those busy mornings when you need something quick yet satisfying. The beauty of these sandwiches lies in their ability to be prepared in advance, allowing you to enjoy a nutritious breakfast with minimal effort. By assembling and freezing them ahead of time, you can simply reheat and enjoy a delicious meal without the morning rush.
These make-ahead breakfast sandwiches are perfect for families or individuals who want to guarantee they start their day with a balanced meal. They can be customized with your favorite ingredients, making them versatile and appealing to various taste preferences. Whether you’re a fan of classic ham and cheese or prefer a vegetarian option with spinach and avocado, these sandwiches are sure to become a staple in your breakfast routine.
Ingredients (Serves 4-6):
- 6 English muffins or bagels
- 6 large eggs
- 6 slices of cheese (cheddar, Swiss, or your choice)
- 6 slices of cooked bacon, ham, or sausage patties
- Salt and pepper to taste
- 1 tablespoon butter or cooking spray
- Optional: spinach, avocado, or tomato slices
Cooking Instructions:
- Prepare the Egg Patties: Preheat your oven to 350°F (175°C). Grease a muffin tin or a rectangular baking dish with butter or cooking spray. Crack the eggs into the muffin cups or pour them into the baking dish, seasoning with salt and pepper. Bake the eggs for 12-15 minutes or until they’re fully set. Let them cool slightly after baking.
- Cook the Meat: While the eggs are baking, cook your choice of bacon, ham, or sausage patties in a skillet over medium heat until thoroughly cooked. Drain excess grease on a paper towel and set aside.
- Assemble the Sandwiches: Slice the English muffins or bagels in half. On the bottom half of each muffin or bagel, place one egg patty, a slice of cheese, and a piece of cooked meat. Add any optional ingredients like spinach or tomato slices on top.
- Complete the Sandwich: Place the top half of the English muffin or bagel over the filling, pressing down gently to hold everything together.
- Wrap and Freeze: Wrap each sandwich individually in aluminum foil or plastic wrap. Place them into a resealable freezer bag or container for storage. These sandwiches can be stored in the freezer for up to 2 months.
- Reheat and Enjoy: To reheat, remove the sandwich from its wrapping and microwave on high for 1-2 minutes until heated through. Alternatively, you can reheat them in a preheated oven at 375°F (190°C) for about 10-15 minutes.
Extra Tips:
When assembling these breakfast sandwiches, verify that all ingredients are completely cooled before wrapping them for freezing. This prevents sogginess and maintains the texture of the bread.
If you’re using vegetables like spinach or tomatoes, consider patting them dry to remove excess moisture before adding them to the sandwich. For a crispier texture, reheat the sandwiches in an oven instead of a microwave.
Customize your sandwiches by experimenting with different meats, cheeses, or adding condiments like mustard or hot sauce for extra flavor.
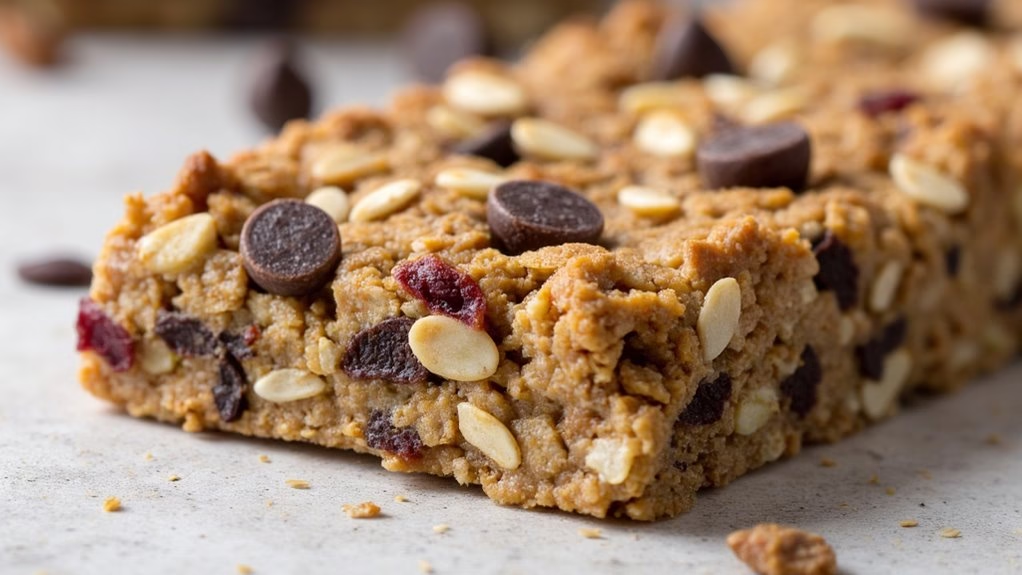
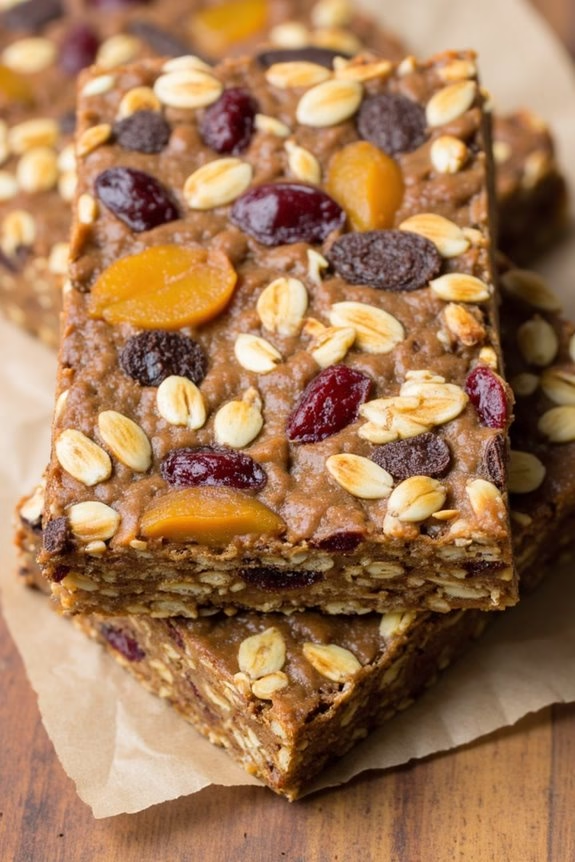
Energy Bars
Energy bars are a perfect make-ahead breakfast option that’s both nutritious and convenient. They’re packed with essential nutrients and can be customized with your favorite ingredients, guaranteeing you get a healthy dose of energy to start your day.
Preparing homemade energy bars allows you to control the ingredients and avoid the excessive sugars and preservatives often found in store-bought varieties.
This recipe for energy bars is simple, requiring only a few steps and no baking. The bars are filled with oats, nuts, seeds, and dried fruits, providing a balanced mix of carbohydrates, proteins, and healthy fats. Ideal for busy mornings, these bars can be prepared in advance and stored for a quick grab-and-go breakfast throughout the week.
Ingredients for 4-6 Servings:
- 2 cups rolled oats
- 1 cup almond butter
- 1/2 cup honey or maple syrup
- 1/2 cup chopped nuts (almonds, walnuts, or pecans)
- 1/2 cup mixed seeds (chia seeds, flaxseeds, or pumpkin seeds)
- 1/2 cup dried fruits (raisins, cranberries, or apricots)
- 1/4 cup dark chocolate chips
- 1 teaspoon vanilla extract
- 1/4 teaspoon salt
Cooking Instructions:
- Prepare Ingredients: Start by measuring all your ingredients to guarantee you have everything ready. Chop the nuts and dried fruits into small, manageable pieces.
- Mix the Base: In a large mixing bowl, combine the rolled oats, chopped nuts, mixed seeds, and dried fruits. Stir these dry ingredients together until they’re evenly distributed.
- Combine Wet Ingredients: In a separate microwave-safe bowl or saucepan, gently heat the almond butter and honey (or maple syrup) until they’re just warm and can be easily mixed. Stir in the vanilla extract and salt.
- Mix Everything Together: Pour the warm almond butter mixture over the dry ingredients. Using a spatula or your hands, mix everything thoroughly until all the dry ingredients are coated with the wet mixture.
- Add Chocolate Chips: Once the mixture is slightly cooled, fold in the dark chocolate chips. This prevents them from melting completely and maintains their texture in the bars.
- Shape the Bars: Line a baking dish or a shallow pan with parchment paper. Transfer the mixture into the pan and press it down firmly with the back of a spoon or your hands to create an even layer.
- Chill and Set: Place the pan in the refrigerator for at least 2 hours, or until the mixture is firm enough to cut into bars.
- Cut and Store: Once set, remove from the refrigerator and cut into bars of your desired size. Store the energy bars in an airtight container in the refrigerator for up to a week.
Extra Tips:
To guarantee your energy bars hold together well, make sure the mixture is packed tightly in the pan before chilling.
You can also experiment with different flavors by substituting ingredients; try using different nut butters or adding spices like cinnamon or nutmeg for extra flavor.
If you prefer a sweeter bar, consider sprinkling some extra chocolate chips on top before pressing the mixture into the pan.