

Who knew air fryers could revolutionize breakfast?
From crispy bacon to fluffy pancakes and savory breakfast burritos, these trendy recipes are ready in a flash.
With minimal mess and oil, your morning routine just got a whole lot easier.
Let’s explore these delicious creations that might redefine your mornings.
Air Fryer Breakfast Burritos

Air Fryer Breakfast Burritos are a delicious and convenient way to start your day with a hearty meal. These burritos are filled with a flavorful combination of scrambled eggs, melted cheese, crispy bacon, and sautéed vegetables, all wrapped up in a warm tortilla.
Using an air fryer to cook these breakfast delights guarantees they’ve a perfectly crisp exterior while keeping the inside soft and melty. This method also reduces the need for excess oil, making it a healthier alternative to traditional frying.
Ideal for busy mornings or a weekend brunch, these breakfast burritos can be prepared in advance and simply reheated in the air fryer when you’re ready to enjoy them. They’re also customizable, allowing you to add your favorite toppings or fillings such as sausage, avocado, or hot sauce to suit your taste.
With this recipe, you’ll have a satisfying meal that everyone in the family will love, and it only takes a few simple steps to prepare.
Ingredients (Serving Size: 4-6 people)
- 6 large eggs
- 1/4 cup milk
- Salt and pepper to taste
- 1 tablespoon butter
- 1 cup shredded cheddar cheese
- 6 slices of bacon
- 1/2 cup diced bell peppers (any color)
- 1/2 cup diced onions
- 6 large flour tortillas
- Non-stick cooking spray
Cooking Instructions
- Prepare the Ingredients: Begin by whisking the eggs with milk, salt, and pepper in a bowl until well combined. Set aside. Dice the bell peppers and onions, and shred the cheddar cheese if not already shredded.
- Cook the Bacon: Preheat the air fryer to 400°F (200°C). Place the bacon slices in a single layer in the air fryer basket and cook for 8-10 minutes or until crispy. Once cooked, remove the bacon and let it drain on paper towels. Chop into bite-sized pieces once cooled.
- Sauté the Vegetables: In a large skillet, melt the butter over medium heat. Add the diced bell peppers and onions, and sauté until they’re soft and slightly caramelized, about 5 minutes. Remove from heat and set aside.
- Scramble the Eggs: In the same skillet, pour in the egg mixture and cook over medium heat, stirring occasionally until the eggs are fully cooked and scrambled. Remove from heat.
- Assemble the Burritos: Lay out the tortillas on a flat surface. Evenly distribute the scrambled eggs, cooked bacon, sautéed vegetables, and shredded cheese onto each tortilla. Roll each tortilla tightly, folding in the sides as you go to prevent the filling from spilling out.
- Air Fry the Burritos: Lightly spray the air fryer basket with non-stick cooking spray. Place the burritos seam-side down in the basket. Depending on the size of your air fryer, you may need to cook them in batches. Air fry at 350°F (175°C) for 5-7 minutes, or until the tortillas are golden and crispy.
- Serve: Remove the burritos from the air fryer and let them cool slightly before serving. Enjoy them as is or with your favorite breakfast sides and condiments.
Extra Tips
To guarantee the burritos hold their shape while cooking, make sure they’re tightly rolled. You can use toothpicks to secure them if needed.
If you prefer a vegetarian option, you can substitute the bacon with vegetarian sausage or additional vegetables. These burritos can also be frozen for up to a month and reheated in the air fryer, making them a versatile option for meal prepping.
Crispy Air Fryer Bacon
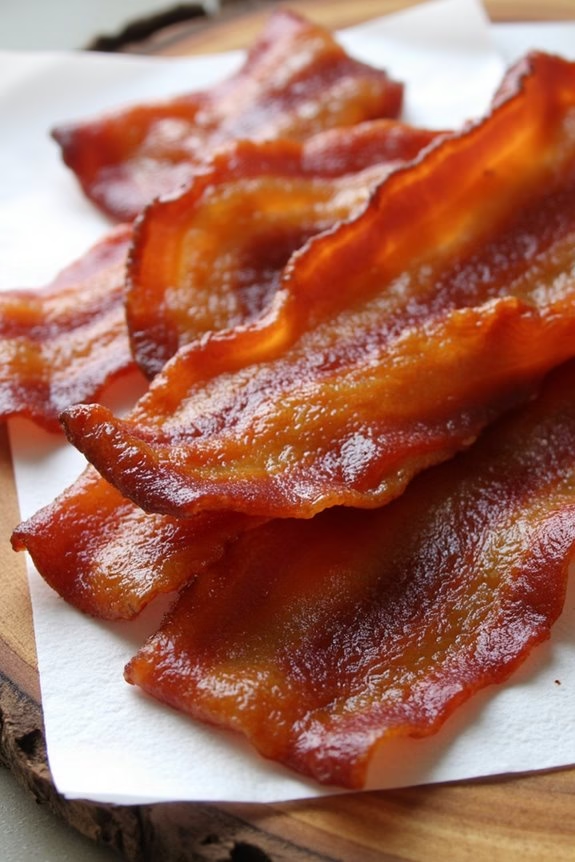
Crispy bacon is a breakfast staple that pairs perfectly with eggs, pancakes, or even a simple slice of toast. Using an air fryer to cook bacon not only reduces the mess associated with traditional stovetop methods but also results in perfectly crispy, evenly cooked strips every time. The circulating hot air of the air fryer guarantees that each piece gets just the right amount of heat, creating that irresistible crunch.
This recipe is designed to serve 4-6 people, making it ideal for family breakfasts or brunch gatherings. Whether you’re using thick-cut bacon for a heartier bite or standard slices for a lighter option, this method will yield excellent results. The preparation is quick, and the cleanup is a breeze, allowing you to enjoy more time with family and friends.
Ingredients for 4-6 servings:
- 12 slices of bacon (thick-cut or regular)
- Cooking spray (optional)
Cooking Instructions:
- Preheat the Air Fryer: Set your air fryer to 400°F (200°C) and allow it to preheat for about 3-5 minutes. This guarantees that the bacon cooks evenly from the start.
- Prepare the Bacon: Depending on the size of your air fryer, you may need to cut the bacon strips in half to fit them comfortably in the basket. Arrange the bacon in a single layer, making sure not to overcrowd the basket. If necessary, cook in batches for best results.
- Cook the Bacon: Place the basket in the air fryer and cook the bacon for 8-10 minutes. Check halfway through and flip the bacon to guarantee even cooking. If you prefer your bacon extra crispy, add an additional 2-3 minutes of cooking time.
- Remove and Drain: Once cooked to your desired level of crispiness, carefully remove the bacon using tongs and place it on a plate lined with paper towels. This will absorb any excess grease.
- Repeat if Necessary: If you have more bacon to cook, repeat the process until all the bacon is prepared.
Extra Tips:
To minimize smoke, add a small amount of water to the bottom of the air fryer basket before cooking. This will help catch the dripping grease and prevent it from burning.
If your air fryer is on the smaller side, cooking in batches is essential to guarantee each piece is cooked evenly and achieves the perfect crisp.
For those who enjoy a touch of sweetness, consider sprinkling a little brown sugar or drizzling maple syrup over the bacon before cooking for a deliciously caramelized finish.
Fluffy Air Fryer Pancakes
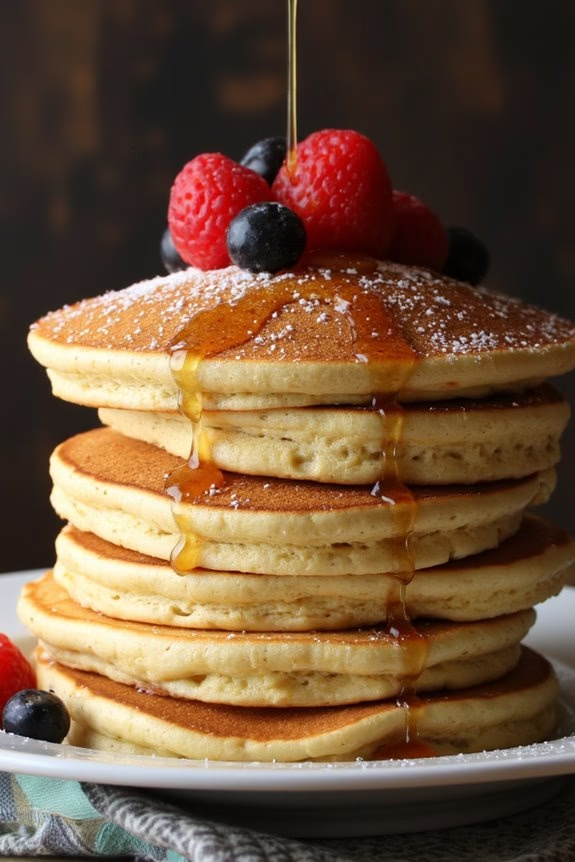
Who says you need a griddle to make perfect pancakes? With an air fryer, you can whip up a batch of fluffy, golden pancakes in no time. This method guarantees even cooking and gives your pancakes a lovely, airy texture that will delight everyone at your breakfast table.
Plus, using an air fryer can be a healthier alternative since it requires less oil, making it an excellent choice for a guilt-free morning treat.
These air fryer pancakes are perfect for a family brunch or a quick breakfast for a group of 4-6 people. They pair wonderfully with classic toppings like maple syrup or fresh berries, but feel free to get creative with your favorite flavors.
Whether you’re a breakfast enthusiast or just looking for a simple way to make pancakes, this recipe will become a staple in your kitchen.
Ingredients (Serves 4-6):
- 2 cups all-purpose flour
- 2 tablespoons granulated sugar
- 1 tablespoon baking powder
- 1/2 teaspoon salt
- 2 large eggs
- 1 1/2 cups milk
- 1/4 cup melted butter
- 1 teaspoon vanilla extract
- Cooking spray or a light drizzle of oil for greasing
Cooking Instructions:
- Preheat the Air Fryer: Start by preheating your air fryer to 360°F (180°C). This will guarantee that the pancakes cook evenly and have a nice, fluffy texture.
- Mix Dry Ingredients: In a large mixing bowl, combine the flour, sugar, baking powder, and salt. Whisk them together until well combined to avoid any lumps in your batter.
- Prepare Wet Ingredients: In a separate bowl, beat the eggs and then add the milk, melted butter, and vanilla extract. Mix well until the ingredients are fully incorporated.
- Combine Mixtures: Gradually pour the wet ingredients into the dry ingredients, stirring gently with a whisk or spatula until just combined. Be careful not to overmix, as this can make the pancakes tough instead of fluffy.
- Prepare the Air Fryer: Lightly grease the bottom of the air fryer basket with cooking spray or a small amount of oil to prevent sticking.
- Cook the Pancakes: Using a ladle or measuring cup, pour a portion of the batter into the air fryer basket, forming a round pancake shape. Be sure not to overcrowd the basket; you may need to cook in batches depending on the size of your air fryer.
- Air Fry the Pancakes: Cook the pancakes at 360°F (180°C) for about 8-10 minutes, flipping halfway through the cooking time. The pancakes should be golden brown and cooked through when done.
- Serve Immediately: Remove the pancakes from the air fryer and serve them hot with your favorite toppings such as syrup, fruit, or whipped cream.
Extra Tips:
For the fluffiest pancakes, make sure not to overmix your batter; a few lumps are perfectly fine.
If you’re cooking in batches, keep the already-cooked pancakes warm in an oven set to a low temperature.
Feel free to experiment by adding mix-ins like chocolate chips or blueberries to the batter before cooking.
Finally, adjust the cooking time as needed since air fryer models can vary in power and size. Enjoy your fluffy pancakes straight from the air fryer with a delightful breakfast spread!
Air Fryer French Toast Sticks

French toast sticks are a delightful and easy breakfast option that can be made quickly with the help of an air fryer. With their crispy exterior and soft, custard-like interior, these French toast sticks are perfect for busy mornings or a leisurely weekend brunch. The air fryer guarantees an even, golden-brown finish without the need for excess oil, making this a healthier yet still delicious choice.
This recipe serves 4-6 people, making it ideal for family breakfasts or a meal prep option that you can enjoy throughout the week. You can serve these French toast sticks with your favorite toppings, such as maple syrup, fresh fruit, or a dusting of powdered sugar. Let’s explore the ingredients and steps needed to create this tasty dish.
Ingredients (Serves 4-6):
- 8 slices of thick bread (such as brioche or Texas toast)
- 4 large eggs
- 1 cup milk
- 1 tablespoon vanilla extract
- 1 teaspoon ground cinnamon
- 1/4 teaspoon salt
- Cooking spray or melted butter
- Optional toppings: maple syrup, powdered sugar, fresh fruit
Cooking Instructions:
- Prepare the Bread: Start by cutting each slice of bread into thirds to create sticks. This size is perfect for air frying and easy to handle when serving.
- Mix the Custard: In a large bowl, whisk together the eggs, milk, vanilla extract, cinnamon, and salt until fully combined. Make sure the mixture is smooth to guarantee even coating on the bread.
- Preheat the Air Fryer: Preheat your air fryer to 375°F (190°C) for about 3-5 minutes. This helps in achieving a consistent cooking temperature.
- Dip the Bread: Dip each bread stick into the custard mixture, making sure each piece is fully coated but not overly soaked. Allow any excess mixture to drip off before placing the sticks in the air fryer basket.
- Arrange the Sticks: Lightly spray the air fryer basket with cooking spray or brush with melted butter to prevent sticking. Arrange the French toast sticks in a single layer in the basket, ensuring there’s space between each stick for even cooking.
- Cook the Sticks: Air fry the French toast sticks at 375°F (190°C) for 8-10 minutes, flipping halfway through. They should be golden brown and crispy on the outside once done.
- Serve Warm: Once cooked, remove the French toast sticks from the air fryer and serve immediately with your choice of toppings.
Extra Tips:
For an extra burst of flavor, consider adding a pinch of nutmeg or a tablespoon of maple syrup to the custard mixture before dipping the bread. If you prefer a sweeter French toast, increase the cinnamon or add a tablespoon of sugar to the mix.
When cooking in batches, keep the ready sticks warm in a low oven until all are prepared. Finally, if you have leftover sticks, they can be stored in an airtight container and reheated in the air fryer for a quick breakfast later in the week.
Air Fryer Breakfast Potatoes

Start your day with a delightful serving of crispy air fryer breakfast potatoes. These potatoes are perfectly seasoned and cooked to a golden-brown crisp that will have everyone reaching for seconds.
They’re the ideal accompaniment to any breakfast spread, pairing perfectly with eggs, bacon, or even as a stand-alone dish. The air fryer method guarantees that you get that perfect crispy texture without the need for excessive oil, making them a healthier choice for your morning meal.
Designed to serve 4-6 people, this recipe is both simple and quick, making it a great option for busy mornings or leisurely weekend brunches. With just a few common pantry ingredients and about 25 minutes of cooking time, you can enjoy a dish that feels indulgent without being overly complicated.
Whether you’re hosting a breakfast gathering or simply cooking for your family, these air fryer breakfast potatoes are sure to be a hit.
Ingredients (Serves 4-6):
- 2 pounds of baby potatoes or red potatoes
- 2 tablespoons of olive oil
- 1 teaspoon of garlic powder
- 1 teaspoon of onion powder
- 1 teaspoon of paprika
- 1 teaspoon of dried thyme
- Salt and pepper to taste
- Fresh parsley for garnish (optional)
Cooking Instructions:
- Preparation: Begin by washing the potatoes thoroughly. You can peel them if desired, but keeping the skin on adds extra texture and nutrients. Cut the potatoes into 1-inch cubes to guarantee even cooking.
- Seasoning: In a large mixing bowl, combine the potato cubes with olive oil, garlic powder, onion powder, paprika, dried thyme, salt, and pepper. Toss the potatoes well to make sure they’re evenly coated with the seasoning.
- Preheat and Arrange: Preheat your air fryer to 400°F (200°C). Once heated, place the seasoned potatoes in the air fryer basket. Confirm they’re spread out in a single layer for even cooking. You may need to cook in batches if your air fryer is small.
- Cooking: Cook the potatoes for 15-20 minutes, shaking the basket halfway through to make sure they cook evenly on all sides. The potatoes should be golden brown and crispy on the outside when done.
- Serving: Once cooked, remove the potatoes from the air fryer and transfer them to a serving dish. Garnish with fresh parsley if desired, and serve immediately for the best texture.
Extra Tips:
For an even crispier texture, make sure not to overcrowd the air fryer basket. If necessary, cook the potatoes in batches to allow hot air to circulate evenly.
You can experiment with different seasonings to match your taste preferences, such as adding chili powder for a spicy kick or rosemary for a herby flavor.
Also, remember that air fryer models can vary, so keep an eye on the potatoes during the last few minutes of cooking to prevent them from overcooking. Enjoy your crispy, flavorful breakfast potatoes!
Air Fryer Veggie Frittata

Air Fryer Veggie Frittata is a delightful and nutritious breakfast option that can be whipped up in no time. This frittata is packed with fresh vegetables, fluffy eggs, and a sprinkle of cheese, creating a hearty meal that will satisfy your morning hunger. Cooking it in an air fryer guarantees a perfectly cooked dish with a light and fluffy texture, while the exterior gains a slight crispiness for added flavor.
It’s a versatile recipe that you can customize with your favorite veggies or whatever you have on hand, making it an ideal breakfast for any day of the week. The beauty of this dish lies in its simplicity and adaptability. Whether you’re looking for a quick breakfast before a busy day or a leisurely brunch with family, this Air Fryer Veggie Frittata fits the bill.
It’s perfect for serving 4-6 people, making it a great option for sharing. Not only is it an excellent way to use up those leftover vegetables from your fridge, but it also provides a balanced meal full of protein and fiber. Pair it with a side salad or some fresh fruit, and you’ve got yourself a complete, wholesome breakfast.
Ingredients (Serves 4-6):
- 8 large eggs
- 1/4 cup milk
- 1 cup bell peppers, diced (any color)
- 1/2 cup onion, diced
- 1 cup spinach, roughly chopped
- 1/2 cup cherry tomatoes, halved
- 1/2 cup shredded cheese (such as cheddar or mozzarella)
- Salt and pepper to taste
- 1 tablespoon olive oil
- Non-stick cooking spray
Cooking Instructions:
- Prepare the Air Fryer: Preheat your air fryer to 350°F (175°C). Lightly coat the air fryer basket with non-stick cooking spray to prevent the frittata from sticking.
- Mix the Eggs: In a large mixing bowl, whisk together the eggs and milk until well combined. Season with salt and pepper to taste.
- Sauté the Vegetables: In a skillet over medium heat, add olive oil and sauté the diced onions and bell peppers until they begin to soften, approximately 3-4 minutes. Add the spinach and cherry tomatoes, and continue to cook for another 2 minutes until the spinach wilts.
- Combine Ingredients: Add the sautéed vegetables to the egg mixture, along with the shredded cheese. Stir everything together until the ingredients are evenly distributed.
- Cook the Frittata: Pour the egg mixture into the prepared air fryer basket. Cook at 350°F (175°C) for 15-18 minutes, or until the eggs are fully set and the top is slightly golden. Check for doneness by inserting a knife into the center; it should come out clean.
- Serve: Carefully remove the frittata from the air fryer, slice it into portions, and serve hot. Enjoy with your favorite sides.
Extra Tips:
To guarantee the frittata cooks evenly, avoid overloading it with too many vegetables or cheese. Keep the layer of ingredients relatively thin to allow for proper air circulation within the air fryer.
You can also experiment with different cheeses or add herbs such as basil or parsley for extra flavor. If you prefer a more golden top, consider sprinkling a little extra cheese on top halfway through cooking.
Finally, remember to let the frittata rest for a couple of minutes after removing it from the air fryer to make slicing easier.
Air Fryer Avocado Toast
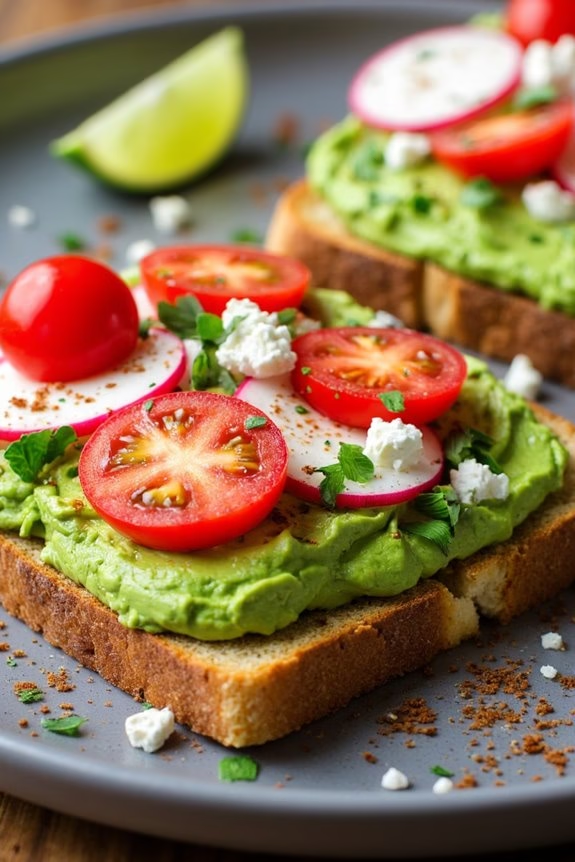
Start your day with a delightful and nutritious breakfast by preparing Air Fryer Avocado Toast. This modern twist on a classic dish combines the creamy richness of ripe avocados with the irresistible crunch of perfectly toasted bread.
Whether you’re looking for a quick weekday breakfast or a brunch option to impress guests, this recipe is both satisfying and easy to prepare. The air fryer not only speeds up the process but also guarantees an even, golden-brown toast that’s sure to please.
This recipe serves 4-6 people, making it ideal for family breakfasts or gatherings. You can customize each slice with various toppings to cater to different tastes, making it a versatile and crowd-pleasing choice. With just a handful of ingredients, you’ll have a delicious meal ready in minutes without compromising on flavor or nutrition.
Ingredients:
- 4-6 slices of whole-grain bread
- 3 ripe avocados
- 1 tablespoon lemon juice
- Salt and pepper to taste
- Optional toppings: cherry tomatoes, radishes, red pepper flakes, feta cheese, fresh herbs
Cooking Instructions:
- Prepare the Avocado Mixture: Start by cutting the avocados in half, removing the pits, and scooping the flesh into a bowl. Add the lemon juice, salt, and pepper, and mash with a fork until you reach your desired consistency. You can make it smooth or leave it a bit chunky, depending on your preference.
- Preheat the Air Fryer: Set your air fryer to 370°F (188°C) and let it preheat for about 3 minutes. This guarantees that the bread will toast evenly and quickly.
- Toast the Bread: Place the slices of whole-grain bread in the air fryer basket in a single layer. Depending on the size of your air fryer, you may need to do this in batches. Toast the bread for 3-5 minutes, or until golden brown and crispy to your liking.
- Assemble the Toast: Once the bread is toasted, remove it from the air fryer and let it cool slightly. Spread a generous amount of the avocado mixture onto each slice of toast.
- Add Toppings: Customize your avocado toast by adding your choice of toppings. For a fresh burst of flavor, consider adding cherry tomatoes or radishes. For a bit of spice, sprinkle red pepper flakes. Feta cheese and fresh herbs can also enhance the taste.
- Serve and Enjoy: Arrange the avocado toast on a serving platter and serve immediately for the best taste and texture.
Extra Tips:
For a richer flavor, consider adding a drizzle of olive oil or balsamic glaze on top of the avocado mixture. If you’re making this dish ahead of time, keep the avocado mixture in an airtight container with plastic wrap pressed directly on the surface to prevent browning.
Experiment with different bread types, such as sourdough or rye, to change up the flavor and texture. Finally, if you enjoy a bit of protein, top your toast with a poached egg for an extra satisfying meal.
Air Fryer Cinnamon Rolls
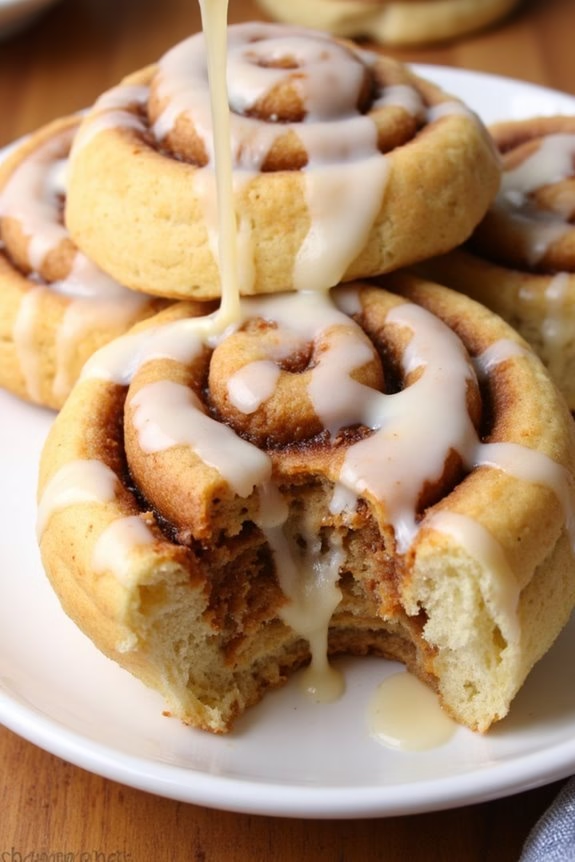
Cinnamon rolls are a delightful breakfast treat, and when made in an air fryer, they become even more irresistible. The air fryer provides a quick and efficient way to bake cinnamon rolls, resulting in a perfectly golden crust and a soft, gooey inside. With the added convenience of the air fryer, you can skip the lengthy preheating and cut down on cooking time, making this a great option for busy mornings or when you’re craving something sweet and comforting.
This recipe will guide you through making cinnamon rolls from scratch, guaranteeing that each roll is filled with a delicious cinnamon-sugar mixture and topped with creamy icing. Whether you’re serving them as a special weekend breakfast or a holiday brunch treat, these air fryer cinnamon rolls are sure to impress. The following recipe serves 4-6 people, making it perfect for family gatherings or sharing with friends.
Ingredients:
- 2 1/4 cups all-purpose flour
- 3 tablespoons granulated sugar
- 1 packet active dry yeast (2 1/4 teaspoons)
- 1/2 cup milk
- 1/4 cup unsalted butter, melted
- 1/4 cup water
- 1/2 teaspoon salt
- 1 egg
- 1/2 cup brown sugar
- 1 tablespoon ground cinnamon
- 1/4 cup unsalted butter, softened (for filling)
- 1/2 cup powdered sugar
- 1-2 tablespoons milk (for icing)
- 1/2 teaspoon vanilla extract
Cooking Instructions:
- Prepare the Dough: In a large bowl, mix the flour, sugar, and yeast. In a separate small saucepan, heat the milk, melted butter, and water until warm (about 110°F). Add the warm mixture to the dry ingredients along with the salt and egg. Mix until a dough forms, then knead for about 5-7 minutes until smooth and elastic. Cover and let it rise in a warm place for about 1 hour or until doubled in size.
- Make the Filling: While the dough is rising, mix the brown sugar and cinnamon in a small bowl. Set aside.
- Roll Out the Dough: Once the dough has risen, roll it out on a lightly floured surface into a rectangle about 1/4 inch thick. Spread the softened butter evenly over the dough, then sprinkle the cinnamon sugar mixture on top, leaving a small border on one long edge.
- Shape the Rolls: Starting from the long edge with the filling, tightly roll up the dough into a log. Cut into 1-inch slices and place them in the air fryer basket lined with parchment paper, guaranteeing they’ve enough space to expand.
- Air Fry the Rolls: Preheat the air fryer to 350°F. Place the rolls in the basket and cook for 10-12 minutes or until golden brown and cooked through.
- Prepare the Icing: While the rolls are cooking, whisk together the powdered sugar, milk, and vanilla extract until smooth. Adjust the consistency with more milk if needed.
- Serve: Once the rolls are done, remove them from the air fryer and drizzle with the icing while warm. Serve immediately.
Extra Tips:
For the best results, make sure that your dough has enough time to rise properly, as this will make the cinnamon rolls fluffy and soft.
Be careful not to overcrowd the air fryer basket; if necessary, cook the rolls in batches to guarantee even cooking.
Additionally, you can customize the filling by adding nuts or raisins if desired. If you prefer a thicker icing, simply reduce the milk in the icing recipe.
Enjoy your delicious air fryer cinnamon rolls fresh out of the fryer for the ultimate breakfast indulgence.
Air Fryer Egg Cups

Air Fryer Egg Cups are a delightful and convenient breakfast option that can be customized to suit your taste preferences. These egg cups aren’t only easy to prepare but also cook quickly in the air fryer, making them perfect for busy mornings.
Whether you like your eggs with veggies, cheese, or meats, these little protein-packed cups provide a nutritious start to your day. Plus, they’re an excellent make-ahead option, allowing you to enjoy a wholesome breakfast even on your busiest days.
To make these scrumptious egg cups, you’ll need a few simple ingredients and an air fryer. The recipe is versatile, allowing you to mix and match ingredients based on what you have on hand or what you enjoy. Once you’ve prepared your ingredients, it’s simply a matter of assembling, cooking, and savoring the flavors.
This recipe serves 4-6 people, making it ideal for a family breakfast or meal prepping for the week.
Ingredients:
- 6 large eggs
- 1/2 cup milk
- 1/2 teaspoon salt
- 1/4 teaspoon black pepper
- 1/2 cup shredded cheese (cheddar, mozzarella, or your choice)
- 1/4 cup chopped bell peppers
- 1/4 cup diced onions
- 1/4 cup cooked bacon or sausage crumbles
- Cooking spray
Instructions:
- Preheat the Air Fryer: Start by preheating your air fryer to 350°F (175°C) for about 3-5 minutes. This guarantees even cooking of your egg cups.
- Prepare the Egg Mixture: In a large mixing bowl, crack the eggs and whisk them together with the milk, salt, and black pepper until well combined. This creates a smooth and creamy base for your egg cups.
- Prepare the Muffin Cups: Lightly spray silicone muffin cups or a silicone muffin pan with cooking spray. This prevents the egg cups from sticking and guarantees easy removal after cooking.
- Assemble the Egg Cups: Evenly distribute the chopped bell peppers, diced onions, and cooked bacon or sausage crumbles into each muffin cup. Pour the egg mixture over the ingredients, filling each cup about three-quarters full. Top each with a sprinkle of shredded cheese.
- Cook the Egg Cups: Carefully place the filled muffin cups in the preheated air fryer basket. Cook at 350°F (175°C) for 10-12 minutes or until the eggs are set and the tops are slightly golden. You may need to cook in batches, depending on the size of your air fryer.
- Cool and Serve: Once cooked, remove the egg cups from the air fryer and let them cool slightly before serving. Enjoy them warm as a delicious breakfast or store them in an airtight container in the refrigerator for up to three days for quick breakfasts on the go.
Extra Tips:
For added flavor, consider incorporating fresh herbs like parsley or chives into the egg mixture. You can also experiment with different fillings such as spinach, mushrooms, or tomatoes to create a variety of egg cups.
If you prefer a spicier kick, add a pinch of red pepper flakes or a dash of hot sauce to the egg mixture. When reheating stored egg cups, use the air fryer at a lower temperature to maintain their fluffy texture without overcooking.
Air Fryer Breakfast Sausage

Start your day with a delectable and satisfying breakfast by making Air Fryer Breakfast Sausages. This recipe provides a quick and healthier alternative to traditional frying, as it uses less oil while still delivering that irresistible crispy exterior and juicy interior.
Perfect for a family breakfast or a brunch gathering, these sausages are sure to be a hit with everyone at the table. By utilizing an air fryer, you can achieve consistent results with minimal effort and cleanup, making this dish a fantastic option for busy mornings.
The beauty of Air Fryer Breakfast Sausages lies in their versatility. You can serve them alongside eggs, pancakes, or waffles, or incorporate them into breakfast sandwiches or wraps. The recipe is simple and can be easily adjusted to suit your taste preferences, whether you like your sausages mild or spicy.
Plus, by choosing your favorite brand or making your own sausage mix, you have complete control over the ingredients, guaranteeing a fresh and flavorful outcome every time.
Ingredients for 4-6 servings:
- 1 pound breakfast sausage links or patties
- Cooking spray (optional for extra crispiness)
- Maple syrup or honey (optional, for a sweet glaze)
Cooking Instructions:
- Preheat the Air Fryer: Start by preheating your air fryer to 370°F (188°C) for about 3-5 minutes. Preheating guarantees even cooking and maximum crispiness.
- Arrange the Sausages: Place the sausage links or patties in a single layer in the air fryer basket. Avoid overcrowding to allow air to circulate effectively around each piece. If necessary, cook in batches.
- Cook the Sausages: Air fry the sausages for 8-10 minutes, flipping them halfway through the cooking time. This helps achieve an evenly cooked and browned exterior.
- Check for Doneness: Use a meat thermometer to verify the sausages have reached an internal temperature of 160°F (71°C), which is the safe temperature for pork sausages. If needed, continue cooking in 1-2 minute increments.
- Optional Glaze: If you prefer a sweet touch, brush the sausages with a little maple syrup or honey during the last minute of cooking. This will create a delicious glaze.
- Serve and Enjoy: Once cooked, let the sausages rest for a couple of minutes before serving. Pair them with your favorite breakfast sides.
Extra Tips:
For added flavor, consider seasoning the sausages with herbs or spices like rosemary, thyme, or paprika before cooking. If you’re using frozen sausages, increase the cooking time by a few minutes, but remember to check the internal temperature to verify they’re thoroughly cooked.
Additionally, using a perforated parchment paper in the air fryer basket can prevent sticking and make cleanup even easier.
Air Fryer Oatmeal Bars

Start your morning with a nutritious and delicious treat by preparing Air Fryer Oatmeal Bars. These bars are perfect for a quick breakfast or as a healthy snack option throughout the day. Made with wholesome ingredients, they provide a good balance of fiber, protein, and natural sweetness, making them a great way to fuel your day.
The air fryer method guarantees a perfectly baked texture with a slightly crispy exterior and a soft, chewy center. Air Fryer Oatmeal Bars are incredibly versatile, allowing you to customize them with your favorite mix-ins such as nuts, dried fruits, or chocolate chips. The recipe is straightforward and comes together quickly, making it ideal for those busy mornings when you need something fast yet fulfilling.
Whether you’re meal-prepping for the week or looking for a new breakfast idea, these oatmeal bars will surely become a staple in your kitchen.
Ingredients (Serves 4-6):
- 2 cups rolled oats
- 1/2 cup almond flour
- 1/2 teaspoon baking powder
- 1/4 teaspoon salt
- 1/2 teaspoon ground cinnamon
- 1/3 cup honey or maple syrup
- 1/4 cup coconut oil, melted
- 1 teaspoon vanilla extract
- 2 large eggs
- 1/2 cup chopped nuts (e.g., almonds, walnuts)
- 1/2 cup dried fruits (e.g., raisins, cranberries)
- Optional: 1/4 cup chocolate chips
Cooking Instructions:
- Preheat the Air Fryer: Start by preheating your air fryer to 350°F (175°C). This guarantees that the bars cook evenly and achieve the desired texture.
- Prepare the Dry Ingredients: In a large mixing bowl, combine the rolled oats, almond flour, baking powder, salt, and cinnamon. Stir well to guarantee all the dry ingredients are evenly distributed.
- Mix Wet Ingredients: In a separate bowl, whisk together the honey or maple syrup, melted coconut oil, vanilla extract, and eggs until smooth and well combined.
- Combine Wet and Dry Ingredients: Pour the wet ingredients into the bowl with the dry ingredients. Stir until the mixture is just combined and no dry spots remain.
- Add Mix-ins: Fold in the chopped nuts, dried fruits, and optional chocolate chips. Make sure they’re evenly distributed throughout the mixture.
- Prepare the Air Fryer Basket: Line the air fryer basket with parchment paper or a silicone mat to prevent sticking. If your air fryer isn’t large enough, you may need to cook the bars in batches.
- Shape the Bars: Transfer the oatmeal mixture into the prepared basket, pressing it down evenly with a spatula or your hands to form a uniform layer.
- Cook the Bars: Place the basket in the preheated air fryer and cook for 15-20 minutes, or until the top is golden brown and the edges are slightly crispy.
- Cool and Serve: Remove the basket from the air fryer and allow the bars to cool for at least 10 minutes. Once cooled, cut into 8-12 bars, depending on your preferred size, and serve.
Extra Tips:
When making Air Fryer Oatmeal Bars, feel free to experiment with different flavor combinations by adding spices like nutmeg or ginger for additional warmth. If you prefer a vegan version, substitute the eggs with flax eggs (1 tablespoon ground flaxseed mixed with 2.5 tablespoons water per egg) and confirm your chocolate chips are dairy-free.
For an added layer of flavor, drizzle some melted chocolate on top of the cooled bars. Store any leftovers in an airtight container at room temperature for up to a week, or freeze them for longer storage.
Air Fryer Granola
Start your day off right with a delicious and healthy homemade Air Fryer Granola! This recipe is perfect for those who love a crunchy, nutty breakfast option without the added preservatives found in store-bought granola.
Made with wholesome oats, nuts, and a touch of sweetness, this granola is easy to customize with your favorite mix-ins. The air fryer makes the entire process quick and efficient, giving you beautifully toasted granola in a fraction of the time it would take in the oven.
Whether you enjoy it with yogurt, milk, or straight out of the jar, this Air Fryer Granola will become a staple in your breakfast routine. Not only is it packed with nutrients, but it’s also a great way to start your day with energy and satisfaction.
This recipe yields enough granola to serve 4-6 people, perfect for a family breakfast or for prepping ahead for the week.
Ingredients for 4-6 servings:
- 3 cups rolled oats
- 1 cup nuts (such as almonds, walnuts, or pecans), roughly chopped
- 1/2 cup shredded coconut (optional)
- 1/4 cup honey or maple syrup
- 1/4 cup coconut oil, melted
- 1 teaspoon vanilla extract
- 1 teaspoon ground cinnamon
- 1/2 teaspoon salt
- 1/2 cup dried fruit (such as raisins, cranberries, or apricots)
Instructions:
- Prepare the Mixture: In a large bowl, combine the rolled oats, chopped nuts, and shredded coconut if using. In a separate small bowl, mix together the honey or maple syrup, melted coconut oil, vanilla extract, ground cinnamon, and salt until well combined.
- Combine Ingredients: Pour the wet mixture over the dry ingredients and stir until all the oats and nuts are evenly coated. Make certain there are no dry spots left.
- Preheat the Air Fryer: Preheat your air fryer to 300°F (150°C). This will guarantee that the granola cooks evenly.
- Cook the Granola: Spread the granola mixture evenly in the air fryer basket in a single layer. Depending on the size of your air fryer, you may need to cook it in batches. Cook for 15-20 minutes, shaking the basket halfway through to guarantee even browning.
- Add Dried Fruit: Once the granola is golden brown and toasted, remove it from the air fryer and stir in the dried fruit. Allow the granola to cool completely; it will become crunchier as it cools.
- Store the Granola: Once cooled, store the granola in an airtight container at room temperature for up to two weeks.
Extra Tips:
For the best results, make sure to shake the air fryer basket halfway through the cooking time to prevent the granola from burning or sticking together.
You can easily customize this recipe by adding different spices, seeds, or even chocolate chips after the granola has cooled. If you prefer clumpier granola, press the mixture down into the air fryer basket with the back of a spatula before cooking.
Air Fryer Bagels
Start your morning off right with these delicious and easy-to-make Air Fryer Bagels. These bagels are crispy on the outside and soft on the inside, making them a perfect breakfast treat.
Using an air fryer not only speeds up the cooking process but also creates bagels that are healthier than their traditional counterparts. Whether you prefer them plain, topped with seeds, or spread with cream cheese, these bagels are certain to become a family favorite.
Making bagels from scratch might sound intimidating, but this recipe breaks it down into simple steps that are easy to follow. In less than an hour, you can have homemade bagels that rival those from your favorite bakery.
Plus, with a serving size of 4-6 people, this recipe is perfect for a small brunch gathering or a family breakfast.
Ingredients (Serves 4-6):
- 2 cups all-purpose flour
- 1 tablespoon baking powder
- 1 teaspoon salt
- 1 cup plain Greek yogurt
- 1 egg (for egg wash)
- 1 tablespoon water
- Optional toppings: sesame seeds, poppy seeds, everything bagel seasoning
Cooking Instructions:
1. Prepare the Dough: In a large mixing bowl, combine the flour, baking powder, and salt. Mix well to evenly distribute the dry ingredients.
Add the Greek yogurt to the dry mixture and stir until a dough begins to form.
2. Knead the Dough: Transfer the dough onto a floured surface. Knead the dough for about 5 minutes, until it becomes smooth and elastic.
If the dough is too sticky, sprinkle a little more flour as needed.
3. Shape the Bagels: Divide the dough into 4-6 equal portions, depending on your desired bagel size. Roll each portion into a ball, then poke a hole through the center with your finger.
Gently stretch and shape each piece into a bagel form.
4. Prepare the Egg Wash: In a small bowl, beat the egg with a tablespoon of water to create an egg wash. Brush the egg wash over each bagel, making sure they’re fully coated.
This will give them a shiny, golden finish.
5. Add Toppings (Optional): If desired, sprinkle your choice of toppings on the bagels after applying the egg wash. Press the toppings gently so they adhere well.
6. Preheat and Cook: Preheat the air fryer to 350°F (175°C). Place the bagels in the air fryer basket in a single layer, making sure they don’t touch.
Cook for 10-12 minutes, or until golden brown and cooked through.
7. Cool and Serve: Once cooked, remove the bagels from the air fryer and let them cool on a wire rack for a few minutes. Serve warm with your favorite spreads or toppings.
Extra Tips:
When making Air Fryer Bagels, make certain that your dough isn’t too sticky by adjusting the flour as needed.
The Greek yogurt provides moisture, but the dough should be pliable and not overly wet. If you’re adding toppings, press them into the dough lightly to prevent them from falling off during cooking.
Also, avoid overcrowding the air fryer basket to guarantee even cooking; if necessary, cook the bagels in batches. Enjoy experimenting with different toppings to create a variety of flavors to suit everyone’s taste.
Air Fryer Hash Browns

Looking for a quick and easy breakfast option that delivers crispy, golden-brown perfection every time? Air fryer hash browns are the answer. This delicious dish is perfect for breakfast or brunch and takes a fraction of the time compared to traditional methods. By using an air fryer, you not only achieve the desired crispiness but also reduce the amount of oil typically needed, resulting in a healthier version of this breakfast staple.
Air fryer hash browns are versatile and can be customized to suit your taste. Whether you prefer them plain or with added ingredients like onions, peppers, or cheese, this recipe is sure to become a family favorite. Serve these hash browns alongside eggs, bacon, or a fresh fruit salad for a well-rounded meal that satisfies everyone’s morning cravings. This recipe serves 4-6 people, making it ideal for a family breakfast or a small gathering.
Ingredients:
- 4 large russet potatoes
- 1 medium yellow onion
- 1/4 cup olive oil
- Salt, to taste
- Black pepper, to taste
- Optional: 1/2 cup shredded cheese of choice
- Optional: 1/4 cup chopped green onions or chives
Instructions:
- Prepare the Potatoes: Start by peeling the russet potatoes and grating them using a box grater or a food processor. Transfer the grated potatoes to a large bowl filled with cold water. Soak for 10 minutes to remove excess starch, which helps in achieving a crispier texture.
- Drain and Dry: Drain the potatoes and use a clean kitchen towel or cheesecloth to squeeze out as much moisture as possible. This step is essential for guaranteeing the hash browns become crispy during cooking.
- Mix Ingredients: In a large mixing bowl, combine the dried potatoes with the finely chopped onion, olive oil, salt, and pepper. If you’re adding cheese or green onions, fold them into the mixture at this point.
- Preheat the Air Fryer: Preheat your air fryer to 375°F (190°C) for about 5 minutes.
- Shape the Hash Browns: Form the potato mixture into patties or a single layer, depending on your preference. Make sure they’re evenly sized for consistent cooking.
- Cook in Batches: Place the hash brown patties in the air fryer basket, ensuring they aren’t overcrowded. Cook in batches if necessary. Air fry for 15-20 minutes, flipping halfway through, until they’re golden brown and crispy.
- Serve Immediately: Once cooked, remove the hash browns from the air fryer and serve immediately. They’re best enjoyed hot and crispy.
Extra Tips:
For the best results, avoid overcrowding the air fryer basket. This allows hot air to circulate freely, assuring even cooking and crispiness. If you find your hash browns aren’t browning evenly, try adjusting the temperature slightly or extending the cooking time in small increments.