

Whipping up breakfast for picky eaters can be a real challenge, but I’ve got some gentle ideas that are both familiar and comforting. Think classic banana pancakes and fluffy scrambled eggs. Imagine the aroma of warm cinnamon raisin bread or the simplicity of smooth peanut butter toast. There’s so much more to discover, each idea thoughtfully crafted to bring joy to even the most selective palates. Let’s make breakfast a delightful experience together!
Classic Banana Pancakes
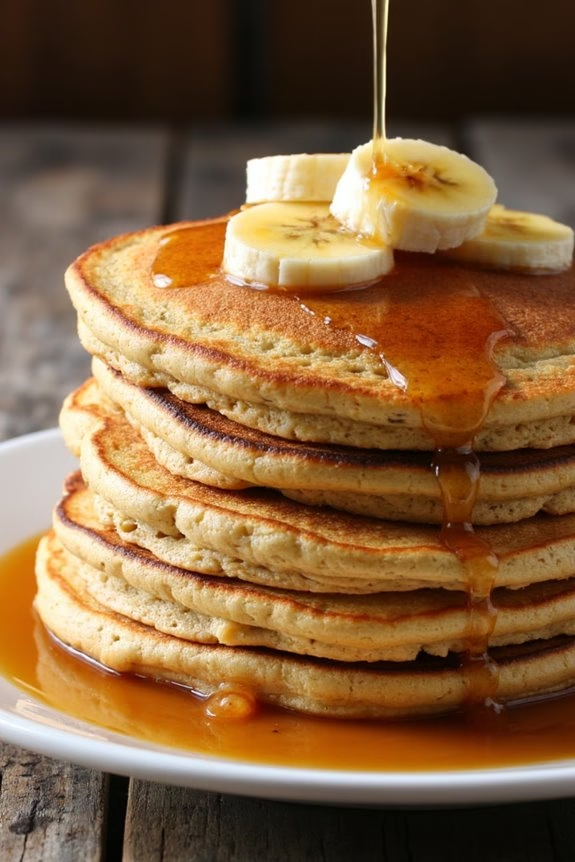
Classic Banana Pancakes are a delightful breakfast option that can win over even the pickiest of eaters. These pancakes aren’t only delicious but also easy to make, combining the natural sweetness of ripe bananas with the fluffiness of classic pancakes. The aroma of banana-infused batter sizzling on the griddle is sure to tempt everyone to the breakfast table.
Whether you’re making them for a weekend brunch or a weekday breakfast, these pancakes are a surefire way to start the day on a delightful note. This recipe serves 4-6 people, making it perfect for a family breakfast or a small gathering. The key to success with these pancakes is using ripe bananas, which add both flavor and moisture to the batter.
Not only are these pancakes a hit with children, but they also offer a bit of nostalgia for adults who might remember enjoying similar treats during their own childhoods. Top them with your favorite syrup, fresh fruits, or a dollop of whipped cream for an extra special touch.
Ingredients:
- 2 cups all-purpose flour
- 2 tablespoons sugar
- 2 teaspoons baking powder
- 1 teaspoon baking soda
- 1/2 teaspoon salt
- 2 large ripe bananas, mashed
- 2 large eggs
- 1 1/2 cups milk
- 1 teaspoon vanilla extract
- 1/4 cup unsalted butter, melted
- Butter or oil for cooking
Cooking Instructions:
- Prepare the Dry Ingredients: In a large mixing bowl, combine the all-purpose flour, sugar, baking powder, baking soda, and salt. Mix well to ascertain the ingredients are evenly distributed.
- Mash the Bananas: In a separate medium-sized bowl, mash the ripe bananas with a fork until smooth. It’s okay if there are a few small lumps left.
- Mix Wet Ingredients: Add the eggs, milk, vanilla extract, and melted butter to the mashed bananas. Whisk the mixture until well combined and smooth.
- Combine Wet and Dry Ingredients: Pour the banana mixture into the bowl with the dry ingredients. Gently stir the mixture until just combined, being careful not to overmix. The batter should be slightly lumpy.
- Heat the Griddle: Preheat a non-stick griddle or large skillet over medium heat. Lightly grease the surface with butter or oil.
- Cook the Pancakes: Pour about 1/4 cup of batter onto the griddle for each pancake. Cook until bubbles form on the surface and the edges look set, about 2-3 minutes. Flip the pancakes and cook for an additional 1-2 minutes, or until golden brown.
- Serve and Enjoy: Transfer the cooked pancakes to a warm plate and cover with a clean tea towel to keep them warm. Serve immediately with your choice of toppings.
Extra Tips:
For the best pancakes, confirm your bananas are very ripe, as they’ll be sweeter and easier to mash. If you prefer a smoother batter, you can blend the bananas with the wet ingredients using a hand blender.
To keep the pancakes warm while you cook the entire batch, place them in a preheated oven at a low temperature (around 200°F). Feel free to experiment with add-ins like chocolate chips or chopped nuts for added texture and flavor.
Fluffy Scrambled Eggs

When it comes to breakfast, scrambled eggs are a classic choice that can be enjoyed by even the pickiest of eaters. However, to truly make them fluffy and delicious, it’s important to use a few simple techniques and ingredients that elevate them from ordinary to extraordinary. The key to achieving the perfect fluffy scrambled eggs lies in the way they’re whisked and cooked, as well as the quality of the ingredients used. By following the steps in this recipe, you’ll be able to serve a breakfast that’s both satisfying and appealing to everyone at the table.
This recipe for Fluffy Scrambled Eggs is designed to serve 4-6 people, making it perfect for a family breakfast or a small gathering. The ingredients are simple and likely already in your kitchen, but the way they’re combined and cooked will make all the difference. Let’s explore this foolproof recipe that promises to win over even the most selective eaters with its creamy texture and rich flavor.
Ingredients (Serves 4-6):
- 12 large eggs
- 1/2 cup whole milk or heavy cream
- Salt, to taste
- Pepper, to taste
- 2 tablespoons unsalted butter
- Optional: chopped fresh herbs (such as chives or parsley) for garnish
Instructions:
- Prepare the Eggs: Crack the 12 large eggs into a mixing bowl. Add the 1/2 cup of whole milk or heavy cream, a pinch of salt, and a dash of pepper. Whisk the mixture vigorously until the eggs and milk are completely blended and the mixture is homogenous. This step is vital for incorporating air into the eggs, which contributes to their fluffy texture.
- Heat the Pan: Place a non-stick skillet over medium-low heat and add the 2 tablespoons of unsalted butter. Allow the butter to melt slowly, ensuring it coats the bottom of the pan evenly. The low heat is important to prevent the eggs from cooking too quickly and becoming rubbery.
- Cook the Eggs: Pour the egg mixture into the pan. Let it sit undisturbed for about 30 seconds to allow the edges to start setting. Using a spatula, gently push the eggs from the edges towards the center of the pan. Continue this process, stirring and folding the eggs regularly, until they form soft curds. This should take approximately 3-5 minutes. Be careful not to overcook the eggs; they should be slightly runny as they’ll continue to cook from residual heat.
- Finish and Serve: Once the eggs are mostly set but still slightly creamy, remove the pan from the heat. The eggs will continue to cook for a few seconds after being removed from the heat due to carryover cooking. Transfer the scrambled eggs to a serving dish immediately to prevent them from overcooking in the pan. Optionally, garnish with chopped fresh herbs for an added burst of color and flavor.
Extra Tips:
For the fluffiest scrambled eggs, make sure to whisk the egg mixture thoroughly to incorporate as much air as possible. Additionally, cooking the eggs over low heat and with gentle stirring helps to form soft curds, which contribute to the desired fluffy texture.
If you’re looking to add more flavor, consider incorporating a small amount of cheese or sautéed vegetables into the eggs just before they finish cooking. Remember, the key to perfect scrambled eggs is patience and attention to detail during the cooking process. Enjoy your fluffy scrambled eggs as a delightful breakfast treat!
Smooth Peanut Butter Toast
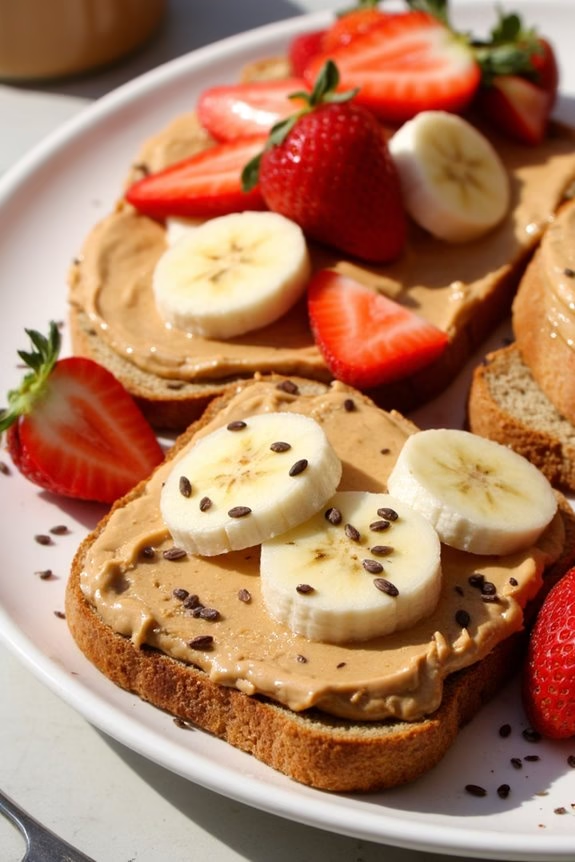
If you’re looking for a breakfast that even the pickiest eaters will love, Smooth Peanut Butter Toast is a fantastic option. This dish combines the creamy richness of peanut butter with the satisfying crunch of toast, creating a delightful balance of textures and flavors. It’s quick, easy to prepare, and packed with protein and healthy fats, making it a nutritious start to the day.
Plus, it’s customizable with various toppings to suit anyone’s taste preferences. Smooth Peanut Butter Toast is perfect for busy mornings when you need a wholesome meal that doesn’t require much fuss. It’s versatile enough to serve as a standalone breakfast or as part of a larger brunch spread.
For those who enjoy a bit of creativity, adding fruits, seeds, or a drizzle of honey can elevate this simple dish to something extraordinary. Whether you’re feeding a family or hosting a group of friends, this recipe is sure to satisfy everyone at the table.
Ingredients (Serving Size: 4-6 people):
- 8-12 slices of whole-grain bread
- 1 cup smooth peanut butter
- 1/4 cup honey (optional)
- 1/2 cup sliced bananas (optional)
- 1/2 cup sliced strawberries (optional)
- 1/4 cup chia seeds or flaxseeds (optional)
Cooking Instructions:
- Prepare the Bread: Begin by preheating your toaster or toaster oven to a medium setting. Place 8-12 slices of whole-grain bread into the toaster. Toast the bread until it reaches your desired level of crispiness, usually about 3-5 minutes.
- Spread the Peanut Butter: Once the toast is ready, use a butter knife to spread a generous layer of smooth peanut butter on each slice. Be sure to cover the entire surface evenly to guarantee every bite is flavorful.
- Add Optional Toppings: If desired, drizzle honey over the peanut butter for added sweetness. Then, arrange sliced bananas and strawberries on top of the toast for extra flavor and nutrients. You can also sprinkle chia seeds or flaxseeds for a boost of omega-3s and fiber.
- Serve and Enjoy: Arrange the prepared toast on a serving plate. Serve immediately while the toast is still warm for the best texture and taste. Encourage guests to try different combinations of toppings.
Extra Tips:
When making Smooth Peanut Butter Toast, feel free to experiment with different types of bread, such as sourdough, rye, or gluten-free options, to cater to dietary preferences. For an extra crunchy texture, consider using crunchy peanut butter instead of smooth.
If you’re serving children, cutting the toast into fun shapes can make the meal more appealing. Finally, always keep an eye on the toast to avoid burning, as toasters can vary in heat settings. Enjoy your delicious breakfast creation!
Simple Oatmeal With Honey
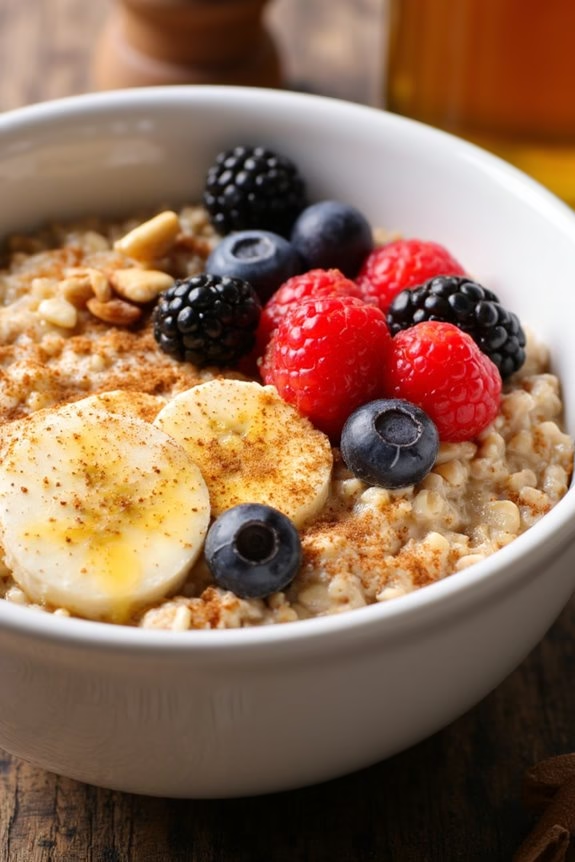
Breakfast can be a challenging meal when catering to picky eaters, but Simple Oatmeal With Honey is a versatile dish that can easily win over even the most discerning taste buds. This recipe offers a comforting, warm breakfast option that’s both nutritious and customizable. The natural sweetness of honey complements the creamy texture of the oatmeal, creating a delightful balance that appeals to both children and adults.
By incorporating toppings like fresh fruits, nuts, or a sprinkle of cinnamon, you can adjust the flavor to suit any preference, making this dish a go-to morning staple. Ideal for serving 4-6 people, this recipe is perfect for family breakfasts or brunch gatherings. Oatmeal is a great source of fiber and essential nutrients, providing a sustained energy boost to start the day.
The simplicity of the preparation process combined with the wholesome ingredients guarantees that this meal is both quick to make and satisfying. Follow the outlined recipe to create a delicious and heartwarming breakfast that will have even the pickiest eaters coming back for more.
Ingredients (Serves 4-6):
- 3 cups rolled oats
- 6 cups water or milk
- 1/2 teaspoon salt
- 1/3 cup honey
- 1 teaspoon vanilla extract
- Optional toppings: fruits (such as bananas, berries, or apples), nuts (such as almonds or walnuts), or a sprinkle of cinnamon
Cooking Instructions:
- Prepare the Oats: In a large saucepan, combine the rolled oats, water or milk, and salt. Stir to mix the ingredients evenly.
- Cook the Oatmeal: Place the saucepan over medium heat. Bring the mixture to a gentle boil, stirring occasionally to prevent the oats from sticking to the bottom of the pan.
- Simmer Until Thickened: Once the mixture reaches a boil, reduce the heat to low. Continue to simmer for about 10-15 minutes, stirring frequently, until the oatmeal thickens and reaches your desired consistency.
- Add Flavorings: Remove the saucepan from the heat. Stir in the honey and vanilla extract, mixing well to make sure the flavors are evenly distributed throughout the oatmeal.
- Serve and Customize: Ladle the oatmeal into bowls. Allow each person to customize their serving with optional toppings such as fresh fruits, nuts, or a sprinkle of cinnamon.
Extra Tips:
For a creamier oatmeal, consider using milk or a milk alternative instead of water. If you prefer a different level of sweetness, adjust the amount of honey to taste. To save time in the morning, you can prepare the dry ingredients the night before.
Leftover oatmeal can be stored in the refrigerator for up to three days and reheated with a splash of milk or water to restore its creamy texture. Experimenting with different toppings can keep the dish exciting and cater to varying taste preferences.
Mild Cheese Quesadillas

Mild Cheese Quesadillas are a fantastic breakfast option for picky eaters who prefer mild flavors. This dish is simple, quick to prepare, and offers a delightful combination of cheesy goodness wrapped in a warm tortilla.
The quesadillas can be customized with additional ingredients like mild salsa or a sprinkle of fresh herbs to suit different taste preferences, making them a versatile choice for the entire family.
The key to making these quesadillas appealing to picky eaters is in selecting a mild cheese that won’t overwhelm their taste buds. Monterey Jack or a mild cheddar are excellent choices for this recipe. Serve these quesadillas with a side of fresh fruit or a small salad for a well-rounded breakfast. This recipe will make enough quesadillas to serve 4-6 people.
Ingredients:
- 8 flour tortillas (8-inch)
- 2 cups shredded Monterey Jack or mild cheddar cheese
- 2 tablespoons unsalted butter
- Optional: Mild salsa or fresh herbs for serving
Cooking Instructions:
- Prepare the Ingredients: Begin by shredding the cheese if it’s not pre-shredded. Set it aside in a bowl within easy reach.
- Heat the Pan: Place a large non-stick skillet over medium heat. Allow it to warm up for a minute or two before proceeding.
- Butter the Tortillas: While the skillet is heating, spread a thin layer of butter on one side of each tortilla.
- Assemble the Quesadillas: Place one tortilla, buttered side down, onto the skillet. Quickly sprinkle about 1/4 cup of shredded cheese evenly over the tortilla. Top with another tortilla, buttered side facing up.
- Cook the Quesadillas: Allow the quesadilla to cook for about 2-3 minutes on one side, or until the bottom tortilla is golden brown and the cheese begins to melt. Carefully flip the quesadilla using a spatula and cook the other side for an additional 2-3 minutes, until golden brown and crispy.
- Repeat: Remove the cooked quesadilla from the skillet and place it on a cutting board. Repeat steps 4 and 5 with the remaining tortillas and cheese.
- Slice and Serve: Once all quesadillas are cooked, slice each into wedges and serve immediately. If desired, offer mild salsa or a sprinkle of fresh herbs on the side.
Extra Tips:
To make sure the cheese melts evenly, keep the heat at a medium level to avoid burning the tortillas. If you prefer a slightly crispier texture, increase the cooking time slightly on each side.
For an added twist, you can mix in a small amount of cream cheese with the shredded cheese for extra creaminess. To make the quesadillas more filling, consider adding thin slices of cooked ham or turkey before adding the cheese.
If you have leftovers, store them in an airtight container in the refrigerator and reheat in a skillet or toaster oven for the best results.
Vanilla Yogurt With Berries
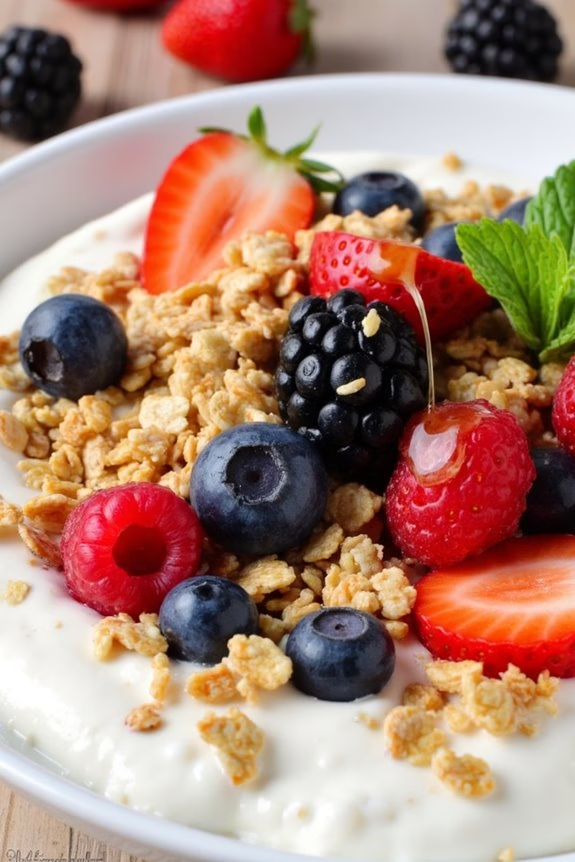
Vanilla Yogurt With Berries is a delightful and healthy breakfast option that caters to even the pickiest of eaters. This dish combines the creamy richness of vanilla yogurt with the natural sweetness and tang of fresh berries, creating a perfect balance of flavors. It’s not only visually appealing but also packed with nutrients, making it a great start to your day.
Whether you’re serving it to kids or adults, this breakfast idea is sure to be a hit. The beauty of Vanilla Yogurt With Berries lies in its simplicity and versatility. You can easily customize it based on the berries in season or your personal preferences.
The recipe is quick to prepare and requires minimal effort, guaranteeing you spend more time enjoying your mornings rather than laboring in the kitchen. It’s an excellent option for busy weekdays or a leisurely weekend brunch.
Ingredients (Serves 4-6 people)
- 4 cups vanilla yogurt
- 2 cups mixed fresh berries (such as strawberries, blueberries, raspberries, and blackberries)
- 1/2 cup granola
- 2 tablespoons honey (optional)
- Fresh mint leaves for garnish (optional)
Instructions
- Prepare the Berries: Rinse the berries thoroughly under cool running water. Pat them dry with a clean kitchen towel or paper towel. Slice any larger berries, like strawberries, into bite-sized pieces.
- Assemble the Yogurt Bowls: Divide the vanilla yogurt evenly among 4-6 serving bowls. You can use a measuring cup or ladle to guarantee even portions.
- Add the Berries: Distribute the mixed berries evenly over the yogurt in each bowl. Try to include a mix of berry types in each serving to guarantee a variety of flavors and colors.
- Top with Granola: Sprinkle about 1-2 tablespoons of granola over each bowl of yogurt and berries. This adds a delightful crunch to the dish.
- Drizzle with Honey: If desired, lightly drizzle honey over the top of each serving for added sweetness. This step is optional but recommended for those who enjoy a sweeter flavor.
- Garnish and Serve: Finish off each bowl with a sprig of fresh mint leaves for an aromatic touch. Serve immediately to enjoy the freshness and texture of the ingredients.
Extra Tips
For best results, use high-quality vanilla yogurt that’s rich and creamy. Greek yogurt is an excellent choice if you prefer a thicker consistency.
Feel free to mix and match different types of berries based on availability and preference. If you’re preparing this dish in advance, keep the yogurt and berries separate until just before serving to prevent the granola from becoming soggy.
Additionally, consider setting up a DIY yogurt bar with various toppings such as nuts, seeds, or additional fruits for a fun and interactive breakfast experience.
Soft-Boiled Eggs With Toast Soldiers
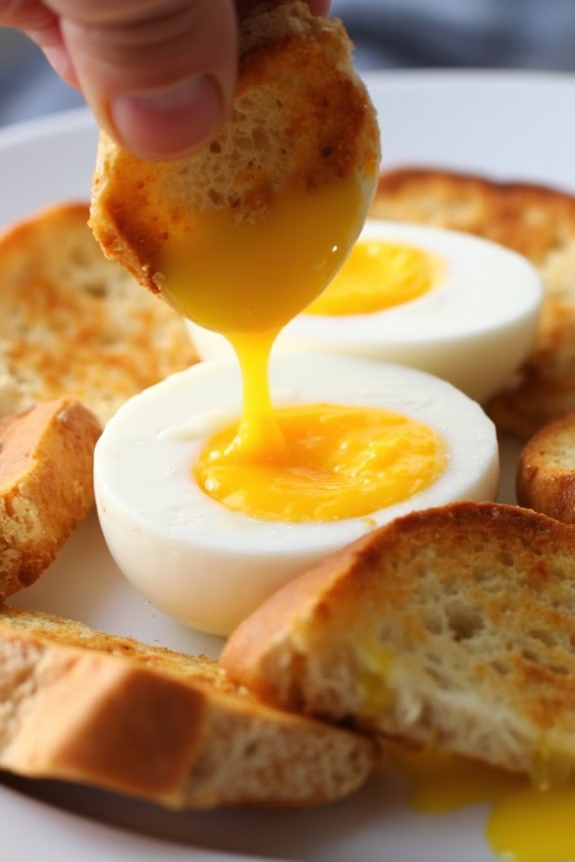
Soft-Boiled Eggs With Toast Soldiers is a delightful breakfast option, perfect for picky eaters who enjoy a simple yet flavorful start to their day. This dish combines the creamy richness of soft-boiled eggs with the comforting crunch of toast soldiers, making it both satisfying and fun to eat. The eggs are cooked just enough to set the whites while leaving the yolks deliciously runny, perfect for dipping with the crisp toast strips known as soldiers.
This recipe serves 4-6 people, making it ideal for a family breakfast or brunch gathering. Soft-Boiled Eggs With Toast Soldiers isn’t only quick and easy to prepare, but it also allows room for customization. You can add a dash of seasoning or serve with a side of fresh fruit to enhance the meal. The versatility of this dish is sure to please even the most discerning palates at the breakfast table.
Ingredients:
- 6 large eggs
- 8 slices of bread (white, whole wheat, or your choice)
- Butter for spreading
- Salt and pepper to taste
Cooking Instructions:
- Prepare the Bread: Start by preheating your oven to 350°F (175°C). Meanwhile, take the slices of bread and trim off the crusts to create neat squares. Cut each slice into 4 even strips to form the soldiers.
- Toast the Soldiers: Arrange the bread strips on a baking sheet and place them in the oven. Toast for about 10 minutes or until they’re golden brown and crisp. Alternatively, you can toast them in a toaster and then cut them into strips. Once done, remove and let them cool slightly before spreading a thin layer of butter over each strip.
- Boil the Eggs: Fill a medium-sized saucepan with water and bring it to a boil over medium-high heat. Gently lower the eggs into the boiling water using a spoon to avoid cracking. Set a timer for precisely 6-7 minutes for soft-boiled eggs with set whites and runny yolks.
- Cool and Serve the Eggs: Once the eggs are done, transfer them immediately to a bowl of ice water to stop the cooking process. Let them sit for about 1-2 minutes. Carefully crack and peel the eggs, then place them in egg cups, slicing off the tops to reveal the yolks.
- Season and Enjoy: Serve the soft-boiled eggs with the buttery toast soldiers on the side. Season the eggs with salt and pepper to taste. Encourage dipping the toast soldiers into the yolk for a delightful combination of textures and flavors.
Extra Tips:
Timing is essential for achieving the perfect soft-boiled egg. Make sure to have an ice bath ready to halt the cooking process immediately after boiling. If you prefer your yolks slightly firmer, you can extend the boiling time by 1-2 minutes.
For a touch of flavor enhancement, consider adding a sprinkle of herbs such as chives or dill over the eggs before serving. This dish pairs well with a side of fresh fruit or a light salad for a balanced breakfast.
Gentle Fruit Smoothie
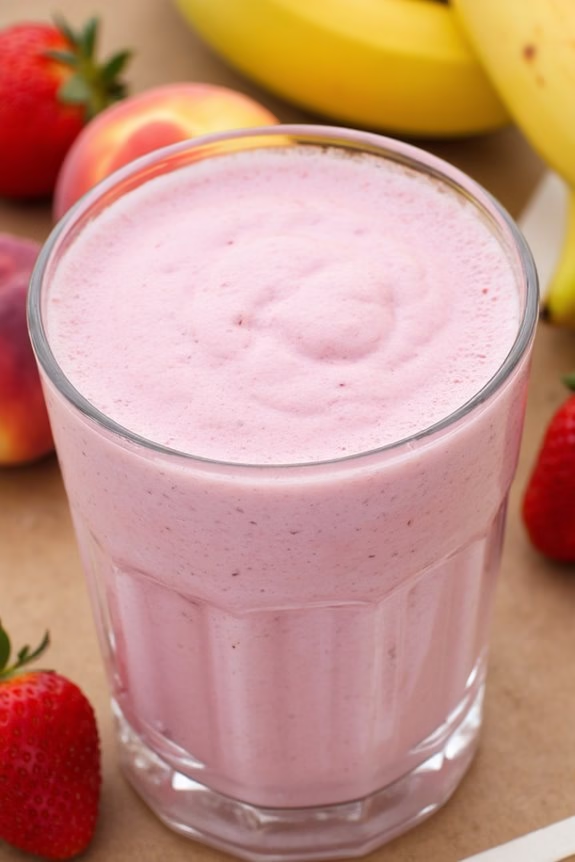
For those with picky eaters at home, finding a breakfast option that satisfies everyone can be a challenge. Enter the Gentle Fruit Smoothie, a delightful and invigorating way to start the day that combines familiar, sweet flavors without overwhelming sensitive palates. This smoothie is packed with nutrients, offering a balanced blend of fruits and a creamy texture that can be sipped easily through a straw. It’s perfect for children and adults alike who may shy away from more textured or robust breakfast foods.
The Gentle Fruit Smoothie isn’t only a treat to the taste buds but also a feast for the eyes with its vibrant colors. The key to making this smoothie appealing to picky eaters is selecting fruits that are naturally sweet and low in acidity. Bananas, strawberries, and peaches come together to create a harmonious blend that’s both satisfying and calming. With a touch of honey for added sweetness and yogurt for creaminess, this smoothie will become a breakfast staple in no time.
Ingredients for 4-6 servings:
- 3 ripe bananas, peeled and sliced
- 2 cups fresh or frozen strawberries, hulled
- 2 cups fresh or frozen peaches, sliced
- 2 cups vanilla yogurt
- 1 cup orange juice
- 2 tablespoons honey
- 1 teaspoon vanilla extract
- Ice cubes (optional, for a frostier texture)
Instructions:
- Prepare the Fruits: Begin by washing the strawberries and peaches thoroughly. Hull the strawberries and slice the peaches if they’re fresh. If using frozen fruits, there’s no need to thaw them; they can go directly into the blender.
- Blend the Ingredients: In a blender, add the bananas, strawberries, peaches, vanilla yogurt, and orange juice. Blend on medium speed until the ingredients start to combine.
- Add Sweetness and Flavor: Pause the blender and add the honey and vanilla extract. Blend again on high speed until the mixture is smooth and creamy. If you desire a frostier texture, add a handful of ice cubes and blend until the ice is completely crushed.
- Taste and Adjust: Taste the smoothie and adjust the sweetness if necessary. If it’s not sweet enough for your preference, add a little more honey and blend again.
- Serve: Pour the smoothie into glasses and serve immediately. If you have picky eaters who are sensitive to texture, you can strain the smoothie through a fine mesh sieve to remove any remaining seeds or pulp.
Extra Tips:
For an extra nutritional boost, consider adding a handful of spinach or kale to the smoothie. The greens will alter the color slightly but are virtually tasteless when blended with the fruits and vanilla yogurt.
If dairy is a concern, substitute the yogurt with a plant-based alternative like almond or coconut yogurt. Additionally, you can experiment with different fruit combinations to keep the smoothie exciting and cater to different preferences.
Plain Bagel With Cream Cheese
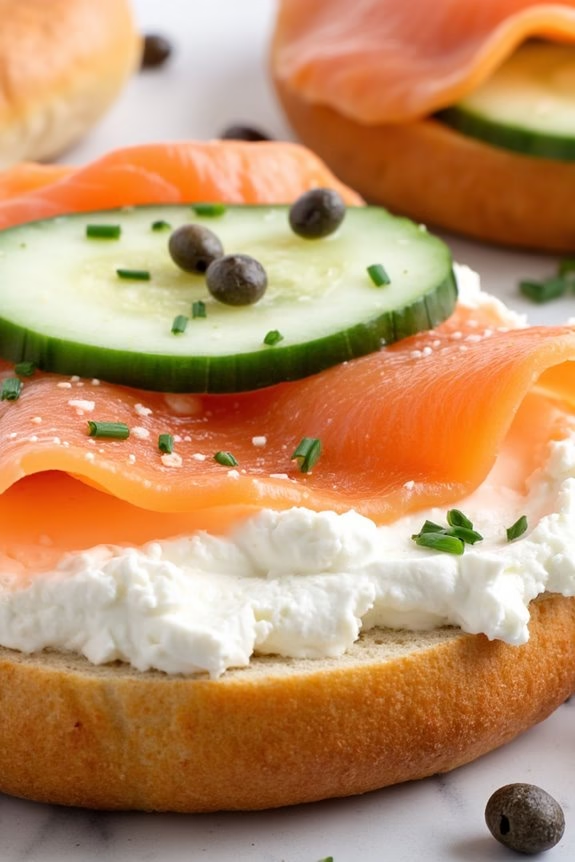
For those mornings when you need a quick, nutritious breakfast that even the pickiest eaters will enjoy, the Plain Bagel with Cream Cheese is an ideal choice. This simple yet satisfying dish combines the chewy texture of a bagel with the creamy richness of fresh cream cheese.
Perfect for a lazy weekend brunch or a weekday breakfast on the go, this dish can easily be customized with additional toppings to suit everyone’s taste.
The beauty of this dish lies in its simplicity and versatility. With just a few quality ingredients, you can create a delicious meal that’s ready in minutes.
Whether you serve it plain or add a few toppings like smoked salmon, sliced cucumber, or a sprinkle of chives, the Plain Bagel with Cream Cheese is sure to become a breakfast favorite in your household.
Let’s immerse ourselves in the recipe, designed to serve 4-6 people, making it perfect for a small family gathering or a brunch with friends.
Ingredients (serving size: 4-6 people):
- 6 plain bagels
- 1 pound (450g) cream cheese
- Optional toppings: smoked salmon, sliced cucumbers, capers, chopped chives
Instructions:
- Prepare the Bagels: Begin by slicing the bagels in half using a serrated knife. Be careful to cut evenly to guarantee each half is the same thickness.
- Toast the Bagels: Place the sliced bagels in a toaster or under a broiler for about 2-4 minutes, or until they’re lightly golden brown and crispy on the outside.
- Spread the Cream Cheese: Allow the cream cheese to soften slightly at room temperature for easy spreading. Using a butter knife, spread a generous layer of cream cheese onto each half of the toasted bagels. Confirm the cream cheese covers the entire surface for a consistent flavor in every bite.
- Add Optional Toppings: If desired, add your choice of optional toppings. Smoked salmon and sliced cucumbers can be layered over the cream cheese. Sprinkle with capers and chopped chives to add extra flavor and a pop of color.
- Serve: Arrange the prepared bagels on a serving platter. Serve immediately while the bagels are still warm and enjoy!
Extra Tips:
To enhance the flavor, consider using flavored cream cheeses, such as chive or garlic herb. If you have leftover bagels, store them in an airtight container to maintain freshness.
For a healthier twist, try using whole wheat or multigrain bagels. Finally, always let the cream cheese soften at room temperature for easier spreading and a smoother texture.
Homemade Applesauce Muffins
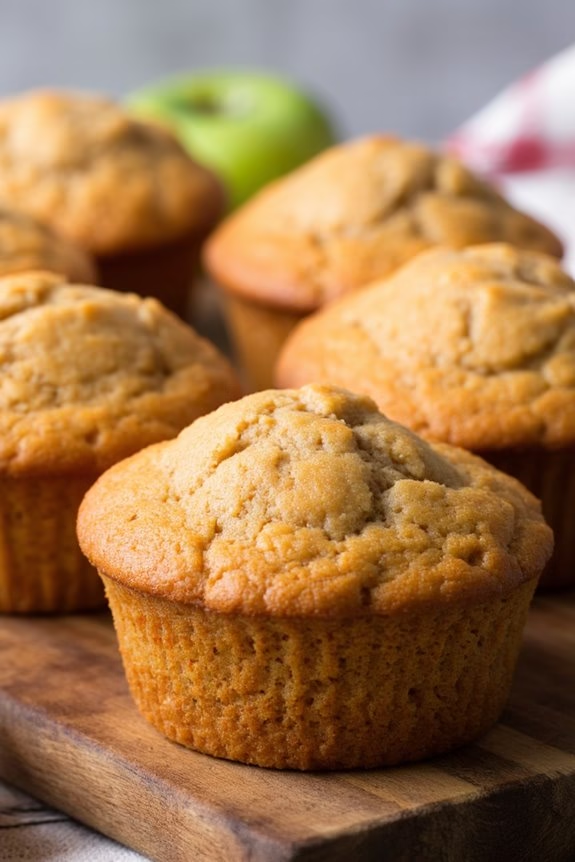
If you’re searching for a breakfast option that will please even the pickiest of eaters, seek no further than Homemade Applesauce Muffins. These delightful treats aren’t only simple to make but also incorporate the natural sweetness of applesauce, making them a healthier option for those morning cravings.
The subtle blend of cinnamon and nutmeg adds a warm, inviting aroma that will fill your kitchen and entice everyone to the breakfast table. Perfect for a family of 4-6, these muffins are a fantastic way to start the day.
They’re moist, flavorful, and can be easily adapted to include additional ingredients like raisins or nuts if desired. Plus, they make for a great on-the-go breakfast or snack, guaranteeing that even the busiest of mornings can be met with a delicious homemade bite.
Ingredients (Serving Size: 4-6 people)
- 1 1/2 cups all-purpose flour
- 1 cup unsweetened applesauce
- 1/2 cup granulated sugar
- 1/4 cup vegetable oil
- 1 large egg
- 1 teaspoon baking soda
- 1 teaspoon ground cinnamon
- 1/2 teaspoon baking powder
- 1/4 teaspoon ground nutmeg
- 1/4 teaspoon salt
- 1 teaspoon vanilla extract
Cooking Instructions
- Preheat the Oven: Begin by preheating your oven to 350°F (175°C). This guarantees that the muffins will bake evenly and rise properly.
- Prepare the Muffin Tin: Line a muffin tin with paper liners or lightly grease it with cooking spray to prevent sticking. This recipe makes about 12 muffins, so prepare accordingly.
- Combine Dry Ingredients: In a medium mixing bowl, whisk together the flour, baking soda, baking powder, cinnamon, nutmeg, and salt. This helps to evenly distribute the leavening agents and spices throughout the batter.
- Mix Wet Ingredients: In a separate large bowl, combine the applesauce, sugar, vegetable oil, egg, and vanilla extract. Stir until the mixture is smooth and well combined.
- Incorporate Dry Ingredients: Gradually add the dry ingredients to the wet ingredients, stirring gently until just combined. Be careful not to overmix, as this can result in dense muffins.
- Fill the Muffin Cups: Divide the batter evenly among the prepared muffin cups, filling each about 2/3 full. This allows room for the muffins to rise without spilling over.
- Bake the Muffins: Place the muffin tin in the preheated oven and bake for 18-20 minutes, or until a toothpick inserted into the center of a muffin comes out clean.
- Cool and Serve: Once baked, remove the muffins from the oven and allow them to cool in the tin for about 5 minutes. Then, transfer them to a wire rack to cool completely.
Extra Tips
For an added burst of flavor, consider folding in a handful of chopped walnuts or raisins into the batter before baking. If you prefer a sweeter muffin, sprinkle a little cinnamon sugar on top of each muffin before baking.
Light Avocado Toast
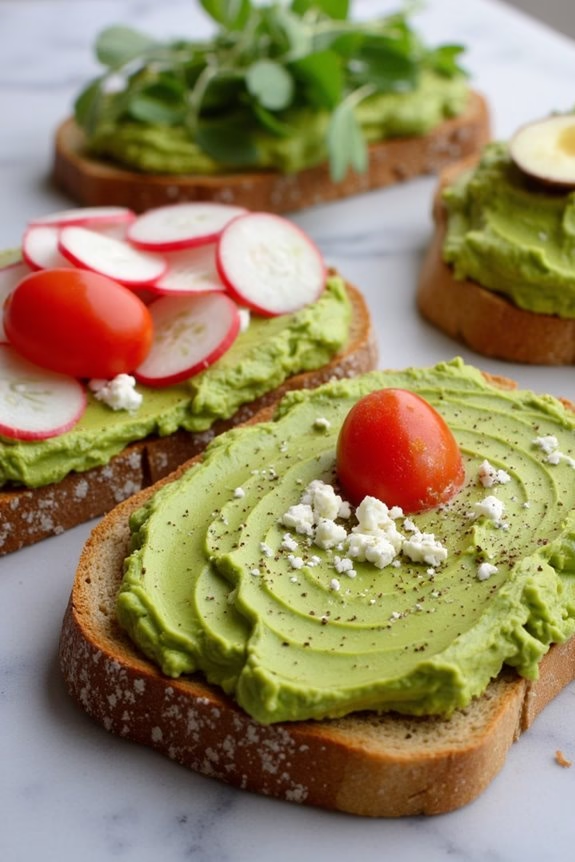
Avocado toast is a simple yet delicious breakfast option that can be easily modified to suit even the pickiest eaters. This Light Avocado Toast recipe is perfect for those who enjoy a creamy, savory start to their day without overwhelming flavors. The key to this dish is using fresh, ripe avocados paired with your choice of bread, creating a delightful balance of textures.
With the addition of subtle seasonings and optional toppings, this breakfast can be both nutritious and satisfying for everyone at the table. Ideal for a family breakfast or brunch, this recipe serves 4-6 people. It’s quick to prepare, making it a great choice for busy mornings.
By incorporating a variety of optional toppings, you can cater to different tastes and dietary preferences. Whether you like your toast plain or with a bit of flair, this Light Avocado Toast can easily become a family favorite. Let’s explore what you’ll need for this dish and how to prepare it.
Ingredients (serves 4-6):
- 4-6 slices of whole-grain or sourdough bread
- 3 ripe avocados
- 1 lemon
- Salt to taste
- Black pepper to taste
- Optional toppings: cherry tomatoes, radish slices, feta cheese, red pepper flakes, microgreens
Cooking Instructions:
- Prepare the Avocados: Start by cutting the avocados in half and removing the pits. Scoop the avocado flesh into a mixing bowl. Use a fork to mash the avocados until they reach your desired consistency – smooth for a creamy texture or chunky for more bite.
- Season the Avocado Mixture: Squeeze the juice of one lemon into the mashed avocados. This not only enhances the flavor but also prevents the avocados from browning too quickly. Add salt and black pepper to taste, mixing well to guarantee the seasoning is evenly distributed.
- Toast the Bread: While preparing the avocado mixture, toast the slices of bread to your preference. You can use a toaster or an oven set to 350°F (175°C) until the bread is golden brown and crispy.
- Assemble the Toast: Once the toast is ready, generously spread the avocado mixture over each slice. Confirm each piece is evenly covered for a consistent taste.
- Add Optional Toppings: If desired, top the avocado toast with any of the optional toppings such as halved cherry tomatoes, thin radish slices, crumbled feta cheese, a sprinkle of red pepper flakes, or a handful of microgreens for added flavor and nutrition.
- Serve Immediately: For the best taste and texture, serve the avocado toast immediately after preparation.
Extra Tips:
When selecting avocados, look for ones that yield slightly to gentle pressure, indicating ripeness. If they’re not ripe enough, the avocados will be hard to mash and lack flavor.
For those who like a bit of spice, adding a dash of cayenne pepper or chili flakes can give the toast a nice kick. To keep the toast from becoming soggy, spread the avocado mixture just before serving.
Finally, storing leftover avocado mixture in an airtight container with a bit of lemon juice can help preserve its freshness for a short time.
Warm Cinnamon Raisin Bread
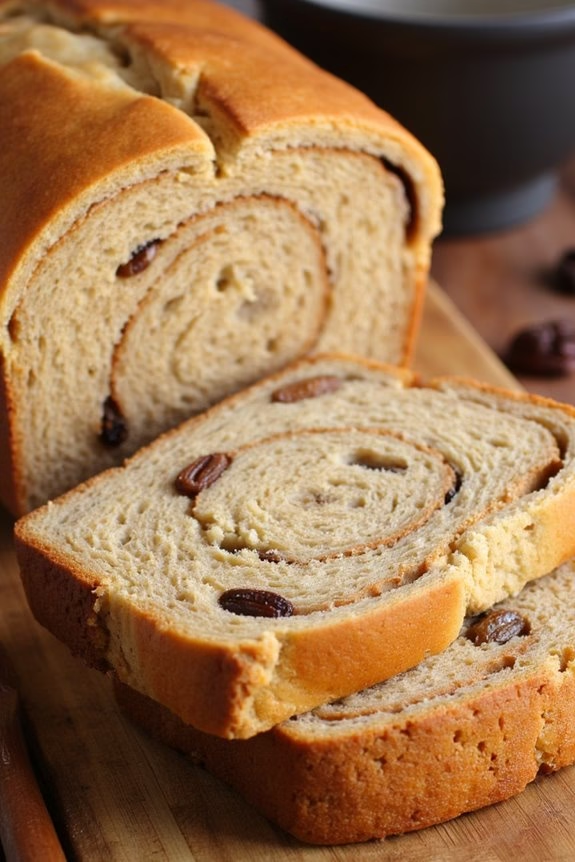
For picky eaters who often shy away from breakfast, creating something aromatic and sweet like Warm Cinnamon Raisin Bread can make the meal much more appealing. This delightful treat combines the comforting flavors of cinnamon and sweet raisins, making it a perfect start to the day.
The warm, freshly baked bread not only fills the kitchen with an irresistible aroma but also provides a soft and chewy texture that’s hard to resist. Whether enjoyed plain, with a smear of butter, or lightly toasted, this bread is sure to become a breakfast favorite.
This recipe yields a loaf that serves 4-6 people, making it ideal for family breakfasts or a small gathering. The preparation involves creating a dough infused with cinnamon and studded with raisins, which is then allowed to rise and baked to perfection. The result is a golden-brown loaf that’s slightly sweet, enticingly fragrant, and utterly satisfying.
Let’s get started on making this scrumptious breakfast treat!
Ingredients:
- 4 cups all-purpose flour
- 1 packet (2 1/4 teaspoons) active dry yeast
- 1 cup warm milk (110°F/45°C)
- 1/4 cup granulated sugar
- 1 teaspoon salt
- 1/4 cup unsalted butter, melted
- 2 large eggs
- 1 cup raisins
- 2 teaspoons ground cinnamon
- 1/4 cup brown sugar
- 1 tablespoon vegetable oil (for greasing the bowl)
Cooking Instructions:
- Prepare the Yeast Mixture: In a small bowl, dissolve the packet of active dry yeast and 1 tablespoon of the granulated sugar in the warm milk. Let it sit for about 5-10 minutes until it becomes frothy, indicating that the yeast is active.
- Mix the Dry Ingredients: In a large mixing bowl, combine 3 1/2 cups of the flour, the remaining granulated sugar, and salt. Stir well to evenly distribute the ingredients.
- Combine Wet Ingredients: In another bowl, beat the eggs and mix them with the melted butter. Once the yeast mixture is frothy, add it to the egg and butter mixture.
- Form the Dough: Gradually add the wet ingredients to the dry ingredients, stirring until a sticky dough begins to form. Incorporate the raisins into the dough.
- Knead the Dough: Transfer the dough onto a floured surface and knead for about 8-10 minutes, adding the remaining flour as needed, until the dough is smooth and elastic.
- First Rise: Place the dough in a greased bowl, cover it with a damp cloth, and let it rise in a warm place for about 1-1.5 hours until it doubles in size.
- Prepare the Filling: In a small bowl, mix the ground cinnamon and brown sugar. Set aside.
- Shape the Bread: Once the dough has risen, punch it down and roll it out into a rectangle on a floured surface. Sprinkle the cinnamon-sugar mixture evenly over the dough.
- Roll and Second Rise: Roll the dough tightly into a log and place it seam-side down in a greased loaf pan. Cover it again and let it rise for another 30-45 minutes until it rises slightly over the top of the pan.
- Bake the Bread: Preheat your oven to 375°F (190°C). Once preheated, bake the bread for about 35-40 minutes until it’s golden brown and sounds hollow when tapped on the bottom.
- Cool and Serve: Allow the bread to cool in the pan for about 10 minutes, then transfer to a wire rack to cool completely before slicing.
Extra Tips:
For an extra burst of flavor, add a teaspoon of vanilla extract to the wet ingredients. If you prefer a more pronounced cinnamon taste, increase the amount of cinnamon in the filling.
To prevent the raisins from sinking to the bottom, lightly coat them with flour before adding them to the dough. If you want a glossy finish, brush the top of the loaf with a bit of melted butter right after it comes out of the oven.
Adjust the rising times slightly depending on the temperature of your kitchen. Enjoy your Warm Cinnamon Raisin Bread fresh, or store it in an airtight container for up to two days.
Basic French Toast
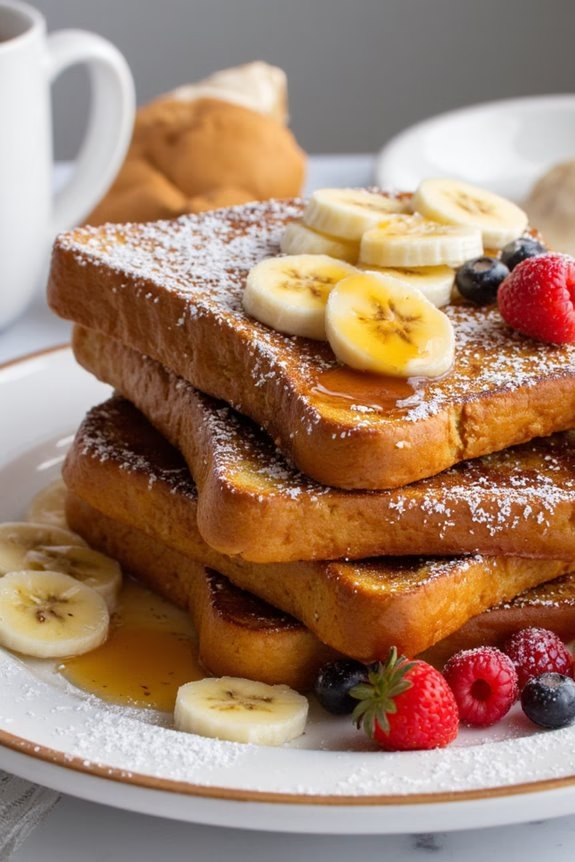
French toast is a classic breakfast dish that’s both simple to make and universally loved. It’s a perfect choice for picky eaters because it offers a soft, warm texture and a sweet flavor that can be customized with various toppings. This recipe for Basic French Toast is designed to please even the fussiest of eaters, with its golden-brown crust and fluffy interior. Whether served with syrup, fresh fruit, or just a dusting of powdered sugar, it makes for a delightful start to the day.
The beauty of French toast lies in its versatility and simplicity. By soaking slices of bread in a rich mixture of eggs, milk, and vanilla, you create a comforting meal that can be adapted with ease. This recipe will guide you through the process of making enough French toast to serve 4-6 people, guaranteeing everyone at the table gets their fill. It’s quick to prepare, requiring just a few staple ingredients found in most kitchens.
Ingredients for Serving 4-6 People:
- 6 large eggs
- 1 cup whole milk
- 2 teaspoons vanilla extract
- 1 teaspoon ground cinnamon
- 12 slices of bread (preferably thick-cut or stale)
- 2 tablespoons butter
- Maple syrup (for serving)
- Optional toppings: powdered sugar, fresh berries, bananas, or whipped cream
Cooking Instructions:
- Prepare the Batter: In a large mixing bowl, whisk together the eggs, milk, vanilla extract, and cinnamon until well combined and slightly frothy. This mixture serves as the custard base for soaking the bread.
- Heat the Pan: Place a large skillet or griddle over medium heat. Add 1 tablespoon of butter to the pan and let it melt, making sure it coats the bottom evenly to prevent sticking.
- Soak the Bread: Dip each slice of bread into the egg mixture, allowing it to soak for about 15-20 seconds on each side. This guarantees the bread absorbs enough of the custard to become soft and flavorful, but not so much that it falls apart.
- Cook the Toast: Carefully place the soaked bread slices onto the heated skillet. Cook for about 3-4 minutes on each side, or until they’re golden brown and cooked through. You may need to adjust the heat to prevent burning.
- Serve Warm: Once all the slices are cooked, serve the French toast warm. Drizzle with maple syrup or add your choice of toppings like fresh fruit or a dusting of powdered sugar.
Extra Tips:
For the best results, use bread that’s slightly stale as it tends to absorb the egg mixture better without becoming too soggy. If you only have fresh bread on hand, consider toasting it lightly before soaking.
Additionally, adjusting the amount of cinnamon or vanilla can tailor the flavor to your liking. Always keep an eye on the heat to avoid burning the toast; medium heat works best to achieve a crispy exterior while ensuring the inside is cooked.
If cooking in batches, keep the cooked French toast warm in an oven set to 200°F (93°C) until ready to serve.