

There’s something truly satisfying about starting your day with a savory breakfast. The sizzle of chorizo in breakfast tacos or the aroma of smoky bacon in creamy oatmeal can make mornings feel special. Sweet breakfasts are great, but sometimes you crave a little something different. Maybe try a colorful shakshuka with poached eggs nestled in spiced tomato sauce. These bold ideas might just shake up your mornings in the best way.
Shakshuka With Feta and Herbs

Shakshuka is a savory and aromatic dish that hails from North Africa and the Middle East, offering a vibrant blend of tomatoes, peppers, and spices. It’s a delightful way to start your day with a burst of flavors and a hint of heat. Traditionally enjoyed for breakfast, Shakshuka is a one-pan wonder that involves poaching eggs in a sauce made from tomatoes, chili peppers, and onions, often spiced with cumin.
The addition of crumbled feta cheese and fresh herbs adds a creamy and invigorating contrast to the rich tomato base, making it a perfect dish to indulge in with some crusty bread. Perfect for serving 4-6 people, this dish isn’t only delicious but also simple to prepare, making it an excellent choice for a leisurely weekend breakfast or brunch.
The combination of ingredients creates a hearty and satisfying meal that can be easily adjusted to suit various taste preferences. Whether you’re new to making Shakshuka or looking to refine your approach, this recipe will guide you through the process with ease, ensuring a delightful dining experience for everyone at the table.
Ingredients:
- 2 tablespoons olive oil
- 1 large onion, finely chopped
- 1 red bell pepper, chopped
- 4 garlic cloves, minced
- 1 teaspoon ground cumin
- 1 teaspoon smoked paprika
- 1/4 teaspoon cayenne pepper (optional)
- 1 (28-ounce) can whole peeled tomatoes
- Salt and freshly ground black pepper to taste
- 6 large eggs
- 1/2 cup crumbled feta cheese
- 1/4 cup chopped fresh parsley
- 1/4 cup chopped fresh cilantro
- Crusty bread, for serving
Cooking Instructions:
- Prepare the Base: Heat the olive oil in a large skillet over medium heat. Add the chopped onion and red bell pepper. Sauté for about 5-7 minutes, or until the onion becomes translucent and the bell pepper softens.
- Add Aromatics: Stir in the minced garlic, ground cumin, smoked paprika, and cayenne pepper if using. Cook for an additional 1-2 minutes until the spices are fragrant.
- Make the Sauce: Pour in the canned tomatoes, breaking them up with a spoon as they cook. Season with salt and pepper. Bring the mixture to a simmer and let it cook for 10-15 minutes, allowing the flavors to meld and the sauce to thicken slightly.
- Create Wells for the Eggs: Using the back of a spoon, make small wells in the tomato sauce. Carefully crack an egg into each well, spacing them evenly throughout the skillet.
- Cook the Eggs: Cover the skillet and reduce the heat to low. Allow the eggs to cook for about 5-8 minutes, or until the egg whites are set but the yolks are still runny (or cooked to your preference).
- Add Cheese and Herbs: Sprinkle the crumbled feta over the top, followed by the chopped parsley and cilantro. Allow the cheese to soften in the residual heat.
- Serve: Remove the skillet from the heat and serve hot, accompanied by slices of crusty bread for dipping.
Extra Tips:
When making Shakshuka, it’s important to find the right balance between the spices and the acidity of the tomatoes. If you prefer a less tangy sauce, consider adding a pinch of sugar to the tomato mixture to mellow its sharpness.
For those who enjoy a little heat, feel free to adjust the quantity of cayenne pepper to suit your taste. Additionally, if you like your eggs cooked through, extend the cooking time slightly. This dish is versatile, so don’t hesitate to experiment with other toppings like olives or a sprinkle of za’atar for an extra layer of flavor.
Enjoy the process of making Shakshuka, and savor the harmony of its vibrant ingredients!
Savory Oatmeal With Bacon and Cheese

Savory oatmeal is a delicious twist on the traditional sweet breakfast staple. This version combines the creamy texture of oats with the salty, smoky flavors of bacon and the richness of cheese, making it a satisfying meal to start your day. The combination of these ingredients not only provides a hearty breakfast but also guarantees you have a balanced meal with enough protein, carbohydrates, and fats to keep you energized throughout the morning.
To prepare this delightful dish, begin by envisioning the creamy oats as a blank canvas, ready to absorb the robust flavors of bacon and cheese. The bacon adds a crisp, savory element, while the cheese melts into the oats, creating a luscious texture. This recipe serves 4-6 people, making it perfect for a family breakfast or a small gathering of friends. With a few simple ingredients and easy steps, you’ll be able to enjoy this comforting and nourishing dish in no time.
Ingredients (Serving Size: 4-6 People):
- 2 cups old-fashioned oats
- 4 cups water
- 1/2 teaspoon salt
- 6 strips of bacon
- 1 cup shredded cheddar cheese
- 1/2 cup milk or cream
- 2 tablespoons butter
- 1/4 teaspoon black pepper
- Optional toppings: chopped green onions, diced tomatoes, or a fried egg
Cooking Instructions:
- Prepare the Bacon: In a large skillet, cook the bacon strips over medium heat until they’re crispy. Remove the bacon from the skillet and place it on a paper towel-lined plate to absorb excess grease. Once cooled, crumble the bacon into small pieces and set aside.
- Cook the Oats: In a medium saucepan, bring 4 cups of water to a boil. Add the salt and oats, then reduce the heat to a simmer. Cook the oats for about 5-7 minutes, stirring occasionally, until they’re tender and have absorbed most of the water.
- Incorporate Cheese and Butter: Once the oats are cooked, stir in the shredded cheddar cheese, butter, and milk or cream. Mix well until the cheese has melted and the oats become creamy. Adjust the consistency by adding more milk if desired.
- Season and Add Bacon: Season the oatmeal with black pepper and stir in the crumbled bacon pieces. Taste and adjust the seasoning if necessary.
- Serve and Garnish: Divide the savory oatmeal into bowls and top with optional garnishes such as chopped green onions, diced tomatoes, or a fried egg for extra flavor and texture.
Extra Tips:
For a more intense flavor, consider using a mix of different cheeses such as Monterey Jack or pepper jack in addition to cheddar. If you prefer a spicier kick, add a pinch of red pepper flakes or a drizzle of hot sauce.
Additionally, you can make this dish vegetarian by omitting the bacon and adding sautéed mushrooms or spinach for a hearty alternative. To save time in the morning, cook the bacon and prepare the garnishes the night before, so you can quickly assemble the dish when you’re ready to serve.
Huevos Rancheros With Avocado

Huevos Rancheros With Avocado is a classic Mexican-inspired dish that makes for a hearty and satisfying breakfast. This vibrant and flavorful meal features a delicious combination of crispy tortillas topped with refried beans, perfectly cooked eggs, and a zesty tomato-based sauce. The addition of creamy avocado enhances the richness and adds a delightful contrast to the dish, making it a nutritious and fulfilling start to your day.
This recipe is perfect for serving a family or a small gathering, with a serving size of 4-6 people. It’s a great way to enjoy a leisurely weekend brunch or a special breakfast treat. The preparation is simple but packed with flavor, and you’ll find that the layers of ingredients come together beautifully on the plate, creating an appetizing and colorful presentation.
Ingredients (Serves 4-6):
- 8 small corn tortillas
- 2 tablespoons vegetable oil
- 1 cup refried beans
- 8 large eggs
- 2 cups ranchero sauce (store-bought or homemade)
- 2 ripe avocados, sliced
- 1 cup crumbled queso fresco or feta cheese
- 1/4 cup chopped fresh cilantro
- Salt and pepper to taste
- Optional: hot sauce, for serving
Cooking Instructions:
- Prepare the Tortillas: Preheat your oven to 200°F (95°C). Heat the vegetable oil in a large skillet over medium heat. Once hot, fry each tortilla for about 1 minute on each side until crispy. Drain on paper towels and keep warm in the oven.
- Warm the Beans: In a small saucepan, heat the refried beans over low heat, stirring occasionally until warm. If the beans are too thick, add a splash of water to reach your desired consistency.
- Cook the Eggs: In the same skillet, add a little more oil if needed and fry the eggs to your liking – sunny side up is traditional for Huevos Rancheros. Season the eggs with salt and pepper.
- Assemble the Dish: Spread a layer of refried beans on each tortilla. Place one or two fried eggs on top of the beans, depending on your preference.
- Add the Sauce: Pour warm ranchero sauce over the eggs and beans. You can adjust the amount based on how saucy you want the dish to be.
- Garnish: Top the eggs with slices of avocado, crumbled queso fresco, and chopped cilantro. Serve immediately with additional hot sauce on the side for those who like some extra heat.
Extra Tips: To elevate the flavors, consider making your own ranchero sauce using fresh tomatoes, onions, garlic, and jalapeños for a homemade touch. If you prefer a spicier kick, add a bit of chopped chili to the sauce.
Additionally, for a healthier option, you can bake the tortillas instead of frying them to reduce the oil content. Remember to choose avocados that are ripe but firm for the best texture and taste. Enjoy your Huevos Rancheros With Avocado with a side of fresh fruit or a light salad to round out the meal.
Breakfast Tacos With Chorizo

Start your day with a deliciously savory twist by enjoying Breakfast Tacos with Chorizo. These tacos are packed with bold flavors and a spicy kick, perfect for those who love a little heat in the morning.
Chorizo, a type of seasoned pork sausage, adds a rich and smoky flavor that pairs beautifully with the creamy eggs and fresh toppings. Whether you’re cooking for yourself or a small group, these breakfast tacos are bound to satisfy your morning cravings and keep you energized for hours.
This dish isn’t only delicious but also highly customizable. You can choose your favorite toppings to personalize the tacos to your taste. From creamy avocado slices to tangy salsa, each bite offers a burst of flavor and texture.
The tacos are easy to prepare and can be on your table in just under 30 minutes, making them an ideal choice for a weekend brunch or a special breakfast treat. Here’s how you can make these flavorful Breakfast Tacos with Chorizo for 4-6 people.
Ingredients:
- 1 pound chorizo sausage, casings removed
- 8 large eggs
- 1/4 cup milk
- Salt and pepper, to taste
- 8 small flour or corn tortillas
- 1 cup shredded cheese (cheddar, Monterey Jack, or your choice)
- 1/2 cup chopped fresh cilantro
- 1 avocado, sliced
- 1/2 cup salsa
- 1 lime, cut into wedges
Cooking Instructions:
1. Cook the Chorizo: In a large skillet over medium heat, add the chorizo. Use a spatula to break it up into small pieces as it cooks. Stir occasionally until the chorizo is fully cooked and browned, about 8-10 minutes.
Once done, remove the chorizo from the skillet and set it aside on a plate lined with paper towels to drain excess grease.
2. Prepare the Egg Mixture: In a medium bowl, whisk together the eggs, milk, salt, and pepper. Verify the mixture is well combined and slightly frothy.
3. Cook the Eggs: In the same skillet used for the chorizo, reduce the heat to low and pour in the egg mixture. Cook, stirring gently with a spatula, until the eggs are scrambled and just set, about 3-5 minutes.
Be careful not to overcook the eggs.
4. Warm the Tortillas: While the eggs are cooking, heat the tortillas. You can do this by placing them directly on a gas stove burner over medium flame for a few seconds on each side or by wrapping them in a damp paper towel and microwaving for about 30 seconds.
5. Assemble the Tacos: Place a spoonful of chorizo on each tortilla, followed by scrambled eggs. Top with shredded cheese, chopped cilantro, and avocado slices.
Add a spoonful of salsa on top, and serve with lime wedges on the side.
Extra Tips:
For an even richer flavor, consider adding sautéed onions or bell peppers to the chorizo. If you prefer a milder option, use breakfast sausage or ground turkey in place of chorizo.
Keep the tortillas warm by wrapping them in a clean kitchen towel as you prepare the tacos. For those who enjoy extra heat, consider adding a dash of hot sauce or jalapeño slices.
Smoked Salmon and Dill Frittata

For a savory and satisfying breakfast, a Smoked Salmon and Dill Frittata is an excellent choice. This dish combines the rich flavors of smoked salmon with the fresh, aromatic notes of dill, creating a delightful contrast that’s perfect for a morning meal. The frittata is a versatile dish that can be enjoyed hot or cold, making it an ideal option for both leisurely breakfasts and quick weekday meals.
The creamy eggs provide a perfect canvas for the salmon and herbs, while the addition of a few complementary ingredients enhances the overall flavor profile. This frittata isn’t only delicious but also packed with nutrients. Eggs are a great source of protein and healthy fats, while smoked salmon provides omega-3 fatty acids, which are beneficial for heart health. Dill adds a rejuvenating herbal note, balancing the richness of the salmon.
This dish can be served on its own or paired with a simple green salad or crusty bread to complete the meal. Whether you’re hosting a brunch or just want to treat yourself to a special breakfast, this Smoked Salmon and Dill Frittata is sure to impress.
Ingredients (Serves 4-6)
- 8 large eggs
- 1/4 cup whole milk
- 1/2 teaspoon salt
- 1/4 teaspoon black pepper
- 1 tablespoon olive oil
- 1 small red onion, thinly sliced
- 1 cup baby spinach
- 4 ounces smoked salmon, cut into bite-sized pieces
- 2 tablespoons fresh dill, chopped
- 1/2 cup feta cheese, crumbled
Cooking Instructions
- Preheat and Prepare: Preheat your oven to 350°F (175°C). In a large bowl, whisk together the eggs, milk, salt, and black pepper until well combined. Set aside.
- Sauté Vegetables: Heat the olive oil in an oven-safe skillet over medium heat. Add the sliced red onion and sauté for about 3-4 minutes or until it becomes translucent. Add the baby spinach and cook until wilted, about 1-2 minutes.
- Combine Ingredients: Pour the egg mixture over the sautéed vegetables in the skillet. Gently stir in the smoked salmon pieces and chopped dill, ensuring they’re evenly distributed throughout the egg mixture.
- Add Cheese: Sprinkle the crumbled feta cheese evenly over the top of the egg mixture in the skillet.
- Cook the Frittata: Allow the frittata to cook on the stovetop for about 5 minutes, or until the edges begin to set. Then transfer the skillet to the preheated oven.
- Bake to Finish: Bake the frittata in the oven for 12-15 minutes, or until the center is set and the top is lightly golden brown. You can check for doneness by inserting a toothpick into the center; it should come out clean.
- Cool and Serve: Remove the frittata from the oven and allow it to cool for a few minutes before slicing. Serve warm or at room temperature.
Extra Tips
When making a frittata, it’s important to use an oven-safe skillet to shift from stovetop to oven seamlessly. If you don’t have an oven-safe skillet, you can transfer the frittata mixture to a baking dish before placing it in the oven.
Feel free to customize this recipe by adding other vegetables such as bell peppers or mushrooms, or by trying different herbs like chives or parsley. Additionally, the choice of cheese can be varied to suit your taste; goat cheese or cheddar can be great alternatives to feta.
Finally, for a creamier texture, substitute the whole milk with half-and-half or heavy cream.
Korean Kimchi Pancakes

Korean Kimchi Pancakes, or Kimchi Jeon, are a popular savory breakfast dish that combines the tangy, spicy flavors of kimchi with a crispy pancake base. This delicious dish isn’t only quick and easy to prepare but also a great way to use up leftover kimchi. Perfect for breakfast, brunch, or even as a side dish, these pancakes offer a delightful blend of flavors and textures that are certain to please the palate.
These pancakes are typically made with a simple batter of flour, water, and kimchi, with the addition of a few other ingredients to enhance the flavor. They’re pan-fried to golden perfection, resulting in a crispy exterior and a soft, flavorful interior. Served with a soy dipping sauce, Korean Kimchi Pancakes are a flavorful and satisfying dish that can be enjoyed by everyone.
Ingredients (serves 4-6):
- 2 cups chopped kimchi
- 1/2 cup kimchi juice
- 1 1/2 cups all-purpose flour
- 1/2 cup cold water
- 2 large eggs
- 2 tablespoons soy sauce
- 1 tablespoon sugar
- 1/4 teaspoon salt
- 1/4 cup sliced green onions
- Vegetable oil for frying
Cooking Instructions:
- Prepare the Batter: In a large mixing bowl, combine the chopped kimchi, kimchi juice, all-purpose flour, cold water, eggs, soy sauce, sugar, and salt. Mix the ingredients together until you have a smooth, consistent batter, confirming there are no lumps.
- Add Green Onions: Gently fold in the sliced green onions into the batter. This will add a fresh, mild onion flavor that complements the savory kimchi.
- Heat the Pan: Place a non-stick frying pan over medium-high heat and add a generous amount of vegetable oil. The oil should be hot enough that a drop of batter sizzles on contact.
- Cook the Pancakes: Pour a ladleful of the batter into the pan, spreading it out to form a circular pancake about 6 inches in diameter. Cook for about 3-4 minutes on each side, or until the edges are crispy and the center is cooked through. Adjust the heat as necessary to prevent burning.
- Repeat the Process: Continue cooking the remaining batter in batches, adding more oil to the pan as needed to keep the pancakes from sticking.
- Serve: Once cooked, remove the pancakes from the pan and let them drain on a paper towel-lined plate to remove excess oil. Serve hot with a side of soy dipping sauce.
Extra Tips:
For the best results, use well-fermented kimchi, as it provides a richer flavor to the pancakes. If the batter is too thick, you can add a little more water to reach the desired consistency. Confirm the pan is properly heated before adding the batter to achieve a crispy texture.
Additionally, you can experiment by adding other ingredients like seafood or vegetables to the batter for variation. Enjoy your Korean Kimchi Pancakes fresh off the pan for the ultimate taste experience!
Mediterranean Breakfast Bowl

Start your day with a burst of Mediterranean flavors by preparing a Mediterranean Breakfast Bowl. This dish is a nutritious and vibrant way to fuel your morning, combining a variety of fresh ingredients that come together to create a satisfying meal. It’s perfect for those who enjoy a savory start to their day, featuring a mix of grains, vegetables, and protein that not only tastes delicious but is also packed with nutrients.
Whether you’re hosting a weekend brunch or looking for a hearty breakfast option, this Mediterranean Breakfast Bowl is sure to delight.
The beauty of this dish lies in its simplicity and versatility. You can easily adapt it to include your favorite ingredients or whatever you have on hand. The combination of hearty quinoa, creamy avocado, tangy feta cheese, and crisp vegetables makes for a delightful contrast of textures and flavors.
A drizzle of olive oil and a sprinkle of fresh herbs tie everything together, making each bite a delightful explosion of Mediterranean goodness. This recipe serves 4-6 people, making it ideal for family gatherings or meal prepping for the week.
Ingredients for a Serving Size of 4-6 People:
- 2 cups quinoa
- 4 cups water
- 1 tablespoon olive oil
- 1 teaspoon salt
- 1 cup cherry tomatoes, halved
- 1 cucumber, diced
- 1/2 cup Kalamata olives, pitted and sliced
- 1/2 red onion, thinly sliced
- 1 cup crumbled feta cheese
- 2 avocados, sliced
- 4 large eggs
- Fresh parsley, chopped (for garnish)
- Black pepper to taste
- Lemon wedges for serving
Cooking Instructions:
- Cook the Quinoa: Rinse the quinoa under cold water. In a medium-sized pot, combine the quinoa, water, and a pinch of salt. Bring to a boil over medium-high heat. Once boiling, reduce the heat to low, cover, and let simmer for about 15 minutes or until the quinoa is fluffy and the water is absorbed. Fluff with a fork and set aside.
- Prepare the Vegetables: While the quinoa is cooking, prepare the vegetables. Halve the cherry tomatoes, dice the cucumber, slice the olives, and thinly slice the red onion. Set aside.
- Cook the Eggs: Heat a non-stick skillet over medium heat and add a tablespoon of olive oil. Crack the eggs into the skillet and cook until the whites are set but the yolks are still runny, about 3-4 minutes. Season with salt and pepper. Remove from heat and set aside.
- Assemble the Bowls: Divide the cooked quinoa among serving bowls. Top each bowl with cherry tomatoes, cucumber, olives, red onion, avocado slices, and crumbled feta cheese.
- Add the Eggs: Place a cooked egg on top of each bowl. Sprinkle with freshly chopped parsley and a dash of black pepper.
- Serve: Serve immediately with lemon wedges on the side for a fresh citrusy kick.
Extra Tips:
For an extra burst of flavor, consider adding a drizzle of balsamic glaze or a sprinkle of za’atar spice over the top of each bowl. If you prefer your eggs cooked differently, feel free to scramble or poach them instead.
This dish is highly customizable: you can add other vegetables like roasted bell peppers or swap out quinoa for bulgur or farro if you prefer. Remember to taste and adjust the seasoning according to your preference, and enjoy this Mediterranean delight hot or cold!
Croissant Sandwich With Prosciutto

There’s nothing quite like starting your day with a savory breakfast that’s both indulgent and easy to make. The Croissant Sandwich with Prosciutto is a delightful choice that combines the buttery flakiness of a croissant with the rich, salty flavor of prosciutto. Perfect for a weekend brunch or a special breakfast treat, this sandwich is elevated with creamy cheese, fresh greens, and a hint of Dijon mustard to give your taste buds a flavorful kick.
The combination of textures and flavors in this sandwich makes it a satisfying and memorable meal. This recipe is designed to serve 4-6 people, making it an ideal choice for family breakfasts or small gatherings. Each sandwich is a complete meal in itself, offering a balance of carbohydrates, protein, and greens. The preparation is straightforward and doesn’t require too much time, allowing you to enjoy a gourmet breakfast experience without spending hours in the kitchen.
The croissants can be served warm or at room temperature, depending on your preference, adding to the versatility of this delightful dish.
Ingredients (Serves 4-6):
- 6 large croissants
- 12 slices of prosciutto
- 6 slices of provolone cheese
- 6 large eggs
- 1 cup arugula or spinach
- 3 tablespoons Dijon mustard
- 3 tablespoons mayonnaise
- Salt and pepper to taste
- 2 tablespoons butter
Cooking Instructions:
- Prepare the Croissants: Preheat your oven to 350°F (175°C). Slice each croissant in half horizontally, and place them on a baking sheet. Lightly toast the croissants in the oven for about 5 minutes, or until they’re warm and slightly crispy. Remove from the oven and set aside.
- Cook the Eggs: In a large skillet, melt the butter over medium heat. Crack the eggs into the skillet and cook them sunny-side up, or to your preferred doneness. Season the eggs with salt and pepper to taste. Once cooked, set them aside on a plate.
- Assemble the Sandwiches: Mix the Dijon mustard and mayonnaise in a small bowl. Spread a thin layer of this mixture on the cut side of each croissant half. On the bottom half of each croissant, place a slice of provolone cheese, two slices of prosciutto, a handful of arugula or spinach, and one cooked egg. Top with the other half of the croissant.
- Finish and Serve: If you prefer your sandwich warm, you can place the assembled sandwiches back in the oven for a couple more minutes to melt the cheese slightly. Serve immediately, while the croissants are still warm, for the best flavor.
Extra Tips:
- For a more robust flavor, consider adding a slice of tomato or a few slices of avocado to each sandwich.
- If you’re preparing these sandwiches ahead of time, keep the components separate and assemble just before serving to maintain the freshness of the croissants and arugula.
- Feel free to experiment with different cheeses like Swiss or Gruyère for a different flavor profile.
- Make certain the prosciutto is thinly sliced and of good quality for the best taste and texture in your sandwich.
Spicy Black Bean Breakfast Burrito

Start your day with a flavor-packed Spicy Black Bean Breakfast Burrito. This savory breakfast option is perfect for those who love a bit of heat in their morning meal. With a combination of black beans, eggs, vegetables, and spices, these burritos aren’t only delicious but also packed with protein and nutrients.
The addition of spicy salsa and creamy avocado creates a balanced taste with a kick, making it an ideal breakfast choice for spice enthusiasts. Perfect for 4-6 people, this recipe is easy to prepare and can be customized to suit individual preferences.
Whether you’re serving a family or hosting a brunch, the Spicy Black Bean Breakfast Burrito is sure to impress. Prepare the ingredients ahead of time and enjoy a hassle-free breakfast that will keep everyone satisfied and energized throughout the morning.
Ingredients:
- 6 large flour tortillas
- 1 tablespoon olive oil
- 1 small onion, diced
- 1 bell pepper, diced
- 2 cloves garlic, minced
- 1 teaspoon ground cumin
- 1 teaspoon chili powder
- 1 can (15 oz) black beans, drained and rinsed
- 6 large eggs
- Salt and pepper, to taste
- 1 cup shredded cheddar cheese
- 1 avocado, sliced
- 1 cup spicy salsa
- Fresh cilantro, chopped (optional)
Cooking Instructions:
1. Prepare the Vegetables: In a large skillet, heat the olive oil over medium heat. Add the diced onion and bell pepper, sautéing until the onion is translucent and the pepper is softened, about 5 minutes.
Add the minced garlic, cumin, and chili powder, stirring for another minute until fragrant.
2. Cook the Black Beans: Add the drained and rinsed black beans to the skillet, stirring to combine with the vegetables. Cook for another 3-4 minutes until the beans are heated through.
Season with salt and pepper to taste. Remove the mixture from the skillet and set aside.
3. Scramble the Eggs: In a separate bowl, crack the eggs and whisk them together. Season with a pinch of salt and pepper.
In the same skillet, pour the eggs and cook over medium heat, scrambling them gently until they’re just set. Remove from heat.
4. Assemble the Burritos: Lay out the flour tortillas on a clean surface. Evenly distribute the black bean mixture, scrambled eggs, shredded cheddar cheese, sliced avocado, and spicy salsa among the tortillas.
Sprinkle with fresh cilantro if using.
5. Roll the Burritos: Fold in the sides of each tortilla, then roll them up tightly from the bottom to secure the filling. Confirm the burritos are tightly wrapped to prevent filling from spilling out.
6. Heat the Burritos (Optional): For a warmer burrito, place them seam-side down in the skillet over medium heat, cooking each side for about 2 minutes until the tortillas are golden brown and slightly crispy.
Extra Tips:
For added convenience, you can prepare the vegetable and bean mixture the night before and store it in the refrigerator. This will greatly reduce your morning prep time.
If you prefer a milder version, swap out the spicy salsa for a mild one or omit it entirely. Additionally, feel free to add other ingredients like cooked sausage, bacon, or fresh spinach for extra flavor and nutrition.
Serve with a side of sour cream or hot sauce for those who like an extra kick!
Cheesy Polenta With Poached Eggs

Cheesy Polenta with Poached Eggs is a delicious and comforting breakfast dish that combines the creamy texture of polenta with the rich flavor of cheese and the delicate, runny yolk of poached eggs. This dish is perfect for a weekend brunch or a special breakfast, offering a satisfying and hearty start to your day. The combination of flavors and textures is sure to please everyone at the table, and it can be customized with your favorite toppings, such as fresh herbs or sautéed vegetables.
Polenta, a staple in Italian cuisine, is made from cornmeal and can be cooked to a smooth and creamy consistency. When combined with cheese, it becomes even more luscious and flavorful. Poached eggs, on the other hand, add a level of sophistication and protein, making this dish not only delicious but also nutritious. This recipe serves 4-6 people, ensuring there’s plenty to go around at your breakfast gathering.
Ingredients for 4-6 servings:
- 1 cup of cornmeal
- 4 cups of water
- 1 teaspoon of salt
- 1 cup of shredded cheddar cheese
- 2 tablespoons of unsalted butter
- 1/4 cup of grated Parmesan cheese
- 2 tablespoons of heavy cream
- 1 tablespoon of vinegar
- 6 large eggs
- Salt and freshly ground black pepper to taste
- Chopped fresh herbs (such as parsley or chives) for garnish
Instructions:
- Prepare the Polenta: In a large saucepan, bring 4 cups of water to a boil. Add 1 teaspoon of salt. Gradually whisk in the cornmeal, stirring constantly to prevent lumps. Reduce the heat to low and continue to cook, stirring frequently, until the polenta is thick and creamy, about 20-25 minutes.
- Incorporate Cheese and Butter: Once the polenta has thickened, remove it from the heat. Stir in the shredded cheddar cheese, Parmesan cheese, and butter until fully melted and incorporated. Add the heavy cream for an extra creamy texture. Season with salt and pepper to taste.
- Poach the Eggs: Fill a large, shallow saucepan with water and bring it to a simmer. Add the vinegar to the water. Crack each egg into a small bowl, then gently slide the eggs into the simmering water. Cook the eggs for about 3-4 minutes, or until the whites are set but the yolks remain runny. Use a slotted spoon to carefully remove the eggs from the water and drain on a paper towel.
- Assemble the Dish: Spoon the cheesy polenta into serving bowls. Top each bowl with a poached egg. Sprinkle with salt, pepper, and fresh herbs for garnish.
Extra Tips:
To make sure your polenta is smooth and lump-free, whisk continuously while adding the cornmeal to the boiling water. If you prefer a firmer polenta, reduce the amount of water slightly or allow it to cook a bit longer.
When poaching eggs, keeping the water at a gentle simmer rather than a rolling boil will help maintain the shape of the eggs. For added flavor, try incorporating sautéed mushrooms or spinach into the polenta or serve with a side of crispy bacon.
Japanese Tamagoyaki Omelette

Japanese Tamagoyaki Omelette is a delightful and savory breakfast option that brings a touch of Japanese cuisine to your morning meal. This rolled omelette is slightly sweet, tender, and packed with flavor. It’s a popular dish in Japan, often served in bento boxes, at sushi restaurants, or enjoyed at home. The unique preparation involves rolling layers of seasoned egg mixture into a log shape, creating a beautiful, multi-layered omelette. The dish is traditionally cooked in a rectangular tamagoyaki pan, but a regular round pan can be used as well.
The taste of tamagoyaki is a balance between sweet and savory, achieved by adding a combination of sugar, soy sauce, and dashi (a Japanese stock) to the beaten eggs. The cooking technique requires careful folding and rolling of the omelette layers, which is made easier with practice. This dish can be served as it is, or with a side of soy sauce or grated daikon for added flavor. Tamagoyaki is a versatile dish that can be customized with additional ingredients like green onions or seaweed to suit your personal taste.
Ingredients (Serves 4-6):
- 8 large eggs
- 1/4 cup dashi stock
- 2 tablespoons sugar
- 1 tablespoon soy sauce
- 1 teaspoon mirin
- Vegetable oil for cooking
Cooking Instructions:
- Prepare the Egg Mixture: In a large bowl, crack the eggs and beat them until the yolks and whites are fully combined. Add the dashi, sugar, soy sauce, and mirin to the eggs, stirring until the sugar is dissolved and all ingredients are well mixed.
- Heat the Pan: Place a tamagoyaki pan (or a small nonstick frying pan) over medium heat. Lightly oil the pan using a paper towel dipped in vegetable oil. Verify the entire surface is coated, but not excessively oily.
- Cook the First Layer: Pour a small amount of the egg mixture into the pan, just enough to cover the surface in a thin layer. Tilt the pan to verify even coverage. Cook until the egg is mostly set but still slightly runny on top, about 1-2 minutes.
- Roll the Omelette: Using a spatula or chopsticks, gently fold the edge of the omelette over itself, rolling it to one side of the pan. Leave the rolled section in the pan.
- Add More Egg Mixture: Re-oil the pan lightly. Pour another thin layer of the egg mixture into the pan, lifting the rolled omelette slightly so the new layer can flow underneath. Once this layer is mostly set, roll it over the first omelette roll.
- Repeat the Process: Continue adding layers of egg mixture and rolling until all the egg mixture is used. Each time, re-oil the pan and verify the omelette is rolled tightly.
- Shape the Omelette: Once finished, shape the omelette by pressing it gently with a spatula or rolling mat to form a neat rectangular log.
- Serve: Let the omelette cool slightly before slicing it into thick pieces. Serve warm or at room temperature, with optional soy sauce or grated daikon on the side.
Extra Tips:
When making tamagoyaki, patience and practice are key. If the omelette tears or breaks, don’t worry; simply continue and roll the next layer over it. Using a tamagoyaki pan helps achieve the traditional shape, but a regular frying pan will work just fine.
Adjust the sweetness and seasoning to your preference, as some people enjoy a sweeter tamagoyaki while others prefer a more savory taste. Finally, verify the pan is at the right temperature—not too hot—to prevent the eggs from browning too quickly.
Sautéed Mushrooms on Sourdough
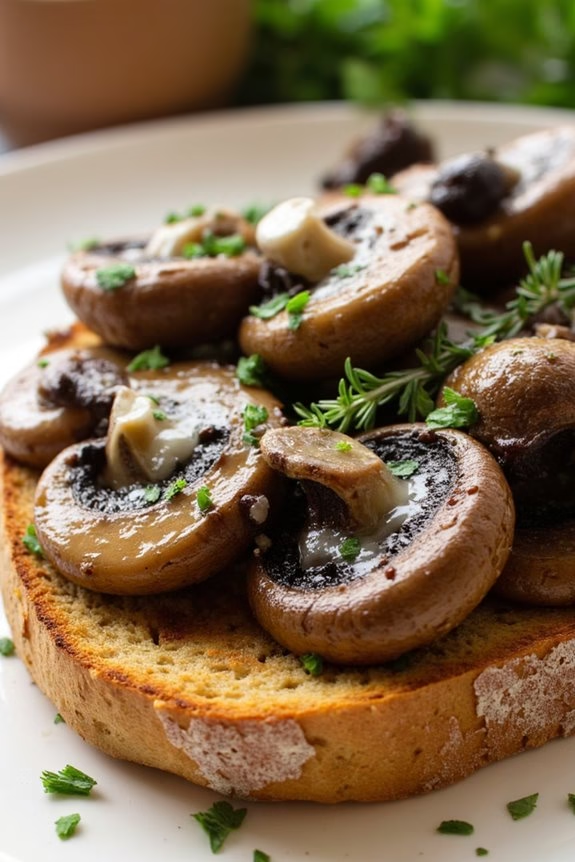
Start your day with a delightful and hearty breakfast option that’s both satisfying and delicious: Sautéed Mushrooms on Sourdough. This savory dish combines the earthy flavors of mushrooms with the crusty texture of sourdough bread, making it a perfect choice for a leisurely weekend breakfast or brunch.
The rich taste of sautéed mushrooms paired with a hint of garlic and thyme offers a complex and comforting flavor profile that’s certain to please your palate.
Preparing Sautéed Mushrooms on Sourdough is both simple and rewarding. In just a few steps, you can create a dish that isn’t only visually appealing but also bursting with flavor. This recipe is designed to serve 4-6 people, making it ideal for a family gathering or a small brunch party.
With a handful of fresh ingredients and a little bit of time, you can elevate your breakfast experience and impress your guests with a dish that’s wholesome and gourmet.
Ingredients for 4-6 servings:
- 1 pound of mixed mushrooms (such as cremini, shiitake, and oyster)
- 2 tablespoons olive oil
- 2 tablespoons unsalted butter
- 3 cloves garlic, minced
- 1 tablespoon fresh thyme leaves
- Salt and pepper to taste
- 6 slices of sourdough bread
- 1/4 cup grated Parmesan cheese (optional)
- 1 tablespoon chopped fresh parsley for garnish (optional)
Cooking Instructions:
- Prepare the Mushrooms: Begin by cleaning the mushrooms with a damp cloth to remove any dirt. Slice them into even pieces to guarantee they cook uniformly.
- Heat the Pan: In a large skillet over medium-high heat, add the olive oil and butter. Allow the butter to melt and combine with the oil.
- Sauté the Garlic: Add the minced garlic to the pan and sauté for about 30 seconds until fragrant, being careful not to burn it.
- Cook the Mushrooms: Add the sliced mushrooms to the pan. Stir occasionally, allowing them to cook for about 5-7 minutes until they’re golden brown and have released their moisture.
- Season the Mushrooms: Add the fresh thyme leaves, and season with salt and pepper to taste. Stir well to combine and cook for an additional 2-3 minutes to let the flavors meld together.
- Toast the Sourdough: While the mushrooms are cooking, toast the sourdough slices to your desired level of crispiness.
- Assemble the Dish: Once the mushrooms are cooked and the sourdough is toasted, place the sourdough slices on a serving platter. Spoon the sautéed mushrooms generously over each slice.
- Garnish and Serve: If using, sprinkle grated Parmesan cheese over the top and garnish with chopped fresh parsley. Serve immediately while warm.
Extra Tips:
For the best results, use a mix of different mushroom varieties to add depth and complexity to the flavor. Confirm that the mushrooms aren’t overcrowded in the pan to allow them to brown properly.
If necessary, cook them in batches. Additionally, you can enhance the dish by drizzling a bit of truffle oil over the mushrooms before serving for an extra layer of sophistication.
This dish pairs wonderfully with a side of poached or scrambled eggs, making it even more nutritious and fulfilling.
Indian Masala Omelette

Indian Masala Omelette is a flavorful and spicy twist on the classic omelette, perfect for those who enjoy a hearty breakfast with a kick. This dish combines the simplicity of eggs with the aromatic flavors of Indian spices and herbs, creating a savory breakfast option that’s both nutritious and satisfying.
The masala omelette is versatile and can be tailored to suit your taste preferences by adjusting the spice levels or adding your favorite vegetables. The Indian Masala Omelette isn’t only delicious but also quick to prepare, making it an ideal choice for busy mornings.
It can be served on its own or paired with toasted bread, a side of chutney, or even rolled into a wrap for an on-the-go meal. This recipe will guide you through making this delightful dish for a serving size of 4-6 people, ensuring everyone at the table can enjoy the spicy goodness.
Ingredients for 4-6 servings:
- 8 large eggs
- 1 large onion, finely chopped
- 2 medium tomatoes, finely chopped
- 1 green chili, finely chopped (optional for spice)
- 1/2 cup fresh cilantro, chopped
- 1 teaspoon ground turmeric
- 1 teaspoon red chili powder
- 1 teaspoon ground cumin
- 1/2 teaspoon salt, or to taste
- 1/4 teaspoon black pepper
- 2 tablespoons vegetable oil or ghee
- 1/4 cup milk (optional, for a creamier texture)
Cooking Instructions:
- Prepare the Ingredients: Begin by chopping the onion, tomatoes, green chili, and cilantro. Set them aside in separate bowls. Crack the eggs into a large mixing bowl and whisk them until they’re well combined and slightly frothy.
- Mix the Omelette Mixture: Add the chopped onion, tomatoes, green chili, and cilantro to the bowl with the whisked eggs. Then, add the turmeric, red chili powder, ground cumin, salt, and black pepper. If you prefer a creamier omelette, add the milk as well. Stir the mixture until all the ingredients are evenly incorporated.
- Heat the Pan: Place a large non-stick skillet over medium heat and add the vegetable oil or ghee. Allow it to heat up until it shimmers, indicating it’s ready for cooking.
- Cook the Omelette: Pour a portion of the egg mixture into the skillet, spreading it evenly to form a thick, round omelette. Cook for about 2-3 minutes or until the edges start to set and the bottom turns golden brown.
- Flip the Omelette: Using a spatula, gently flip the omelette and cook the other side for another 2-3 minutes until it’s fully cooked through and nicely browned.
- Repeat the Process: Continue cooking the remaining egg mixture in batches, adding more oil or ghee if necessary, until all the omelettes are prepared.
- Serve: Transfer the cooked omelettes to a serving plate. Garnish with additional chopped cilantro if desired and serve hot.
Extra Tips:
For an added layer of flavor, you can incorporate finely chopped bell peppers or mushrooms into the egg mixture. Adjust the spice levels by varying the amount of green chili or red chili powder to suit your taste.
If you find it challenging to flip the omelette in one piece, try making smaller omelettes for easier handling. Additionally, using a non-stick skillet will help prevent sticking and make flipping the omelette more manageable.
Breakfast Pide With Spinach and Feta

Breakfast Pide With Spinach and Feta is a delightful savory breakfast option that combines the rich flavors of spinach and feta cheese with a deliciously soft and flaky homemade dough. Originating from Turkey, pide is a flatbread that’s typically shaped like a boat and filled with a variety of ingredients. This version, featuring spinach and feta, is perfect for a morning meal that will satisfy your taste buds and provide a nutritious start to the day.
The combination of the creamy, tangy feta cheese with the earthy notes of spinach creates a harmonious flavor profile that pairs beautifully with the light, airy texture of the pide dough.
This breakfast dish isn’t only delicious but also versatile, making it ideal for gatherings or a leisurely weekend brunch. You can prepare the dough and filling a day ahead and bake them fresh in the morning, ensuring a piping hot, freshly baked treat to enjoy.
The recipe below provides a serving size of 4-6 people, making it perfect for a family meal or sharing with friends. With a few simple ingredients and straightforward instructions, you can bring a taste of traditional Turkish cuisine to your breakfast table.
Ingredients (Serving Size: 4-6 people):
- 2 cups all-purpose flour
- 1 teaspoon salt
- 1 teaspoon sugar
- 1 packet (2 1/4 teaspoons) active dry yeast
- 3/4 cup warm water
- 2 tablespoons olive oil
- 1 1/2 cups fresh spinach, chopped
- 1 cup crumbled feta cheese
- 1/2 teaspoon black pepper
- 1 egg, beaten (for egg wash)
- 1 tablespoon sesame seeds (optional for topping)
Cooking Instructions:
- Prepare the Dough: In a large mixing bowl, combine the flour, salt, and sugar. In a small bowl, dissolve the yeast in warm water and let it sit for about 5 minutes until it becomes frothy. Add the yeast mixture and olive oil to the dry ingredients. Mix until a dough forms.
- Knead the Dough: Transfer the dough onto a lightly floured surface and knead it for about 8-10 minutes until it becomes smooth and elastic. Place the dough in a lightly oiled bowl, cover it with a clean kitchen towel, and let it rise in a warm place for about 1 hour or until it doubles in size.
- Prepare the Filling: While the dough is rising, prepare the filling. In a medium bowl, combine the chopped spinach, crumbled feta cheese, and black pepper. Mix well and set aside.
- Shape the Pide: Once the dough has risen, punch it down and divide it into 4-6 equal pieces, depending on your desired size. Roll each piece into an oval shape on a lightly floured surface. Place a generous amount of the spinach and feta filling in the center of each oval, leaving a border around the edges.
- Form the Boat Shape: Fold the edges of the dough over the filling, pinching the ends to create a boat shape. Make sure the filling is visible in the center. Place each shaped pide on a baking sheet lined with parchment paper.
- Apply Egg Wash: Preheat your oven to 400°F (200°C). Brush the edges of each pide with the beaten egg to give it a beautiful golden color when baked. Sprinkle sesame seeds on top if desired.
- Bake the Pide: Place the baking sheet in the preheated oven and bake for 15-20 minutes or until the dough is golden brown and cooked through. Remove from the oven and let them cool slightly before serving.
Extra Tips: For an extra crispy crust, you can bake the pide on a preheated baking stone or a pizza stone if available. Feel free to experiment with additional fillings such as cooked sausage, mushrooms, or peppers to add more variety to your pide.
If you prefer a vegetarian alternative, you can substitute the feta with a plant-based cheese. Remember to keep the dough covered with a damp cloth while shaping each piece to prevent it from drying out. Enjoy your Breakfast Pide With Spinach and Feta warm for the best flavor and texture!
Thai Basil Chicken Stir-Fry With Egg

Thai Basil Chicken Stir-Fry With Egg is a delightful and savory breakfast dish that combines the bold flavors of Thai cuisine with the comfort of a hearty morning meal. This dish features tender chicken pieces stir-fried with aromatic garlic, spicy chilies, and fragrant Thai basil leaves, all nestled under a perfectly cooked fried egg. The combination of these ingredients creates a burst of flavors and textures that will invigorate your taste buds and start your day off with a satisfying meal.
Prepared in under 30 minutes, this dish is both quick and straightforward, making it ideal for busy mornings. The key to this recipe is using fresh ingredients, especially the Thai basil, which imparts a unique, slightly peppery flavor that’s essential to this dish. The addition of a fried egg on top adds a rich, creamy element that complements the spicy and savory notes of the stir-fry. Serve it over a warm bed of jasmine rice for a complete and delicious breakfast.
Ingredients for 4-6 servings:
- 1 1/2 lbs boneless, skinless chicken thighs, cut into bite-sized pieces
- 2 tablespoons vegetable oil
- 6 cloves garlic, minced
- 4-6 Thai bird chilies, sliced (adjust to taste)
- 1 large onion, sliced
- 2 tablespoons soy sauce
- 1 tablespoon oyster sauce
- 2 teaspoons fish sauce
- 1 teaspoon sugar
- 1 cup fresh Thai basil leaves
- 4-6 large eggs
- Cooked jasmine rice, for serving
Cooking Instructions:
- Prepare the Ingredients: Start by cutting the chicken thighs into bite-sized pieces. Mince the garlic and slice the chilies and onion. Set aside.
- Cook the Chicken: Heat 1 tablespoon of vegetable oil in a large pan or wok over medium-high heat. Add the chicken pieces and stir-fry until they’re cooked through and golden brown, about 5-7 minutes. Remove the chicken from the pan and set aside.
- Stir-Fry Aromatics: In the same pan, add the remaining tablespoon of oil. Add the minced garlic and sliced chilies, and stir-fry for about 30 seconds until fragrant. Add the sliced onion and continue to stir-fry until it becomes translucent.
- Combine Ingredients: Return the chicken to the pan. Add the soy sauce, oyster sauce, fish sauce, and sugar. Stir well to coat the chicken and vegetables evenly with the sauces.
- Add Thai Basil: Once the sauce is well incorporated, add the Thai basil leaves. Stir-fry for another 2 minutes until the basil is wilted and the flavors are well combined.
- Fry the Eggs: In a separate non-stick pan, fry the eggs to your preferred doneness. A runny yolk is traditionally preferred as it adds richness to the dish.
- Serve: Serve the Thai Basil Chicken Stir-Fry over a plate of warm jasmine rice and top each serving with a fried egg.
Extra Tips:
For the best results, use fresh Thai basil as it provides the most authentic flavor. If you desire more heat, you can increase the number of Thai bird chilies or add a splash of chili paste to the stir-fry.
Make sure to have all your ingredients prepped and ready, as the stir-frying process moves quickly and you’ll want to prevent any burning. Finally, feel free to experiment with additional vegetables such as bell peppers or green beans for added texture and nutrients.