
Start your morning right with these delightful and easy breakfast ideas. Whether you’re rushing out the door or enjoying a leisurely morning, there’s something here just for you. From creamy avocado toast with a perfectly poached egg to a refreshing banana and almond butter smoothie, these recipes are as quick as they are delicious. Fuel your body and treat your taste buds without spending hours in the kitchen. Explore these simple yet satisfying options to kickstart your day.
Avocado Toast With Poached Egg
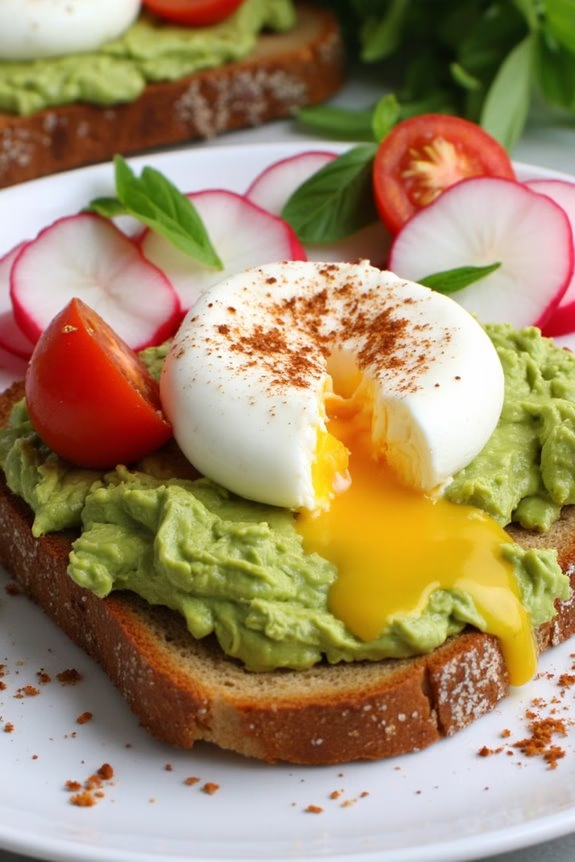
Avocado Toast With Poached Egg is a delightful combination of creamy avocado, perfectly poached eggs, and crispy toast that makes for a satisfying breakfast. This dish isn’t only quick and easy to prepare, but it’s also packed with healthy fats and protein, making it a nutritious start to your day.
The creamy texture of the avocado pairs wonderfully with the rich yolk of the egg, while a sprinkle of salt and pepper brings out the flavors, making each bite irresistible.
Whether you’re looking to impress guests with a hearty breakfast or just want to treat yourself to something delicious, Avocado Toast With Poached Egg is a fantastic choice. It’s versatile enough to accommodate additional toppings like cherry tomatoes, radishes, or a sprinkle of chili flakes for added zest.
Prepare to elevate your breakfast game with this simple yet sophisticated recipe that serves 4-6 people.
Ingredients:
- 6 large eggs
- 3 ripe avocados
- 6 slices of whole-grain bread
- 1 tablespoon white vinegar
- Salt, to taste
- Black pepper, to taste
- Optional toppings: cherry tomatoes, radishes, chili flakes
- Olive oil, for drizzling
- Lemon juice, to taste
Cooking Instructions:
- Prepare the Avocado Mixture:
- Cut the avocados in half, remove the pits, and scoop the flesh into a bowl. Mash the avocado using a fork until you achieve your desired consistency. Add a pinch of salt, a squeeze of lemon juice, and mix well to enhance the flavor.
- Toast the Bread:
- While preparing the avocado mixture, start toasting the slices of whole-grain bread until they’re golden brown and crispy. You can do this in a toaster or on a grill pan for added texture.
- Poach the Eggs:
- Fill a medium-sized pot with water and bring it to a gentle simmer. Add the white vinegar to the water to help the egg whites set. Crack each egg into a small bowl or cup, then gently slide them one by one into the simmering water. Let the eggs cook for about 3-4 minutes until the whites are set, but the yolks remain runny.
- Use a slotted spoon to carefully remove the eggs and place them on a paper towel to drain excess water.
- Assemble the Toast:
- Spread a generous amount of the mashed avocado mixture onto each slice of toasted bread. Place a poached egg on top of the avocado, season with additional salt and pepper, and drizzle with a little olive oil if desired.
- Add Optional Toppings:
- If using cherry tomatoes, radishes, or chili flakes, add them on top of the poached egg for extra flavor and color. Serve the avocado toast warm and enjoy!
Extra Tips:
To guarantee perfectly poached eggs, make sure the water is at a gentle simmer rather than a rapid boil, which can break the eggs apart.
Using fresh eggs is also essential, as they hold their shape better when poached. If you’re making this dish for a larger group, consider keeping the poached eggs warm in a bowl of warm water until ready to serve.
Finally, feel free to experiment with various herbs and spices to customize the flavor profile to your liking.
Greek Yogurt Parfait
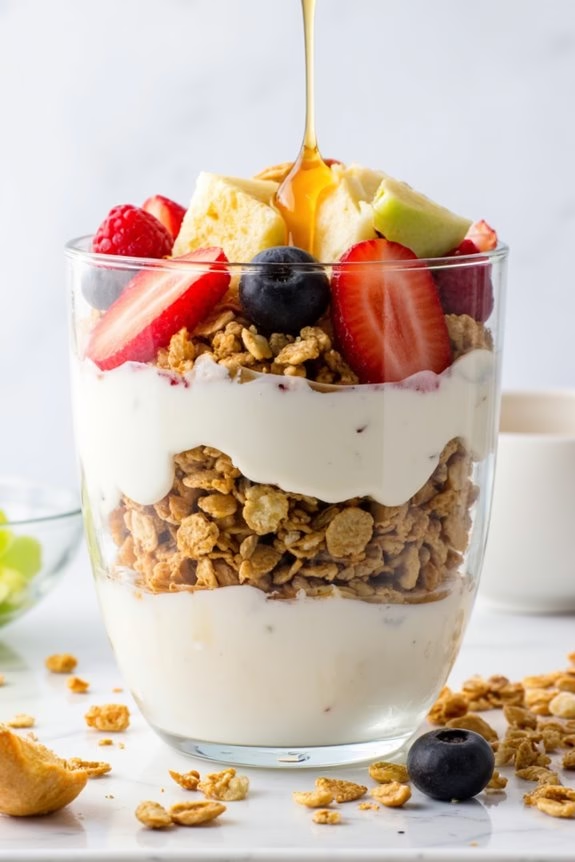
Greek Yogurt Parfait is a delicious and nutritious breakfast option that’s as pleasing to the eye as it’s to the palate. This dish layers creamy Greek yogurt with fresh fruits, crunchy granola, and a drizzle of honey, creating a perfect balance of flavors and textures. It isn’t only quick to prepare but also packed with protein, fiber, and vitamins, making it an ideal start to your day.
Whether you’re rushing out the door or enjoying a leisurely morning, Greek Yogurt Parfait is certain to satisfy your breakfast cravings. This recipe is perfect for serving 4-6 people, making it an excellent choice for a family breakfast or a small gathering.
You can easily customize it to suit your tastes by using your favorite fruits and granola, or even adding nuts and seeds for extra crunch. With minimal preparation and no cooking required, Greek Yogurt Parfait is a hassle-free breakfast that everyone will enjoy.
Ingredients (Serving Size: 4-6 people):
- 4 cups Greek yogurt
- 2 cups granola
- 2 cups mixed fresh fruits (such as berries, sliced bananas, or diced apples)
- 1/4 cup honey
- 1/4 cup chopped nuts (optional)
- 1 teaspoon vanilla extract (optional)
Cooking Instructions:
- Prepare the Ingredients: Begin by washing and preparing the fruits. Slice or dice them as needed to guarantee they’re ready to layer in the parfait. If you’re using bananas, slice them just before assembling to prevent browning.
- Layer the Yogurt: In a clear glass or bowl, add a generous scoop of Greek yogurt as the base layer. Smooth it out with the back of a spoon to create an even surface.
- Add the Granola: Sprinkle a layer of granola over the yogurt. This will add a delightful crunch to your parfait.
- Layer the Fruits: Add a layer of mixed fruits over the granola. Use a variety of colors and textures for visual appeal and a range of flavors.
- Repeat the Layers: Repeat the layers of yogurt, granola, and fruit until the glass or bowl is filled. Aim for at least two sets of layers for a nice visual effect.
- Finish with Honey and Nuts: Drizzle honey over the top layer of fruit for sweetness. If desired, sprinkle chopped nuts for added texture and flavor. Add a dash of vanilla extract for extra aroma.
- Serve Immediately: Serve the Greek Yogurt Parfait immediately to enjoy the freshness of the ingredients. If preparing in advance, store in the refrigerator but add the granola just before serving to maintain its crunch.
Extra Tips:
For the best results, choose ripe and seasonal fruits to enhance the flavor of your parfait. If you prefer a less sweet version, you can reduce or omit the honey.
Feel free to experiment with different types of granola or even make your own for a personalized touch. If you’re preparing this dish in advance, keep the fruit and yogurt layers ready but wait to add the granola and honey until just before serving to keep the granola crunchy.
Enjoy your Greek Yogurt Parfait as a versatile and healthy breakfast option!
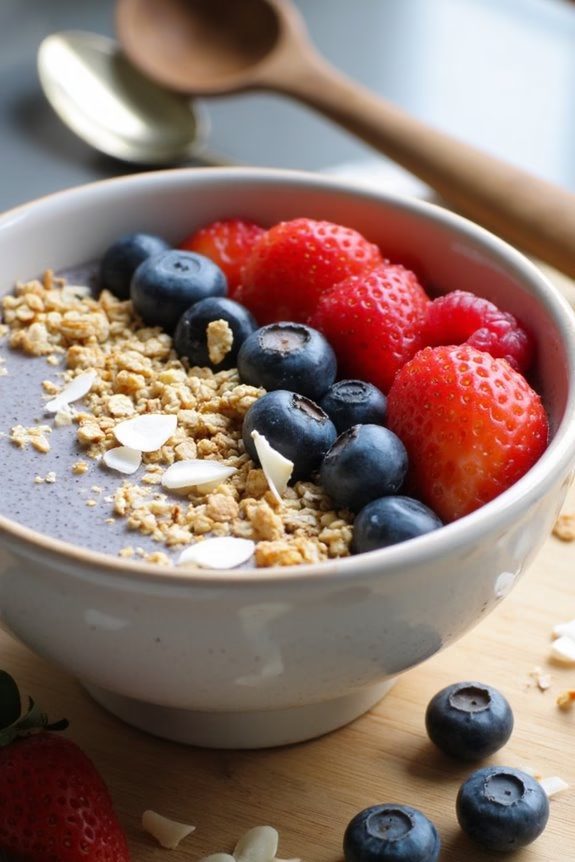
Overnight Oats With Berries
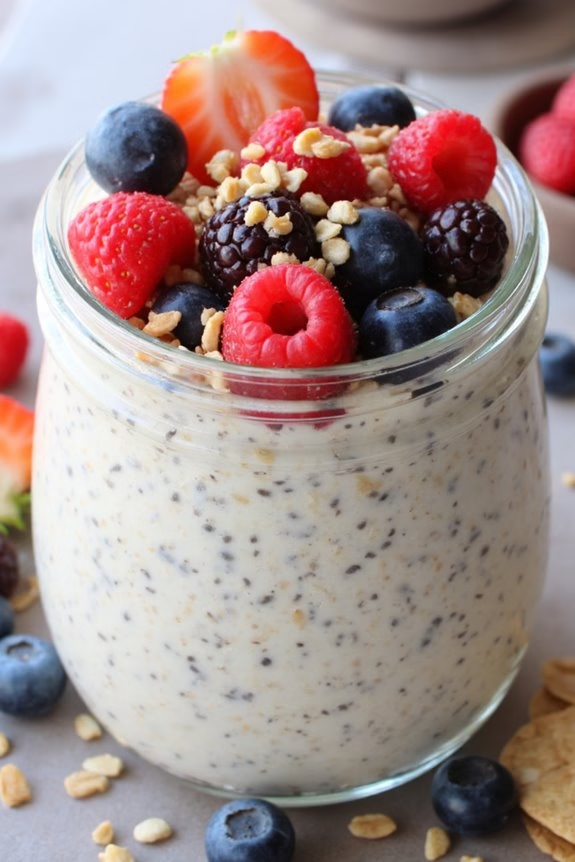
Overnight oats with berries is a nutritious and delicious breakfast option that can be prepared ahead of time, making your mornings stress-free and guaranteeing you start the day on a healthy note.
This dish combines the creaminess of oats with the fresh, vibrant flavors of mixed berries, providing a balanced meal that’s high in fiber, antioxidants, and essential vitamins. Perfect for busy families or individuals, this recipe allows you to wake up to a ready-made breakfast that keeps you energized and satisfied throughout the morning.
The preparation is simple and can be customized to suit your taste preferences. By soaking oats in milk or a milk alternative overnight, they become soft and creamy, requiring no cooking in the morning.
The addition of berries not only adds a burst of flavor but also a splash of color, making this breakfast as visually appealing as it’s tasty. Whether you enjoy them at home or take them on the go, overnight oats with berries are a versatile and convenient choice.
Ingredients for 4-6 servings:
- 2 cups rolled oats
- 2 cups milk or milk alternative (such as almond or soy milk)
- 1 cup Greek yogurt
- 1 tablespoon chia seeds
- 2 tablespoons honey or maple syrup
- 1 teaspoon vanilla extract
- 1 cup mixed berries (such as strawberries, blueberries, raspberries)
- 1/4 cup chopped nuts (such as almonds or walnuts)
- A pinch of salt
Cooking Instructions:
- Mix the Base: In a large mixing bowl, combine the rolled oats, milk (or milk alternative), Greek yogurt, chia seeds, honey or maple syrup, vanilla extract, and a pinch of salt. Stir well to ascertain all ingredients are thoroughly mixed.
- Add Berries and Nuts: Gently fold in the mixed berries and chopped nuts. Confirm the berries are evenly distributed throughout the mixture.
- Portion the Oats: Divide the mixture evenly into individual serving containers or jars. This makes it easy to grab a single serving and helps with portion control.
- Refrigerate: Cover the containers with lids or plastic wrap and refrigerate them overnight, or for at least 4 hours. This allows the oats to soak up the liquid and become soft and creamy.
- Serve: In the morning, stir the oats and add any additional toppings if desired, such as more fresh berries, a dollop of yogurt, or a sprinkle of nuts. Serve chilled and enjoy your ready-made breakfast.
Extra Tips:
For a richer flavor, try toasting the oats in a dry pan before mixing them with the other ingredients. This adds a nutty aroma and enhances the taste.
Feel free to experiment with different types of berries or nuts based on your preferences and what’s in season. If you prefer a sweeter taste, adjust the amount of honey or maple syrup to your liking.
Overnight oats can last in the refrigerator for up to five days, making them an excellent choice for meal prepping at the start of the week.
Banana and Almond Butter Smoothie

Start your day with a nutritious and delicious Banana and Almond Butter Smoothie. This quick breakfast option is perfect for those busy mornings when you need something filling yet easy to prepare. Packed with the natural sweetness of bananas and the creamy richness of almond butter, this smoothie is a delightful way to fuel your morning.
It’s not only satisfying but also loaded with essential vitamins and minerals to keep you energized throughout the day. This smoothie is perfect for families or small groups, as it serves 4-6 people. Whether you’re making it for yourself or sharing with loved ones, this smoothie is sure to be a hit.
The combination of bananas and almond butter creates a naturally sweet and nutty flavor that both adults and kids will love. Plus, it’s a fantastic way to sneak in some extra nutrients without any fuss.
Ingredients (serves 4-6):
- 6 ripe bananas
- 1 cup almond butter
- 4 cups almond milk (or any milk of choice)
- 1/4 cup honey or maple syrup (optional)
- 1 teaspoon vanilla extract
- 1/2 teaspoon ground cinnamon
- 1/4 teaspoon salt
- 1-2 cups ice cubes
Instructions:
1. Prepare the Ingredients:
Peel the bananas and break them into chunks. This will make it easier to blend them into a smooth consistency.
2. Combine Ingredients in Blender:
Add the banana chunks, almond butter, almond milk, honey or maple syrup (if using), vanilla extract, ground cinnamon, and salt into the blender.
3. Blend Until Smooth:
Start blending the mixture on low speed, gradually increasing to high. Blend until the mixture is smooth and creamy, and all the ingredients are fully incorporated. This should take about 1-2 minutes depending on your blender.
4. Add Ice and Blend:
Add the ice cubes to the blender and blend again until the ice is crushed and the smoothie reaches your desired thickness. If you like a thicker smoothie, use more ice.
5. Taste and Adjust:
Taste the smoothie and adjust the sweetness or thickness as needed. You can add more honey or maple syrup if you prefer it sweeter, or more almond milk if it’s too thick.
6. Serve:
Pour the smoothie into glasses and serve immediately for the freshest taste. Enjoy your delicious Banana and Almond Butter Smoothie!
Extra Tips:
For a creamier texture, consider using frozen bananas instead of fresh ones. This not only adds thickness but also keeps the smoothie cold without needing as much ice.
If you’re looking to add some extra nutrition, consider throwing in a handful of spinach or a scoop of protein powder. Finally, feel free to experiment with different nut butters or milk alternatives to suit your taste preferences or dietary needs. Enjoy this versatile and satisfying breakfast option!
Spinach and Feta Wrap

Spinach and Feta Wrap is a delightful and nutritious breakfast option that’s perfect for those busy mornings when you need something quick yet satisfying. This wrap combines the earthy taste of spinach with the creamy, tangy flavor of feta cheese, all wrapped up in a soft tortilla.
It’s not only easy to prepare but also packed with essential nutrients that will keep you energized throughout the morning. Whether you’re feeding a family or preparing a meal for yourself, this recipe is sure to become a breakfast staple in your home.
To make this delicious Spinach and Feta Wrap, you’ll need to gather a few simple ingredients and follow some straightforward steps. The recipe is designed to serve 4-6 people, making it an ideal choice for a family breakfast or a small brunch gathering.
With fresh ingredients and minimal prep time, you can whip up these wraps in no time, allowing you more moments to enjoy your morning or catch those extra minutes of sleep.
Ingredients (serving size: 4-6 people):
- 6 large whole wheat tortillas
- 2 tablespoons olive oil
- 1 medium onion, finely chopped
- 2 cloves garlic, minced
- 10 ounces fresh spinach leaves
- 1/2 teaspoon salt
- 1/4 teaspoon black pepper
- 1 cup crumbled feta cheese
- 6 large eggs
- 1/4 cup milk
- 1 tablespoon fresh dill, chopped
Instructions:
- Prepare the Spinach Mixture:
- Heat olive oil in a large skillet over medium heat. Add the chopped onion and sauté until it becomes translucent, about 3-4 minutes. Stir in the minced garlic and cook for an additional minute until fragrant.
- Add the fresh spinach to the skillet and season with salt and black pepper. Cook while stirring occasionally until the spinach wilts, approximately 3-5 minutes. Once cooked, remove the skillet from the heat and stir in the crumbled feta cheese. Set aside.
- Prepare the Egg Mixture:
- In a large bowl, whisk together the eggs and milk until well combined. Stir in the chopped fresh dill.
- Cook the Eggs:
- In a separate non-stick skillet over medium heat, pour the egg mixture. Cook while gently stirring with a spatula until the eggs are scrambled and just cooked through, about 3-5 minutes. Remove from the heat.
- Assemble the Wraps:
- Lay out the tortillas on a clean surface. Evenly divide the spinach and feta mixture among the tortillas, placing it in the center of each. Top with an equal portion of scrambled eggs.
- Roll each tortilla tightly by folding in the sides and then rolling from the bottom up.
- Serve:
- Serve the wraps immediately while warm, or wrap them in foil to keep them warm for a bit longer.
Extra Tips:
For an extra burst of flavor, consider adding a pinch of red pepper flakes to the spinach mixture while it cooks. If you prefer a creamier texture, substitute half of the milk with heavy cream in the egg mixture.
Additionally, these wraps can be made ahead of time and stored in the refrigerator for up to two days. Simply reheat them in a skillet or microwave before serving.
Chia Seed Pudding
Chia Seed Pudding is a nutritious and delicious breakfast option that can be prepared in advance, making it perfect for those busy mornings. This dish isn’t only easy to make but also packed with fiber, protein, and omega-3 fatty acids, thanks to the chia seeds.
The pudding is versatile, allowing you to customize it with your favorite flavors and toppings, such as fresh fruits, nuts, or granola. By preparing it the night before, you can have a satisfying breakfast ready to go when you wake up, guaranteeing you start your day on the right foot.
This recipe is designed to serve 4-6 people, making it ideal for a family breakfast or meal prepping for the week. The basic recipe involves mixing chia seeds with a liquid base, such as milk or a plant-based alternative, and letting it sit overnight. The seeds absorb the liquid and expand, creating a thick, pudding-like texture that’s both creamy and satisfying.
Whether you enjoy it plain or dressed up with various toppings, chia seed pudding is a convenient and healthy breakfast option that will keep you energized throughout the day.
Ingredients (Serving Size: 4-6 people):
- 1 cup chia seeds
- 4 cups milk (dairy or plant-based)
- 1/4 cup maple syrup or honey
- 1 teaspoon vanilla extract
- Pinch of salt
- Optional toppings: fresh fruits, nuts, granola, coconut flakes
Cooking Instructions:
- Mix Ingredients: In a large mixing bowl, combine the chia seeds, milk, maple syrup (or honey), vanilla extract, and a pinch of salt. Whisk the mixture thoroughly to guarantee the chia seeds are evenly distributed and not clumping together.
- Refrigerate: Cover the bowl with a lid or plastic wrap and place it in the refrigerator. Allow the mixture to sit for at least 4 hours, or overnight if possible. This resting period allows the chia seeds to absorb the liquid and form a pudding-like consistency.
- Stir Occasionally: If possible, stir the mixture once or twice during the first hour of refrigeration. This helps to prevent clumping and guarantees a smooth texture throughout.
- Serve: Once the pudding has set, give it a good stir. Divide the pudding into individual serving bowls or jars. Add your choice of toppings, such as fresh fruits, nuts, granola, or coconut flakes, to enhance flavor and texture.
- Store: If you have leftovers, the pudding can be stored in the refrigerator for up to 5 days. Simply cover the bowls or jars tightly to maintain freshness.
Extra Tips:
For a creamier pudding, consider using full-fat coconut milk or Greek yogurt as part of the liquid base. You can also experiment with different sweeteners, like agave syrup or stevia, if you prefer a lower-sugar option.
If the pudding is too thick after refrigeration, simply add a bit more milk and stir until you reach the desired consistency. To save time, prepare the pudding in individual jars so you can grab-and-go in the morning.
Quick Veggie Omelette

Start your day with a wholesome and nutritious Quick Veggie Omelette that’s packed full of flavor and ready in no time! This omelette brings together a vibrant mix of fresh vegetables and fluffy eggs for a breakfast that’s both satisfying and healthy. Perfect for those busy mornings or when you want to impress your family with your culinary skills, this omelette is a delightful way to kickstart your day.
The beauty of a veggie omelette lies in its versatility. You can adapt the ingredients based on what you have on hand, making it a fantastic option for using up any leftover vegetables. Not only is it quick to prepare, but it’s also an excellent source of protein, vitamins, and minerals.
Whether you’re a seasoned cook or a beginner, this Quick Veggie Omelette recipe is straightforward, guaranteeing a tasty breakfast that everyone at the table will love.
Ingredients (Serves 4-6 people):
- 10 large eggs
- 1/4 cup milk
- Salt and pepper to taste
- 1 tablespoon olive oil
- 1 cup diced bell peppers (any color)
- 1 cup chopped spinach
- 1/2 cup diced tomatoes
- 1/2 cup sliced mushrooms
- 1/2 cup shredded cheddar cheese
- 1/4 cup chopped onions
- 2 tablespoons chopped fresh parsley
Cooking Instructions:
- Prep the Eggs: In a large mixing bowl, crack 10 eggs and add 1/4 cup of milk. Season with salt and pepper to taste. Whisk the mixture vigorously until it’s well combined and slightly frothy.
- Cook the Vegetables: Heat 1 tablespoon of olive oil in a large non-stick skillet over medium-high heat. Add the chopped onions and cook for about 1-2 minutes until they become translucent. Add the bell peppers, mushrooms, and tomatoes. Sauté the vegetables for another 3-4 minutes, or until they’re tender.
- Add Spinach: Toss in the chopped spinach and cook for an additional 1-2 minutes until wilted. Once the vegetables are cooked to your liking, transfer them to a bowl and set aside.
- Cook the Eggs: In the same skillet, pour the egg mixture and allow it to cook undisturbed for about 2 minutes until the edges start to set. Reduce the heat to low to prevent the eggs from burning.
- Combine and Cook: Evenly distribute the sautéed vegetables over one half of the omelette. Sprinkle the shredded cheddar cheese over the veggies, then fold the other half of the omelette over the filling using a spatula.
- Finish Cooking: Allow the omelette to cook for an additional 3-4 minutes or until the cheese is melted and the eggs are fully set. Carefully slide the omelette onto a serving platter, cut into portions, and garnish with fresh parsley.
Extra Tips: To guarantee a fluffy omelette, whisk the eggs until they’re fully aerated, and cook them on a lower heat to avoid overcooking. Feel free to experiment with different vegetables or cheese types to suit your taste preferences.
If you want to add a bit of spice, consider including a pinch of red pepper flakes or a dash of hot sauce in the egg mixture. Remember, the key to a successful omelette is cooking it gently and patiently to maintain its delicate texture.
Peanut Butter and Banana Sandwich

Start your day with a nutritious and satisfying breakfast by making a Peanut Butter and Banana Sandwich. This classic combination isn’t only delicious but also packed with protein, fiber, and potassium, making it an ideal choice for a quick breakfast.
Perfect for those busy mornings, this sandwich can be prepared in just a few minutes and is sure to keep you energized throughout the morning. The creamy texture of peanut butter pairs beautifully with the natural sweetness of bananas, creating a delightful harmony of flavors.
Whether you’re feeding a family or preparing breakfast for a group of friends, this simple yet delicious recipe can easily be scaled to serve 4-6 people. With minimal ingredients and preparation, the Peanut Butter and Banana Sandwich is a wonderful breakfast option that everyone will love.
Ingredients (serves 4-6 people):
- 8-12 slices of whole grain or your preferred bread
- 1 cup of creamy or crunchy peanut butter
- 4-6 ripe bananas
- Honey (optional)
- Cinnamon (optional)
Cooking Instructions:
- Prepare the Bread: Begin by toasting the slices of bread to your desired level of crispiness. You can use a toaster or an oven for this step. Toasting the bread will add a nice texture to the sandwich and prevent it from becoming soggy.
- Spread the Peanut Butter: Once the bread is toasted, spread a generous layer of peanut butter on one side of each slice. Confirm the peanut butter is evenly distributed to provide a consistent taste throughout the sandwich.
- Slice the Bananas: Peel the bananas and slice them into thin, even rounds. This will make it easier to layer them on the bread and help the sandwich hold together better.
- Assemble the Sandwich: Place the banana slices evenly over the peanut butter on half of the bread slices. If you like, drizzle a little honey over the bananas for added sweetness or sprinkle a pinch of cinnamon for extra flavor.
- Complete the Sandwich: Take the remaining slices of bread and place them on top of the banana-layered slices, peanut butter side down, to create a sandwich.
- Serve and Enjoy: Cut the sandwiches in half or quarters for easy handling and serve immediately. Enjoy your Peanut Butter and Banana Sandwich as a delightful breakfast treat.
Extra Tips:
For a more indulgent version, consider adding a layer of Nutella or chocolate spread along with the peanut butter. If you’re looking to add some crunch, sprinkle some granola or chopped nuts on top of the banana slices before assembling the sandwich.
You can also experiment with different types of bread such as sourdough or rye for a unique flavor. For those with dietary restrictions, substitute the peanut butter with almond or sunflower seed butter. Remember, the ripeness of the bananas will affect the sweetness of the sandwich, so choose accordingly.
Instant Pot Breakfast Quinoa
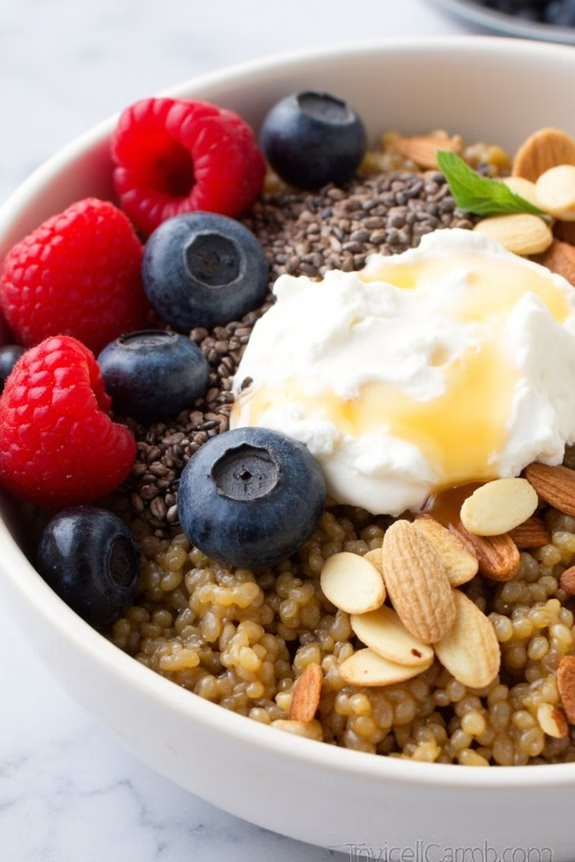
Start your day with a nutritious and hearty breakfast by preparing Instant Pot Breakfast Quinoa. This dish isn’t only quick and easy to make but also packed with protein and fiber, keeping you full and energized throughout the morning.
The Instant Pot does a fantastic job of cooking quinoa to perfection, creating fluffy grains that serve as a perfect base for your favorite toppings. Whether you’re rushing out the door or enjoying a leisurely morning, this breakfast option is both convenient and satisfying.
Instant Pot Breakfast Quinoa offers versatility, allowing you to customize it with various toppings to suit your taste. From sweet to savory, you can top your quinoa with fresh fruits, nuts, seeds, or even a dollop of yogurt.
It’s a wonderful option for those who want to prepare breakfast for the entire family or meal prep for the week. With the Instant Pot, you can achieve consistent results every time, guaranteeing your breakfast quinoa is ready in no time for 4-6 people.
Ingredients (Serving Size: 4-6)
- 1 cup quinoa, rinsed
- 2 cups water
- 1/2 teaspoon salt
- 1 teaspoon vanilla extract
- 1 teaspoon cinnamon
- 1/4 cup maple syrup or honey
- 1 cup milk or almond milk
- Optional toppings: fresh berries, nuts, seeds, yogurt, dried fruits
Instructions
- Prepare the Ingredients: Begin by rinsing the quinoa under cold water using a fine mesh strainer. This step helps remove the natural coating called saponin, which can make quinoa taste bitter.
- Combine in Instant Pot: Add the rinsed quinoa, water, and salt to the Instant Pot. Stir in the vanilla extract, cinnamon, and maple syrup or honey. This combination will infuse the quinoa with flavor as it cooks.
- Set Instant Pot: Secure the lid on the Instant Pot and confirm the valve is set to the “Sealing” position. Select the “Manual” or “Pressure Cook” setting and set the cooking time for 1 minute at high pressure.
- Natural Release: Once the cooking time is up, allow the pressure to release naturally for about 10 minutes. This step guarantees that the quinoa absorbs all the flavors and achieves the desired texture.
- Open and Stir: Carefully turn the valve to the “Venting” position to release any remaining pressure. Open the lid, add the milk or almond milk, and stir the quinoa gently to combine. The milk adds creaminess and enhances the overall taste.
- Serve and Top: Spoon the cooked quinoa into bowls and add your choice of optional toppings such as fresh berries, nuts, seeds, yogurt, or dried fruits. Serve warm and enjoy.
Extra Tips
For a richer flavor, consider toasting the quinoa in the Instant Pot for a few minutes before adding the water and other ingredients. This can enhance the nutty taste of the quinoa.
If you’re meal prepping, store the cooked quinoa in an airtight container in the refrigerator for up to five days. Reheat individual portions as needed and add toppings just before serving to maintain freshness and texture.
Experiment with different spices and sweeteners to find your perfect breakfast combination.
Savory Cottage Cheese Bowl
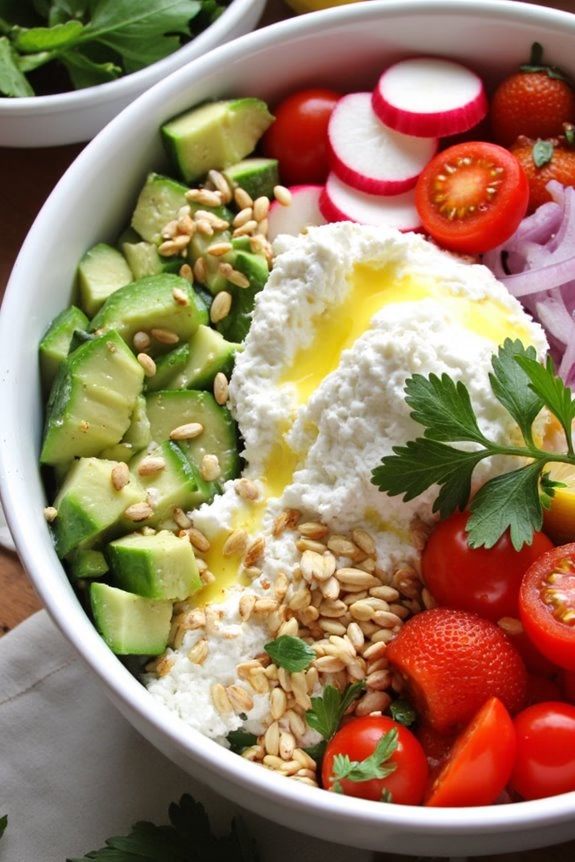
Savory Cottage Cheese Bowl is a delightful way to start your morning with a protein-packed and flavorful breakfast. This dish combines creamy cottage cheese with a variety of fresh and savory toppings, creating a wholesome meal that satisfies both the palate and the stomach. The interplay of textures and flavors makes it an exciting option for those who prefer savory over sweet to kick off their day.
Plus, it’s not only quick to prepare but also offers flexibility with ingredients, allowing you to tailor it to your taste preferences. Perfect for those busy mornings when time is of the essence, a Savory Cottage Cheese Bowl can be assembled in just a few minutes.
The cottage cheese serves as a nutritious base, providing a good source of protein and calcium, while the choice of toppings adds vitamins, minerals, and healthy fats. Whether you’re feeding a family or prepping for a brunch gathering, this dish can easily be scaled up to accommodate 4-6 people, ensuring everyone gets a nourishing start to their day.
Ingredients (Serves 4-6):
- 4 cups cottage cheese
- 1 cup cherry tomatoes, halved
- 1 cucumber, diced
- 1 avocado, pitted and diced
- 1/2 cup radishes, thinly sliced
- 1/4 cup red onion, finely chopped
- 1/4 cup fresh parsley, chopped
- 1/4 cup sunflower seeds
- 1/4 cup olive oil
- Salt and pepper to taste
- 1 lemon, juiced
Instructions:
- Prepare the Base:
- Start by distributing the cottage cheese evenly into 4-6 serving bowls. This will be the creamy base for your savory bowl.
- Prepare the Vegetables:
- Wash and halve the cherry tomatoes, dice the cucumber, pit and dice the avocado, and thinly slice the radishes. Finely chop the red onion and parsley.
- Assemble the Bowls:
- Top each bowl of cottage cheese with a generous mix of the prepared vegetables – cherry tomatoes, cucumber, avocado, radishes, and red onion.
- Add Crunch and Flavor:
- Sprinkle sunflower seeds over the top of each bowl to add a lovely crunch. Drizzle olive oil over the vegetables, and season each bowl with salt and pepper to taste.
- Finish with Freshness:
- Squeeze fresh lemon juice over each bowl to add a bright, invigorating note. Garnish with chopped parsley for color and an additional burst of flavor.
Extra Tips:
For added flavor, you can incorporate a variety of fresh herbs such as dill or basil, or add ingredients like olives or capers for a Mediterranean twist.
If you prefer a little heat, consider adding a sprinkle of red pepper flakes. To save time in the morning, you can prepare the vegetables the night before and store them in airtight containers in the refrigerator.
This way, you’ll only need to assemble the bowls in the morning. Remember, the beauty of the Savory Cottage Cheese Bowl lies in its adaptability, so feel free to experiment with your favorite ingredients!
Microwave Mug Pancake

Microwave Mug Pancakes are a delightful and swift solution for anyone looking to enjoy a comforting breakfast in just a few minutes. Perfect for mornings when time is short, this recipe allows you to whip up individual servings of fluffy pancakes using your microwave and a few simple ingredients.
These pancakes aren’t only quick to make but also customizable with your favorite toppings like fresh fruits, nuts, or a drizzle of syrup, making them a versatile breakfast choice.
Whether you’re feeding a family or just yourself, you can easily adjust the quantities to suit your needs. The following recipe serves 4-6 people, guaranteeing everyone can enjoy a warm, homemade breakfast without the hassle of a griddle. This is a perfect go-to recipe for a busy morning or for when you want to indulge in a cozy breakfast treat without the fuss of traditional pancake making.
Ingredients for 4-6 Servings:
- 2 cups all-purpose flour
- 2 teaspoons baking powder
- 1/4 teaspoon salt
- 3 tablespoons granulated sugar
- 2 large eggs
- 1 1/2 cups milk
- 4 tablespoons melted butter
- 1 teaspoon vanilla extract
Cooking Instructions:
- Prepare the Dry Ingredients: In a large mixing bowl, whisk together the flour, baking powder, salt, and sugar until well combined. This guarantees that the dry ingredients are evenly distributed, which will help in creating a uniform batter.
- Mix the Wet Ingredients: In a separate bowl, beat the eggs and then mix in the milk, melted butter, and vanilla extract. Make sure the melted butter is cooled slightly to avoid cooking the eggs.
- Combine Wet and Dry Ingredients: Gradually pour the wet ingredients into the dry ingredients, stirring gently with a whisk or spatula until a smooth batter forms. Be careful not to overmix, as this can make the pancakes tough.
- Prepare the Mugs: Lightly grease 4-6 microwave-safe mugs or cups with a bit of butter or non-stick spray to prevent the pancakes from sticking.
- Fill the Mugs: Divide the batter evenly among the mugs, filling each about halfway to allow room for the pancake to rise during cooking.
- Microwave the Pancakes: Place one mug in the microwave and cook on high for 1 to 1.5 minutes. The exact time will depend on your microwave’s power, so start with 1 minute and then check for doneness. The pancake should be firm and spring back when touched.
- Repeat for Remaining Mugs: Continue microwaving the pancakes one at a time or in pairs, depending on your microwave’s capacity.
- Serve and Enjoy: Once cooked, carefully remove the mugs (they can be hot) and let them cool slightly. Top with your favorite pancake toppings such as maple syrup, fresh fruit, or a sprinkle of powdered sugar.
Extra Tips:
For the fluffiest Microwave Mug Pancakes, make sure not to overfill the mugs as the batter needs space to rise.
You can also experiment with add-ins like chocolate chips or blueberries directly in the batter before microwaving for a fun twist.
If you’re making these for kids, consider letting them choose their own toppings to add a fun, personalized touch to their breakfast.
Finally, always adjust the microwaving time if you notice the pancakes are undercooked or too firm, as microwaves can vary in power.
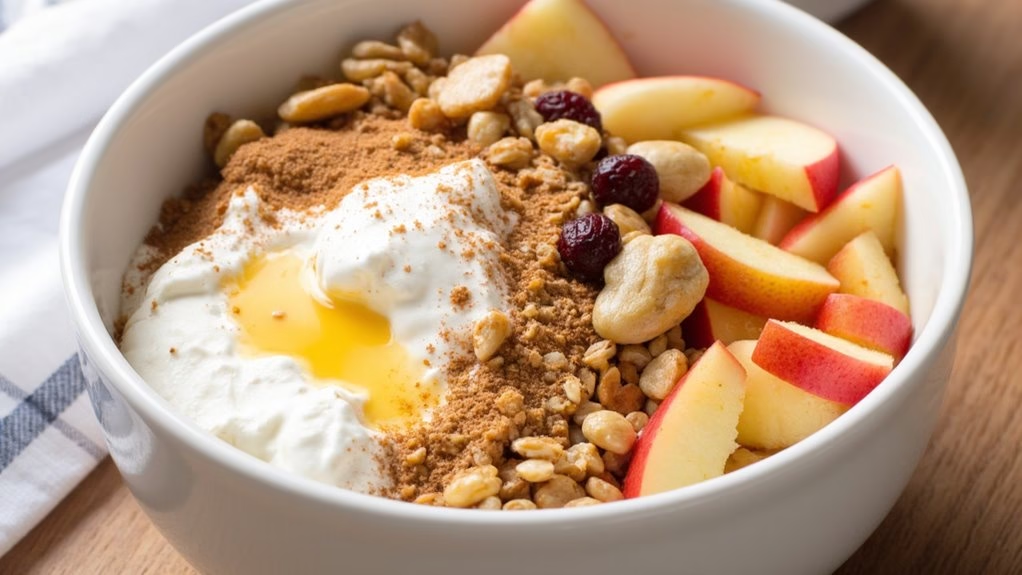
Apple and Cinnamon Yogurt Bowl
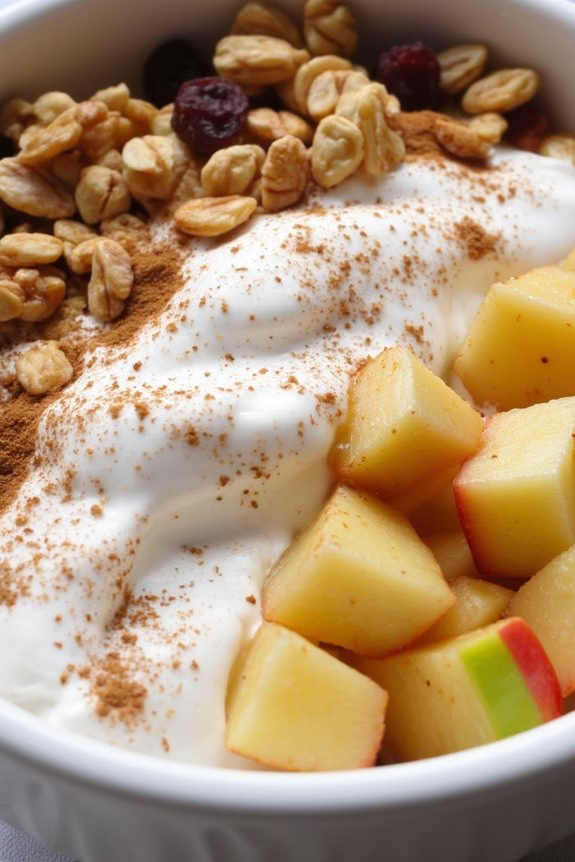
Apple and Cinnamon Yogurt Bowl is a nutritious and delicious breakfast option that combines the creamy texture of yogurt with the sweet and spicy flavors of apples and cinnamon. This dish isn’t only easy to prepare but also packed with vitamins and minerals, making it an excellent choice for a quick morning meal.
The combination of fresh apples, warm spices, and protein-rich yogurt will keep you satisfied and energized until lunchtime. Perfect for serving a group of 4-6 people, this recipe can be made in just a few minutes and requires minimal ingredients that you likely already have in your pantry.
The natural sweetness of the apples, coupled with the aromatic cinnamon and the crunch of nuts or granola, creates a delightful mix of flavors and textures. Whether you’re preparing breakfast for your family or hosting a brunch, the Apple and Cinnamon Yogurt Bowl is sure to be a hit.
Ingredients (Serves 4-6)
- 4 cups plain Greek yogurt
- 3 medium apples, cored and diced
- 3 tablespoons honey
- 2 teaspoons ground cinnamon
- 1 teaspoon vanilla extract
- ½ cup granola
- ¼ cup chopped walnuts or almonds
- A pinch of salt
- Optional: additional toppings such as chia seeds, dried cranberries, or raisins
Cooking Instructions
- Prepare the Apples: Begin by washing, coring, and dicing the apples into small pieces. This guarantees they blend well with the yogurt and are easy to eat.
- Mix the Yogurt Base: In a medium-sized mixing bowl, combine the Greek yogurt, honey, ground cinnamon, vanilla extract, and a pinch of salt. Stir well until all the ingredients are thoroughly mixed and the yogurt is smooth and creamy.
- Combine Apples and Yogurt: Add the diced apples to the yogurt mixture. Stir gently to confirm that the apples are evenly distributed throughout the yogurt.
- Assemble the Bowls: Divide the yogurt and apple mixture into individual serving bowls. Sprinkle each bowl with granola and chopped nuts for added crunch and flavor.
- Optional Toppings: If desired, garnish each bowl with additional toppings such as chia seeds, dried cranberries, or raisins for extra texture and flavor.
- Serve Immediately: The Apple and Cinnamon Yogurt Bowl is best enjoyed fresh. Serve immediately to retain the crunchiness of the granola and nuts.
Extra Tips
For a creamier texture, consider using full-fat Greek yogurt. If you prefer a sweeter dish, adjust the amount of honey to taste.
For a more robust apple flavor, try using a mix of apple varieties, such as Granny Smith and Honeycrisp. To save time in the morning, prepare the yogurt mixture and dice the apples the night before, storing them separately in the refrigerator.
This way, you can quickly assemble the bowls in the morning. Remember, the toppings can be easily customized based on personal preferences or dietary restrictions.