

When the holiday rush is in full swing and you’re scrambling for that perfect potluck dish, don’t worry—I’ve got you covered. These 12 last-minute Christmas potluck recipes will make you the star of the gathering. From cranberry brie bites to garlic parmesan knots, each dish looks effortlessly impressive. They’re quick to prepare and bursting with festive flavors. Curious about the no-bake chocolate peanut butter bars or honey garlic shrimp? Your potluck success is just a recipe away!
Festive Cranberry Brie Bites

The holiday season is a time for gathering with loved ones, and what better way to celebrate than with a delectable appetizer that embodies the festive spirit? Festive Cranberry Brie Bites are the perfect addition to your Christmas potluck, combining the tangy sweetness of cranberries with the creamy richness of Brie cheese.
These bite-sized treats aren’t only visually appealing but also a burst of flavor in every mouthful, making them a crowd-pleaser at any holiday gathering. These delightful bites are easy to prepare and require minimal ingredients, making them an ideal choice for busy hosts looking to impress their guests.
Whether you’re hosting a small family dinner or a larger holiday party, these cranberry Brie bites are versatile enough to suit any occasion. With a flaky pastry base and a topping of luscious cranberry and Brie, they’re sure to be a hit with both adults and children alike.
Ingredients (serves 4-6 people):
- 1 sheet of puff pastry, thawed
- 8 ounces of Brie cheese, cut into small cubes
- 1/2 cup of cranberry sauce (homemade or store-bought)
- 1/4 cup of chopped pecans (optional)
- 1 tablespoon of fresh rosemary, finely chopped
- 1 egg, beaten
Cooking Instructions:
- Preheat and Prepare: Preheat your oven to 375°F (190°C). Line a baking sheet with parchment paper to prevent sticking and guarantee even baking.
- Cut the Pastry: Roll out the thawed puff pastry sheet on a lightly floured surface. Using a sharp knife or a pizza cutter, cut the pastry into approximately 2×2 inch squares. This should yield about 20-24 squares depending on the size of your sheet.
- Assemble the Bites: Place a cube of Brie in the center of each pastry square. Add a teaspoon of cranberry sauce on top of the Brie, followed by a sprinkle of chopped pecans and a pinch of rosemary if desired.
- Form the Bites: Gently lift each corner of the pastry square and pinch them together above the filling to form a small pouch or bundle. Confirm the edges are sealed to prevent the cheese from leaking out during baking.
- Egg Wash: Brush the tops of the pastry bundles with the beaten egg to give them a golden, glossy finish once baked.
- Bake: Place the assembled bites on the prepared baking sheet, leaving some space between each one. Bake in the preheated oven for 15-20 minutes, or until the pastry is puffed and golden brown.
- Cool and Serve: Allow the bites to cool slightly on the baking sheet for a few minutes before transferring them to a serving platter. These are best served warm.
Extra Tips: For added flavor, consider experimenting with different herbs like thyme or sage, which also complement the cranberry and Brie beautifully.
If you prefer a sweeter bite, you can drizzle a little honey over the top before serving. Additionally, if you’re making these ahead of time, you can prepare the bites up to the baking step and store them in the refrigerator for a few hours, then bake them just before serving to guarantee they’re fresh and warm for your guests.
Quick Caprese Skewers
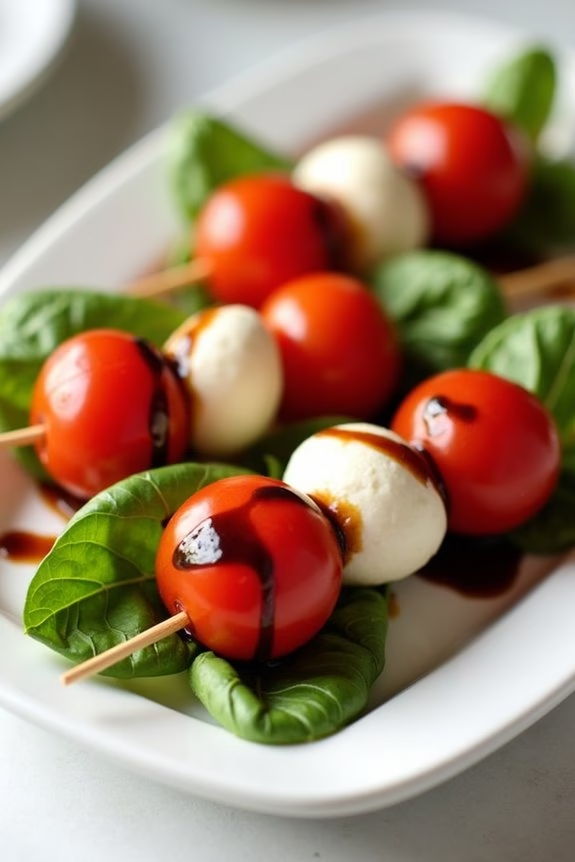
Caprese skewers are a delightful and visually appealing appetizer that’s perfect for any Christmas potluck. This dish combines the classic flavors of a traditional Caprese salad—tomatoes, mozzarella, and basil—into a convenient, handheld form.
These skewers aren’t only quick to assemble but also burst with freshness and flavor, making them a crowd-pleaser at any festive gathering. The vibrant red, white, and green colors of the ingredients also reflect the holiday spirit, adding to the festive ambiance.
This recipe for Quick Caprese Skewers serves 4-6 people, making it ideal for a small gathering or as part of a larger spread. The simplicity of the ingredients allows the natural flavors to shine, while the balsamic glaze adds a touch of sweetness and acidity that perfectly complements the creamy mozzarella and juicy tomatoes.
These skewers require minimal preparation and can be made ahead of time, giving you more time to enjoy the festivities with your guests.
Ingredients:
- 24 cherry tomatoes
- 24 small mozzarella balls (bocconcini)
- 24 fresh basil leaves
- 2 tablespoons extra virgin olive oil
- Salt and pepper to taste
- Balsamic glaze for drizzling
- 24 wooden skewers or toothpicks
Cooking Instructions:
- Prepare the Ingredients: Wash the cherry tomatoes and basil leaves thoroughly. Pat them dry with a paper towel to remove any excess moisture. Drain the mozzarella balls from their brine and pat dry.
- Assemble the Skewers: Begin by threading a cherry tomato onto the skewer, followed by a basil leaf, and then a mozzarella ball. Repeat this pattern until all the skewers are assembled, making sure that each skewer has an even distribution of ingredients.
- Season the Skewers: Arrange the skewers on a serving platter. Drizzle them with extra virgin olive oil, and sprinkle with salt and pepper to taste. Confirm that the seasoning is evenly distributed across all the skewers.
- Add the Finishing Touch: Just before serving, drizzle a small amount of balsamic glaze over each skewer. This will add a sweet and tangy flavor that complements the fresh ingredients beautifully.
Extra Tips:
For a more intense flavor, consider marinating the mozzarella balls in olive oil, garlic, or herbs for an hour before assembling the skewers.
If you prefer a balsamic reduction to a store-bought glaze, you can easily make it by simmering balsamic vinegar until it thickens slightly.
Additionally, if wooden skewers are too long for your serving style, they can be trimmed to size with kitchen scissors.
Make sure to prepare these skewers as close to serving time as possible to maintain their freshness, but they can be assembled a few hours in advance and kept in the refrigerator, covered, until ready to serve.
Easy Garlic Parmesan Knots
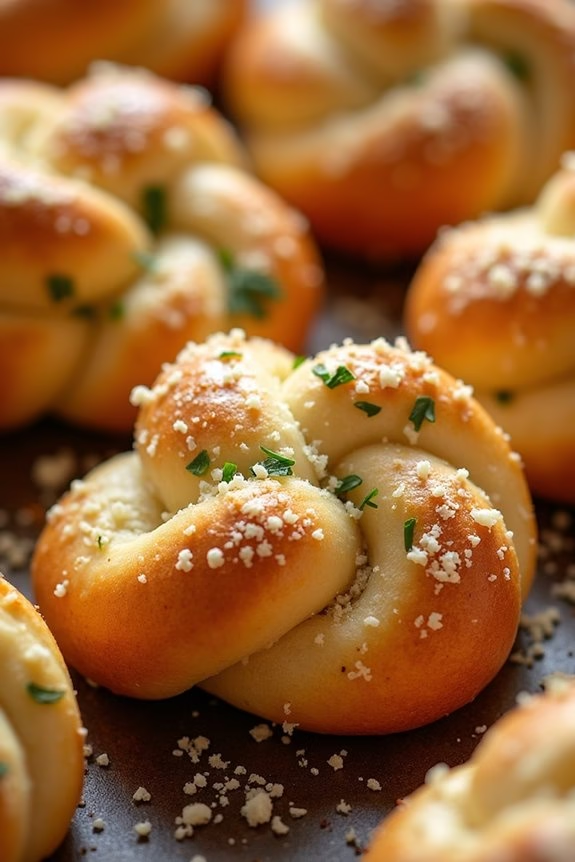
Easy Garlic Parmesan Knots are a delightful addition to any Christmas potluck, offering a savory complement to the array of festive treats.
These knots aren’t only easy to make but also bring a comforting aroma of garlic and cheese to the table, making them a real crowd-pleaser. Perfectly golden brown with a soft interior, these knots are brushed with a mouthwatering mixture of butter, garlic, and Parmesan cheese, guaranteeing every bite is as delicious as the previous.
Ideal for serving 4-6 people, this recipe is a great option for those looking to impress guests with minimal effort. The ingredients are simple and likely to be found in most kitchens, making these knots an accessible treat.
Prepare these ahead of time and pop them in the oven just before guests arrive to fill your home with an inviting, irresistible scent.
Ingredients (serving size: 4-6 people):
- 1 can of refrigerated biscuit dough (16.3 oz)
- 1/4 cup unsalted butter, melted
- 3 cloves garlic, minced
- 1/4 cup grated Parmesan cheese
- 1 tablespoon chopped fresh parsley
- 1/2 teaspoon salt
- 1/4 teaspoon black pepper
- Cooking spray
Cooking Instructions:
- Preheat the oven: Set your oven to 375°F (190°C) and line a baking sheet with parchment paper or lightly spray it with cooking spray to prevent the knots from sticking.
- Prepare the biscuit dough: Open the can of refrigerated biscuit dough and separate the biscuits. Cut each biscuit into halves, then roll each half into a rope about 6 inches long. Tie each rope into a knot and place them on the prepared baking sheet.
- Make the garlic butter: In a small bowl, combine the melted butter, minced garlic, salt, and black pepper. Mix well to guarantee the garlic is evenly distributed throughout the butter.
- Brush the knots: Using a pastry brush, generously coat each knot with the garlic butter mixture. Save a bit of the mixture for later use.
- Bake the knots: Place the baking sheet in the preheated oven and bake for 12-15 minutes, or until the knots are golden brown and cooked through.
- Add the finishing touches: Once baked, remove the knots from the oven and immediately brush them with the remaining garlic butter. Sprinkle grated Parmesan cheese and chopped parsley over the top while they’re still warm for added flavor and presentation.
- Serve: Transfer the garlic Parmesan knots to a serving platter and serve warm for the best taste and texture.
Extra Tips: For an extra kick, consider adding a pinch of red pepper flakes to the garlic butter for a spicy twist.
These knots can be made with homemade dough if you prefer, just adjust the baking time accordingly. If you want to prepare them ahead of time, you can shape the knots and refrigerate them until you’re ready to bake. Just bring them back to room temperature before popping them in the oven.
Finally, feel free to experiment with different herbs like rosemary or thyme for a unique flavor profile.
No-Bake Chocolate Peanut Butter Bars
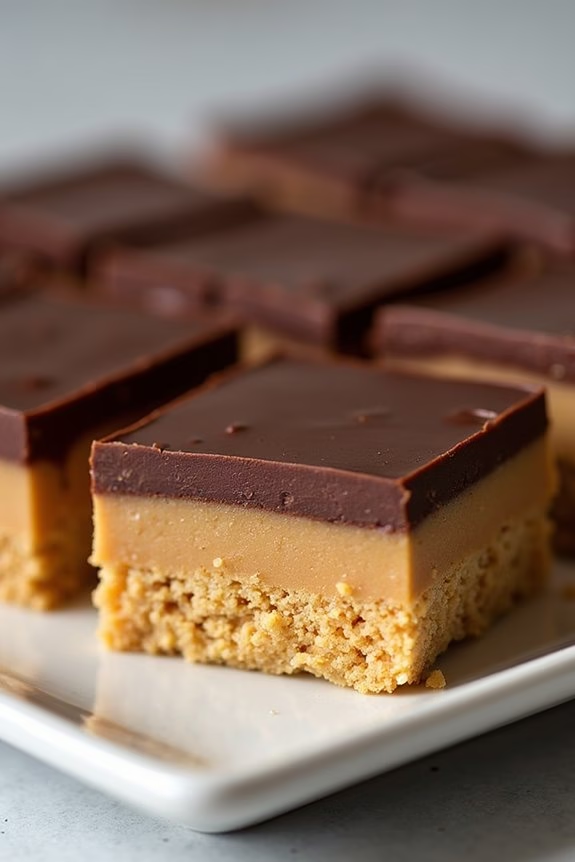
No-Bake Chocolate Peanut Butter Bars are a delicious and easy-to-make dessert that’s perfect for a Christmas potluck. These bars combine the classic flavors of chocolate and peanut butter in a rich and creamy treat that requires no baking, making it a convenient option for busy holiday schedules.
The smooth peanut butter layer is topped with a luscious chocolate ganache, creating a decadent dessert that will surely be a hit with family and friends. Ideal for a serving size of 4-6 people, this recipe allows you to prepare a dessert that isn’t only tasty but also visually appealing.
The bars can be prepared ahead of time, allowing you to focus on other holiday preparations. With a few simple ingredients and easy-to-follow instructions, you can create these mouthwatering bars that will leave your guests craving more.
Ingredients:
- 1 cup unsalted butter
- 2 cups graham cracker crumbs
- 2 cups powdered sugar
- 1 cup creamy peanut butter
- 1 1/2 cups semisweet chocolate chips
- 1/4 cup creamy peanut butter (for topping)
Instructions:
- Prepare the Base: In a medium saucepan, melt the unsalted butter over low heat, stirring occasionally. Once melted, remove from heat and add the graham cracker crumbs, powdered sugar, and 1 cup of creamy peanut butter. Stir until the mixture is well combined and smooth.
- Form the Base Layer: Press the graham cracker mixture evenly into the bottom of a 9×13 inch baking dish. Use the back of a spoon or a spatula to spread it out evenly, making sure the layer is compact and level.
- Create the Chocolate Layer: In a microwave-safe bowl, combine the semisweet chocolate chips and the remaining 1/4 cup of peanut butter. Microwave in 30-second intervals, stirring after each, until the chocolate is fully melted and the mixture is smooth.
- Top the Bars: Pour the melted chocolate and peanut butter mixture over the peanut butter base layer in the baking dish. Use a spatula to spread the chocolate layer evenly across the top.
- Set the Bars: Refrigerate the bars for at least 2 hours, or until the chocolate is firm and the bars have set completely. For best results, leave them in the refrigerator overnight.
- Serve: Once set, remove the bars from the refrigerator and cut them into squares. Serve chilled for the best texture and flavor.
Extra Tips:
When making No-Bake Chocolate Peanut Butter Bars, make sure that the peanut butter you use is creamy for a smoother texture in both layers.
If you prefer your chocolate layer to have a glossy finish, you can add a teaspoon of coconut oil to the chocolate and peanut butter mixture before melting. For easy removal from the pan, line the baking dish with parchment paper, leaving an overhang on the sides to lift the bars out once set.
Enjoy these bars as a delightful treat at your next holiday gathering!
Instant Pot Spinach Artichoke Dip
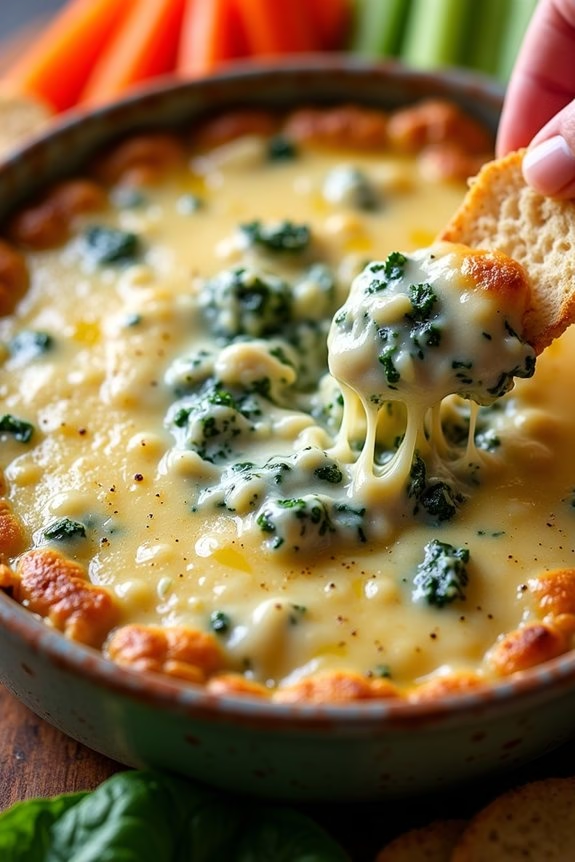
The Instant Pot Spinach Artichoke Dip is a delicious and creamy appetizer that’s perfect for your Christmas potluck. This warm, cheesy dip combines fresh spinach and tender artichokes with a blend of cheeses, creating a savory delight that’s bound to please any crowd.
Using an Instant Pot makes this recipe incredibly easy and quick to prepare, allowing you to focus on other aspects of your holiday gathering while still delivering a homemade dish that feels gourmet.
This dip isn’t only a crowd-pleaser but also a versatile addition to your potluck spread. It pairs perfectly with a variety of dippers such as crusty bread, tortilla chips, or fresh vegetable sticks. The creamy texture, enhanced by the tangy artichokes and the slight bitterness of the spinach, guarantees that this dish will become a staple at your holiday gatherings for years to come.
Ingredients (Serves 4-6):
- 1 tablespoon olive oil
- 1 small onion, finely chopped
- 3 cloves garlic, minced
- 1 (14-ounce) can artichoke hearts, drained and chopped
- 8 ounces fresh spinach, roughly chopped
- 8 ounces cream cheese, softened
- 1/2 cup sour cream
- 1/4 cup mayonnaise
- 1 cup shredded mozzarella cheese
- 1/2 cup grated Parmesan cheese
- 1/4 teaspoon salt
- 1/4 teaspoon black pepper
Cooking Instructions:
- Prepare the Instant Pot: Set your Instant Pot to the sauté function and add the olive oil. Once the oil is hot, add the chopped onion and sauté until it becomes translucent, about 3-4 minutes. Stir in the minced garlic and cook for another minute until fragrant.
- Add Artichokes and Spinach: Add the chopped artichoke hearts and spinach to the pot. Stir well and cook until the spinach is wilted, about 2-3 minutes.
- Mix in the Cheeses: Turn off the sauté function and add the cream cheese, sour cream, mayonnaise, mozzarella cheese, Parmesan cheese, salt, and black pepper. Stir continuously until the cheeses are fully melted and the mixture is smooth and creamy.
- Pressure Cook: Secure the lid on the Instant Pot and set it to the Manual/Pressure Cook setting on high pressure for 5 minutes. Once the cooking time is complete, perform a quick release of the pressure by carefully turning the valve to the venting position.
- Stir and Serve: Open the lid and give the dip a good stir to confirm all ingredients are well combined. Transfer the dip to a serving dish and serve warm with your choice of dippers.
Extra Tips:
For an extra kick, consider adding a pinch of red pepper flakes or a dash of hot sauce to the mix before pressure cooking. If you find the dip too thick, you can adjust the consistency by stirring in a little milk or cream after cooking.
For a bit more texture, try topping the dip with a sprinkle of extra Parmesan cheese and broiling it in the oven for a few minutes until golden and bubbly. This dip is also easily adaptable; feel free to experiment by adding other cheeses, such as cheddar or Gruyere, for a unique flavor twist.
Holiday Sausage and Cheese Platter
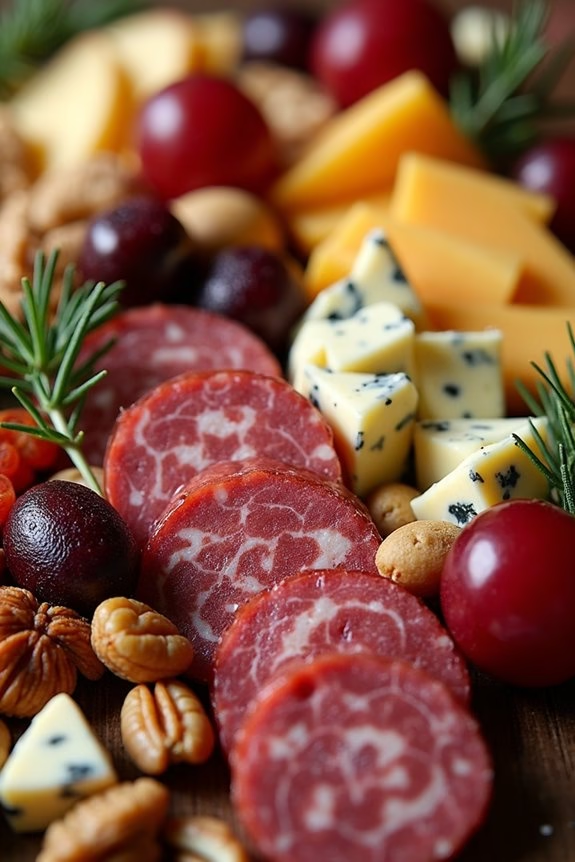
A Holiday Sausage and Cheese Platter is an elegant and delectable addition to any Christmas potluck. This platter brings together a harmonious blend of savory sausages and a variety of cheeses, creating a festive centerpiece that’s both visually appealing and delightfully flavorful. It’s perfect for entertaining a small group of 4-6 people, providing them with a selection of textures and tastes that complement each other beautifully.
A well-curated platter not only satisfies appetites but also serves as a conversation starter, inviting guests to explore different flavor pairings. This dish requires minimal cooking, focusing instead on the quality and presentation of ingredients. An array of cured meats and cheeses, garnished with seasonal fruits and nuts, can elevate this platter to new heights.
The key to a successful platter lies in balancing flavors and making sure the ingredients are fresh and varied. With the right combination of sweet, spicy, and tangy elements, this dish will be a surefire hit at your holiday gathering.
Ingredients for 4-6 people:
- 8 ounces of assorted cured sausages (such as salami, chorizo, or summer sausage)
- 8 ounces of assorted cheeses (such as cheddar, brie, gouda, or blue cheese)
- 1 cup of mixed nuts (such as almonds, walnuts, or pecans)
- 1 cup of assorted seasonal fruits (such as grapes, apple slices, or figs)
- 1/2 cup of olives (green or black, pitted)
- 1/4 cup of dried fruits (such as apricots or cranberries)
- Crackers or sliced baguette for serving
Cooking Instructions:
- Prepare the Sausages: Begin by slicing the cured sausages into thin, bite-sized pieces. Arrange them in one section of your platter, making sure they’re easy for guests to pick up.
- Slice the Cheeses: Depending on the type of cheese, slice or crumble them into manageable pieces. For soft cheeses like brie, consider leaving them in small wedges. Place the cheeses on the platter, spacing them out among the sausages.
- Add the Nuts and Fruits: Scatter the mixed nuts and dried fruits around the cheeses and sausages. If using fresh fruits, like grapes or apple slices, arrange them in small clusters for a pop of color and freshness.
- Incorporate the Olives: Add the olives to a small bowl or directly onto the platter, near the cheeses. This will add a briny flavor that pairs well with the other components.
- Include Crackers or Bread: Place a selection of crackers or slices of baguette on the side of the platter or in a separate basket. Make sure they’re easily accessible for guests to grab.
- Final Touches: Garnish the platter with sprigs of rosemary or thyme for a festive touch. Make sure that each element is easily reachable, encouraging guests to mix and match flavors.
Extra Tips:
When crafting your Holiday Sausage and Cheese Platter, consider the importance of variety and balance. Include a mix of textures and flavors, such as tangy blue cheese with sweet figs or spicy chorizo with creamy brie.
Always make sure the cheeses and meats are at room temperature for best flavor. You can prepare the platter a few hours in advance and wrap it tightly with plastic wrap to keep it fresh until serving time. Remember, presentation is key, so don’t hesitate to get creative with your arrangement!
Speedy Pesto Pasta Salad
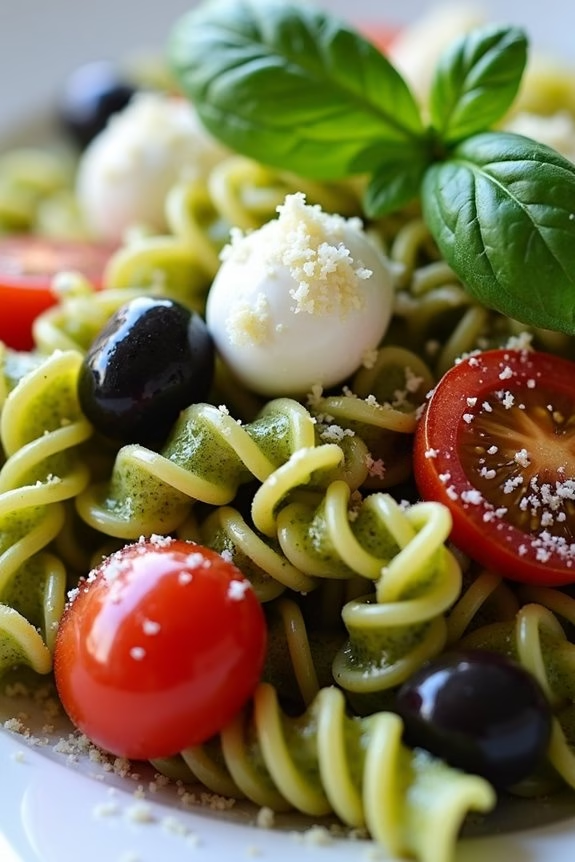
Need a quick yet delicious dish for your Christmas potluck gathering? This Speedy Pesto Pasta Salad is the perfect solution. Combining vibrant flavors and a fresh, zesty taste, this dish is sure to be a hit at any festive event.
This recipe isn’t only quick to make but also versatile, allowing you to easily adapt it to suit your guests’ preferences. Whether you’re catering to vegetarians or just looking for a side dish that complements the main course, this pasta salad will deliver.
The secret to this dish lies in its simplicity and the rich, aromatic taste of fresh pesto. The pasta serves as a canvas, soaking up the flavorful pesto while being complemented by fresh vegetables and cheese. This recipe serves 4-6 people, making it ideal for a small gathering or as part of a larger potluck spread.
With just a few ingredients and minimal preparation, you can whip up this crowd-pleaser in no time, leaving you free to enjoy the festivities.
Ingredients:
- 12 ounces of pasta (fusilli or penne)
- 1 cup of fresh basil pesto
- 1 cup of cherry tomatoes, halved
- 1 cup of mozzarella balls, halved
- 1/2 cup of black olives, sliced
- 1/4 cup of grated Parmesan cheese
- Salt and pepper to taste
- Fresh basil leaves for garnish
Cooking Instructions:
- Cook the Pasta: Begin by boiling a large pot of salted water. Add the pasta and cook according to the package instructions until al dente. Once cooked, drain the pasta and rinse it under cold water to stop the cooking process and cool it down.
- Prepare the Ingredients: While the pasta is cooking, halve the cherry tomatoes, mozzarella balls, and slice the black olives. Having these ingredients ready will make assembling the salad quick and easy.
- Mix the Salad: In a large bowl, combine the cooked pasta, cherry tomatoes, mozzarella balls, and black olives. Add the fresh basil pesto and gently toss until all the ingredients are well coated with the pesto.
- Season and Serve: Taste the pasta salad and season with salt and pepper as needed. Sprinkle grated Parmesan cheese over the top and gently mix it into the salad. Transfer the salad to a serving platter or bowl.
- Garnish and Enjoy: Just before serving, garnish the salad with fresh basil leaves for added flavor and a pop of color. Serve chilled or at room temperature.
Extra Tips:
For the best results, use fresh, high-quality pesto for a vibrant and authentic flavor. If you’re making this dish ahead of time, keep the pasta and pesto separate until just before serving to prevent the pasta from absorbing too much of the sauce.
Feel free to customize the salad by adding other ingredients such as grilled chicken for extra protein, or roasted vegetables for additional depth of flavor. To add a little zing, consider a splash of lemon juice or balsamic glaze just before serving.
Simple Deviled Eggs With a Twist
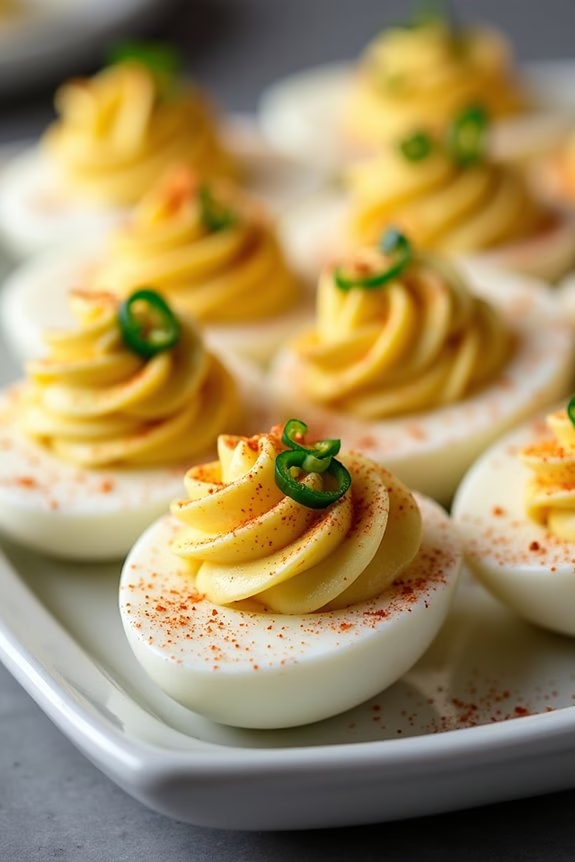
Deviled eggs are a classic dish that never fails to impress at any holiday gathering, and adding a unique twist can elevate their flavor and presentation. This version incorporates a hint of smoked paprika and a touch of spicy jalapeño to give these deviled eggs a delightful, unexpected kick. Perfect for a Christmas potluck, these deviled eggs aren’t only easy to prepare but also make for a visually appealing appetizer that can be made ahead of time.
The creamy yolk mixture is enriched with tangy mustard, smooth mayonnaise, and mellowed by the addition of diced pickles. Topped with a sprinkle of fresh chives for a burst of color and freshness, these deviled eggs are sure to be a hit. Whether you’re hosting or attending a festive gathering, these Simple Deviled Eggs With a Twist will surely become a favorite among your friends and family.
Ingredients (Serves 4-6):
- 6 large eggs
- 3 tablespoons mayonnaise
- 1 teaspoon Dijon mustard
- 1 tablespoon finely chopped pickles
- 1 teaspoon smoked paprika
- 1 small jalapeño, finely diced
- Salt and pepper to taste
- Fresh chives, chopped, for garnish
Cooking Instructions:
- Boil the Eggs: Place the eggs in a single layer in a saucepan and fill with enough water to cover them by about an inch. Bring the water to a rolling boil over medium-high heat, then cover the saucepan and remove it from the heat. Let the eggs sit in the hot water for 10-12 minutes.
- Cool and Peel the Eggs: After the eggs have cooked, transfer them to a bowl of ice water to cool for about 5 minutes. Once cooled, gently tap each egg on the counter to crack the shell, then peel and discard the shells.
- Prepare the Egg Halves: Slice each egg in half lengthwise and carefully remove the yolks, placing them into a medium-sized bowl. Arrange the egg whites on a serving platter.
- Make the Filling: Mash the yolks with a fork until smooth. Add mayonnaise, Dijon mustard, chopped pickles, smoked paprika, diced jalapeño, salt, and pepper. Mix until the filling is creamy and well-combined.
- Fill the Egg Whites: Spoon or pipe the yolk mixture back into the egg white halves, guaranteeing each half is generously filled.
- Garnish and Serve: Sprinkle the filled eggs with chopped chives for a fresh touch. Serve immediately or cover and refrigerate until ready to serve.
Extra Tips:
When boiling eggs, adding a teaspoon of vinegar to the water can help prevent the whites from leaking out if an egg happens to crack during cooking.
For a smooth filling, ensure the yolk mixture is mashed thoroughly, and consider using a piping bag or a plastic bag with a snipped corner for neat filling.
If you prefer a milder dish, adjust the amount of jalapeño to suit your taste. These deviled eggs can be made a day in advance and stored in the refrigerator, making them a convenient option for busy holiday schedules.
One-Pan Honey Garlic Shrimp
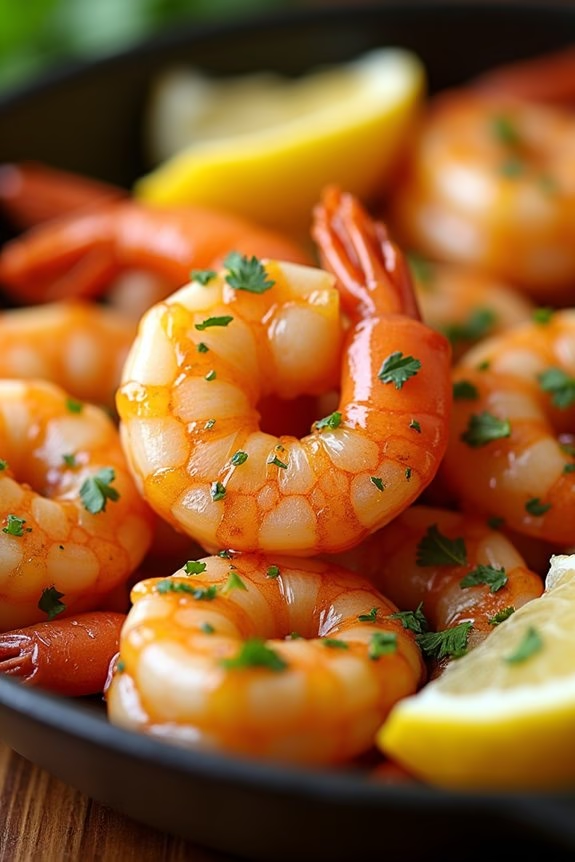
One-Pan Honey Garlic Shrimp is a delightful and flavorful dish perfect for Christmas potlucks. This recipe isn’t only quick and easy to prepare but also allows you to serve a mouthwatering seafood dish that will impress your guests. The combination of sweet honey, savory garlic, and tender shrimp creates a harmonious blend of flavors that’s bound to be a hit at any gathering.
Plus, the one-pan preparation makes for easy cleanup, so you can spend more time enjoying the festivities. The beauty of this dish lies in its simplicity and the way it highlights the natural sweetness of shrimp with the rich, caramelized flavors of honey and garlic.
It’s a perfect dish for those who love seafood and appreciate the balance of sweet and savory tastes. This recipe serves 4-6 people, making it an ideal choice for small to medium-sized gatherings. Whether you’re hosting a Christmas potluck or simply want to add a new dish to your holiday repertoire, One-Pan Honey Garlic Shrimp is bound to be a crowd-pleaser.
Ingredients (for 4-6 servings):
- 1 ½ pounds large shrimp, peeled and deveined
- ½ cup honey
- ¼ cup soy sauce
- 1 tablespoon minced garlic
- 1 tablespoon olive oil
- 1 tablespoon butter
- 1 teaspoon fresh ginger, grated
- ¼ teaspoon red pepper flakes (optional)
- 2 tablespoons chopped fresh parsley
- Salt and pepper to taste
- Lemon wedges, for serving
Cooking Instructions:
- Prepare the Marinade: In a medium bowl, whisk together honey, soy sauce, minced garlic, grated ginger, and red pepper flakes (if using). This mixture will serve as both the marinade and the sauce for the shrimp.
- Marinate the Shrimp: Place the shrimp in a large resealable plastic bag or a shallow dish. Pour half of the honey garlic marinade over the shrimp, reserving the other half for later. Seal the bag or cover the dish, and let the shrimp marinate in the refrigerator for at least 15-30 minutes. This will allow the flavors to infuse into the shrimp.
- Heat the Pan: In a large skillet or frying pan, heat the olive oil and butter over medium-high heat. Once the butter has melted and the oil is hot, add the shrimp to the pan in a single layer. Be sure to discard the used marinade.
- Cook the Shrimp: Cook the shrimp for about 2-3 minutes on one side, then flip them over. Pour the reserved marinade over the shrimp and continue to cook for another 2-3 minutes, or until the shrimp are pink and opaque throughout. The sauce should have thickened slightly and coated the shrimp.
- Garnish and Serve: Remove the pan from heat and sprinkle the shrimp with chopped fresh parsley. Season with salt and pepper to taste. Serve the shrimp hot with lemon wedges on the side for an extra burst of flavor.
Extra Tips:
To guarantee the shrimp cook evenly, make sure they’re all similar in size. Larger shrimp take longer to cook, so adjust the cooking time accordingly if you’re using smaller or larger shrimp.
Also, be mindful not to overcrowd the pan as this can cause the shrimp to steam rather than sear, which can affect the texture. If necessary, cook the shrimp in batches. This dish pairs well with steamed rice or a fresh salad, providing a delightful contrast to the rich flavors of the honey garlic sauce.
Enjoy your One-Pan Honey Garlic Shrimp as a delicious addition to your Christmas potluck!
5-Minute Eggnog Trifle
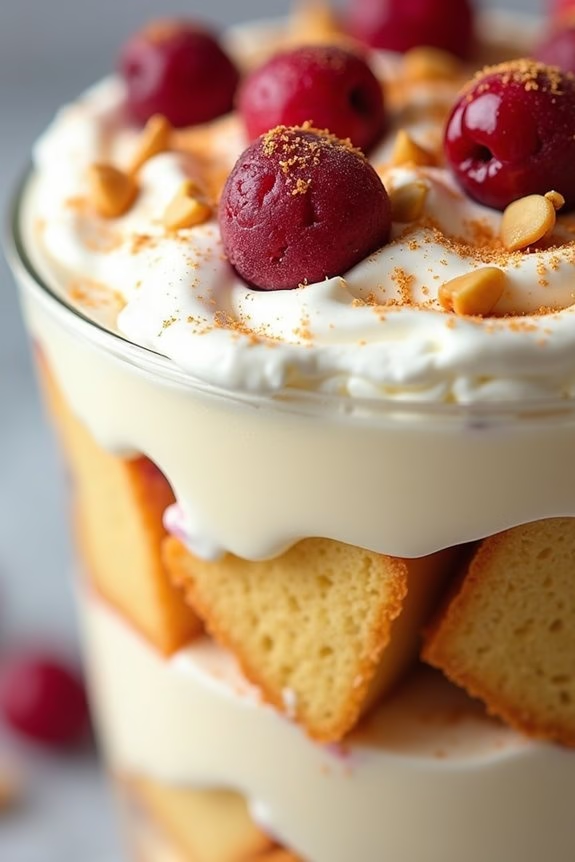
The Minute Eggnog Trifle is a delightful dessert that combines the rich, creamy flavors of eggnog with the classic layered presentation of a traditional trifle. Perfect for a Christmas potluck, this dessert not only stands out for its festive flair but also for its simplicity and speed of preparation.
With layers of spongy cake, luscious eggnog custard, whipped cream, and a sprinkle of nutmeg, this trifle brings together comforting seasonal flavors in a way that’s sure to be a hit among family and friends.
Designed for a serving size of 4-6 people, the Minute Eggnog Trifle is an ideal dish to prepare when you’re short on time but still want to impress your guests with a homemade treat. The combination of ready-made ingredients and quick assembly guarantees that this dessert can be whipped up in no time, allowing you to focus on enjoying the company of loved ones rather than spending hours in the kitchen.
It’s a festive, easy-to-make dessert that encapsulates the essence of holiday cheer.
Ingredients:
- 1 pound cake or sponge cake
- 2 cups eggnog
- 1 cup heavy cream
- 1/4 cup sugar
- 1 teaspoon vanilla extract
- 1/2 teaspoon nutmeg
- 1 cup vanilla pudding (store-bought or homemade)
- 1/4 cup rum or rum extract (optional)
- 1/2 cup chopped nuts (optional, for garnish)
- Fresh berries or cherries (optional, for garnish)
Instructions:
- Prepare the Cake Layer:
- Cut the pound cake or sponge cake into 1-inch cubes. If you prefer, you can lightly toast these cubes in the oven at 350°F (175°C) for about 5 minutes to add a bit of texture to the trifle.
- Make the Whipped Cream:
- In a chilled bowl, whip the heavy cream with the sugar and vanilla extract until soft peaks form. This will serve as one of the main layers in your trifle. Set aside in the refrigerator.
- Mix the Eggnog Custard:
- In a large bowl, combine the eggnog with the vanilla pudding. If using rum or rum extract, stir it into the mixture. This will serve as the custard layer for the trifle.
- Assemble the Trifle:
- In a trifle bowl or individual serving glasses, start by placing a layer of cake cubes at the bottom. Next, add a layer of the eggnog custard, followed by a layer of whipped cream. Continue layering until all ingredients are used, finishing with a layer of whipped cream on top.
- Garnish:
- Sprinkle nutmeg over the top layer for a festive touch. For added texture and flavor, you can also sprinkle chopped nuts or place fresh berries/cherries as a garnish on top.
- Chill and Serve:
- Allow the trifle to chill in the refrigerator for at least 30 minutes before serving. This will help the flavors meld together and the layers set properly.
Extra Tips:
For an even quicker assembly, consider using store-bought pound cake or sponge cake, which can save you additional prep time. If you prefer a non-alcoholic version, simply omit the rum or use a rum extract.
Feel free to experiment with different garnishes such as grated chocolate, caramel drizzle, or even crushed gingerbread cookies for added holiday flair. Finally, confirm the trifle is thoroughly chilled before serving to enhance the flavors and presentation.
Cheesy Pull-Apart Bread
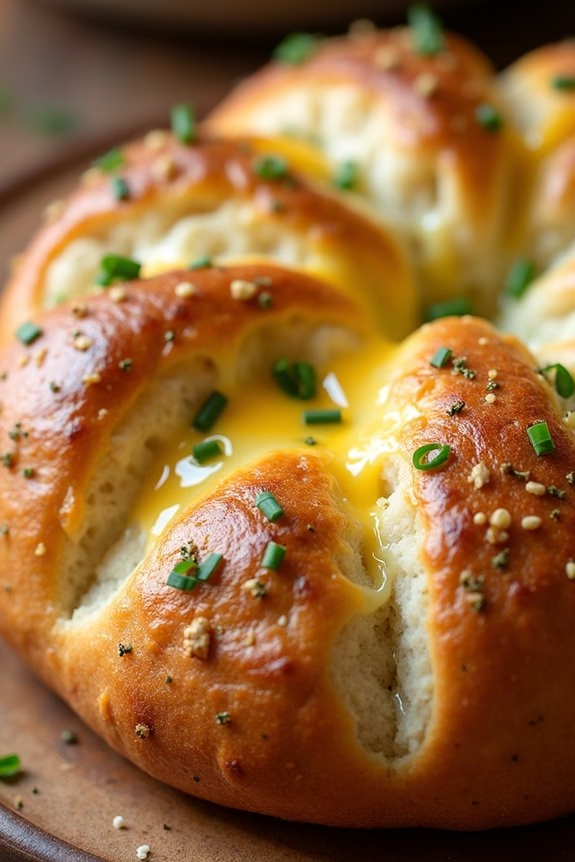
There’s nothing quite like the aroma of freshly baked bread, especially when it’s stuffed with gooey cheese and seasoned to perfection. Cheesy Pull-Apart Bread is a delectable dish that’s perfect for a Christmas potluck, offering both a visual and flavorful treat for your guests.
This dish isn’t only easy to make but also allows for creative customization with your favorite ingredients. Whether you’re serving it as an appetizer or alongside the main course, it’s sure to be a crowd-pleaser.
Imagine a loaf of crusty bread, filled with melted cheese that stretches with every pull. The combination of herbs, butter, and cheese creates a savory masterpiece that’s irresistible. Not only is this dish delicious, but it’s also interactive—guests can enjoy tearing pieces off the loaf, making it a perfect communal dish for any festive gathering.
Let’s explore how you can make this delightful dish for a serving size of 4-6 people.
Ingredients:
- 1 large round loaf of sourdough bread
- 2 cups shredded mozzarella cheese
- 1 cup shredded cheddar cheese
- 1/2 cup unsalted butter, melted
- 2 cloves garlic, minced
- 1 tablespoon fresh parsley, chopped
- 1 tablespoon fresh chives, chopped
- 1 teaspoon dried oregano
- Salt and pepper to taste
Instructions:
- Preheat the Oven: Start by preheating your oven to 350°F (175°C) to make sure it’s ready for baking once your bread is prepped.
- Prepare the Bread: Using a sharp bread knife, make diagonal cuts across the loaf, about 1 inch apart, without slicing all the way through to the bottom. Turn the loaf and make similar cuts in the opposite direction, creating a diamond pattern.
- Mix the Ingredients: In a small bowl, combine the melted butter, minced garlic, chopped parsley, chives, oregano, salt, and pepper. Stir well to guarantee the garlic and herbs are evenly distributed.
- Stuff the Bread: Carefully separate the bread sections and evenly stuff the shredded mozzarella and cheddar cheese into the cracks. Pour the butter mixture over the top, making sure it seeps into the crevices.
- Wrap and Bake: Wrap the loaf tightly in aluminum foil and place it on a baking sheet. Bake in the preheated oven for 15 minutes. Then, unwrap the foil and bake for an additional 10 minutes to allow the cheese to get bubbly and golden brown.
- Serve: Remove the bread from the oven and let it cool slightly before serving. Place it on a decorative platter for a festive touch.
Extra Tips:
For an even richer flavor, consider adding cooked and crumbled bacon or sautéed mushrooms into the cheese mixture before stuffing the bread.
If you prefer a spicier kick, sprinkle in some red pepper flakes. Remember, the key to perfect pull-apart bread isn’t overbaking; you want the cheese to be melted but not burnt.
Finally, using fresh herbs will greatly enhance the flavor, so opt for fresh over dried whenever possible. Enjoy your cheesy creation!
Last-Minute Gingerbread Cookies

Christmas time is often bustling with activities, leaving little room for elaborate preparations. When you’re in need of a quick yet delightful treat to bring to a holiday potluck, these Last-Minute Gingerbread Cookies are your culinary savior. This recipe is perfect for those who want to capture the essence of Christmas with its warm, spiced aroma and classic gingerbread taste, without the requirement for lengthy dough chilling or intricate decoration.
These cookies come together quickly, so you can have them baking in the oven in no time, allowing you more moments to enjoy the festivities. With a serving size that comfortably caters to 4-6 people, this recipe guarantees everyone can enjoy a generous portion. So, gather your ingredients and get ready to whip up a batch of these delicious cookies that are sure to please any crowd.
Ingredients for 4-6 people:
- 2 1/4 cups all-purpose flour
- 1/2 teaspoon baking soda
- 1 tablespoon ground ginger
- 1 teaspoon ground cinnamon
- 1/4 teaspoon ground cloves
- 1/4 teaspoon salt
- 1/2 cup unsalted butter, softened
- 1/2 cup packed brown sugar
- 1 large egg
- 1/3 cup molasses
- 1 teaspoon vanilla extract
Instructions:
- Preheat the Oven: Start by preheating your oven to 350°F (175°C). Line two baking sheets with parchment paper to prevent the cookies from sticking.
- Mix Dry Ingredients: In a medium bowl, whisk together the flour, baking soda, ginger, cinnamon, cloves, and salt. This guarantees the spices are evenly distributed throughout the dough.
- Cream Butter and Sugar: In a large mixing bowl, use an electric mixer to beat the softened butter and brown sugar together until the mixture is light and fluffy. This typically takes about 2-3 minutes.
- Add Wet Ingredients: Beat in the egg, molasses, and vanilla extract to the butter-sugar mixture. Mix until well combined, and the mixture is smooth.
- Combine Dry and Wet Mixtures: Gradually add the dry ingredients to the wet ingredients, mixing on low speed until a dough forms. The dough should be slightly sticky but manageable.
- Shape the Cookies: Using a tablespoon or small cookie scoop, scoop out dough and roll into 1-inch balls. Place them on the prepared baking sheets about 2 inches apart.
- Bake: Bake in the preheated oven for 8-10 minutes, or until the edges are firm and the center is set. The cookies should have a slightly soft center.
- Cool: Remove the cookies from the oven and let them cool on the baking sheet for 5 minutes before transferring them to a wire rack to cool completely.
Extra Tips:
For an added festive touch, consider sprinkling the cookies with a bit of granulated sugar or decorating them with simple icing once cooled. If you prefer a chewier texture, slightly underbake the cookies by a minute or two. Remember, the cookies will continue to firm up as they cool on the baking sheet.
Adjust the spices to your preference; for a bolder flavor, increase the amounts of ginger and cinnamon. Enjoy these cookies fresh, or store them in an airtight container for up to a week to maintain their delightful softness.