

With Christmas just around the corner, I’ve been on a mission to curate a collection of festive potluck recipes that are both delightful and budget-friendly. Hosting a holiday gathering doesn’t have to break the bank, and it’s always rewarding to see guests enjoy dishes that are as affordable as they are delicious. From crowd-pleasers like cranberry brie bites to the refreshing twist of lemon and dill potato salad, these recipes are sure to impress. Ready to explore these flavorful and affordable culinary treasures? Let’s embark on this delicious journey together.
Festive Cranberry Brie Bites

Festive Cranberry Brie Bites are the perfect appetizer for your Christmas potluck, combining the creamy richness of brie cheese with the tart sweetness of cranberry sauce, all wrapped in a flaky puff pastry.
These bites aren’t only delicious but also incredibly easy to prepare, making them a great choice for those looking to contribute something special without a lot of fuss. With just a handful of ingredients, this recipe is both budget-friendly and impressive, guaranteeing that your dish will be a hit at any holiday gathering.
The contrast of textures and flavors in these bites is what makes them truly irresistible. The buttery puff pastry provides a delicate crunch, while the gooey brie melts in your mouth, complemented perfectly by the tangy cranberry sauce.
This recipe serves 4-6 people, making it ideal for small gatherings or as part of a larger spread of appetizers. Whether you’re a seasoned cook or a beginner in the kitchen, these Festive Cranberry Brie Bites are sure to delight your guests and add a touch of elegance to your holiday table.
Ingredients (serves 4-6):
- 1 sheet puff pastry, thawed
- 1/2 wheel of brie cheese (about 4 ounces)
- 1/2 cup cranberry sauce (homemade or store-bought)
- 1/4 cup chopped pecans (optional)
- 1 tablespoon fresh rosemary, finely chopped
- 1 egg, beaten (for egg wash)
Cooking Instructions:
- Preheat the Oven: Start by preheating your oven to 375°F (190°C). This will guarantee that your puff pastry bakes evenly and achieves a golden-brown color.
- Prepare the Puff Pastry: Roll out the thawed puff pastry on a lightly floured surface. Cut the pastry into squares approximately 2.5 inches by 2.5 inches. You should have about 12 squares.
- Assemble the Bites: Place each cut square of puff pastry into the cups of a mini muffin tin, pressing gently to create small pastry cups. Cut the brie into small cubes and place a piece into each pastry cup.
- Add Cranberry Sauce and Nuts: Spoon about a teaspoon of cranberry sauce over the brie in each pastry cup. If desired, sprinkle a few chopped pecans on top for added texture and flavor.
- Season with Rosemary: Sprinkle a pinch of chopped fresh rosemary over the cranberry sauce in each cup. This will add a fragrant, festive touch to your bites.
- Apply Egg Wash: Brush the edges of the pastry with the beaten egg to help them turn golden brown during baking.
- Bake: Place the muffin tin in the preheated oven and bake for 15-20 minutes, or until the pastry is puffed and golden brown and the cheese is bubbly.
- Cool Slightly and Serve: Allow the bites to cool in the tin for a few minutes before transferring them to a serving platter. Serve warm for the best taste experience.
Extra Tips:
For an extra touch of sweetness, consider adding a small amount of honey to the cranberry sauce before spooning it onto the brie.
If you’re making these bites ahead of time, you can prepare them up to the point of baking and then refrigerate covered, baking them fresh just before serving.
Additionally, try experimenting with different cheeses, such as Camembert, or adding a touch of heat with a pinch of cayenne pepper or red pepper flakes for a unique twist.
Savory Garlic & Herb Roasted Vegetables
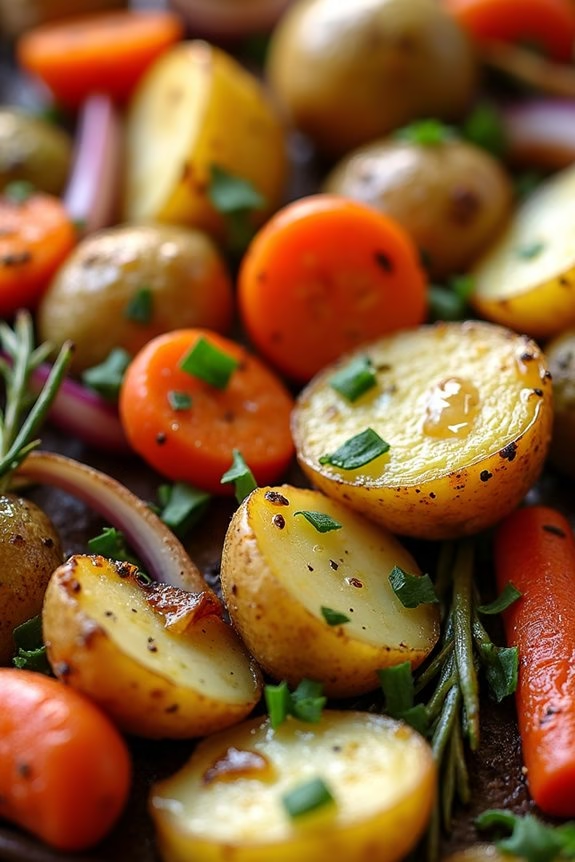
The Savory Garlic & Herb Roasted Vegetables is a delightful dish that adds a burst of flavor and color to any Christmas potluck. This budget-friendly recipe isn’t only easy to prepare but also allows you to use a variety of seasonal vegetables, making it both economical and nutritious.
The combination of garlic and herbs infuses the vegetables with an aromatic essence, transforming a simple side into a festive treat. Whether you’re hosting a gathering or bringing a dish to share, these roasted vegetables will be a crowd-pleaser.
This recipe serves 4-6 people, making it ideal for small gatherings or as one of several dishes at a larger event. The key to this recipe is choosing fresh, vibrant vegetables and roasting them to perfection. The process brings out their natural sweetness and enhances their flavors.
The garlic and herbs add depth, making this dish both satisfying and memorable. Perfect for those looking to impress without breaking the bank, this dish pairs well with a variety of main courses and will surely leave your guests asking for the recipe.
Ingredients:
- 2 cups carrots, peeled and cut into sticks
- 2 cups Brussels sprouts, halved
- 2 cups baby potatoes, halved
- 1 red onion, cut into wedges
- 1 bell pepper, sliced
- 4 cloves garlic, minced
- 3 tablespoons olive oil
- 1 teaspoon dried thyme
- 1 teaspoon dried rosemary
- Salt and pepper to taste
- Fresh parsley, chopped for garnish
Cooking Instructions:
- Preheat your oven to 400°F (200°C). This temperature is ideal for roasting, allowing the vegetables to cook evenly and caramelize beautifully.
- In a large mixing bowl, combine the carrots, Brussels sprouts, baby potatoes, red onion, and bell pepper. Confirm all vegetables are cut into similar sizes for even cooking.
- Add the minced garlic, olive oil, dried thyme, and dried rosemary to the vegetable mixture. Season generously with salt and pepper. Toss everything together until the vegetables are well coated with the oil and seasonings.
- Spread the coated vegetables evenly on a large baking sheet lined with parchment paper. Make sure they’re in a single layer to guarantee even roasting.
- Roast in the preheated oven for 25-30 minutes, stirring halfway through, until the vegetables are tender and golden brown around the edges.
- Once roasted, remove the vegetables from the oven and transfer them to a serving dish. Garnish with freshly chopped parsley before serving to add a pop of color and freshness.
Extra Tips:
When preparing Savory Garlic & Herb Roasted Vegetables, feel free to experiment with different vegetable combinations based on what’s available and in season. Root vegetables like parsnips and sweet potatoes can be wonderful additions.
If you prefer a more intense garlic flavor, consider adding whole, peeled garlic cloves to the roasting pan. For an added crunch, sprinkle the finished dish with toasted nuts or seeds. Remember to adjust the seasoning to your taste before serving, and enjoy the compliments that will surely follow!
Classic Deviled Eggs With a Twist
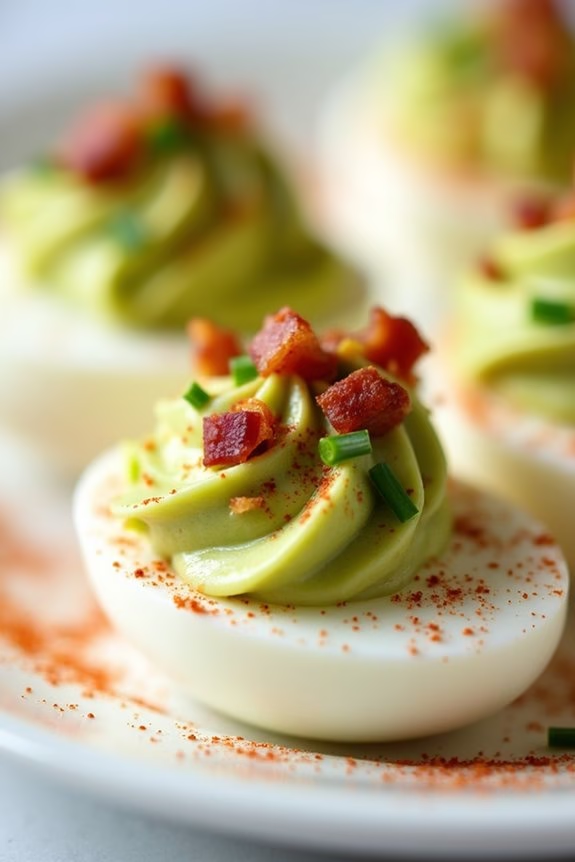
Deviled eggs are a quintessential dish perfect for any Christmas potluck, offering a creamy and tangy flavor that’s both satisfying and indulgent. This classic appetizer gets a modern update with the addition of some unique ingredients that are sure to surprise and delight your guests.
By introducing a few unexpected flavors, we transform the traditional deviled egg into a show-stopping dish that’s both budget-friendly and easy to prepare.
These Classic Deviled Eggs With a Twist are designed to serve 4-6 people and can be effortlessly prepared with pantry staples and a few special ingredients. The twist lies in the addition of avocado, bacon, and a hint of sriracha, which take this dish to the next level.
Whether you’re a deviled egg aficionado or trying them for the first time, this recipe is bound to become a holiday favorite.
Ingredients (Serves 4-6):
- 6 large eggs
- 1 ripe avocado
- 2 tablespoons mayonnaise
- 1 teaspoon Dijon mustard
- 1 teaspoon apple cider vinegar
- 1 teaspoon sriracha sauce
- Salt and pepper to taste
- 2 slices of cooked bacon, crumbled
- 1 tablespoon chopped fresh chives
- Paprika for garnish
Cooking Instructions:
- Boil the Eggs: Place the eggs in a single layer in a saucepan and cover them with cold water by about an inch. Bring to a boil over medium-high heat. Once boiling, remove from heat, cover, and let sit for 10-12 minutes.
- Prepare the Filling: While the eggs are cooking, halve the avocado, remove the pit, and scoop the flesh into a mixing bowl. Mash the avocado until smooth.
- Cool and Peel the Eggs: After the eggs have finished cooking, transfer them to a bowl of ice water to cool for about 5 minutes. Gently tap each egg on a hard surface to crack the shell, then peel under running water for easier peeling.
- Halve the Eggs: Once peeled, slice the eggs in half lengthwise and carefully remove the yolks, placing them in the bowl with the mashed avocado.
- Mix the Filling: To the bowl with yolks and avocado, add mayonnaise, Dijon mustard, apple cider vinegar, sriracha, salt, and pepper. Mix until smooth and well combined.
- Fill the Egg Whites: Spoon or pipe the yolk mixture back into the hollowed egg whites. Be generous with the filling for a richer taste.
- Add the Twist: Top each deviled egg with crumbled bacon and a sprinkle of chopped chives. Finish with a light dusting of paprika for color.
Extra Tips:
For the best results, use eggs that are at least a week old, as they tend to peel more easily than fresh eggs. If you prefer a spicier kick, feel free to adjust the amount of sriracha according to your taste.
To expedite the process, bacon can be cooked ahead of time and stored in the refrigerator until you’re ready to assemble the deviled eggs. For a smoother filling, consider using a food processor to blend the yolk mixture.
Enjoy these deviled eggs immediately or store them covered in the refrigerator for up to two days.
Creamy Spinach and Artichoke Dip

Creamy Spinach and Artichoke Dip is a crowd-pleasing favorite that’s perfect for any holiday potluck. Its rich, cheesy texture combined with the savory flavors of spinach and artichokes makes it an irresistible dish that your guests will love. Not only is it delicious, but it’s also quite simple to prepare, making it a fantastic option for those looking to contribute to a festive gathering without breaking the bank.
This dip pairs well with an assortment of dippers such as tortilla chips, pita bread, or fresh vegetable sticks.
This budget-friendly recipe serves 4-6 people, making it ideal for small to medium-sized gatherings. By using a mix of pantry staples and fresh ingredients, you can create a delicious appetizer that’s both satisfying and easy on the wallet. The combination of cream cheese, sour cream, and mozzarella guarantees a creamy consistency, while the addition of spinach and artichokes provides a nutritious boost.
Whether you’re hosting or attending a Christmas potluck, this Creamy Spinach and Artichoke Dip is sure to be a hit.
Ingredients:
- 1 (10 oz) package frozen chopped spinach, thawed and drained
- 1 (14 oz) can artichoke hearts, drained and chopped
- 1 cup cream cheese, softened
- 1/2 cup sour cream
- 1/4 cup mayonnaise
- 1 cup shredded mozzarella cheese
- 1/2 cup grated Parmesan cheese
- 2 cloves garlic, minced
- 1/2 teaspoon salt
- 1/4 teaspoon black pepper
- 1/4 teaspoon red pepper flakes (optional)
- Tortilla chips, pita bread, or vegetable sticks for serving
Instructions:
- Preheat the oven: Begin by preheating your oven to 350°F (175°C). This guarantees that your dip will bake evenly and achieve a golden-brown top.
- Prepare the spinach and artichokes: Thoroughly drain the thawed spinach by pressing it between paper towels or using a clean kitchen towel. Next, drain the artichoke hearts and chop them into small pieces. This step prevents excess moisture from making the dip too watery.
- Mix the creamy base: In a large mixing bowl, combine the softened cream cheese, sour cream, and mayonnaise. Mix well until the ingredients are fully incorporated and the mixture is smooth.
- Add cheeses and seasonings: Stir in the mozzarella and Parmesan cheese, minced garlic, salt, black pepper, and red pepper flakes (if using). Mix until all ingredients are evenly distributed.
- Combine and transfer: Fold in the prepared spinach and chopped artichokes into the creamy cheese mixture. Once combined, transfer the dip into a baking dish, spreading it out evenly.
- Bake the dip: Place the baking dish in the preheated oven and bake for 20-25 minutes, or until the top is bubbly and lightly golden.
- Serve warm: Remove the dip from the oven and allow it to cool slightly before serving. Pair with tortilla chips, pita bread, or fresh vegetable sticks for dipping.
Extra Tips:
For added flavor, consider mixing in a tablespoon of lemon juice or a teaspoon of Italian seasoning with the cheese mixture. If you prefer a bit more spice, increase the amount of red pepper flakes.
To save time, prepare the dip a day in advance and store it in the refrigerator; just remember to bake it fresh before serving. If you’re looking for a healthier version, substitute Greek yogurt for the sour cream and opt for reduced-fat cheeses. Enjoy this creamy delight with your favorite dippers for a memorable holiday treat!
Hearty Slow Cooker Beef Stew
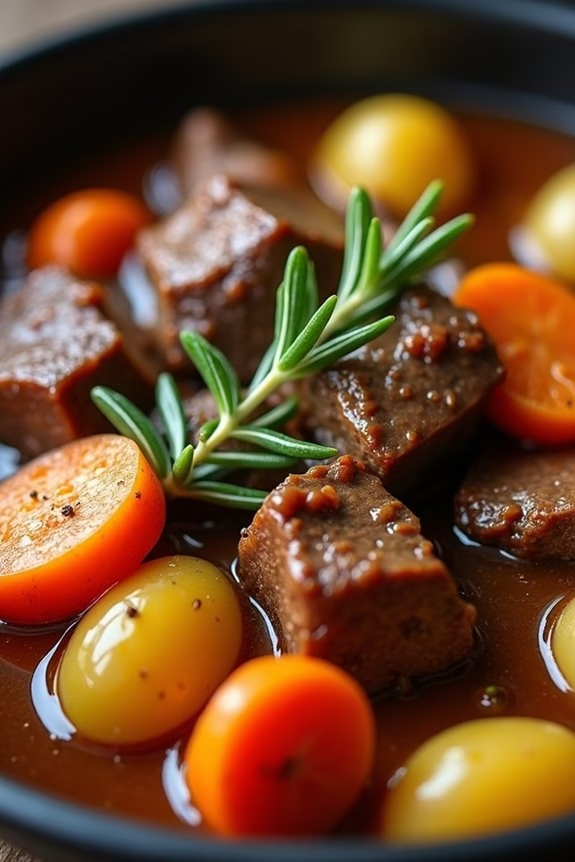
Nothing beats the warmth and comfort of a hearty beef stew, especially during the festive season. This slow cooker beef stew is perfect for a Christmas potluck as it requires minimal effort yet yields maximum flavor.
The slow cooking process allows the beef to become tender and the vegetables to absorb all the savory goodness, creating a dish that’s both nourishing and satisfying. Not only is this recipe budget-friendly, but it also allows you to spend more time with family and friends rather than being tied to the kitchen.
This recipe is designed to serve 4-6 people, making it ideal for a small gathering or as part of a larger buffet. The ingredients are simple and can easily be found in your local grocery store. The stew is best prepared in a slow cooker, which means you can set it and forget it, freeing you up to attend to other preparations.
Once you try this recipe, it will surely become a holiday staple.
Ingredients:
- 2 pounds beef chuck, cut into 1-inch cubes
- 4 cups beef broth
- 1 cup red wine (optional)
- 2 tablespoons tomato paste
- 3 cloves garlic, minced
- 1 large onion, diced
- 3 carrots, peeled and sliced
- 3 potatoes, peeled and cubed
- 2 stalks celery, sliced
- 1 teaspoon dried thyme
- 1 teaspoon dried rosemary
- 2 bay leaves
- Salt and pepper to taste
- 2 tablespoons olive oil
- 2 tablespoons all-purpose flour (optional, for thickening)
Instructions:
- Prepare the Beef: Season the beef cubes with salt and pepper. In a large skillet, heat olive oil over medium-high heat. Add the beef cubes in batches, making sure not to overcrowd the pan, and brown them on all sides. Transfer the browned beef to the slow cooker.
- Sauté Aromatics: In the same skillet, add the diced onion, minced garlic, and tomato paste. Sauté for 2-3 minutes until the onion becomes translucent and the tomato paste is well incorporated. This step enhances the depth of flavor in your stew.
- Combine Ingredients: Pour the sautéed onion mixture over the beef in the slow cooker. Add the sliced carrots, cubed potatoes, and celery. Sprinkle the thyme, rosemary, and bay leaves over the top.
- Add Liquids: Pour in the beef broth and red wine (if using). Stir everything to combine, ensuring the liquid covers the ingredients.
- Cook: Cover and cook on low for 7-8 hours or high for 4-5 hours, until the beef is tender and the vegetables are cooked through.
- Thicken (Optional): If you prefer a thicker stew, about 30 minutes before serving, mix the all-purpose flour with a little water to make a slurry. Stir it into the stew, cover, and let it continue cooking until thickened.
Extra Tips:
For best results, use a well-marbled cut of beef such as chuck roast, as it becomes tender and flavorful when slow-cooked.
If you’re watching your budget, you can substitute red wine with an extra cup of beef broth, and it will still taste delicious. Feel free to customize the vegetables based on what you have on hand; parsnips or peas can be excellent additions.
Finally, always taste and adjust the seasoning at the end of cooking, as the flavors develop over time.
Herb-Infused Lemon Roasted Chicken
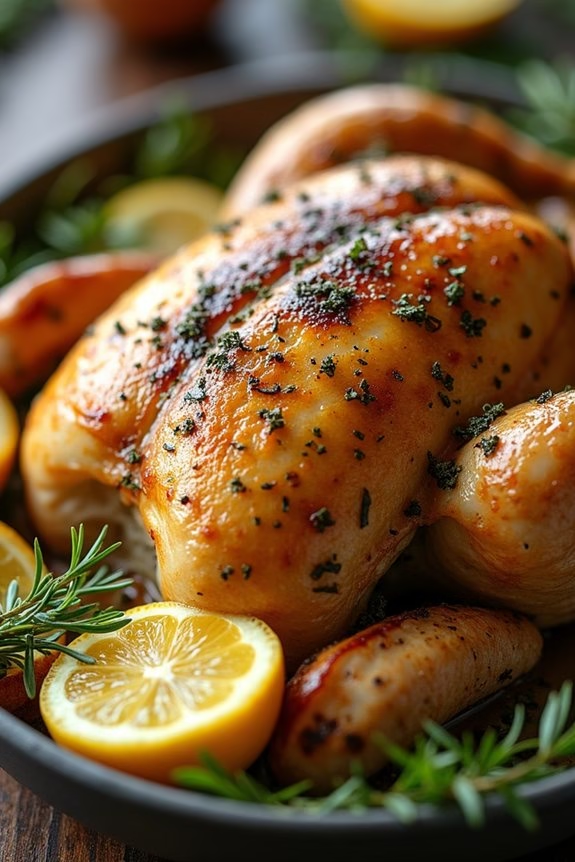
Herb-Infused Lemon Roasted Chicken is a delicious and budget-friendly option for your Christmas potluck. This dish combines the classic flavors of roasted chicken with the fresh, zesty aroma of lemon and a fragrant blend of herbs. The result is a succulent, flavorful chicken that’s sure to impress your guests.
Not only is this dish easy to prepare, but it also allows you to spend more time enjoying the festivities rather than being stuck in the kitchen. This recipe is perfect for serving 4-6 people, making it ideal for a small gathering or as part of a larger spread.
The key to achieving a juicy and flavorful chicken is in the marination and careful roasting process. By infusing the chicken with herbs and lemon, you’ll create a dish that’s both aromatic and delicious. The balance of flavors in this recipe will complement any other dishes you decide to bring to the table for your Christmas potluck.
Ingredients (serving size: 4-6 people):
- 1 whole chicken (about 3-4 pounds)
- 2 lemons
- 4 cloves of garlic
- 1/4 cup olive oil
- 1 tablespoon fresh rosemary, chopped
- 1 tablespoon fresh thyme, chopped
- 1 tablespoon fresh parsley, chopped
- 1 teaspoon salt
- 1/2 teaspoon black pepper
- 1 teaspoon paprika
- 1 onion, quartered
Cooking Instructions:
- Prepare the Chicken: Rinse the chicken under cold water and pat dry with paper towels. Place the chicken in a large roasting pan.
- Make the Marinade: In a small bowl, combine the olive oil, the juice of one lemon, chopped garlic, rosemary, thyme, parsley, salt, pepper, and paprika. Mix well to create a marinade.
- Marinate the Chicken: Rub the marinade all over the chicken, ensuring that you get the mixture under the skin and inside the cavity for maximum flavor. Slice the second lemon and place it inside the cavity along with the quartered onion.
- Preheat the Oven: Preheat your oven to 375°F (190°C).
- Roast the Chicken: Place the chicken in the preheated oven. Roast for about 1.5 to 2 hours, or until the internal temperature reaches 165°F (74°C) and the juices run clear when the thickest part of the chicken is pierced.
- Rest and Serve: Remove the chicken from the oven and let it rest for about 10-15 minutes before carving. This allows the juices to redistribute, ensuring the meat remains juicy.
Extra Tips:
For an even more flavorful result, you can prepare the marinade a day in advance and let the chicken marinate overnight in the refrigerator. This will allow the flavors to penetrate deeper into the meat.
If you want a crispy skin, you can increase the oven temperature to 425°F (218°C) for the last 15-20 minutes of roasting. Remember to baste the chicken occasionally with the juices from the pan to keep it moist.
Serve with your choice of side dishes such as roasted vegetables or a fresh salad to complete the meal.
Flavorful Cheesy Broccoli Rice Casserole

The Flavorful Cheesy Broccoli Rice Casserole is an ideal dish for a budget-friendly Christmas potluck, combining the creamy goodness of cheese with the nutritious crunch of broccoli, all mixed with fluffy rice. This comforting casserole isn’t only easy to prepare but also a crowd-pleaser that will leave your guests coming back for seconds.
It’s perfect for a cozy Christmas gathering, as it can be prepared ahead of time, allowing you to enjoy the festivities without spending too much time in the kitchen. This dish is a delightful way to incorporate vegetables into your holiday meal, and it can be tailored to suit various dietary preferences.
The combination of sharp cheddar cheese and tender broccoli creates a savory flavor profile that pairs beautifully with the aromatic rice. Whether you’re serving it as a side dish or a main course, this casserole is sure to become a holiday favorite. Prepare to impress your family and friends with this delicious and effortless recipe.
Ingredients (serves 4-6):
- 1 cup uncooked white rice
- 2 cups water
- 3 cups broccoli florets
- 2 tablespoons butter
- 1 small onion, diced
- 2 cloves garlic, minced
- 1 cup sharp cheddar cheese, shredded
- 1 can (10.5 oz) cream of mushroom soup
- 1/2 cup milk
- 1 teaspoon salt
- 1/2 teaspoon black pepper
- 1/4 teaspoon paprika (optional)
- 1/2 cup breadcrumbs (optional for topping)
Cooking Instructions:
- Cook the Rice: In a medium saucepan, bring 2 cups of water to a boil. Add the rice, reduce the heat to low, cover, and simmer for about 15 minutes or until the rice is fully cooked and the water is absorbed. Fluff with a fork and set aside.
- Steam the Broccoli: While the rice is cooking, steam the broccoli florets until they’re just tender, about 4-5 minutes. You can use a steaming basket over boiling water or microwave them in a covered dish with a bit of water. Drain and set aside.
- Sauté the Aromatics: In a large skillet, melt the butter over medium heat. Add the diced onion and minced garlic, sautéing until the onion becomes translucent and fragrant, about 3-4 minutes.
- Combine Ingredients: Preheat your oven to 350°F (175°C). In a large mixing bowl, combine the cooked rice, steamed broccoli, sautéed onions, garlic, shredded cheddar cheese, cream of mushroom soup, milk, salt, pepper, and paprika. Mix well until all ingredients are thoroughly combined.
- Transfer to Baking Dish: Pour the mixture into a lightly greased 9×13-inch baking dish. Spread it evenly. If desired, sprinkle breadcrumbs on top for added texture.
- Bake the Casserole: Place the baking dish in the preheated oven and bake for 25-30 minutes, or until the casserole is bubbly and the top is golden brown.
- Serve and Enjoy: Remove from the oven and let it cool slightly before serving. Enjoy your Flavorful Cheesy Broccoli Rice Casserole warm, garnished with additional cheese if desired.
Extra Tips:
To make this dish even more budget-friendly, consider using frozen broccoli instead of fresh, as it’s often less expensive and just as nutritious. You can also experiment with different types of cheese, such as mozzarella or gouda, to vary the taste.
If you’re looking to add some protein, cooked chicken or turkey can be mixed into the casserole. For a vegetarian version, make sure the cream of mushroom soup used is suitable for vegetarians. Finally, leftovers can be stored in the refrigerator for up to 3 days and reheated for a quick meal.
Sweet and Tangy Balsamic Glazed Carrots
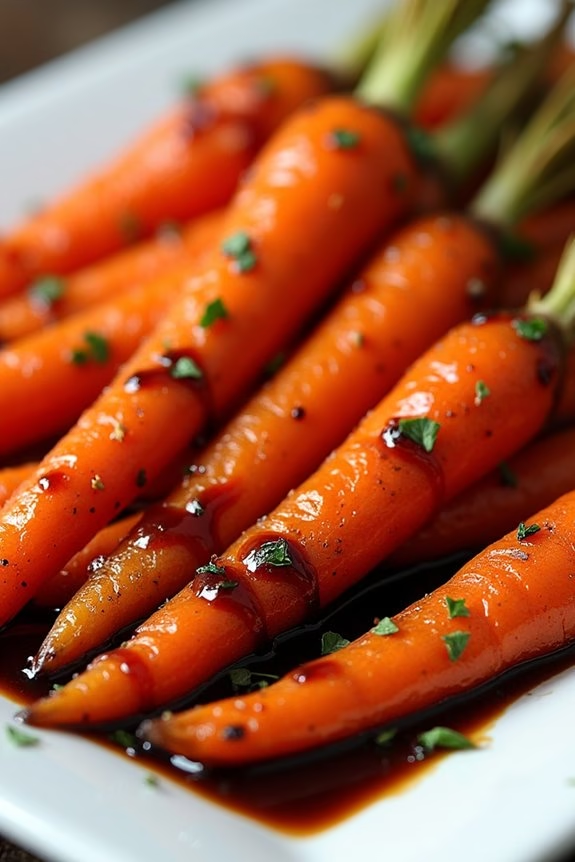
Sweet and Tangy Balsamic Glazed Carrots are a delightful addition to any holiday potluck. These vibrant carrots are roasted to perfection and then coated in a luscious balsamic glaze that offers a perfect balance of sweetness and tanginess. Not only are they visually appealing, but they also bring a burst of flavor to your table, complementing a variety of main dishes.
This dish is perfect for those looking to add a touch of elegance to their festive gatherings without breaking the bank. Carrots are a staple in many kitchens due to their affordability and versatility, and this recipe elevates them into a dish that feels special and celebratory. The balsamic glaze adds depth and complexity to the naturally sweet carrots, making them a crowd-pleaser.
Whether you’re catering to a family gathering or a larger holiday potluck, these Sweet and Tangy Balsamic Glazed Carrots will surely impress your guests with minimal effort and cost.
Ingredients (Serves 4-6):
- 2 pounds of carrots, peeled and cut into sticks
- 2 tablespoons olive oil
- Salt and pepper to taste
- 1/3 cup balsamic vinegar
- 2 tablespoons honey
- 1 tablespoon brown sugar
- 1 teaspoon fresh thyme leaves (optional)
Cooking Instructions:
- Prepare the Carrots: Preheat your oven to 400°F (200°C). Peel the carrots and cut them into evenly sized sticks, guaranteeing that they cook uniformly. Place the carrot sticks on a large baking sheet.
- Season the Carrots: Drizzle the olive oil over the carrots and sprinkle with salt and pepper. Toss the carrots to coat them evenly with the oil and seasonings.
- Roast the Carrots: Spread the carrots out in a single layer on the baking sheet. Roast them in the preheated oven for about 25-30 minutes, or until they’re tender and slightly caramelized, stirring halfway through the cooking time for even roasting.
- Make the Balsamic Glaze: While the carrots are roasting, prepare the glaze. In a small saucepan over medium heat, combine the balsamic vinegar, honey, and brown sugar. Stir the mixture until the sugar dissolves, then let it simmer for about 5-7 minutes, or until it thickens slightly and reduces by about half.
- Glaze the Carrots: Once the carrots are roasted, remove them from the oven and drizzle the balsamic glaze over the top. Toss the carrots gently to guarantee they’re evenly coated with the glaze. If using, sprinkle fresh thyme leaves over the top as a garnish.
- Serve: Transfer the glazed carrots to a serving platter and serve warm. Enjoy the sweet and tangy flavors they bring to your holiday table.
Extra Tips:
When preparing Sweet and Tangy Balsamic Glazed Carrots, it’s important to confirm the carrots are cut into uniform sizes to promote even cooking. If you’re short on time, you can use pre-cut baby carrots, though they may require a shorter roasting time.
For added depth of flavor, consider using aged balsamic vinegar, which is naturally sweeter and more complex. Additionally, feel free to adjust the amount of honey and brown sugar to suit your taste preference, and for a touch of heat, a pinch of red pepper flakes can be added to the glaze.
Zesty Lemon and Dill Potato Salad
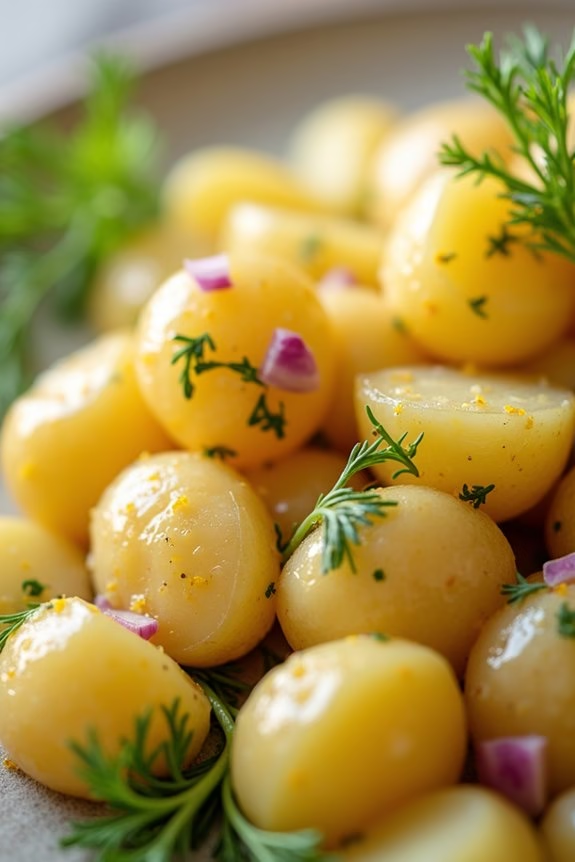
Zesty Lemon and Dill Potato Salad is a revitalizing and flavorful dish that’s perfect for any holiday potluck or family gathering. This budget-friendly recipe combines the earthiness of potatoes with the bright tanginess of lemon and the aromatic freshness of dill.
The salad isn’t only easy to prepare but also pairs beautifully with a variety of main courses, making it a versatile addition to any festive table.
This potato salad is a delightful twist on the classic, offering a healthier and lighter alternative by using a lemon-based dressing instead of the traditional mayonnaise. The combination of zesty lemon juice, fragrant dill, and a hint of garlic creates a vibrant flavor profile that complements the creamy texture of the potatoes.
This recipe serves 4-6 people, making it perfect for sharing with friends and family during the holiday season.
Ingredients:
- 2 pounds of baby potatoes
- 1/4 cup of fresh lemon juice
- 2 tablespoons of olive oil
- 1 teaspoon of lemon zest
- 1/4 cup of fresh dill, chopped
- 2 cloves of garlic, minced
- Salt and pepper to taste
- Optional: 1/4 cup of finely chopped red onion
Instructions:
- Prepare the Potatoes: Begin by washing the baby potatoes thoroughly under cold water to remove any dirt. Leave the skin on for added texture and nutrients. Cut the potatoes into halves or quarters, ensuring they’re of uniform size for even cooking.
- Boil the Potatoes: Fill a large pot with water and add a pinch of salt. Bring the water to a boil over high heat. Once boiling, add the cut potatoes and cook for about 10-15 minutes or until they’re fork-tender. Be careful not to overcook them as they should hold their shape.
- Make the Dressing: While the potatoes are boiling, prepare the lemon and dill dressing. In a small bowl, whisk together the fresh lemon juice, olive oil, lemon zest, minced garlic, and a generous pinch of salt and pepper. Adjust seasoning to your taste.
- Drain and Cool Potatoes: Once the potatoes are cooked, drain them in a colander and let them cool slightly. You can spread them out on a baking sheet for faster cooling.
- Combine Ingredients: In a large mixing bowl, gently toss the cooled potatoes with the lemon dressing until they’re well coated. Be careful to not break the potatoes. Add the chopped dill and optional red onion, and mix until evenly distributed.
- Chill and Serve: Cover the bowl with plastic wrap and refrigerate for at least 30 minutes to allow the flavors to meld together. Serve chilled or at room temperature for a revitalizing side dish.
Extra Tips:
For best results, choose waxy potatoes like red or Yukon Gold, which hold their shape well when boiled. If you’re preparing this salad ahead of time, add the fresh dill just before serving to maintain its bright color and flavor.
Feel free to experiment with additional herbs or spices, such as parsley or a pinch of cayenne pepper, to customize the salad to your taste. Enjoy your Zesty Lemon and Dill Potato Salad as a delightful addition to your holiday feast!
Decadent Chocolate Peppermint Fudge

Decadent Chocolate Peppermint Fudge is a delightful treat perfect for sharing at your holiday potluck. This budget-friendly dessert combines the rich, creamy texture of chocolate fudge with the invigorating zing of peppermint, creating a harmonious blend that will impress your friends and family.
The best part? This recipe is simple to follow and requires minimal ingredients, guaranteeing you can whip it up without breaking the bank or spending too much time in the kitchen.
Ideal for serving 4-6 people, this fudge is perfect for small gatherings or as a sweet addition to a larger dessert spread. The peppermint flavor gives it a festive twist, making it a seasonal favorite that everyone will enjoy.
Whether you’re a seasoned cook or a novice in the kitchen, this recipe promises a foolproof way to deliver a deliciously indulgent treat.
Ingredients:
- 2 cups semi-sweet chocolate chips
- 1 (14-ounce) can sweetened condensed milk
- 1 teaspoon vanilla extract
- 1 teaspoon peppermint extract
- 1/4 cup crushed candy canes or peppermint candies
- 1 tablespoon unsalted butter
Cooking Instructions:
- Prepare the Pan: Line an 8×8-inch baking dish with parchment paper, allowing some to hang over the edges for easy removal later.
- Melt the Chocolate: In a medium saucepan, combine the semi-sweet chocolate chips, sweetened condensed milk, and butter. Heat over low to medium heat, stirring frequently, until the chocolate is completely melted and the mixture is smooth.
- Add Flavor: Once the chocolate mixture is smooth, remove from heat and stir in the vanilla and peppermint extracts. Mix well to guarantee the flavor is evenly distributed.
- Pour and Spread: Pour the chocolate mixture into the prepared baking dish. Use a spatula to spread it evenly into all corners and smooth out the top.
- Add Peppermint Crunch: Sprinkle the crushed candy canes or peppermint candies evenly over the top of the fudge, gently pressing them into the surface.
- Chill and Set: Place the baking dish in the refrigerator for at least 2 hours, or until the fudge is firm and set.
- Cut and Serve: Once set, lift the fudge out of the pan using the parchment paper edges. Cut into small squares and serve.
Extra Tips: For best results, make sure to use high-quality chocolate chips, as this will greatly enhance the flavor and texture of your fudge.
You can also adjust the amount of peppermint extract to suit your taste preferences. If you prefer a more intense peppermint flavor, consider adding an extra half teaspoon.
To make cutting the fudge easier, warm your knife under hot water before slicing. This will help you achieve clean, even cuts without cracking the fudge.
Spiced Gingerbread Cookies

Spiced Gingerbread Cookies are a delightful treat that bring warmth and cheer to any holiday gathering. These cookies aren’t only delicious but are also budget-friendly, making them the perfect addition to your Christmas potluck. The rich aroma of spices like ginger, cinnamon, and cloves fills your kitchen as these cookies bake, evoking the spirit of the festive season.
Their perfectly chewy texture and robust flavors make them a crowd-pleaser, while their charming shapes and decorations add a touch of whimsy to your dessert spread.
Preparing Spiced Gingerbread Cookies is a fun and engaging activity, especially if you involve family and friends in the process. The dough is easy to handle, allowing you to roll it out and cut it into various festive shapes such as stars, trees, and gingerbread men.
Once baked, you can decorate these cookies with icing and sprinkles, making them as beautiful as they’re tasty. This recipe is designed to serve 4-6 people, making it ideal for a small holiday gathering or as a contribution to a larger potluck.
Ingredients:
- 3 cups all-purpose flour
- 3/4 cup packed brown sugar
- 3/4 cup unsalted butter, softened
- 1/2 cup molasses
- 1 large egg
- 1 teaspoon baking soda
- 1 tablespoon ground ginger
- 1 tablespoon ground cinnamon
- 1/2 teaspoon ground cloves
- 1/4 teaspoon ground nutmeg
- 1/2 teaspoon salt
- Royal icing (for decorating)
- Assorted sprinkles (optional)
Cooking Instructions:
1. Prepare the Dough:
In a large mixing bowl, combine the flour, baking soda, ginger, cinnamon, cloves, nutmeg, and salt. In another bowl, beat the softened butter and brown sugar together until creamy.
Add the molasses and egg to the butter mixture and mix well. Gradually add the dry ingredients to the wet ingredients, stirring until a dough forms.
2. Chill the Dough:
Divide the dough into two portions, wrap each in plastic wrap, and refrigerate for at least 1 hour. Chilling the dough makes it easier to roll out and helps maintain the shape of the cookies during baking.
3. Preheat the Oven:
Preheat your oven to 350°F (175°C) and line two baking sheets with parchment paper.
4. Roll and Cut:
On a lightly floured surface, roll out one portion of the chilled dough to about 1/4 inch thickness. Use cookie cutters to cut out desired shapes and place them on the prepared baking sheets, leaving some space between each cookie.
5. Bake the Cookies:
Bake in the preheated oven for 8-10 minutes or until the edges are firm. Be careful not to overbake; the cookies should be slightly soft when removed from the oven.
6. Cool and Decorate:
Allow the cookies to cool on the baking sheets for a few minutes before transferring them to wire racks to cool completely. Once cooled, decorate with royal icing and sprinkles as desired.
Extra Tips:
For best results, allow the cookies to cool completely before decorating to make sure the icing adheres well. If you want your cookies to have a stronger spice flavor, you can adjust the spices to taste.
These cookies can be stored in an airtight container for up to a week, making them a great make-ahead option for holiday gatherings. Additionally, consider involving kids in the decorating process for a fun family activity.
Refreshing Cranberry Orange Punch

Nothing embodies the festive spirit of Christmas quite like a revitalizing, tangy punch. Our Cranberry Orange Punch isn’t only delicious and vibrant, but it’s also budget-friendly, making it an ideal choice for a holiday potluck. This punch combines the tartness of cranberries with the sweet and zesty notes of oranges, resulting in a delightful beverage that will please both adults and kids alike.
It’s a simple yet elegant drink that can be prepared in advance, allowing you more time to enjoy the festivities. Perfect for serving 4-6 people, this punch requires only a handful of ingredients and takes minimal effort to prepare. The balance of flavors in this punch makes it a standout addition to any holiday gathering, and its cheerful red hue will complement your holiday décor beautifully.
Whether you’re hosting a large party or an intimate gathering, this Cranberry Orange Punch will add a touch of seasonal flair to your celebration.
Ingredients (Serves 4-6 people)
- 2 cups cranberry juice
- 1 cup orange juice
- 1 cup ginger ale
- 1/2 cup pineapple juice
- 1 orange, sliced into rounds
- 1/2 cup fresh cranberries (optional, for garnish)
- Ice cubes
- Mint leaves (optional, for garnish)
Instructions
- Prepare the Juices: In a large pitcher, combine the cranberry juice, orange juice, and pineapple juice. Stir well to verify all the juices are evenly mixed. This will form the base of your punch, providing a robust and fruity foundation.
- Add the Fizz: Slowly pour in the ginger ale to the juice mixture. Stir gently to retain the carbonation from the ginger ale, which adds a revitalizing sparkle to the punch.
- Chill the Punch: Refrigerate the punch for at least 1 hour before serving. This allows the flavors to meld together and verifies the punch is nicely chilled.
- Prepare the Garnishes: While the punch is chilling, slice the orange into thin rounds. Set aside a few slices for garnishing the pitcher or individual glasses. If using fresh cranberries and mint leaves, rinse them and set aside.
- Serve the Punch: Fill each glass with ice cubes, pour the chilled punch over the ice, and garnish with an orange slice, a few fresh cranberries, and a sprig of mint (if using). Alternatively, you can also add the garnishes directly to the pitcher for a more festive presentation.
- Enjoy the Celebration: Serve the punch immediately, and let your guests enjoy this revitalizing holiday beverage.
Extra Tips
To enhance the flavor, consider using freshly squeezed orange juice if available, as it adds a vibrant freshness to the punch. For a more festive touch, you can rim the glasses with sugar by dipping the rim in water and then into a plate of sugar before pouring the punch.
If you want to make the drink kid-friendly, substitute the ginger ale with club soda for a less sweet version. You can also experiment with additional spices such as a cinnamon stick or star anise for a hint of warmth and complexity.