
Last Christmas, my kitchen was alive with the cozy scents of herb-crusted roast beef and cranberry-orange glazed ham. It felt like a holiday dream come true, surrounded by laughter and love. These rustic recipes add a touch of magic to any gathering, combining warmth with tradition. Think about the comfort of garlic mashed potatoes and the charm of a gingerbread yule log. Ready to explore more delicious ideas?
Herb-Crusted Roast Beef
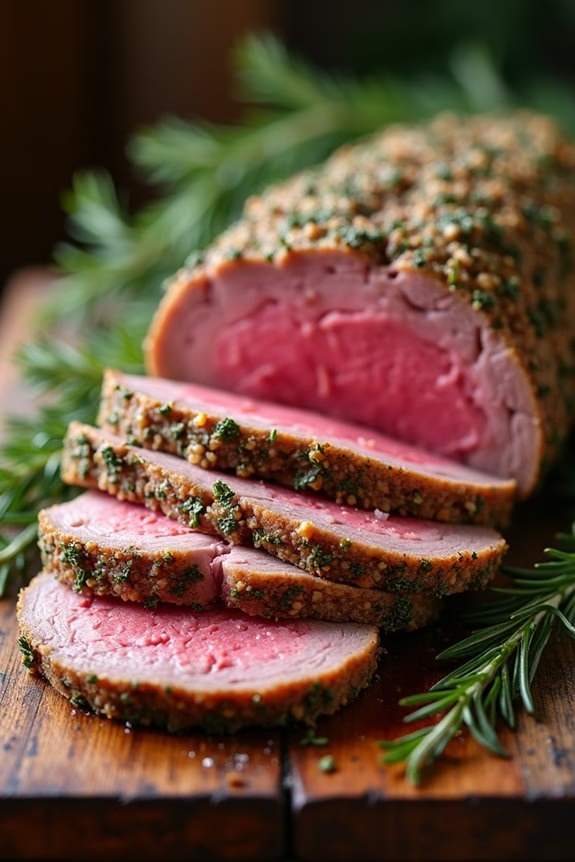
Herb-Crusted Roast Beef is a show-stopping main course perfect for a rustic Christmas potluck. This dish combines the richness of tender roast beef with a flavorful herb crust, creating a festive and hearty meal. The aroma of rosemary, thyme, and garlic mingling with the roasting beef will fill your kitchen with the essence of the holidays, making it a memorable dish for your gathering.
The herb crust not only adds a beautiful texture but also locks in the juiciness of the beef, guaranteeing every bite is succulent and flavorful. This recipe is designed to serve 4-6 people, making it an ideal choice for a family gathering or a small potluck event. The preparation is straightforward, yet the result is a dish that looks and tastes gourmet.
By following this recipe, you’ll be able to impress your guests with a dish that’s both visually appealing and delicious. The key to achieving the perfect roast is in the preparation of the herb crust and the careful monitoring of cooking times to make sure the beef is cooked to your desired level of doneness.
Ingredients for Herb-Crusted Roast Beef (serves 4-6):
- 3-pound boneless beef roast (such as ribeye or tenderloin)
- 2 tablespoons olive oil
- 3 cloves garlic, minced
- 2 tablespoons fresh rosemary, finely chopped
- 2 tablespoons fresh thyme, finely chopped
- 1 tablespoon Dijon mustard
- 1 tablespoon coarse sea salt
- 1 teaspoon freshly ground black pepper
Cooking Instructions:
- Preheat the Oven: Preheat your oven to 450°F (232°C). This high temperature will help to sear the beef and create a flavorful crust.
- Prepare the Herb Mixture: In a small bowl, combine the minced garlic, rosemary, thyme, olive oil, Dijon mustard, sea salt, and black pepper. Mix thoroughly to form a paste.
- Season the Beef: Pat the beef roast dry with paper towels to remove excess moisture. This helps the herb mixture adhere better. Rub the herb mixture evenly over the entire surface of the beef, pressing it into the meat to make sure it sticks.
- Roast the Beef: Place the seasoned beef on a roasting rack in a shallow roasting pan. Insert a meat thermometer into the thickest part of the roast, making sure it doesn’t touch bone or fat. Roast in the preheated oven for 20 minutes to create a crust, then reduce the temperature to 350°F (175°C) and continue roasting until the thermometer reads your desired doneness (about 120°F/49°C for rare, 130°F/54°C for medium-rare, 140°F/60°C for medium).
- Rest the Meat: Once the beef reaches your preferred doneness, remove it from the oven and cover it loosely with aluminum foil. Allow it to rest for at least 15 minutes. This resting period allows the juices to redistribute, guaranteeing a juicy roast.
- Carve and Serve: Slice the roast beef against the grain into 1/2-inch thick slices. Serve with your choice of sides, such as roasted vegetables or creamy mashed potatoes.
Extra Tips:
For the best results, consider letting the beef sit at room temperature for about an hour before cooking. This helps it cook more evenly. Additionally, if you prefer a deeper flavor, you can prepare the herb mixture the day before and let the beef marinate in the refrigerator overnight. Just remember to bring it back to room temperature before roasting.
Using a meat thermometer is essential for achieving the perfect doneness, as oven temperatures can vary. Finally, resist the temptation to carve the roast immediately; resting the meat is crucial for preserving its juiciness.
Savory Mushroom and Thyme Tart
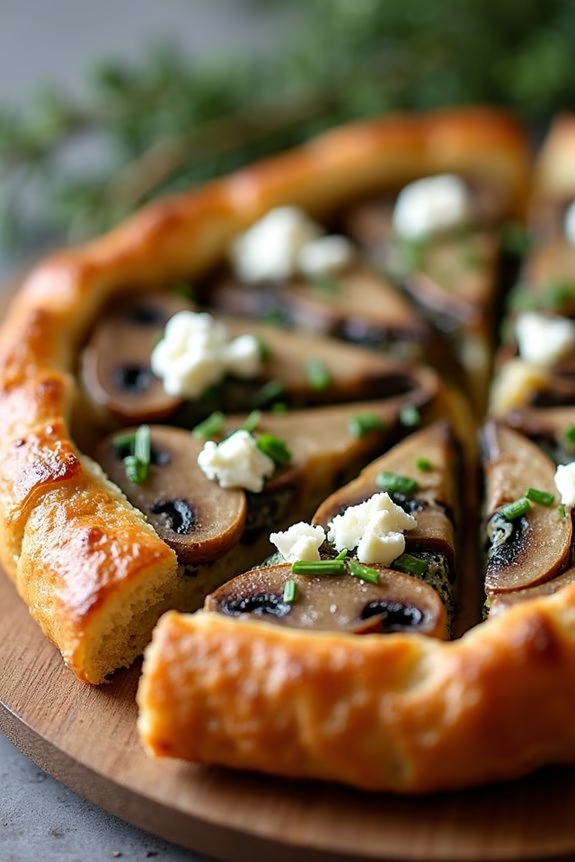
Savory Mushroom and Thyme Tart is a delightful dish perfect for adding a touch of elegance to your rustic Christmas potluck. This tart combines the earthy flavors of mushrooms with the aromatic essence of thyme, all encased in a buttery, flaky pastry. It’s a crowd-pleaser that will impress your guests with its rich taste and attractive presentation.
Whether served as an appetizer or a centerpiece, this tart is versatile and certain to become a holiday favorite. The key to a successful Savory Mushroom and Thyme Tart lies in balancing the flavors and achieving the perfect texture. The mushrooms are sautéed to bring out their deep umami flavor, while the thyme adds a fragrant herbal note that complements the dish beautifully.
The pastry should be golden and crisp, providing a satisfying contrast to the creamy filling. This recipe serves 4-6 people, making it ideal for sharing with family and friends during your festive gatherings.
Ingredients:
- 1 sheet of puff pastry, thawed
- 2 tablespoons olive oil
- 1 medium onion, finely chopped
- 3 cloves garlic, minced
- 500g mixed mushrooms, sliced
- 1 teaspoon fresh thyme leaves
- 100g goat cheese, crumbled
- 100ml heavy cream
- 2 eggs
- Salt and pepper to taste
- 1 tablespoon butter
- 1 tablespoon all-purpose flour (for dusting)
Instructions:
- Preheat the Oven: Begin by preheating your oven to 200°C (390°F). This guarantees that the tart will cook evenly and the pastry will be perfectly crisp.
- Prepare the Pastry: Roll out the puff pastry on a lightly floured surface to fit your tart pan (approximately 9 inches in diameter). Gently press the pastry into the pan, trimming the excess. Prick the base with a fork to prevent puffing and place in the fridge to chill while you prepare the filling.
- Sauté the Onions and Garlic: In a large skillet, heat the olive oil over medium heat. Add the chopped onion and sauté until soft and translucent, about 5 minutes. Stir in the minced garlic and cook for an additional 1 minute until fragrant.
- Cook the Mushrooms: Add the sliced mushrooms to the skillet with the onions and garlic. Continue to cook until the mushrooms are golden brown and have released their moisture, around 10 minutes. Stir in the fresh thyme leaves, and season with salt and pepper to taste. Remove from heat and let cool slightly.
- Prepare the Filling: In a mixing bowl, whisk together the eggs and heavy cream until well combined. Add the sautéed mushroom mixture and crumbled goat cheese, stirring to incorporate everything evenly.
- Assemble the Tart: Remove the prepared pastry from the fridge and pour the mushroom filling into the tart shell, spreading it evenly.
- Bake the Tart: Place the tart in the preheated oven and bake for 25-30 minutes, or until the filling is set and the pastry is golden brown. Allow it to cool slightly before slicing and serving.
Extra Tips: When preparing the mushrooms, make sure they’re thoroughly washed and dried to prevent excess moisture in the tart, which can make the pastry soggy.
For added depth of flavor, consider using a mix of mushroom varieties such as cremini, shiitake, and oyster. If you prefer a stronger cheese flavor, you can substitute goat cheese for blue cheese or feta. Finally, if you don’t have fresh thyme, dried thyme can be used; just reduce the quantity by half.
Rustic Garlic Mashed Potatoes
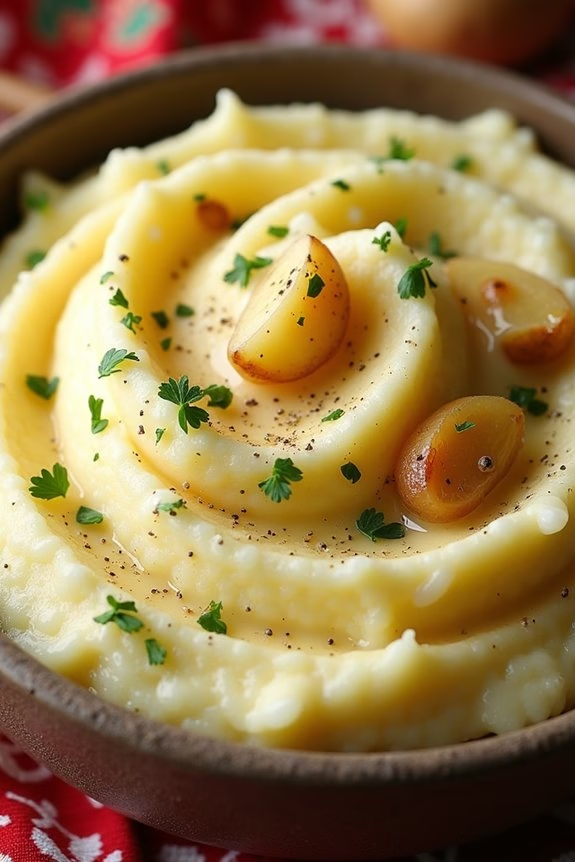
Rustic Garlic Mashed Potatoes are a perfect addition to any Christmas potluck, offering a comforting and flavorful side dish that complements a variety of main courses. This recipe combines the earthy richness of roasted garlic with creamy potatoes, resulting in a dish that’s both rustic and elegant. The secret to achieving the perfect texture and flavor lies in selecting the right type of potatoes and balancing the ingredients to enhance the natural flavors.
For this recipe, you’ll want to use Yukon Gold potatoes, which are known for their buttery flavor and smooth texture. The roasted garlic adds a depth of flavor that elevates this classic dish to new heights. Preparing these mashed potatoes involves roasting the garlic to bring out its sweetness, carefully boiling the potatoes, and mashing them to the desired consistency before adding the creamy elements that make this dish irresistible.
Ingredients (Serves 4-6):
- 2 pounds Yukon Gold potatoes
- 1 whole head of garlic
- 1/4 cup olive oil
- 1/2 cup unsalted butter
- 1 cup heavy cream
- Salt to taste
- Freshly ground black pepper to taste
- 2 tablespoons chopped fresh parsley (optional, for garnish)
Instructions:
- Prepare the Garlic: Preheat your oven to 400°F (200°C). Cut the top off the head of garlic to expose the cloves, drizzle with a tablespoon of olive oil, wrap it in aluminum foil, and roast in the oven for about 30-35 minutes until the cloves are soft and golden brown. Allow to cool, then squeeze the roasted garlic cloves out of their skins.
- Cook the Potatoes: While the garlic is roasting, peel and cut the potatoes into evenly-sized chunks. Place them in a large pot, cover with cold water, and add a pinch of salt. Bring to a boil over medium-high heat, then reduce to a simmer. Cook for about 15-20 minutes, or until the potatoes are fork-tender.
- Mash the Potatoes: Drain the potatoes and return them to the pot. Add the roasted garlic and mash using a potato masher or a ricer until you reach your desired consistency.
- Incorporate the Creamy Elements: In a small saucepan, heat the butter and heavy cream over low heat until the butter is melted and the mixture is warm. Gradually add this to the mashed potatoes, mixing thoroughly to combine. Season with salt and freshly ground black pepper to taste.
- Finish and Serve: Transfer the mashed potatoes to a serving dish, and if desired, garnish with chopped fresh parsley. Serve hot.
For the best results, make certain that the potatoes are thoroughly drained before mashing to prevent excess water from making the dish runny. If you prefer a smoother consistency, use a potato ricer instead of a masher.
Feel free to adjust the amount of roasted garlic to suit your taste preference. Additionally, for a lighter version, you can substitute the heavy cream with whole milk or a mixture of milk and Greek yogurt, though the texture will be slightly different.
Enjoy your Rustic Garlic Mashed Potatoes as a delightful side at your Christmas gathering!
Cranberry-Orange Glazed Ham
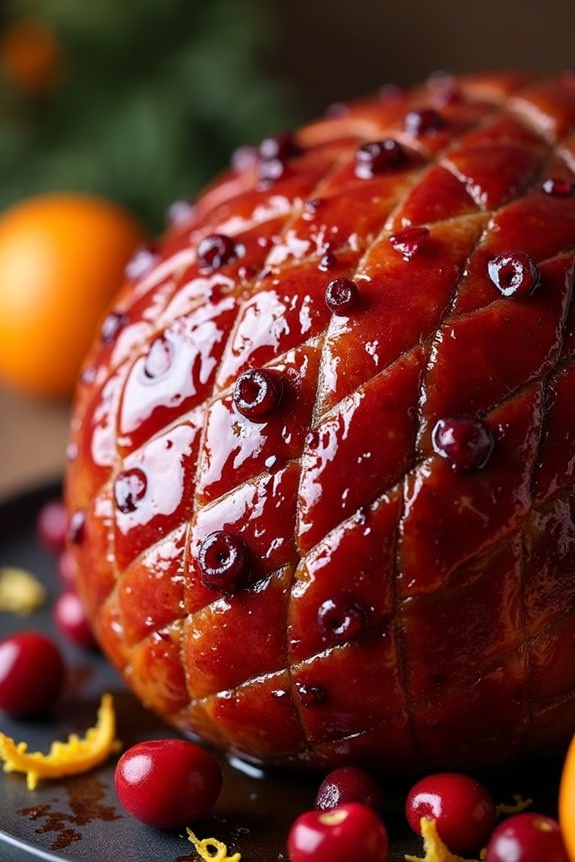
Indulge in the festive flavors of a Cranberry-Orange Glazed Ham this holiday season. This dish brings together the tartness of cranberries and the citrusy brightness of oranges to create a delightful glaze that complements the rich, savory taste of ham. Perfect for a rustic Christmas potluck, this recipe is sure to become a family favorite. The vibrant glaze not only enhances the flavor of the ham but also adds a beautiful, glossy finish that will make your holiday table shine.
The preparation of Cranberry-Orange Glazed Ham is simple yet rewarding. It involves simmering a combination of fresh cranberries, orange juice, and a hint of spices to create a thick, luscious glaze that’s generously applied to a succulent, baked ham. This recipe serves 4-6 people, making it ideal for a cozy gathering with family and friends. Whether you’re hosting or attending a potluck, this delightful dish is a showstopper that promises to bring warmth and joy to your holiday celebration.
Ingredients for 4-6 servings:
- 1 fully cooked bone-in ham (about 4-5 pounds)
- 1 cup fresh cranberries
- 1 cup orange juice
- 1/2 cup brown sugar
- 1/4 cup honey
- 1 tablespoon Dijon mustard
- 1 teaspoon ground cinnamon
- 1/2 teaspoon ground cloves
- Zest of 1 orange
- Salt and pepper to taste
Cooking Instructions:
- Preheat the Oven: Begin by preheating your oven to 325°F (165°C). This temperature will guarantee that your ham heats through evenly without drying out.
- Prepare the Ham: Place the ham on a roasting rack set inside a roasting pan. Score the surface of the ham in a diamond pattern, making shallow cuts about 1/4 inch deep. This will allow the glaze to penetrate the ham more effectively.
- Make the Glaze: In a medium saucepan over medium heat, combine the cranberries, orange juice, brown sugar, honey, Dijon mustard, ground cinnamon, ground cloves, and orange zest. Stir well and bring the mixture to a simmer. Cook until the cranberries have burst and the sauce has thickened, about 10-15 minutes. Season with salt and pepper to taste.
- Glaze the Ham: Brush a generous amount of the cranberry-orange glaze over the ham, making sure it gets into the scored cuts. Reserve some glaze for basting.
- Bake the Ham: Place the ham in the preheated oven and bake for about 1 1/2 to 2 hours, or until an instant-read thermometer inserted into the thickest part of the ham reads 140°F (60°C). Baste the ham with the reserved glaze every 30 minutes.
- Rest and Serve: Once cooked, remove the ham from the oven and let it rest for about 10 minutes before slicing. This will allow the juices to redistribute, guaranteeing a moist and tender ham. Serve with the remaining glaze on the side for extra flavor.
Extra Tips:
For the best results, choose a high-quality ham as the foundation of your dish. If you prefer a sweeter glaze, you can adjust the amount of brown sugar and honey to taste. Additionally, if fresh cranberries aren’t available, you can use frozen cranberries instead; just be sure to adjust the cooking time, as frozen cranberries may take longer to burst.
When scoring the ham, be careful not to cut too deeply, as this can cause the ham to dry out. Finally, if you’re planning to serve the dish at a potluck, consider slicing the ham beforehand for easy serving and presentation.
Classic Green Bean Casserole
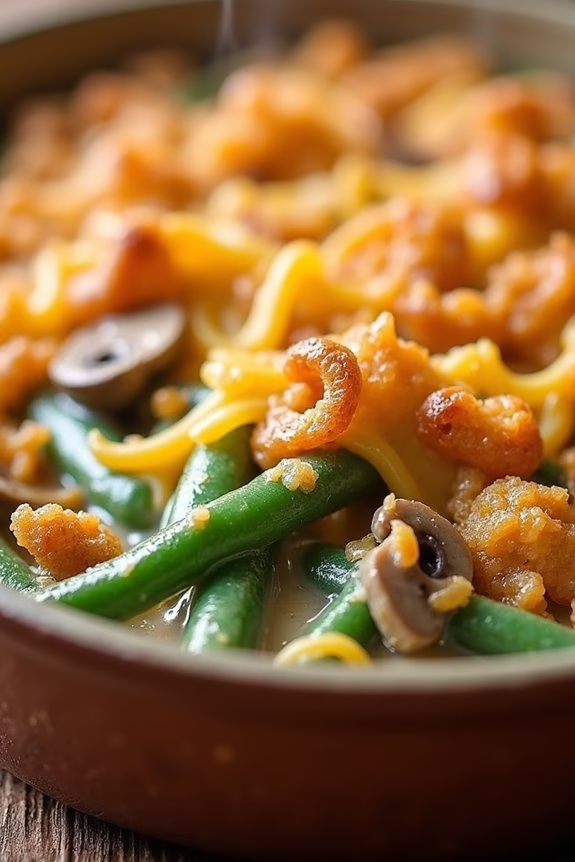
The Classic Green Bean Casserole is a must-have dish at any rustic Christmas potluck. Its creamy, savory flavor combined with the crunchy texture of fried onions makes it a beloved staple during the holiday season. The dish isn’t only delicious but also relatively simple to prepare, which makes it a perfect choice for both novice and experienced cooks.
Whether served as a side dish or the main attraction, this casserole will certainly delight your family and friends at any festive gathering.
Designed to serve 4-6 people, this version of the Classic Green Bean Casserole combines fresh ingredients with timeless flavors. The traditional recipe calls for canned green beans, but using fresh or frozen green beans can elevate the dish to a whole new level.
The key to a perfect casserole is the creamy mushroom sauce, which binds all the components together, creating that comforting, homely feel that everyone loves. So gather your ingredients and prepare to make this iconic holiday dish a highlight on your Christmas table.
Ingredients:
- 1 pound fresh or frozen green beans, trimmed and cut into 1-inch pieces
- 1 can (10.5 ounces) condensed cream of mushroom soup
- 1/2 cup milk
- 1 teaspoon soy sauce
- 1/4 teaspoon black pepper
- 1 1/3 cups French-fried onions
- 1 cup shredded cheddar cheese (optional)
Instructions:
- Preheat the Oven: Start by preheating your oven to 350°F (175°C). This allows the casserole to cook evenly and thoroughly.
- Prepare the Green Beans: If using fresh green beans, blanch them in boiling water for about 5 minutes, then drain and set aside. For frozen green beans, simply thaw them under running water and drain.
- Mix the Sauce: In a large mixing bowl, combine the cream of mushroom soup, milk, soy sauce, and black pepper. Stir until the mixture is smooth and well combined.
- Assemble the Casserole: Add the prepared green beans to the bowl with the sauce and mix until the beans are well coated. If you like a cheesy casserole, mix in the shredded cheddar cheese at this stage.
- Add Crunch: Transfer the mixture into a 1 1/2-quart casserole dish. Sprinkle 2/3 cup of the French-fried onions evenly over the top.
- Bake the Casserole: Place the dish in the preheated oven and bake for 25 minutes, or until the mixture is hot and bubbling.
- Final Touches: Remove the casserole from the oven and stir gently. Top with the remaining French-fried onions and return it to the oven for an additional 5 minutes, or until the onions are golden brown.
- Serve and Enjoy: Allow the casserole to cool for a few minutes before serving. This will let the flavors meld together for a more cohesive taste.
Extra Tips:
For the best results, use fresh green beans if possible, as they provide a vibrant color and a crisp texture that canned beans may lack. If you prefer a more robust flavor, consider adding sautéed mushrooms or a dash of garlic powder to the sauce.
For a healthier twist, use low-sodium cream of mushroom soup and opt for a reduced-fat version of the fried onions. Finally, always taste the casserole before serving; you might want to adjust the seasoning according to your preference.
Warm Apple and Cheddar Salad
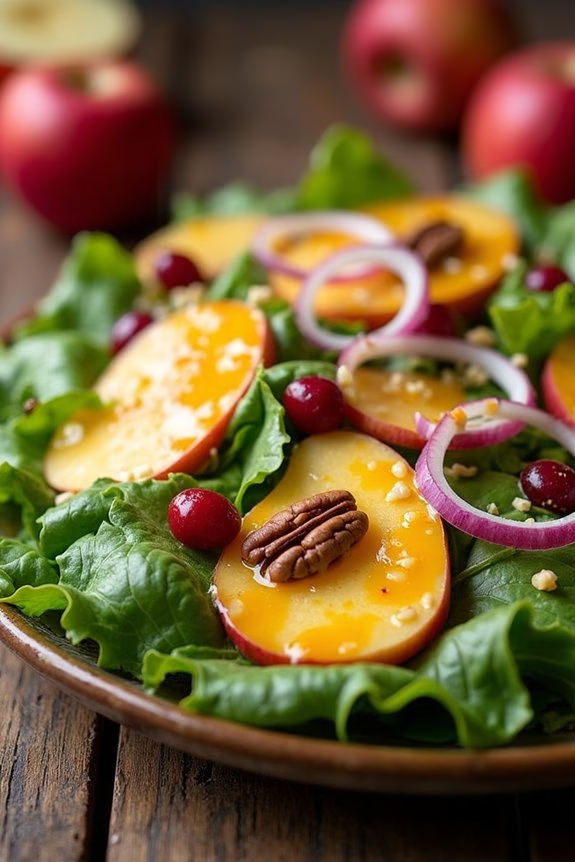
Celebrate the holiday season with a delightful Warm Apple and Cheddar Salad, perfect for a cozy Christmas potluck. This dish combines the crisp sweetness of apples with the savory sharpness of cheddar cheese, all balanced with a warm dressing that brings the flavors together in perfect harmony.
The salad not only offers a vibrant burst of color to your festive table but also delights with its blend of textures and tastes, making it a memorable addition to your holiday menu.
This recipe serves 4-6 people and is designed to be both simple and elegant. The key to this dish is using fresh, high-quality ingredients to guarantee every bite is as delicious as it’s visually appealing.
The warm dressing gently wilts the salad greens, allowing the cheese to slightly melt and the apples to soften, creating a comforting dish that’s sure to be a hit at any gathering.
Ingredients:
- 4 cups mixed salad greens (such as arugula, spinach, and kale)
- 2 large apples (such as Honeycrisp or Fuji), cored and thinly sliced
- 1 cup sharp cheddar cheese, cubed or shredded
- 1/2 cup pecans, toasted
- 1/4 cup dried cranberries
- 1/4 cup red onion, thinly sliced
- 1/4 cup extra-virgin olive oil
- 2 tablespoons apple cider vinegar
- 1 tablespoon Dijon mustard
- 1 tablespoon honey
- Salt and pepper to taste
Instructions:
- Prepare the Salad Base: Begin by washing and drying the mixed salad greens. Place them in a large serving bowl. Add the thinly sliced apples, cheddar cheese, toasted pecans, dried cranberries, and red onion to the greens.
- Make the Dressing: In a small saucepan, combine the olive oil, apple cider vinegar, Dijon mustard, honey, salt, and pepper. Heat the mixture over low heat, stirring continuously, until it’s warm and well combined. Be careful not to let it boil.
- Assemble the Salad: Pour the warm dressing over the salad ingredients in the bowl. Use salad tongs to gently toss the salad, making sure that the dressing coats all the ingredients evenly.
- Serve Immediately: Transfer the salad to a serving platter or distribute it into individual bowls. Serve immediately while the salad is still warm to enjoy the full range of textures and flavors.
Extra Tips:
For the best result, choose apples that are crisp and sweet-tart, like Honeycrisp or Fuji, as they provide a nice contrast to the sharp cheddar.
Toasting the pecans enhances their flavor and adds a pleasant crunch to the salad. If you prefer a creamier dressing, you can add a tablespoon of mayonnaise to the dressing mixture.
Finally, confirm that the dressing is only warmed and not hot, as too much heat can wilt the greens too much and alter the cheese’s texture. Enjoy this festive dish as a lovely starter or a side at your holiday gathering!
Sourdough Stuffing With Sausage
Sourdough Stuffing With Sausage is a delightful and hearty dish that brings a rustic charm to your Christmas potluck. This recipe combines the tangy flavor of sourdough bread with the savory richness of sausage, creating a stuffing that’s both comforting and festive. The combination of herbs and spices adds depth to the dish, making it an ideal accompaniment to your holiday spread.
The beauty of this stuffing lies in its balance of textures and flavors. The sourdough provides a chewy, slightly crisp base while the sausage adds a tender, juicy element. By incorporating aromatic vegetables and fresh herbs, the stuffing becomes aromatic and flavorful, making it a surefire hit at any holiday gathering. This recipe serves 4-6 people, making it perfect for small to medium-sized gatherings.
Ingredients:
- 1 pound sourdough bread, cut into 1-inch cubes
- 1 pound sausage (Italian or breakfast), casings removed
- 2 tablespoons olive oil
- 1 large onion, diced
- 2 celery stalks, diced
- 2 cloves garlic, minced
- 1 teaspoon dried sage
- 1 teaspoon dried thyme
- 1/2 teaspoon dried rosemary
- 1/4 teaspoon ground black pepper
- 1/2 teaspoon salt
- 2 cups chicken or vegetable broth
- 1/4 cup fresh parsley, chopped
- 2 tablespoons unsalted butter, melted
Cooking Instructions:
- Prepare the Bread: Preheat the oven to 350°F (175°C). Spread the sourdough bread cubes on a baking sheet and toast them in the oven for about 10 minutes, or until they’re dry and slightly golden. This step helps the bread absorb the flavors better.
- Cook the Sausage: In a large skillet over medium heat, add the olive oil. Once hot, add the sausage. Break it into small pieces with a spatula and cook until browned and cooked through, about 8 minutes. Remove the sausage from the skillet and set aside.
- Sauté Vegetables: In the same skillet, add the diced onion and celery. Sauté until the vegetables are soft and translucent, about 5 minutes. Add the minced garlic, sage, thyme, rosemary, salt, and pepper. Cook for another 2 minutes until fragrant.
- Combine Ingredients: In a large mixing bowl, combine the toasted sourdough cubes, cooked sausage, and sautéed vegetables. Pour in the chicken or vegetable broth gradually while stirring to make certain the bread cubes are evenly moistened. Stir in the chopped parsley.
- Bake the Stuffing: Transfer the mixture to a greased baking dish. Drizzle the melted butter on top to enhance flavor and browning. Cover the dish with foil and bake in the preheated oven for 20 minutes. Remove the foil and bake for an additional 15 minutes or until the top is golden and crispy.
Extra Tips:
For the best results, use day-old sourdough bread as it will absorb the flavors without getting too mushy. You can customize the stuffing by adding dried cranberries or toasted nuts for a sweet and crunchy element.
If you prefer a spicier stuffing, consider using spicy sausage or adding a pinch of red pepper flakes. Confirm to taste and adjust the seasoning before baking, as the salt content can vary depending on the sausage and broth used.
Maple-Glazed Carrots and Parsnips
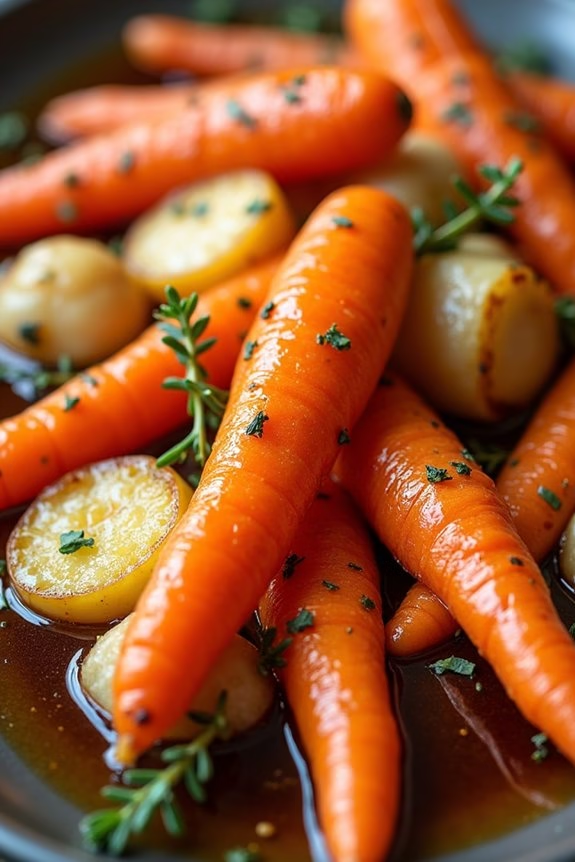
Add a touch of sweetness to your holiday table with Maple-Glazed Carrots and Parsnips. This rustic side dish combines the earthy flavors of root vegetables with the rich, natural sweetness of maple syrup, creating a delightful contrast that’s certain to please.
Perfect for a Christmas potluck, these glazed veggies aren’t only delicious but also visually appealing, adding a splash of color to your festive spread.
The combination of carrots and parsnips provides a delicate balance of flavors, with the carrots offering a subtle sweetness and the parsnips contributing a slightly nutty taste. When glazed with maple syrup and roasted to perfection, these vegetables become tender and caramelized, making them an irresistible addition to your holiday menu.
This recipe serves 4-6 people, making it an ideal side dish for a small gathering or a larger potluck event.
Ingredients:
- 1 pound carrots, peeled and cut into 2-inch pieces
- 1 pound parsnips, peeled and cut into 2-inch pieces
- 3 tablespoons olive oil
- 1/4 cup pure maple syrup
- 1 teaspoon salt
- 1/2 teaspoon black pepper
- 1 tablespoon fresh thyme leaves (optional)
- 1 tablespoon butter
- 1 tablespoon apple cider vinegar
Instructions:
- Preheat the Oven: Preheat your oven to 400°F (200°C). This temperature will guarantee that the vegetables roast evenly and develop a nice caramelization.
- Prepare the Vegetables: Place the peeled and cut carrots and parsnips in a large mixing bowl. Drizzle with olive oil, and sprinkle with salt and pepper. Toss the vegetables until they’re evenly coated with the oil and seasonings.
- Roast the Vegetables: Spread the vegetables out in a single layer on a large baking sheet. Roast in the preheated oven for 20-25 minutes, or until they start to become tender. Stir halfway through to guarantee even cooking.
- Make the Maple Glaze: While the vegetables are roasting, combine the maple syrup, butter, and apple cider vinegar in a small saucepan. Heat over medium-low heat, stirring occasionally, until the butter is melted and the glaze is smooth.
- Glaze the Vegetables: Remove the partially roasted vegetables from the oven. Drizzle the maple glaze over the top, and toss the vegetables to guarantee they’re evenly coated. Sprinkle with fresh thyme leaves if using.
- Finish Roasting: Return the glazed vegetables to the oven and continue roasting for another 10-15 minutes, or until they’re tender and caramelized. The glaze should be sticky and slightly thickened.
- Serve: Transfer the roasted maple-glazed carrots and parsnips to a serving platter. Serve warm as a delightful side dish for your Christmas potluck.
Extra Tips:
For the best results, make sure the carrots and parsnips are cut into uniform sizes to guarantee even cooking.
If you prefer a more pronounced maple flavor, you can increase the amount of maple syrup slightly. Additionally, you can substitute the fresh thyme with rosemary or parsley if desired, to suit your taste preferences.
When tossing the vegetables in the glaze, guarantee they’re fully coated to maximize the delicious caramelization. Enjoy these maple-glazed vegetables as a versatile side dish that pairs well with a variety of main courses.
Cheesy Scalloped Potatoes

Cheesy Scalloped Potatoes are a heartwarming addition to any rustic Christmas potluck. This creamy, cheesy dish combines tender, thinly sliced potatoes with a rich cheese sauce, creating a comforting side that pairs well with any holiday spread. The melding of sharp cheddar, rich cream, and savory seasonings results in a dish that’s certain to be a hit with family and friends.
Plus, it’s easy to prepare ahead of time, allowing you to enjoy more time with loved ones during the festive season. Perfect for serving 4-6 people, these Cheesy Scalloped Potatoes are baked until they’re golden and bubbling, with a crispy cheese topping that adds a delightful texture contrast to the creamy potatoes beneath.
The key to achieving the perfect consistency lies in slicing the potatoes uniformly, guaranteeing even cooking throughout. Serve this dish alongside a holiday roast or as part of a vegetarian spread, and watch it quickly become a sought-after staple at your potluck gatherings.
Ingredients:
- 2 pounds russet potatoes, peeled and thinly sliced
- 2 tablespoons unsalted butter
- 2 tablespoons all-purpose flour
- 1 1/2 cups whole milk
- 1 cup heavy cream
- 2 cups shredded sharp cheddar cheese
- 1 teaspoon garlic powder
- 1 teaspoon onion powder
- Salt and pepper to taste
- 1/2 cup grated Parmesan cheese
- Chopped fresh parsley for garnish (optional)
Instructions:
- Preheat and Prepare: Preheat your oven to 375°F (190°C). Lightly grease a 9×13-inch baking dish with butter or non-stick spray.
- Prepare the Sauce: In a medium saucepan over medium heat, melt the butter. Once melted, whisk in the flour to form a smooth paste, cooking for about 1 minute. Gradually whisk in the milk and heavy cream, stirring continuously until the mixture thickens and begins to bubble.
- Add the Cheese and Seasonings: Reduce the heat to low and stir in the cheddar cheese, garlic powder, onion powder, salt, and pepper. Continue stirring until the cheese is fully melted and the sauce is smooth.
- Layer the Potatoes: Arrange half of the sliced potatoes in the bottom of the prepared baking dish. Pour half of the cheese sauce over the potatoes, spreading it evenly. Add the remaining potato slices, then top with the remaining cheese sauce.
- Top and Bake: Sprinkle the Parmesan cheese evenly over the top. Cover the dish with aluminum foil and bake in the preheated oven for 45 minutes. Remove the foil and bake for an additional 20-25 minutes, or until the top is golden brown and the potatoes are tender when pierced with a fork.
- Garnish and Serve: Let the scalloped potatoes rest for 5-10 minutes before serving. Garnish with chopped fresh parsley if desired, and serve warm.
Extra Tips:
To guarantee even cooking, it’s important that the potato slices are of uniform thickness. A mandoline slicer can be a handy tool for this task.
If you prefer a more robust flavor, consider adding a pinch of nutmeg to the cheese sauce or incorporating cooked bacon bits between the potato layers. For a gluten-free version, substitute the all-purpose flour with a gluten-free flour blend.
Remember to taste your sauce and adjust the seasoning to your liking before pouring it over the potatoes. Enjoy the cozy, cheesy delight of Cheesy Scalloped Potatoes at your next holiday gathering!
Honey-Balsamic Brussels Sprouts

Honey-Balsamic Brussels Sprouts are a delightful side dish that combines the earthy flavor of Brussels sprouts with the sweet and tangy notes of honey and balsamic vinegar. This dish is perfect for a rustic Christmas potluck, as it adds a vibrant green color to the table and pleases both the eyes and the palate.
The Brussels sprouts are roasted to perfection, giving them a crispy exterior that contrasts beautifully with their tender insides. The honey-balsamic glaze adds a depth of flavor that elevates the dish, making it a standout at any holiday gathering.
This recipe is designed to serve 4-6 people, making it an ideal addition to a potluck where a variety of dishes are shared. The preparation is straightforward, with minimal ingredients, but it results in a dish that’s rich in flavor and complexity.
The roasting process enhances the natural sweetness of the Brussels sprouts, while the glaze provides a lovely balance of sweet and sour. Whether you’re a fan of Brussels sprouts or new to them, this recipe is sure to win over your taste buds and those of your guests.
Ingredients for 4-6 people:
- 1 1/2 pounds Brussels sprouts, trimmed and halved
- 3 tablespoons olive oil
- Salt and black pepper to taste
- 3 tablespoons balsamic vinegar
- 2 tablespoons honey
- 1/2 teaspoon garlic powder
- 1/4 cup chopped walnuts (optional)
- 1/4 cup dried cranberries (optional)
Instructions:
- Preheat the Oven: Begin by preheating your oven to 400°F (200°C). This temperature guarantees that the Brussels sprouts roast evenly and achieve a crispy texture.
- Prepare the Brussels Sprouts: Rinse the Brussels sprouts under cold water, trim the ends, and cut them in half. Removing any outer leaves that are yellow or damaged is important for a cleaner dish.
- Season the Sprouts: Place the halved Brussels sprouts in a large bowl. Add the olive oil, salt, and black pepper. Toss the sprouts until they’re evenly coated with the oil and seasoning.
- Roast the Sprouts: Spread the seasoned Brussels sprouts in a single layer on a baking sheet. This arrangement allows for even roasting. Place the baking sheet in the preheated oven and roast for 20-25 minutes, or until the sprouts are golden brown and tender, stirring halfway through the cooking time.
- Prepare the Glaze: While the Brussels sprouts are roasting, combine the balsamic vinegar, honey, and garlic powder in a small saucepan over medium heat. Stir occasionally until the mixture begins to thicken, which should take about 3-5 minutes.
- Glaze the Sprouts: Once the Brussels sprouts are roasted, remove them from the oven and drizzle the honey-balsamic glaze over them. Toss gently to guarantee even coating.
- Add Final Touches: If desired, sprinkle the roasted sprouts with chopped walnuts and dried cranberries for added texture and flavor. Serve immediately for the best taste and texture.
Extra Tips:
When selecting Brussels sprouts, look for ones that are firm and bright green for the freshest flavor. If you prefer a sweeter dish, you can increase the amount of honey in the glaze.
To save time, the Brussels sprouts can be prepped a day in advance and stored in the refrigerator. Just be sure to bring them to room temperature before roasting. Additionally, for a more caramelized finish, you can broil the Brussels sprouts for an additional 2-3 minutes after glazing.
Spiced Pear and Pecan Salad
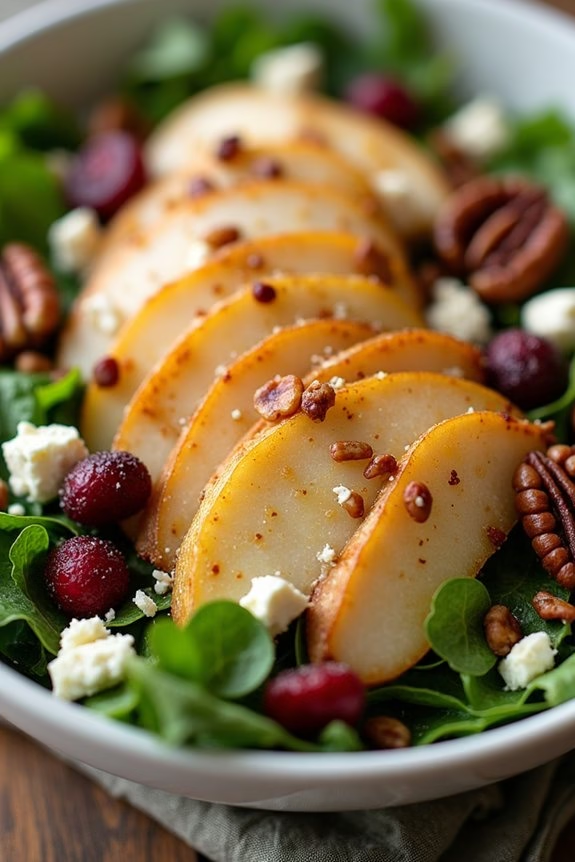
Spiced Pear and Pecan Salad is a delightful dish that perfectly fits the rustic theme of a Christmas potluck. This salad combines the natural sweetness of ripe pears with the earthy crunch of pecans, all enhanced by a warm array of spices.
It’s a revitalizing yet cozy addition to a holiday table, providing a balance of flavors and textures. The salad is light yet satisfying, making it a great starter or side dish alongside heartier Christmas fare.
The dressing brings everything together with its tangy, spiced undertones, complementing the sweetness of the fruit and the nuttiness of the pecans. Additionally, the crispness of fresh greens adds a revitalizing contrast.
This recipe serves 4-6 people, making it an ideal choice for small gatherings or as part of a larger spread. It’s simple to prepare, allowing you to spend more time enjoying the festivities and less time in the kitchen.
Ingredients:
- 3 ripe pears, cored and thinly sliced
- 1 cup pecans, toasted
- 6 cups mixed salad greens (such as arugula, spinach, or romaine)
- 1/2 cup dried cranberries
- 1/4 cup crumbled feta cheese
- 1/4 cup olive oil
- 2 tablespoons apple cider vinegar
- 1 tablespoon honey
- 1 teaspoon Dijon mustard
- 1/2 teaspoon ground cinnamon
- 1/4 teaspoon ground nutmeg
- Salt and pepper to taste
Instructions:
- Prepare the Pears and Pecans: Start by preheating your oven to 350°F (175°C). Spread the pecans on a baking sheet and toast them in the oven for about 5-7 minutes, or until they’re fragrant and lightly browned. Remove them from the oven and let them cool.
- Mix the Dressing: In a small bowl, whisk together the olive oil, apple cider vinegar, honey, Dijon mustard, ground cinnamon, ground nutmeg, salt, and pepper. Confirm that all ingredients are well combined to create a smooth dressing.
- Assemble the Salad: In a large salad bowl, combine the mixed greens, sliced pears, toasted pecans, dried cranberries, and crumbled feta cheese. Gently toss the ingredients to evenly distribute them throughout the salad.
- Dress the Salad: Pour the dressing over the salad and gently toss again to confirm all ingredients are coated with the dressing. Adjust the seasoning with additional salt and pepper if needed.
- Serve: Transfer the salad to a serving platter or individual plates. Serve immediately to enjoy the crispness of the greens and the freshness of the pears.
Extra Tips:
When selecting pears for this salad, opt for varieties like Bosc or Bartlett, which hold their shape well and offer a good balance of sweetness.
If you prepare the salad in advance, keep the dressing separate until just before serving to prevent the greens from wilting. Toasting the pecans enhances their flavor, but be sure to watch them closely in the oven to avoid burning.
For a festive touch, consider adding a sprinkle of pomegranate seeds on top for extra color and a burst of flavor.
Gingerbread Yule Log
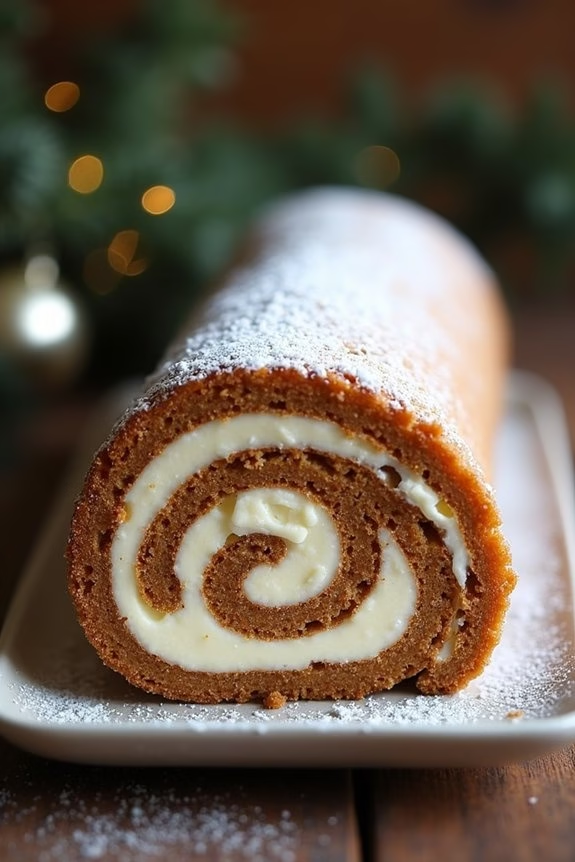
The Gingerbread Yule Log is a festive twist on the traditional French Bûche de Noël, perfect for adding a rustic charm to your holiday potluck. This delightful dessert combines the rich, spiced flavors of gingerbread with the creamy goodness of a mascarpone filling, all beautifully rolled into a log shape and dusted with confectioners’ sugar for a snowy effect.
It’s a show-stopping centerpiece that brings warmth and joy to any Christmas gathering, embodying the spirit of the season in every bite.
To create this Gingerbread Yule Log, you’ll begin by preparing a gingerbread sponge cake, which will serve as the base. The cake is then filled with a luscious mascarpone cream before being rolled and decorated to resemble a rustic log. This recipe serves 4-6 people, making it an ideal option for sharing with family and friends.
Gather your ingredients and follow the steps below for a dessert that’s sure to impress and delight your holiday guests.
Ingredients (Serves 4-6):
- 3 large eggs
- 1/2 cup granulated sugar
- 1/4 cup molasses
- 1 teaspoon vanilla extract
- 3/4 cup all-purpose flour
- 1 teaspoon baking powder
- 1 teaspoon ground ginger
- 1 teaspoon ground cinnamon
- 1/4 teaspoon ground cloves
- 1/4 teaspoon salt
- 8 oz mascarpone cheese
- 1/2 cup heavy cream
- 1/2 cup powdered sugar
- 1 teaspoon vanilla extract
- Confectioners’ sugar for dusting
Cooking Instructions:
- Preheat and Prepare Pan: Preheat your oven to 350°F (175°C). Line a 10×15-inch jelly roll pan with parchment paper, ensuring it’s well-fitted to prevent sticking.
- Make the Gingerbread Batter: In a large mixing bowl, whisk together the eggs and granulated sugar until light and fluffy. Add the molasses and vanilla extract, mixing well. In a separate bowl, sift together the flour, baking powder, ground ginger, cinnamon, cloves, and salt. Gradually fold the dry ingredients into the egg mixture until just combined.
- Bake the Cake: Pour the batter into the prepared pan, spreading it evenly with a spatula. Bake in the preheated oven for 10-12 minutes, or until the cake springs back when lightly touched.
- Roll the Cake: While the cake is still warm, carefully lift it using the parchment paper and roll it up tightly from the short end, parchment side in. Allow it to cool completely on a wire rack.
- Prepare the Mascarpone Filling: In a medium bowl, beat the mascarpone cheese with the heavy cream, powdered sugar, and vanilla extract until smooth and thick.
- Assemble the Yule Log: Once the cake has cooled, gently unroll it and remove the parchment paper. Spread the mascarpone filling evenly over the cake, then re-roll the cake without the parchment.
- Decorate: Place the rolled cake seam side down on a serving platter. Dust the top with confectioners’ sugar to give it a snowy appearance.
Extra Tips:
For a more authentic log appearance, use a fork to create bark-like lines on the surface of the rolled cake before dusting with confectioners’ sugar.
If you want to add a bit of flair, consider decorating the log with edible holly leaves and berries made from marzipan or fondant.
Remember to chill the assembled Yule Log for at least an hour before serving to allow the flavors to meld and the cake to set properly.
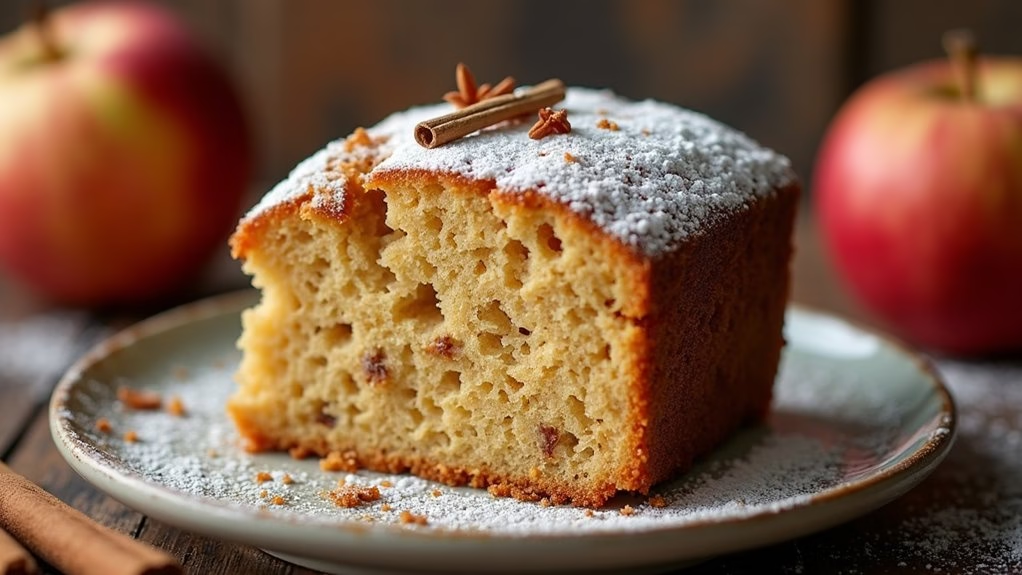
Spiced Apple Cider Cake
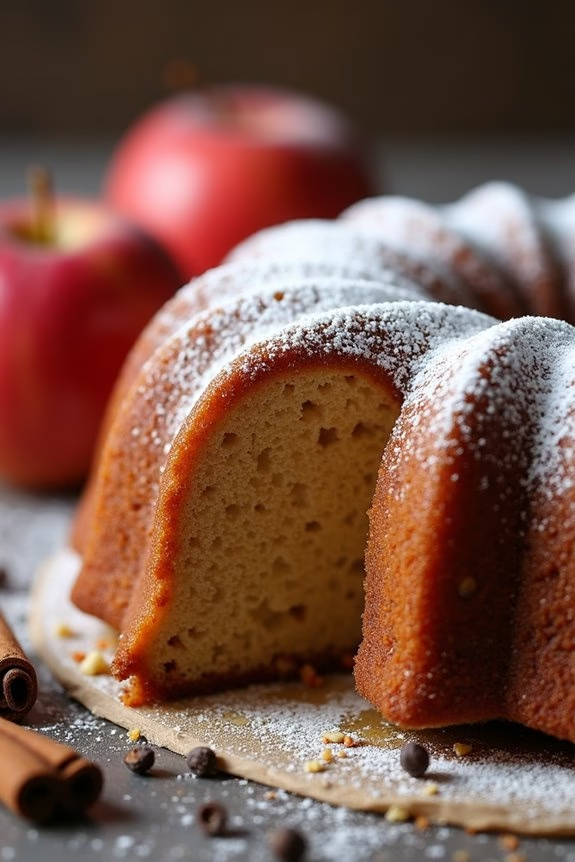
Transport your taste buds to a cozy cabin with the warm and inviting flavors of a Spiced Apple Cider Cake. This delightful dessert is perfect for your rustic Christmas potluck, combining the comforting essence of apple cider with a fragrant blend of spices.
The cake is moist and flavorful, with a slightly dense texture that pairs beautifully with a rich cream cheese frosting or a simple dusting of powdered sugar. Whether served for dessert or as a sweet slice with afternoon tea, this cake is bound to be a crowd-pleaser at your holiday gathering.
The secret to this cake’s irresistible taste lies in the use of fresh apple cider, which infuses the batter with a subtle sweetness and a hint of tartness. Cinnamon, nutmeg, and cloves add warmth and depth, transforming a simple cake into a festive masterpiece.
The recipe yields a serving size of 4-6 people, making it an ideal choice for smaller gatherings or as part of a larger dessert spread.
Ingredients:
- 1 1/2 cups apple cider
- 2 cups all-purpose flour
- 1 1/2 teaspoons baking powder
- 1/2 teaspoon baking soda
- 1/2 teaspoon salt
- 1 teaspoon ground cinnamon
- 1/2 teaspoon ground nutmeg
- 1/4 teaspoon ground cloves
- 1/2 cup unsalted butter, softened
- 1 cup granulated sugar
- 2 large eggs
- 1 teaspoon vanilla extract
Instructions:
- Preheat and Prepare: Begin by preheating your oven to 350°F (175°C). Grease and flour a 9-inch round cake pan or line it with parchment paper for easy removal.
- Reduce the Cider: In a small saucepan, bring the apple cider to a simmer over medium heat. Allow it to reduce until you have 1 cup of concentrated cider. This should take about 10-12 minutes. Once reduced, set it aside to cool.
- Mix Dry Ingredients: In a medium bowl, whisk together the flour, baking powder, baking soda, salt, cinnamon, nutmeg, and cloves until well combined.
- Cream Butter and Sugar: In a large mixing bowl, cream the softened butter and granulated sugar together using an electric mixer on medium speed until light and fluffy, about 3-4 minutes.
- Add Eggs and Vanilla: Beat in the eggs one at a time, making sure each egg is fully incorporated before adding the next. Mix in the vanilla extract.
- Combine Wet and Dry: Gradually add the dry ingredients to the butter mixture in three additions, alternating with the reduced apple cider. Begin and end with the dry ingredients, mixing just until combined after each addition.
- Bake the Cake: Pour the batter into the prepared cake pan, smoothing the top with a spatula. Bake in the preheated oven for 25-30 minutes, or until a toothpick inserted into the center of the cake comes out clean.
- Cool and Serve: Allow the cake to cool in the pan for about 10 minutes, then transfer it to a wire rack to cool completely. Dust with powdered sugar or frost with cream cheese frosting before serving.
Extra Tips:
For an added flavor twist, consider stirring in 1/2 cup of chopped nuts or raisins into the batter before baking. If you prefer a more pronounced apple flavor, you can add finely diced apples to the mix.
Confirm that the apple cider is properly reduced to concentrate its flavors; otherwise, the cake may turn out too moist. For a decorative touch, sprinkle the top with some extra ground cinnamon before serving. Enjoy this cake with a hot cup of tea or coffee for the perfect holiday treat.