
The holiday season is upon us, and I’m always on the lookout for appetizers that make my gatherings special without the added stress. Think of classic deviled eggs with a little twist or the sophisticated touch of cranberry brie bites on your table. Each option caters to a wide range of tastes and preferences. These visually appealing and easy-to-prepare bites are just what you need to elevate your holiday get-togethers. Let’s explore these festive appetizers that are sure to impress your guests.
Classic Deviled Eggs With a Twist
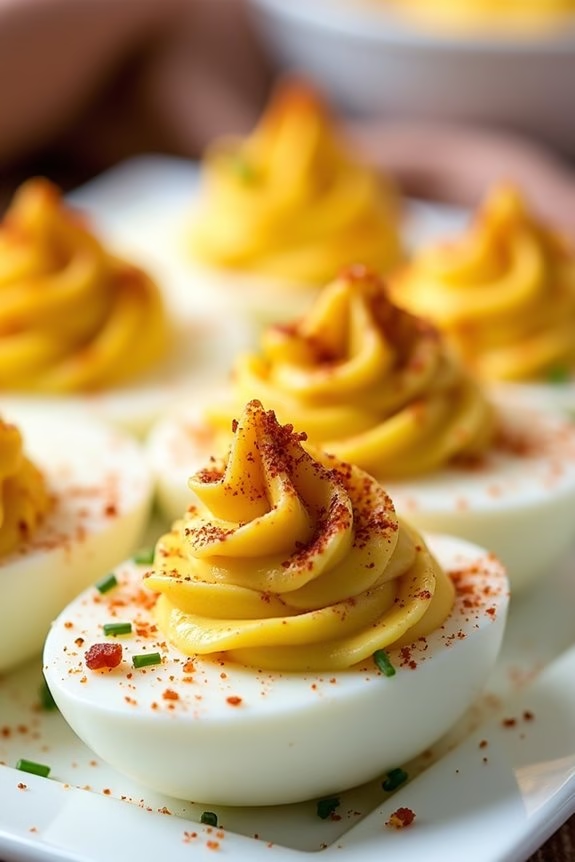
Deviled eggs are a staple at any holiday gathering, offering the perfect combination of creamy texture and savory flavor. This classic appetizer gets a modern upgrade with a twist of unexpected ingredients that elevate the traditional recipe to new heights. Imagine the delight on your guests’ faces when they experience the familiar comfort of deviled eggs with a surprising burst of flavor.
By adding a few unique elements, you can transform this simple dish into a memorable addition to your Christmas appetizer spread. The secret to making these deviled eggs stand out lies in the careful selection of fresh, high-quality ingredients combined with a creative flair in seasoning. The addition of ingredients like smoked paprika, crispy bacon bits, and a hint of Dijon mustard not only enhances the taste but also adds a pleasing visual contrast.
Whether you’re hosting a holiday dinner or attending a potluck, these deviled eggs are sure to be a crowd-pleaser. Here’s how you can prepare Classic Deviled Eggs With a Twist for 4-6 people.
Ingredients:
- 12 large eggs
- 1/2 cup mayonnaise
- 1 tablespoon Dijon mustard
- 1 tablespoon apple cider vinegar
- Salt and pepper to taste
- 1/2 teaspoon smoked paprika
- 1/4 cup cooked and crumbled bacon
- 2 tablespoons finely chopped chives
- 1 tablespoon capers, drained and chopped
- 1 teaspoon hot sauce (optional)
Instructions:
- Boil the Eggs: Place the eggs in a single layer in a large saucepan and cover with water, about an inch above the eggs. Bring the water to a boil over medium-high heat. Once boiling, remove the saucepan from heat, cover, and let the eggs sit for 10-12 minutes.
- Cool and Peel: Drain the hot water and transfer the eggs to a bowl of ice water to cool for about 5 minutes. Gently tap each egg on a hard surface and peel off the shells.
- Prepare the Filling: Slice each egg in half lengthwise and carefully scoop out the yolks into a medium mixing bowl. Place the egg whites on a serving platter.
- Mix the Yolk Filling: Mash the yolks with a fork until they’re crumbly. Add mayonnaise, Dijon mustard, apple cider vinegar, salt, pepper, and smoked paprika. Mix until smooth and creamy.
- Add the Twist: Gently fold in the chopped bacon, chives, capers, and hot sauce (if using) into the yolk mixture until well combined.
- Fill the Egg Whites: Use a spoon or a piping bag to fill the egg whites with the yolk mixture. For a fancy touch, use a star-tipped piping bag.
- Garnish and Serve: Sprinkle a little extra smoked paprika on top of the filled eggs for color and garnish with additional chopped chives or bacon bits if desired. Serve immediately or refrigerate until ready to serve.
Extra Tips:
For perfectly boiled eggs, consider using eggs that are a few days old, as they tend to peel more easily than fresh eggs. If you prefer a tangier flavor, increase the amount of vinegar or mustard in the filling.
To save time on the day of your event, you can prepare the filling in advance and store it in the refrigerator, then fill the egg whites just before serving to keep them fresh. Adjust the level of hot sauce based on your guests’ spice preference. Enjoy your Classic Deviled Eggs With a Twist!
Cranberry Brie Bites
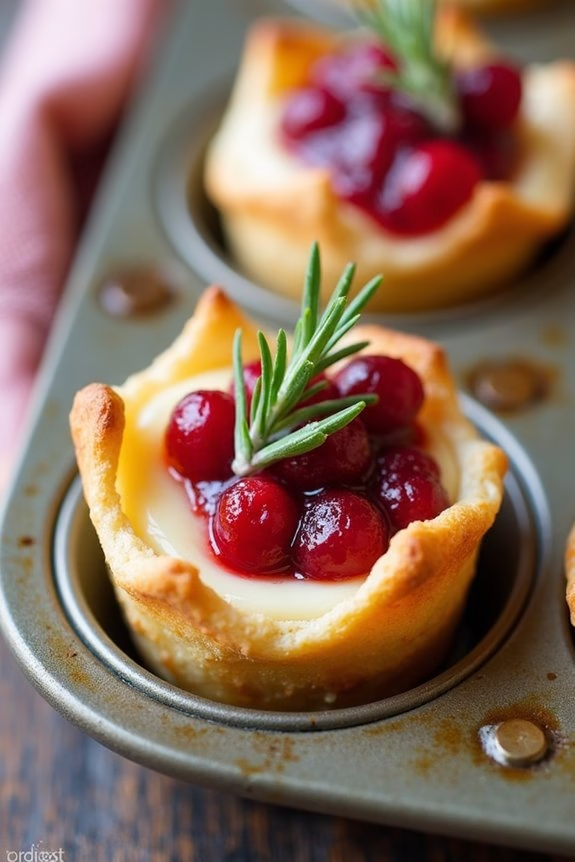
These Cranberry Brie Bites are incredibly easy to make, requiring just a few ingredients and minimal prep time. They can be prepared in advance and baked just before serving, making them a convenient choice for busy holiday schedules.
The warmth of the melted Brie paired with the tangy sweetness of the cranberry sauce creates a flavor explosion in every bite. With their elegant presentation and mouth-watering taste, these appetizers will quickly become a staple at your holiday celebrations.
Ingredients (Serves 4-6):
- 1 sheet of puff pastry or 1 package of phyllo dough
- 8 oz Brie cheese
- 1/2 cup cranberry sauce
- 1/4 cup chopped pecans (optional)
- Fresh rosemary or thyme for garnish (optional)
Cooking Instructions:
- Preheat the Oven: Set your oven to 375°F (190°C) and allow it to preheat while you prepare the ingredients.
- Prepare the Dough: If using puff pastry, roll out the sheet on a lightly floured surface to prevent sticking. Cut the dough into approximately 3-inch squares. If using phyllo dough, layer 2-3 sheets together, brushing lightly with melted butter between each layer, and then cut into squares.
- Prepare the Brie Cheese: Cut the Brie into small cubes, about 1-inch each.
- Assemble the Bites: Place each square of dough into a mini muffin tin, gently pressing down to form a cup shape. Place a cube of Brie into each cup.
- Add the Cranberry Sauce: Spoon about a teaspoon of cranberry sauce over the top of the Brie in each cup. If desired, sprinkle chopped pecans over the cranberry sauce for added texture and flavor.
- Bake: Place the muffin tin in the preheated oven and bake for 12-15 minutes, or until the dough is golden brown and the Brie is melted.
- Garnish and Serve: Remove the bites from the oven and allow them to cool slightly before removing from the tin. Garnish with fresh rosemary or thyme if using, and serve warm.
Extra Tips:
To guarantee the Brie cheese melts evenly, make sure to cut it into uniform pieces. If you’re preparing these bites in advance, you can assemble them and store them in the refrigerator for a few hours before baking.
Avoid adding the cranberry sauce too early, as it can make the dough soggy. For a sweeter version, consider adding a small drizzle of honey over the top before baking. These bites are best served warm, straight from the oven, to enjoy the full flavor of the melted Brie and cranberry combination.
Spinach and Artichoke Stuffed Mushrooms

Spinach and Artichoke Stuffed Mushrooms make for a delicious and elegant appetizer that’s sure to impress your guests during the holiday season. These bite-sized delights combine the creamy richness of a spinach and artichoke dip with the earthiness of mushrooms, creating a perfect flavor harmony. Perfect for a Christmas gathering, these stuffed mushrooms aren’t only delightful to taste but also visually appealing, adding a festive touch to your holiday table.
This recipe is designed to serve 4-6 people, making it ideal for a small gathering or as part of a larger spread of appetizers. The stuffed mushrooms are easy to prepare and can be made ahead of time, allowing you to enjoy the festivities with your loved ones rather than spending all your time in the kitchen.
Let’s plunge into the recipe and create these crowd-pleasing Spinach and Artichoke Stuffed Mushrooms.
Ingredients (for 4-6 servings):
- 16 large button mushrooms
- 1 tablespoon olive oil
- 1/2 cup cream cheese, softened
- 1/4 cup sour cream
- 1/4 cup mayonnaise
- 1/2 cup grated Parmesan cheese
- 1/2 cup shredded mozzarella cheese
- 1 cup fresh spinach, chopped
- 1/2 cup artichoke hearts, drained and chopped
- 2 cloves garlic, minced
- 1/4 teaspoon salt
- 1/4 teaspoon black pepper
- 1/4 teaspoon crushed red pepper flakes (optional)
- 2 tablespoons breadcrumbs
- 1 tablespoon chopped fresh parsley (for garnish)
Instructions:
- Prepare the Mushrooms: Preheat your oven to 375°F (190°C). Clean the mushrooms with a damp paper towel to remove any dirt. Carefully remove the stems and scoop out the insides using a small spoon to create space for the filling. Brush the mushroom caps with olive oil and arrange them on a baking sheet.
- Make the Filling: In a large mixing bowl, combine cream cheese, sour cream, and mayonnaise until smooth. Stir in the grated Parmesan cheese and shredded mozzarella cheese. Add the chopped spinach, chopped artichoke hearts, minced garlic, salt, black pepper, and crushed red pepper flakes if using. Mix until all ingredients are well incorporated.
- Stuff the Mushrooms: Using a spoon or small scoop, fill each mushroom cap generously with the spinach and artichoke mixture. Press lightly to guarantee the filling is secure.
- Add the Topping: Sprinkle a little breadcrumbs over the top of each stuffed mushroom to add a crispy texture.
- Bake the Mushrooms: Place the baking sheet in the preheated oven and bake for 20-25 minutes, or until the mushrooms are tender and the tops are golden brown.
- Garnish and Serve: Remove the mushrooms from the oven and let them cool for a few minutes. Transfer them to a serving platter and garnish with chopped fresh parsley for a pop of color. Serve warm.
Extra Tips:
For an extra burst of flavor, you can add a squeeze of lemon juice to the filling mixture before stuffing the mushrooms. If you prefer a more decadent version, consider adding some crumbled bacon to the filling.
These mushrooms can also be prepared a day ahead—simply stuff them, cover, and refrigerate. When ready to serve, bake as instructed, and they’ll emerge perfectly cooked and oozing with deliciousness. Enjoy your festive treat!
Prosciutto-Wrapped Asparagus
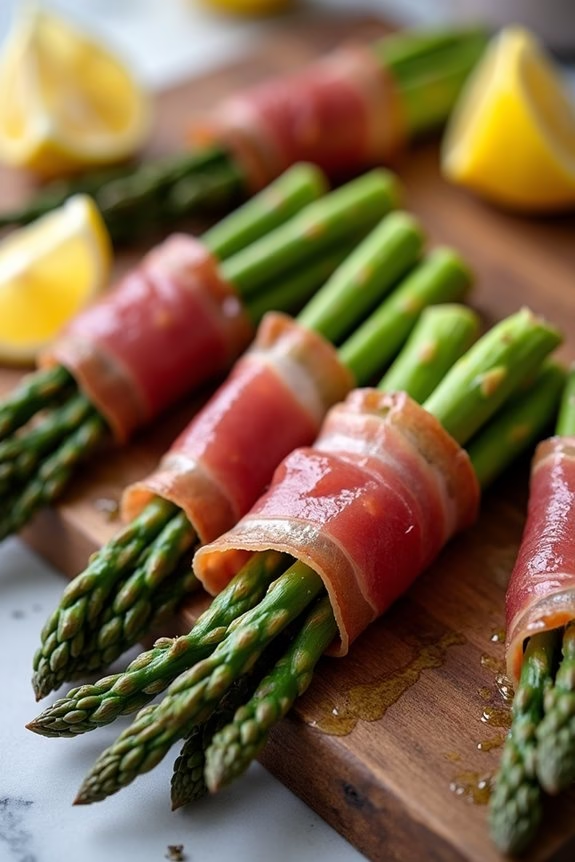
Prosciutto-Wrapped Asparagus is a delightful and elegant appetizer that perfectly combines the salty richness of prosciutto with the fresh, earthy flavor of asparagus. This dish isn’t only visually appealing but also incredibly easy to prepare, making it an ideal choice for Christmas gatherings.
Whether you’re hosting a formal dinner or a casual get-together, these savory bites are sure to impress your guests with their sophisticated taste and simplicity.
The key to making the perfect Prosciutto-Wrapped Asparagus is to select fresh, crisp asparagus stalks and high-quality prosciutto. The asparagus should be tender yet firm, and the prosciutto should be thinly sliced to allow for easy wrapping and best flavor balance.
With just a few ingredients and minimal effort, you’ll have a stunning appetizer ready to serve in no time. This recipe serves 4-6 people, making it a great addition to your holiday spread.
Ingredients:
- 24 asparagus spears
- 12 slices of prosciutto
- 2 tablespoons olive oil
- Salt and pepper to taste
- 1 tablespoon lemon juice
- Lemon wedges for serving (optional)
Cooking Instructions:
- Preheat the Oven: Start by preheating your oven to 400°F (200°C). This will guarantee that the asparagus cooks evenly and the prosciutto crisps up beautifully.
- Prepare the Asparagus: Wash the asparagus spears thoroughly and trim the woody ends. Pat them dry with a paper towel to remove excess moisture, which helps the oil and seasonings adhere better.
- Season the Asparagus: Place the asparagus in a large mixing bowl. Drizzle with olive oil, lemon juice, and sprinkle with a pinch of salt and pepper. Toss the asparagus gently to guarantee each spear is evenly coated.
- Wrap with Prosciutto: Take one slice of prosciutto and cut it in half lengthwise. Wrap each piece around the middle of an asparagus spear, leaving the tips exposed. Repeat this process until all the asparagus spears are wrapped.
- Arrange on Baking Sheet: Line a baking sheet with parchment paper for easy cleanup. Arrange the wrapped asparagus in a single layer, ensuring they aren’t touching each other for even roasting.
- Bake the Asparagus: Place the baking sheet in the preheated oven and bake for 12-15 minutes. The asparagus should be tender, and the prosciutto should be crispy.
- Serve: Remove from the oven and let cool slightly before transferring to a serving platter. Garnish with lemon wedges, if desired, and serve warm.
Extra Tips:
For a variation in flavor, you can add a sprinkle of Parmesan cheese over the wrapped asparagus before baking for an extra savory touch.
If you prefer a smokier taste, consider using smoked prosciutto or wrapping the asparagus with a strip of bacon instead.
Keep an eye on the asparagus while it’s in the oven; cooking time may vary depending on the thickness of the asparagus spears.
If you’re preparing this dish ahead of time, you can wrap the asparagus and store it in the refrigerator until you’re ready to bake, guaranteeing a stress-free entertaining experience.
Festive Caprese Skewers
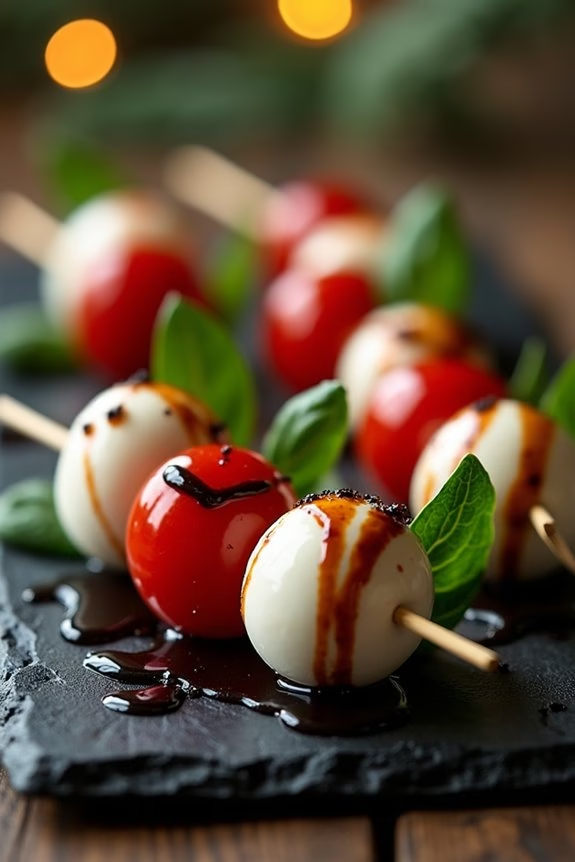
Celebrate the holiday season with a delightful and colorful appetizer that’s as easy to make as it’s delicious — Festive Caprese Skewers. These skewers are a playful twist on the classic Italian Caprese salad, perfectly presented on bite-sized skewers for a vibrant and festive touch.
The combination of fresh cherry tomatoes, creamy mozzarella balls, and aromatic basil leaves drizzled with rich balsamic glaze offers a burst of flavors that will leave your guests craving for more.
These skewers not only look stunning on a holiday platter but are also incredibly simple to assemble, making them an ideal choice for your Christmas gatherings. Whether you’re hosting a large party or a small family dinner, these Festive Caprese Skewers will add a touch of elegance and freshness to your appetizer spread.
Best of all, they require no cooking, allowing you to prepare them in advance and focus on enjoying the festivities.
Ingredients (Serves 4-6):
- 24 cherry tomatoes
- 24 small mozzarella balls (bocconcini)
- 24 fresh basil leaves
- 2 tablespoons extra virgin olive oil
- Salt and freshly ground black pepper to taste
- 4 tablespoons balsamic glaze
- 24 wooden skewers or cocktail picks
Instructions:
1. Prepare Ingredients: Start by rinsing the cherry tomatoes and basil leaves under cold water. Pat them dry with a clean kitchen towel. Drain the mozzarella balls and set them aside.
2. Assemble Skewers: Take a wooden skewer or cocktail pick and slide one cherry tomato onto it. Follow this by adding a fresh basil leaf. Next, add a mozzarella ball. Repeat this sequence one more time, ensuring each skewer has a total of two cherry tomatoes, two basil leaves, and two mozzarella balls.
Repeat the process until all skewers are assembled.
3. Season Skewers: Arrange the skewers on a serving platter. Drizzle them evenly with extra virgin olive oil. Sprinkle a pinch of salt and freshly ground black pepper over the skewers to enhance the flavors.
4. Add Balsamic Glaze: Finally, drizzle the balsamic glaze over the arranged skewers, providing a sweet and tangy finish to the appetizer.
Extra Tips:
For the best flavor, use the freshest ingredients you can find. Fresh basil leaves and ripe cherry tomatoes will give the skewers a vibrant taste.
If you can’t find small mozzarella balls, you can slice a large mozzarella ball into small cubes. To keep the basil fresh, assemble the skewers shortly before serving and drizzle with balsamic glaze just before presenting to avoid wilting the leaves.
If you prefer a more intense balsamic flavor, consider making a balsamic reduction from scratch to drizzle over the skewers.
Sausage-Stuffed Mini Peppers

Sausage-Stuffed Mini Peppers are a delightful and flavorful appetizer perfect for Christmas gatherings. These bite-sized treats are filled with a savory sausage mixture that complements the natural sweetness of the mini peppers. They’re quick to prepare, making them a stress-free addition to your holiday menu.
The combination of colorful peppers and the rich filling not only looks appealing but also provides a satisfying taste experience that your guests will love. Ideal for serving at parties or as a festive snack, these stuffed peppers are sure to be a hit.
The contrast between the tender roasted peppers and the hearty sausage stuffing creates a balanced dish that’s both nutritious and indulgent. Whether you’re hosting a large gathering or an intimate dinner, Sausage-Stuffed Mini Peppers can be prepared in advance and baked just before serving, allowing you to spend more time enjoying the festivities.
Ingredients (serving size: 4-6 people):
- 20 mini sweet peppers
- 1 pound Italian sausage (mild or spicy, based on preference)
- 1 cup cream cheese, softened
- 1/2 cup shredded mozzarella cheese
- 1/4 cup grated Parmesan cheese
- 2 cloves garlic, minced
- 1 teaspoon dried oregano
- 1/2 teaspoon salt
- 1/4 teaspoon black pepper
- 2 tablespoons chopped fresh parsley (optional, for garnish)
Cooking Instructions:
- Preheat the Oven: Start by preheating your oven to 375°F (190°C) to guarantee it’s ready for baking the stuffed peppers.
- Prepare the Peppers: Wash the mini peppers thoroughly. Slice each pepper lengthwise and remove the seeds and membranes to create a cavity for the stuffing. Place the prepared peppers on a baking sheet lined with parchment paper.
- Cook the Sausage: In a skillet over medium heat, cook the Italian sausage until it’s browned and cooked through, breaking it into small pieces with a spatula. Drain any excess fat from the skillet.
- Mix the Filling: In a large bowl, combine the cooked sausage, cream cheese, mozzarella cheese, Parmesan cheese, minced garlic, oregano, salt, and black pepper. Mix until well combined and smooth.
- Stuff the Peppers: Using a spoon or a piping bag, fill each pepper half with the sausage mixture, pressing gently to confirm the filling is compact and evenly distributed.
- Bake the Peppers: Place the stuffed peppers in the preheated oven and bake for 15-20 minutes, or until the peppers are tender and the cheese is bubbly and golden brown on top.
- Garnish and Serve: Once baked, remove the peppers from the oven and allow them to cool slightly. Garnish with chopped fresh parsley if desired, and serve warm.
Extra Tips:
For a spicier version, consider using hot Italian sausage or adding a pinch of crushed red pepper flakes to the sausage mixture. If you prefer a vegetarian option, substitute the sausage with cooked quinoa or a meat substitute like crumbled tofu or tempeh.
Additionally, make sure the cream cheese is fully softened before mixing to guarantee a smooth and creamy filling. This dish can also be made ahead of time; simply prepare and stuff the peppers, then refrigerate them until you’re ready to bake.
Enjoy the vibrant colors and savory flavors as part of your festive spread!
Sweet and Spicy Bacon-Wrapped Dates
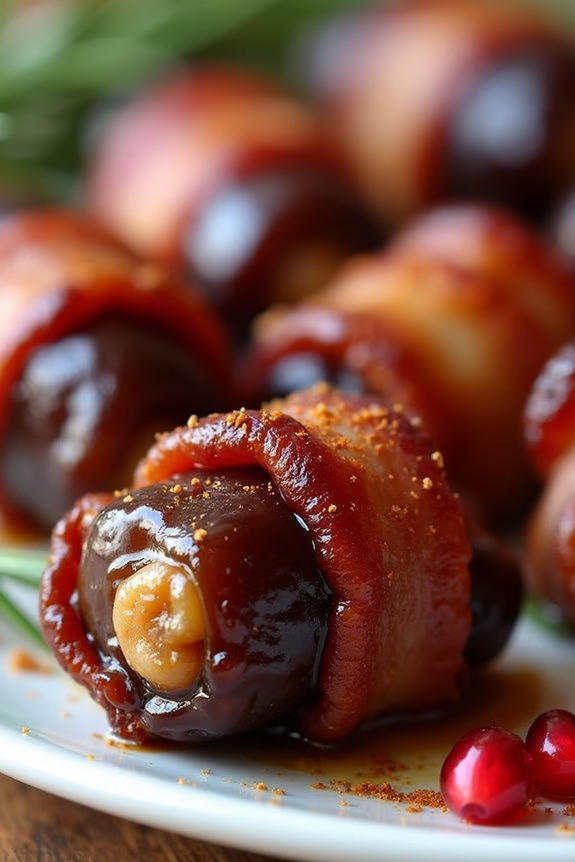
Sweet and Spicy Bacon-Wrapped Dates are an enticing appetizer that perfectly balances sweet, savory, and spicy flavors. These little morsels are a celebration of contrasting tastes and textures, making them an ideal choice for a festive Christmas gathering. The natural sweetness of the dates is complemented by the smoky saltiness of the bacon, while a hint of spice adds an unexpected kick that keeps guests reaching for more.
This dish isn’t only delicious but also easy to prepare, making it perfect for those who want to impress without spending hours in the kitchen. Each bite-sized piece is a delightful mouthful that bursts with flavor, ensuring that your Christmas appetizer spread is memorable.
Plus, it’s a versatile recipe that allows for variations to suit different palates or dietary preferences.
Ingredients (Serves 4-6):
- 24 Medjool dates
- 12 slices of bacon
- 24 whole almonds or pecans
- 1/4 cup balsamic glaze
- 1 teaspoon cayenne pepper
- 24 toothpicks
Instructions:
- Preheat the Oven: Preheat your oven to 375°F (190°C). Prepare a baking sheet by lining it with parchment paper or a silicone baking mat to prevent sticking.
- Prepare the Dates: Slice each date lengthwise on one side to create an opening. Remove the pit carefully without tearing the date apart.
- Stuff the Dates: Insert a whole almond or pecan into the cavity of each date. The nut adds a delightful crunch and complements the soft texture of the date.
- Wrap with Bacon: Cut each bacon slice in half. Wrap each date with a half slice of bacon, ensuring the seam is on the underside. Secure with a toothpick to hold everything in place.
- Season the Dates: In a small bowl, mix the cayenne pepper into the balsamic glaze. Lightly brush each bacon-wrapped date with this sweet and spicy mixture for added flavor.
- Bake: Arrange the bacon-wrapped dates on the prepared baking sheet, seam side down. Bake in the preheated oven for 15-20 minutes, or until the bacon is crispy and the dates are warmed through.
- Serve: Remove from the oven and let them cool slightly before serving. The dates can be served warm or at room temperature, depending on your preference.
Extra Tips: To enhance the flavor, consider using smoked bacon for an extra layer of depth. If you prefer your appetizers less spicy, simply adjust the amount of cayenne pepper to taste.
For a different twist, try stuffing the dates with a small piece of blue cheese or goat cheese instead of nuts. These variations can bring out new flavors that will delight your guests.
Additionally, if you have leftover bacon-wrapped dates, they can be stored in the refrigerator and reheated in the oven for a quick and easy snack.
Smoked Salmon and Cream Cheese Cucumber Bites
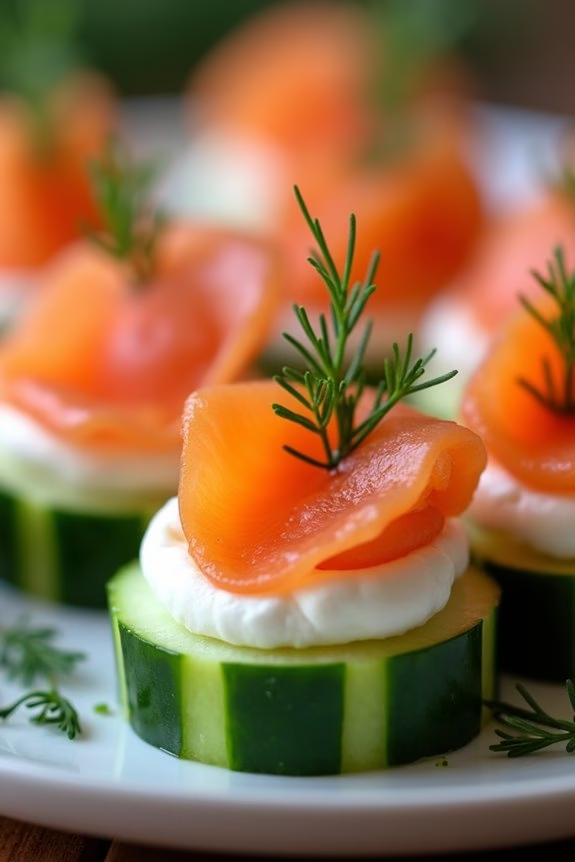
Smoked Salmon and Cream Cheese Cucumber Bites are a delightful and elegant appetizer perfect for any Christmas gathering. This dish combines the fresh, crisp texture of cucumbers with the rich, savory flavors of smoked salmon and cream cheese.
These bites aren’t only visually appealing with their vibrant colors and sophisticated presentation, but they also offer a delicious blend of flavors that are certain to impress your guests.
This recipe is simple to prepare and requires no cooking, making it an ideal choice for a stress-free appetizer that you can quickly assemble before your guests arrive. The creamy texture of the cream cheese complements the smoky flavor of the salmon, while the cucumber provides a revitalizing crunch.
These bites are perfect as finger food and can be prepared in advance, allowing you to enjoy more time with family and friends during your Christmas celebration.
Ingredients for 4-6 people:
- 2 large cucumbers
- 8 oz (225 g) cream cheese, softened
- 1 tablespoon lemon juice
- 1 tablespoon fresh dill, chopped
- 1/2 teaspoon garlic powder
- 8 oz (225 g) smoked salmon, thinly sliced
- Fresh dill or chives for garnish
- Salt and pepper to taste
Instructions:
- Prepare the Cream Cheese Mixture: In a medium-sized bowl, combine the softened cream cheese, lemon juice, chopped dill, garlic powder, salt, and pepper. Mix well until all the ingredients are thoroughly combined and the mixture is smooth.
- Prepare the Cucumbers: Wash the cucumbers thoroughly and pat them dry with a towel. Using a vegetable peeler, partially peel the cucumbers to create stripes. Slice the cucumbers into 1/2-inch thick rounds.
- Assemble the Bites: Lay the cucumber rounds flat on a serving platter. Using a small spoon or a piping bag, place a dollop of the cream cheese mixture onto each cucumber slice.
- Add the Smoked Salmon: Tear or cut the smoked salmon into small pieces that fit comfortably atop the cream cheese. Gently press a piece of salmon onto each cream cheese-topped cucumber slice.
- Garnish and Serve: Garnish each bite with a small sprig of fresh dill or a few chive pieces. Serve immediately, or refrigerate until ready to serve.
Extra Tips:
For best results, verify that the cream cheese is fully softened before mixing to achieve a smooth texture. If you don’t have a piping bag, you can use a zip-top bag with a corner cut off as an alternative.
Feel free to experiment with additional flavors, such as a touch of horseradish in the cream cheese mixture for a bit of heat. These bites can be made a few hours in advance and kept in the refrigerator; just be sure to cover them to prevent drying out.
Enjoy these delicious bites as a revitalizing start to your Christmas festivities!
Cheesy Garlic Pull-Apart Bread
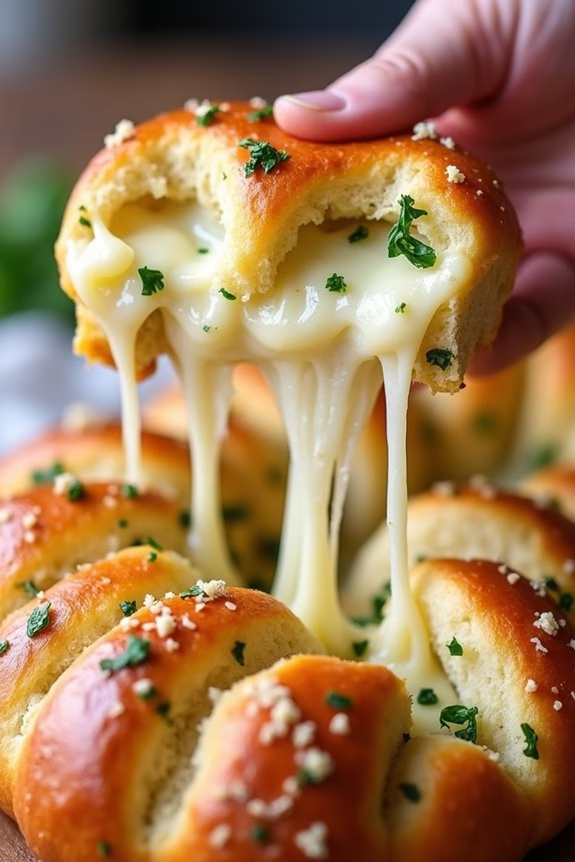
Cheesy Garlic Pull-Apart Bread is a delightful appetizer perfect for your Christmas gatherings. This dish combines the warm, comforting taste of freshly baked bread with the rich flavors of cheese and garlic. It’s an ideal starter to keep your guests entertained while the main course is being prepared.
The beauty of this recipe lies in its simplicity and the fact that it can be made in advance, leaving you more time to enjoy the festivities. This pull-apart bread isn’t only pleasing to the palate but also visually appealing, with its golden crust and gooey cheese oozing from every crevice.
The recipe is designed to serve 4-6 people, making it an excellent option for a small family gathering or a cozy evening with friends. With just a few ingredients and straightforward steps, you’ll have a delicious appetizer ready in no time. Simply pull apart a piece, dip it in your favorite sauce, and enjoy the heavenly combination of flavors.
Ingredients:
- 1 large round loaf of sourdough bread
- 1/2 cup (1 stick) unsalted butter
- 3 cloves garlic, minced
- 1 1/2 cups shredded mozzarella cheese
- 1/2 cup grated Parmesan cheese
- 2 tablespoons chopped fresh parsley
- Salt and pepper to taste
Cooking Instructions:
- Preheat the Oven: Preheat your oven to 350°F (175°C). This guarantees the bread will bake evenly.
- Prepare the Bread: Place the sourdough loaf on a cutting board. Using a sharp bread knife, make diagonal cuts about 1 inch apart across the loaf, being careful not to cut all the way through. Turn the loaf and make similar diagonal cuts in the opposite direction, creating a crosshatch pattern.
- Make the Garlic Butter: In a small saucepan, melt the butter over medium heat. Add the minced garlic and cook for about 1-2 minutes until fragrant. Remove from heat and mix in the chopped parsley, salt, and pepper.
- Assemble the Bread: Carefully open the cuts in the bread and use a spoon or brush to drizzle the garlic butter mixture into the crevices. Confirm each section gets a good coating of butter.
- Add the Cheese: Stuff the shredded mozzarella and grated Parmesan into the cuts of the bread, making sure to distribute the cheese evenly throughout the loaf.
- Bake the Bread: Wrap the entire loaf in aluminum foil and place it on a baking sheet. Bake in the preheated oven for 15 minutes. Remove the foil and bake for an additional 10 minutes, or until the cheese is melted and the top is golden brown.
- Serve: Once baked, remove from the oven and let it cool for a few minutes before serving. Present the bread on a platter for everyone to pull apart and enjoy.
Extra Tips:
For an added twist, you can incorporate other types of cheese such as cheddar or Gruyère for extra flavor. If you prefer a spicier kick, sprinkle some red pepper flakes into the garlic butter mixture.
Remember to select a good quality sourdough bread with a sturdy crust, as this will hold up better during baking. If you want to prepare this dish ahead of time, assemble the bread with the garlic butter and cheese, wrap it in foil, and store it in the refrigerator until you’re ready to bake it.
Enjoy your Cheesy Garlic Pull-Apart Bread warm for the best taste and texture!
Cranberry and Pecan Goat Cheese Balls
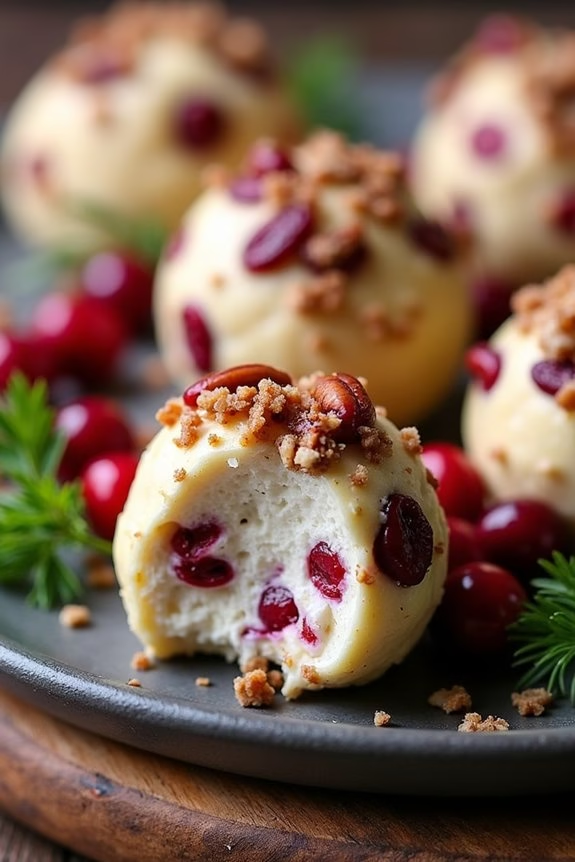
Cranberry and Pecan Goat Cheese Balls are a festive and delicious appetizer perfect for any holiday gathering. These bite-sized delights combine the tangy flavor of goat cheese with the sweetness of dried cranberries and the crunch of pecans, creating a harmonious blend of flavors and textures. Ideal for parties or as a starter for a Christmas dinner, these cheese balls aren’t only easy to make but also visually appealing, adding a touch of elegance to your holiday spread.
The preparation of Cranberry and Pecan Goat Cheese Balls is straightforward, making it an excellent choice even for novice cooks. The key to this recipe is choosing high-quality ingredients, ensuring that the goat cheese is creamy and the cranberries are fresh and plump. This dish serves 4-6 people, making it ideal for small gatherings or as part of a larger appetizer selection. With minimal cooking time required, you can focus on spending quality time with your loved ones while enjoying a delicious and satisfying appetizer.
Ingredients (serving size: 4-6 people):
- 8 oz goat cheese, softened
- 1/4 cup dried cranberries, chopped
- 1/4 cup pecans, chopped
- 1 tablespoon honey
- 1/2 teaspoon cinnamon
- 1/4 teaspoon salt
- 1/4 teaspoon black pepper
- 1 tablespoon fresh parsley, chopped (optional, for garnish)
- Crackers or bread slices, for serving
Instructions:
- Prepare the Ingredients: Begin by placing the softened goat cheese into a medium-sized mixing bowl. Using a spatula or a fork, gently mash and stir the cheese until it’s smooth and creamy.
- Mix the Flavors: Add the chopped dried cranberries, chopped pecans, honey, cinnamon, salt, and black pepper to the goat cheese. Mix all the ingredients thoroughly until they’re well incorporated, ensuring that the cranberries and pecans are evenly distributed throughout the cheese.
- Shape the Cheese Balls: Take a small amount of the cheese mixture (about a tablespoon) and roll it between your palms to form a ball. Continue this process until all the cheese mixture is used, aiming to make approximately 12-16 cheese balls.
- Chill the Cheese Balls: Place the formed cheese balls on a plate or tray and cover them with plastic wrap. Refrigerate for at least 30 minutes to allow the flavors to meld and the cheese balls to firm up.
- Serve and Garnish: Once chilled, remove the cheese balls from the refrigerator and arrange them on a serving platter. If desired, sprinkle with fresh parsley for an added touch of color. Serve immediately with crackers or bread slices for guests to enjoy.
Extra Tips:
For an added layer of flavor and texture, consider toasting the pecans before chopping them. This can be done by spreading them in a single layer on a baking sheet and baking at 350°F (175°C) for about 5 minutes or until they’re fragrant.
Additionally, you can customize the recipe by adding other ingredients like chopped fresh herbs or a dash of lemon zest to the cheese mixture. If you’re preparing this appetizer in advance, the cheese balls can be stored in the refrigerator for up to 24 hours before serving, making it a convenient option for busy holiday hosts.
Mini Beef Wellington Bites
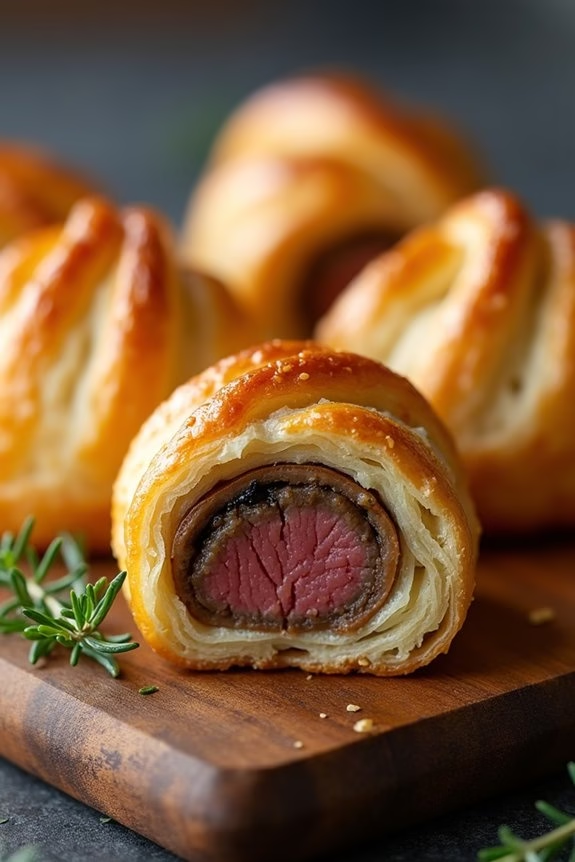
Mini Beef Wellington Bites are a delightful twist on the classic Beef Wellington, perfect for serving as an appetizer during Christmas celebrations. These bite-sized treats are great for entertaining, as they offer all the rich, savory flavors of the traditional dish in a convenient, easy-to-eat package. Each piece features tender beef wrapped in a flaky puff pastry crust, with a savory mushroom and shallot filling that adds depth and complexity to the dish.
This recipe is designed to serve 4-6 people, making it ideal for a small gathering or as part of a larger spread of festive appetizers. By following these simple steps, you can create an impressive and delicious dish that will surely impress your guests. The key to perfecting Mini Beef Wellington Bites lies in using high-quality ingredients and taking care with each step of preparation to guarantee the flavors are well-balanced and the pastry is perfectly flaky.
Ingredients (Serves 4-6):
- 1 pound beef tenderloin, cut into 1-inch cubes
- 1 tablespoon olive oil
- Salt and pepper, to taste
- 2 tablespoons butter
- 1 cup finely chopped mushrooms
- 2 shallots, finely chopped
- 2 cloves garlic, minced
- 1 teaspoon fresh thyme leaves
- 2 tablespoons Dijon mustard
- 1 sheet puff pastry, thawed
- 1 egg, beaten (for egg wash)
Instructions:
- Prepare the Beef: Season the beef tenderloin cubes with salt and pepper. Heat the olive oil in a skillet over medium-high heat. Sear the beef cubes on all sides until browned, about 2-3 minutes per side. Remove from the skillet and set aside to cool.
- Make the Duxelles: In the same skillet, melt the butter over medium heat. Add the mushrooms, shallots, and garlic. Sauté until the mushrooms release their moisture and the mixture becomes dry and golden brown, about 5-7 minutes. Stir in the thyme and season with salt and pepper. Allow the mixture to cool.
- Assemble the Wellingtons: Preheat your oven to 400°F (200°C). Roll out the puff pastry on a lightly floured surface. Cut the pastry into 3-inch squares. Spread a small amount of Dijon mustard on each square. Place a spoonful of the mushroom mixture in the center, then top with a cube of beef. Fold the corners of the pastry over the beef to form a neat package.
- Bake: Place the wrapped beef parcels on a baking sheet lined with parchment paper. Brush the tops with the beaten egg. Bake in the preheated oven for 12-15 minutes, or until the pastry is golden brown and flaky.
- Serve: Allow the Mini Beef Wellington Bites to cool slightly before serving. These are best enjoyed warm, either on their own or with a side of your favorite dipping sauce.
Extra Tips:
To guarantee the puff pastry is perfectly flaky, keep it cold until you’re ready to use it. If the pastry becomes too warm, it can become difficult to work with and may not puff up as desired during baking.
Additionally, make sure the beef isn’t overcooked during the initial searing process, as it will continue to cook in the oven. For an added touch, you might consider incorporating some chopped fresh parsley or a sprinkle of Parmesan cheese into the mushroom mixture for extra flavor.
Roasted Red Pepper Hummus With Pita Chips
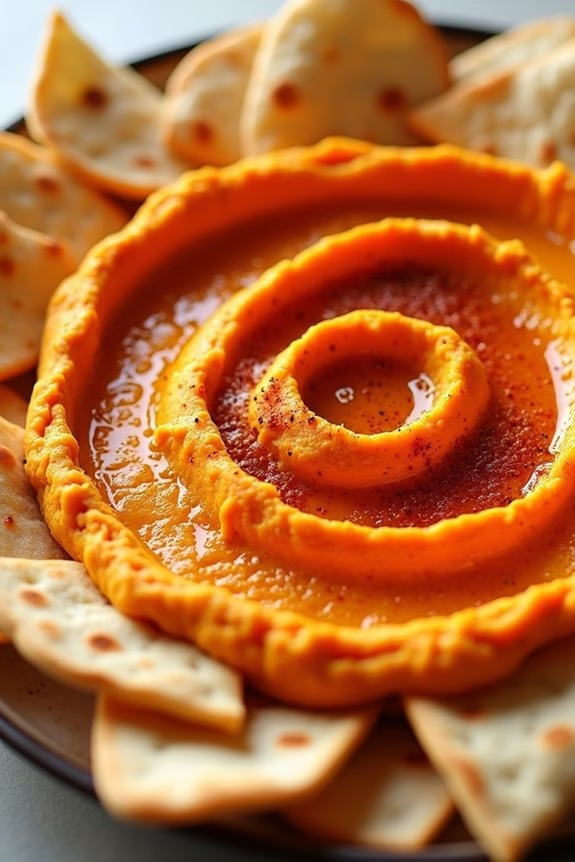
Roasted Red Pepper Hummus with Pita Chips is a delightful and flavorful appetizer that’s perfect for any Christmas gathering. This dish combines the creamy texture of traditional hummus with the rich, smoky flavor of roasted red peppers, creating a vibrant dip that’s both visually appealing and delicious.
Paired with crispy, golden-brown pita chips, this appetizer is sure to be a hit with your family and friends, setting the tone for a festive and joyous celebration.
Not only is Roasted Red Pepper Hummus a crowd-pleaser, but it’s also incredibly simple to prepare. Whether you’re hosting a large holiday dinner or a casual get-together, this dish can be made ahead of time, allowing you to spend more time with your guests and less time in the kitchen.
Plus, it’s a healthy option that caters to various dietary preferences, being both vegan and gluten-free. Let’s plunge into the ingredients and steps needed to create this scrumptious appetizer for 4-6 people.
Ingredients:
- 2 large red bell peppers
- 1 can (15 ounces) chickpeas, drained and rinsed
- 2 tablespoons tahini
- 2 tablespoons lemon juice
- 2 cloves garlic, minced
- 1 teaspoon ground cumin
- 1/2 teaspoon smoked paprika
- Salt to taste
- 2 tablespoons olive oil
- 4-6 whole wheat pita breads
- Olive oil spray or a small amount for brushing
- Salt and pepper to taste
Instructions:
1. Roast the Red Peppers: Preheat your oven to 450°F (230°C). Place the red bell peppers on a baking sheet and roast them in the oven for about 25-30 minutes, turning occasionally, until the skins are charred and blistered.
Remove from the oven and place them in a bowl, covering it with plastic wrap to let them steam for about 10 minutes. This will make the skins easier to peel off.
2. Prepare the Peppers: Once cooled, peel the skins off the peppers, remove the seeds and stems, and chop them coarsely. Set aside.
3. Blend the Hummus: In a food processor, combine the chickpeas, tahini, lemon juice, garlic, cumin, smoked paprika, and a pinch of salt. Add the roasted red peppers and blend until smooth. Gradually add olive oil while processing until the mixture is creamy and well combined.
Taste and adjust seasoning if necessary.
4. Prepare the Pita Chips: Lower the oven temperature to 375°F (190°C). Cut the pita breads into triangles and arrange them in a single layer on a baking sheet. Lightly spray or brush with olive oil, and sprinkle with salt and pepper.
Bake for about 10-12 minutes, or until the chips are crispy and golden brown, flipping halfway through.
5. Serve: Transfer the hummus to a serving bowl, drizzle with a little olive oil, and sprinkle with additional smoked paprika for garnish if desired. Serve alongside the freshly baked pita chips.
Extra Tips:
When preparing this dish, consider making the roasted red peppers a day in advance to save time on the day of your event. You can store them in an airtight container in the refrigerator.
If you prefer a spicier version of this hummus, feel free to add a pinch of cayenne pepper or a dash of hot sauce to the mix. Also, verify your pita chips are fully cooled before serving to maintain their crispiness.
If you have leftover hummus, it can be stored in an airtight container in the fridge for up to a week, making it a versatile snack even after your Christmas celebration.
Holiday Cheese and Charcuterie Board

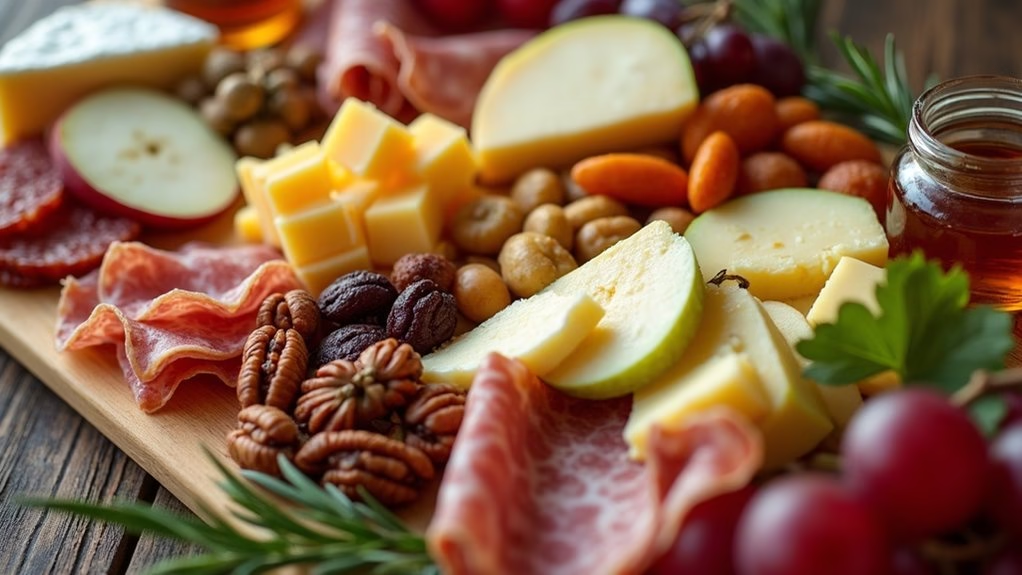
Creating a Holiday Cheese and Charcuterie Board is an artful way to impress your guests with minimal effort. This festive appetizer is perfect for gatherings, offering a delightful variety of flavors and textures that cater to diverse palates. By combining an assortment of cheeses, cured meats, and complementary accompaniments, you can create a visually stunning and delicious centerpiece for your holiday celebration.
The beauty of a charcuterie board lies in its versatility; you can customize it based on your preferences and the availability of ingredients. A well-curated charcuterie board is more than just a platter; it’s an experience. The key to a successful board is balance, both regarding taste and presentation.
Begin by selecting a range of cheeses with different textures and flavors, such as soft, hard, and blue cheeses. Pair these with a variety of cured meats, like salami or prosciutto, and add fresh fruits, nuts, and crackers to complement the flavors. To enhance the visual appeal, arrange the components artfully, considering color, shape, and height variations.
Ingredients (Serves 4-6):
- 150g Brie cheese
- 150g aged cheddar cheese
- 100g blue cheese
- 150g salami slices
- 150g prosciutto slices
- 1 small bunch of grapes
- 1 apple, sliced
- 1 pear, sliced
- 50g dried apricots
- 50g mixed nuts (almonds, walnuts, pecans)
- 1 jar of honey or fig jam
- 100g assorted crackers
- Fresh rosemary or thyme for garnish
Instructions:
- Prepare the Base: Start by choosing a large wooden board or platter as the base for your charcuterie board. Confirm it’s clean and dry before arranging your ingredients.
- Arrange the Cheeses: Place the cheeses on different sections of the board. Cut the brie into wedges, the cheddar into cubes, and leave the blue cheese in a small wedge. This creates variety and makes it easier for guests to serve themselves.
- Add the Meats: Fold the salami and prosciutto slices into quarters and arrange them around the cheeses. This creates a lovely visual effect and makes the meats easy to pick up.
- Incorporate Fruits and Nuts: Place the bunch of grapes in a corner of the board. Arrange the apple and pear slices in small piles near the cheeses. Scatter the dried apricots and mixed nuts around the board for added color and texture.
- Include Condiments: Set a small jar or bowl of honey or fig jam in one corner of the board. This adds a sweet contrast to the savory elements.
- Add Crackers: Arrange the assorted crackers in stacks or fans around the board. This makes them accessible and adds a crunchy element.
- Garnish: Finish by adding sprigs of fresh rosemary or thyme for a festive touch.
Extra Tips:
When assembling your Holiday Cheese and Charcuterie Board, remember that variety is key. Choose cheeses with different milk origins (cow, goat, sheep) for diverse flavors. Consider dietary needs, offering gluten-free crackers if necessary.
For a personal touch, incorporate local or seasonal ingredients. Finally, allow the cheeses to come to room temperature before serving to enhance their flavors. A well-balanced charcuterie board not only satisfies taste buds but also adds a sophisticated charm to your holiday gathering.