

The holiday season is upon us, and it’s the perfect time to gather with loved ones over delicious food. I’ve put together a list of 11 hot Christmas appetizer recipes that will warm up any party. From creamy Baked Brie with Cranberry Sauce to savory Bacon-Wrapped Jalapeño Poppers, these dishes are sure to impress. Picture the delightful aroma of Garlic Parmesan Shrimp filling your home. Curious to see what other tasty treats are on the list?
Baked Brie With Cranberry Sauce
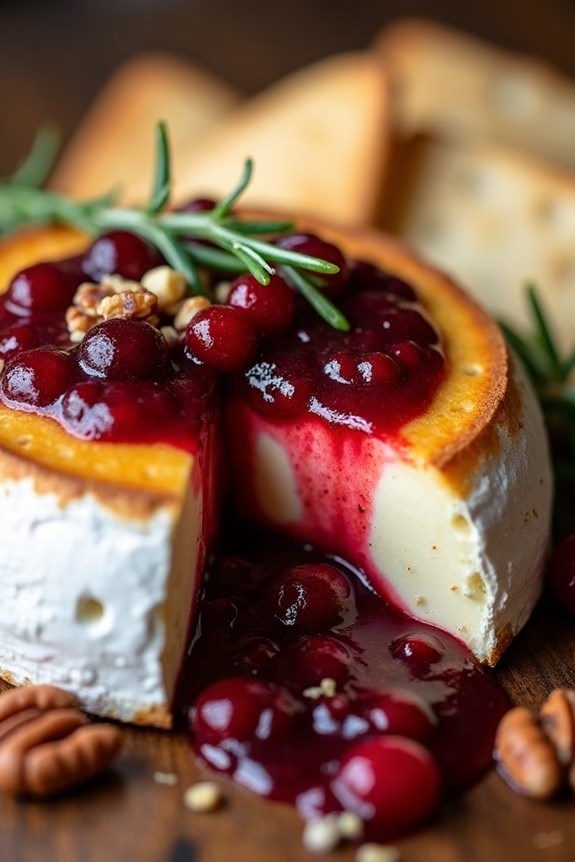
Baked Brie with Cranberry Sauce is a delightful appetizer perfect for holiday gatherings. The combination of creamy, rich brie cheese and tangy cranberry sauce creates a harmonious blend of flavors that’s both elegant and comforting. This dish is ideal for serving at Christmas parties, providing a warm and inviting start to your festive celebration.
The melted cheese oozes over the edges when baked, creating an irresistible dip for crusty bread or crackers. This recipe is simple to prepare and makes for an impressive centerpiece on your appetizer table. The tartness of the cranberry sauce complements the creaminess of the brie, while the addition of toasted nuts or fresh herbs can add a delightful crunch or aromatic touch.
Whether you’re an experienced cook or a beginner, this dish is sure to impress your guests and leave them keenly anticipating the main course.
Ingredients for 4-6 servings:
- 1 wheel of brie cheese (about 8 ounces)
- 1/2 cup cranberry sauce (store-bought or homemade)
- 1/4 cup chopped pecans or walnuts
- 1 tablespoon honey (optional)
- 1 tablespoon fresh rosemary or thyme leaves, chopped
- Crackers or sliced French baguette, for serving
Cooking Instructions:
1. Preheat the Oven:
Preheat your oven to 350°F (175°C) to guarantee it’s at the right temperature for baking the brie.
2. Prepare the Brie:
Place the wheel of brie on a baking sheet lined with parchment paper. If you prefer, you can score the top of the cheese with a knife to help the flavors meld better.
3. Add the Toppings:
Spoon the cranberry sauce over the top of the brie, spreading it evenly. Sprinkle the chopped nuts over the sauce, and drizzle with honey if desired. Finish with a scatter of fresh rosemary or thyme leaves.
4. Bake the Brie:
Place the baking sheet in the preheated oven and bake for 10-15 minutes, or until the brie is warm and gooey but not completely melted. Keep an eye on it to prevent over-baking.
5. Serve:
Remove the brie from the oven and allow it to sit for a few minutes before transferring it to a serving platter. Serve immediately with crackers or slices of French baguette for dipping.
Extra Tips:
When preparing Baked Brie with Cranberry Sauce, consider using a high-quality brie for the best flavor and texture. If using a particularly ripe cheese, adjust the baking time accordingly to avoid it becoming too runny.
For added texture, lightly toast the nuts before adding them to the dish. If you’re short on time, store-bought cranberry sauce works well, but homemade can add a personal touch.
Finally, remember to let the brie rest for a couple of minutes before serving to guarantee it holds its shape just enough for dipping without creating a mess.
Bacon-Wrapped Jalapeño Poppers
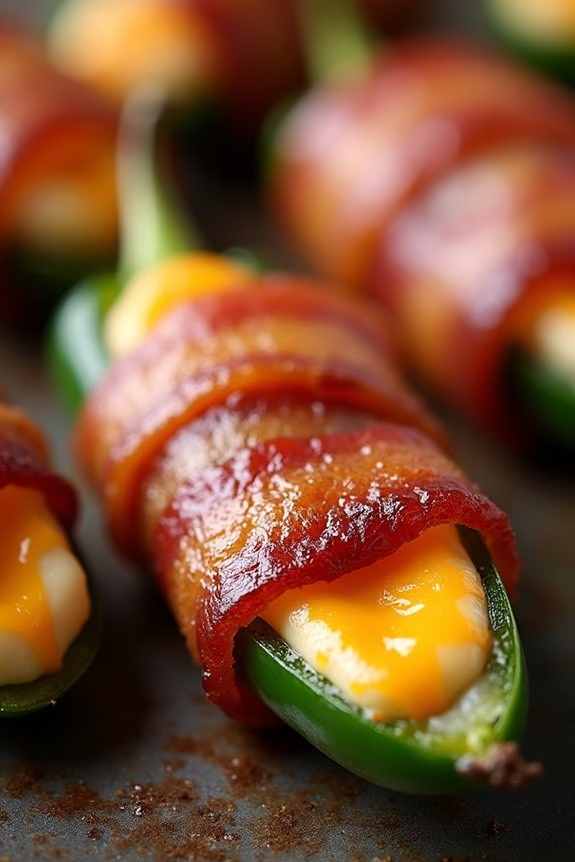
Bacon-Wrapped Jalapeño Poppers are a delightful and spicy appetizer perfect for your Christmas gathering. These poppers combine the heat of fresh jalapeños with the creamy richness of a cheese filling, all wrapped in crispy, savory bacon. They offer a wonderful combination of flavors and textures that are certain to please everyone at your holiday party. The preparation is straightforward, and the result is an irresistible bite-sized treat that guests will find hard to resist.
This festive appetizer isn’t only delicious but also visually appealing, with the vibrant green of the jalapeños peeping through the golden-brown bacon. The creamy cheese stuffing tempers the jalapeño’s spice, creating a balanced and flavorful bite. This recipe makes enough for 4-6 people, making it ideal for small gatherings or as part of a larger spread. Enjoy these Bacon-Wrapped Jalapeño Poppers fresh out of the oven for the best taste and texture.
Ingredients (for 4-6 people):
- 12 fresh jalapeño peppers
- 8 ounces of cream cheese, softened
- 1 cup shredded cheddar cheese
- 1 teaspoon garlic powder
- 1 teaspoon onion powder
- 1/2 teaspoon smoked paprika
- 12 slices of bacon
- Toothpicks
Cooking Instructions:
- Preheat the Oven: Start by preheating your oven to 400°F (200°C). This temperature will guarantee that the bacon crisps up nicely while the cheese filling melts perfectly.
- Prepare the Jalapeños: Cut each jalapeño in half lengthwise and remove the seeds and membranes. This will reduce the heat level, but if you prefer spicier poppers, you can leave some seeds in.
- Make the Cheese Filling: In a mixing bowl, combine the softened cream cheese, shredded cheddar cheese, garlic powder, onion powder, and smoked paprika. Mix until all ingredients are well blended and smooth.
- Fill Jalapeño Halves: Using a spoon, carefully fill each jalapeño half with the cheese mixture, ensuring the filling is evenly distributed and slightly mounded.
- Wrap with Bacon: Take a slice of bacon and wrap it around each filled jalapeño half. Secure the bacon in place by inserting a toothpick through the popper.
- Bake the Poppers: Place the bacon-wrapped jalapeño poppers on a baking sheet lined with parchment paper or a silicone baking mat. Bake in the preheated oven for 20-25 minutes, or until the bacon is crispy and the cheese filling is bubbly.
- Serve: Remove the poppers from the oven and let them cool slightly before serving. They can be enjoyed warm or at room temperature.
Extra Tips: For an extra kick, consider adding some chopped chives or a few dashes of hot sauce to the cheese filling. If you want to prep ahead, you can assemble the poppers a day in advance and store them in the refrigerator until you’re ready to bake. Just be sure to allow them to come to room temperature before baking for the best results.
For a smoky flavor, try using smoked bacon, and if you’re watching your sodium intake, opt for low-sodium bacon instead. Enjoy your Bacon-Wrapped Jalapeño Poppers with a side of ranch or blue cheese dressing for dipping.
Spinach and Artichoke Dip
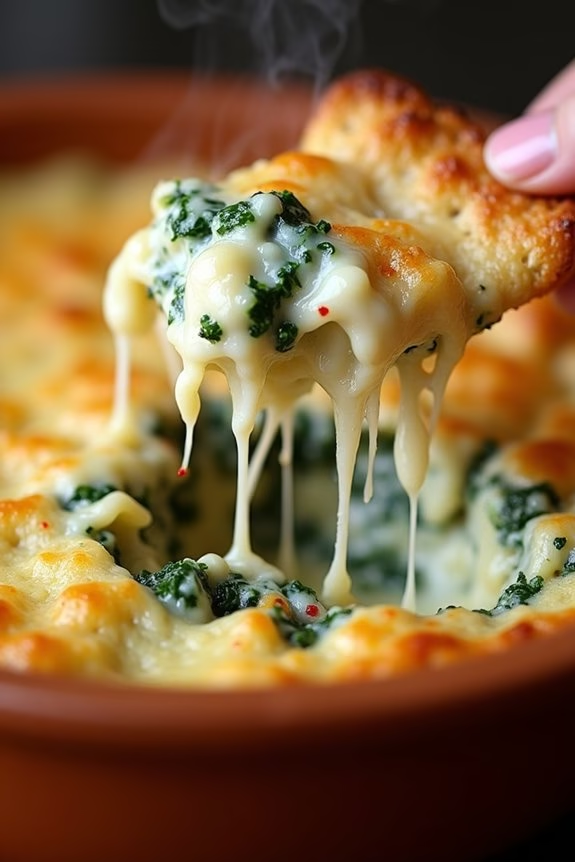
Spinach and Artichoke Dip is a classic choice for holiday gatherings, offering a creamy and flavorful appetizer that’s certain to please guests. This dish combines the earthy taste of spinach with the tangy flavor of artichokes, all enveloped in a rich, cheesy mixture. Perfect for spreading on crackers or dipping into with slices of baguette, this appetizer is both satisfying and easy to prepare.
Ideal for serving a group of 4-6 people, this recipe is a great addition to any festive spread. It can be prepared in advance and baked just before serving, making it a convenient option for busy hosts. Whether you’re a seasoned cook or a beginner, this recipe is straightforward and results in a deliciously warm and inviting dish that sets the tone for a cozy holiday celebration.
Ingredients (serving size: 4-6 people):
- 1 (10-ounce) package of frozen chopped spinach, thawed and drained
- 1 (14-ounce) can of artichoke hearts, drained and chopped
- 1/2 cup mayonnaise
- 1/2 cup sour cream
- 1 cup grated Parmesan cheese
- 1 cup shredded mozzarella cheese
- 2 cloves garlic, minced
- 1/4 teaspoon salt
- 1/4 teaspoon black pepper
- 1/4 teaspoon crushed red pepper flakes (optional)
Instructions:
- Preheat the Oven: Begin by preheating your oven to 350°F (175°C). This guarantees that the oven reaches the right temperature by the time you’re ready to bake the dip.
- Prepare Spinach: Drain the thawed spinach thoroughly, squeezing out any excess moisture with paper towels or a clean kitchen cloth to prevent the dip from becoming watery.
- Mix Ingredients: In a large mixing bowl, combine the spinach, chopped artichokes, mayonnaise, sour cream, Parmesan cheese, mozzarella cheese, minced garlic, salt, black pepper, and crushed red pepper flakes. Mix well until all ingredients are fully integrated.
- Transfer to Baking Dish: Spoon the mixture into a 9-inch baking dish or a similar size ovenproof dish, spreading it evenly to guarantee uniform cooking.
- Bake the Dip: Place the dish in the preheated oven and bake for about 25-30 minutes, or until the top is golden brown and the cheese is bubbly.
- Serve Hot: Remove the dish from the oven and allow it to cool slightly before serving. Serve the dip warm with crackers, sliced baguette, or fresh vegetable sticks.
Extra Tips:
For a smoother texture, consider using a food processor to blend the spinach and artichokes before mixing them with the other ingredients.
Additionally, you can customize the dip by adding ingredients like chopped jalapeños for extra heat or using different types of cheese such as fontina or cream cheese for variation.
If preparing in advance, store the unbaked dip in the refrigerator and bake it just before serving to confirm it remains fresh and appetizing.
Sausage-Stuffed Mushrooms
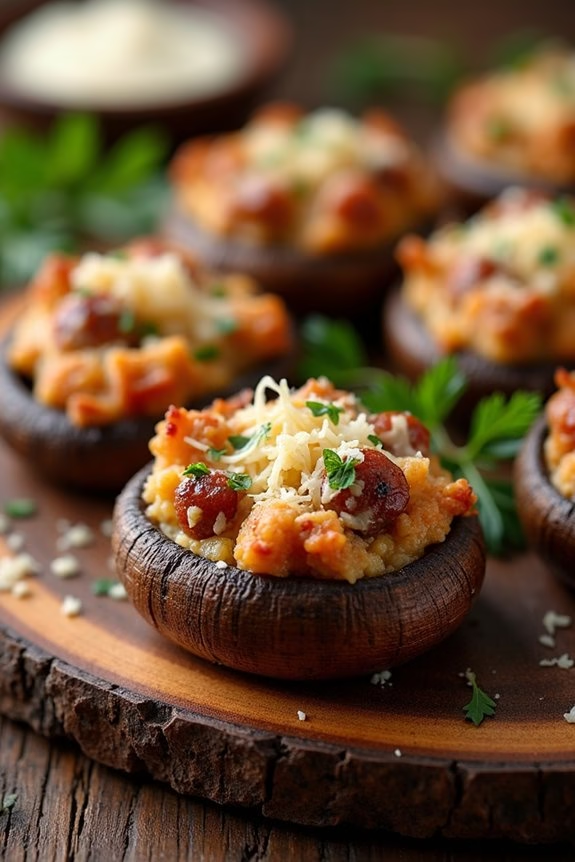
Sausage-Stuffed Mushrooms are a delightful and savory appetizer perfect for holiday gatherings, especially during Christmas. These bite-sized treats offer a burst of flavor with every bite, combining the earthiness of mushrooms with the rich, savory taste of sausage and a blend of complementary ingredients.
They’re not only delicious but also relatively simple to prepare, making them an excellent choice for both novice and experienced cooks looking to impress their guests. This recipe serves 4-6 people, making it a great option for small to medium-sized gatherings.
The mushrooms are filled with a mixture that includes sausage, breadcrumbs, cheese, and seasonings, which is then baked to perfection. The result is a warm, comforting appetizer that’s sure to be a hit at your Christmas celebration.
Ingredients:
- 24 large white mushrooms
- 1 pound mild Italian sausage, casing removed
- 1/2 cup breadcrumbs
- 1/2 cup grated Parmesan cheese
- 1/4 cup chopped fresh parsley
- 2 cloves garlic, minced
- 1/4 teaspoon black pepper
- 1/4 teaspoon salt
- 3 tablespoons olive oil
- 1/4 cup cream cheese, softened
Cooking Instructions:
- Preheat the Oven: Start by preheating your oven to 375°F (190°C). This will guarantee it’s hot enough to bake the mushrooms evenly.
- Prepare the Mushrooms: Gently clean the mushrooms with a damp paper towel to remove any dirt. Carefully remove the stems from the mushroom caps and set them aside. Arrange the mushroom caps on a baking sheet.
- Cook the Sausage: In a large skillet over medium heat, add 1 tablespoon of olive oil. Add the sausage, breaking it up with a spoon as it cooks. Cook until the sausage is browned and cooked through, about 8-10 minutes. Remove from heat and allow it to cool slightly.
- Make the Filling: In a large bowl, combine the cooked sausage, breadcrumbs, Parmesan cheese, parsley, garlic, black pepper, salt, and cream cheese. Mix until all the ingredients are well incorporated.
- Stuff the Mushrooms: Using a spoon or your hands, fill each mushroom cap with the sausage mixture, pressing down slightly to pack the filling.
- Bake: Drizzle the remaining olive oil over the stuffed mushrooms. Place the baking sheet in the preheated oven and bake for 20-25 minutes, or until the mushrooms are tender and the tops are golden brown.
- Serve: Once baked, remove the mushrooms from the oven and let them cool slightly before serving. They can be served warm or at room temperature.
Extra Tips:
For an extra burst of flavor, consider adding a teaspoon of crushed red pepper flakes to the sausage mixture if you enjoy a little heat.
Additionally, you can substitute the mild Italian sausage with spicy sausage for a more robust flavor. If you want to make the dish ahead of time, you can prepare the stuffing and clean the mushrooms the day before, then simply stuff and bake them before serving.
This will save time and allow you to focus on other aspects of your holiday meal preparation.
Mini Caprese Skewers
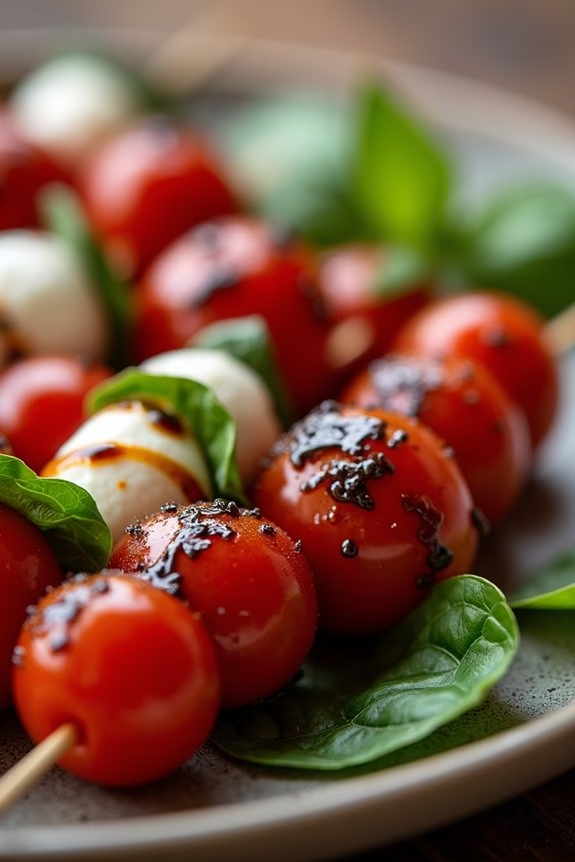
Mini Caprese Skewers are a delightful and invigorating appetizer perfect for adding a touch of elegance to your Christmas gathering. This dish combines classic Italian flavors with the festive presentation of skewers, making them not only delicious but also visually appealing. The combination of fresh mozzarella, ripe tomatoes, and aromatic basil leaves, all drizzled with a balsamic glaze, makes these skewers a hit with guests of all ages.
They’re simple to prepare, requiring minimal cooking effort, and can be assembled ahead of time, allowing you to focus on other holiday preparations.
These skewers aren’t only delicious but also healthy, providing a great alternative to heavier appetizers. The fresh ingredients provide a burst of flavor, while the balsamic glaze adds a sweet and tangy finish. Whether you’re hosting a small family gathering or a larger party, Mini Caprese Skewers are sure to be a crowd-pleaser.
The vibrant colors also add a festive touch to your holiday table setting, making them a perfect choice for Christmas celebrations.
Ingredients for 4-6 servings:
- 24 cherry tomatoes
- 24 small fresh mozzarella balls (bocconcini)
- 24 fresh basil leaves
- 2 tablespoons extra-virgin olive oil
- Salt and freshly ground black pepper, to taste
- 2 tablespoons balsamic glaze
- 24 wooden skewers or toothpicks
Cooking Instructions:
- Prepare the Ingredients: Begin by washing the cherry tomatoes and basil leaves under cold water. Pat them dry with paper towels to remove excess moisture. Drain the fresh mozzarella balls from their packaging liquid and set them aside.
- Assemble the Skewers: Take a wooden skewer or toothpick and start by threading one mozzarella ball onto it. Follow with a fresh basil leaf, folding it if necessary to fit. Next, add a cherry tomato. Repeat this sequence until all skewers are assembled, aiming for approximately 24 skewers.
- Season the Skewers: Arrange the assembled skewers on a serving platter. Drizzle the extra-virgin olive oil evenly over the skewers, ensuring each one is lightly coated. Season with salt and freshly ground black pepper to taste.
- Add Balsamic Glaze: Using a spoon or a squeeze bottle, drizzle the balsamic glaze over the skewers. Try to guarantee each skewer gets a touch of the glaze for flavor balance.
- Serve: The skewers are ready to be served immediately. They can also be stored in the refrigerator for up to an hour before serving to keep them fresh.
Extra Tips:
For a more intense flavor, consider marinating the mozzarella balls in olive oil, salt, and pepper for about 30 minutes before assembly. This step can enhance the taste profile of the skewers.
If you can’t find small mozzarella balls, larger mozzarella pieces can be cut into bite-sized chunks. Additionally, if balsamic glaze is unavailable, you can make your own by reducing balsamic vinegar over medium heat until it thickens. Be sure to monitor it closely to prevent burning.
These skewers can also be made with heirloom cherry tomatoes for added color variety, adding even more visual appeal to your Christmas table.
Crab-Stuffed Crescent Rolls

Indulge in the delectable flavors of the sea with these Crab-Stuffed Crescent Rolls, a perfect appetizer for your Christmas gathering. These rolls are a delightful combination of soft, flaky crescent dough and a creamy, savory crab filling that will surely impress your guests.
Whether you’re hosting a festive holiday party or looking to add a touch of elegance to your Christmas dinner, these rolls are a crowd-pleaser that will leave everyone asking for more.
The secret to these delicious rolls lies in the balance of flavors and textures. The creamy crab mixture, seasoned with herbs and spices, complements the buttery and flaky crescent dough perfectly. The rolls are easy to make and bake to a golden brown, filling your kitchen with an irresistible aroma.
Serve them warm straight from the oven, and you’ll have an appetizer that’s both elegant and comforting.
Ingredients (Serves 4-6):
- 1 can (8 oz) refrigerated crescent roll dough
- 8 oz lump crab meat, drained and picked over for shells
- 4 oz cream cheese, softened
- 1/4 cup mayonnaise
- 1/4 cup grated Parmesan cheese
- 1 tablespoon lemon juice
- 1 tablespoon chopped fresh chives
- 1/2 teaspoon garlic powder
- 1/4 teaspoon salt
- 1/4 teaspoon black pepper
- 1 egg, beaten, for egg wash
Cooking Instructions:
- Preheat the Oven: Start by preheating your oven to 375°F (190°C). This guarantees that your crescent rolls bake evenly and achieve a nice golden color.
- Prepare the Crab Mixture: In a medium-sized bowl, combine the crab meat, cream cheese, mayonnaise, Parmesan cheese, lemon juice, chives, garlic powder, salt, and black pepper. Mix well until all the ingredients are evenly combined and the mixture is smooth.
- Prepare the Crescent Dough: Unroll the crescent roll dough and separate it into triangles as per the perforations. Place them on a clean, flat surface for easy assembly.
- Fill the Crescent Rolls: Spoon about 1 tablespoon of the crab mixture onto the wide end of each crescent triangle. Carefully roll each triangle, starting from the wide end and rolling towards the tip, to form a crescent shape.
- Brush with Egg Wash: Place the crab-stuffed crescent rolls on a baking sheet lined with parchment paper. Brush the tops with the beaten egg to give them a shiny, golden finish once baked.
- Bake: Place the baking sheet in the preheated oven and bake for 12-15 minutes, or until the rolls are golden brown and the filling is heated through.
- Serve: Remove from the oven and let them cool slightly before serving. Enjoy them warm for the best taste and texture.
Extra Tips:
Guarantee that the cream cheese is fully softened before mixing to avoid lumps in the crab filling. You can prepare the crab mixture a day in advance and store it in the refrigerator to save time on the day of your event.
For added flavor, consider adding a pinch of cayenne pepper or some chopped dill. If you prefer smaller appetizers, you can cut the crescent dough into smaller triangles and adjust the filling accordingly.
Enjoy these rolls fresh out of the oven, as reheating may alter the texture of the dough.
Sweet and Spicy Meatballs
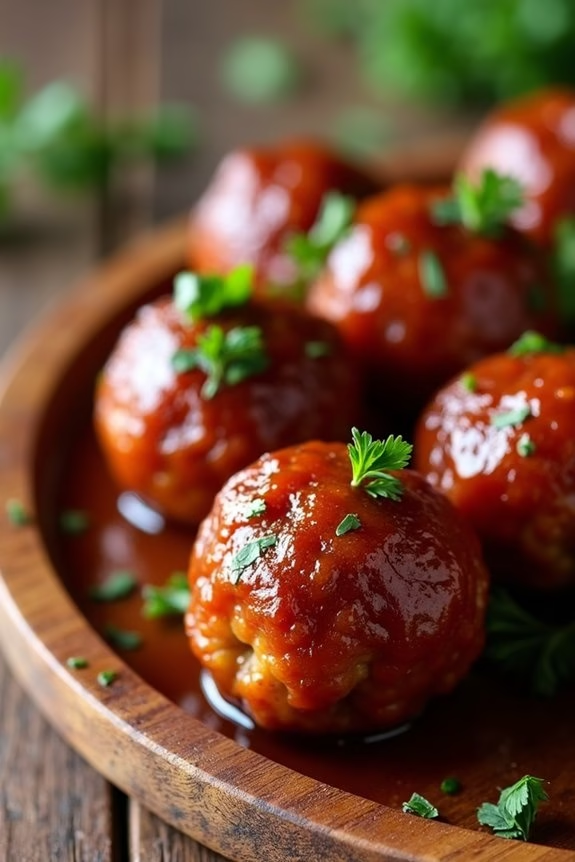
Sweet and Spicy Meatballs are a delightful appetizer that perfectly balances the savory and sweet flavors with a hint of heat. These meatballs are ideal for your Christmas gathering, offering a warm and festive option that guests will love. The combination of juicy meat, sweet honey, and spicy chili sauce creates an irresistible dish that will keep everyone coming back for more.
These meatballs aren’t only delicious but also quite easy to prepare, making them an excellent choice for busy holiday cooks. With a few simple ingredients, you can create a crowd-pleasing appetizer that pairs well with other holiday dishes. Whether served alongside a cheese platter or as a standalone starter, Sweet and Spicy Meatballs will surely be a hit at your holiday table.
Ingredients (Serves 4-6):
- 1 pound ground beef
- 1/2 cup breadcrumbs
- 1/4 cup milk
- 1 large egg
- 1 teaspoon garlic powder
- 1/2 teaspoon salt
- 1/2 teaspoon black pepper
- 1/4 cup chopped fresh parsley
- 1/3 cup honey
- 1/3 cup chili sauce
- 2 tablespoons soy sauce
- 1 tablespoon apple cider vinegar
- 1 tablespoon olive oil
Cooking Instructions:
- Preheat the oven: Begin by preheating your oven to 375°F (190°C). This guarantees that the meatballs will cook evenly and thoroughly.
- Prepare the meat mixture: In a large mixing bowl, combine the ground beef, breadcrumbs, milk, egg, garlic powder, salt, black pepper, and chopped parsley. Use your hands to mix until just combined, being careful not to overwork the mixture to keep the meatballs tender.
- Shape the meatballs: Roll the meat mixture into 1-inch balls, using your hands to shape them. Place the meatballs on a baking sheet lined with parchment paper or a lightly greased baking dish, making certain they’re evenly spaced.
- Bake the meatballs: Place the baking sheet in the preheated oven and bake for 20-25 minutes, or until the meatballs are cooked through and golden brown.
- Prepare the sauce: While the meatballs are baking, prepare the sauce by combining the honey, chili sauce, soy sauce, and apple cider vinegar in a small saucepan. Heat over medium heat, stirring occasionally, until the sauce is well combined and slightly thickened.
- Coat the meatballs: Once the meatballs are done, remove them from the oven and place them in a large bowl. Pour the sauce over the meatballs, tossing gently to coat them evenly.
- Serve: Transfer the coated meatballs to a serving platter and garnish with additional chopped parsley if desired. Serve warm and enjoy!
Extra Tips:
For best results, try not to overmix the meatball ingredients, as this can make the meatballs dense. Using a gentle hand when forming the meatballs will help keep them tender.
You can also prep the meatballs ahead of time and store them in the refrigerator until you’re ready to bake. If you prefer a spicier kick, adjust the amount of chili sauce to your liking.
Finally, these meatballs pair wonderfully with a variety of dipping sauces, such as ranch or blue cheese, for additional flavor options.
Garlic Parmesan Shrimp
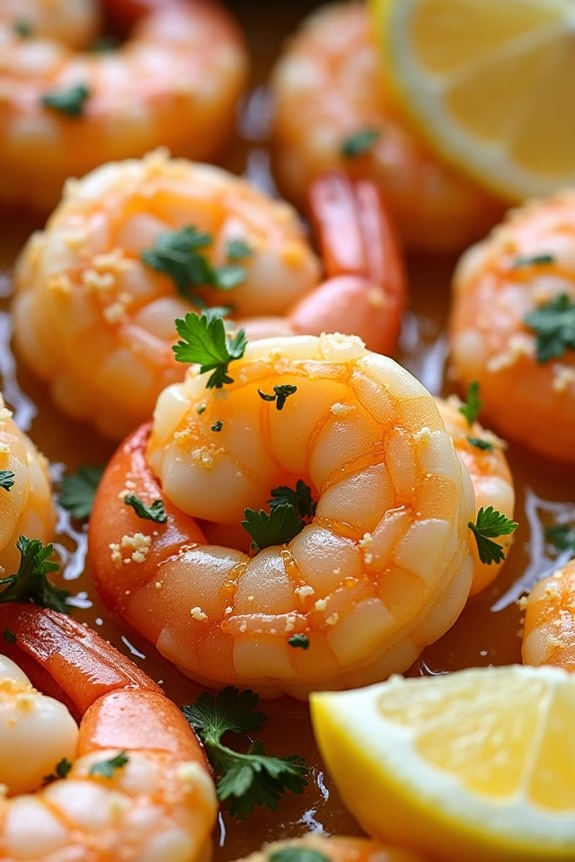
Impress your holiday guests with this delightful Garlic Parmesan Shrimp dish, a perfect appetizer to kickstart your Christmas feast. This recipe combines succulent shrimp with the rich flavors of garlic and Parmesan, creating a dish that’s both simple to prepare and guaranteed to satisfy.
The light, buttery sauce perfectly complements the shrimp, making it an irresistible choice for seafood lovers and a wonderful addition to your festive spread.
This recipe serves 4-6 people and is an excellent choice if you’re looking for a quick and elegant dish that doesn’t require hours in the kitchen. The beauty of this dish lies in its simplicity; with a few quality ingredients, you can create a memorable appetizer that sets the tone for the rest of your holiday meal.
Whether served with crusty bread or atop a bed of pasta, Garlic Parmesan Shrimp promises to be a crowd-pleaser.
Ingredients:
- 1 1/2 pounds large shrimp, peeled and deveined
- 3 tablespoons unsalted butter
- 4 cloves garlic, minced
- 1/2 cup grated Parmesan cheese
- 1 teaspoon Italian seasoning
- Salt and freshly ground black pepper, to taste
- 2 tablespoons chopped fresh parsley leaves
- Lemon wedges, for serving
Instructions:
- Prepare the Shrimp: Rinse the shrimp under cold water, then pat them dry with paper towels. Make sure the shrimp are completely dry to guarantee they cook evenly.
- Melt Butter and Sauté Garlic: In a large skillet, melt the butter over medium heat. Add the minced garlic and sauté for about 1-2 minutes until the garlic is fragrant and lightly golden, being careful not to burn it.
- Cook the Shrimp: Add the shrimp to the skillet in a single layer. Cook for about 2-3 minutes on each side, or until the shrimp are pink and opaque. Don’t overcook, as they’ll become tough and chewy.
- Season and Add Cheese: Sprinkle the Italian seasoning, salt, and pepper over the shrimp. Then, add the grated Parmesan cheese, stirring gently to coat the shrimp evenly in the cheese and garlic butter.
- Garnish and Serve: Remove the skillet from the heat. Garnish the shrimp with chopped fresh parsley. Serve immediately with lemon wedges on the side for a fresh citrusy finish.
Extra Tips:
To enhance the flavor of the shrimp, consider marinating them in olive oil, garlic, and lemon juice for 30 minutes before cooking.
If you prefer a spicier dish, add a pinch of red pepper flakes along with the Italian seasoning.
When serving, pair the shrimp with a side of crusty bread to soak up the delicious garlic butter sauce, or toss them with your favorite pasta for a more substantial dish.
Always keep an eye on the shrimp as they cook quickly and can easily become overdone.
Pigs in a Blanket With Honey Mustard

Pigs in a Blanket With Honey Mustard are a delightful and savory appetizer that’s perfect for Christmas gatherings. This classic dish features juicy cocktail sausages wrapped in a golden, flaky pastry, served with a tangy and sweet honey mustard dipping sauce.
They’re easy to prepare and can be made ahead of time, making them a stress-free option for holiday entertaining. This crowd-pleasing recipe serves 4-6 people and is great for both adults and kids alike. The combination of the buttery pastry and the flavorful sausages, paired with the honey mustard, makes for an irresistible snack that will keep your guests coming back for more.
Whether you’re hosting a formal dinner or a casual get-together, Pigs in a Blanket With Honey Mustard are sure to be a hit.
Ingredients for Pigs in a Blanket With Honey Mustard (Serves 4-6):
- 1 package (8 oz) of refrigerated crescent roll dough
- 1 package (14 oz) of cocktail sausages or mini hot dogs
- 1 egg, beaten
- 2 tablespoons poppy seeds (optional)
- 1/4 cup Dijon mustard
- 2 tablespoons honey
Cooking Instructions:
- Preheat the Oven: Preheat your oven to 375°F (190°C) to guarantee it’s hot enough to bake the pigs in a blanket to a perfect golden brown.
- Prepare the Dough: Unroll the crescent roll dough and separate it into triangles. If needed, use a rolling pin to slightly flatten each triangle for easier wrapping around the sausages.
- Wrap the Sausages: Place a cocktail sausage at the wide end of each dough triangle. Roll the dough around the sausage, starting from the wide end and rolling towards the pointed end. Confirm the dough wraps securely around the sausage.
- Arrange on Baking Sheet: Place each wrapped sausage on a baking sheet lined with parchment paper, ensuring they’re spaced slightly apart to allow for even cooking.
- Egg Wash and Topping: Brush the tops of the dough with the beaten egg. Sprinkle poppy seeds on top of the wrapped sausages if desired, which will add a nice texture and appearance.
- Bake: Place the baking sheet in the preheated oven and bake for 12-15 minutes, or until the dough is golden brown and cooked through.
- Prepare Honey Mustard Sauce: While the pigs in a blanket are baking, make the honey mustard sauce by mixing the Dijon mustard and honey together in a small bowl until well combined.
- Serve: Once baked, remove the pigs in a blanket from the oven and let them cool slightly. Serve warm alongside the honey mustard dipping sauce.
Extra Tips:
For an extra burst of flavor, consider adding a small slice of cheese or a dab of spicy mustard inside the dough before wrapping it around the sausage.
You can also make the pigs in a blanket ahead of time and store them in the refrigerator until you’re ready to bake. If you don’t have poppy seeds, sesame seeds are a great alternative for topping.
Be sure to keep an eye on the baking time to prevent overcooking, as ovens can vary slightly in temperature.
Roasted Red Pepper Hummus With Pita Chips
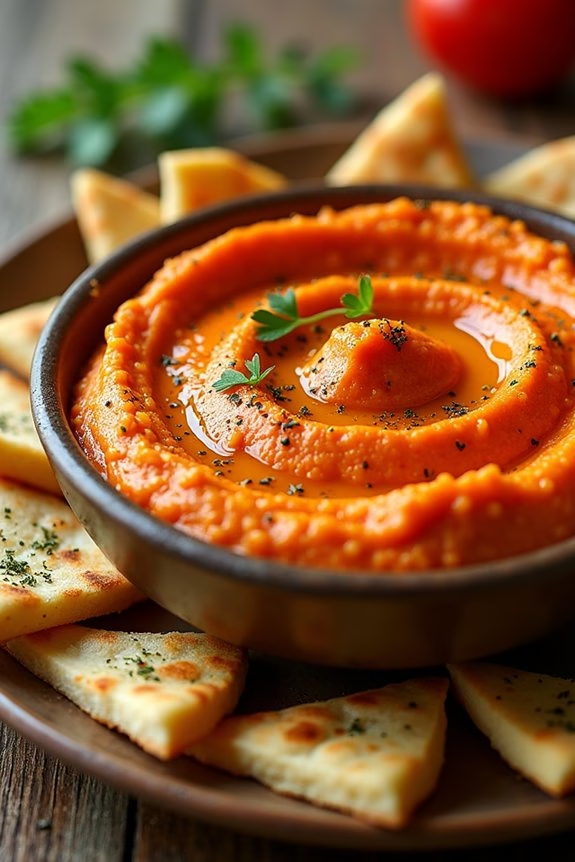
Roasted Red Pepper Hummus With Pita Chips is a delightful and flavorful appetizer perfect for the holiday season. This dish combines the creamy, nutty taste of hummus with the sweet, smoky flavors of roasted red peppers. Paired with crispy, golden pita chips, this appetizer is bound to be a hit at your Christmas gathering.
Not only is it delicious, but it’s also a healthy option that can be prepared in advance, making it a stress-free addition to your festive menu. The vibrant color of the roasted red pepper hummus adds a festive flair to any holiday table, while the crunchy pita chips provide a satisfying contrast in texture.
This recipe is perfect for serving 4-6 people, making it an ideal choice for intimate gatherings or as part of a larger spread. Whether you’re a seasoned cook or a novice in the kitchen, this easy-to-follow recipe will guide you to create a dish that’s both pleasing to the eye and the palate.
Ingredients (for 4-6 people):
- 2 large red bell peppers
- 1 can (15 oz) chickpeas, drained and rinsed
- 1/4 cup tahini
- 3 tablespoons olive oil
- 3 tablespoons lemon juice
- 2 cloves garlic, minced
- 1 teaspoon ground cumin
- 1/2 teaspoon smoked paprika
- Salt and pepper to taste
- 4 whole wheat pitas
- 1 tablespoon olive oil
- 1 teaspoon garlic powder
- 1 teaspoon dried oregano
Cooking Instructions:
- Roast the Red Peppers: Preheat your oven to 450°F (230°C). Place the red bell peppers on a baking sheet and roast for 25-30 minutes, turning occasionally, until the skin is charred and blistered. Remove the peppers from the oven, place them in a bowl, and cover with plastic wrap. Let them steam for about 10 minutes, which will make peeling the skin easier.
- Prepare the Pita Chips: While the peppers are steaming, reduce the oven temperature to 375°F (190°C). Cut the pitas into triangles and place them in a single layer on a baking sheet. Drizzle with 1 tablespoon of olive oil and sprinkle with garlic powder and dried oregano. Toss to coat the pita pieces evenly. Bake for 10-12 minutes, or until the chips are golden and crisp. Remove from the oven and set aside.
- Peel and Blend: Once the red peppers have steamed, peel off the skins, remove the seeds, and roughly chop the flesh. In a food processor, combine the roasted red peppers, chickpeas, tahini, olive oil, lemon juice, minced garlic, ground cumin, and smoked paprika. Blend until smooth. Season with salt and pepper to taste, and blend again to combine.
- Serve: Transfer the roasted red pepper hummus to a serving bowl. Drizzle with a little extra olive oil and garnish with a pinch of smoked paprika, if desired. Serve with the pita chips for dipping.
Extra Tips: For an extra layer of flavor, you can add a sprinkle of chopped fresh herbs like parsley or cilantro on top of the hummus before serving. If you want a spicier version, consider adding a pinch of cayenne pepper to the hummus blend.
This dish can also be prepared a day in advance; just store the hummus in the refrigerator and bake the pita chips fresh on the day of serving to make sure they remain crisp. Enjoy your Roasted Red Pepper Hummus With Pita Chips as a delightful start to your Christmas feast!
Cheesy Pull-Apart Bread With Herbs

Cheesy Pull-Apart Bread With Herbs is an irresistible appetizer that will have your guests reaching for more. This delightful dish combines the comforting flavors of melted cheese and aromatic herbs, baked into a crusty loaf of bread that’s perfect for sharing.
Whether you’re hosting a holiday gathering or just want to treat your family to something special, this easy-to-make appetizer is bound to impress. The key to this recipe lies in the combination of cheeses and herbs, which create a gooey, flavorful experience with every bite.
To make this dish, you’ll need a good quality round loaf of bread, such as sourdough or a rustic Italian loaf, which will hold up well during baking while allowing easy tearing. The bread is scored into a grid pattern, creating pockets perfect for stuffing with a mixture of cheeses and fresh herbs. As the bread bakes, the cheese melts, and the herbs infuse their flavors, resulting in a pull-apart bread that’s both cheesy and fragrant.
Ingredients for 4-6 people:
- 1 round loaf of bread (sourdough or Italian)
- 1 cup shredded mozzarella cheese
- 1 cup shredded cheddar cheese
- 1/4 cup grated Parmesan cheese
- 1/4 cup unsalted butter, melted
- 3 cloves garlic, minced
- 2 tablespoons fresh parsley, chopped
- 1 tablespoon fresh thyme, chopped
- 1 tablespoon fresh rosemary, chopped
- Salt and pepper to taste
Cooking Instructions:
- Preheat the Oven: Start by preheating your oven to 350°F (175°C). This will guarantee the bread bakes evenly and the cheese melts perfectly.
- Prepare the Bread: Place the loaf of bread on a cutting board. Using a serrated knife, carefully cut the bread into a grid pattern without slicing all the way through to the bottom. Aim for 1-inch squares, ensuring the loaf remains intact.
- Mix the Cheese and Herbs: In a medium bowl, combine the mozzarella, cheddar, and Parmesan cheeses. Add the minced garlic, parsley, thyme, and rosemary. Season with salt and pepper, and mix everything until well combined.
- Stuff the Bread: Gently separate the bread squares and stuff the cheese and herb mixture into the cuts. Make sure to fill each crevice well to maximize the flavor and gooeyness.
- Drizzle with Butter: Drizzle the melted butter evenly over the top of the stuffed bread, allowing it to seep into the cuts. This will help the bread crisp up as it bakes and add a rich, buttery flavor.
- Wrap and Bake: Wrap the prepared loaf in aluminum foil, making sure it’s completely covered. Place it on a baking sheet and bake in the preheated oven for 15 minutes.
- Unwrap and Finish Baking: Remove the foil and return the bread to the oven. Bake for an additional 10 minutes, or until the cheese is fully melted and the top of the bread is golden and crispy.
- Serve: Remove the bread from the oven and let it cool slightly before serving. Place it on a serving platter and let your guests pull apart the cheesy, herby goodness.
Extra Tips:
For the best results, use fresh herbs rather than dried ones, as they impart a more vibrant flavor to the bread. If you like a bit of heat, consider adding a pinch of red pepper flakes to the cheese mixture.
You can also experiment with different types of cheese, such as Gruyère or fontina, to create your own flavor combinations. If you find the bread browning too quickly, tent it with foil and continue baking until the cheese is melted.
Enjoy this cheesy pull-apart bread while it’s warm for the ultimate taste experience.