

If you’re like me and love hosting holiday gatherings, you’ll know the joy of crafting appetizers that make your guests smile. This Christmas, I’ve put together a collection of 10 dairy-free appetizers that will cater to everyone’s tastes. From the creamy roasted red pepper hummus to indulgent dark chocolate-dipped fruit skewers, there’s something for every palate. Picture the vibrant colors and delicious aromas filling your home. Ready to explore these festive treats?
Roasted Red Pepper Hummus

Roasted Red Pepper Hummus is a delightful and creamy appetizer, perfect for adding a splash of color and flavor to your dairy-free Christmas spread. This delicious dip combines the earthy richness of chickpeas with the smoky sweetness of roasted red peppers, creating a harmonious blend that’s both satisfying and nutritious.
It’s an easy-to-make dish that caters to a variety of dietary needs, ensuring everyone at your holiday gathering can enjoy a tasty treat. This hummus not only serves as a wonderful appetizer but also doubles as a versatile side dish or spread.
Serve it with a platter of fresh vegetables, warm pita bread, or crispy crackers, and watch it disappear in no time! The recipe is simple enough for beginners yet impressive enough to delight seasoned cooks, making it an ideal choice for your festive menu.
Here’s how you can make this scrumptious dish for 4-6 people:
Ingredients:
- 2 large red bell peppers
- 2 cups canned chickpeas, drained and rinsed
- ¼ cup tahini
- 3 tablespoons fresh lemon juice
- 2 cloves garlic, minced
- 1 teaspoon ground cumin
- ¼ teaspoon smoked paprika
- ½ teaspoon salt
- ¼ cup olive oil
- 2-3 tablespoons water (as needed)
- Fresh parsley, chopped (for garnish)
- Paprika (for garnish)
Instructions:
- Roast the Red Peppers: Preheat your oven to 450°F (230°C). Place the whole red bell peppers on a baking sheet lined with aluminum foil. Roast them in the oven for about 25-30 minutes, turning occasionally, until the skins are charred and blistered.
- Cool and Peel: Remove the peppers from the oven and place them in a bowl. Cover the bowl with plastic wrap and let them cool for about 15 minutes. This will make it easier to peel off the skins. Once cool, peel off the skins, remove the stems, and discard the seeds.
- Blend the Ingredients: In a food processor, combine the peeled roasted red peppers, chickpeas, tahini, lemon juice, garlic, cumin, smoked paprika, and salt. Blend until smooth.
- Add Olive Oil and Adjust Consistency: While the food processor is running, slowly drizzle in the olive oil. If the hummus is too thick, add 2-3 tablespoons of water, one tablespoon at a time, until you reach your desired consistency.
- Taste and Adjust Seasoning: Taste the hummus and adjust the seasoning if necessary. You may want to add more lemon juice or salt to suit your preferences.
- Serve: Transfer the hummus to a serving bowl. Garnish with a sprinkle of paprika and chopped fresh parsley.
Extra Tips:
For a more intense smoky flavor, you can grill the red peppers on an outdoor grill instead of roasting them in the oven.
Also, to save time, you can use jarred roasted red peppers, but make sure to rinse and drain them well to remove any excess brine. If you prefer a spicier hummus, consider adding a pinch of cayenne pepper or a dash of hot sauce.
This Roasted Red Pepper Hummus can be made a day in advance and stored in the refrigerator, allowing the flavors to meld beautifully.
Stuffed Mushrooms With Spinach and Pine Nuts

Stuffed mushrooms are a classic appetizer that can be easily adapted to suit a variety of dietary needs, including a dairy-free diet. These Stuffed Mushrooms with Spinach and Pine Nuts bring together the earthy flavors of mushrooms with the rich, nutty taste of pine nuts and the vibrant freshness of spinach.
This dish isn’t only flavorful but also visually appealing, making it a perfect addition to your Christmas appetizer spread. This recipe is designed to serve 4-6 people, making it ideal for a festive gathering. The combination of ingredients guarantees a balance of textures and tastes, with the creamy spinach filling contrasting beautifully with the slightly crispy mushroom caps.
By using simple yet premium ingredients, this dish manages to be both elegant and satisfying without the need for dairy.
Ingredients
- 20 medium-sized button mushrooms
- 2 tablespoons olive oil
- 1 small onion, finely chopped
- 2 garlic cloves, minced
- 3 cups fresh spinach, roughly chopped
- 1/2 cup pine nuts, toasted
- 1/4 cup breadcrumbs
- 1 tablespoon lemon juice
- Salt and pepper to taste
- Fresh parsley for garnish (optional)
Instructions
- Prepare the Mushrooms: Preheat your oven to 375°F (190°C). Gently clean the mushrooms with a damp cloth and remove the stems. Set the caps aside and finely chop the stems.
- Sauté the Aromatics: In a large skillet over medium heat, add 1 tablespoon of olive oil. Add the chopped onion and garlic, sautéing until the onion becomes translucent and fragrant, about 3-4 minutes.
- Cook the Spinach: Add the chopped mushroom stems to the skillet and continue to sauté for another 2 minutes. Stir in the spinach and cook until it wilts, about 2-3 minutes.
- Combine the Filling: Remove the skillet from heat and stir in the toasted pine nuts, breadcrumbs, lemon juice, salt, and pepper. Mix until well combined.
- Stuff the Mushrooms: Brush the mushroom caps with the remaining olive oil, then place them on a baking sheet. Spoon the spinach and pine nut mixture into each mushroom cap, pressing slightly to guarantee the filling stays in place.
- Bake: Bake the stuffed mushrooms in the preheated oven for 15-20 minutes, or until the mushrooms are tender and the filling is golden brown.
- Serve: Remove from the oven, let cool slightly, and garnish with fresh parsley if desired. Serve warm.
Extra Tips
When preparing stuffed mushrooms, it’s important to choose mushrooms that are uniform in size to guarantee even cooking. Toasting the pine nuts enhances their flavor, so don’t skip this step.
If you prefer a bit of spice, consider adding a pinch of red pepper flakes to the filling. Also, make sure to pack the filling gently into the mushroom caps to prevent them from toppling over while baking.
This dish can be prepared a day in advance and refrigerated; simply bake right before serving for a fresh and warm appetizer.
Crispy Baked Avocado Fries

Crispy Baked Avocado Fries are a delectable dairy-free appetizer perfect for your Christmas gatherings. These avocado fries are crispy on the outside and creamy on the inside, offering a delightful texture contrast that’s bound to please your guests. The natural richness of avocado is complemented by a seasoned coating that provides a burst of flavor with every bite.
This dish isn’t only easy to prepare but also brings a modern twist to your holiday spread. Baking the avocado fries instead of frying them makes this dish a healthier option while still achieving that satisfying crunch. This recipe is designed to serve 4-6 people, making it ideal for a small gathering or as part of a larger appetizer selection. With just a few ingredients and simple steps, you can create a memorable dish that everyone will love, whether they follow a dairy-free diet or not.
Ingredients (serving size: 4-6 people):
- 3 ripe avocados
- 1 cup all-purpose flour (or gluten-free alternative)
- 1 teaspoon garlic powder
- 1 teaspoon smoked paprika
- 1 teaspoon salt
- 1/2 teaspoon black pepper
- 2 large eggs, beaten (or flaxseed meal mixed with water for a vegan option)
- 1 cup panko breadcrumbs (or gluten-free breadcrumbs)
- Cooking spray
- Lemon wedges (optional)
Instructions:
1. Preheat the Oven:
Preheat your oven to 425°F (220°C). Line a baking sheet with parchment paper and lightly spray it with cooking spray to prevent sticking.
2. Prepare the Avocados:
Slice the avocados in half lengthwise, remove the pits, and carefully peel off the skins. Cut each avocado half into thick wedges, aiming for about 4-5 wedges per half, depending on the avocado size.
3. Set Up the Dredging Station:
In one shallow bowl, mix the flour, garlic powder, smoked paprika, salt, and black pepper. In a second bowl, add the beaten eggs (or flaxseed mixture). In a third bowl, place the panko breadcrumbs.
4. Coat the Avocado Wedges:
Working one at a time, dip each avocado wedge into the flour mixture, making sure it’s well-coated. Shake off any excess flour, then dip the wedge into the egg mixture, allowing any excess to drip off. Finally, coat the wedge with panko breadcrumbs, pressing gently to adhere. Place the coated wedges on the prepared baking sheet.
5. Bake the Avocado Fries:
Lightly spray the avocado fries with additional cooking spray to enhance crispiness. Bake in the preheated oven for 15-20 minutes, or until they’re golden brown and crispy, flipping halfway through to guarantee even cooking.
6. Serve:
Remove the avocado fries from the oven and let them cool slightly before serving. Arrange them on a platter and serve with lemon wedges on the side, if desired.
Extra Tips:
For the best results, make certain your avocados are ripe but still firm, as overly ripe avocados may become too mushy during baking. If you opt for the vegan version using flaxseed meal, mix 2 tablespoons of flaxseed meal with 6 tablespoons of water and let it sit for a few minutes until it thickens, mimicking the consistency of beaten eggs.
For added flavor, consider mixing in some grated lemon zest with the panko breadcrumbs before coating the avocados. Enjoy these Crispy Baked Avocado Fries warm for the ultimate texture and taste experience.
Spicy Sweet Potato Rounds

Spicy Sweet Potato Rounds are a delightful dairy-free appetizer that will add a festive touch to your Christmas table. These rounds aren’t only visually appealing but also offer a burst of flavors with a perfect blend of sweetness from the sweet potatoes and a kick of heat from the spices. The dish is both simple to prepare and a crowd-pleaser, making it an ideal choice for holiday gatherings.
Sweet potatoes are a nutritious and versatile ingredient that shine in this recipe. The natural sweetness of the potatoes is complemented by a spicy seasoning mix, creating a harmonious balance of flavors. These rounds are baked to achieve a crispy exterior while maintaining a soft and creamy interior. Whether you’re hosting a large Christmas party or an intimate holiday dinner, Spicy Sweet Potato Rounds are certain to impress your guests and cater to those following a dairy-free diet.
Ingredients (Serves 4-6)
- 3 large sweet potatoes
- 3 tablespoons olive oil
- 1 teaspoon ground cumin
- 1 teaspoon smoked paprika
- 1/2 teaspoon cayenne pepper
- 1/2 teaspoon garlic powder
- Salt and pepper to taste
- Fresh cilantro, chopped (for garnish)
- Lime wedges (for serving)
Cooking Instructions
- Preheat the Oven: Begin by preheating your oven to 400°F (200°C). Line a large baking sheet with parchment paper to prevent sticking and make for easy cleanup.
- Prepare the Sweet Potatoes: Wash and scrub the sweet potatoes thoroughly. Slice them into 1/4-inch thick rounds, ensuring that they’re uniformly cut for even cooking.
- Season the Potatoes: In a large bowl, combine the olive oil, ground cumin, smoked paprika, cayenne pepper, garlic powder, salt, and pepper. Add the sweet potato rounds to the bowl and toss until they’re evenly coated with the spice mixture.
- Arrange and Bake: Arrange the seasoned sweet potato rounds in a single layer on the prepared baking sheet. Ensure that the rounds don’t overlap to allow for proper roasting. Bake in the preheated oven for 20-25 minutes, flipping halfway through, until the edges are golden brown and the centers are tender.
- Garnish and Serve: Remove the baked sweet potato rounds from the oven and transfer them to a serving platter. Garnish with chopped fresh cilantro and serve with lime wedges on the side for an extra burst of flavor.
Extra Tips
For an added layer of flavor, you can sprinkle a pinch of ground cinnamon over the sweet potatoes before baking to enhance their natural sweetness. If you prefer a milder spice level, reduce the amount of cayenne pepper.
These Spicy Sweet Potato Rounds can be prepared in advance; simply slice and season the potatoes, then bake them just before your guests arrive. To keep them warm until serving, place them in a low oven (around 200°F/93°C) for up to 30 minutes. Enjoy this delightful appetizer that perfectly complements your holiday spread!
Vegan Caprese Skewers
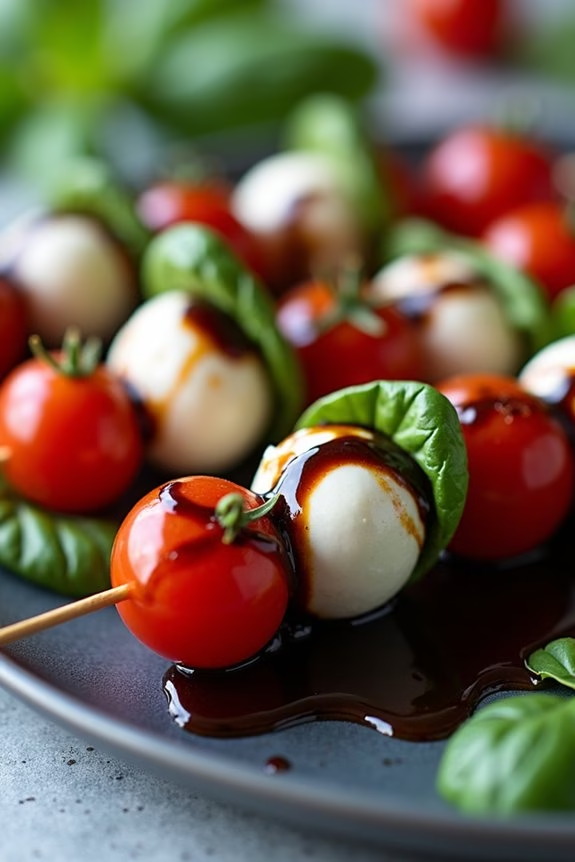
Elevate your holiday appetizer game with these vibrant and delicious Vegan Caprese Skewers. Perfect for a dairy-free Christmas celebration, these skewers offer a revitalizing twist on the traditional Caprese salad, substituting classic mozzarella with a creamy plant-based alternative. The combination of juicy cherry tomatoes, fresh basil leaves, and marinated vegan mozzarella balls creates an explosion of flavors and textures that will delight your guests.
These skewers aren’t only visually appealing but also incredibly easy to prepare, making them an excellent choice for both novice and experienced home cooks. Ideal for serving 4-6 people, these Vegan Caprese Skewers can be assembled in advance, allowing you to spend more time enjoying the festivities.
Whether you’re catering to guests with dietary restrictions or simply looking to add a health-conscious option to your appetizer spread, these skewers are sure to impress. With minimal ingredients and straightforward preparation, you’ll have a stunning appetizer in no time, leaving you free to focus on the main event.
Ingredients for 4-6 servings:
- 24 cherry tomatoes
- 24 vegan mozzarella balls
- 24 fresh basil leaves
- 2 tablespoons balsamic glaze
- 2 tablespoons olive oil
- Salt and pepper to taste
- 24 small bamboo skewers
Cooking Instructions:
- Prepare the Ingredients: Rinse the cherry tomatoes and fresh basil leaves under cold water and pat dry with a paper towel. Drain the vegan mozzarella balls if they’re in liquid.
- Season the Mozzarella: In a medium bowl, combine the vegan mozzarella balls with olive oil, salt, and pepper. Stir gently to coat each ball evenly, allowing them to marinate for about 10 minutes while you prepare the other ingredients.
- Assemble the Skewers: Take a bamboo skewer and thread one cherry tomato onto it, followed by a basil leaf, then a vegan mozzarella ball. Repeat the process until each skewer has two sets of tomato, basil, and mozzarella.
- Drizzle with Balsamic Glaze: Arrange the skewers on a serving platter. Just before serving, drizzle the balsamic glaze over the skewers for added flavor and presentation.
- Serve and Enjoy: Serve the skewers immediately as a cold appetizer, allowing guests to enjoy the fresh and vibrant flavors of this dish.
Extra Tips:
When preparing Vegan Caprese Skewers, choose ripe cherry tomatoes for peak sweetness and flavor. If vegan mozzarella balls aren’t readily available, you can create your own by using firm tofu marinated in a mixture of lemon juice, nutritional yeast, and garlic powder.
Experiment with different herbs like oregano or thyme for a unique twist, and always taste the marinated cheese before assembling to verify it’s seasoned to your liking. Using small bamboo skewers not only keeps the ingredients secure but also makes serving and eating more convenient for guests.
Zucchini Fritters With Herb Dip

Zucchini Fritters With Herb Dip are a delightful dairy-free appetizer that promises to be a hit at any Christmas gathering. These crispy, golden fritters are made from fresh zucchini, which is finely grated and mixed with a blend of herbs and spices to create a tantalizing flavor profile. The accompanying herb dip, made from fresh herbs and a creamy base, perfectly complements the fritters, making them a rejuvenating and savory starter that will whet your guests’ appetites.
Perfect for those who are lactose intolerant or just looking to cut down on dairy, these fritters are both easy to prepare and incredibly delicious. The recipe is designed to serve 4-6 people, making it ideal for small family gatherings or intimate parties. The combination of the earthy zucchini and fragrant herbs creates a unique dish that’s both health-conscious and indulgent, guaranteeing that everyone at your table can enjoy a festive treat without any dietary restrictions.
Ingredients
For the Zucchini Fritters:
- 4 medium zucchinis
- 1 cup all-purpose flour
- 2 eggs
- 3 green onions, finely chopped
- 2 cloves garlic, minced
- 1 teaspoon salt
- 1/2 teaspoon black pepper
- 1 teaspoon baking powder
- 1/4 cup fresh parsley, chopped
- Olive oil for frying
For the Herb Dip:
- 1 cup dairy-free yogurt
- 2 tablespoons fresh dill, chopped
- 2 tablespoons fresh chives, chopped
- 1 tablespoon lemon juice
- Salt and pepper to taste
Cooking Instructions
- Prepare the Zucchini: Begin by washing the zucchinis thoroughly. Grate them using a box grater and then place the grated zucchini in a clean kitchen towel. Squeeze out as much moisture as possible to prevent the fritters from becoming soggy.
- Mix the Fritter Batter: In a large mixing bowl, combine the grated zucchini, flour, eggs, green onions, garlic, salt, black pepper, baking powder, and parsley. Mix until all ingredients are well combined.
- Heat the Oil: In a large frying pan, heat a thin layer of olive oil over medium heat. Confirm the oil is hot before adding the fritter mixture to avoid sticking.
- Fry the Fritters: Using a spoon or your hands, form small patties with the zucchini mixture. Carefully place them into the hot oil, pressing down gently to flatten. Fry each side for about 3-4 minutes or until golden brown and crispy.
- Make the Herb Dip: While the fritters are frying, prepare the herb dip. In a small bowl, combine the dairy-free yogurt, dill, chives, lemon juice, and a pinch of salt and pepper. Stir until all ingredients are well mixed.
- Serve: Once the fritters are cooked, place them on a paper towel-lined plate to drain any excess oil. Serve warm with the herb dip on the side for dipping.
Extra Tips
To guarantee your Zucchini Fritters are perfectly crispy, it’s essential to remove as much moisture as possible from the zucchini before mixing the batter. This step will prevent the fritters from falling apart during cooking.
Additionally, if you find the mixture too wet, you can add a bit more flour to help bind the ingredients together. For added flavor, you can also experiment with different herbs or add a touch of chili flakes for a spicy kick. Enjoy these fritters fresh for the best texture and taste.
Coconut Shrimp With Mango Salsa
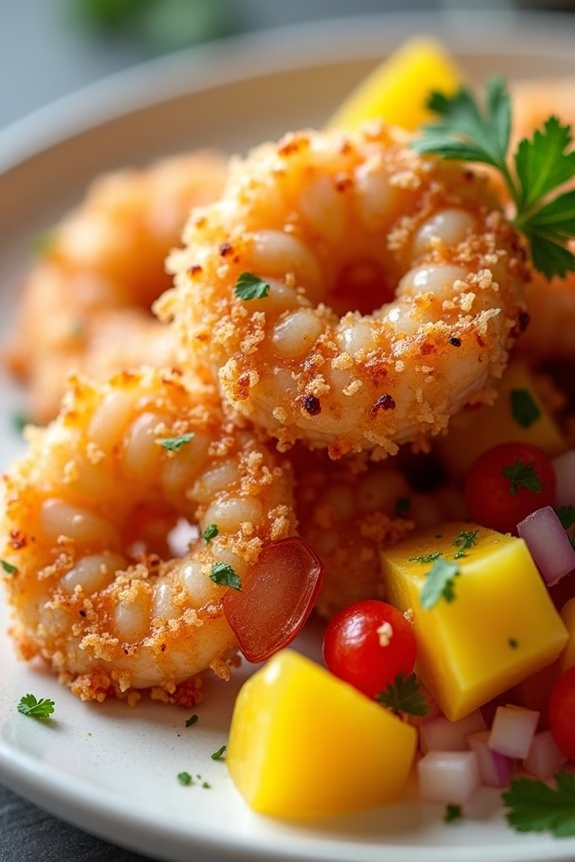
Coconut Shrimp With Mango Salsa is a delightful dairy-free appetizer that’s perfect for your Christmas gathering. This dish combines the crunchy, tropical goodness of coconut-crusted shrimp with the vibrant flavors of mango salsa. The shrimp are coated in a mixture of shredded coconut and breadcrumbs, then fried to a golden crisp, providing a delightful contrast to the sweet and tangy salsa made from fresh mangoes, red onions, cilantro, and lime juice.
This appetizer isn’t only visually appealing but also bursts with flavor, making it an excellent choice for impressing your guests. This recipe serves 4-6 people and is sure to be a hit at your holiday party. The combination of textures from the crispy shrimp and juicy salsa is a match made in culinary heaven.
The mango salsa adds a revitalizing touch to the dish, balancing out the richness of the fried shrimp. Whether you’re catering to dairy-free guests or simply want to try something new and exciting, this Coconut Shrimp With Mango Salsa is a must-try.
Ingredients:
For the Coconut Shrimp:
- 1 pound large shrimp, peeled and deveined
- 1 cup all-purpose flour
- 2 large eggs
- 1 cup shredded unsweetened coconut
- 1 cup panko breadcrumbs
- 1 teaspoon garlic powder
- 1 teaspoon paprika
- Salt and pepper to taste
- Vegetable oil for frying
For the Mango Salsa:
- 2 ripe mangoes, diced
- 1/2 red onion, finely chopped
- 1/4 cup fresh cilantro, chopped
- 1 red bell pepper, diced
- 1 lime, juiced
- Salt and pepper to taste
Cooking Instructions:
- Prepare the Shrimp: Rinse and pat dry the shrimp with paper towels. Season with salt, pepper, garlic powder, and paprika.
- Set Up Breading Station: In three separate shallow bowls, place flour in the first, beaten eggs in the second, and a mixture of shredded coconut and panko breadcrumbs in the third.
- Bread the Shrimp: Dredge each shrimp in flour, shaking off excess. Dip in beaten eggs, and then coat thoroughly with the coconut and panko mixture. Press gently to guarantee the coating adheres.
- Heat the Oil: In a large skillet, heat about 1 inch of vegetable oil over medium-high heat until it reaches 350°F (175°C).
- Fry the Shrimp: Carefully add the shrimp to the hot oil, cooking in batches to avoid overcrowding. Fry for 2-3 minutes on each side until golden brown and crispy. Remove with a slotted spoon and drain on paper towels.
- Prepare the Mango Salsa: In a medium bowl, combine diced mangoes, red onion, cilantro, red bell pepper, lime juice, salt, and pepper. Toss gently to mix.
- Serve: Arrange the coconut shrimp on a platter and serve with a bowl of mango salsa on the side for dipping.
Extra Tips:
When preparing the coconut shrimp, it’s vital to maintain the oil temperature to guarantee an even, crispy coating. If the oil is too hot, the coating may burn before the shrimp are cooked through. Conversely, if it’s too cool, the shrimp may become greasy.
Using a thermometer can help maintain the correct temperature. Additionally, for a spicier twist, consider adding a pinch of cayenne pepper to the shrimp seasoning. The mango salsa can be made a few hours in advance to allow the flavors to meld, just be sure to store it in the refrigerator until serving time.
Caramelized Onion and Fig Tartlets

Caramelized Onion and Fig Tartlets are an elegant and delicious dairy-free appetizer perfect for your Christmas gathering. These tartlets combine the rich sweetness of caramelized onions with the natural fruity notes of figs, all nestled in a flaky, golden pastry shell. The combination of flavors and textures creates a delightful bite-sized treat that’s certain to impress your guests.
Whether you’re hosting a large family dinner or a small intimate gathering, these tartlets make for an exquisite addition to your holiday spread.
The beauty of this recipe lies in its simplicity. With just a few ingredients, you can create a sophisticated dish that looks as good as it tastes. The caramelized onions add a depth of flavor, while the figs provide a touch of sweetness that balances perfectly. The pastry is crisp and light, making each bite a delightful experience.
These tartlets aren’t only dairy-free but also can easily be adapted to suit other dietary needs, making them a versatile option for any holiday menu.
Ingredients (Serves 4-6):
- 2 tablespoons olive oil
- 2 large onions, thinly sliced
- 1 tablespoon balsamic vinegar
- 1 tablespoon brown sugar
- 200 grams fresh figs, quartered
- 1 sheet of dairy-free puff pastry
- 1 tablespoon fresh thyme leaves
- Salt and pepper to taste
Cooking Instructions:
- Preheat the Oven: Start by preheating your oven to 200°C (400°F) to make sure it reaches the right temperature by the time you’re ready to bake the tartlets.
- Caramelize the Onions: Heat olive oil in a large skillet over medium heat. Add the sliced onions and cook, stirring occasionally, until they soften and begin to caramelize, about 15-20 minutes. Stir in the balsamic vinegar and brown sugar, continuing to cook for another 5 minutes until the onions are golden brown and sticky. Season with salt and pepper to taste.
- Prepare the Pastry: While the onions are caramelizing, roll out the puff pastry on a lightly floured surface. Cut the pastry into small squares or rounds, around 2-3 inches in diameter, depending on your preference. Arrange the cut pastry on a baking sheet lined with parchment paper.
- Assemble the Tartlets: Spoon a small amount of the caramelized onions onto each piece of pastry. Top with a quartered fig and a sprinkle of fresh thyme leaves. This will add a fresh, aromatic touch to the tartlets.
- Bake: Place the assembled tartlets into the preheated oven and bake for about 15-20 minutes, or until the pastry is puffed and golden brown. Keep an eye on them to make certain they don’t overbake.
- Serve: Remove the tartlets from the oven and let them cool slightly before serving. These tartlets are best enjoyed warm but can also be served at room temperature.
Extra Tips:
For best results, make sure to keep the puff pastry cold until you’re ready to use it, as this will help it to puff up nicely during baking.
You can also experiment with adding other herbs like rosemary or a sprinkle of chopped nuts such as almonds or walnuts for additional texture and flavor.
If fresh figs aren’t available, dried figs can be rehydrated in a bit of warm water before use.
Finally, these tartlets can be made a few hours in advance and reheated just before serving, making them a convenient option for busy holiday preparations.
Smoky Eggplant Dip
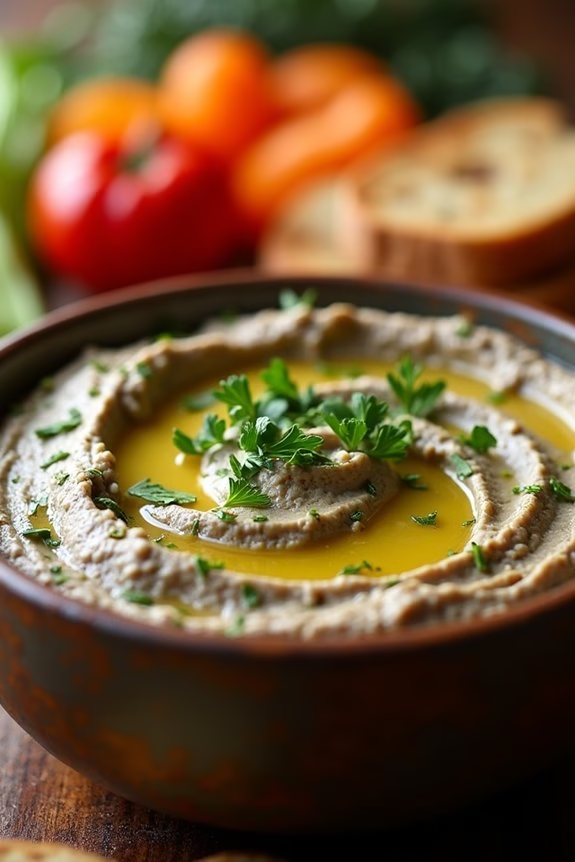
Smoky Eggplant Dip is a flavorful and creamy appetizer that’s perfect for adding a touch of elegance to your dairy-free Christmas spread. This dish highlights the rich, earthy taste of roasted eggplant, which is then blended with a smoky, spicy kick to delight your taste buds.
It’s a versatile dip that pairs wonderfully with crusty bread, fresh veggies, or even as a spread on sandwiches. The key to a great Smoky Eggplant Dip is the roasting process, which brings out the eggplant’s natural sweetness and imparts a subtle charred flavor.
This is complemented by garlic, lemon, and a hint of cumin, resulting in a well-balanced dish that’s both healthy and satisfying. Serve it as a centerpiece at your holiday gathering and watch it disappear quickly!
Ingredients (for 4-6 people):
- 2 large eggplants
- 2 cloves garlic, minced
- 2 tablespoons tahini
- 3 tablespoons lemon juice
- 2 tablespoons olive oil
- 1 teaspoon ground cumin
- 1 teaspoon smoked paprika
- Salt and pepper to taste
- Fresh parsley, chopped (for garnish)
Cooking Instructions:
- Preheat your oven to 400°F (200°C). While the oven is heating, wash the eggplants and poke them several times with a fork to allow steam to escape during roasting.
- Place the eggplants directly on the oven rack or on a baking sheet lined with foil. Roast them for about 30-40 minutes or until the skin is charred and the inside is soft. Turn them occasionally for even cooking.
- Remove the eggplants from the oven and let them cool for a few minutes. Once cool enough to handle, slice them open and scoop out the flesh into a bowl, discarding the skin.
- In a food processor, combine the eggplant flesh, minced garlic, tahini, lemon juice, olive oil, cumin, smoked paprika, salt, and pepper. Blend until smooth and creamy. Taste and adjust seasoning if necessary.
- Transfer the dip to a serving bowl and drizzle with a bit of olive oil. Garnish with chopped fresh parsley before serving.
Extra Tips:
For an even smokier flavor, you can grill the eggplants over an open flame instead of roasting them. This method adds an extra layer of smokiness that enhances the overall taste of the dip.
If you don’t have a food processor, a blender or even a potato masher can be used to achieve the desired consistency. Additionally, letting the dip sit for a few hours or overnight in the refrigerator allows the flavors to meld together beautifully, making it an excellent make-ahead appetizer for your holiday gathering.
Dark Chocolate-Dipped Fruit Skewers

Dark Chocolate-Dipped Fruit Skewers are a delightful and elegant appetizer perfect for any festive gathering. These skewers combine the richness of dark chocolate with the natural sweetness of fresh fruit, making them a crowd-pleaser that caters to both sweet and health-conscious palates.
They aren’t only dairy-free but also visually appealing, making them an ideal choice for a Christmas spread. The combination of contrasting colors and flavors will certainly make these skewers a standout appetizer at your holiday table.
Preparing these skewers is simple and requires minimal ingredients, allowing you to focus on spending quality time with your loved ones instead of being stuck in the kitchen. The fruits provide a juicy burst of flavor, while the dark chocolate adds a touch of indulgence.
This recipe serves 4-6 people, making it perfect for small gatherings or as part of a larger appetizer selection. With a little preparation and creativity, you can have these delightful treats ready in no time.
Ingredients:
- 1 cup of dark chocolate chips (dairy-free)
- 1 tablespoon coconut oil
- 1 pint of strawberries, hulled
- 2 bananas, cut into thick slices
- 1 cup of seedless grapes
- 1 cup of pineapple chunks
- 12-18 bamboo skewers
Instructions:
- Prepare the Fruit: Start by washing all the fruits thoroughly. Hull the strawberries, slice the bananas into thick rounds, and cut the pineapple into bite-sized chunks. Confirm the grapes are seedless and clean.
- Melt the Chocolate: In a microwave-safe bowl, combine the dark chocolate chips and coconut oil. Microwave in 30-second intervals, stirring in between, until the chocolate is completely melted and smooth.
- Assemble the Skewers: Thread the fruit onto the bamboo skewers, alternating between different types of fruit for a colorful presentation. Each skewer should have a balanced mix of strawberries, banana slices, grapes, and pineapple chunks.
- Dip in Chocolate: Line a baking sheet with parchment paper. Carefully dip each fruit skewer halfway into the melted chocolate, allowing any excess to drip off before placing it on the prepared baking sheet.
- Chill the Skewers: Once all the skewers are dipped, place the baking sheet in the refrigerator for about 15-20 minutes, or until the chocolate has hardened.
- Serve: Arrange the chocolate-dipped fruit skewers on a serving platter, and they’re ready to enjoy.
Extra Tips:
For an added touch of holiday spirit, consider sprinkling the chocolate-dipped portion of the skewers with crushed nuts or shredded coconut before the chocolate sets. This not only enhances the flavor but also adds a festive look to the skewers.
Additionally, if you prefer, you can substitute the fruits with seasonal options like mandarins or kiwis. Remember to serve the skewers chilled to maintain the firmness of the chocolate and the freshness of the fruit.