
When planning your holiday party, a variety of festive appetizers can truly elevate the experience. Picture a table filled with Cranberry Brie Bites and Prosciutto-Wrapped Asparagus, offering both flavor and elegance. As you craft these dishes, your kitchen will be filled with the enticing aroma of baked Brie and cranberry sauce. Wondering how to bring these delightful bites to life? Let’s explore these recipes that are sure to captivate your guests.
Cranberry Brie Bites
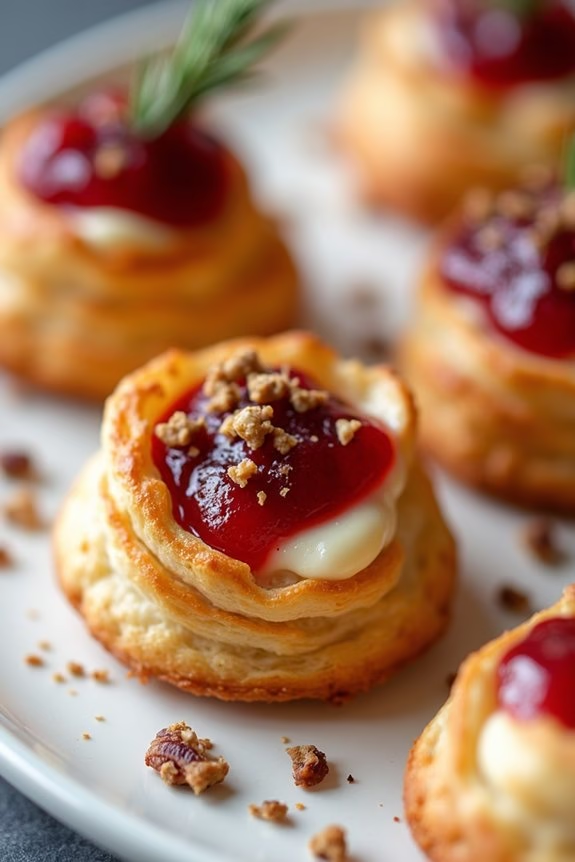
Cranberry Brie Bites are the perfect appetizer to impress your holiday guests with their delightful combination of creamy brie cheese, sweet-tart cranberry sauce, and flaky puff pastry.
These bite-sized treats aren’t only delicious but also incredibly easy to prepare, making them a fantastic choice for busy holiday gatherings. With just a few ingredients and minimal prep time, you’ll have a festive appetizer that will leave everyone asking for more.
Whether you’re hosting a Christmas party or simply looking for a festive snack to enjoy with family and friends, Cranberry Brie Bites are bound to be a hit. The combination of flavors and textures makes them irresistible.
The buttery puff pastry provides the perfect base to hold the rich, melty brie and the zesty cranberry sauce, creating a harmonious blend that captures the essence of the holiday season.
Ingredients for Cranberry Brie Bites (Serves 4-6):
- 1 sheet of puff pastry, thawed
- 1 wheel of brie cheese (about 8 ounces)
- 1/2 cup cranberry sauce (homemade or canned)
- 1/4 cup chopped pecans (optional)
- 1 tablespoon fresh rosemary, finely chopped (optional)
- 1 egg, beaten (for egg wash)
Cooking Instructions:
- Preheat your oven to 375°F (190°C). This guarantees the oven is hot enough to bake the puff pastry to a golden brown.
- Prepare the puff pastry by lightly flouring a clean surface and rolling out the thawed sheet to smooth out any creases. Cut the pastry into 2-inch squares using a sharp knife or a pizza cutter. You’ll need about 24 squares.
- Arrange the pastry squares in a mini muffin tin. Gently press each square into the tin, allowing the corners to stick out slightly, creating a cup shape. This will hold the brie and cranberry sauce.
- Cut the brie cheese into small cubes, approximately 1-inch in size. Place one cube of brie in each pastry cup. This will guarantee every bite is filled with creamy cheese.
- Add the cranberry sauce by spooning about 1 teaspoon onto each brie cube. For a more festive touch, sprinkle chopped pecans and rosemary over the top if you desire.
- Brush the edges of the puff pastry with the beaten egg. This step will give the pastry a beautiful golden color once baked.
- Bake the bites in the preheated oven for 12-15 minutes or until the pastry is puffed and golden brown, and the cheese is melted and bubbly.
- Cool slightly before serving. Allow the bites to cool for a few minutes in the tin before using a small knife to gently lift them out.
Extra Tips:
When making Cranberry Brie Bites, feel free to experiment with flavors by adding a touch of orange zest to the cranberry sauce for a citrusy twist.
If you’re using store-bought cranberry sauce, consider stirring in a pinch of cinnamon or nutmeg for added warmth and depth.
To guarantee your puff pastry is perfectly crisp, make sure it’s well-chilled before baking, and avoid overfilling the pastry cups, which can cause them to become soggy.
Serve these bites warm, and watch them disappear quickly!
Prosciutto-Wrapped Asparagus
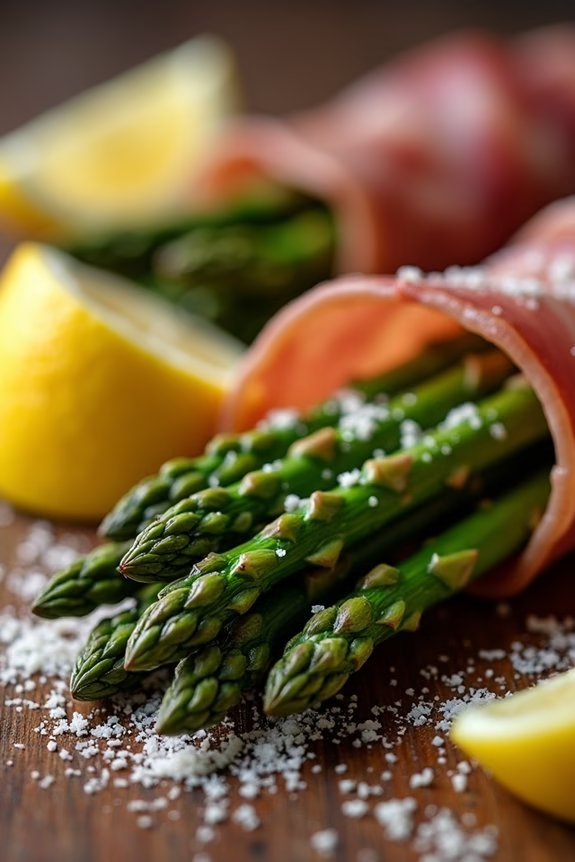
Prosciutto-wrapped asparagus is a classic Christmas appetizer that combines the earthy flavors of fresh asparagus with the rich, savory taste of prosciutto. This elegant and easy-to-make dish is perfect for holiday gatherings, offering a delectable start to your festive meal. The crispy prosciutto contrasts beautifully with the tender asparagus, creating a delightful texture that your guests will love.
Whether you’re hosting a family dinner or a large holiday party, this appetizer is bound to impress with its sophisticated appearance and mouthwatering flavor. This recipe serves 4-6 people and can be prepared in under 30 minutes, making it a convenient option for busy holiday hosts. The ingredients are simple and easy to find, yet the result is a dish that looks and tastes gourmet.
You can prepare the asparagus ahead of time and simply pop it in the oven when you’re ready to serve, giving you more time to enjoy the festivities with your loved ones.
Ingredients:
- 1 pound fresh asparagus (approximately 20-25 spears)
- 8-10 slices of prosciutto, halved lengthwise
- 2 tablespoons olive oil
- Salt, to taste
- Black pepper, to taste
- Optional: grated Parmesan cheese for garnish
- Optional: lemon wedges for serving
Instructions:
- Preheat the Oven: Preheat your oven to 400°F (200°C) to verify it’s hot enough to crisp the prosciutto while keeping the asparagus tender.
- Prepare the Asparagus: Wash the asparagus thoroughly under cold water and pat dry with a paper towel. Trim the woody ends of the asparagus by snapping them off or cutting about 1-2 inches from the bottom.
- Wrap the Asparagus: Take a half slice of prosciutto and wrap it around each asparagus spear starting from the bottom and spiraling up to the tip. Confirm the prosciutto is wrapped tightly but not overlapping too much to allow even cooking.
- Season and Drizzle: Place the wrapped asparagus spears on a baking sheet lined with parchment paper. Drizzle olive oil over the top and season with a pinch of salt and freshly ground black pepper. Be cautious with the salt as prosciutto is already quite salty.
- Bake: Transfer the baking sheet to the preheated oven. Bake for 10-15 minutes or until the prosciutto is crispy and the asparagus is just tender. Keep a close eye on them to avoid overcooking.
- Serve: Remove from the oven and let cool slightly. Transfer to a serving platter and, if desired, sprinkle with grated Parmesan cheese and serve with lemon wedges for a revitalizing citrus kick.
Extra Tips:
For the best results, select asparagus that’s similar in size to confirm even cooking. Thicker spears will remain tender yet firm, providing a nice bite. If you prefer, you can also grill the prosciutto-wrapped asparagus instead of baking, which will impart a smoky flavor that complements the savory prosciutto.
Remember that prosciutto can be quite salty, so use additional salt sparingly. For added flavor, consider adding a sprinkle of garlic powder or a dash of balsamic glaze before serving. Enjoy this delightful appetizer as part of your Christmas spread or at any celebration throughout the year!
Spinach Artichoke Dip Bites

Spinach Artichoke Dip Bites are the perfect appetizer for any Christmas gathering. They combine the creamy richness of a classic spinach artichoke dip with the convenient, bite-sized appeal of phyllo pastry cups. These delicious bites are bound to impress your guests and are easy to prepare, making them a great option for holiday entertaining.
The combination of savory spinach, tangy artichokes, and gooey cheese nestled inside crispy pastry shells creates a tantalizing flavor experience that everyone will enjoy.
These bites aren’t only delightful in taste but also in presentation. The golden brown phyllo cups filled with creamy dip look as good as they taste, adding a touch of elegance to your appetizer spread. They’re also quite versatile, allowing you to prepare them in advance and simply warm them up before serving.
Whether you’re hosting a large party or a small gathering, these Spinach Artichoke Dip Bites will be a hit among all your guests.
Ingredients for 4-6 servings:
- 1 cup fresh spinach, chopped
- 1/2 cup canned artichoke hearts, drained and chopped
- 1/2 cup cream cheese, softened
- 1/4 cup sour cream
- 1/4 cup mayonnaise
- 1/2 cup grated Parmesan cheese
- 1/2 cup shredded mozzarella cheese
- 1 garlic clove, minced
- 1/2 teaspoon salt
- 1/4 teaspoon black pepper
- 1 package (15 pieces) pre-made phyllo pastry cups
Cooking Instructions:
- Preheat the Oven: Start by preheating your oven to 350°F (175°C) to confirm it’s ready for baking the phyllo cups.
- Prepare the Dip Mixture: In a large mixing bowl, combine the chopped spinach, artichoke hearts, cream cheese, sour cream, and mayonnaise. Mix well until all ingredients are thoroughly combined and smooth.
- Add Cheese and Seasonings: Stir in the Parmesan cheese, mozzarella cheese, minced garlic, salt, and black pepper. Mix until the cheese and seasoning are evenly incorporated into the dip.
- Fill the Phyllo Cups: Arrange the phyllo pastry cups on a baking sheet. Using a spoon, fill each cup with a generous amount of the spinach artichoke mixture, being careful not to overfill.
- Bake the Bites: Place the baking sheet with the filled cups in the preheated oven. Bake for 15-20 minutes or until the phyllo cups turn golden brown and the cheese is melted and bubbly.
- Serve Warm: Once baked, remove the bites from the oven and let them cool slightly. Serve them warm for the best taste and texture.
Extra Tips:
To save time on the day of your event, you can prepare the spinach artichoke filling a day in advance and store it in the refrigerator. When ready to serve, simply fill the phyllo cups and bake.
If you’re unable to find pre-made phyllo cups, you can use mini muffin tins and phyllo dough sheets to create your own cups. Also, feel free to experiment with adding other ingredients like chopped jalapeños for a spicy kick or sun-dried tomatoes for additional flavor.
Caprese Skewers
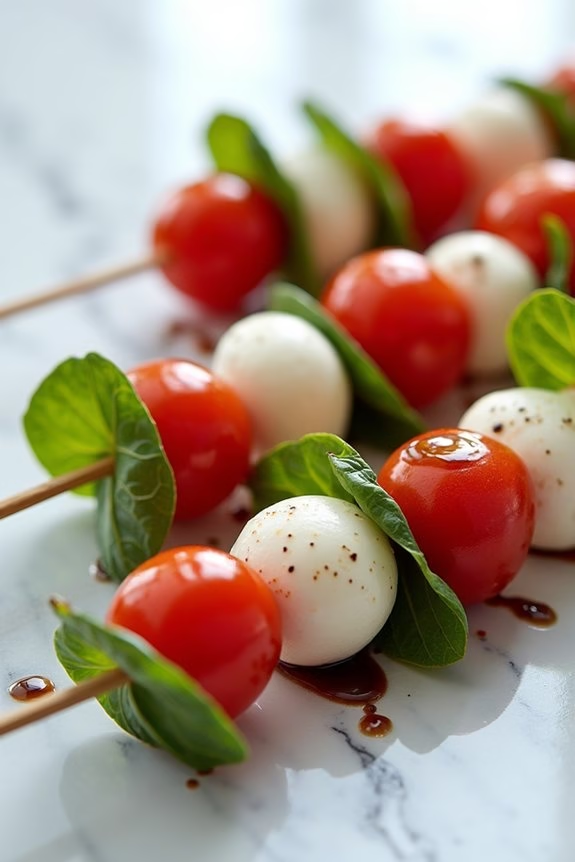
Ideal for serving 4-6 people, this appetizer is easy to assemble and requires minimal ingredients, making it a stress-free addition to your holiday menu. The combination of juicy cherry tomatoes, fresh mozzarella balls, and fragrant basil leaves drizzled with balsamic glaze creates a harmonious blend of flavors that’s both invigorating and satisfying.
Ingredients (Serves 4-6):
- 20 cherry tomatoes
- 20 fresh mozzarella balls (bocconcini or ciliegine)
- 20 fresh basil leaves
- 1/4 cup balsamic glaze
- Salt and freshly ground black pepper to taste
- 20 wooden skewers or toothpicks
Instructions:
- Prepare the Ingredients: Rinse the cherry tomatoes and basil leaves under cold water, then pat them dry with a paper towel. Drain the mozzarella balls from their packaging liquid.
- Assemble the Skewers: Take a wooden skewer or toothpick and slide on a cherry tomato, followed by a basil leaf, and then a mozzarella ball. Repeat until all skewers are assembled with one of each ingredient, making sure they’re neatly stacked.
- Season the Skewers: Arrange the assembled skewers on a serving platter. Lightly sprinkle salt and freshly ground black pepper over the skewers to taste.
- Drizzle with Balsamic Glaze: Just before serving, drizzle the balsamic glaze evenly over the skewers. Make certain each skewer gets a generous coating for the best flavor.
- Serve Immediately: Present the Caprese Skewers on a decorative platter, and they’re ready to be enjoyed by your guests.
Extra Tips: To enhance the flavor of your Caprese Skewers, consider marinating the mozzarella balls in olive oil and a pinch of Italian herbs for a few hours before assembling.
If you prefer a slightly sweeter taste, try using heirloom cherry tomatoes. For a more polished presentation, consider using decorative skewers or toothpicks.
Finally, if balsamic glaze is unavailable, you can make your own by reducing balsamic vinegar on low heat until it thickens.
Smoked Salmon Pinwheels
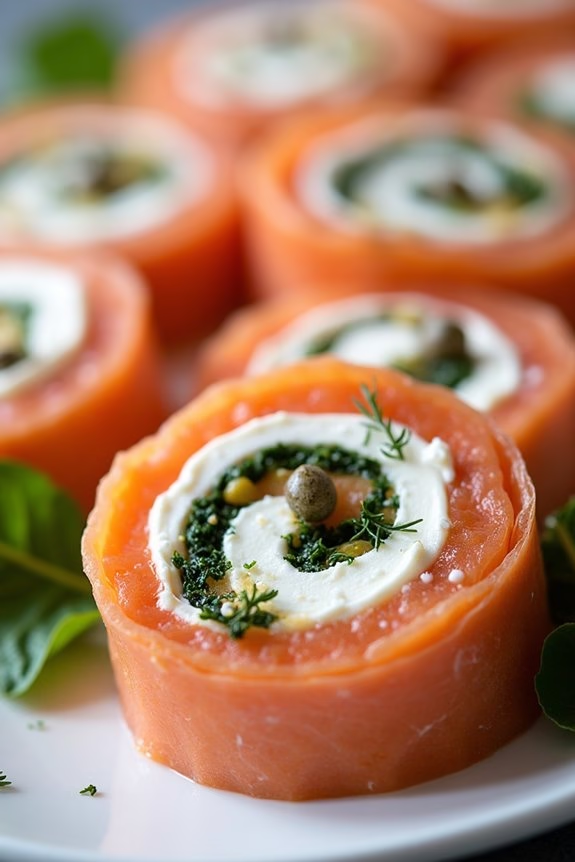
Smoked Salmon Pinwheels are an elegant and delicious appetizer that’s perfect for Christmas gatherings. These delightful bites combine the savory taste of smoked salmon with a creamy, tangy filling, all wrapped up in a soft tortilla.
The pinwheels aren’t only visually appealing but also incredibly easy to prepare, making them an ideal choice for entertaining during the holiday season. With their delightful balance of flavors and textures, these pinwheels are sure to impress your guests and add a touch of sophistication to your appetizer spread.
The beauty of this dish lies in its simplicity and versatility. You can prepare these pinwheels in advance, which is a blessing when hosting a party. The key is to use high-quality smoked salmon and fresh ingredients to enhance the flavors.
Whether you’re hosting a festive brunch, a cocktail party, or a cozy family dinner, these Smoked Salmon Pinwheels will be a hit, offering a perfect bite-sized treat that’s both satisfying and elegant.
Ingredients for 4-6 people:
- 4 large flour tortillas
- 8 ounces of smoked salmon
- 8 ounces of cream cheese, softened
- 1 tablespoon of lemon juice
- 1 tablespoon of fresh dill, chopped
- 1 tablespoon of capers, drained
- 1/2 cup of fresh spinach leaves
- Salt and pepper to taste
Cooking Instructions:
- Prepare the Cream Cheese Mixture: In a medium-sized bowl, combine the softened cream cheese, lemon juice, and chopped dill. Mix until well blended and smooth. Season with salt and pepper to taste to guarantee a well-balanced flavor.
- Assemble the Tortillas: Lay a tortilla flat on a clean work surface. Spread a generous amount of the cream cheese mixture evenly over the entire surface of the tortilla, making sure that it reaches the edges.
- Layer the Ingredients: Place a layer of spinach leaves over the cream cheese, followed by a layer of smoked salmon slices. Sprinkle a few capers over the salmon for an added burst of flavor.
- Roll the Tortilla: Starting from one edge, roll the tortilla tightly into a log shape. Take care to keep the roll compact to make sure the pinwheels hold their shape when sliced.
- Chill and Set: Wrap the rolled tortilla in plastic wrap and refrigerate for at least 1 hour. This will help the pinwheels set and make them easier to slice.
- Slice and Serve: Once chilled, remove the plastic wrap and use a sharp knife to slice the roll into 1-inch thick pinwheels. Arrange them on a serving platter and serve immediately.
Extra Tips:
To achieve the best results, make sure the cream cheese is at room temperature before mixing, as this will make spreading easier. You can also experiment with different herbs or add a touch of horseradish to the cream cheese mixture for an extra kick.
For a colorful presentation, consider using spinach or sun-dried tomato tortillas. If preparing ahead of time, keep the rolled tortillas wrapped in the refrigerator and slice just before serving to maintain freshness.
Enjoy the delightful flavors and ease of preparation that make these Smoked Salmon Pinwheels a festive favorite!
Stuffed Mushrooms

Stuffed mushrooms are a classic and crowd-pleasing appetizer that will elevate any Christmas gathering. These bite-sized delights aren’t only easy to prepare but also packed with flavor, making them a perfect addition to your holiday spread. The combination of earthy mushrooms filled with a savory mixture of breadcrumbs, cheese, and herbs offers a delightful burst of taste with every bite.
Whether you’re hosting a large dinner party or a cozy family get-together, these festive stuffed mushrooms are sure to impress your guests. This recipe serves 4-6 people and is ideal for those who want to serve a warm and comforting appetizer that can be prepared in advance. The stuffing is versatile, allowing you to experiment with different cheeses and herbs to suit your taste preferences.
By following this simple recipe, you’ll be able to create a delicious and visually appealing dish that complements the festive spirit of the season.
Ingredients:
- 24 medium-sized white or cremini mushrooms
- 3 tablespoons olive oil
- 1/2 cup finely chopped onion
- 2 cloves garlic, minced
- 1 cup breadcrumbs
- 1/2 cup grated Parmesan cheese
- 1/4 cup cream cheese, softened
- 2 tablespoons fresh parsley, chopped
- 1 tablespoon fresh thyme, chopped
- Salt and pepper to taste
Instructions:
- Preheat the Oven: Begin by preheating your oven to 375°F (190°C). This guarantees that it’s at the right temperature by the time you’re ready to bake the mushrooms.
- Prepare the Mushrooms: Clean the mushrooms with a damp paper towel to remove any dirt. Carefully remove the stems and set them aside. Arrange the mushroom caps on a baking sheet, cavity side up.
- Chop the Stems: Finely chop the mushroom stems that you’ve set aside. They’ll be incorporated into the stuffing mixture for added flavor.
- Cook the Filling: In a large skillet over medium heat, add 2 tablespoons of olive oil. Sauté the chopped onion and garlic until they become translucent, about 3-4 minutes. Add the chopped mushroom stems and cook for another 2 minutes.
- Mix the Stuffing: In a large bowl, combine the sautéed mixture with breadcrumbs, Parmesan cheese, cream cheese, parsley, thyme, salt, and pepper. Mix until all ingredients are well incorporated.
- Stuff the Mushrooms: Using a small spoon, fill each mushroom cap with the stuffing mixture, pressing gently to make sure it’s compact. Drizzle the remaining olive oil over the stuffed mushrooms.
- Bake: Place the baking sheet in the preheated oven and bake for 20-25 minutes, or until the mushrooms are tender and the tops are golden brown and crispy.
- Serve: Allow the stuffed mushrooms to cool for a few minutes before serving. They can be enjoyed warm or at room temperature.
Extra Tips:
To enhance the flavor, consider adding a hint of white wine to the sautéed mushrooms and onion mixture for a touch of acidity. If you’re looking for a richer stuffing, swap out the Parmesan for a sharper cheese like aged cheddar.
For a bit of heat, a pinch of red pepper flakes can be added to the stuffing mixture. Make sure not to overcrowd the baking sheet, as this can prevent the mushrooms from cooking evenly. Finally, these stuffed mushrooms can be prepared a day in advance; simply store them in the refrigerator and bake just before serving.
Pigs in a Blanket

Pigs in a Blanket are a delightful and simple appetizer perfect for Christmas gatherings. These tasty little bites involve wrapping cocktail-sized sausages in flaky pastry dough, creating a delicious combination of flavors and textures.
They’re easy to make and are sure to be a hit with both adults and children at your holiday party. This recipe yields enough Pigs in a Blanket to serve 4-6 people, making it an ideal choice for a small gathering or as part of a larger spread of appetizers.
With minimal ingredients and a straightforward preparation process, you can whip up these savory treats with ease.
Ingredients for 4-6 servings:
- 24 cocktail sausages or mini hot dogs
- 1 package of refrigerated crescent roll dough
- 1 tablespoon Dijon mustard (optional)
- 1 egg
- 1 tablespoon water
- Poppy seeds or sesame seeds (optional, for garnish)
Cooking Instructions:
- Preheat the oven: Set your oven to 375°F (190°C) and allow it to preheat while you prepare the Pigs in a Blanket.
- Prepare the dough: Unroll the crescent roll dough and separate it into triangles. Cut each triangle into three smaller triangles. This will give you enough dough to wrap around each sausage.
- Assemble the Pigs in a Blanket: If desired, spread a small amount of Dijon mustard onto each dough triangle. Place a cocktail sausage at the wide end of each triangle and roll it up toward the point. Make sure the dough is snug around the sausage.
- Prepare the egg wash: In a small bowl, beat the egg with one tablespoon of water to create an egg wash. Using a pastry brush, lightly coat each wrapped sausage with the egg wash. This will give them a golden, shiny finish when baked.
- Add garnish: If you like, sprinkle poppy seeds or sesame seeds on top of each wrapped sausage for added flavor and a festive touch.
- Bake: Arrange the wrapped sausages on a baking sheet lined with parchment paper, leaving space between each one. Bake in the preheated oven for 12-15 minutes, or until the dough is golden brown and puffed.
- Serve: Remove from the oven and let cool slightly before serving. These are best enjoyed warm.
Extra Tips:
For an extra touch of holiday flavor, consider adding a sprinkle of dried herbs, such as rosemary or thyme, to the dough before wrapping the sausages.
You can also experiment with different types of sausages, such as spicy or cheese-filled, to vary the taste. If you’re serving a larger crowd, simply double or triple the recipe.
Pigs in a Blanket can be prepared in advance and refrigerated until you’re ready to bake them, making them a convenient option for busy holiday hosts.
Roasted Red Pepper Hummus
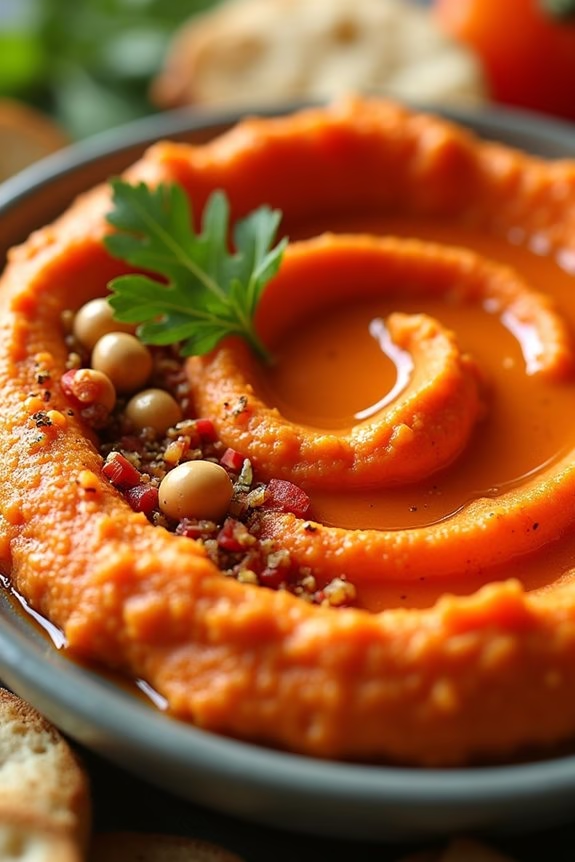
Roasted Red Pepper Hummus is a flavorful and vibrant appetizer that’s perfect for your Christmas gathering. This dish combines the creamy texture of traditional hummus with the sweet, smoky taste of roasted red peppers. It’s not only delicious but also visually appealing with its bright red hue, making it a standout on any holiday spread.
Whether served with pita bread, fresh vegetables, or crackers, this hummus is sure to be a crowd-pleaser. Making Roasted Red Pepper Hummus at home is simple and rewarding. By using high-quality ingredients and a food processor, you can whip up this tasty dip in no time.
This recipe is designed to serve 4-6 people, making it an ideal choice for a small gathering or as part of a larger appetizer selection. Enjoy the harmonious blend of flavors that will leave your guests coming back for more.
Ingredients (serving size: 4-6 people):
- 2 large red bell peppers
- 1 can (15 ounces) chickpeas, drained and rinsed
- 1/4 cup tahini
- 3 tablespoons lemon juice
- 2 tablespoons olive oil
- 2 cloves garlic, minced
- 1 teaspoon ground cumin
- 1/2 teaspoon smoked paprika
- Salt to taste
- Freshly ground black pepper to taste
- Optional garnish: chopped fresh parsley, whole chickpeas, additional smoked paprika
Cooking Instructions:
- Roast the Red Peppers: Preheat your oven to 450°F (230°C). Cut the red bell peppers in half, remove the seeds and stems, and place them cut side down on a baking sheet. Roast in the oven for 20-25 minutes, or until the skins are charred and blistered.
- Peel the Peppers: Once roasted, remove the peppers from the oven and place them in a bowl. Cover the bowl with plastic wrap and let the peppers steam for about 10 minutes. This will make it easier to peel off the skins. Once cool enough to handle, peel off and discard the skins.
- Blend the Ingredients: In a food processor, combine the peeled roasted red peppers, chickpeas, tahini, lemon juice, olive oil, minced garlic, cumin, and smoked paprika. Blend until smooth and creamy.
- Season the Hummus: Taste the hummus and add salt and pepper to your preference. Blend again to incorporate the seasoning.
- Serve: Transfer the hummus to a serving bowl. If desired, garnish with chopped fresh parsley, a few whole chickpeas, and a sprinkle of smoked paprika. Serve with your choice of pita bread, vegetable sticks, or crackers.
Extra Tips: For an even smokier flavor, try using a grill to roast the red peppers instead of the oven. You can also experiment with the seasoning to suit your taste, such as adding more garlic or a bit of cayenne pepper for a spicy kick.
If the hummus is too thick, add a tablespoon of water or olive oil at a time until you reach your desired consistency. Enjoy your homemade Roasted Red Pepper Hummus as a delightful and healthy addition to your Christmas appetizer lineup.
Mini Cheese Balls
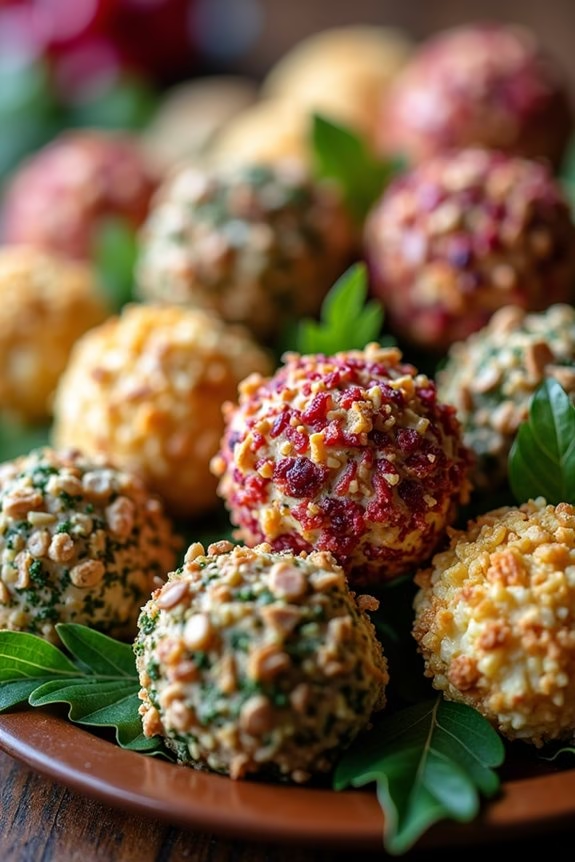
Looking to impress your guests this holiday season with a delicious and visually appealing appetizer? Mini Cheese Balls are the perfect solution for your Christmas gathering. These bite-sized treats are both creamy and flavorful, making them an irresistible addition to your festive spread. Not only are they easy to make, but they also offer the flexibility to incorporate various flavors and coatings, guaranteeing there’s something for everyone to enjoy.
With a combination of cream cheese, cheddar, and a selection of herbs and spices, these Mini Cheese Balls are sure to become a holiday favorite. The beauty of Mini Cheese Balls lies in their simplicity and versatility. You can prepare them in advance, giving you more time to enjoy the festivities with your family and friends.
Plus, their small size makes them the perfect finger food, allowing guests to enjoy them without the need for utensils. Whether you’re hosting a casual get-together or a more formal affair, these tasty morsels will add a touch of elegance to your appetizer table. Let’s plunge into the recipe and get started on making this delightful Christmas appetizer that serves 4-6 people.
Ingredients (serving size: 4-6 people):
- 8 oz cream cheese, softened
- 1 cup sharp cheddar cheese, shredded
- 1/4 cup green onions, finely chopped
- 1/4 cup parsley, finely chopped
- 1/4 cup pecans, finely chopped
- 1/2 tsp garlic powder
- 1/2 tsp onion powder
- 1/4 tsp paprika
- Salt and pepper to taste
- Assorted coatings (e.g., chopped nuts, herbs, crushed crackers)
Cooking Instructions:
- Prepare the Cheese Mixture: In a medium-sized mixing bowl, combine the softened cream cheese and shredded cheddar cheese. Mix until they’re well combined and smooth.
- Add Flavors: Stir in the chopped green onions, parsley, pecans, garlic powder, onion powder, paprika, salt, and pepper. Mix thoroughly to confirm the flavors are evenly distributed throughout the cheese mixture.
- Shape the Cheese Balls: Using a spoon or a small cookie scoop, portion out the cheese mixture and roll it into small balls, approximately 1 inch in diameter. This should yield around 12-18 mini cheese balls.
- Coat the Cheese Balls: Prepare your choice of coatings on separate plates. Roll each cheese ball in the coatings, pressing gently to confirm they adhere to the surface.
- Chill the Cheese Balls: Place the coated cheese balls on a lined baking sheet or plate and refrigerate for at least 30 minutes. This helps the cheese balls firm up and the flavors to meld together.
- Serve: Once chilled, arrange the mini cheese balls on a serving platter. They can be served with toothpicks for easy grabbing or alongside crackers or slices of baguette.
Extra Tips:
For the best flavor, prepare the cheese mixture a day in advance and allow it to chill overnight before rolling the balls and adding the coatings. This allows the flavors to develop more fully.
Feel free to experiment with different coatings such as crushed pretzels, dried cranberries, or different types of nuts to add variety and cater to different palates. If you’re short on time, you can also use pre-shredded cheese, but freshly shredded cheese will melt better and provide a creamier texture.
Enjoy your festive Mini Cheese Balls and happy holidays!
Deviled Eggs With a Twist
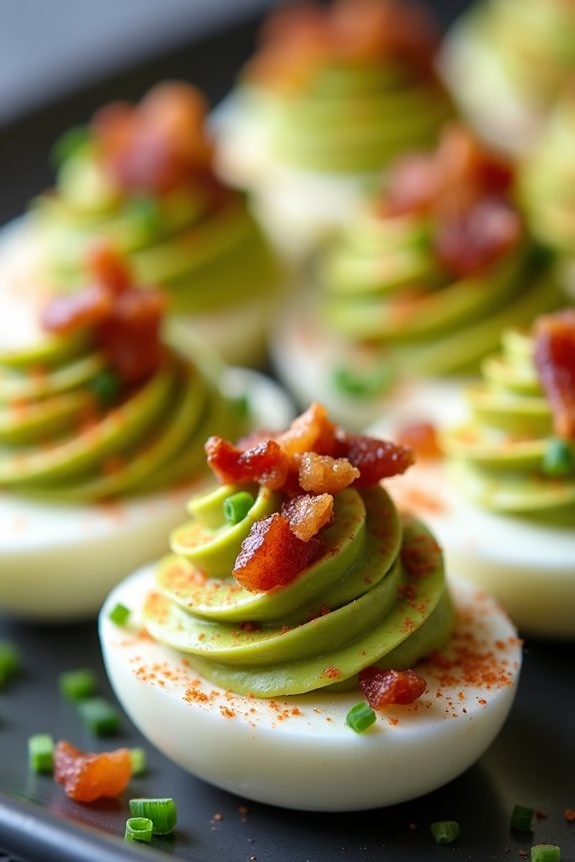
Deviled eggs are a classic appetizer that never fails to delight party guests, but why not add a little flair to this traditional dish with a surprising twist? Our “Deviled Eggs With a Twist” recipe brings an exciting blend of flavors to the table, combining the creamy, rich yolk filling with unexpected ingredients that will captivate your taste buds.
Whether you’re hosting a Christmas party or looking for a new appetizer to try, these deviled eggs are bound to impress. This version maintains the creamy texture you love but introduces ingredients like avocado and smoked paprika to add depth and complexity. The avocado not only enhances the creaminess but also offers a healthy dose of nutrients, while the smoked paprika brings a subtle hint of warmth and smokiness.
Topped off with crispy bacon bits and a sprinkle of fresh chives, these deviled eggs are a delightful fusion of flavors that will have everyone reaching for seconds.
Ingredients (Serves 4-6):
- 6 large eggs
- 1 ripe avocado
- 2 tablespoons mayonnaise
- 1 teaspoon Dijon mustard
- 1 teaspoon lemon juice
- 1/2 teaspoon smoked paprika
- Salt and black pepper, to taste
- 2 slices of bacon, cooked and crumbled
- 1 tablespoon fresh chives, chopped
Cooking Instructions:
- Boil the Eggs: Place the eggs in a single layer in a saucepan. Cover them with cold water by about an inch. Bring the water to a full boil over medium-high heat. Once boiling, remove the pan from the heat, cover it with a lid, and let the eggs sit for 10-12 minutes.
- Prepare the Ice Bath: While the eggs are cooking, prepare an ice bath by filling a large bowl with ice and water. Once the eggs have finished cooking, transfer them to the ice bath to stop the cooking process and make them easier to peel.
- Peel the Eggs: After the eggs have cooled completely in the ice bath, gently tap them on a hard surface to crack the shell. Peel away the shell under cold running water to help remove any stubborn bits.
- Make the Filling: Halve the peeled eggs lengthwise and carefully scoop out the yolks into a mixing bowl. Add the avocado, mayonnaise, Dijon mustard, lemon juice, smoked paprika, salt, and pepper to the yolks. Mash the ingredients together with a fork until smooth and creamy.
- Stuff the Egg Whites: Spoon or pipe the yolk mixture back into the hollowed-out egg whites. You can use a piping bag with a star tip for a decorative touch or a spoon for a more rustic look.
- Garnish and Serve: Sprinkle the crumbled bacon and chopped chives over the stuffed eggs. Arrange the deviled eggs on a serving platter and serve immediately, or refrigerate them for up to a few hours before serving.
Extra Tips:
For the best results, verify your avocado is perfectly ripe to achieve the creamiest texture in the filling. If your avocado is slightly firm, you might consider blending the filling in a food processor for a smoother consistency.
Additionally, if you’re preparing these deviled eggs in advance, it’s best to add the bacon and chives just before serving to maintain their crispness and freshness. Enjoy this festive twist on a beloved classic that will surely become a holiday favorite!
Honey Garlic Shrimp
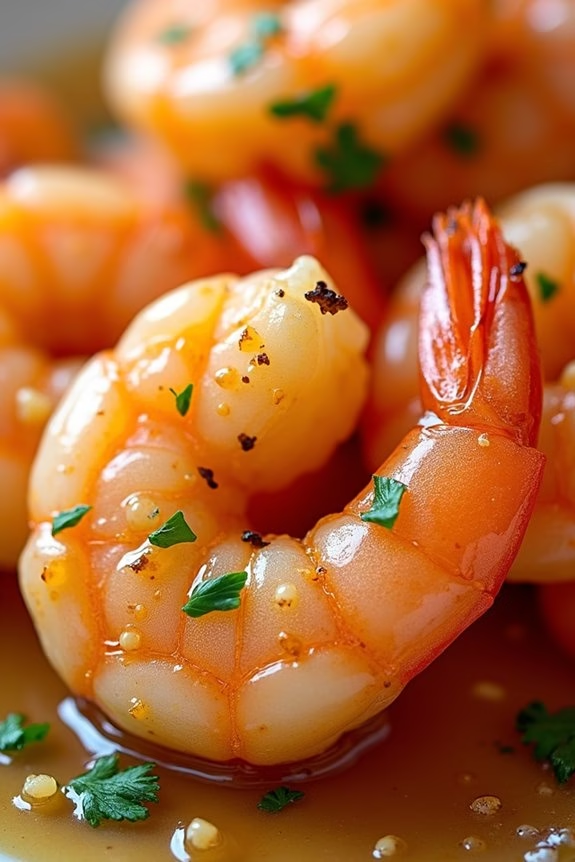
Honey Garlic Shrimp is a delightful appetizer that brings together the perfect balance of sweet and savory flavors. This dish is ideal for Christmas gatherings, where its vibrant taste and quick preparation make it a crowd-pleaser. Honey and garlic create a luscious glaze that coats the tender shrimp, offering a delicious burst of flavor with every bite.
Whether you’re serving it as an appetizer or a main course, this dish is bound to be a hit with your family and friends.
To make Honey Garlic Shrimp for 4-6 people, you’ll need a few simple ingredients and just a short amount of time. The sauce, made with honey, garlic, soy sauce, and a hint of lemon, perfectly complements the shrimp’s natural sweetness. This dish can be prepared in advance and cooked just before serving, making it a convenient option for holiday entertaining.
Below are the ingredients and detailed instructions to help you create this mouthwatering appetizer.
Ingredients (for 4-6 servings):
- 1 ½ pounds large shrimp, peeled and deveined
- 1 tablespoon olive oil
- 3 tablespoons honey
- 5 cloves garlic, minced
- 2 tablespoons soy sauce
- 1 tablespoon lemon juice
- 1 tablespoon unsalted butter
- 2 tablespoons chopped fresh parsley
- Salt and black pepper to taste
Cooking Instructions:
- Prepare the Shrimp: Start by patting the shrimp dry with paper towels. This will help them sear better in the pan and guarantee they absorb the flavors of the marinade.
- Make the Sauce: In a small bowl, whisk together the honey, minced garlic, soy sauce, and lemon juice. This will form a sticky, flavorful sauce that will coat the shrimp.
- Heat the Pan: Place a large skillet over medium-high heat and add the olive oil. Allow it to heat up until it’s shimmering, which means it’s hot enough to start cooking.
- Cook the Shrimp: Add the shrimp to the skillet in a single layer. Season with a pinch of salt and black pepper. Let them cook undisturbed for about 1-2 minutes until the edges start to turn pink.
- Add the Sauce: Pour the honey-garlic sauce over the shrimp. Stir gently to coat each piece. Let the shrimp cook for another 2-3 minutes, turning them over halfway through to guarantee they’re cooked evenly.
- Finish with Butter: Once the shrimp are cooked through and the sauce has thickened slightly, add the butter to the skillet. Stir to combine, allowing the butter to melt and enhance the sauce’s richness.
- Garnish and Serve: Remove the skillet from the heat and sprinkle the chopped parsley over the shrimp. Transfer the shrimp to a serving platter, and serve immediately while hot.
Extra Tips:
When making Honey Garlic Shrimp, it’s important not to overcook the shrimp, as they can become rubbery. They should be opaque and pink all the way through but still tender.
If you prefer a bit of heat, consider adding a pinch of red pepper flakes to the sauce for a spicy kick. This dish pairs beautifully with a side of rice or a fresh salad, making it a versatile addition to your holiday menu.
Christmas Tree Veggie Platter
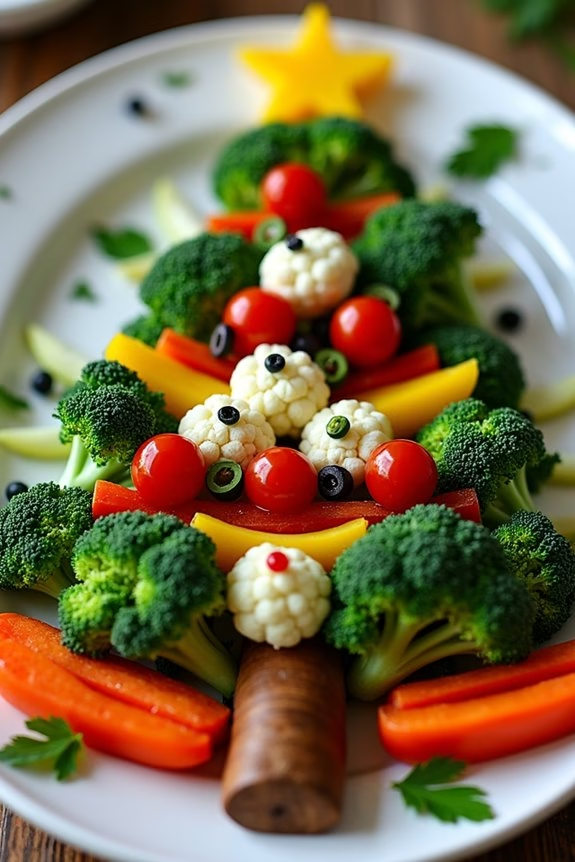
A Christmas Tree Veggie Platter is a delightful and festive way to serve fresh vegetables during the holiday season. This appetizer isn’t only visually appealing but also healthy and delicious. It’s perfect for holiday gatherings, adding a splash of color and creativity to your party table.
Customize it with your favorite vegetables to suit your taste preferences and dietary needs. This appetizer is easy to assemble, making it a great choice for both experienced and novice cooks. The platter’s Christmas tree shape is created using a variety of vibrant vegetables, which are arranged in layers to resemble a tree.
The platter can be paired with a flavorful dip, making it a crowd-pleaser at any holiday event. With a serving size perfect for 4-6 people, this platter is sure to impress your guests.
Ingredients for 4-6 People:
- 1 head of broccoli
- 1 red bell pepper
- 1 yellow bell pepper
- 1 cup cherry tomatoes
- 1 cucumber
- 1 carrot
- 1/2 cup black olives
- 1 cup cauliflower florets
- 1 small bunch of parsley
- 1 cup ranch or hummus dip
Instructions:
- Prepare the Vegetables: Wash all the vegetables thoroughly under cold water. Pat them dry with a clean kitchen towel to remove any excess water.
- Cut the Broccoli and Cauliflower: Separate the broccoli and cauliflower into small florets. This will form the bulk of your “tree” and “snow” base.
- Slice the Bell Peppers and Cucumber: Cut the red and yellow bell peppers into thin strips. Slice the cucumber into rounds or half-moons. These will add color and variety to your platter.
- Prepare the Cherry Tomatoes and Carrot: Leave the cherry tomatoes whole. Peel the carrot and cut it into thin sticks. These will serve as ornaments and part of the tree trunk.
- Assemble the Tree: On a large, flat serving platter, start arranging the broccoli florets in a triangular shape to form the tree. Add layers of cauliflower at the base for a snowy effect.
- Decorate the Tree: Place cherry tomatoes, bell pepper strips, and cucumber slices strategically across the tree to resemble ornaments. Use carrot sticks to create the tree trunk at the bottom.
- Add Finishing Touches: Scatter black olives as additional ornaments or tree toppings. Garnish with parsley to add a pop of green. You can also use a star-shaped cookie cutter to cut a star from the yellow bell pepper to place at the top of the tree.
- Serve with Dip: Place a bowl of ranch or hummus dip at the base of the tree for a festive touch and to offer a tasty accompaniment to the veggies.
Extra Tips:
When assembling the platter, consider using a large, flat surface to give yourself plenty of space to create the tree shape. You can prepare the vegetables a few hours in advance and store them in the refrigerator to keep them fresh.
If you’re short on time, use pre-cut vegetable trays available at most grocery stores to simplify the process. Don’t hesitate to get creative with your decorations; you can add other vegetables or even fruits like pineapple or grapes for added flair and taste.
Baked Brie With Cranberry Sauce
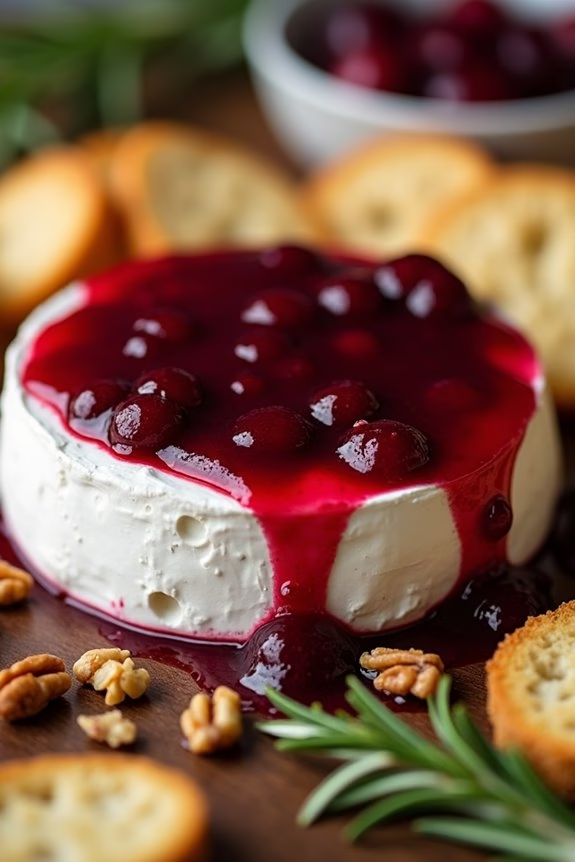
Baked Brie With Cranberry Sauce is a delightful appetizer that combines the creamy richness of Brie cheese with the tart sweetness of cranberry sauce. This dish is perfect for holiday gatherings or any festive occasion, offering a beautiful balance of flavors and textures. The gooey Brie cheese, once baked, becomes irresistibly soft and pairs wonderfully with the cranberry sauce, which can be homemade or store-bought.
Served with crusty bread or crackers, this appetizer will surely impress your guests and set a festive mood. This recipe is designed to serve 4-6 people, making it ideal for a small party or family gathering. The preparation is simple yet elegant, allowing you to spend more time enjoying the company of your loved ones rather than being stuck in the kitchen.
The combination of warm Brie and tangy cranberry sauce offers a taste of the holidays in every bite, making it a must-have on your holiday menu.
Ingredients:
- 1 wheel of Brie cheese (approximately 8 ounces)
- 1 cup cranberry sauce (homemade or store-bought)
- 1/4 cup chopped pecans or walnuts (optional)
- Fresh rosemary or thyme sprigs (for garnish)
- Crackers or sliced baguette (for serving)
Instructions:
- Preheat the Oven: Begin by preheating your oven to 350°F (175°C). This guarantees that the oven is at the right temperature for evenly baking the Brie cheese.
- Prepare the Baking Dish: Place the wheel of Brie in a small, oven-safe baking dish. Confirm the dish is slightly larger than the Brie to catch any cheese that may ooze out during baking.
- Add the Cranberry Sauce: Spoon the cranberry sauce over the top of the Brie. Spread it evenly to cover the entire surface, allowing some of the sauce to drip down the sides for added flavor.
- Optional Nuts: If you’re using nuts, sprinkle them over the cranberry sauce for a crunchy texture that complements the creamy Brie and tart cranberries.
- Bake the Brie: Place the dish in the preheated oven and bake for about 15-20 minutes, or until the Brie is soft and gooey. Be careful not to overbake, as the cheese can become too runny.
- Garnish and Serve: Once baked, remove the dish from the oven and let it cool slightly. Garnish with fresh rosemary or thyme sprigs for an aromatic touch. Serve immediately with crackers or sliced baguette for dipping.
Extra Tips:
For an added touch of flavor, consider adding a drizzle of honey over the cranberry sauce before baking. This can enhance the sweetness and create a more complex flavor profile.
If you prefer a homemade cranberry sauce, try cooking fresh cranberries with sugar and a splash of orange juice until they burst and form a sauce. Finally, if you find the Brie’s rind too strong, you can carefully slice it off before adding the cranberry sauce, although many enjoy the rind’s unique flavor.
Enjoy this dish warm as the Brie will continue to soften once it’s out of the oven.
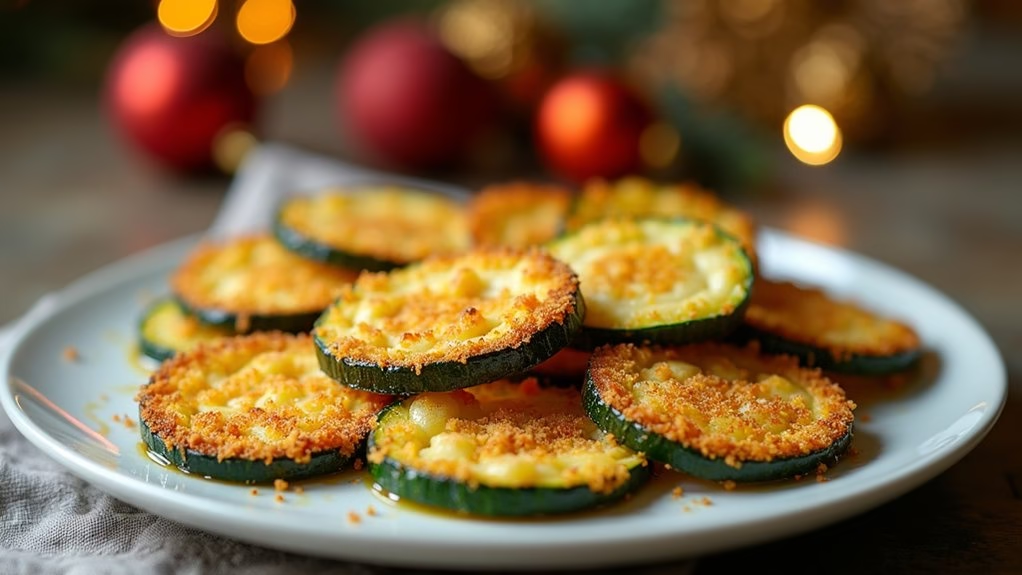
Parmesan Crusted Zucchini Chips
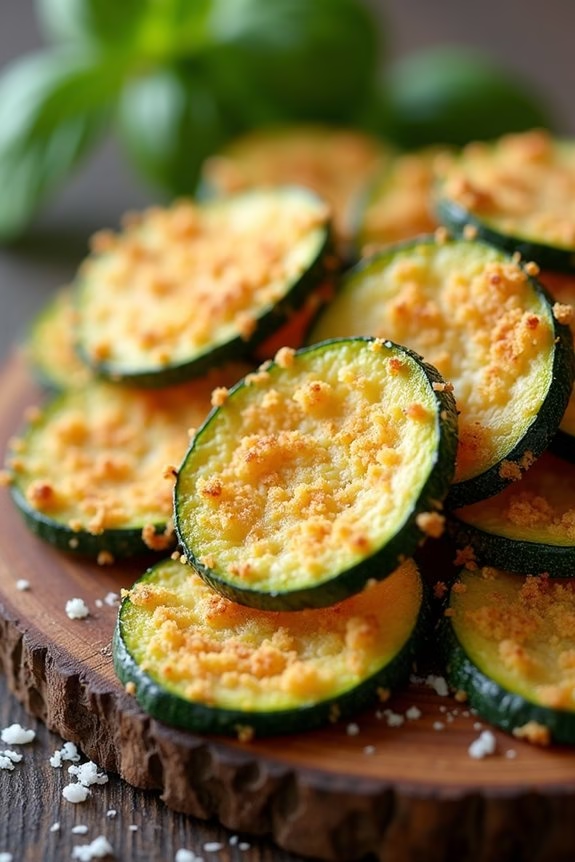
Parmesan Crusted Zucchini Chips are a delectable and healthy appetizer perfect for the festive Christmas season. These crispy, golden bites offer a delightful blend of savory Parmesan and tender zucchini, making them an irresistible treat for your holiday guests.
Not only are they easy to prepare, but they also offer a nutritious snack alternative that’s bound to please both children and adults alike. The parmesan crust provides a wonderful crunch, while the zucchini remains juicy and flavorful, making each bite a delightful experience.
These zucchini chips are a great addition to any Christmas appetizer spread. They pair well with a variety of dips, such as marinara sauce or a tangy ranch dressing, enhancing their flavor profile.
Whether you’re hosting a large gathering or an intimate family dinner, these chips are bound to be a hit. The recipe is straightforward, using simple ingredients that are likely already in your kitchen. Plus, they can be prepared ahead of time, allowing you to focus on other holiday preparations.
Ingredients (Serves 4-6):
- 3 medium zucchinis
- 1 cup grated Parmesan cheese
- 1 cup Panko breadcrumbs
- 1 teaspoon garlic powder
- 1/2 teaspoon salt
- 1/4 teaspoon black pepper
- 2 large eggs
- 1 tablespoon olive oil
- Cooking spray
Cooking Instructions:
1. Preheat the Oven:
Preheat your oven to 425°F (220°C). Prepare a large baking sheet by lining it with parchment paper or lightly greasing it with cooking spray.
2. Prepare the Zucchini:
Wash the zucchinis thoroughly and cut them into 1/4-inch thick slices. Aim for uniform slices to guarantee even cooking.
3. Create the Coating Mixture:
In a medium-sized bowl, combine the grated Parmesan cheese, Panko breadcrumbs, garlic powder, salt, and black pepper. Mix well to ensure the seasoning is evenly distributed.
4. Prepare the Egg Wash:
In another bowl, beat the eggs and add the tablespoon of olive oil. Mix until well combined. This will help the breadcrumb mixture adhere to the zucchini slices.
5. Coat the Zucchini Slices:
Dip each zucchini slice into the egg wash, allowing any excess liquid to drip off. Then, press each slice into the Parmesan breadcrumb mixture, ensuring both sides are well-coated. Place the coated slices onto the prepared baking sheet.
6. Bake the Zucchini Chips:
Arrange the zucchini slices in a single layer on the baking sheet. Lightly spray the tops with cooking spray to help them crisp up. Bake in the preheated oven for 20-25 minutes, or until the chips are golden brown and crispy.
7. Serve:
Once baked, remove the zucchini chips from the oven and let them cool slightly before serving. Serve alongside your favorite dipping sauce.
Extra Tips:
For the crispiest results, guarantee the zucchini slices aren’t overcrowded on the baking sheet. This allows hot air to circulate around each slice, promoting even browning.
If you find your chips aren’t crisping to your liking, you can finish them under the broiler for 1-2 minutes, but watch them closely to prevent burning.
Also, for added flavor, try experimenting with different herbs or spices in the breadcrumb mixture, such as dried oregano or paprika.
These Parmesan Crusted Zucchini Chips are best served fresh, but if you have leftovers, they can be reheated in a preheated oven to bring back some of the crispiness.